Implementer training - Using WebDAV to maintain configuration, templates and web resources from your desktop
Funnelback can be mounted as a network drive using a compatible WebDAV client. This exposes the configuration, template and web resources folders and allows maintenance and editing of the files directly from your desktop computer.
Once mounted you can perform a number of tasks including:
-
Edit templates using a local text editor of your choice.
-
Create new templates.
-
Upload web resources and configuration files.
-
Create a folder structure beneath the web resources folder.
Tutorial: Create an API token for access to WebDAV
An API token is required to access the WebDAV service in the Squiz DXP. This exercise takes you through the steps required to generate an appropriate token.
-
Log in to the search dashboard where you are doing your training.
See: Training - search dashboard access information if you’re not sure how to access the training. Ignore this step if you’re treating this as a non-interactive tutorial. -
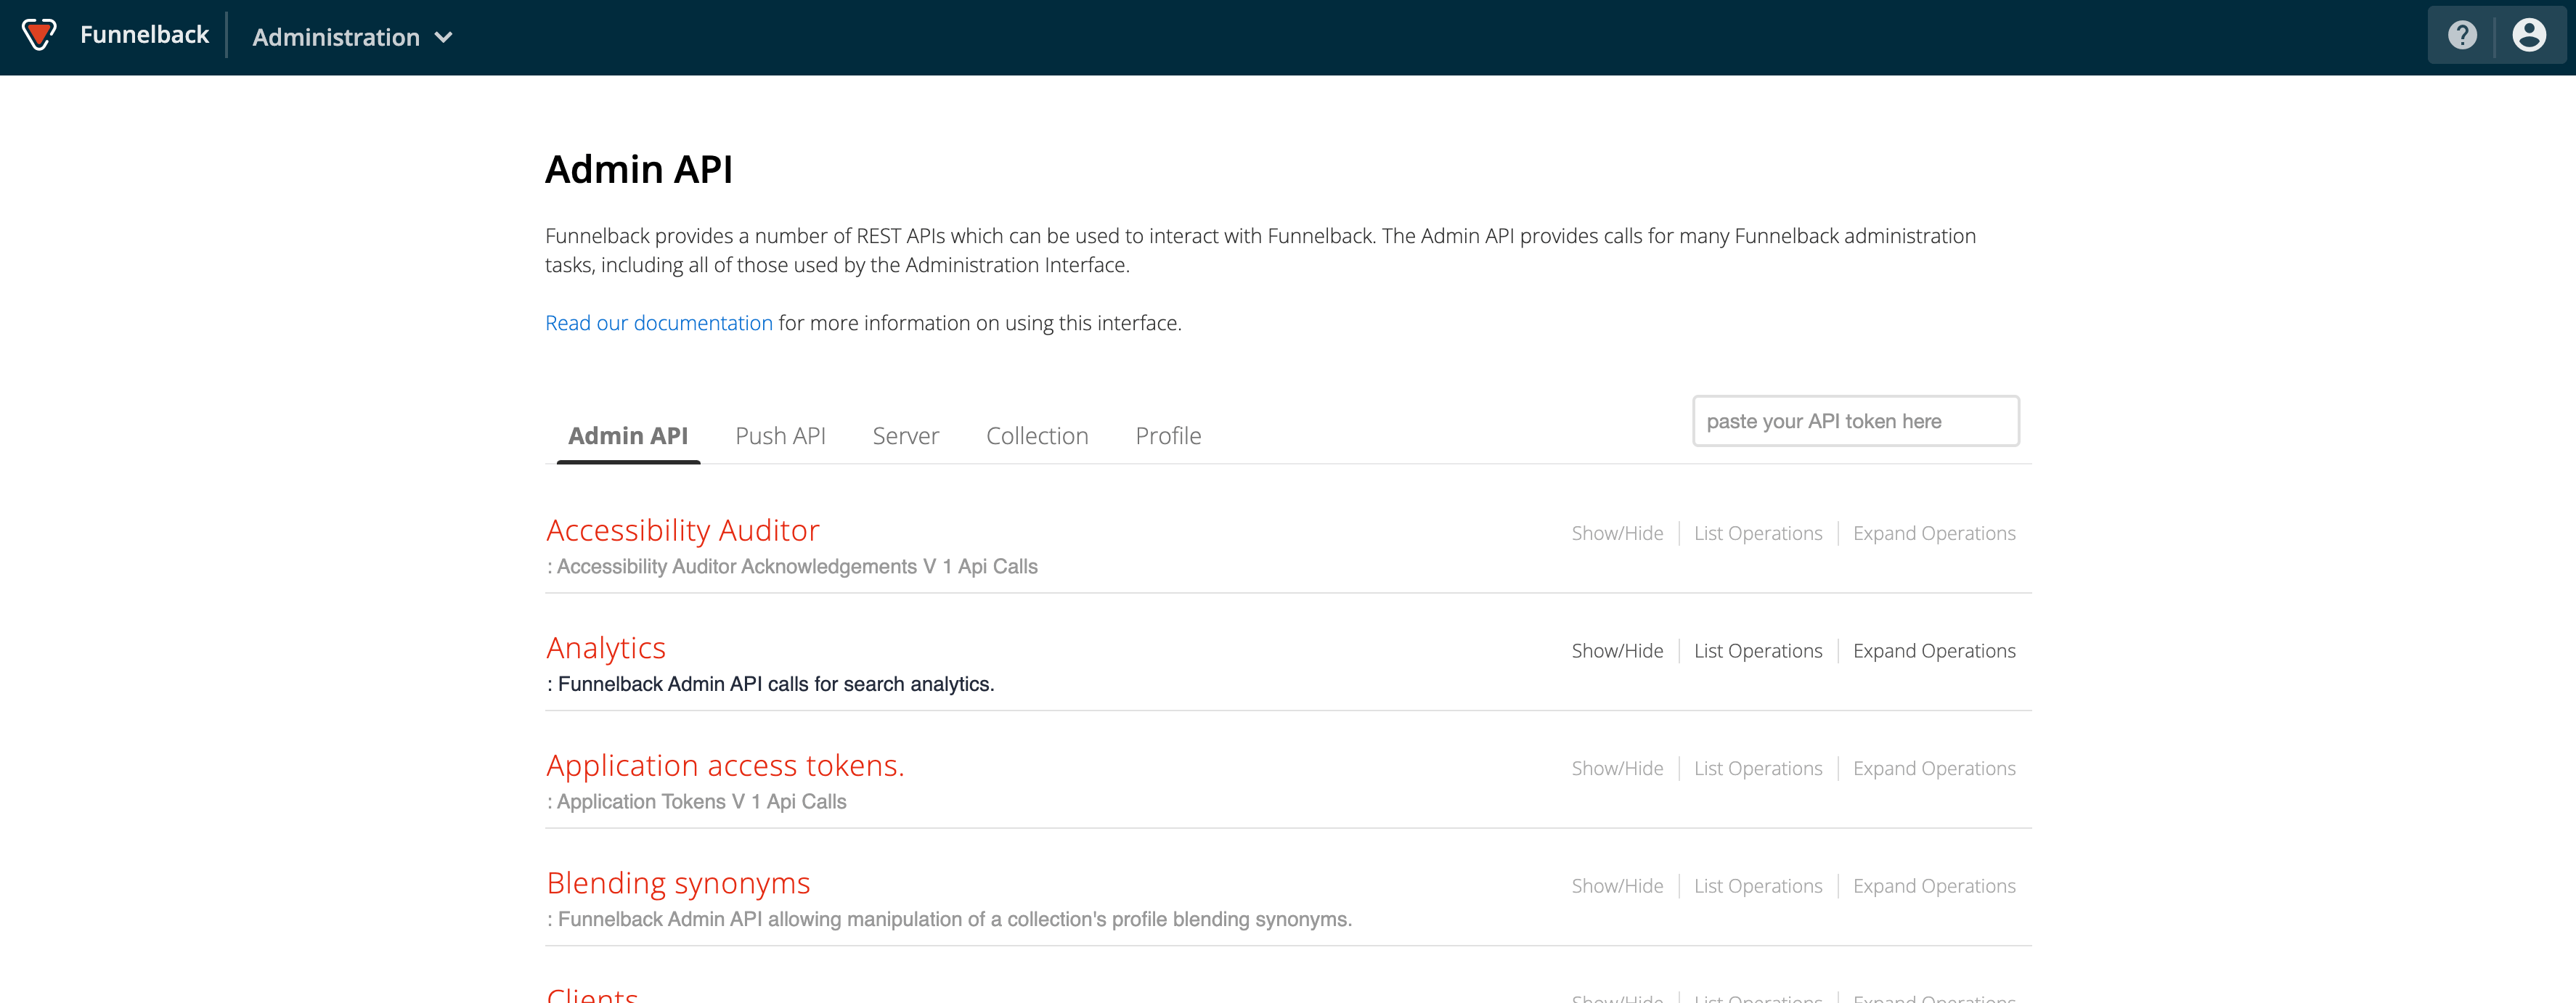
Select the > API UI item from the main toolbar.

-
The API screen will open providing access to API documentation and the running of API calls.
-
Locate the application access tokens section. Click on the heading to expand the section then find the
PUT /application-tokens/v2/application-token/{tokenname}API call and click on this. This is used to create a non-expiring user application token.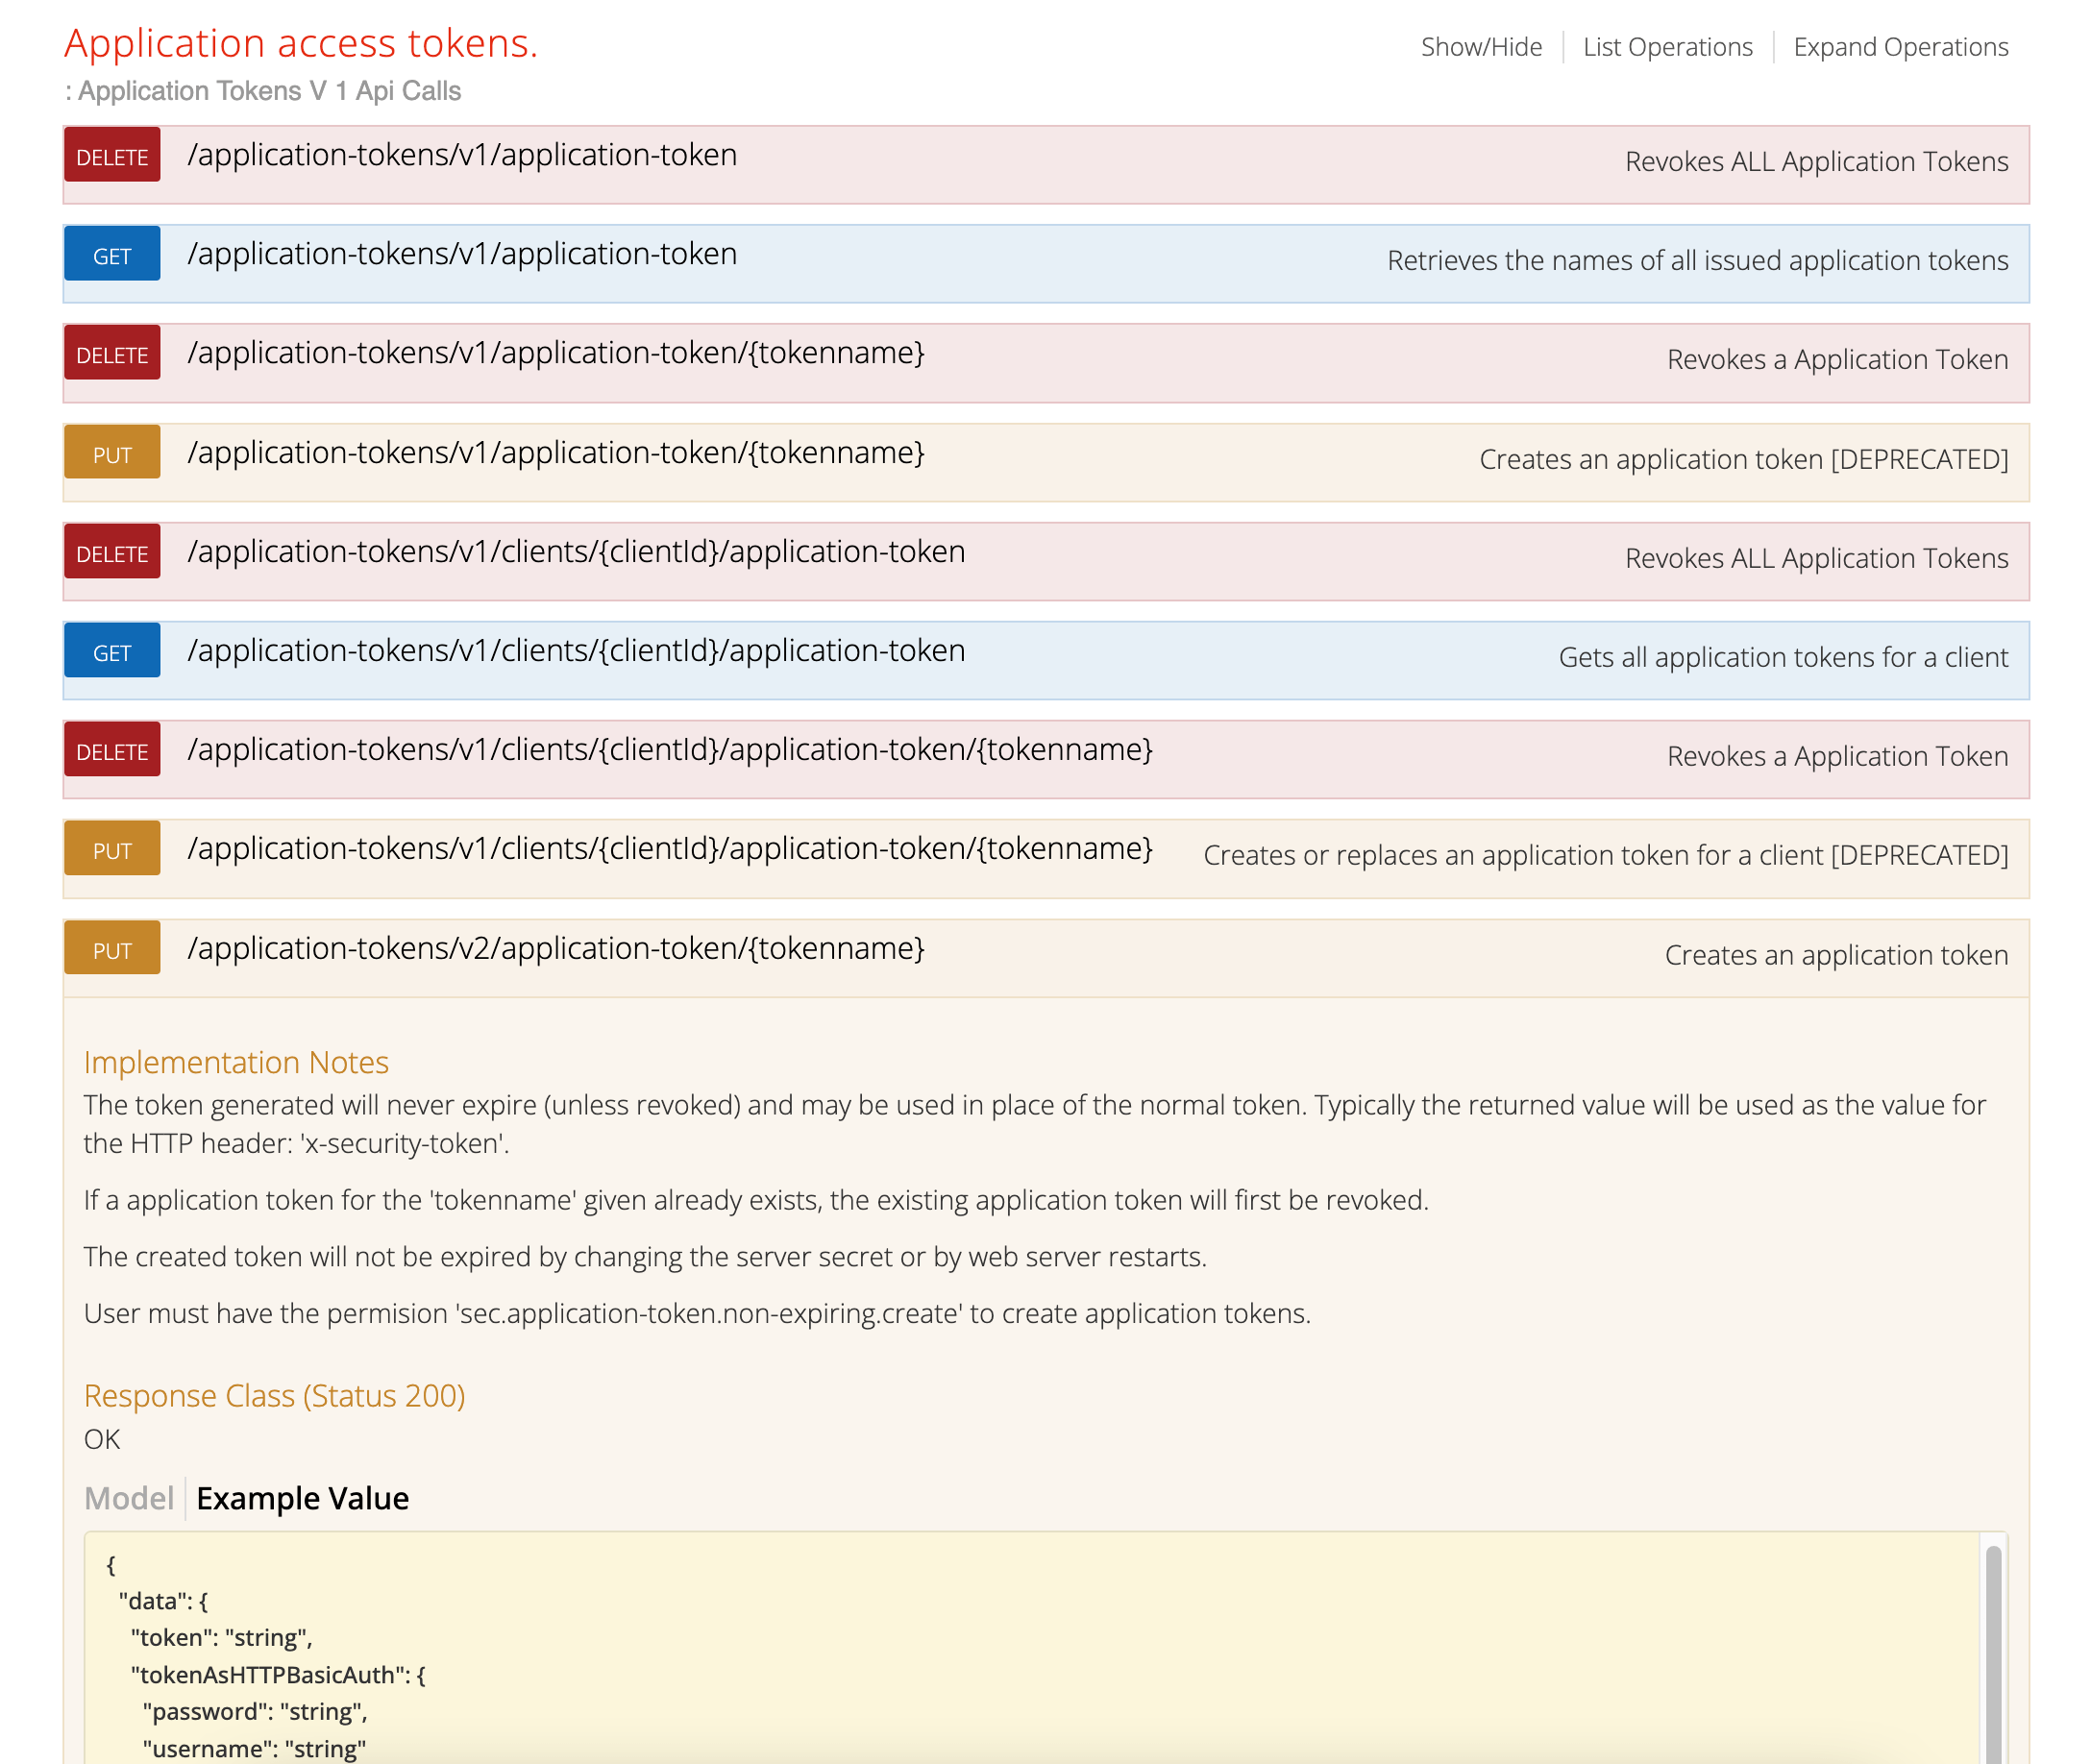
-
Enter a name (for example,
webdav-access) for your token in the tokenname field then click the execute button. This runs the API call and generates a token for you to use.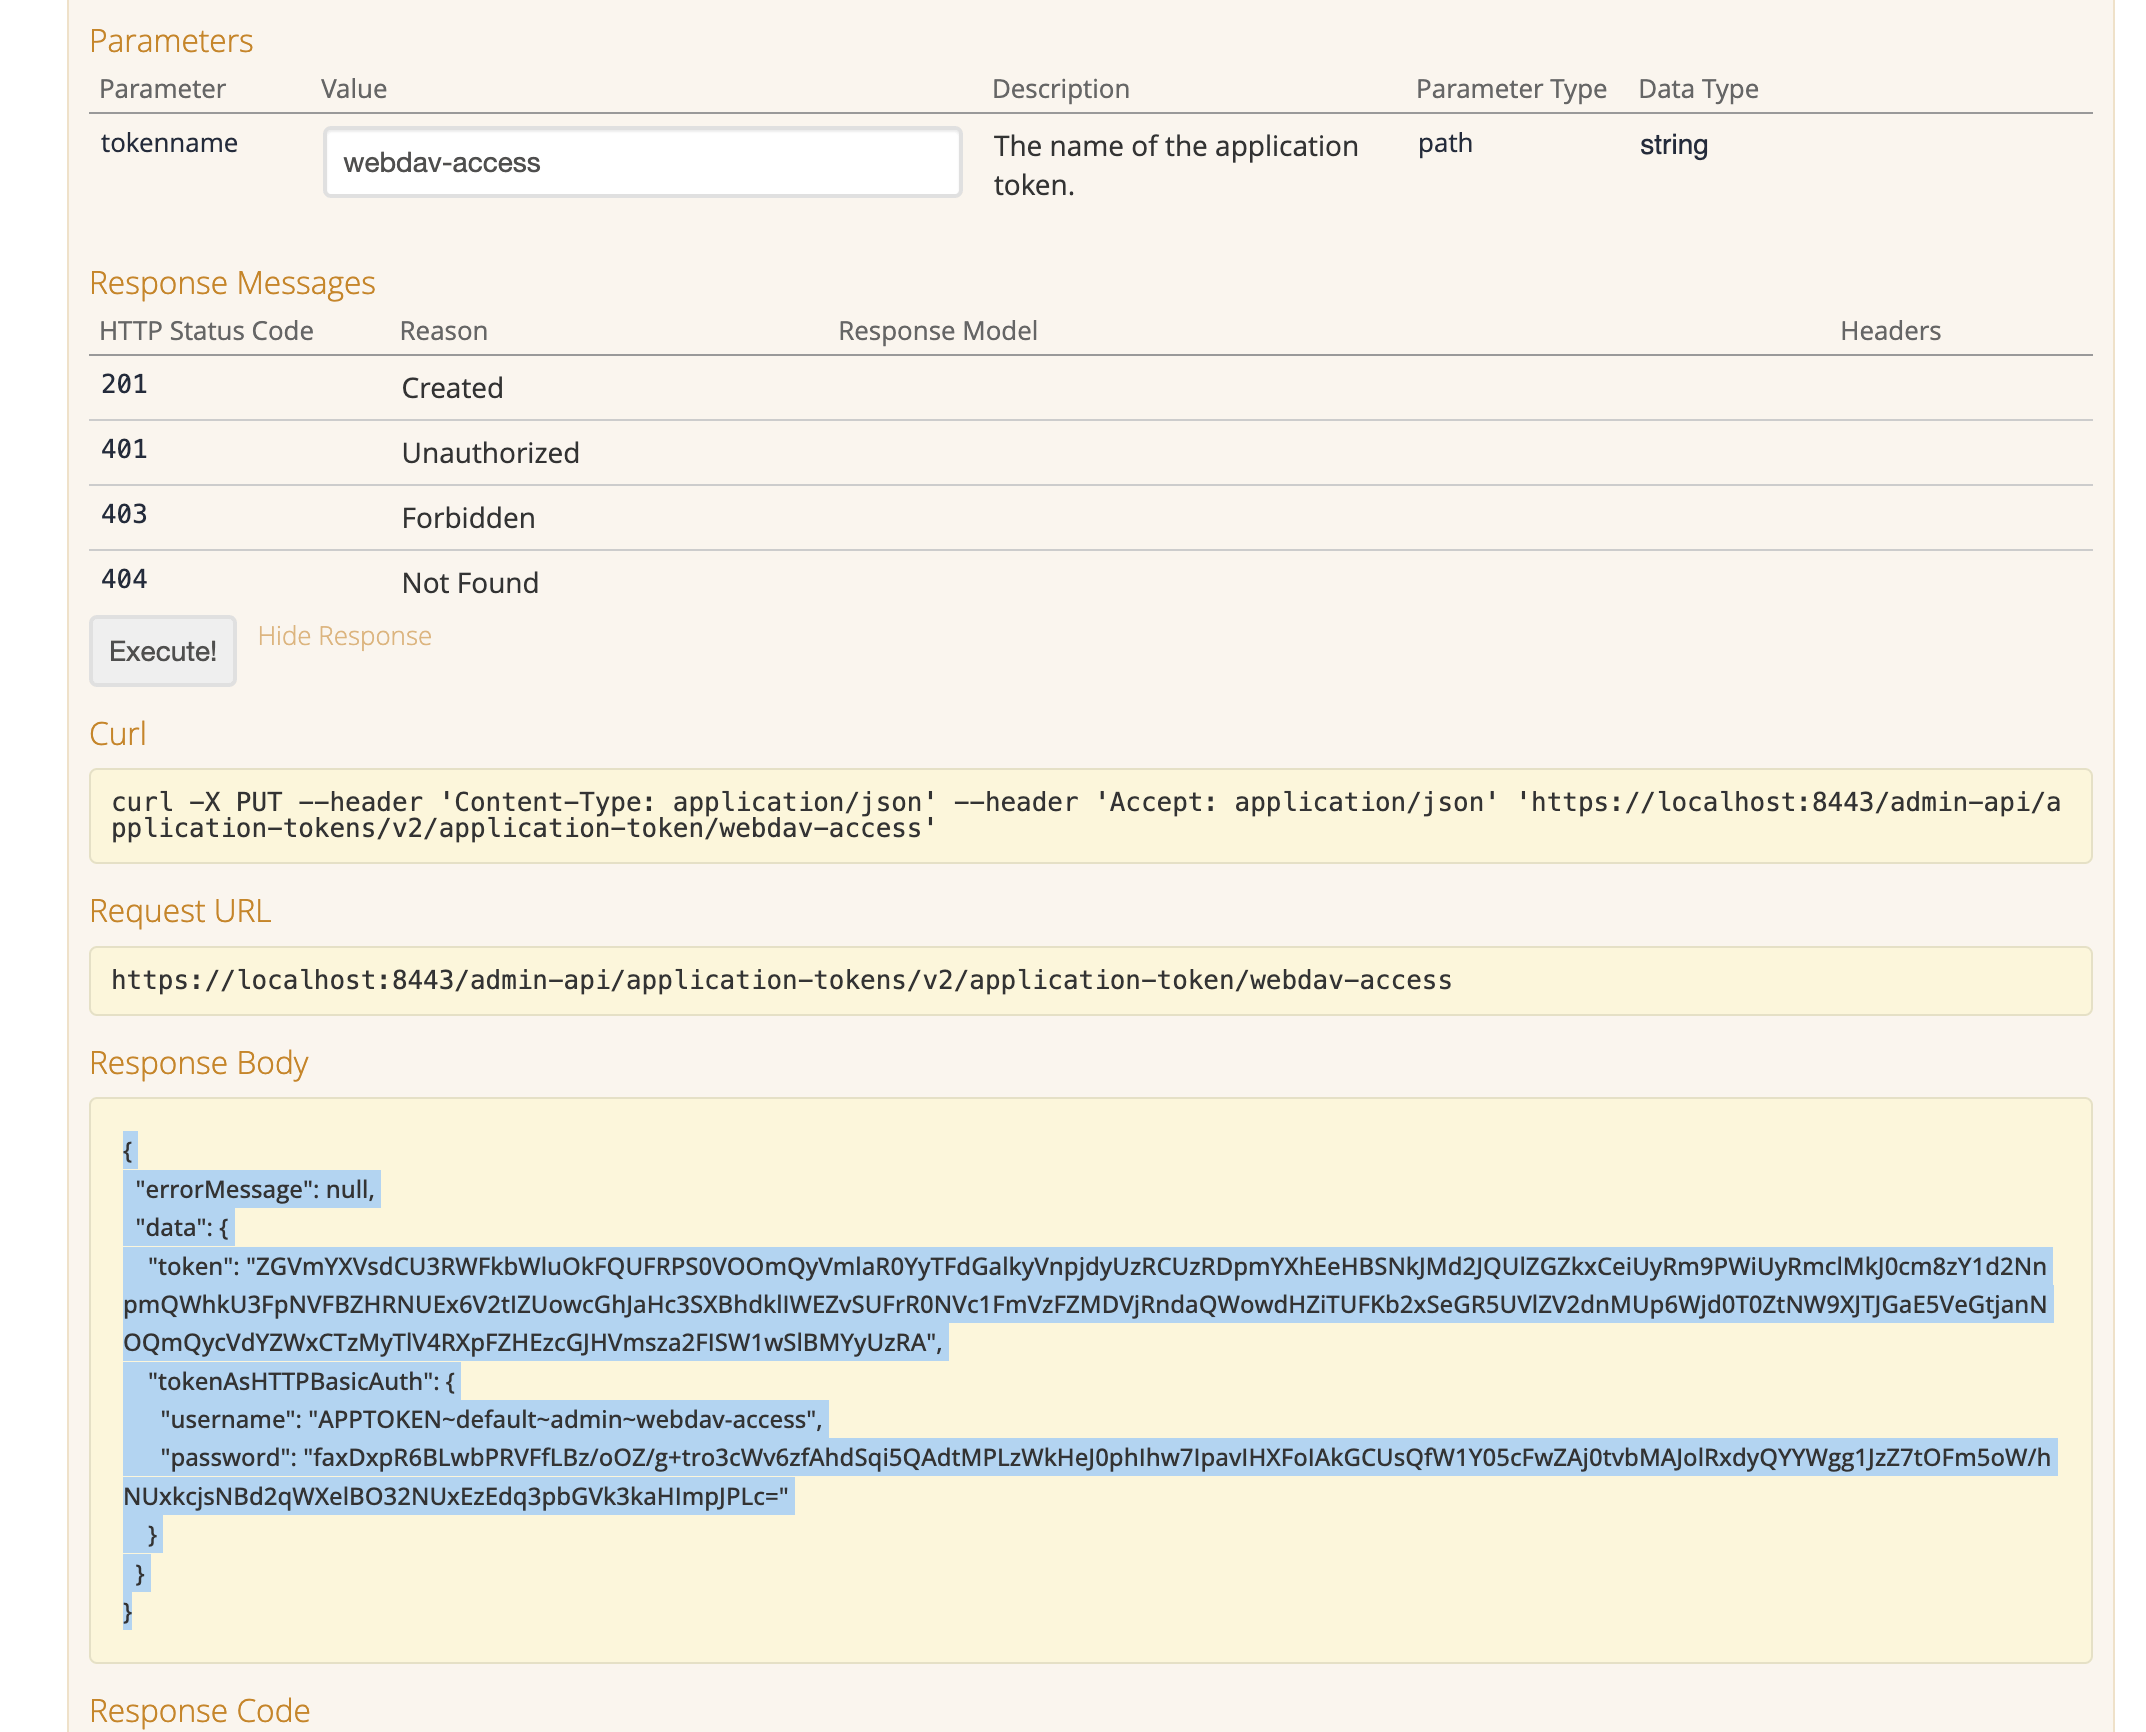
-
Make a careful note of the JSON response which includes a token as well as a username and password, which will look something similar to:
{
"errorMessage": null,
"data": {
    "token": "ZGVmYXVsdCU3RWFkbWluOkFQUFRPS0VOOmQyVmlaR0YyTFdGalkyVnpjdyUzRCUzRDpmYXhEeHBSNkJMd2JQUlZGZkxCeiUyRm9PWiUyRmclMkJ0cm8zY1d2NnpmQWhkU3FpNVFBZHRNUEx6V2tIZUowcGhJaHc3SXBhdklIWEZvSUFrR0NVc1FmVzFZMDVjRndaQWowdHZiTUFKb2xSeGR5UVlZV2dnMUp6Wjd0T0ZtNW9XJTJGaE5VeGtjanNOQmQycVdYZWxCTzMyTlV4RXpFZHEzcGJHVmsza2FISW1wSlBMYyUzRA",
    "tokenAsHTTPBasicAuth": {
        "username": "APPTOKEN~default~admin~webdav-access",
        "password": "faxDxpR6BLwbPRVFfLBz/oOZ/g+tro3cWv6zfAhdSqi5QAdtMPLzWkHeJ0phIhw7IpavIHXFoIAkGCUsQfW1Y05cFwZAj0tvbMAJolRxdyQYYWgg1JzZ7tOFm5oW/hNUxkcjsNBd2qWXelBO32NUxEzEdq3pbGVk3kaHImpJPLc="
        }
    }
}
This username and password will be used to authenticate your WebDAV client when you access Funnelback (for example, using Windows Explorer of MacOS Finder).
If you don’t see the tokenAsHTTPBasicAuthfields being returned in your JSON check that you ran the correct API call. This information is only returned when executing the V2 API call.
Tutorial: Mount Funnelback in MacOS using WebDAV
| This exercise applies if you are running MacOS. See the following exercise for Windows. |
This exercise shows how to access your Funnelback templates and web resources directly from Finder.
-
Open Finder.
-
Select from the menu bar, or press ⌘ Command+K.
-
Enter the path to the WebDAV endpoint into the server address field:
https://localhost:8443/admin-api/file-management/v1/webdav/ -
(optional) add to your favourites by clicking the + button.
-
Click connect.
-
Enter the token HTTP Basic Authentication details (from the token you generated in the previous exercise) when prompted for a username and password (optional: select the save password option).
-
You should be able to then browse the files and folders located on the Funnelback server via your Finder window.
| Finder will not let you create any new files in the live folders but will allow you to open the files and edit them. If you try to save a file that is located in the live folder (which is read only) the operation will not succeed and you will not receive any feedback to indicate that it has failed. This means that it will look like the file has saved normally but you will silently lose the changes. |
Tutorial: Mount Funnelback on Windows using WebDAV
| This tutorial is only relevant if you are accessing Funnelback from a Windows PC. See the previous exercise for MacOS. |
This exercise shows how to access your Funnelback templates and web resources directly from Windows File Explorer.
Windows File Explorer’s WebDAV support is a bit buggy and sometimes will fail to connect. Retrying the connection sometimes solves the problem. Setting the following registry key: ServerNotFoundCacheLifeTimeInSec to 0 seems to resolve this issue when the problem occurs. See: https://docs.microsoft.com/en-us/iis/publish/using-webdav/using-the-webdav-redirector#webdav-redirector-registry-settings for information on the registry key and warnings about editing of registry keys. Failing this, we recommend using the Cyberduck WebDAV client.
|
-
Right click on 'computer' in the start menu and select map network drive.
-
Enter the path to the WebDAV endpoint into the network location field:
https://localhost:8443/admin-api/file-management/v1/webdav/ -
(optional) check the reconnect on logon option if you wish the drive to be auto-mounted on boot.
-
Click connect.
-
Enter the token HTTP Basic Authentication details (from the token you generated in the previous exercise) when prompted for a username and password (optional: select the save password option).
-
You should be able to then browse the files and folders located on the Funnelback server via Windows explorer.
| If you attempt to save a file in a read only folder (such as the live view of a results page) Windows will return an error message saying that the save failed. |
Tutorial: Edit a template using WebDAV
This exercise demonstrates how templates can be edited in a locally installed text editor.
-
Edit the
simple.ftltemplate for the inventors results page. Open Finder (MacOS) or Windows File Explorer (Windows) and open your Funnelback network drive (which you mounted in the previous exercise)>. Browse to the folder. Right click on thesimple.ftlthen select open with from the popup menu and choose a suitable text editor.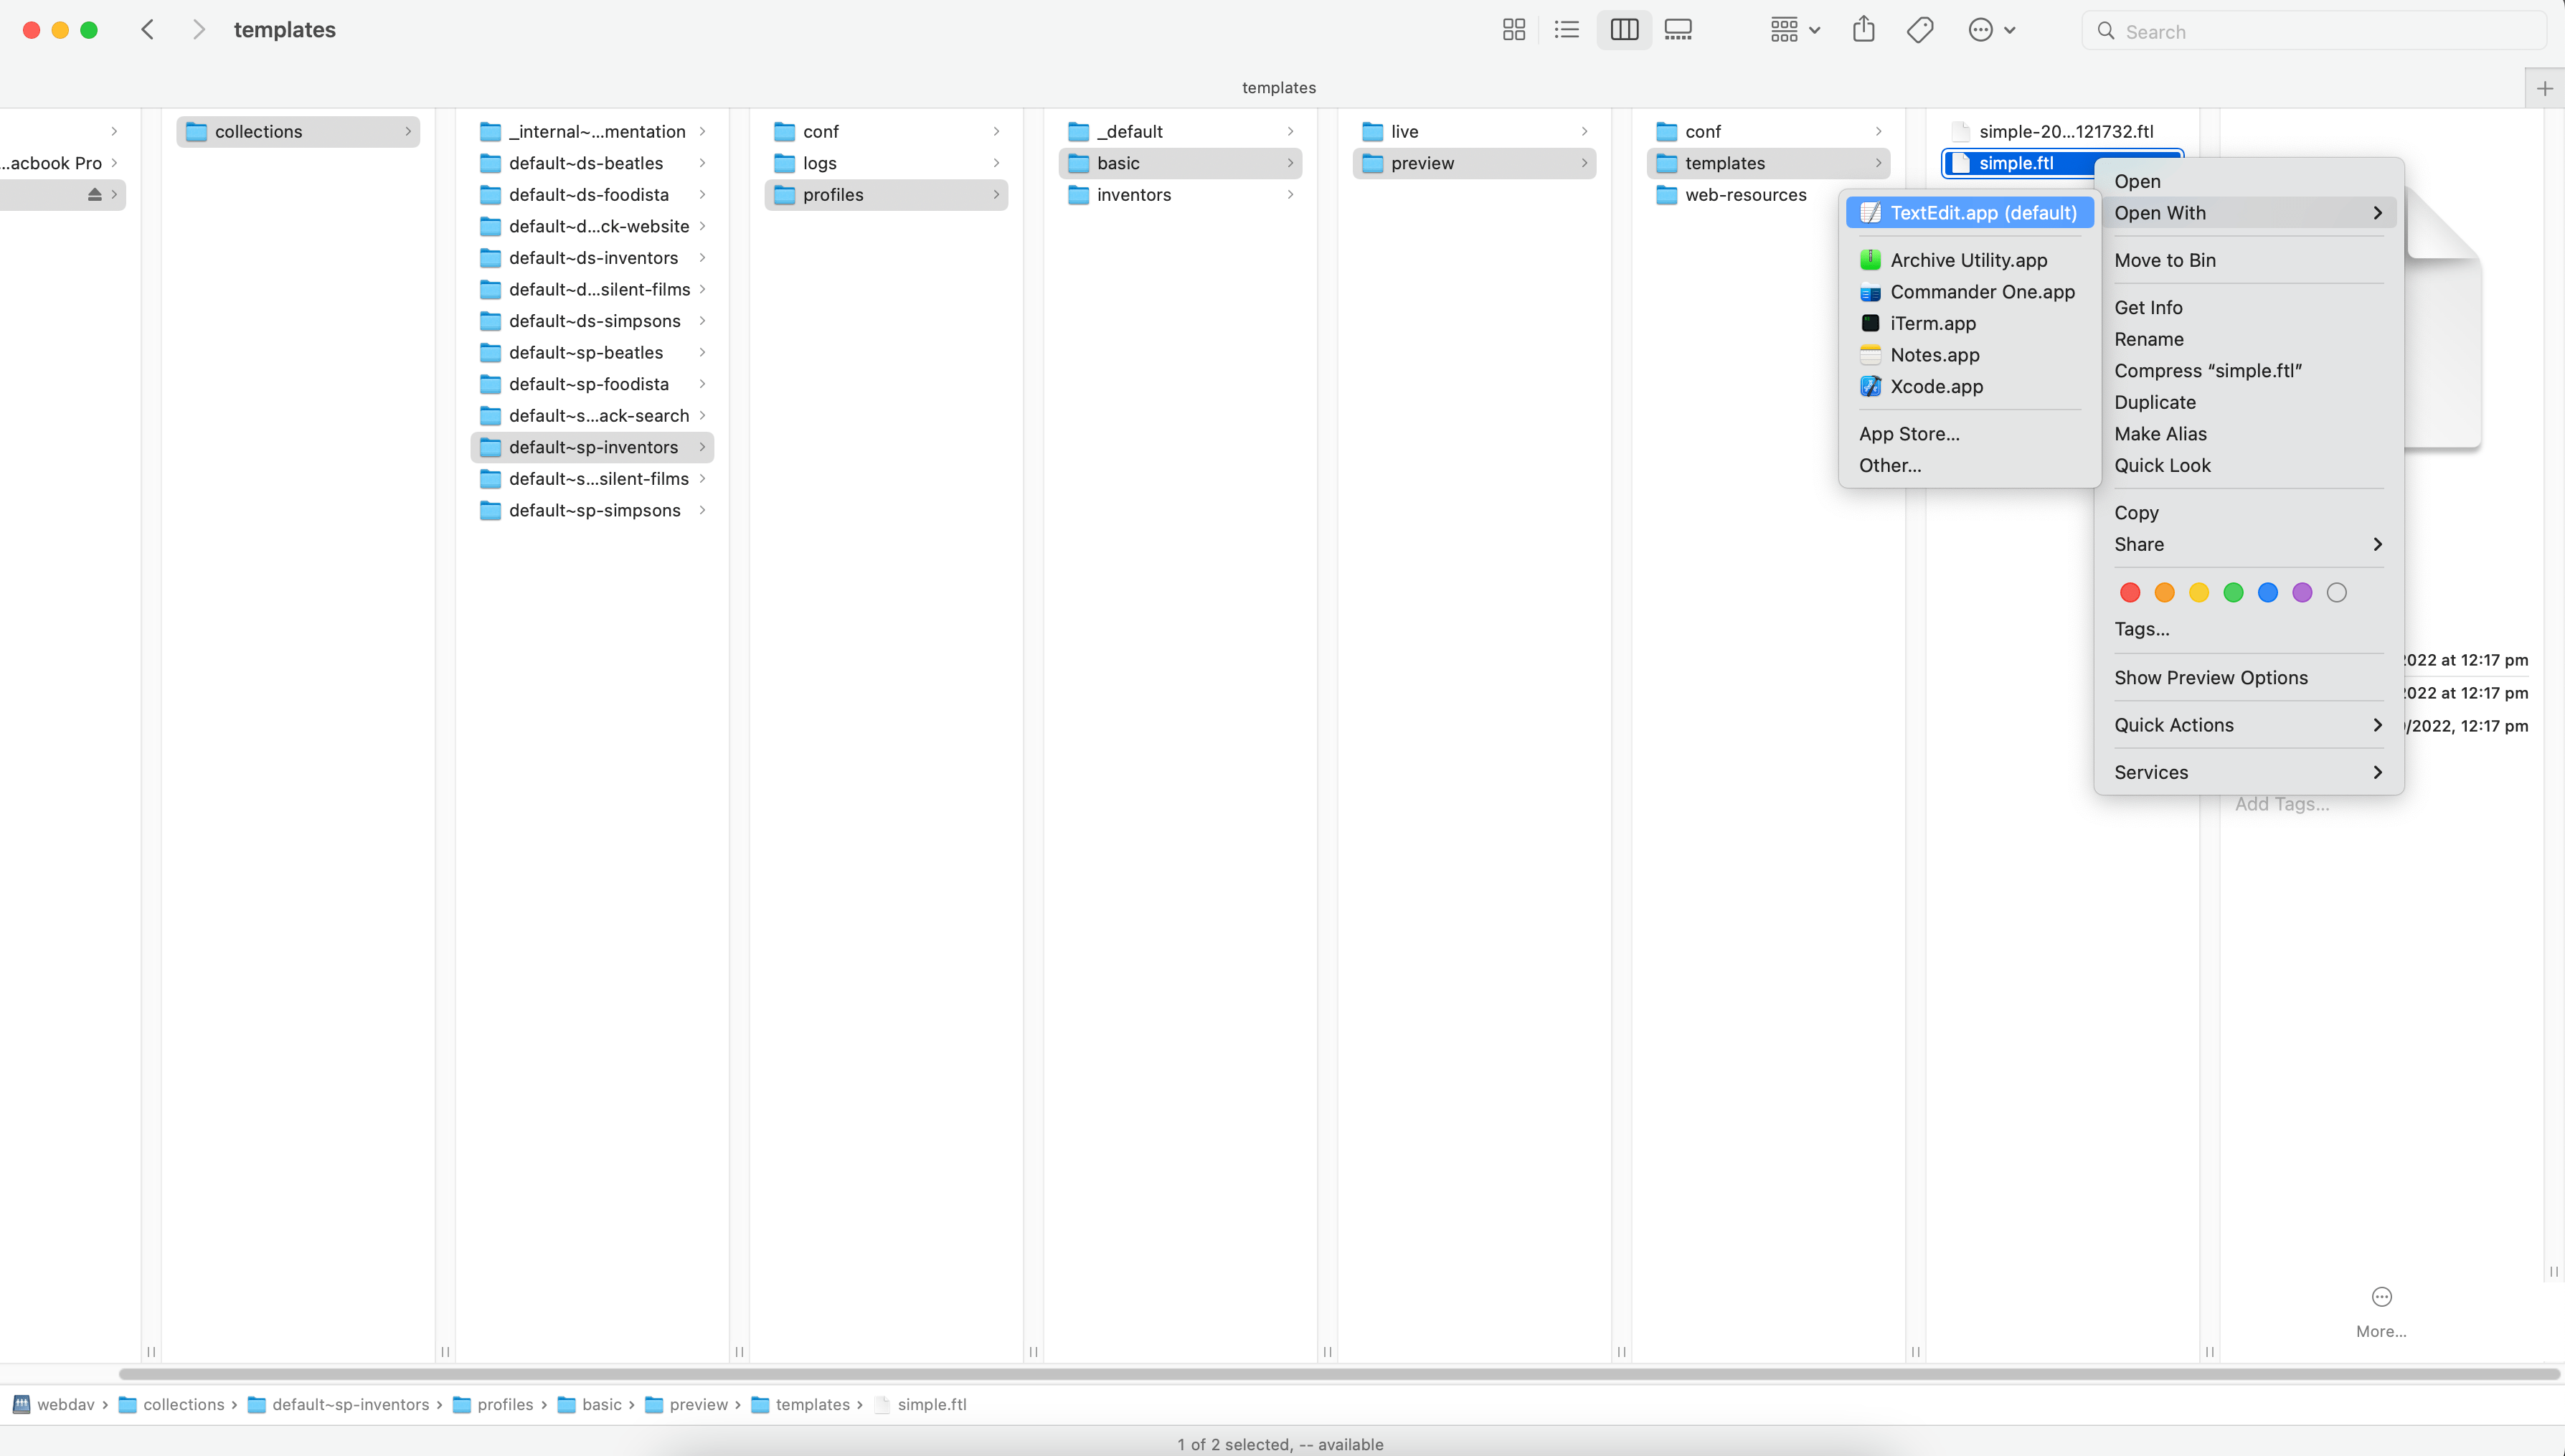
-
The file will open in your text editor. Add a title immediately before the
<ol>tag:<h1>Title added via WebDAV</h1>then save the file. This will update on the Funnelback server.when you save a file this way it overwrites the file on the server without creating an automatic backup of the file. Changes will be reflected when viewing the file on the Funnelback server. If you wish to publish the file you will need to do this from the admin interface. 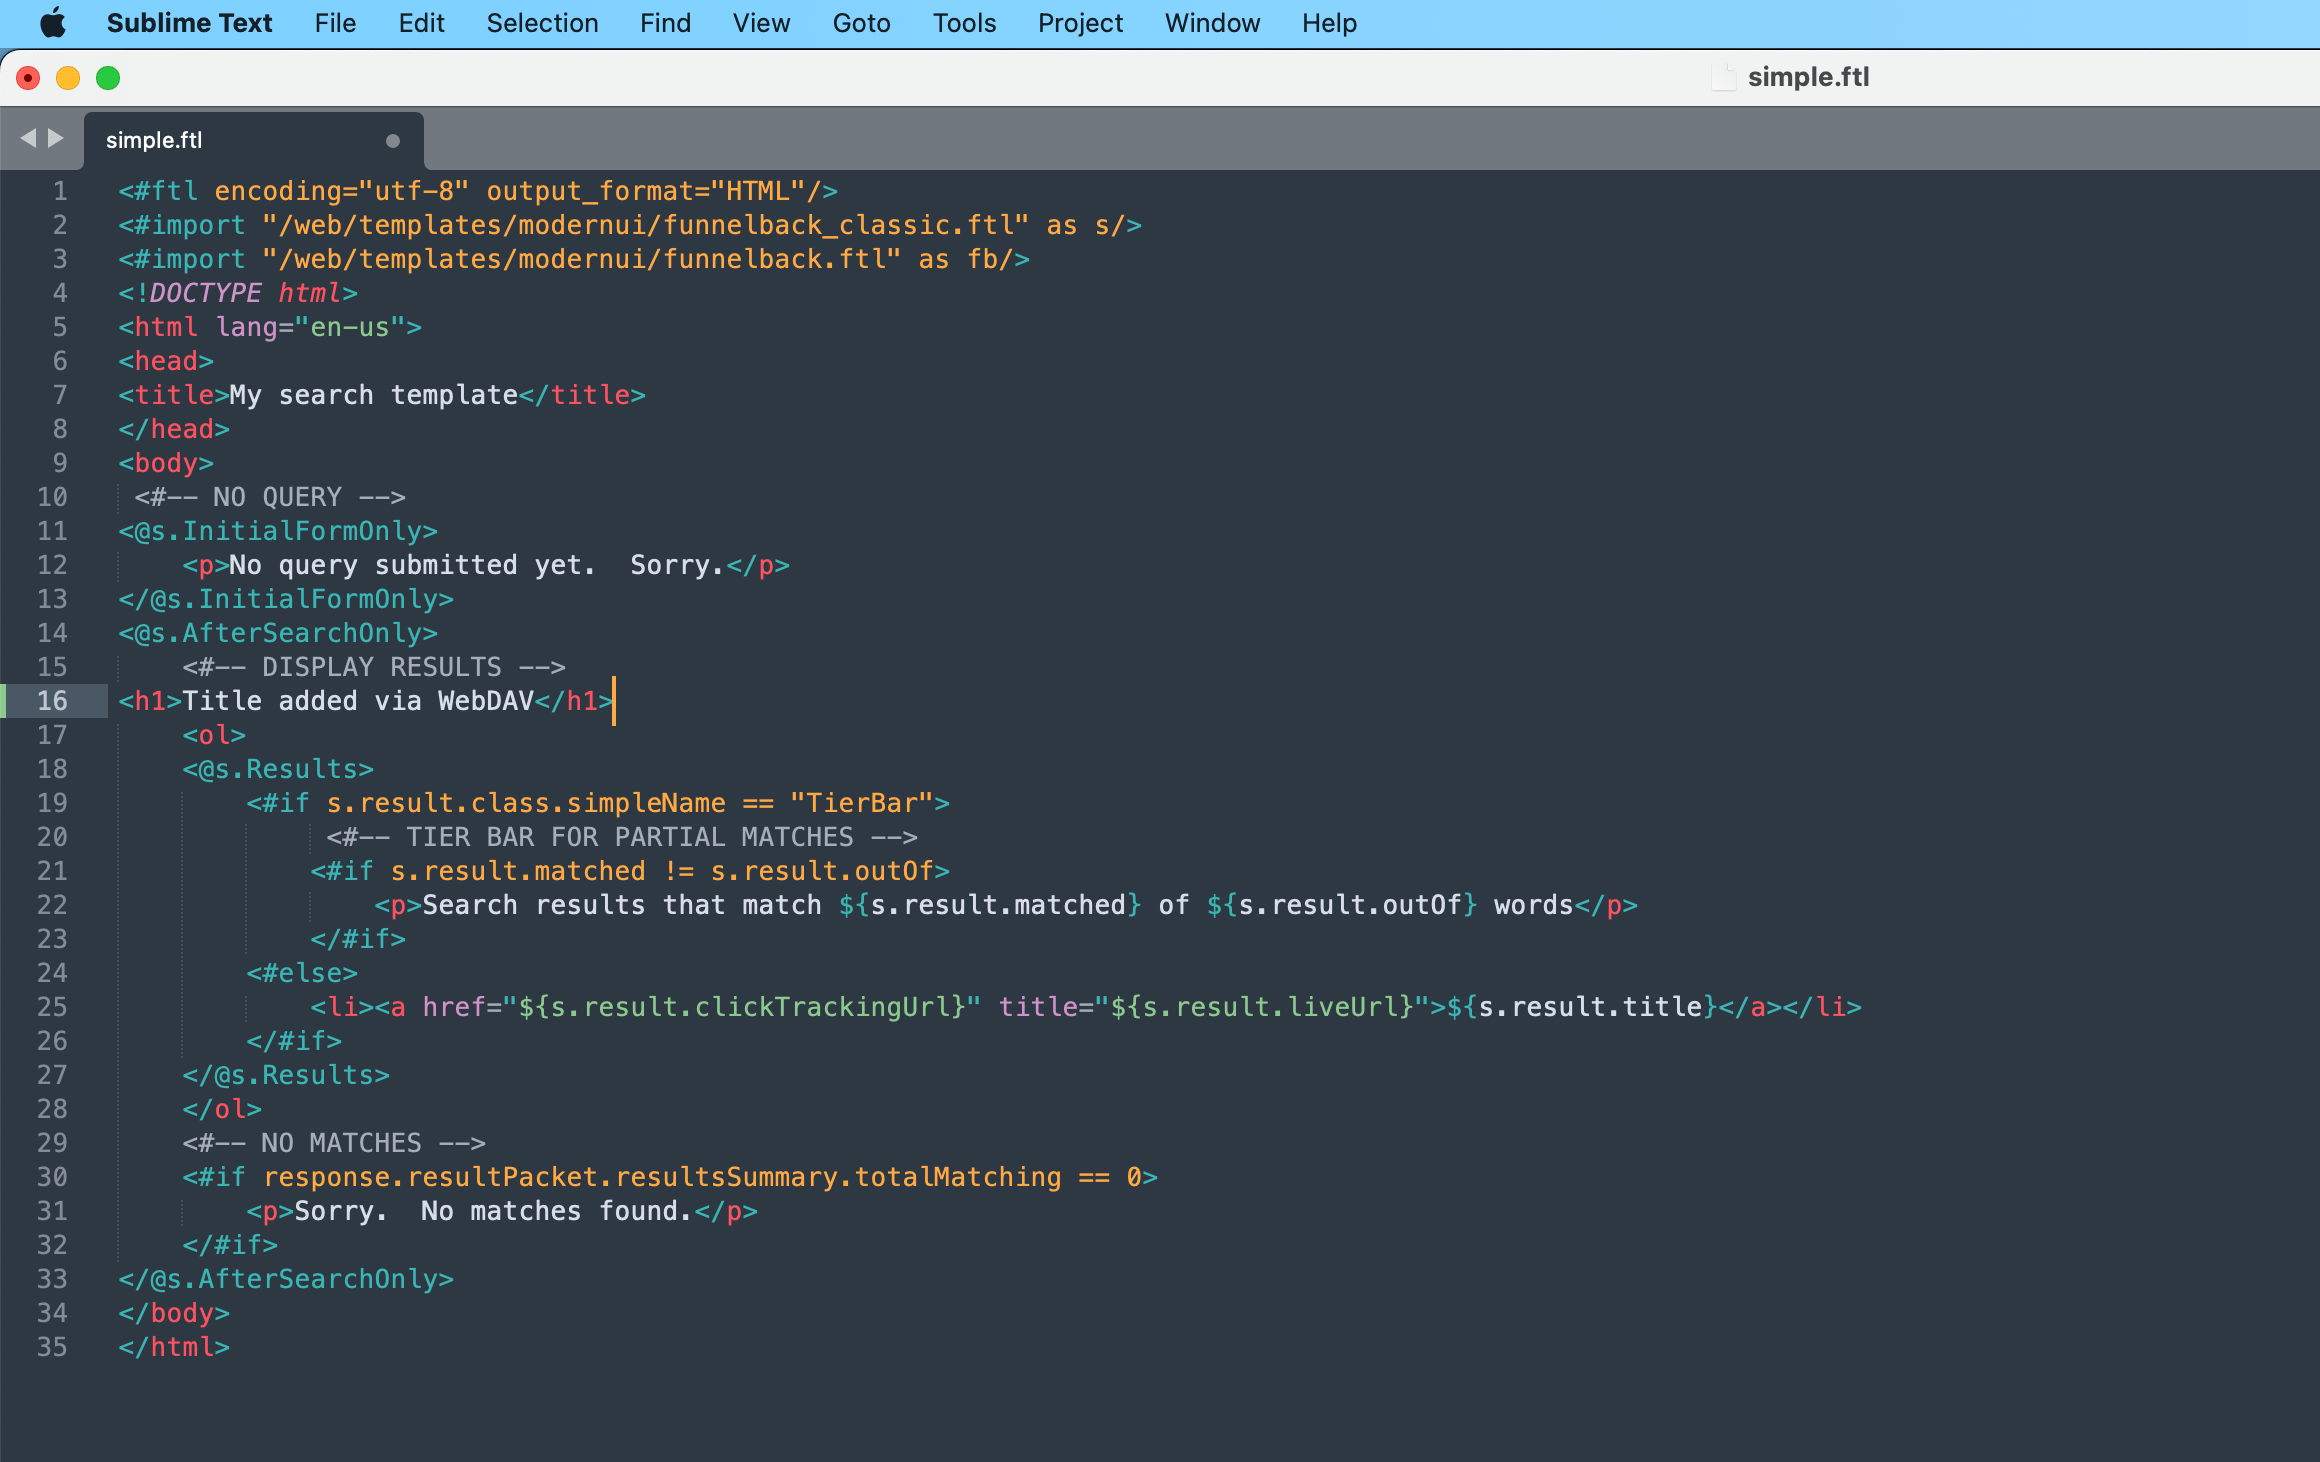
-
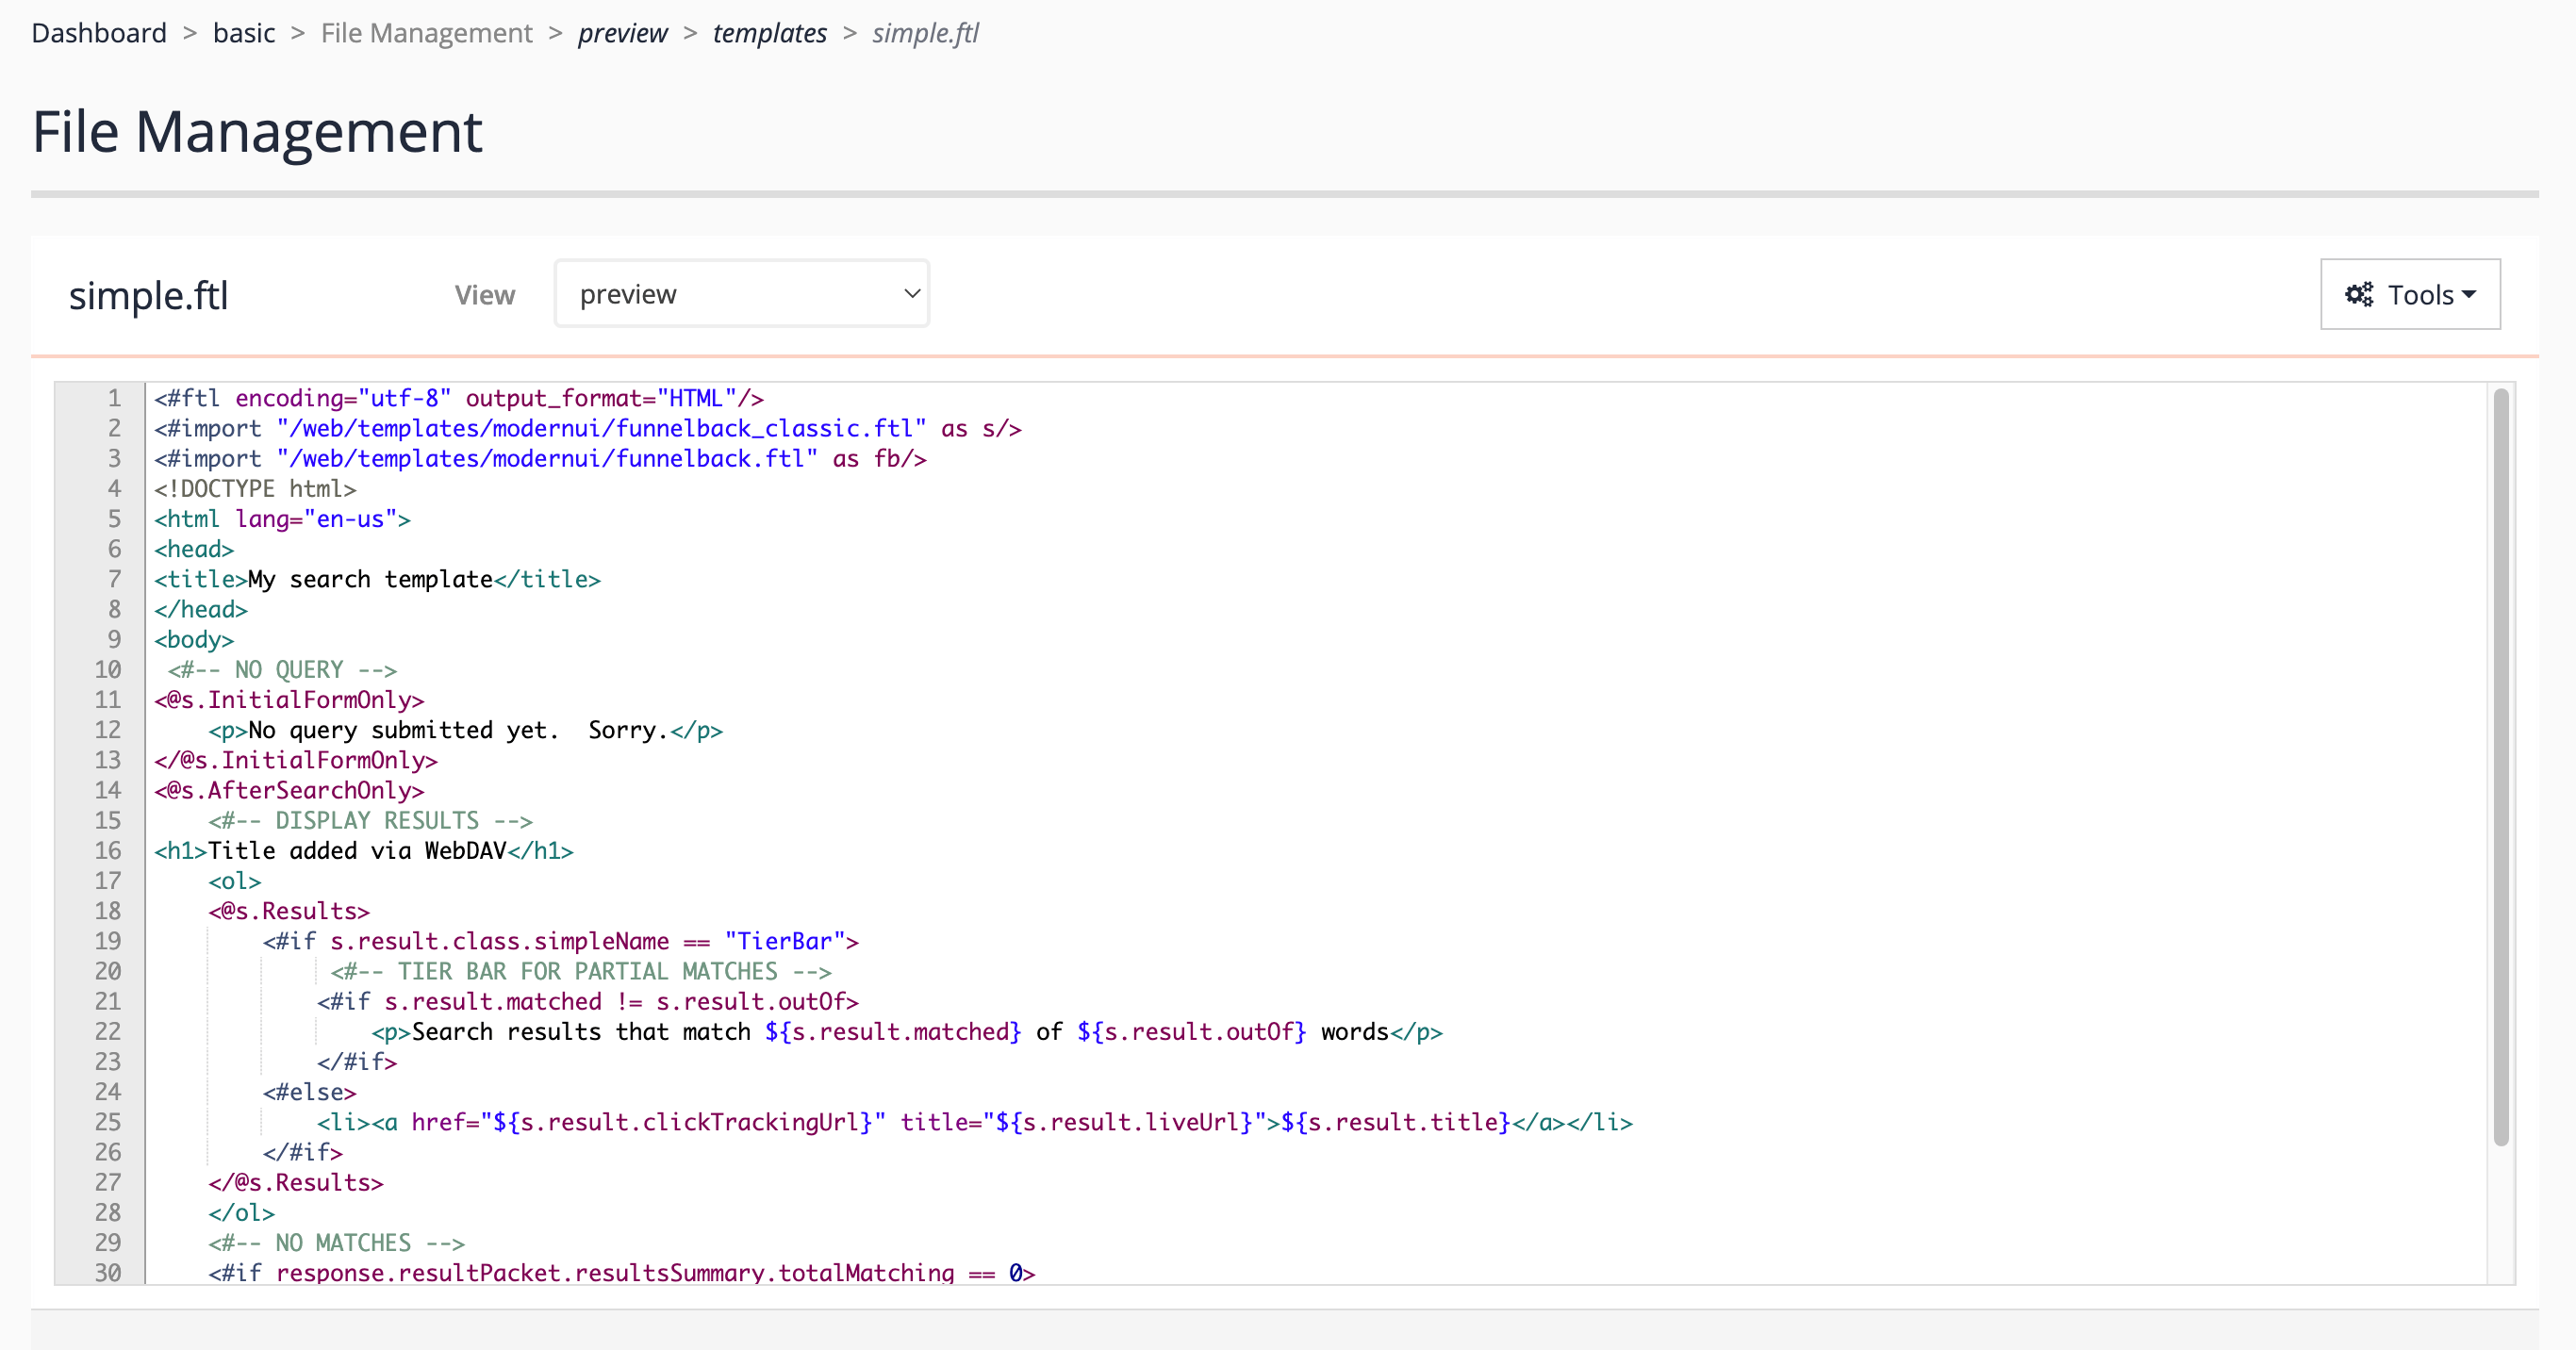
Open the administration interface, select the basic results page on the female inventors search package, then open the results page manage screen and click the edit results page templates item. Observe that unpublished changes are recorded for the
simple.ftlfile. Click on this and observe that the text you just added and saved in your text editor is showing inside the built-in editor.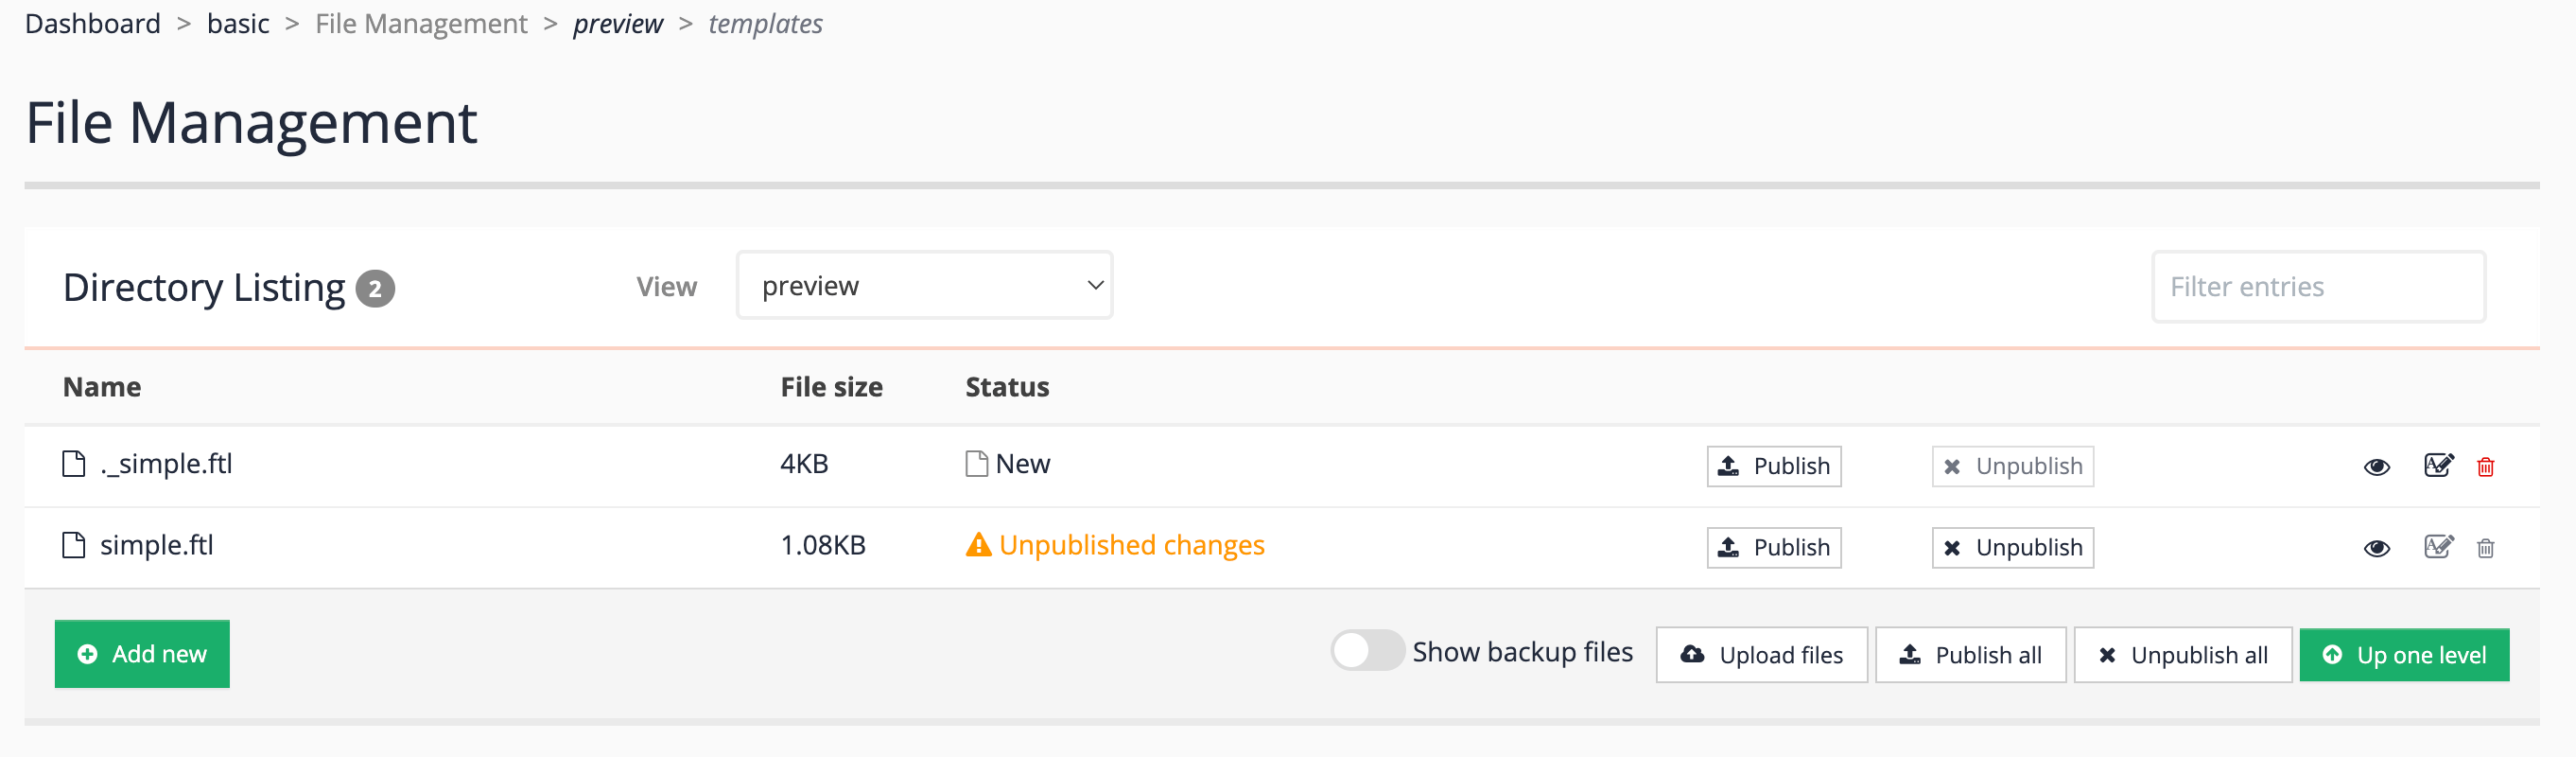
-
View the template by running a search using that template and observe that the title is displaying. http://localhost:9080/s/search.html?collection=default~ds-inventors&profile=basic_preview&form=simple&query=test
-
The file will still need to be published using the administration interface as the live folder when mounted via WebDAV is read only.
Tutorial: Add web resources using WebDAV
In this exercise you will manage your web resources directly from your desktop.
-
Download this image and save it locally https://docs.squiz.net/training-resources/inventors-resources/Professor-Frink.jpg.
-
Navigate and click into the web-resources folder for the female inventors search package, again attached to the inventors results page.
-
Observe that the
cssfolder that you created via the admin interface is displayed. Create a new folder calledmystuff(inside the same folder as thecssfolder) by selecting new folder from the menu. -
Navigate into this folder and drag the image you just saved into this folder.
-
Return to the search dashboard and view the web resources for the inventors results page (female inventors search package).
-
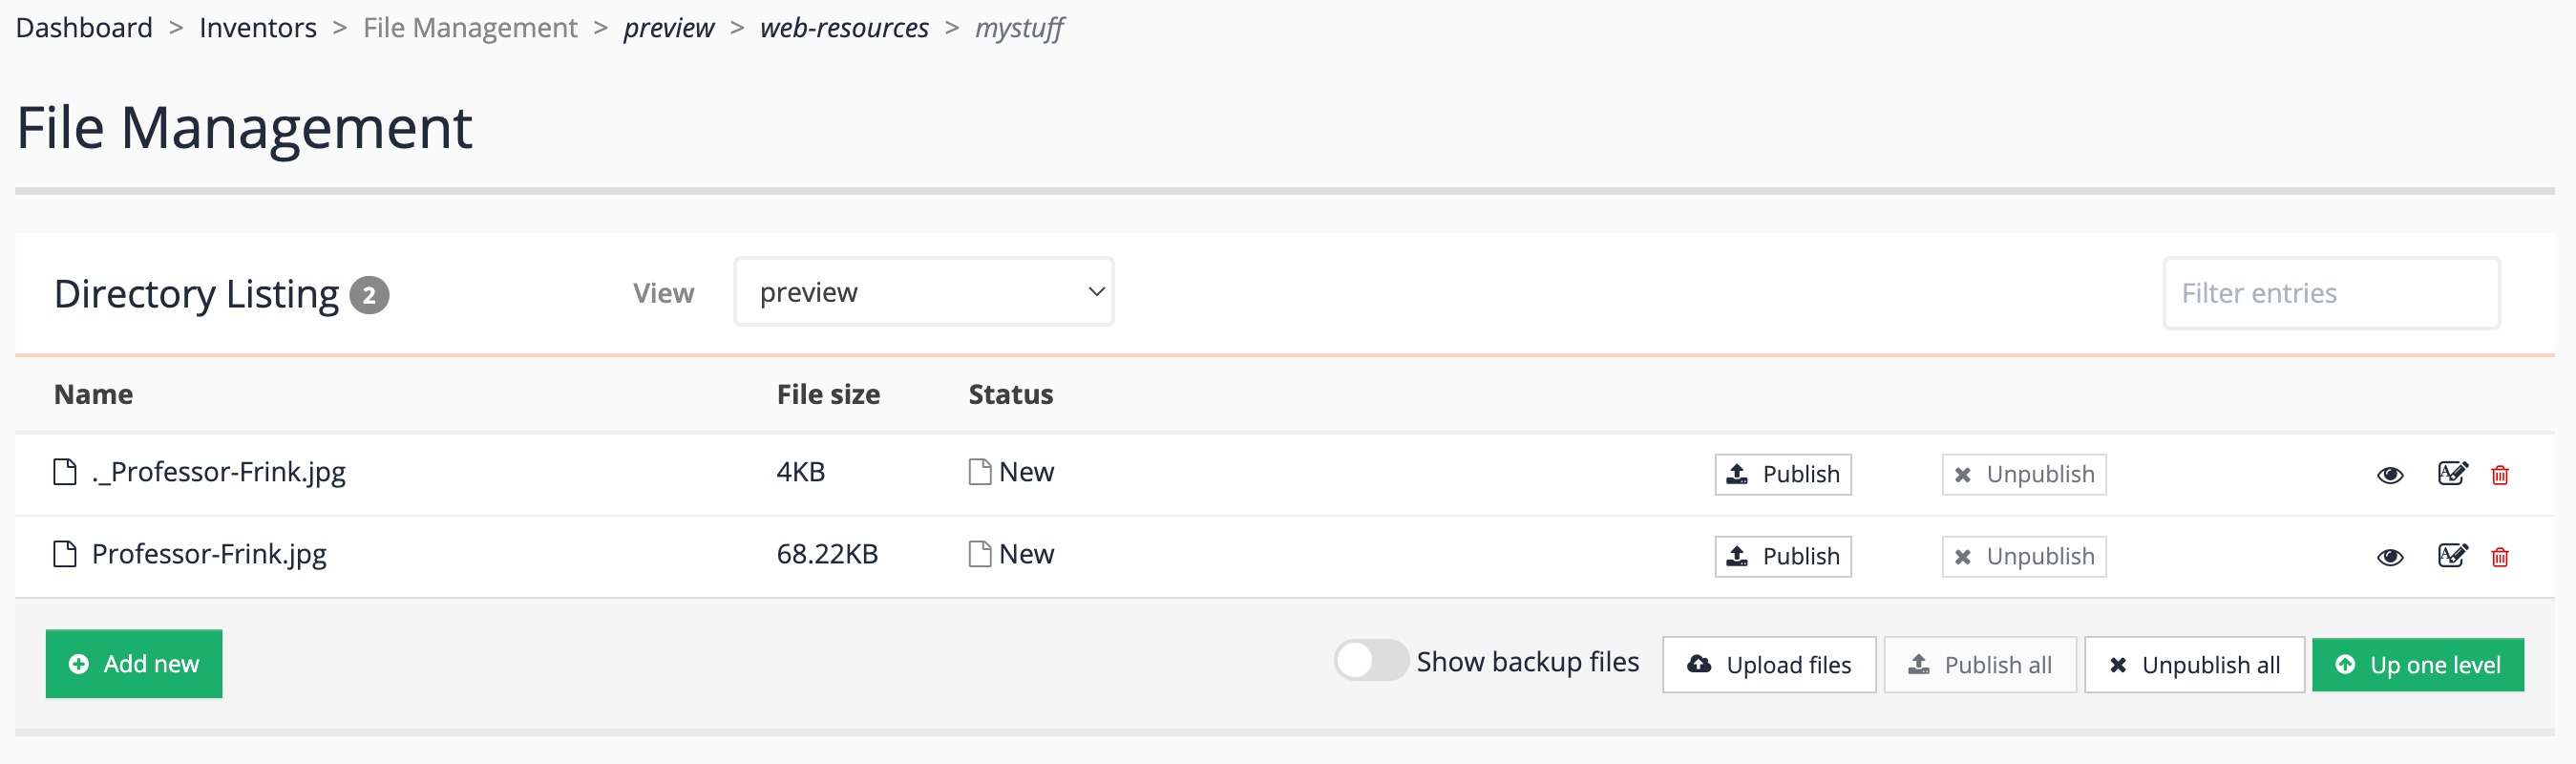
Observe that the
mystufffolder you created is displayed as a subfolder to the web resources, and that the file you just uploaded is also present.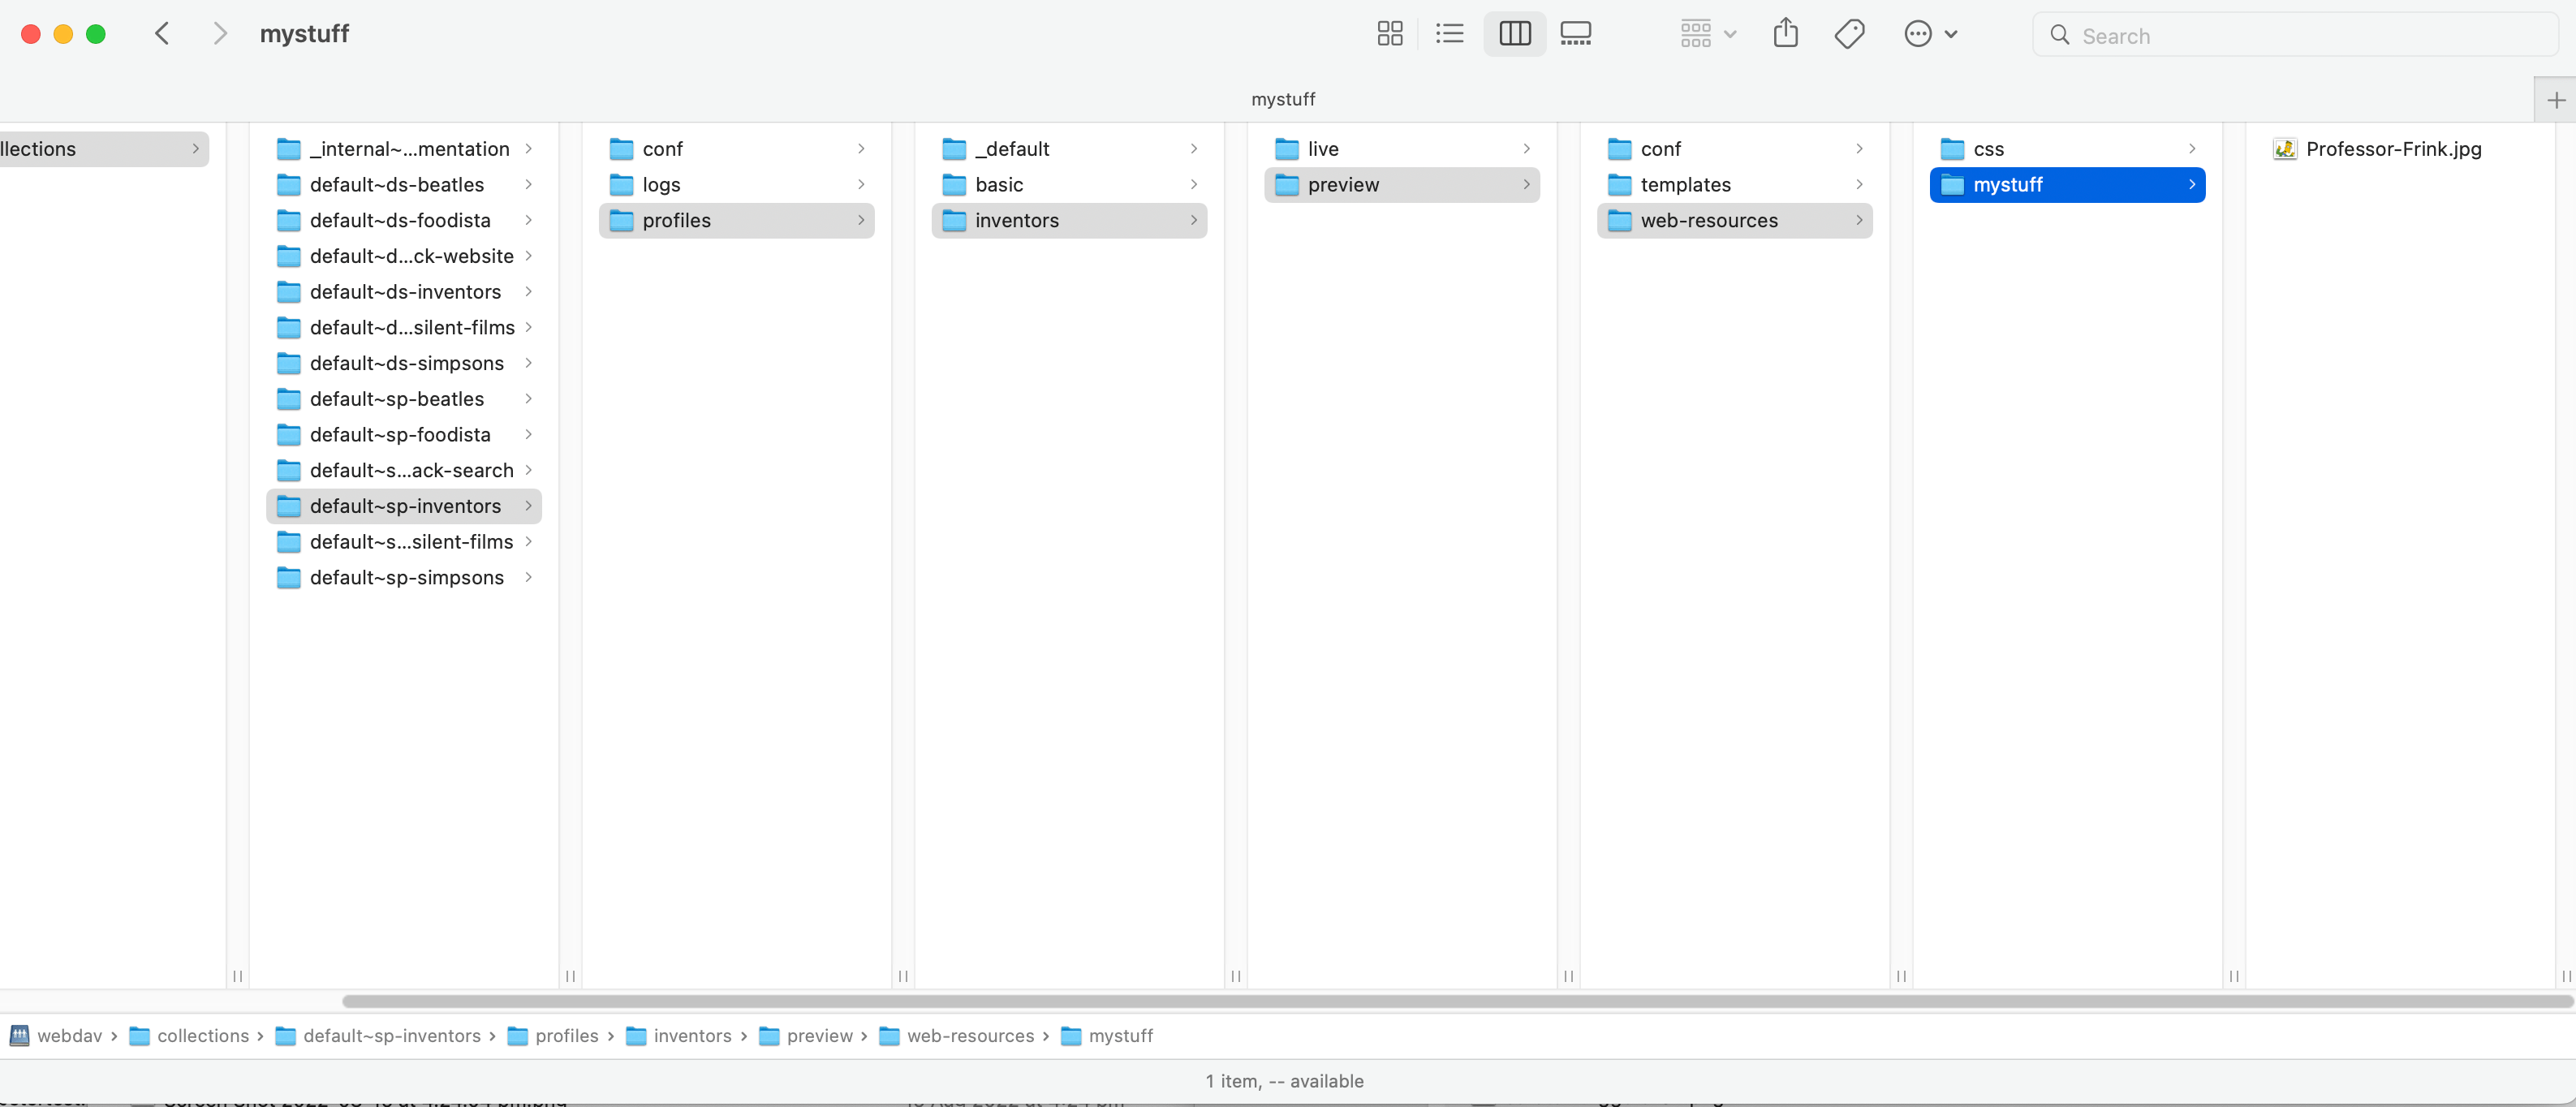
-
The folder and file will still need to be published using the administration interface as the live folder when mounted via WebDAV is read only.