SEARCH 201 - Extend an existing search
Introduction
This course is aimed at frontend developers and takes you through the tasks that you will perform when working on existing Funnelback searches.
Each section contains:
-
A summary: A brief overview of what you will accomplish and learn throughout the exercise.
-
Exercise requirements: A list of requirements, such as files, that are needed to complete the exercise.
The exercises can be read as tutorials or completed interactively. In order to interactively complete the exercises you will need to set up the training searches, or use a training VM. -
Detailed step-by-step instructions: detailed step-by-step instructions to guide you through completing the exercise.
-
Some extended exercises are also provided. These exercises can be attempted if the standard exercises are completed early, or as some review exercises that can be attempted in your own time.
Prerequisites to completing the course:
-
SEARCH 101 - Using search (recommended)
-
HTML, JavaScript and CSS familiarity.
1. Components of a search
Every search provided by Funnelback is made of three base components which combine to create your search. Understanding what these components are, and how they fit together is critical to managing and creating your searches.
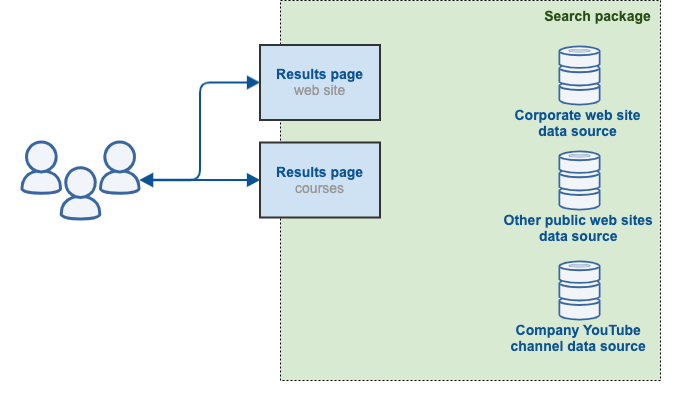
The base components are:
- Search packages
-
A search package is used to bundle (or package) the data sources and results pages that are part of a search.
- Data sources
-
A data source contains content that is indexed by Funnelback.
The set of content included in a data source is configurable - it might contain many websites, or part of a website. It might be records from an SQL database, or videos from a YouTube channel.
A search package can include multiple data sources. The set of data sources are combined into a single, merged index that is used by the search package.
- Results pages
-
A results page defines a way of searching over the search package index.
The results page includes configuration for various features such as auto-completion or faceted navigation and may also include configuration of a template to return the search results as HTML.
A results page can also be configured to return a sub-set (or part) of a search package’s index - for example it may return part of a website, or all of the social media content.
A results page can include:
-
search templates
-
ranking and display settings
-
synonyms
-
interface functionality: faceted navigation, best bets, curator rule sets
-
search analytics
-
| Each search package must include at least one results page and one data source in order to be searchable. Many results pages can be defined if you have differing search needs that share the same underlying content. Results pages reporting and optimization functions can also be managed via the insights dashboard. |
1.1. Funnelback 15
There are some key differences with how a search is constructed when compared to earlier versions Funnelback (v15.24 and earlier).
If you are familiar with Funnelback 15 or earlier:
1.1.1. Collections and profiles
Collections and profiles don’t exist in Funnelback 16 and are replaced with search packages, data sources and results pages.
Key points:
-
A search package is the same as a v15 meta collection.
-
A data source is the same as a v15 non-meta collection.
-
A results page is the same as a v15 service-enabled profile.
-
Every search you create must at a minimum have a search package that contains a data source and a results page.
-
Searches can only be made against a search package/results page combination. This means you can no longer search a non-meta collection, and that all profiles and query-time configuration (such as query processor options, templates, and front-end features like faceted navigation and extra searches) can no longer be configured on a non-meta collection (data source).
-
Auto-completion generation can no-longer be configured on a non-meta collection, and a profile that was used for auto-completion generation must now be set up as a results page on a search package.
2. Overview of the search dashboard
The Funnelback search dashboard is a tool for setting up and maintaining your search using a web browser.
| The URL of the search dashboard for your organization will vary depending on where your service is hosted. Contact your account manager for the access details for your own Funnelback instance. |
The search dashboard home screen is composed of several regions, which perform different functions. Some of these are highlighted below:
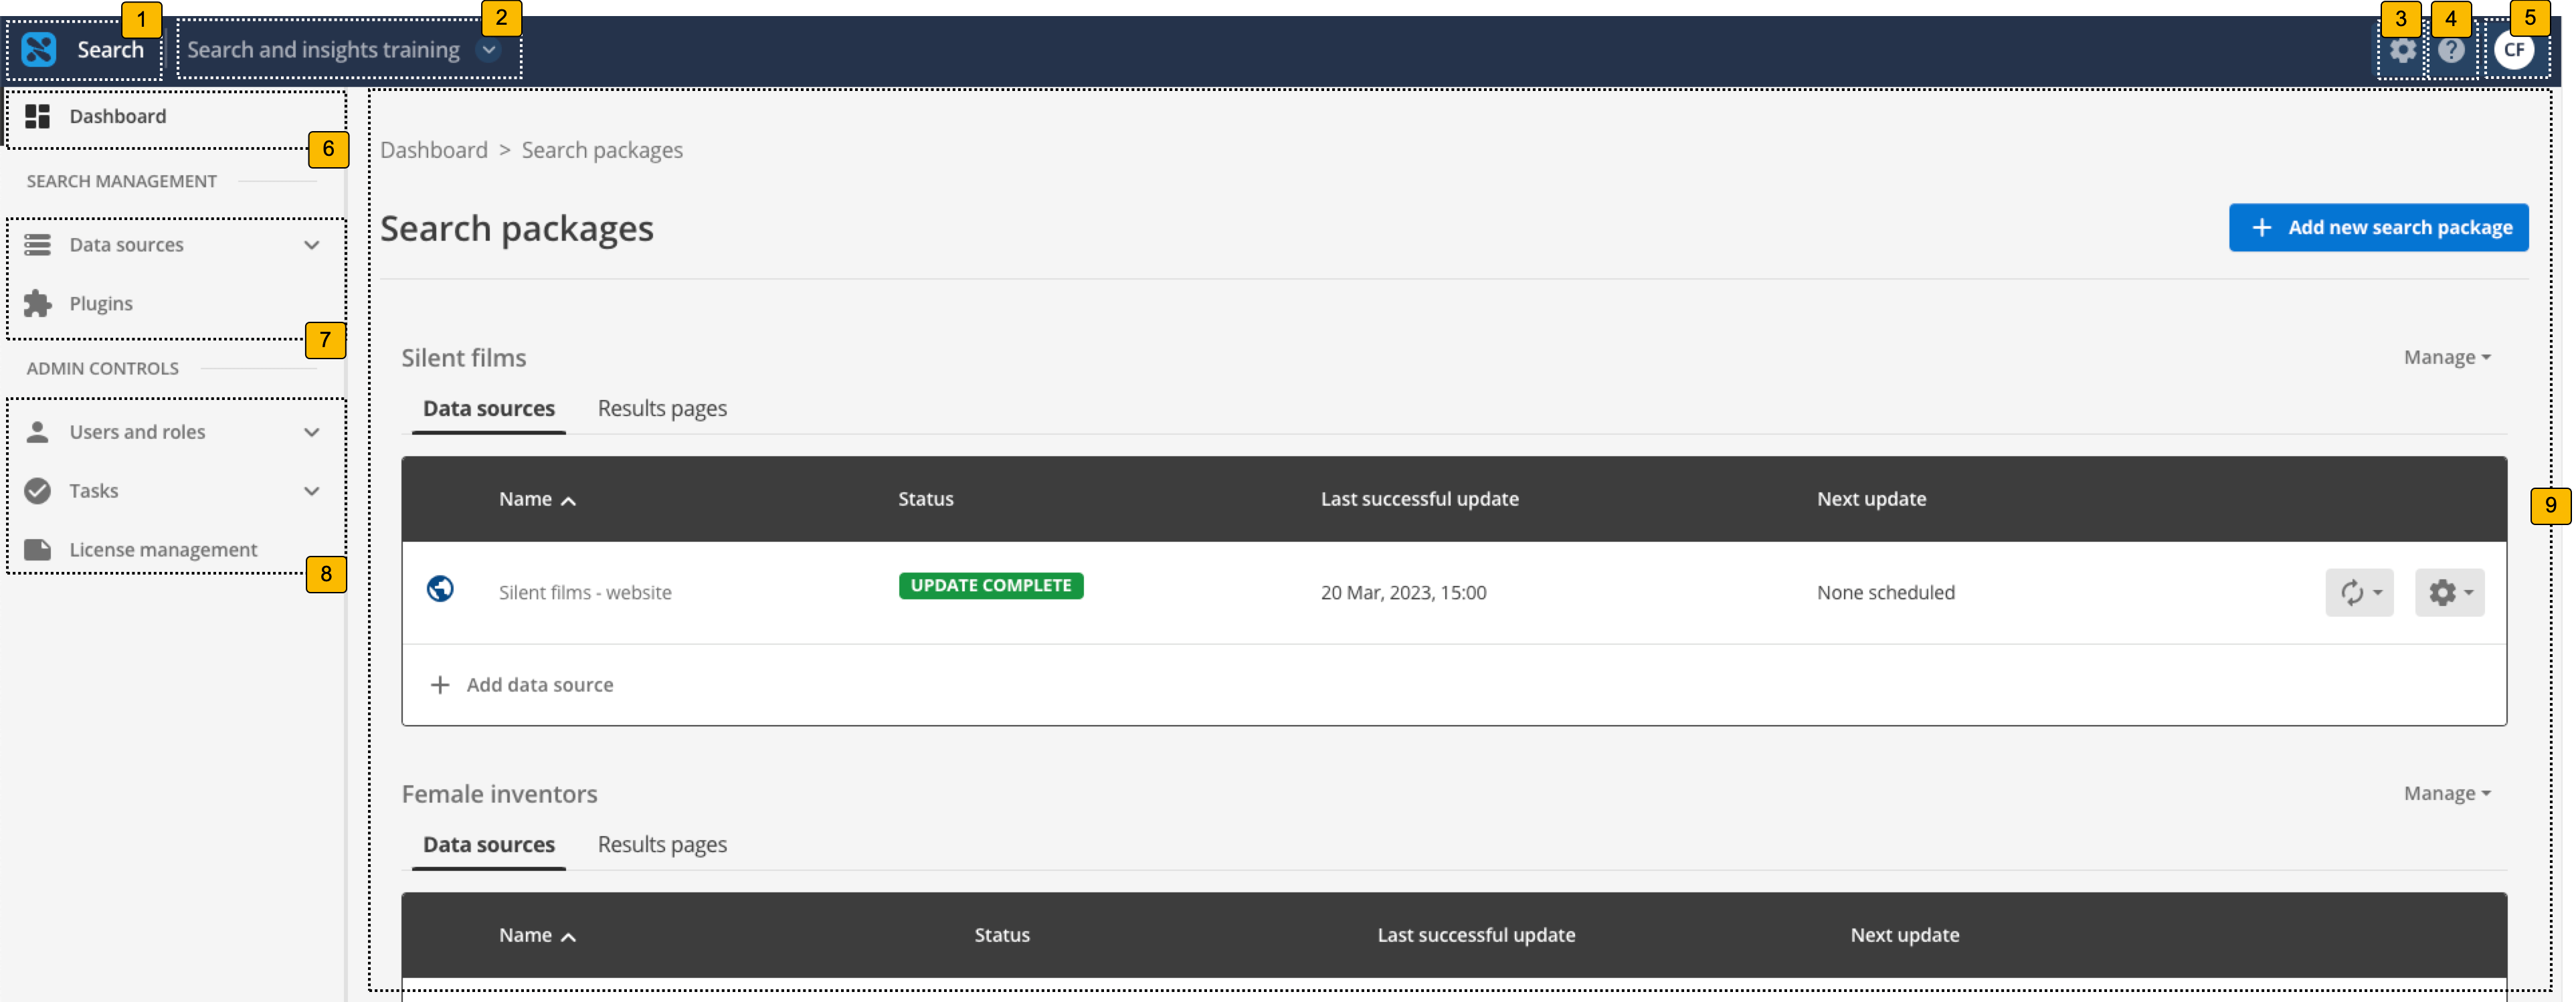
-
Home button: Opens the home page for the search dashboard.
-
Client switcher: Displays the current client and enables you to switch to a different client if you have access to manage more than one client.
-
System configuration menu: Provides access to system configuration functions and also the API UI.
-
Online help: Opens the Funnelback online documentation.
-
User profile: Opens a menu that provides access to your user profile and also the ability to log out of the search dashboard.
-
Dashboards: Provides access to the home pages of the administration and insights dashboards.
-
Search management functions: Provides access to data source management and extensions (plugins).
-
Administration controls: Provides access to user, role and license management as well as the task queue and update scheduler.
-
Main management section: Provides tools to manage your search configuration and updates. This panel is context-sensitive and will vary depending on what you are managing.
Tutorial: Introduction to the search dashboard
In this exercise you will be introduced to the main sections available within the search dashboard.
-
Log in to the search dashboard where you are doing your training.
See: Training - search dashboard access information if you’re not sure how to access the training. Ignore this step if you’re treating this as a non-interactive tutorial. -
Observe that there are several search packages defined - Female inventors, Silent films, Simpsons and Foodista.
-
Note the location of the search package manage button - this provides access to the search package configuration screen.
You can also click on the name of the search package to manage your search package. -
Locate the Female inventors search package in the listing. Observe that the search package includes a single data source named Female inventors - website, and a single results page named inventors.
2.1. Administering a search package
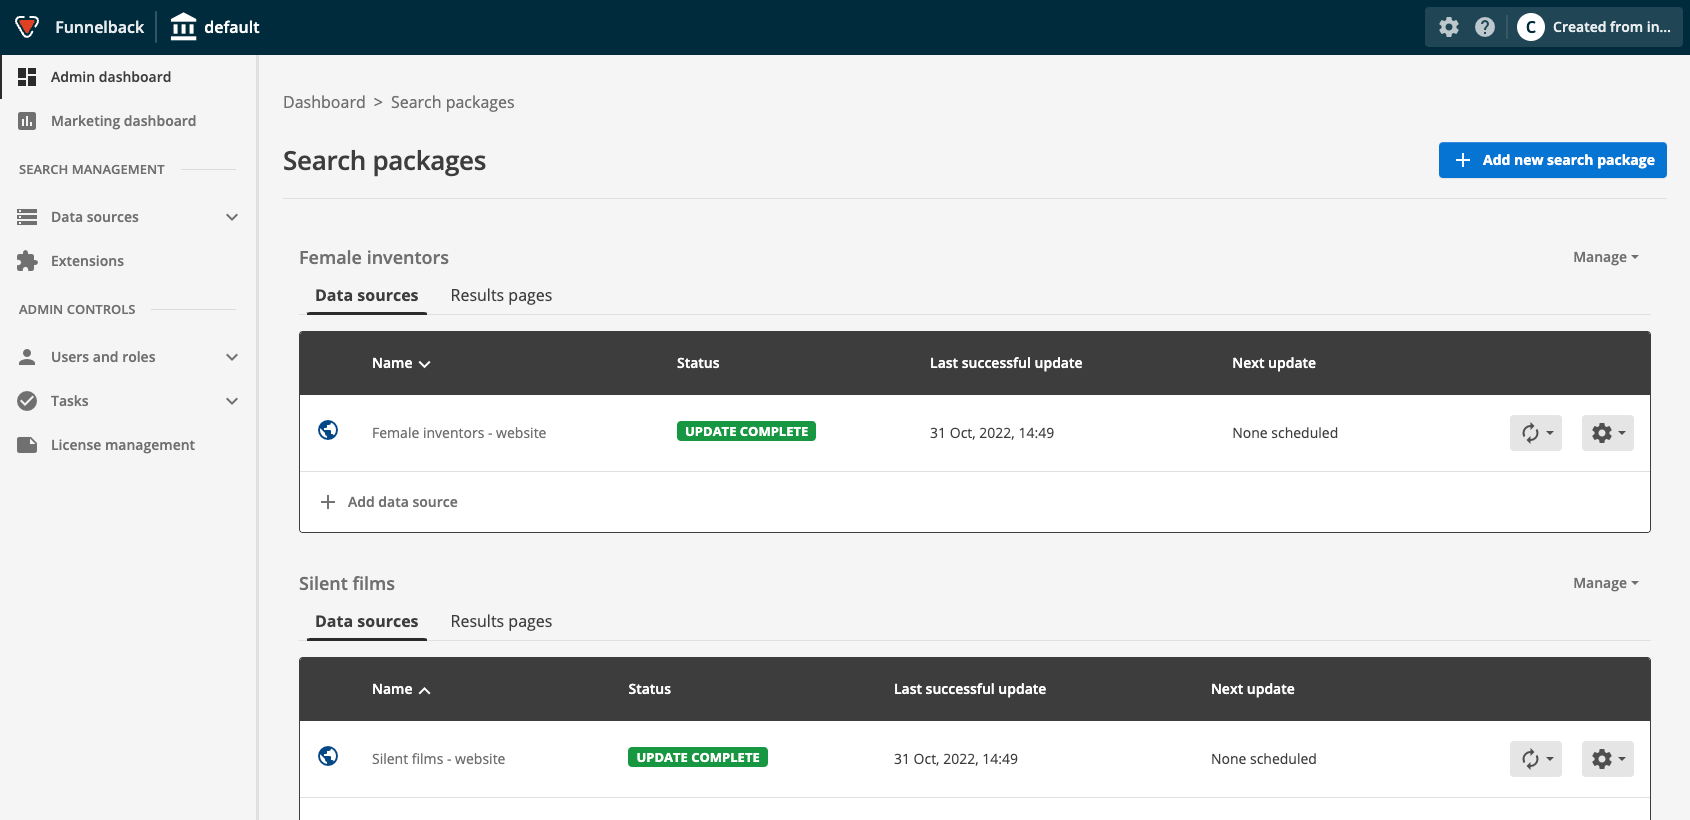
Every search that you build in Funnelback must be encapsulated in a search package. As a result, the search dashboard is built around administering a search package.
The main panel of the search dashboard home screen shows the search packages that you can manage, or if you’re logging in for the first time you are given the option to create a new search package.
The overview screen will look similar to the following if no search packages have been set up yet:
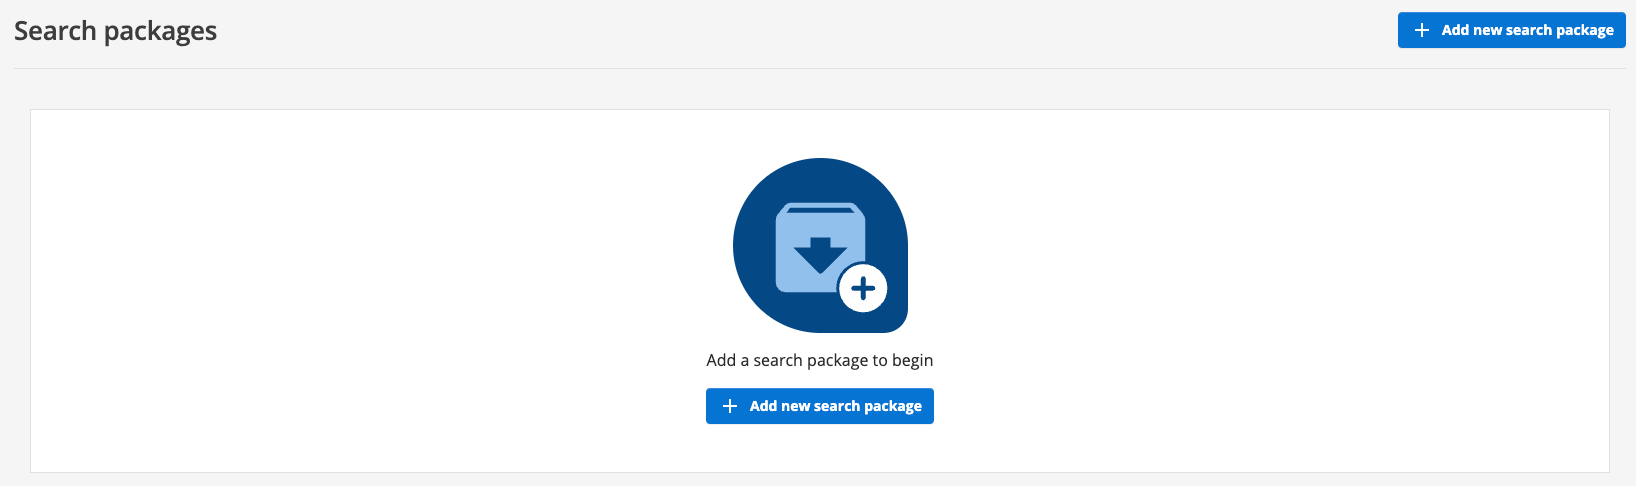
Clicking on the Add new search package button steps through the process of creating a new search package.
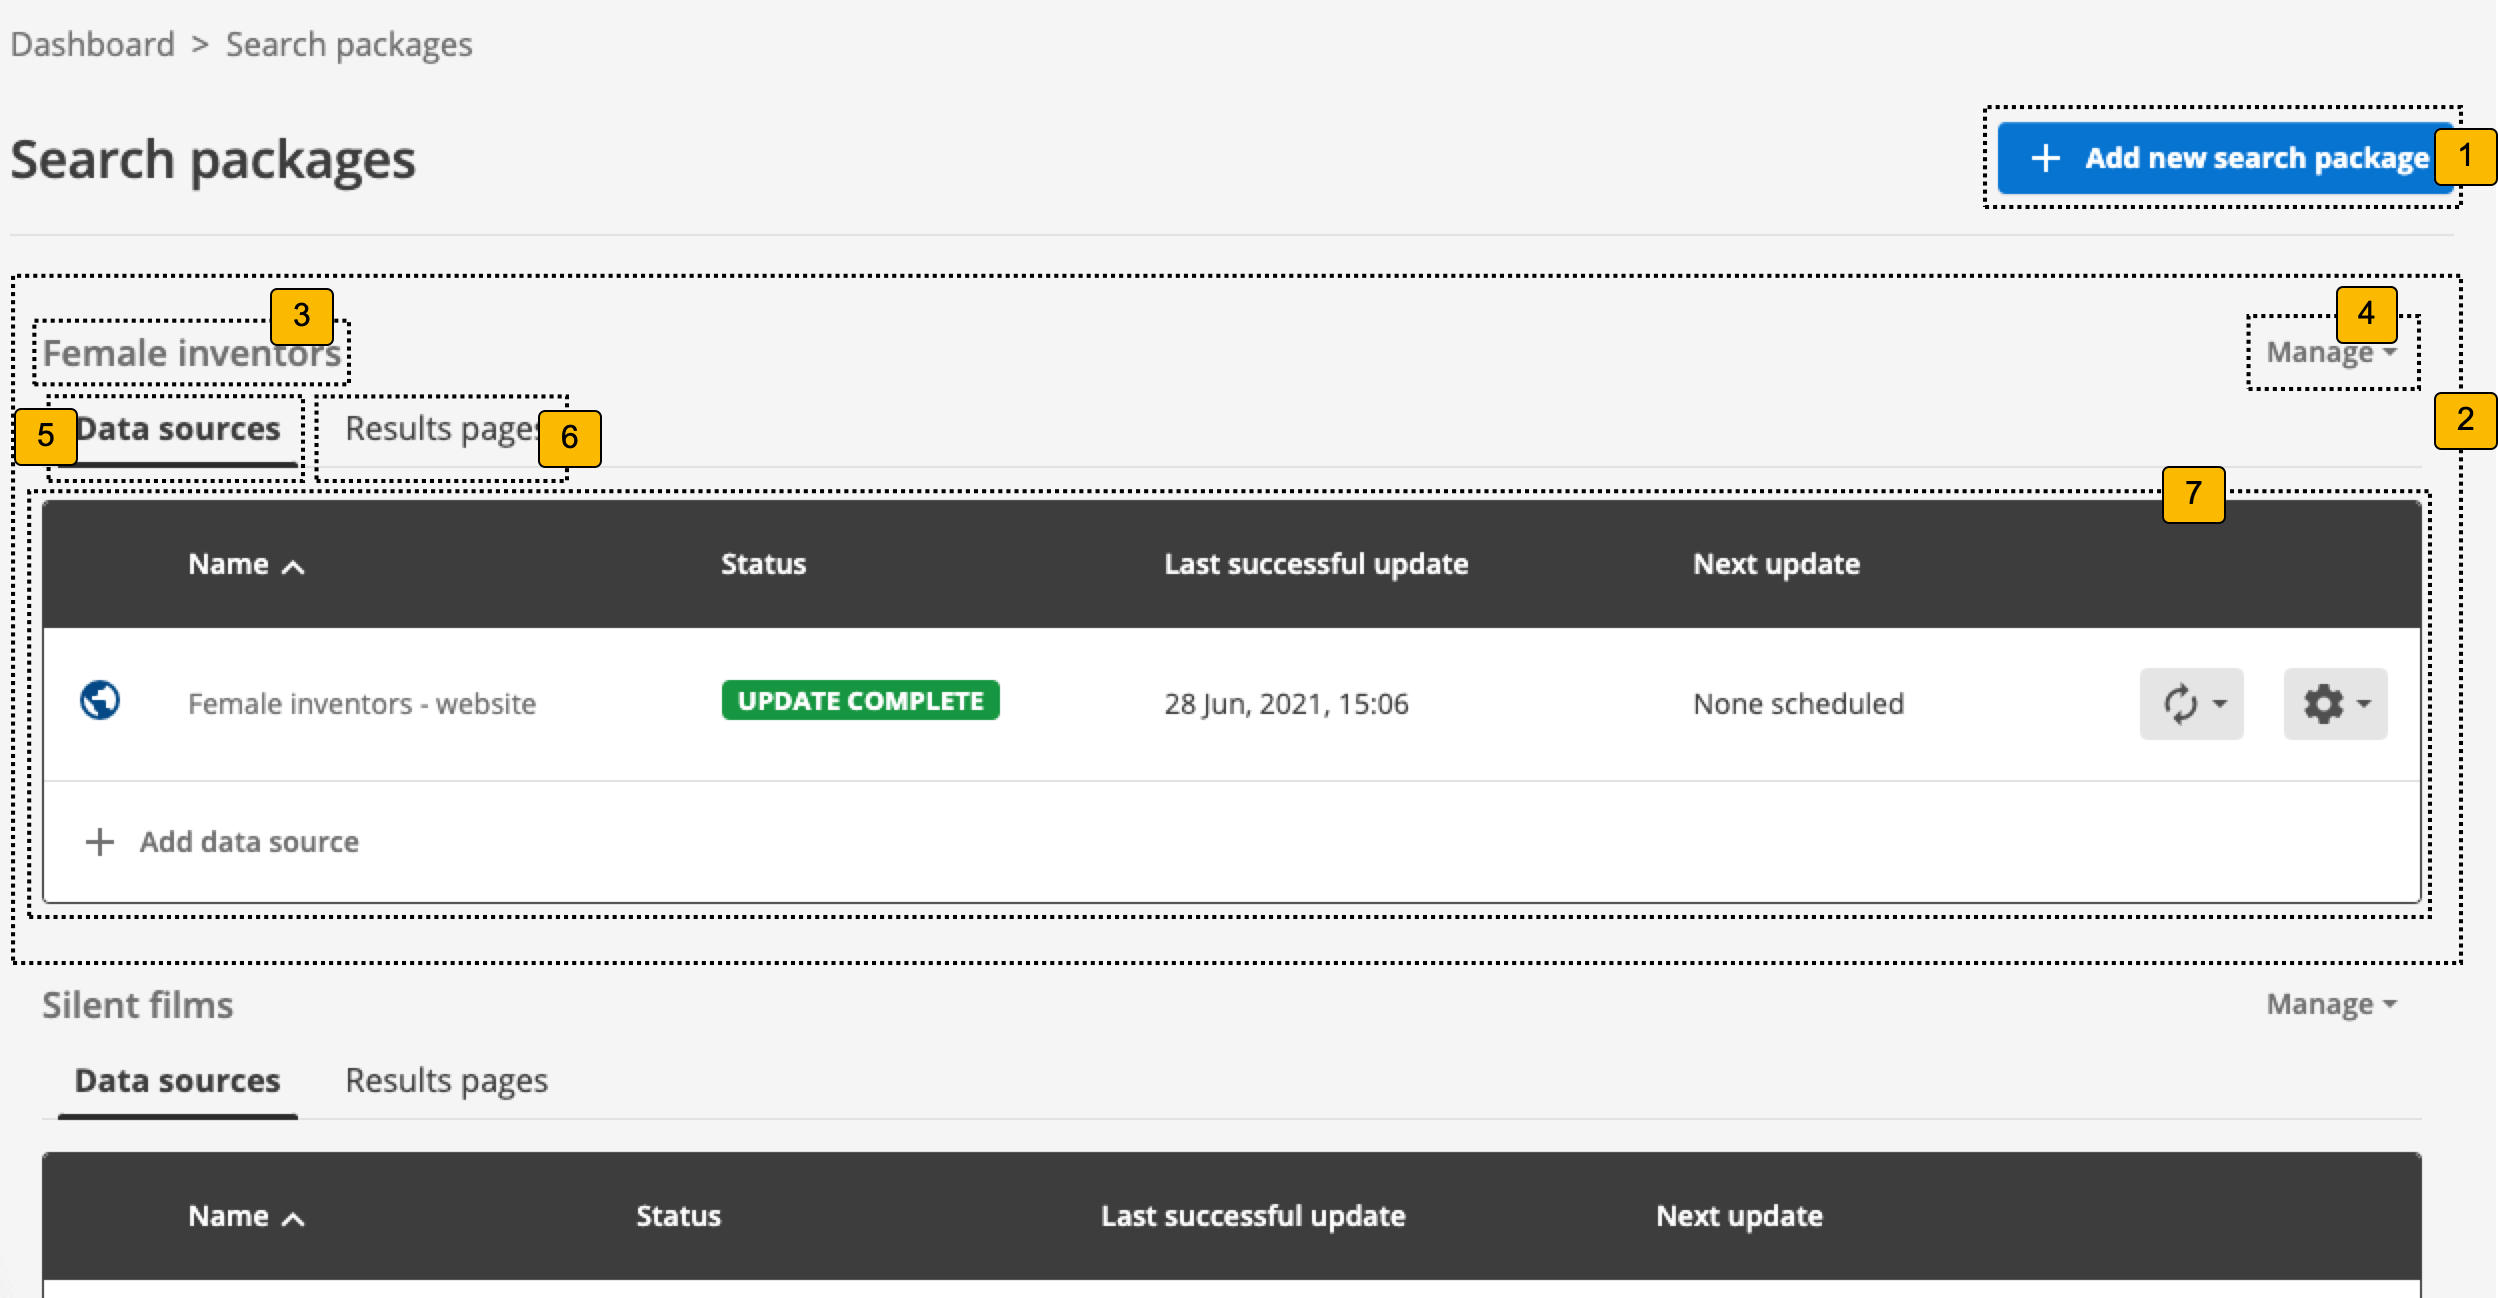
If there are any existing search packages then the following is displayed for each search package:
-
Add new search package: Clicking this button steps through the process of creating a new search package.
-
Information and controls for a search package. A block like this will be displayed for each search package that you have access to.
-
Search package name: This displays the name of the search package.
-
Manage this search package: Clicking the Manage button opens the search package configuration screen for the associated search package.
-
Data sources: Clicking the data sources tab lists the data sources associated with the search package in the panel below.
-
Results pages: Clicking the results pages tab lists the results pages associated with the search package in the panel below
-
Information and status of each data source or results page.
Tutorial: Manage a search package
This exercise introduces you to the search package management screen.
-
Log in to the search dashboard where you are doing your training.
See: Training - search dashboard access information if you’re not sure how to access the training. Ignore this step if you’re treating this as a non-interactive tutorial. -
Locate the Foodista search package.
-
Manage the search package by either clicking on the Foodista heading, or by selecting the menu item for the search package:
-
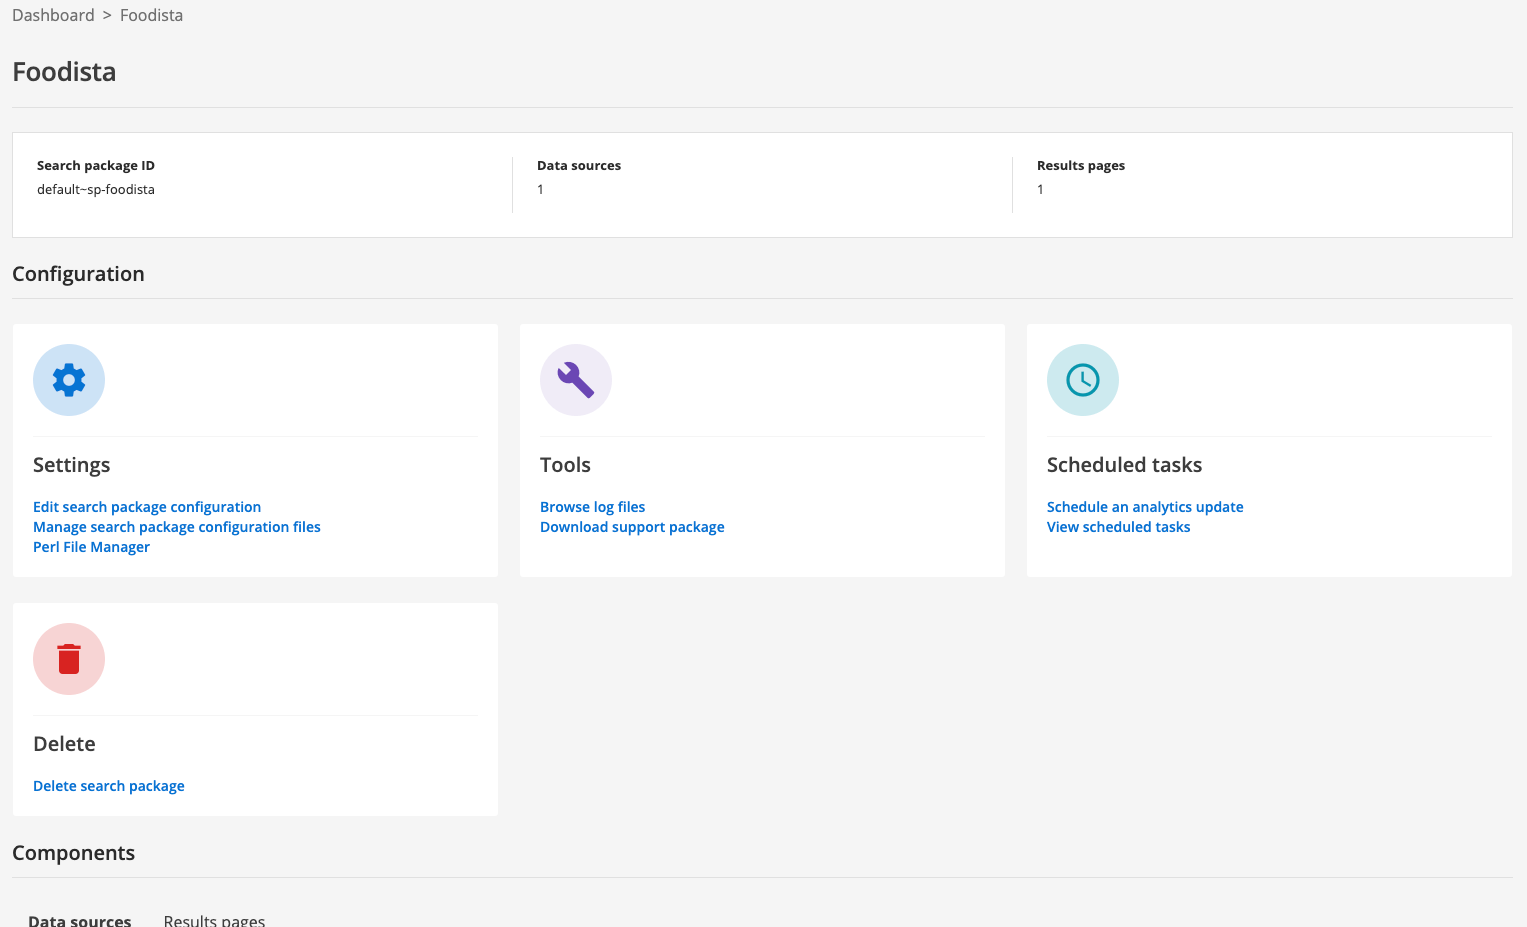
The search package manage screen opens for the Foodista search package.
-
Explore the different configuration options, grouped into settings, tools, scheduled tasks and delete.
-
Discover the associated data sources and results pages by looking at the data sources and results pages tabs listed under the components heading.
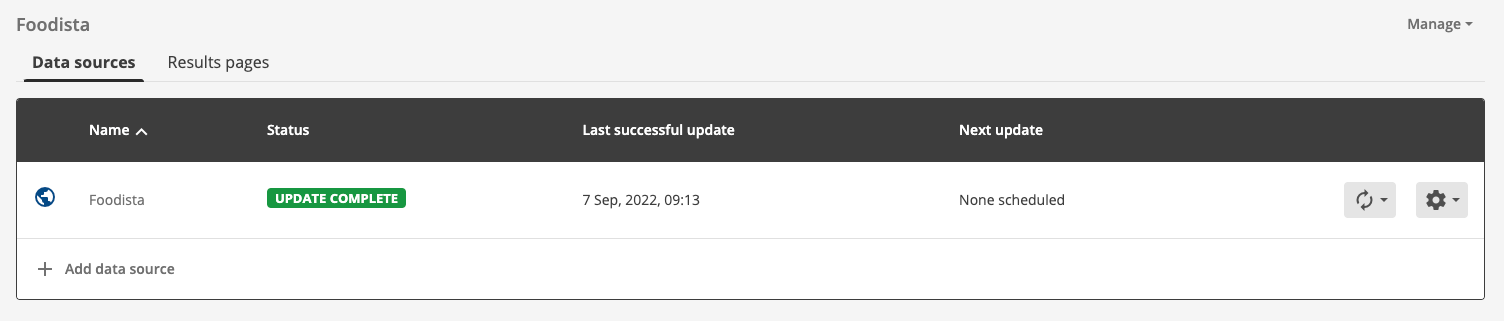
2.1.1. Search package overview - data source tab
When the data source tab is selected for any search package the following information is displayed in the tab’s panel.
If the search package doesn’t have any data sources yet:
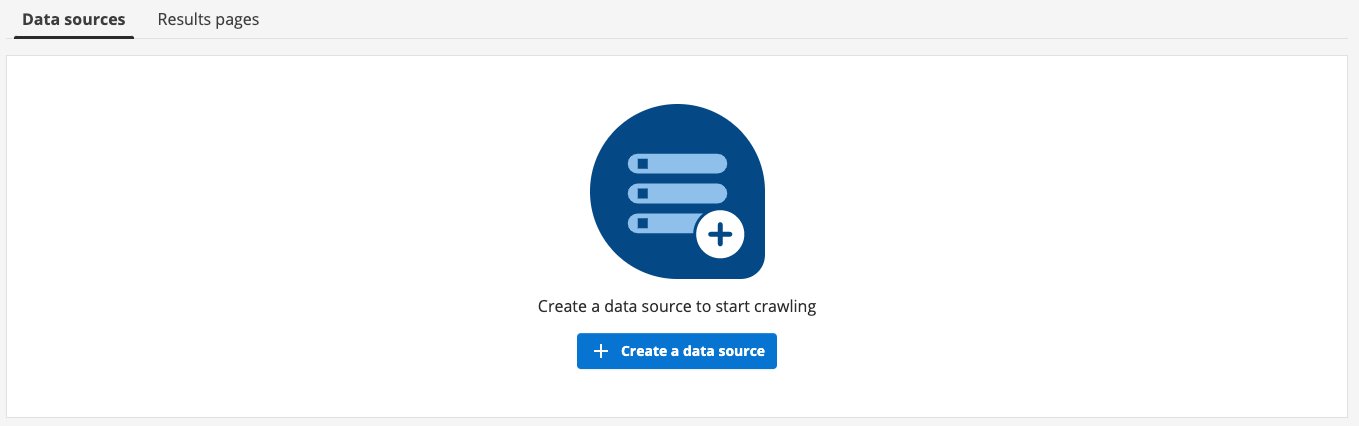
Clicking on the create a data source button steps through the process of creating a new search data source or attaching an existing data source to the search package.
If there are any attached data sources then the following is displayed for each:
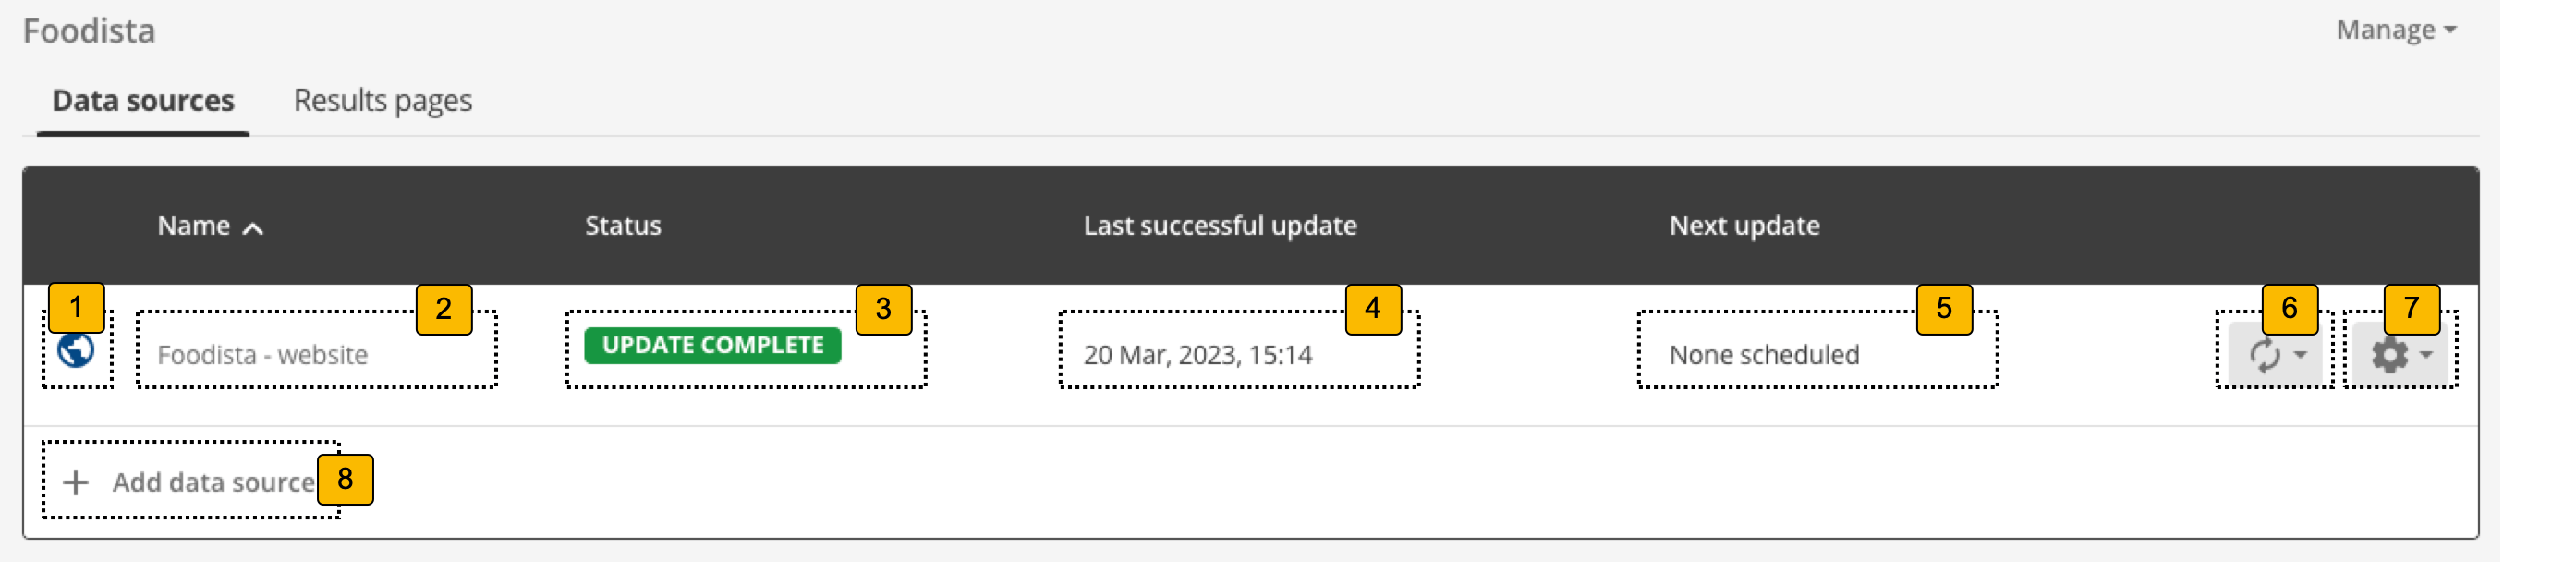
-
Indicates the type of data source
-
Data source name: Indicates the name of the data source. Clicking on the name opens the data source management screen.
-
Status: Indicates the update status of the data source.
-
Last successful update: Indicates when the last successful update of the data source ran.
-
Next update: Indicates when the next update of the data source is scheduled to occur.
-
Update menu: Opens a menu allowing you to run, stop or schedule an update of the data source.
-
Manage menu: Opens a menu allowing you to manage the data source (the same as clicking on the data source name 2), or to detach the data source from the search package.
-
Add data source: Opens the data source creation dialog which enables you to create a new data source or to add an existing data source to the search package.
Tutorial: Manage a search package’s data sources
This exercise introduces you to the data source management screen.
-
Return to the Foodista search package management screen from the previous exercise and scroll to the components section at the bottom of the screen.
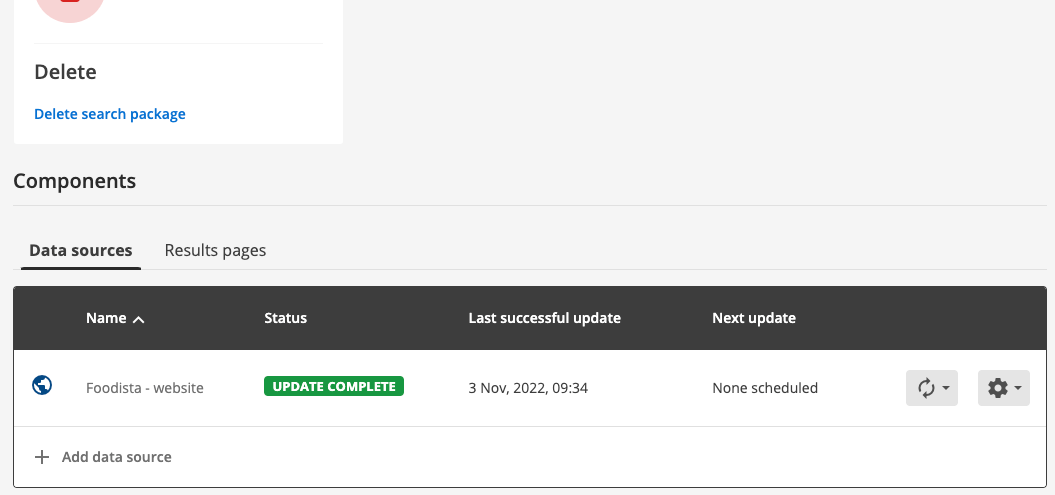
-
Ensure that the data sources tab is selected. The Foodista - website item that is displayed indicates that the search package contains a single web data source (called Foodista - website). Each data source that is attached to the search package is listed here.
The add data source button can be used to add or attach another data source, which will add additional content to the search package.
To manage the configuration for the data source either click on the data source name (Foodista - website) or select the > configuration menu item.
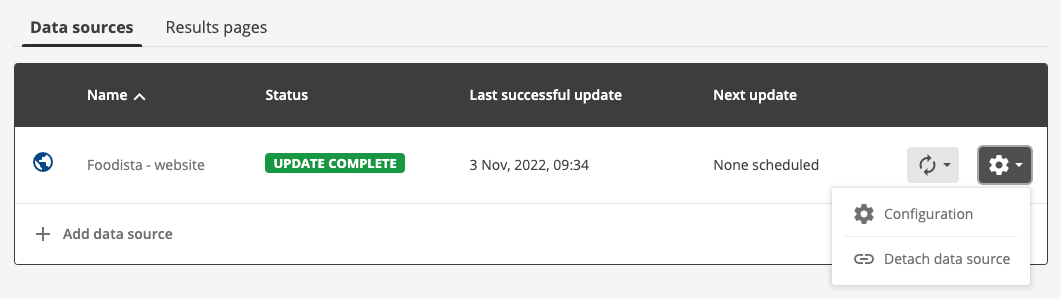
-
The management screen opens for the Foodista - website data source.
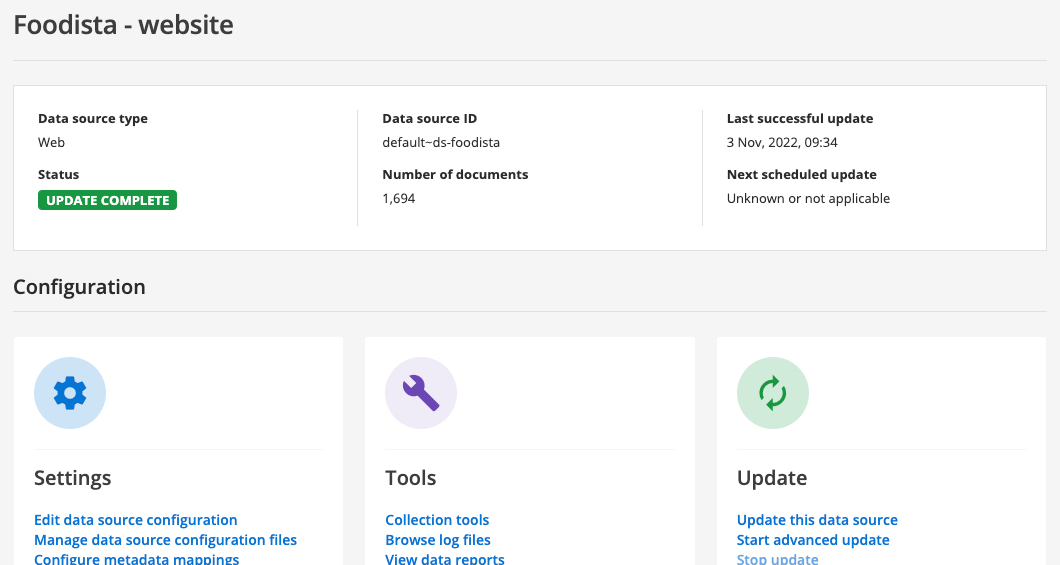
-
Explore the different configuration options, grouped into settings, tools, update, scheduled tasks and delete.
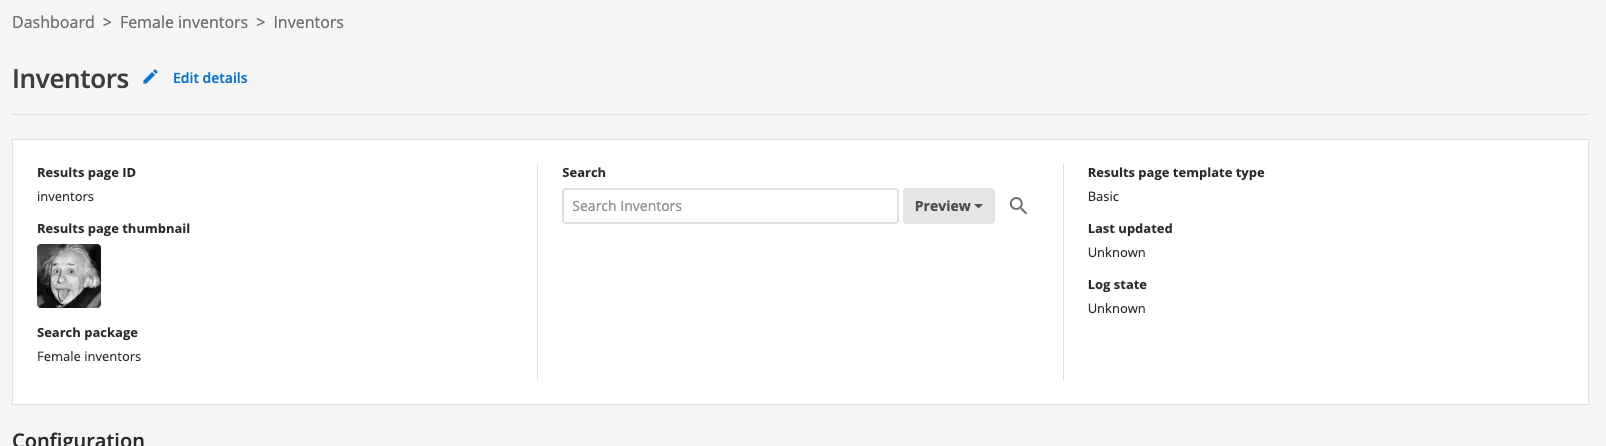
2.1.2. Search package overview - results page tab
When the results page tab is selected for any search package the following information is displayed in the tab’s panel.
If the search package doesn’t have any results pages yet:

Clicking on the Create a results page button steps through the process of creating a results page.
If there are any configured results pages then the following is displayed for each:
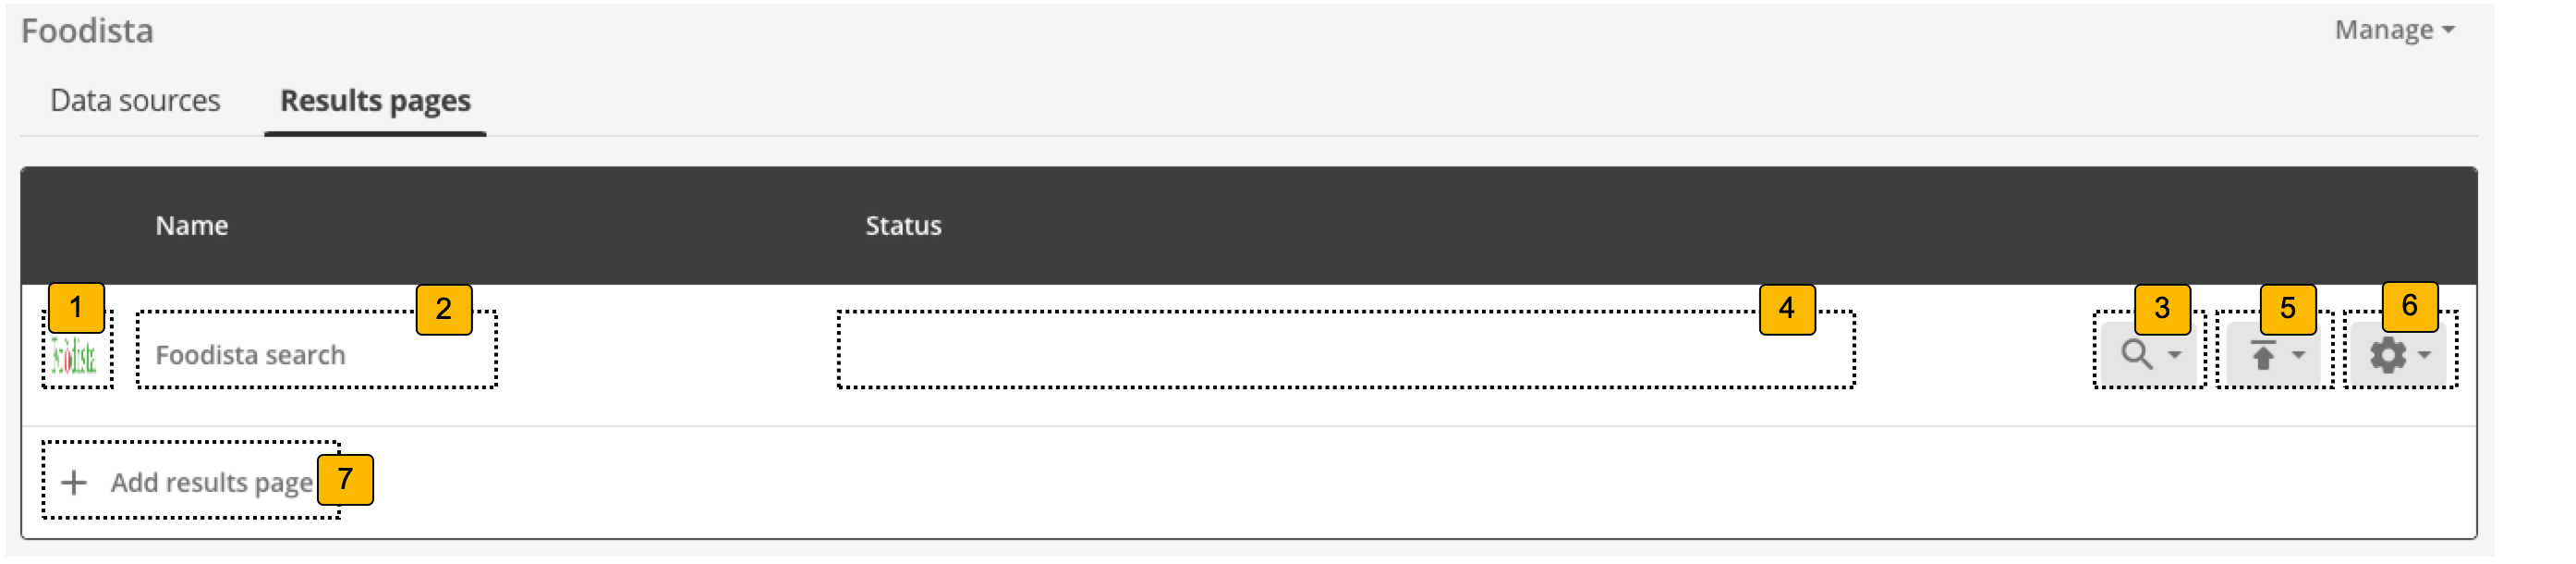
-
Icon: Displays the results page thumbnail image (if configured) or a generic results page icon.
-
Results page name: Provides access to search using the results page live or preview version.
-
Status: Indicates the current status of the results page.
-
Search menu: Indicates when the next update of the data source is scheduled to occur.
-
Publish menu: Clicking on this opens a menu that allows you to publish results page templates or web resources.
-
Manage menu: Clicking on this opens a menu allowing you to configure the results page (the same as clicking on the results page name 2), to open the insights dashboard for this results page or to delete the results page.
-
Add results page: Clicking the add results page button opens the results page creation dialog which enables you to create a results page for the search package.
Tutorial: Manage a search package’s results pages
This exercise introduces you to the results page management screen.
-
Return to the foodista search package management screen from the previous exercise and scroll to the components section at the bottom of the screen.

-
Ensure that the results pages tab is selected. The foodista item that is displayed indicates that the search package contains a single results page (called foodista search). Each results page that is defined for the search package is listed here.
To manage the configuration for the results page either click on the results page name (foodista search) or select the > configuration menu item.
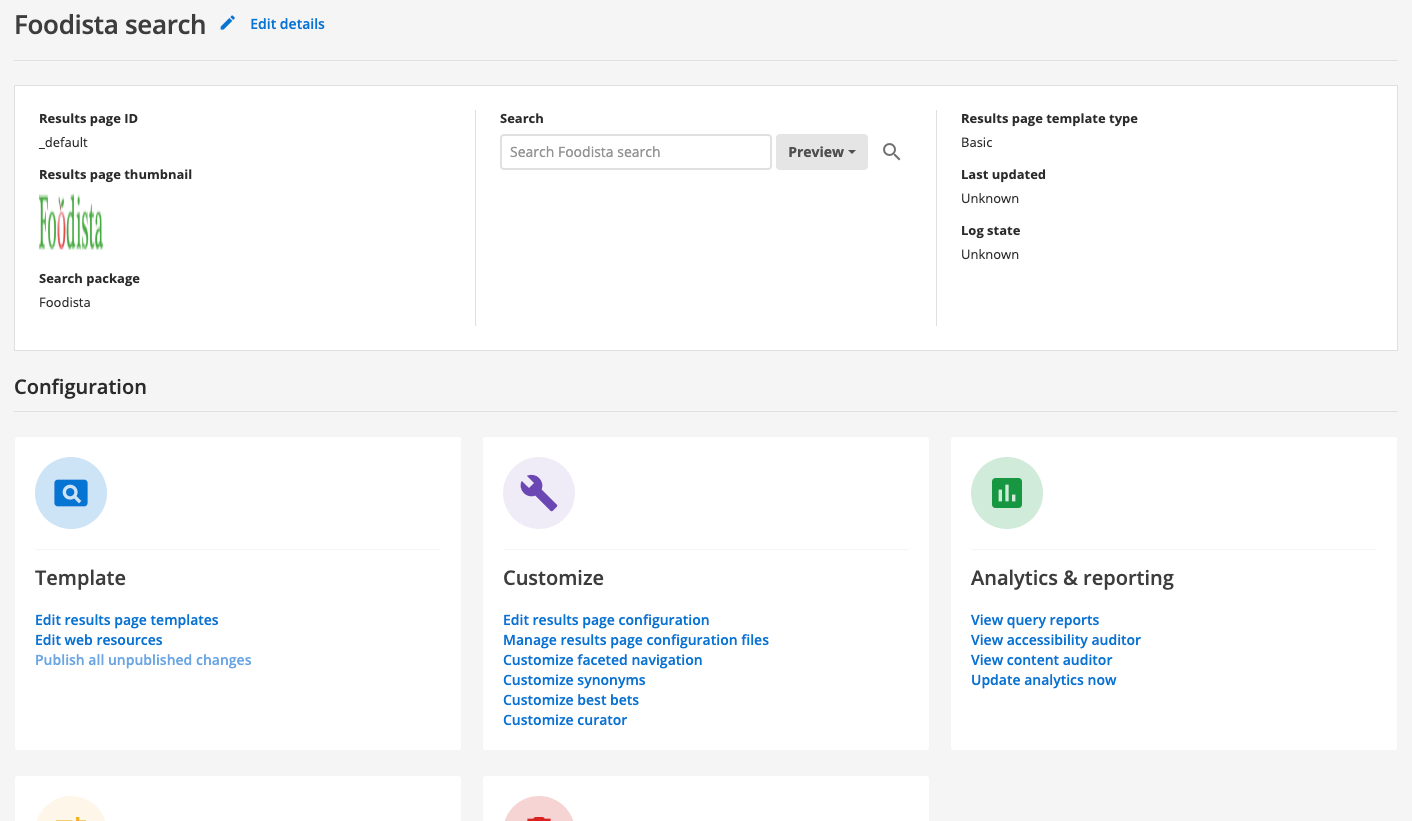
-
The data source manage screen opens for the foodista search package.
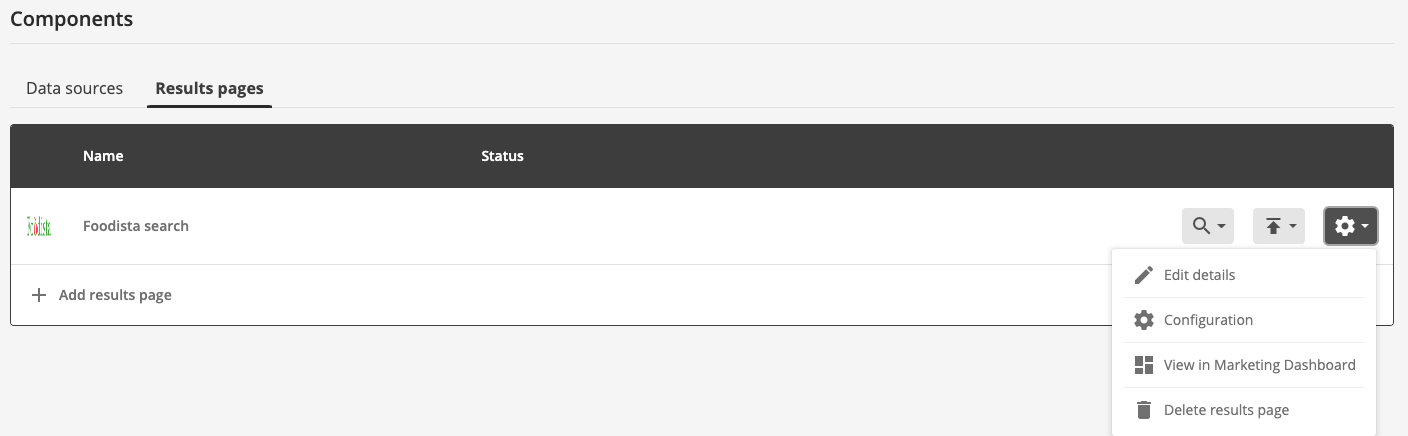
-
Explore the different configuration options, grouped into template, customize, analytics and reporting, tuning and delete.
3. Overview of the insights dashboard
The insights dashboard is primarily targeted at non-technical users that are concerned with the reporting functions within Funnelback. This interface also enables users to maintain Funnelback’s best bets, synonyms, curator rules and training data for automated tuning.
The insights dashboard can be accessed standalone and will also launch automatically when certain editing functions for results pages are selected within the administration interface.
3.1. insights dashboard home screen
The insights dashboard home screen is composed of several features, which perform different functions. These include:
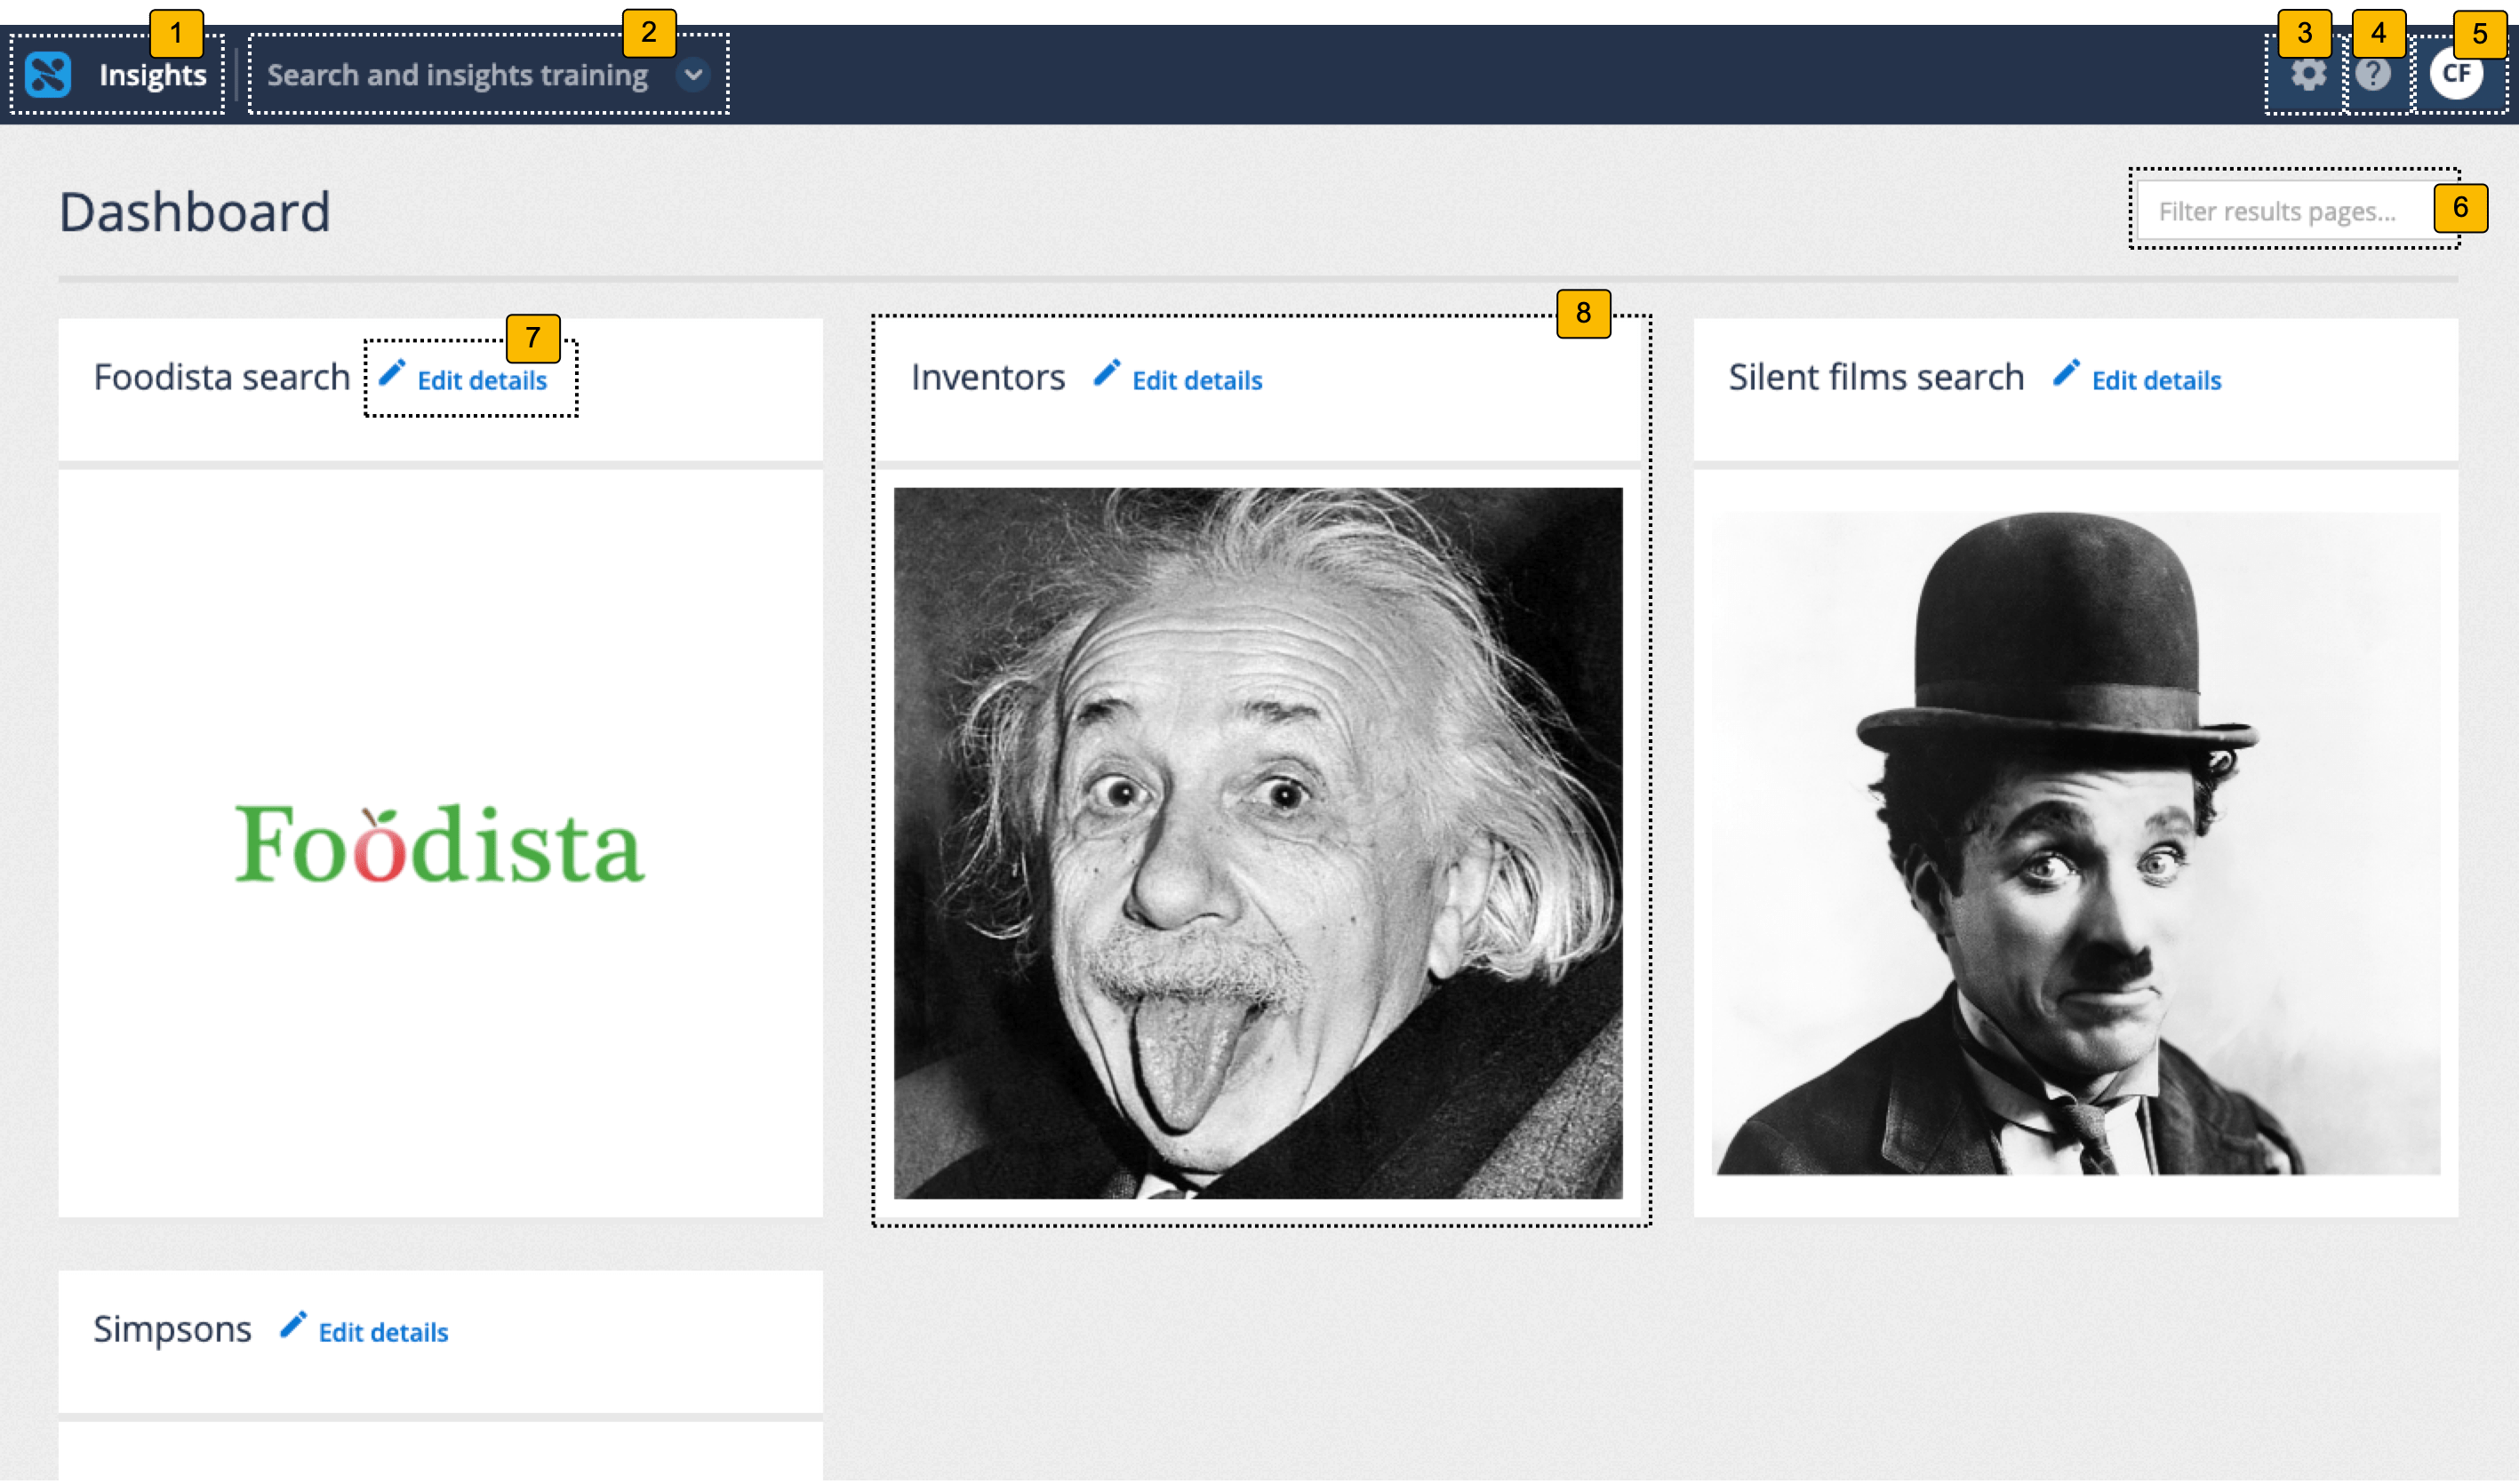
-
Dashboard switcher: Switches between the administration and insights dashboards.
-
Client switcher: Switches between available clients.
-
System configuration menu: Provides access to system configuration functions and also the API UI.
-
Online help: Opens the Funnelback online documentation.
-
User profile: Opens a menu that provides access to your user profile and also the ability to log out of the search dashboard.
-
Filter results pages: Filters the results pages displayed as tiles below to include only those where the filter string matches within the name.
-
Edit details: Provides options to change your results page name and thumbnail image.
-
Results page tiles: Opens the insights dashboard for the results page.
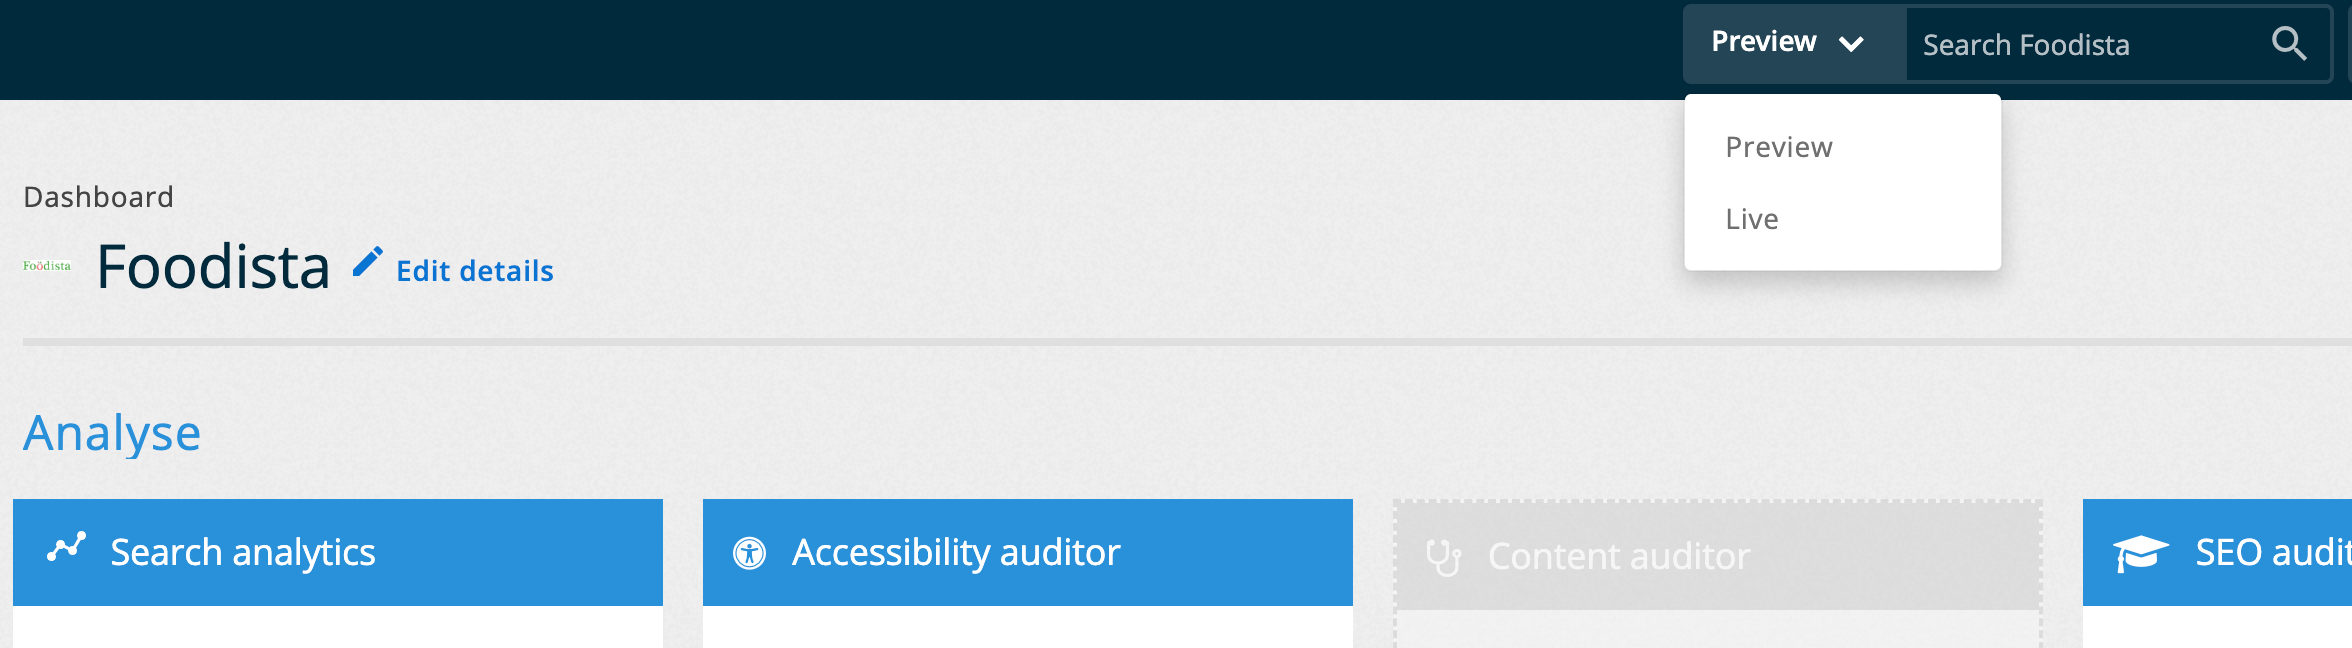
3.2. Insights dashboard manage specific results page
Selecting a results page tile from the insights dashboard overview screen opens a dashboard for optimizing and analyzing the selected results page.
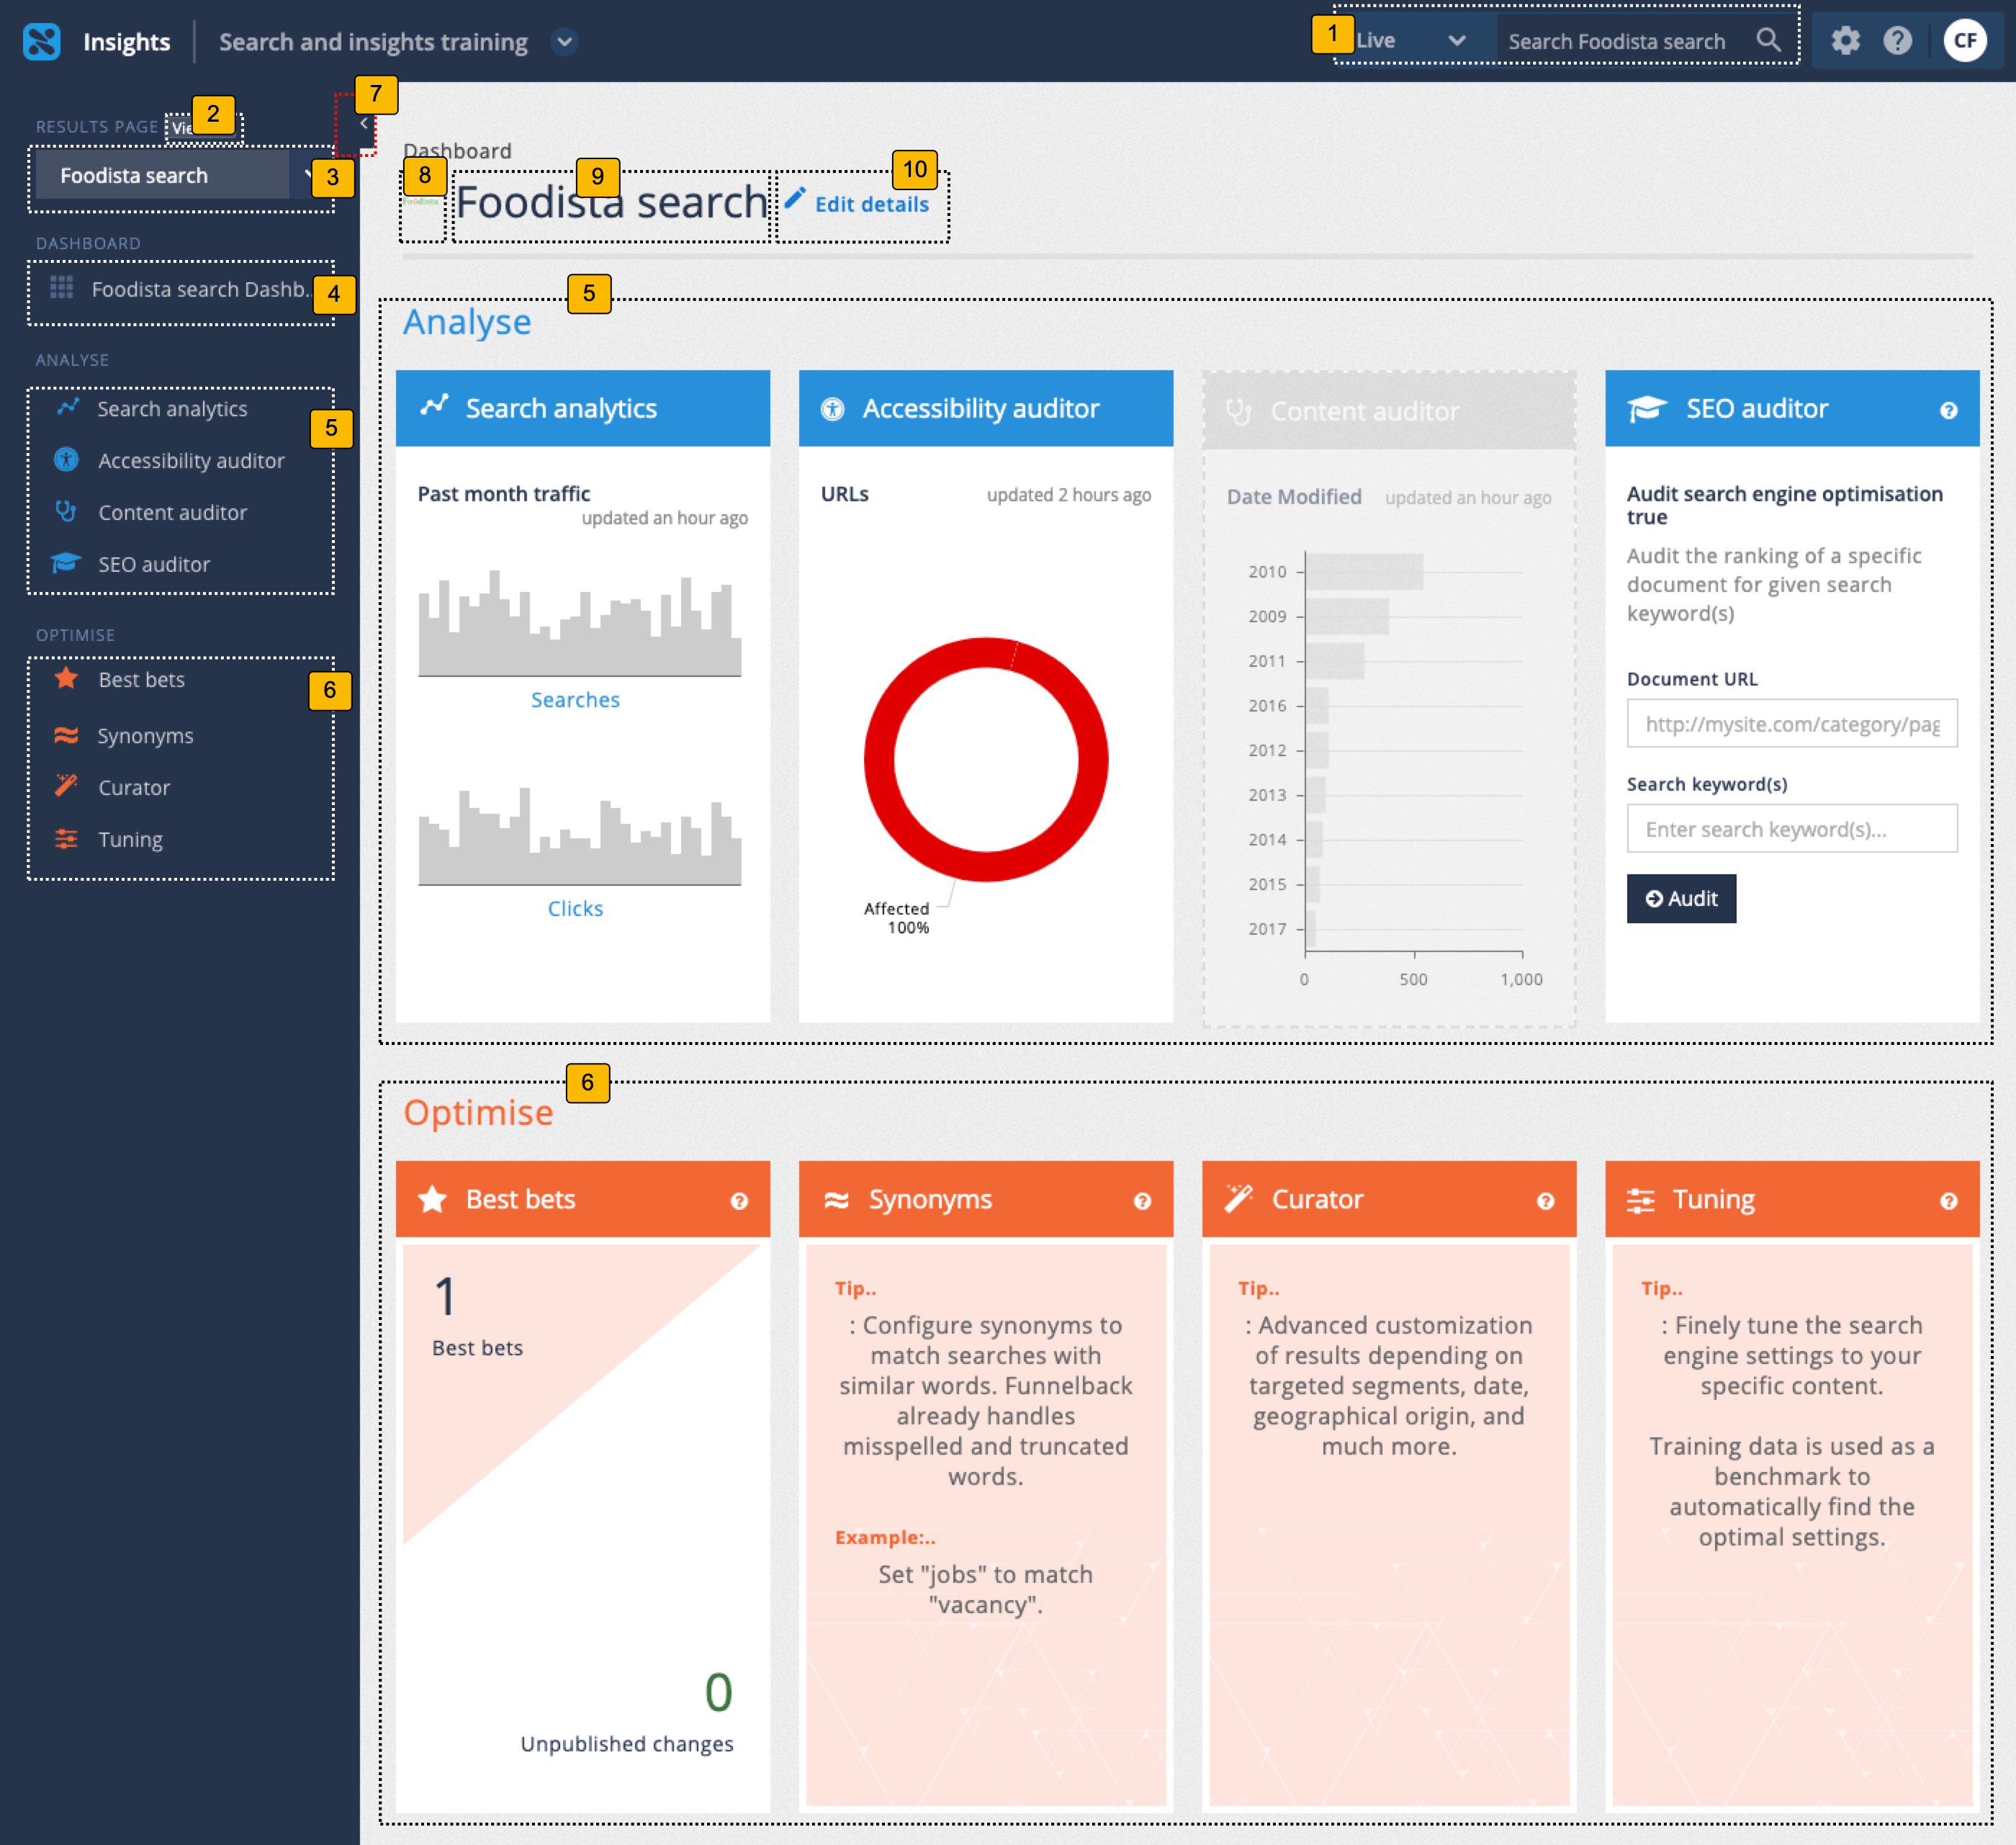
-
Quick search box: allows a search to be run against the current results page in preview or live mode. The Funnelback insights dashboard provides the ability to preview any changes made using the available optimization tools. This allows best bets, synonyms and curator changes to be made and viewed without the live search being affected. The changes are then published to make them visible on the live search.
-
Display all available results pages: returns to the insights dashboard overview screen that lists the available results pages as tiles.
-
Results page switcher: quickly switch between available results pages. Listed results pages are the same as on the insights dashboard overview screen.
-
Return to results page dashboard: indicates the current results page and clicking returns the user to the results page dashboard for the current results page.
-
Analyze tools: menu of available analysis tools for the current results page.
-
Optimize tools: menu of available optimization tools for the current results page.
-
Show/hide menu: Clicking this button shows and hides the left hand menu.
-
Thumbnail for the current results page
-
Name of the current results page: indicates the current results page.
-
Edit details: Provides options to change your results page name and thumbnail image.
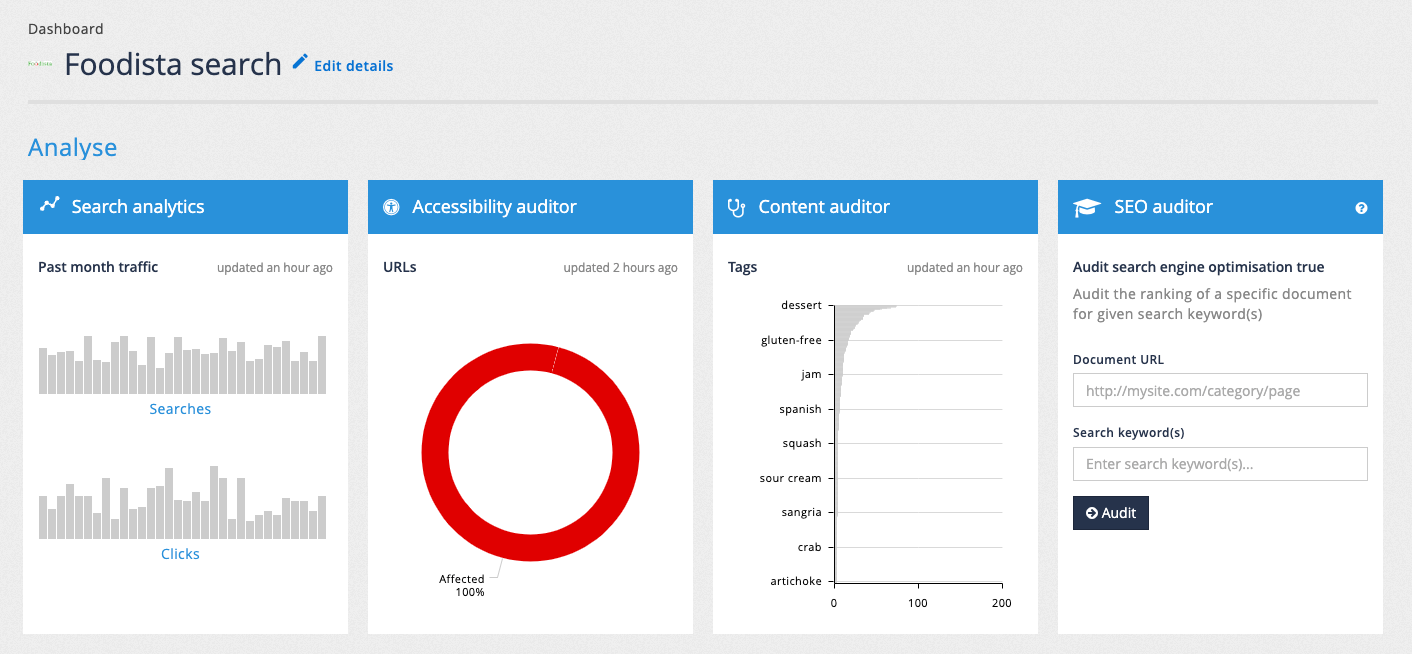
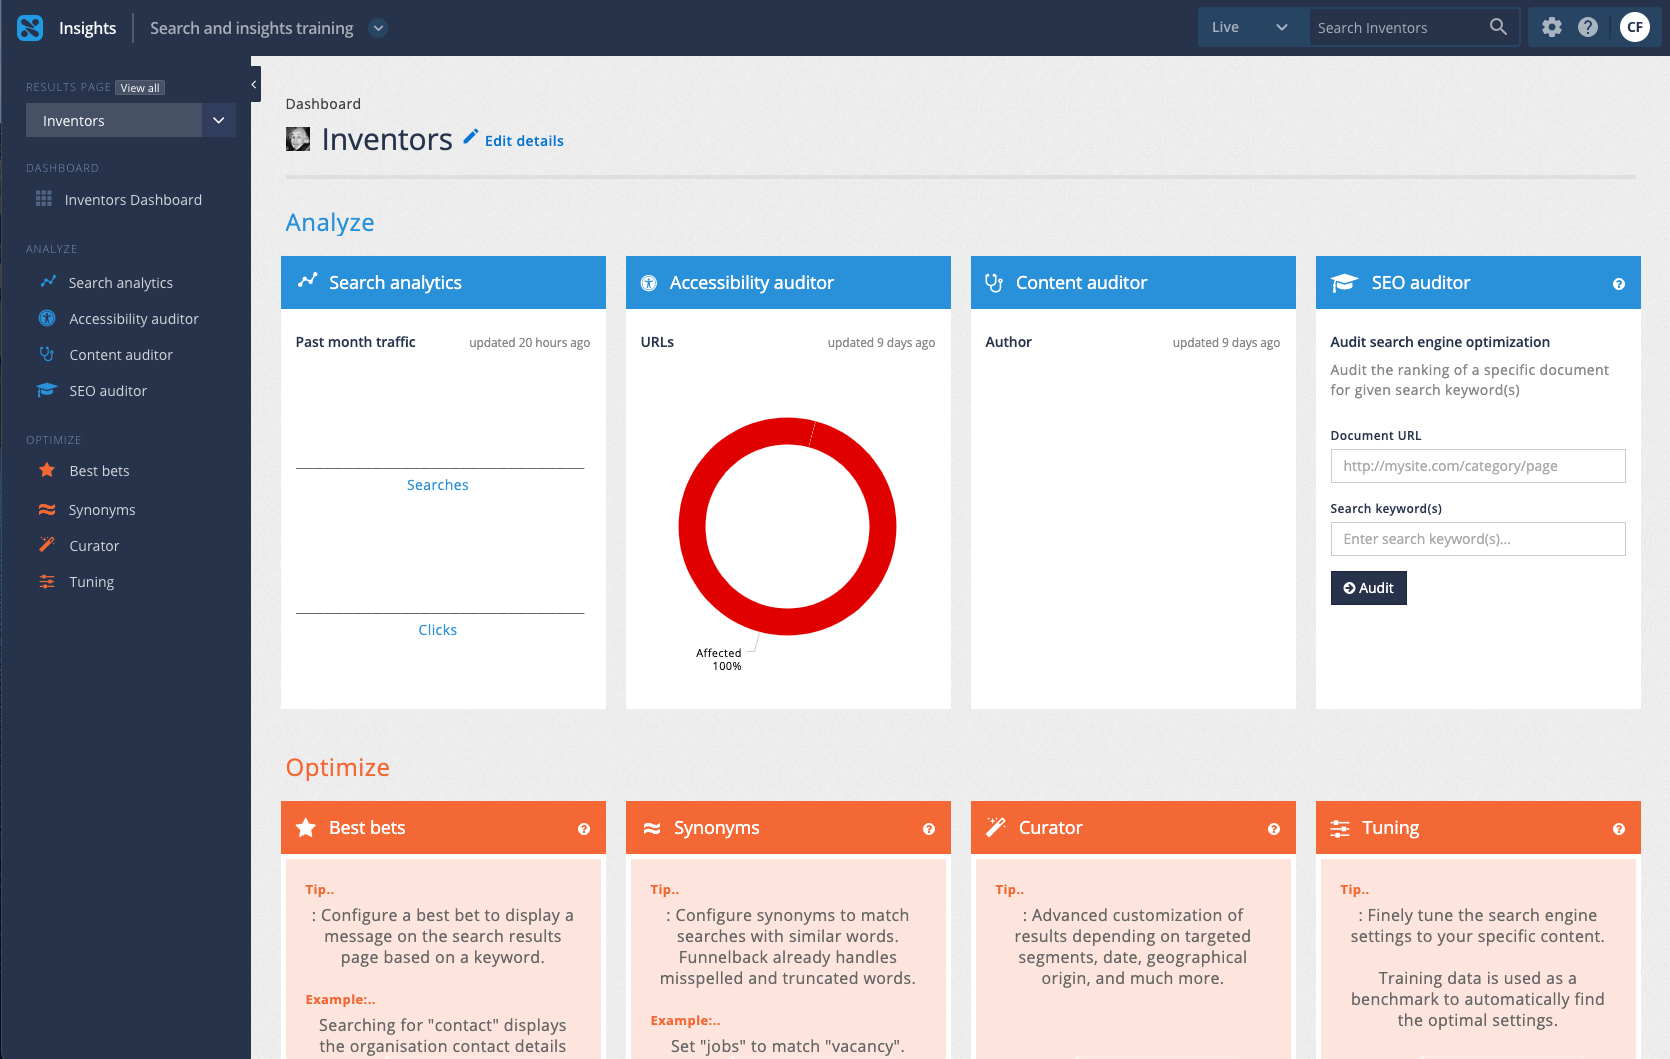
The main area of the results page insights dashboard provides access to all the analysis and optimization tools and displays a tile for each containing a summary of the tool.
3.3. Analysis tools
The analysis tools of the insights dashboard provide insight into both search user behavior, and the underlying content available to Funnelback.
- Search analytics
-
View reports on queries and what people have clicked on - allows you to drill-down by date and export to various formats.
- Accessibility auditor
-
View accessibility auditor reports.
- Content auditor
-
View reports on metadata, duplicates and other content features.
- SEO auditor
-
Display information on how to improve the ranking of a particular document for a particular query.
3.4. Optimization tools
The optimization tools of the insights dashboard provide the ability to refine result pages in a range of ways, to improve the search user’s experience.
- Best bets
-
Specify best bets for key queries, to ensure users see the results you want them to.
- Synonyms
-
Control how some queries are interpreted to match up with your organization’s terminology.
- Curator
-
Customization of result pages for specific queries.
- Tuning
-
Optimize the ranking your search results by training the ranking algorithm.
| Find out more about the insights dashboard by completing the INSIGHTS 101 training course. |
4. Funnelback templating
The search results produced by Funnelback are fully customizable. This allows the search results to be adapted for any HTML design or text-based formats such as CSV, XML and JSON.
Funnelback uses the Freemarker templating language to define the search templates. The templates look like HTML files with additional custom tags - anyone familiar with editing HTML will be able to understand the Freemarker template code. The Freemarker documentation should be read to assist in understanding the Funnelback templates.
A single search results template in Funnelback must handle two cases covering what to present to the end user before and after a search is run.
4.1. Template preview and live modes
The Funnelback search dashboard provides the ability to preview changes made to template files, allowing changes to be made and viewed without the live search being affected.
The changes are then published to make them visible on the live search.
| When you click the publish button this will make the file available in the live view of your results page. Clicking an unpublish button removes the file from the live view (so it is only available in preview). This should not be confused with undoing any changes to the file that you previously published. |
Tutorial: Preview and publish template changes
This exercise looks at a bare-bones search results template and relates the template file to what you see on screen.
-
Log in to the search dashboard where you are doing your training.
See: Training - search dashboard access information if you’re not sure how to access the training. Ignore this step if you’re treating this as a non-interactive tutorial. -
Locate the female inventors search package.
-
Manage the linked inventors results page by selecting the results pages tab then clicking on the inventors title.
-
From the inventors results page management screen, view the template in preview mode. Locate the search box, select the preview item from the drop-down menu then click on the [ ] button. This runs the search and opens the results in a new browser tab.
-
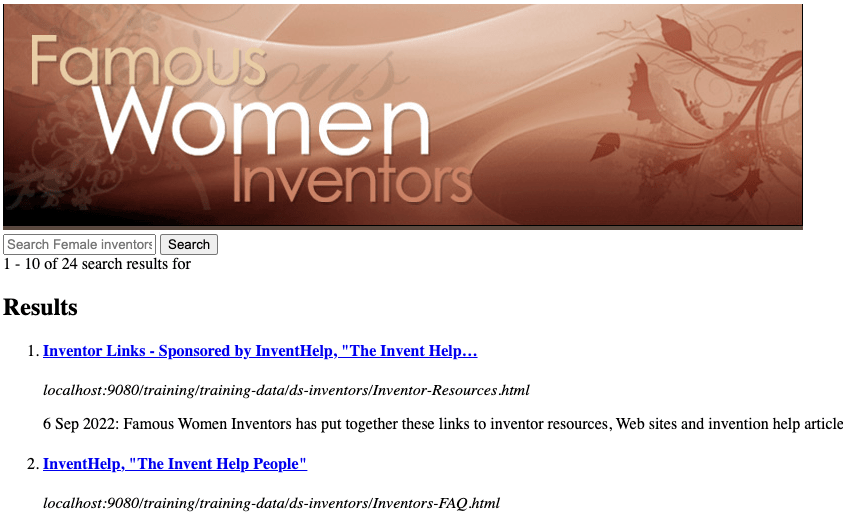
The search results are loaded in a new browser tab - a very basic search box is displayed, along with some search results. Observe that the URL includes two URL parameters -
collectionandprofile. The Funnelback query processor is accessed by visiting thesearch.htmlURL and passing parameters to it that tell Funnelback what search package (collection) and results page (profile) to use. The URL also contains a couple of additional parameters (logands) which are extra parameters that were added because you ran the search from the results page management screen.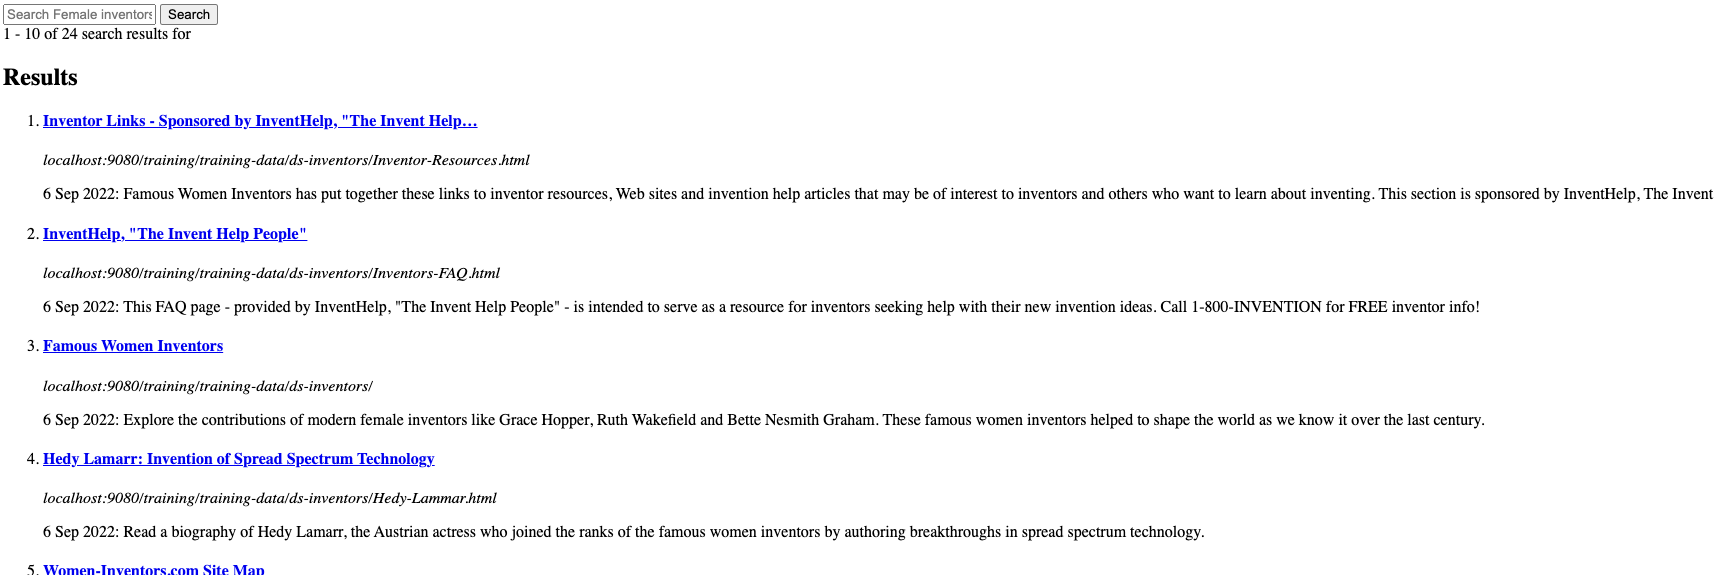
-
Delete the two additional parameters from the end of the URL (
&log=false&s=!FunDoesNotExist:PadreNull) then press enter. This now shows the template’s response when no search query is provided (just a search box). Templates are configured to return certain content only when a search query is provided. View the HTML page source in your web browser. Note that the code returned includes only the HTML form code to call the Funnelback search with basic parameters.<!DOCTYPE html> <html lang="en-us"> <head> <title>Female inventors, Funnelback Search</title> </head> <body> <form action="search.html" method="GET"> <input type="hidden" name="collection" value="default~sp-inventors"> <input type="hidden" name="profile" value="inventors_preview"> <input required name="query" id="query" title="Search query" type="text" value="" accesskey="q" placeholder="Search Female inventors…"> <button type="submit">Search</button> </form> </body> </html> -
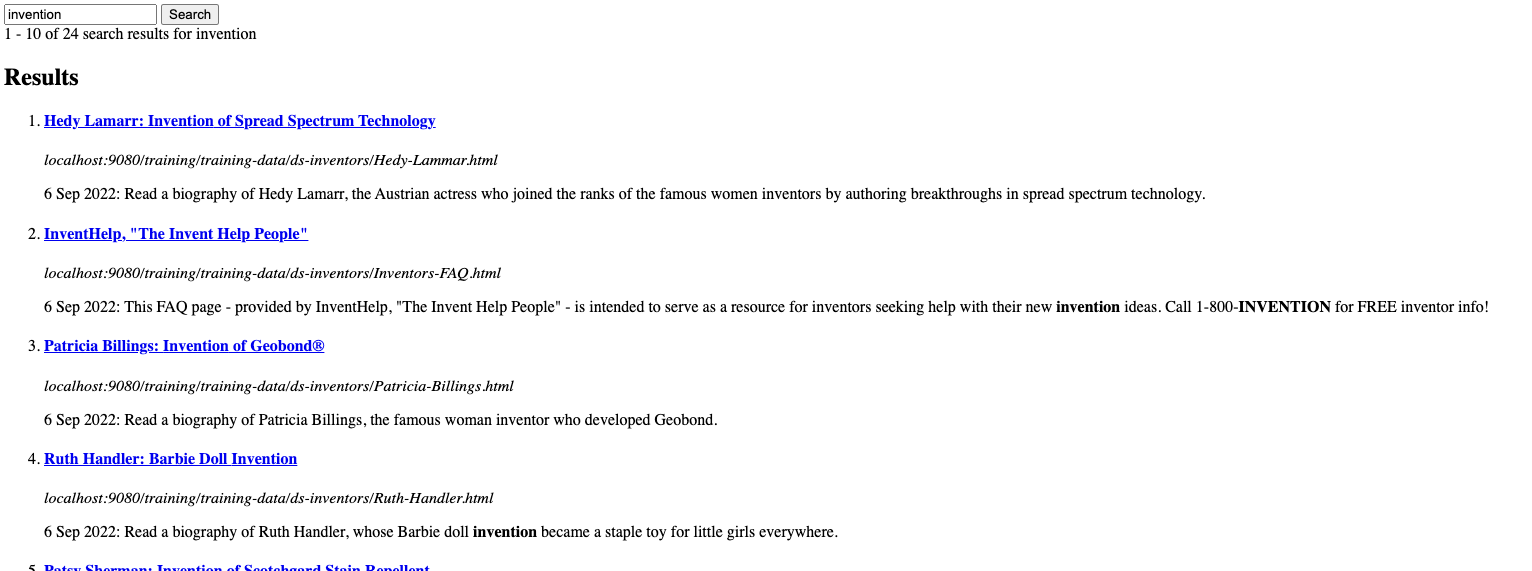
Close the tabs showing the html source code, and the search results screen. Preview the search again, this time entering invention into the search box before submitting the query. Observe that the URL called is the same as the previous URL, but with one additional parameter, query. This demonstrates that the search results template handles two types of result screens - a screen (normally containing a search box) when no query is present and a screen containing a search results listing when a query has been provided.
-
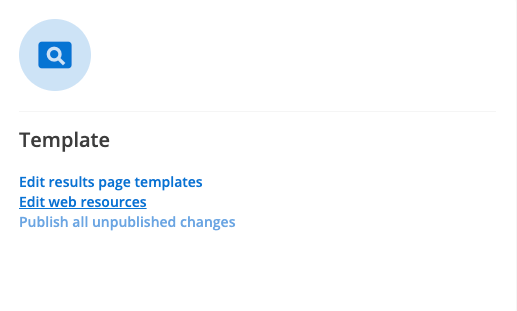
Return to the inventors manage results page screen by closing the tab. Load the template manager by selecting edit results page templates from the templates panel.
-
The template management screen allows you to edit, rename, delete, publish and unpublish existing templates and create or upload new templates for use with the current frontend service. Edit the template by clicking on the
simple.ftllink.simple.ftlis the default template.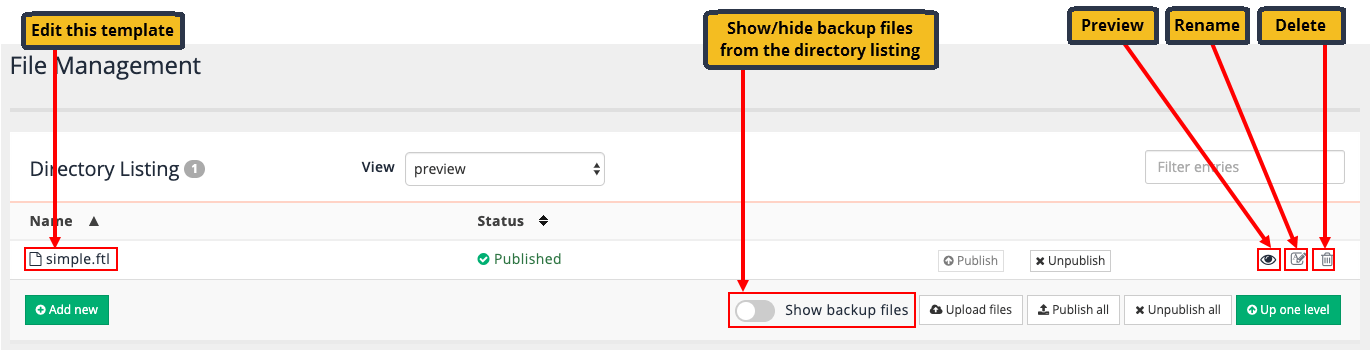
-
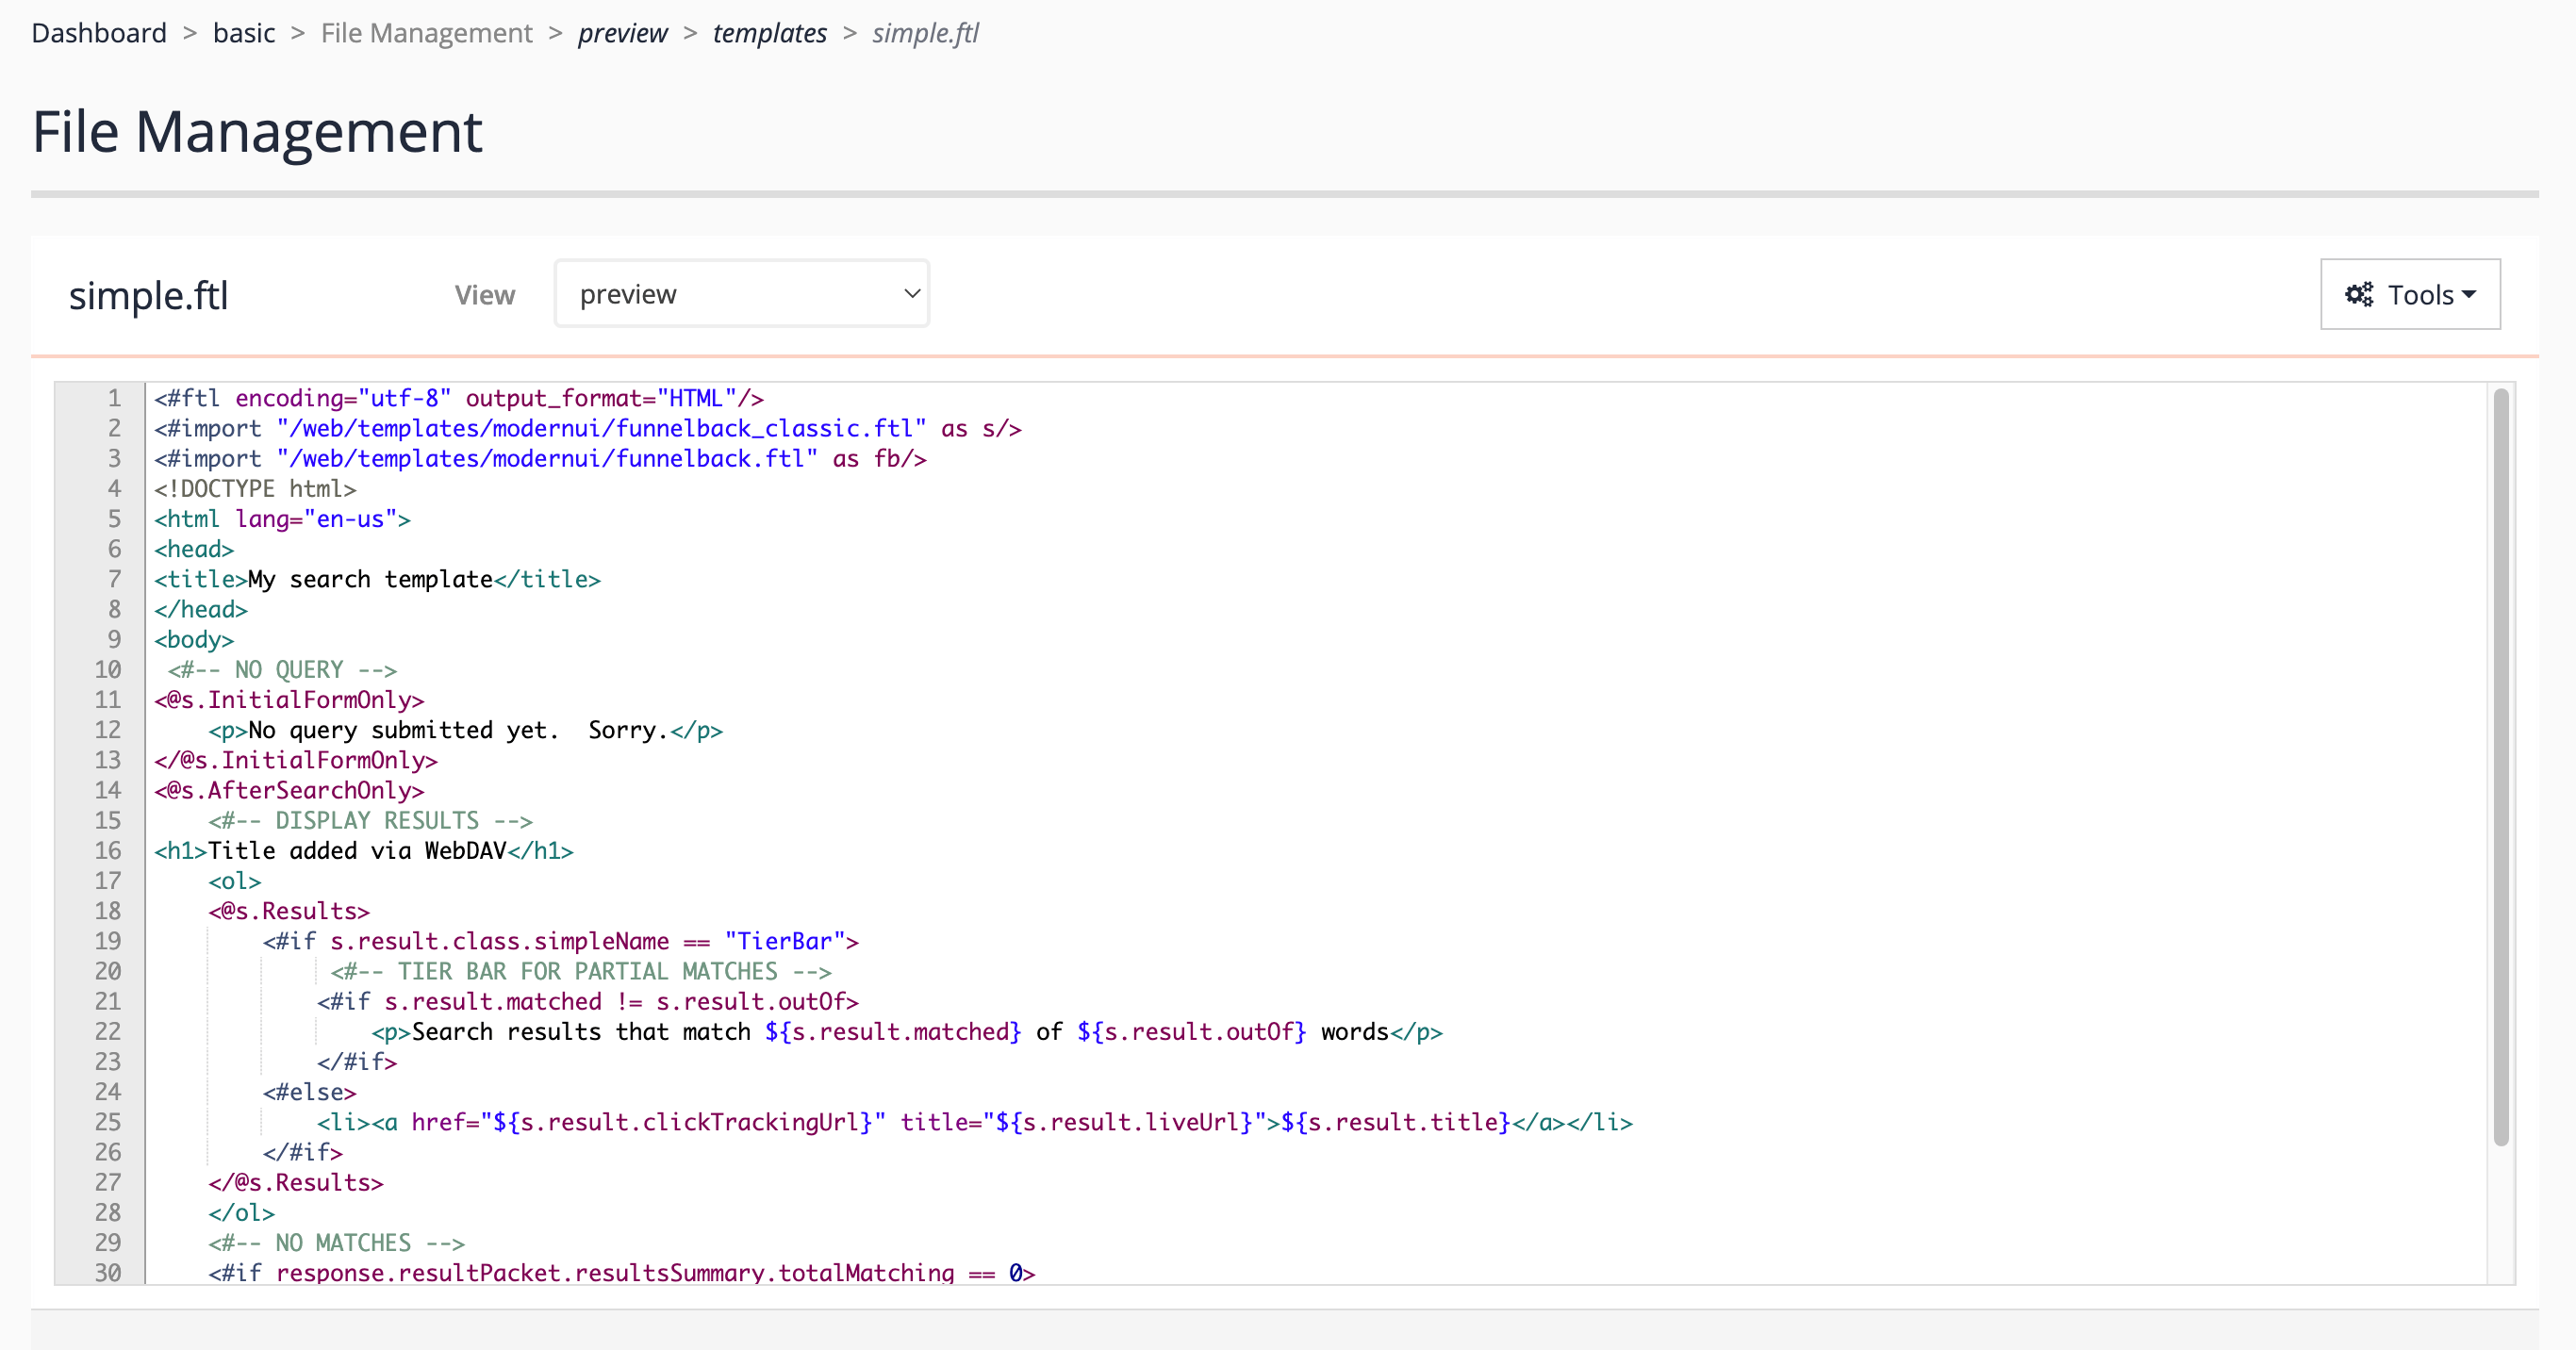
The template file loads in the built-in template editor:
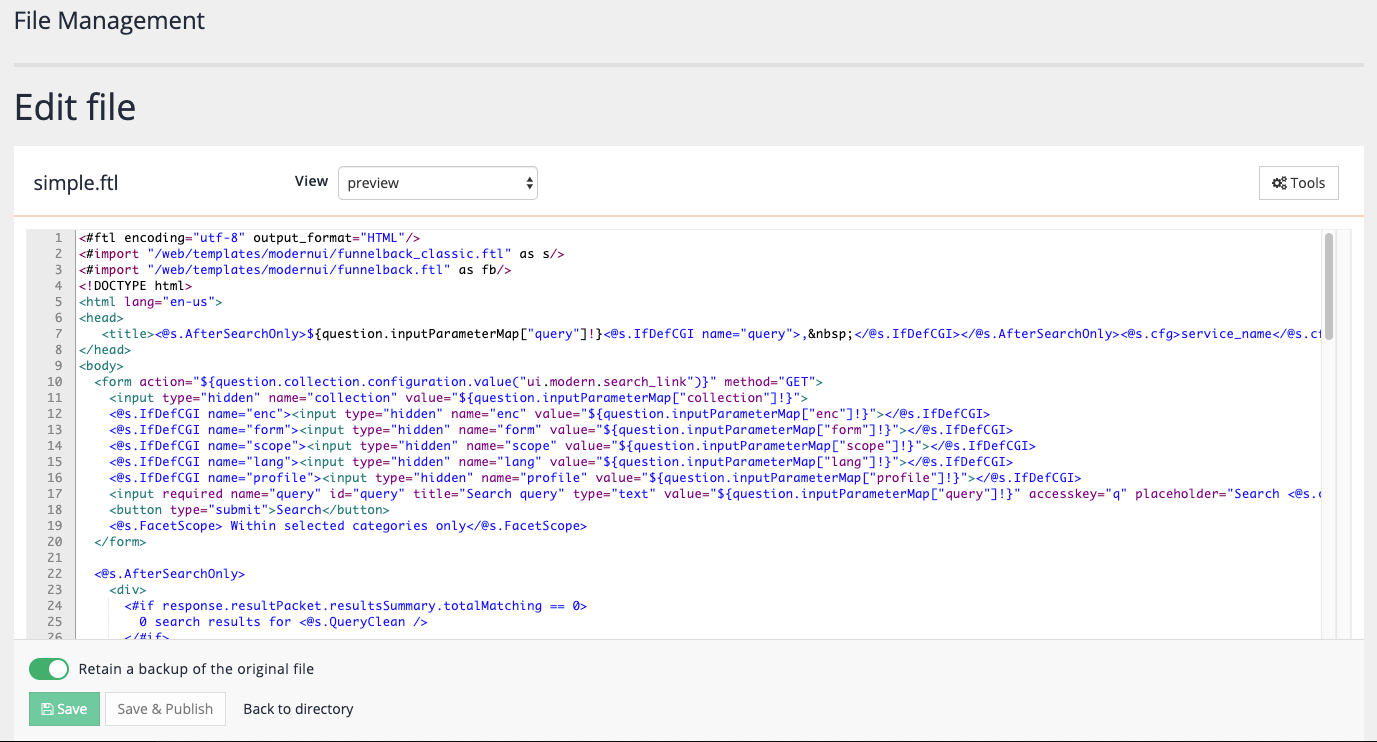
If you are familiar with HTML you will probably be able to read the template and get a sense of what it’s doing. Freemarker templates are made up of XML-style tags that look like
<@MACRO>(Freemarker macro) or<#DIRECTIVE>(Freemarker directives), and Freemarker variables that look like${VARIABLE}. Everything else in the template will be returned as is. The HTML code inside the<@s.AfterSearchOnly>macro is rendered only after a search is run. This explains why the first preview of the search only displayed a search box, but after a search for inventors was run the search results were also displayed. It also means that the same template file is used to provide the interface for both use cases - before and after a search has taken place. -
Add a heading image to the results page. Locate the
<body>tag and insert:<div><img src="https://docs.squiz.net/training-resources/inventors/media/images/women_header.jpg" ></div>immediately after the (
<body>) tag. -
Save your changes by clicking the save button (but don’t save and publish at this stage).
-
Return to the inventors results page manage screen and preview your template again - view the search before and after submitting a query to view the effects of your change.
-
View the template again, but select the live option from the drop-down menu before submitting the search. Observe that the banner image is not displayed. This is because the change has been made only to the preview mode of the search - to make the change live the template needs to be published.
-
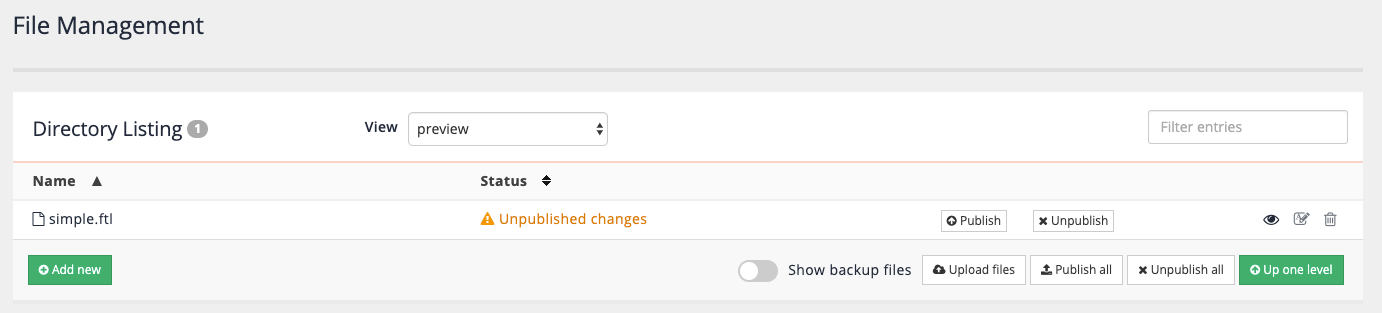
The template management screen (accessed via the edit results page template link on the inventors manage results page screen) indicates that the template has unpublished changes. The file listing also shows a backup file that was automatically created when you saved the template when you toggle the show backup files option below the file listing.
-
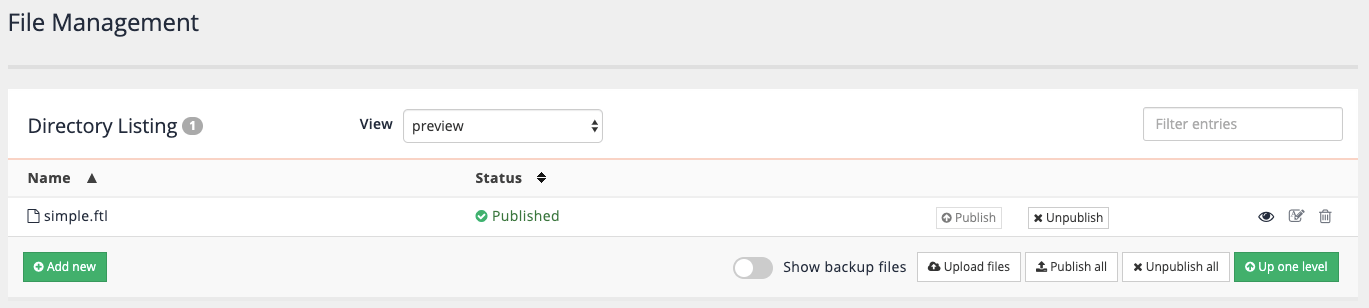
Publish the template by clicking on the publish button. The status will update to published. Note that the unpublish button is used to completely remove the template from the published (live) view, and not to undo changes that you have published.
-
View the live mode of the search results page again and confirm that the banner is now displayed. Select live from the view menu to show the published (live view) templates then click the small eye icon on the right hand side of the
simple.ftlrow to load the search with the live version of the template.
4.1.1. Error logging
Funnelback logs user interface issues to the modern UI log. These are accessible via the log viewer from the collection log files for the search package. The relevant log files are:
-
modernui.Public.log: contains errors for searches made against the public HTTP and HTTPS ports. -
modernui.Admin.log: contains errors for searches made against the administration HTTPS port.
| These files will only get created when some errors occur. |
See: Modern UI logging for more information on the modern UI logging, and also for information on how to increase the modern UI log level.
Funnelback also includes some settings that allow this behavior to be modified so that some errors can be returned as comments within the (templated) web page returned by Funnelback.
The following configuration options can be set in the parent search package’s configuration while you are working on template changes:
ui.modern.freemarker.display_errors=true
ui.modern.freemarker.error_format=string
The error format can also be set to return as HTML or JSON comments.
The string error format will return the error as raw text, which results in the error message being rendered (albeit unformatted) when you view the page - this is the recommended option to choose while working on an HTML template as the errors are not hidden from view.
Setting these causes the template execution to continue but return an error message within the code.
| Syntax errors in the template resulting in a 500 error are not returned to the user interface - the browser will return an error page. |
Data model log object
The data model includes a log object that can be accessed within the Freemarker template allowing custom debug messages to be printed to the modern UI logs.
The log object is accessed as a Freemarker variable and contains methods for different log levels. The parameter passed to the object must be a string.
| The default log level used by the modern UI is INFO. To capture more detailed logs you can pass a special HTTP header in with your request to cause the request to be logged at the TRACE level. See: Increasing the log level for a request |
When debugging you define the log level for the message to print.
For example:
<#-- print the query out at the INFO log level -->
${Log.info("The query is: "+question.query)}
<#-- print the detected origin out at the DEBUG log level -->
${Log.debug("Geospatial searches are relative to: "+question.additionalParameters["origin"]?join(","))}
Messages written via the log object will only be logged when accessing the search.html endpoint.
|
Tutorial: View template error messages
This exercise examines the log files used to hold errors generated by templates.
-
Log in to the search dashboard where you are doing your training.
See: Training - search dashboard access information if you’re not sure how to access the training. Ignore this step if you’re treating this as a non-interactive tutorial. -
Open the inventors results page that is linked to the female inventors search package.
-
From the inventors manage results page screen, select edit results page templates, then edit the
simple.ftl. -
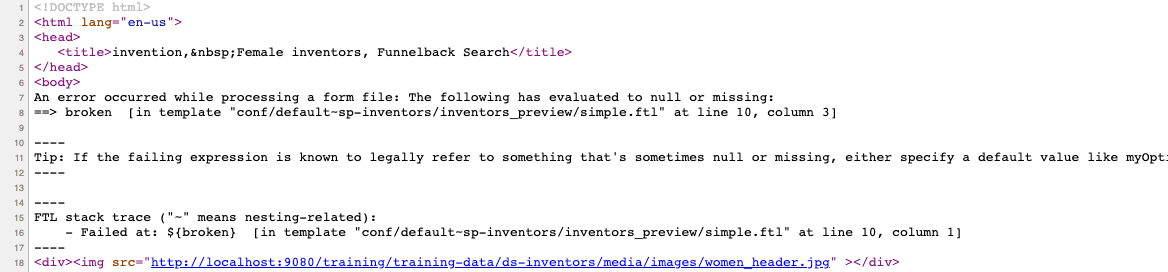
Add the following code below the
<body>line then save the template. This introduces an unclosed variable to the template which will break the display.${broken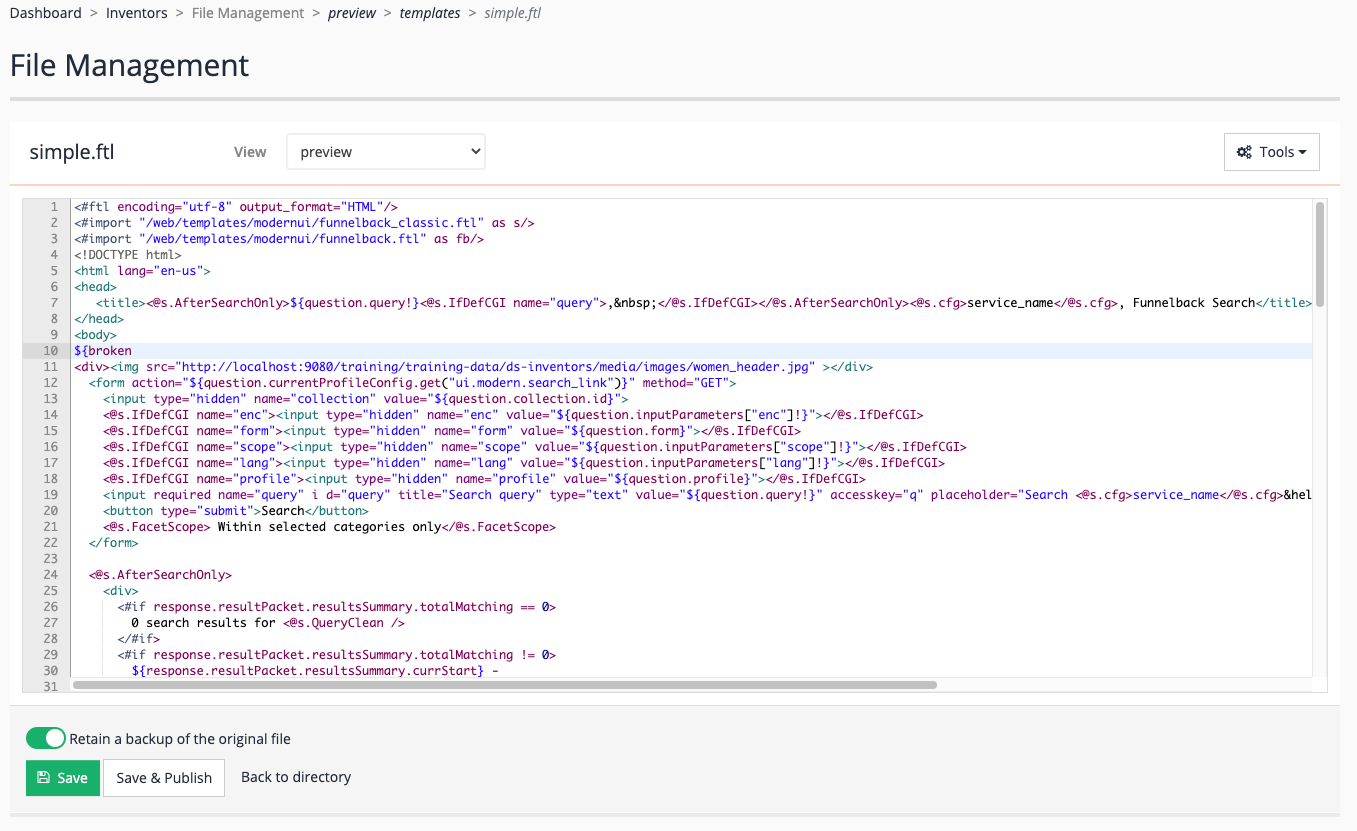
-
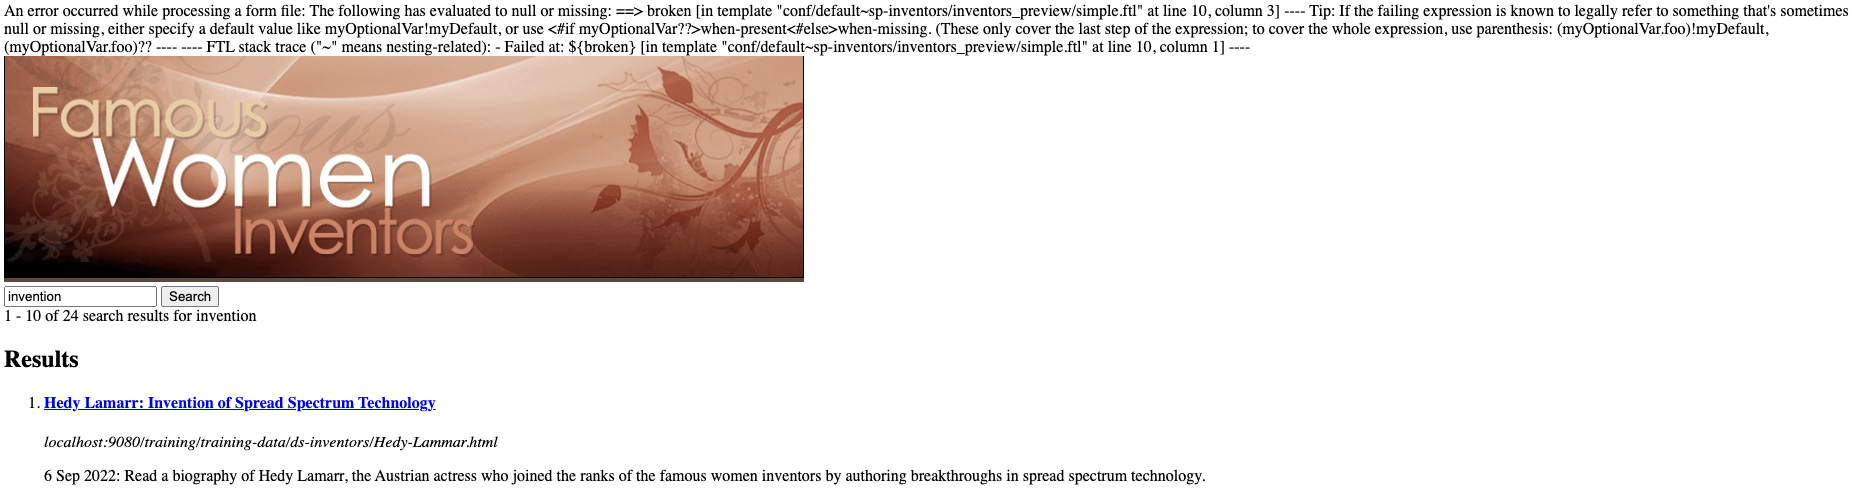
View the broken template by conducting a search for invention against the preview version of the results page. Observe that an error is now returned.
-
Return to the search dashboard home, locate the female inventors search package and open the management screen for the search package (click the female inventors title). Select browse log files from the tools panel.

Template errors are written to the following logs, which appear beneath the collection logs heading:
modernui.Public.log-
This log is used when accessing the search results via the public HTTP or HTTPS ports (by default this is for http:// or https:// requests to the search that use standard ports; or ports 9080 and 9443 if you are using the Vagrant training VM).
modernui.Admin.log-
This log is used when accessing the search results via the admin HTTPS url (normally on port 8443). This URL is normally only accessed when you preview a search from the administration interface.
-
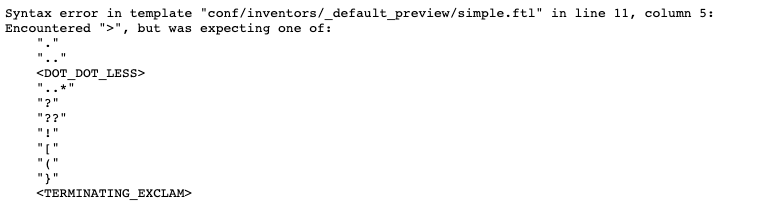
View the
modernui.Admin.logfile (as the search has been launched from the administration interface search box) by clicking on the log file name. The end of the log file should provide clues about what caused the error. The log file indicates that the template contains an error at line 11.2022-09-09 03:22:33,901 [admin-3723] [default~sp-inventors:inventors_preview] ERROR interceptors.FreeMarkerParseExceptionInterceptor - Error parsing FreeMarker template freemarker.core.ParseException: Syntax error in template "conf/default~sp-inventors/inventors_preview/simple.ftl" in line 11, column 5: Encountered ">", but was expecting one of these patterns: "." ".." <DOT_DOT_LESS> "..*" "?" "??" "!" "[" "(" "}" <TERMINATING_EXCLAM> at freemarker.core.FMParser.generateParseException(FMParser.java:6120) at freemarker.core.FMParser.jj_consume_token(FMParser.java:5979) at freemarker.core.FMParser.StringOutput(FMParser.java:1675) at freemarker.core.FMParser.MixedContentElements(FMParser.java:3968) at freemarker.core.FMParser.Root(FMParser.java:4665) at freemarker.template.Template.<init>(Template.java:252) at freemarker.cache.TemplateCache.loadTemplate(TemplateCache.java:548) at freemarker.cache.TemplateCache.getTemplateInternal(TemplateCache.java:439) at freemarker.cache.TemplateCache.getTemplate(TemplateCache.java:292) at freemarker.template.Configuration.getTemplate(Configuration.java:2836) at freemarker.template.Configuration.getTemplate(Configuration.java:2694) at org.springframework.web.servlet.view.freemarker.FreeMarkerView.getTemplate(FreeMarkerView.java:375) ... -
Return to the template editor and correct the error by closing the bracket on the variable added earlier in the exercise before saving the template. If you saved and published in the earlier step make sure you save and publish again now to ensure that the change is applied to both the preview and the live versions of the template.
${broken} -
Rerun the search. The browser still shows an error, however this time the error is due to the variable being undefined and there is some text providing a clue as to the problem. This error can be investigated in the same way as the previous error.
Tutorial: Enable template debugging
In this exercise the results page configuration will be updated to return errors to the template as plain text.
| this approach only works on some types of errors - debugging using log files is still required if the template fails to compile. |
-
Log in to the search dashboard where you are doing your training.
See: Training - search dashboard access information if you’re not sure how to access the training. Ignore this step if you’re treating this as a non-interactive tutorial. -
Open the inventors results page configuration screen.
-
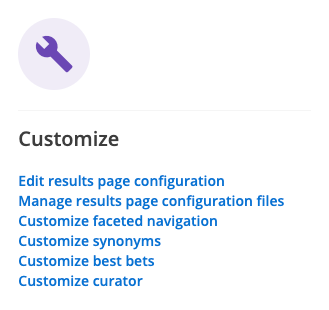
Select edit results page configuration from the customize panel.
-
Check to see if
ui.modern.freemarker.display_errorsis listed in the currently set keys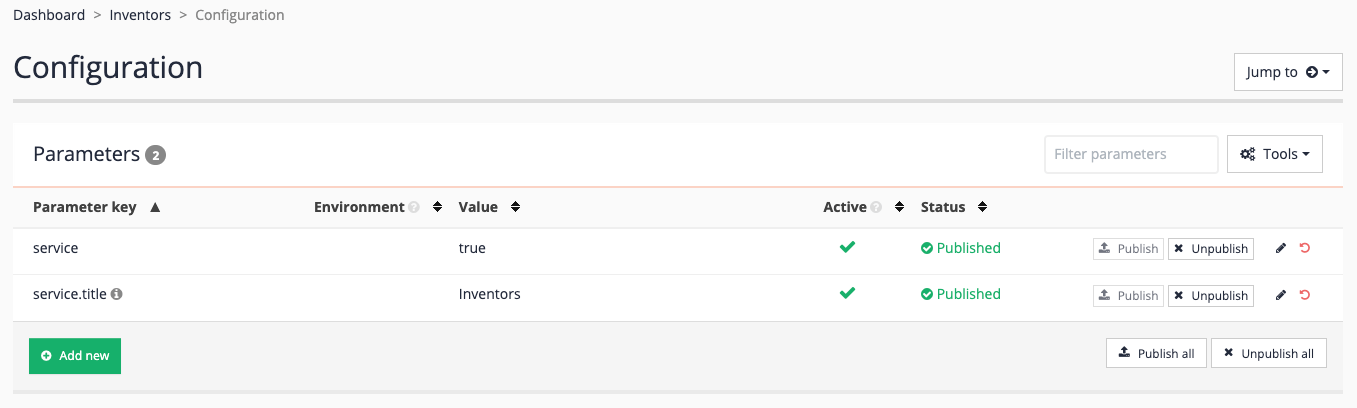
-
Add the setting by clicking the add new button. Start typing freemarker into the parameter key field and select
ui.modern.freemarker.display_errorsfrom the suggested entries.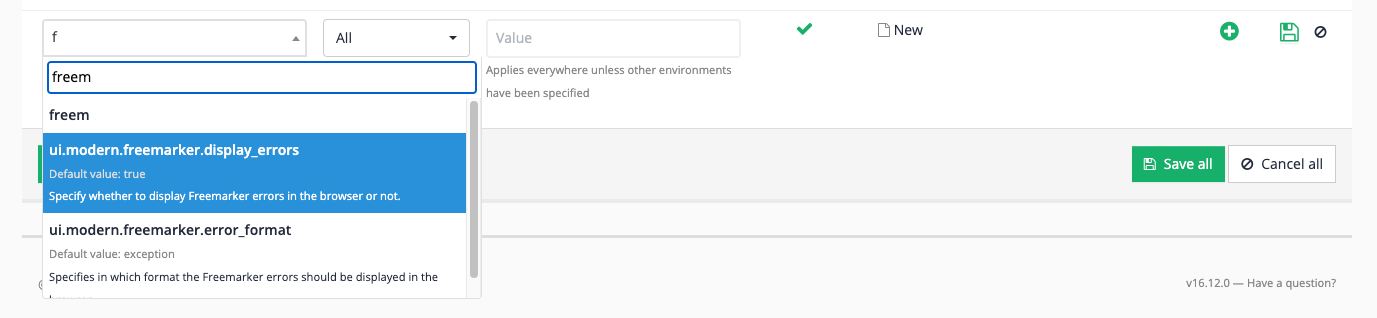
-
Set the value to
truethen save the setting.
-
Repeat to set
ui.modern.freemarker.error_format.The error format can be set to one of
exception,json,htmlorstring. Exception (the default) causes template processing to halt completely if an error is encountered (which will usually result in either a blank screen or a server error page being returned). JSON and HTML return the error messages wrapped in JSON or HTML comments. Set the value tostring, which returns the error as a string, so that the errors will appear in the browser display.
-
Rerun the query for invention observing the error message that is returned and also that the search results are now returned below the error message.
-
View the page source to read the error message with some formatting - as the error message is currently returned as raw text the browser will join all the text into a single paragraph.
-
The two results page configuration settings should be removed once testing of the template is complete to avoid errors being exposed to users. Return to the results page configuration screen and remove the two
ui.modern.freemarkeroptions added above. -
Reset the template by removing the
${broken}parameter that was added above. -
Print some custom log messages. Edit the
simple.ftland add the following lines after the<@AfterSearchOnly>tag on (approx.) line 30:<#-- print the query out at the INFO log level --> ${Log.info("The query is: "+question.query)} <#-- print information on the version of Funnelback that is running. --> ${Log.debug("Funnelback version: "+response.resultPacket.details.padreVersion)} -
Run a search against the inventors results page and observe the messages written to the
modernui.Public.Log(ormodernui.Admin.log). Observe that only the INFO level message is displayed. This is because the default log level is INFO (meaning deeper log level messages are suppressed). Refer to the previous exercise if you can’t remember how to access the log files. -
Modify the
simple.ftland amend the second log call that prints the Funnelback version to use the INFO log level and observe the messages in the modern UI logs. -
Reset the template by removing the two
Logcalls.
Extended exercise: template debugging
-
Experiment with the effect of changing the error format on both the template and log files.
4.1.2. Template editor shortcuts
The built-in template editor has a number of keyboard shortcuts that can assist with editing. The keyboard shortcuts will vary depending on whether you are using a Windows PC or Apple Mac computer.
| Windows | MacOS | |
|---|---|---|
Save (but don’t publish) changes |
Ctrl+S |
control ⌃+S |
Jump to a line number |
Ctrl+L |
command ⌘+L |
Find (click + button on find popup for replace) |
Ctrl+F |
command ⌘+F |
| the jump to line option only works in some browsers. |
4.2. Customizing the search results block
Search results are templated according to the code that appears within the <@s.Results> block of code.
<@s.Results>
<#if s.result.class.simpleName != "TierBar">
CODE FOR EACH RESULT
</#if>
</@s.Results>
Basic results item variables available:
-
s.result.title:the result title -
s.result.summary:the result summary -
s.result.liveUrl:the URL of the target document -
s.result.clickTrackingUrl:the URL to use for link actions to make use of Funnelback’s click tracking feature. -
s.result.cacheUrl:the URL to use to access the cached version of the document -
s.result.date:the date associated with the document. -
s.result.fileType:the file type of the document -
s.result.rank:the position (rank) of the current result item inside the result set. -
s.result.listMetadata:map of metadata elements available for use in templates. Values for each are returned as a list of strings. Includes only metadata fields that have been configured (using display options) to be returned with the search results.
To print any of these values (except for listMetadata) wrap them in the Freemarker directive ${VARIABLENAME}. For example, ${s.result.title} will be replaced with the title text for the current result. To print values from listMetadata you need to iterate over the map using the Freemarker <#list> directive.
Before accessing any variable ensure that the variable being printed is defined:
-
by wrapping the variable in an
<#if>statement using the missing value operator??<#if s.result.title??>${s.result.title}<#else>No title</#if> -
or for cases where you are printing variable without surrounding markup an exclamation mark (
!) can be used. For example,${VARIABLENAME!}-
${s.result.title}: template returns an error if the variable is not defined. -
${s.result.title!}: prints variable if set otherwise nothing -
${s.result.title!"Empty"}: prints variable if set otherwise printsEmptyor any string you define.
-
Tutorial: Customize the search results listing
This exercise shows how to make some simple changes to the formatting of the individual search results.
-
Log in to the search dashboard where you are doing your training.
See: Training - search dashboard access information if you’re not sure how to access the training. Ignore this step if you’re treating this as a non-interactive tutorial. -
Open the template editor for the inventors results page you were using in the previous exercise.
-
Edit the template for the by selecting edit results page templates from the template panel then clicking on the
simple.ftllink. Locate the results block (the code between<@s.Results>and</@s.Results>, starting at approx line 97). Observe that the ordered list container appears outside the<@s.Results>tags. The Freemarker code inside the results block is expanded for each result item in the result set. Variables, such as${s.result.title}are replaced with the value from the current result item. For example${s.result.date}is replaced with the date of the current result.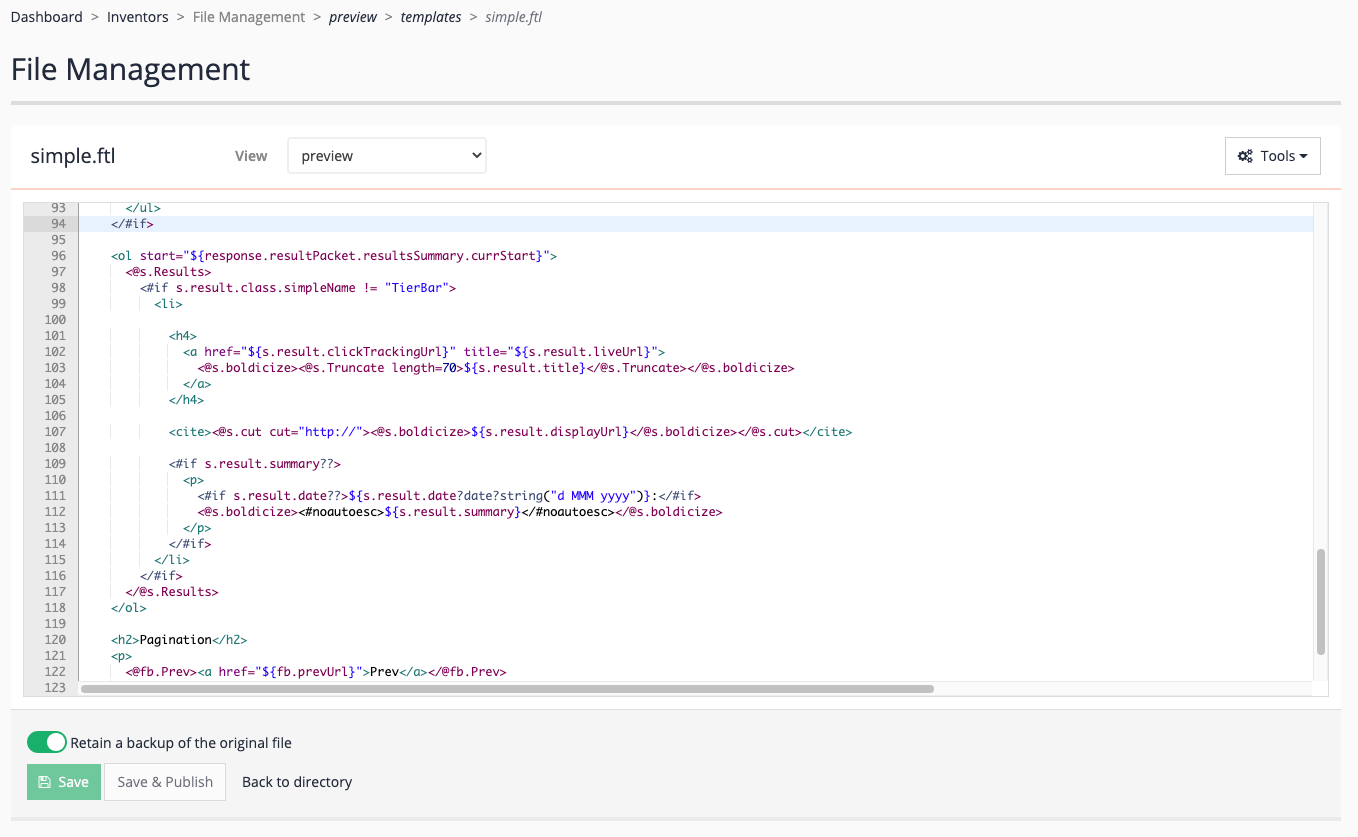
-
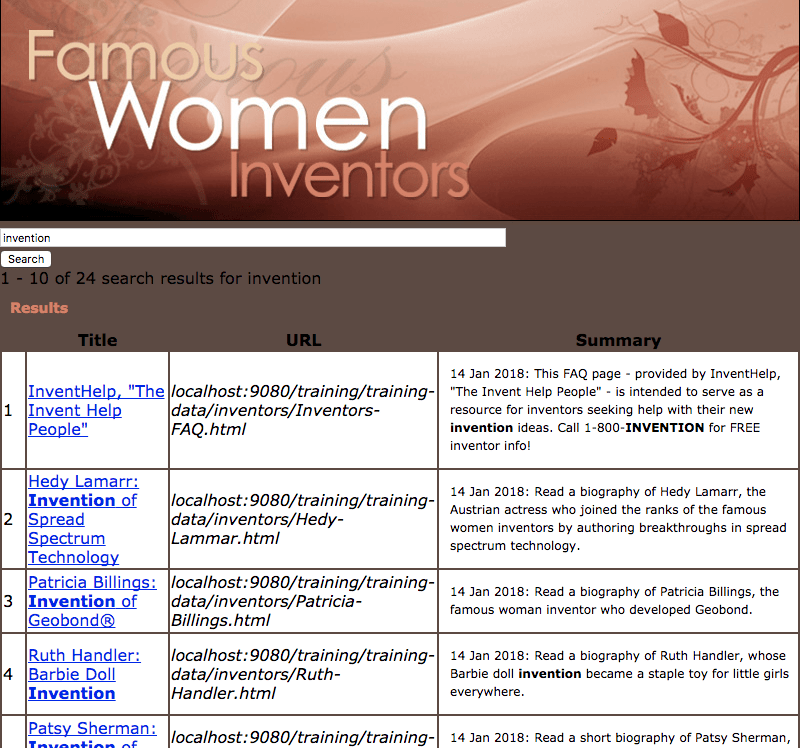
Modify the template so that the search results are returned inside a table. When you are finished save the change (but don’t publish yet). Hint: you need to replace the
<@s.Results>block and surrounding<ol>tags and replace with the following:<table> <tr><th>Title</th><th>URL</th><th>Summary</th></tr> <@s.Results> <#if s.result.class.simpleName != "TierBar"> <tr> <td> <a href="${s.result.clickTrackingUrl}" title="${s.result.liveUrl}"> <@s.boldicize><@s.Truncate length=70>${s.result.title}</@s.Truncate></@s.boldicize> </a> </td> <td> <cite><@s.cut cut="http://"><@s.boldicize>${s.result.displayUrl}</@s.boldicize></@s.cut></cite> </td> <td> <#if s.result.summary??> <p> <#if s.result.date??>${s.result.date?date?string("d MMM yyyy")}:</#if> <@s.boldicize><#noautoesc>${s.result.summary}</#noautoesc></@s.boldicize> </p> </#if> </td> </tr> </#if> </@s.Results> </table> -
Preview your changes. You should see the results reformatted in a table, similar to what’s displayed below. If you receive a server error then check to make sure you haven’t accidentally broken any of the macro or conditional Freemarker tags.

Extended exercise: result customization
-
Experiment and make some other changes to the template to change the result formatting. Try displaying some of the other items listed under the customizing the search results block heading above. For example add the result rank as an additional first column.
4.3. The data model - an introduction
Behind every search page is a highly detailed data structure containing all the data relating to the search transaction. This data structure, known as the data model, contains information relating to the search query, response and configuration. Every element that is returned in the data model can be utilised by the search template.
4.3.1. Top-level structure
The Funnelback data model consists of two main objects:
-
question: includes all the data defining the search question. This includes the search keywords, the collection, configuration, ranking and display options, and other search constraints.
-
response: the response contains all the information returned by the Funnelback query processor in response to the question object. This includes the search results and associated metadata, faceted navigation and result counts, spelling suggestions, best bets etc.
Tutorial: Viewing the data model for a search as XML or JSON
It is often useful to view the underlying data model for a query when building a search template or debugging search behavior. The data model shows you all the settings that are applied and also all of the data elements and values that you can use within the search template. This exercise shows how to view the underlying data model for a Funnelback query in XML or JSON.
| A browser plugin or extension for formatting of JSON (such as JSONView) may be required to view the JSON response. |
-
Log in to the search dashboard where you are doing your training.
See: Training - search dashboard access information if you’re not sure how to access the training. Ignore this step if you’re treating this as a non-interactive tutorial. -
Open the inventors manage results page screen for the female inventors search package.
-
Run a search for invention: enter
inventioninto the search preview box and execute the search.
-
Edit the URL in your browser and change
search.htmltosearch.xmlto view the data model behind the search for invention as XML. This is the XML endpoint for the search and shows the underlying data structure for the query for invention that you just ran.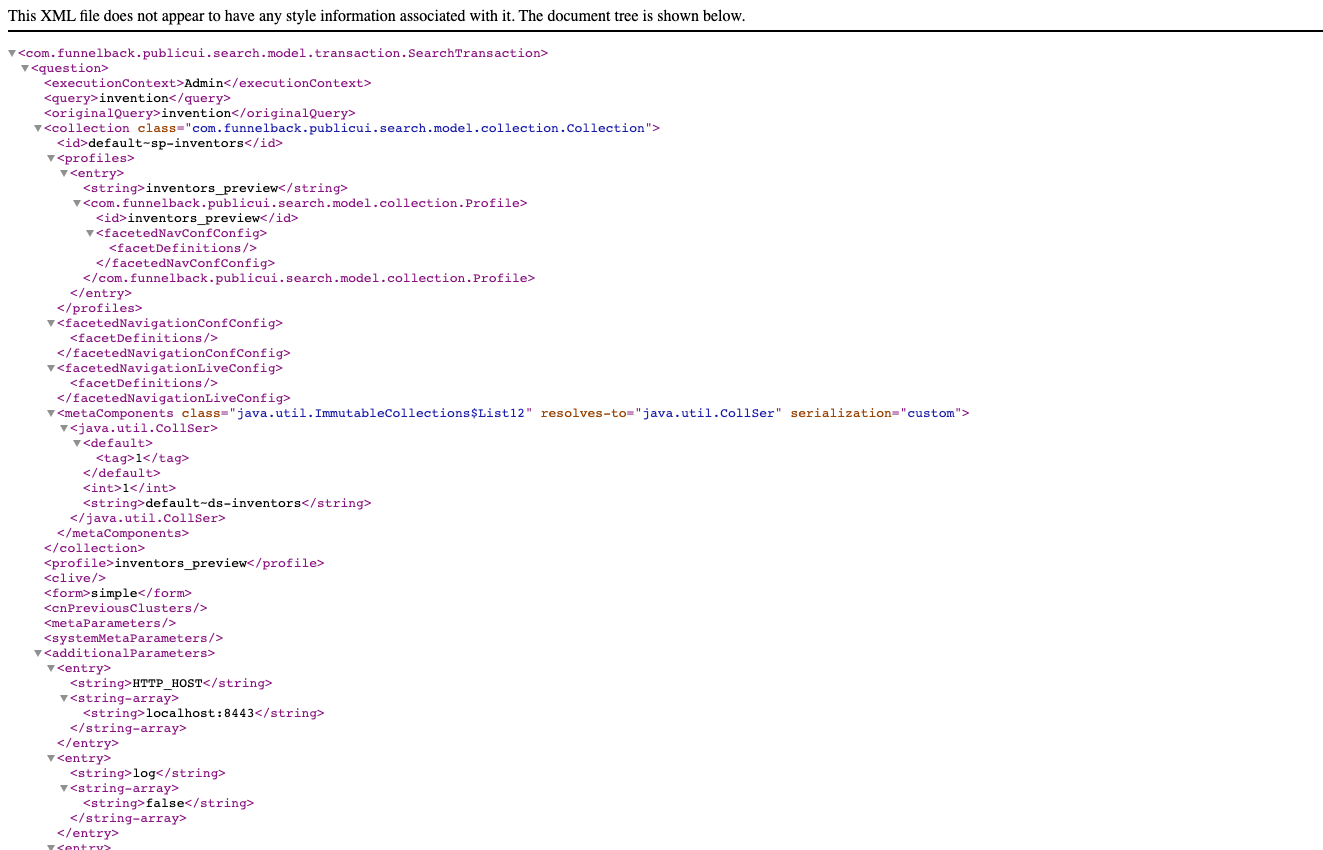
-
Edit the URL in your browser and change
search.xmltosearch.jsonto view the data model behind the search for invention as JSON. Observe that the data structure is the same as the one that you just viewed as XML. If your browser just displays unformatted text then you don’t have a JSON viewer browser extension installed on your computer. If you are seeing unformatted text install a browser extension to enable you to view the JSON.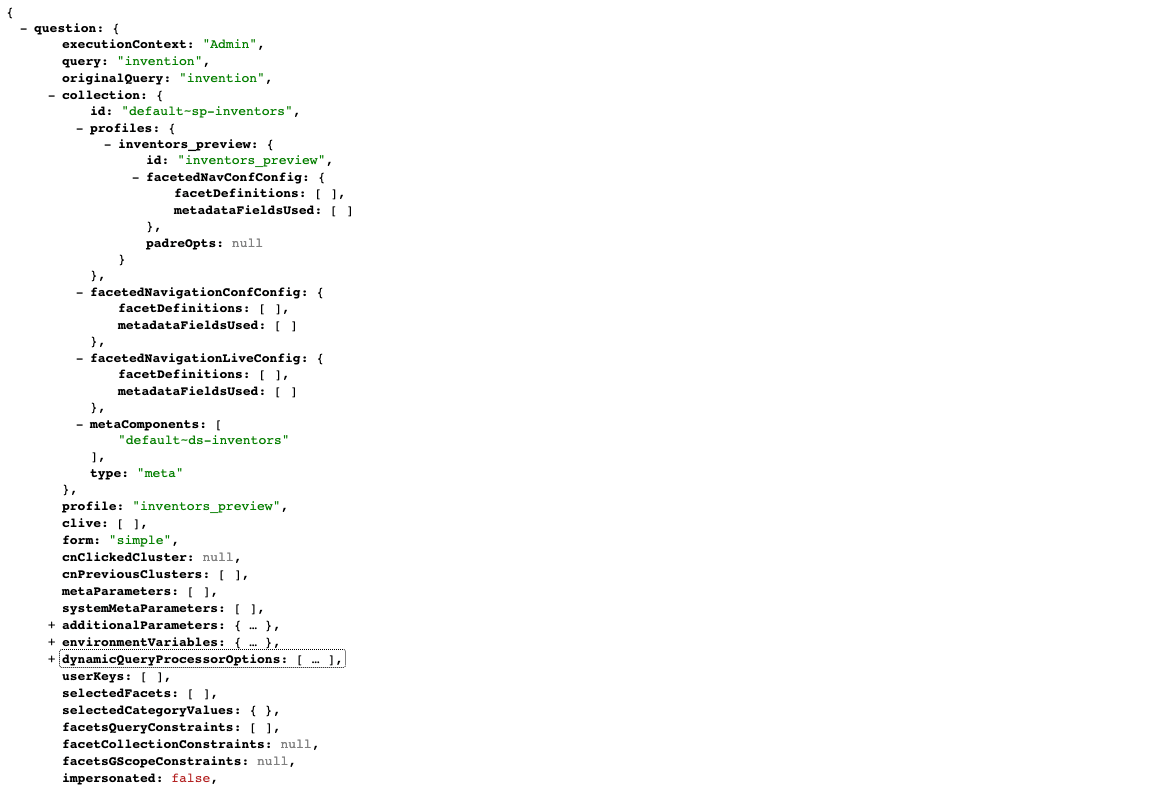
Inspect the question object. Observe that there are sub-items, and that each item contains a key and value component.
The data type is important as Freemarker has different built-in functions that operate on the variable depending on the variable’s type.
The key is case-sensitive so take care when accessing the variables from Freemarker templates.
The value component indicates the data type of the field. Funnelback fields are one of the following types:
-
String: indicated by double quotes. For example,
title: "example" -
Number: indicated by an integer without quotes. For example,
rank: 0 -
Sequence: (array/list) indicated by square brackets. For example,
selectedFacets: [] -
Hash: (map/associative array) indicated by curly brackets. For example,
environmentVariables: {}
While the XML endpoint will work in most browsers, it is recommended that you install a suitable JSON viewer plugin and user the JSON endpoint. The XML is useful for viewing the structure but doesn’t provide you with information on the different variable types so is only of limited use when viewing the data model. -
4.4. Freemarker macro libraries
Funnelback ships with two libraries of Freemarker macros, providing quick pre-built functions that can be used to build your search interface.
The libraries are loaded into the search template using <#import> directives located at the top of the template file.
<#ftl encoding="utf-8" output_format="HTML"/>
<#import "/web/templates/modernui/funnelback_classic.ftl" as s/>
<#import "/web/templates/modernui/funnelback.ftl" as fb/>
The two import directives above import the funnelback_classic and funnelback macro libraries into the s and fb namespaces respectively.
The macros included within these libraries can be accessed once imported by prefixing the macro call with the namespace. The libraries contain functions that implement conditional logic (for example, whatever appears inside this tag is run only after a search keyword is entered) or handle logic required to implement the display of a feature.
For example: <@s.Results> calls the Results macro from the s namespace (which corresponds to the funnelback_classic macro library).
-
funnelback_classic:contains macros providing access to Funnelback’s core functionality. -
funnelback:contains macros providing access to extended and newer functionality.
|
Funnelback documentation |
4.5. Freemarker built-in functions
Freemarker has an extensive set of built-in functions that can be called when a value is printed. A built-in function is called by appending a question mark (?) to the variable name and adding the function. For example, ${s.result.title?upper_case} prints the result title as an uppercase string. Function calls can also be chained. ${s.result.title?upper_case?html} will convert the title to upper case then html encode it.
The built-in functions provide a rich set of tools that can be used to manipulate or transform the variables allowing a huge amount of flexibility to be built in to the search result templates.
|
When working with Freemarker it is important to know what version of Freemarker is used by the version of Funnelback you are using as some built-in functions are not available in older versions of Freemarker. |
4.5.1. Variable escaping
Freemarker has built-in support for the automatic escaping of variables that are in templates. Escaping is an important tool that ensures template generated-code is valid and is also an important security feature as correct use of escaping mitigates some security issues such as injection style attacks.
Templates should define an output format that specifies what type of content is being returned. The defined output format will apply escaping rules to all variables contained within the template unless you choose to override the default escaping for a section of the template or when expanding specific variables.
4.6. Creating additional results pages
A search package can host one or more results pages, each of which support templating, best bets, analytics and so on.
It is also possible for a single results page to support multiple templates, however the most common use case of requiring multiple templates for a search should be setup us as an additional results page so that the supporting configuration can also be tailored for your results page.
Create an additional web page if you are providing a different search (for example, publications search vs site search) - this will provide separate analytics and also allow you to configure separate features for your new results page such as facets, best bets etc.
Create an additional template on your results page if you want analytics for this to be captured together and the content that you are searching across is identical
The default template for any results page in Funnelback is the simple.ftl template. Additional templates with arbitrary file names can be defined and created from the template management screen.
Search results templates in Funnelback usually have the following overall logic:
if (search has not been performed)
    display empty search input box and branding
else
    display a search refinement box
    if (search has matching results)
        for each matching result
            display result
    else
        display zero results message
Tutorial: Customize a results template
In this exercise we will create a new results page for the search package and customize the default template to provide basic logic for the presentation of the search results.
-
Log in to the search dashboard where you are doing your training.
See: Training - search dashboard access information if you’re not sure how to access the training. Ignore this step if you’re treating this as a non-interactive tutorial. -
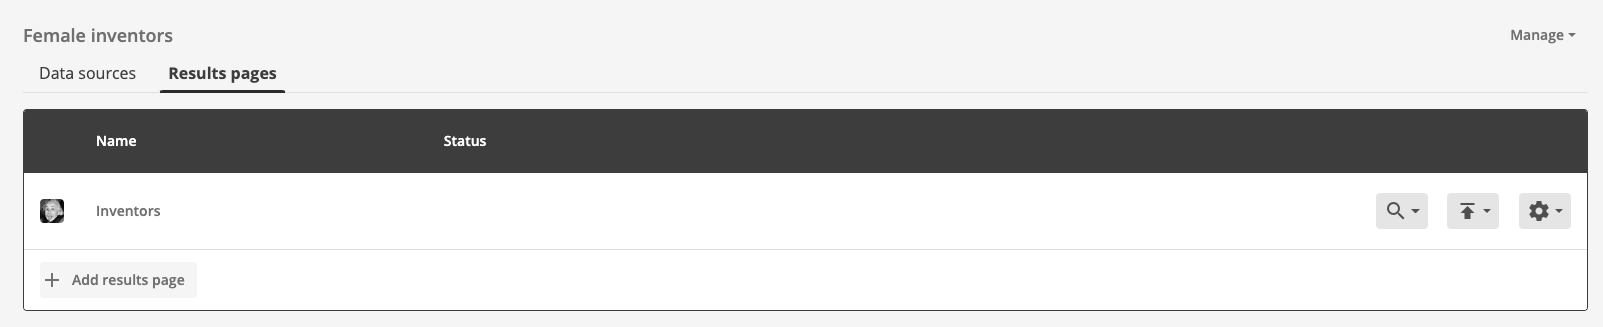
Locate the female inventors search package. Click the results pages tab then click the add results page button.
-
Enter basic when prompted for the results page name and click the continue button.
-
You are then given the option to upload an image thumbnail, which will be displayed for this results page. We’ll skip this now. Click the proceed button.
-
The review step confirms the information you have entered for your results page and provides you with the chance to go back and make any corrections. Click the finish button to create your results page.
-
You are redirected to the results page manage screen (the same as what you used in previous exercises, but this time for your basic results page).
-
Click the edit results page template option in the template panel to access your results page template.
-
Click the simple.ftl link to edit the default template for the basic results page. The default template for a results page is always called simple.ftl.
-
Select and delete all the text in the template editor and replace it with the code below, then click save and publish. This will update the template to use the basic logic described above.
<#ftl encoding="utf-8" output_format="HTML"/> <#import "/web/templates/modernui/funnelback_classic.ftl" as s/> <#import "/web/templates/modernui/funnelback.ftl" as fb/> <!DOCTYPE html> <html lang="en-us"> <head> <title>My search template</title> </head> <body> <#-- NO QUERY --> <@s.InitialFormOnly> <p>No query submitted yet. Sorry.</p> </@s.InitialFormOnly> <@s.AfterSearchOnly> <#-- DISPLAY RESULTS --> <ol> <@s.Results> <#if s.result.class.simpleName == "TierBar"> <#-- TIER BAR FOR PARTIAL MATCHES --> <#if s.result.matched != s.result.outOf> <p>Search results that match ${s.result.matched} of ${s.result.outOf} words</p> </#if> <#else> <li><a href="${s.result.clickTrackingUrl}" title="${s.result.liveUrl}">${s.result.title}</a></li> </#if> </@s.Results> </ol> <#-- NO MATCHES --> <#if response.resultPacket.resultsSummary.totalMatching == 0> <p>Sorry. No matches found.</p> </#if> </@s.AfterSearchOnly> </body> </html> -
Return to the results page manager by clicking basic in your breadcrumb trail. Preview the search template by running a search for barbie the central search box. This shows what the basic template returns when a valid query is input. Observe that the URL contains a parameter,
profile=basic_preview- this tells you that it’s using the basic results page that you just created, and displaying the preview version of the results page. If you rerun the search and select the live option you’ll notice that the URL parameter now points to the live profileprofile=basic.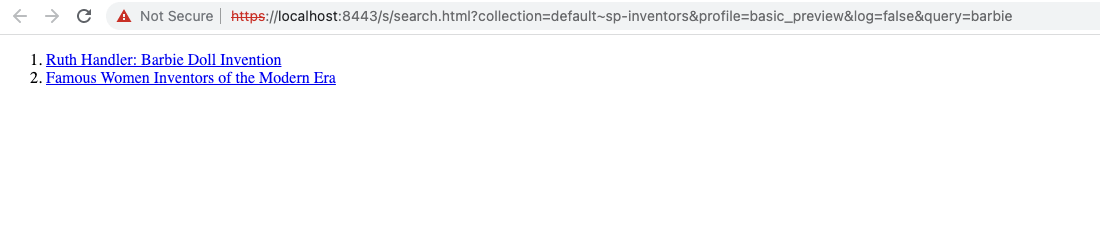
-
Test the template logic. Update the URL by updating the query parameter to
qwerty, a word that won’t match any results. This demonstrates what is returned to a user for the case where there are no search results.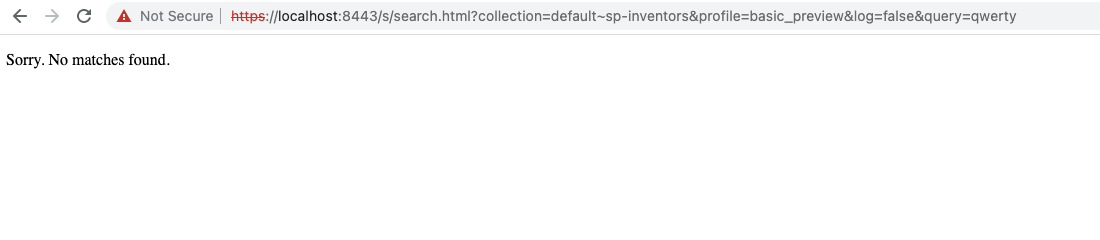
-
Test the default form case - for what is returned when the template is called with no query. Update the URL by removing the query parameter (delete
&query=qwerty) then press enter.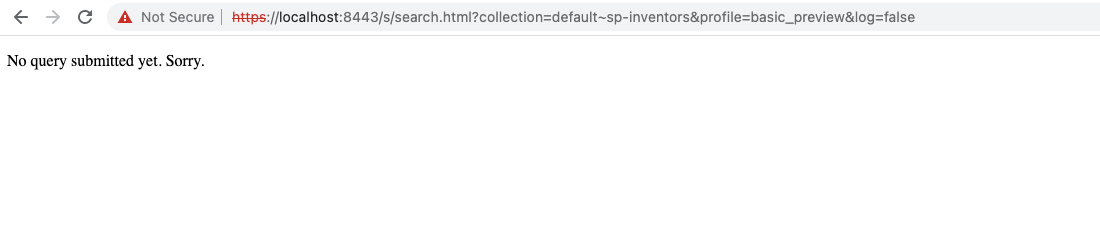
Extended exercises: conditional templating
-
Define a query that will display partially matching results (results that match some of the words in the query). Replace
query=qwertyin URL withquery=hair dryer. -
Update the text that is presented when there are no search results.
-
Experiment with some of the Freemarker built-in functions and observe the effect on the search results output.
4.7. Web resources
Most templates rely on external resources such as image, JavaScript and CSS files.
These external resources can be stored at web accessible locations such as your public web server and referenced as external resources from the template using absolute URLs.
Funnelback provides web resource folders that can also be used for local storage of these files. Web resource folders are associated with the folders that contain the search template files.
The URL of a web resources folder is constructed using the following pattern: <PROTOCOL>://<FUNNELBACK-SERVER>/s/resources/<SEARCH-PACKAGE-ID>/<RESULTS-PAGE-ID>/<FILENAME>
where:
-
<PROTOCOL>is eitherhttporhttps -
<FUNNELBACK-SERVER>is the hostname of the Funnelback server. If referencing from a template the<FUNNELBACK-SERVER>and<PROTOCOL>can be omitted and presented as a relative link. -
<SEARCH-PACKAGE-ID>is the collection containing the resource. (This can be copied from the collection parameter in the URL of the file manager). When accessing a resource from within a search template<COLLECTION-ID>should be replaced with:${question.collection.id} -
<RESULTS-PAGE-ID>is the results page containing the resource (this can be copied from the profile parameter in the URL of the file manager). When accessing a resource from within a search template<RESULTS-PAGE-ID>should be replaced with:${question.profile} -
<FILENAME>is the filename of the web resource. For example, a link to a resource from a templateexample.cssmight be:<link rel="stylesheet" href="/s/resources/${question.collection.id}/${question.profile}/example.css" />
| It is often a good idea to use protocol-independent URLs when linking to web resources to avoid mixed content warnings when working with HTTPS urls. |
Tutorial: Web resources
This exercise shows how to manage your web resources and access them from your Funnelback templates.
-
Log in to the administration interface by visiting
https://localhost:8443/d/client/ -
Open the template editor for the inventors results page (note: not the basic results page from the previous exercise).
-
Select Edit web resources files from templates panel.
-
Click the add new button to create a new file named
inventor-styles.css. Create a CSS file containing the following code then click the save button:body { font-family: Verdana, Arial, Helvetica, sans-serif; background: #5a4a42; margin-left: 0px; margin-top: 0px; margin-right: 0px; margin-bottom: 0px; } p { font-size:12px; padding-left: 10px; padding-right: 5px; line-height: 18px; } h1 { font-size:16px; color: #61281d; padding-left: 10px; } h2 { font-size:14px; color: #cb8366; padding-left: 10px; } h3 { font-size:12px; color: #cb8366; padding-left: 10px; } table td { background-color: #fff;} input#query {width:500px;} .tt-menu h5.tt-group {background-color:transparent; text-align:left; border-bottom:1px solid #333;} -
Click the back to directory button to return to the web resources file manager. Observe that
inventor-styles.cssis now listed, but has a status of new. Web resources can be previewed allowing changes to me made to web resources that can be tested without being live.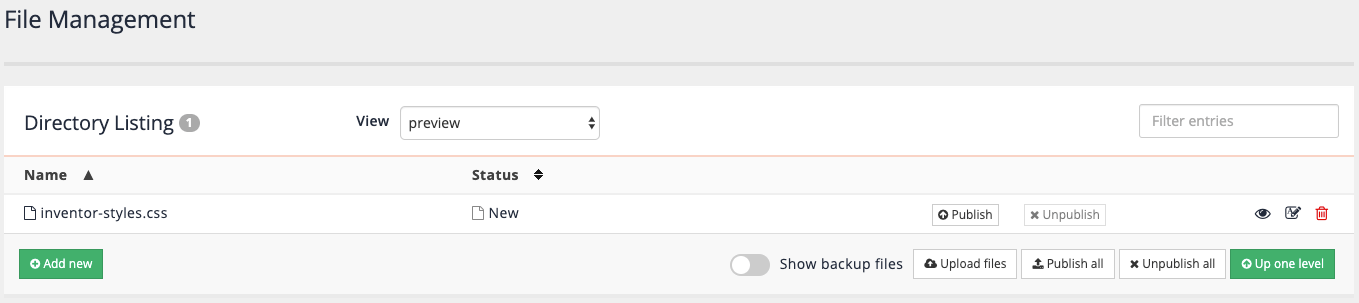
-
Modify the default search template (
simple.ftl) to reference the newly added CSS file. Remember that the resource will only be available from the preview version of the template until both the template and the CSS file are published. Add the following to the document’s<head>and click save.<link rel="stylesheet" href="/s/resources/${question.collection.id}/${question.profile}/inventor-styles.css" /> -
Test the search by running some queries and verify that the linked styles are now being applied.
-
Publish both the CSS and template files and verify that the changes are live.
-
Make the CSS file available from a css subfolder. Hint: remove the css file the create a css folder (using the add new button) then upload the css file into the newly created folder. Update your search template to read the CSS file from the new location.
Extended exercises: style the results page
-
Style the results page for the inventors search to match the styling for the inventors website. This will require additional styles to be defined within the imported stylesheet and additional markup (
<div>tags etc.) to be added to the main results template.
5. Using WebDAV to maintain configuration, templates and web resources from your desktop
Funnelback can be mounted as a network drive using a compatible WebDAV client. This exposes the configuration, template and web resources folders and allows maintenance and editing of the files directly from your desktop computer.
Once mounted you can perform a number of tasks including:
-
Edit templates using a local text editor of your choice.
-
Create new templates.
-
Upload web resources and configuration files.
-
Create a folder structure beneath the web resources folder.
Tutorial: Create an API token for access to WebDAV
An API token is required to access the WebDAV service in the Squiz DXP. This exercise takes you through the steps required to generate an appropriate token.
-
Log in to the search dashboard where you are doing your training.
See: Training - search dashboard access information if you’re not sure how to access the training. Ignore this step if you’re treating this as a non-interactive tutorial. -
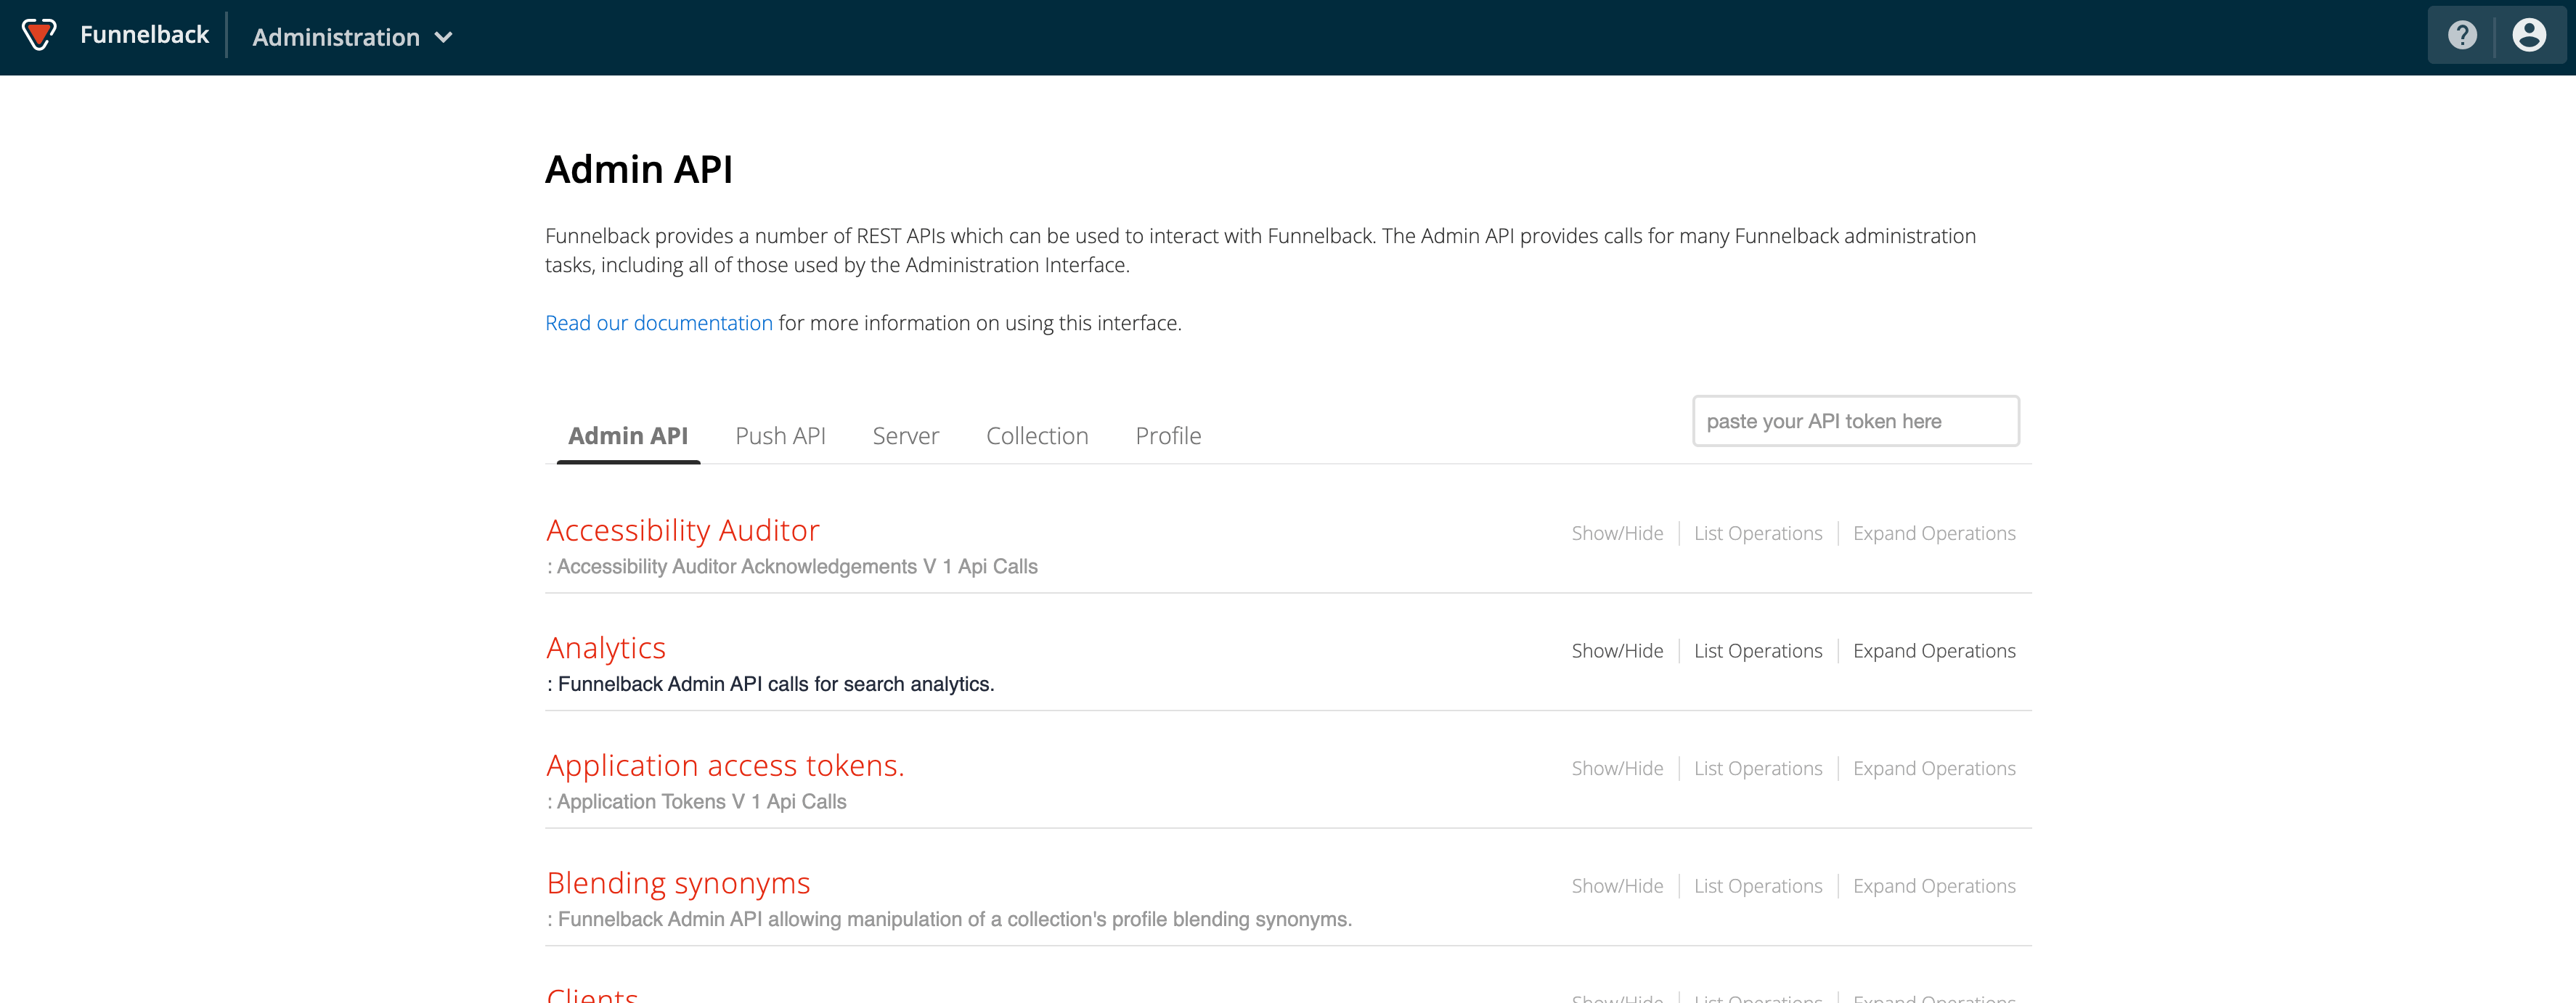
Select the > API UI item from the main toolbar.

-
The API screen will open providing access to API documentation and the running of API calls.
-
Locate the application access tokens section. Click on the heading to expand the section then find the
PUT /application-tokens/v2/application-token/{tokenname}API call and click on this. This is used to create a non-expiring user application token.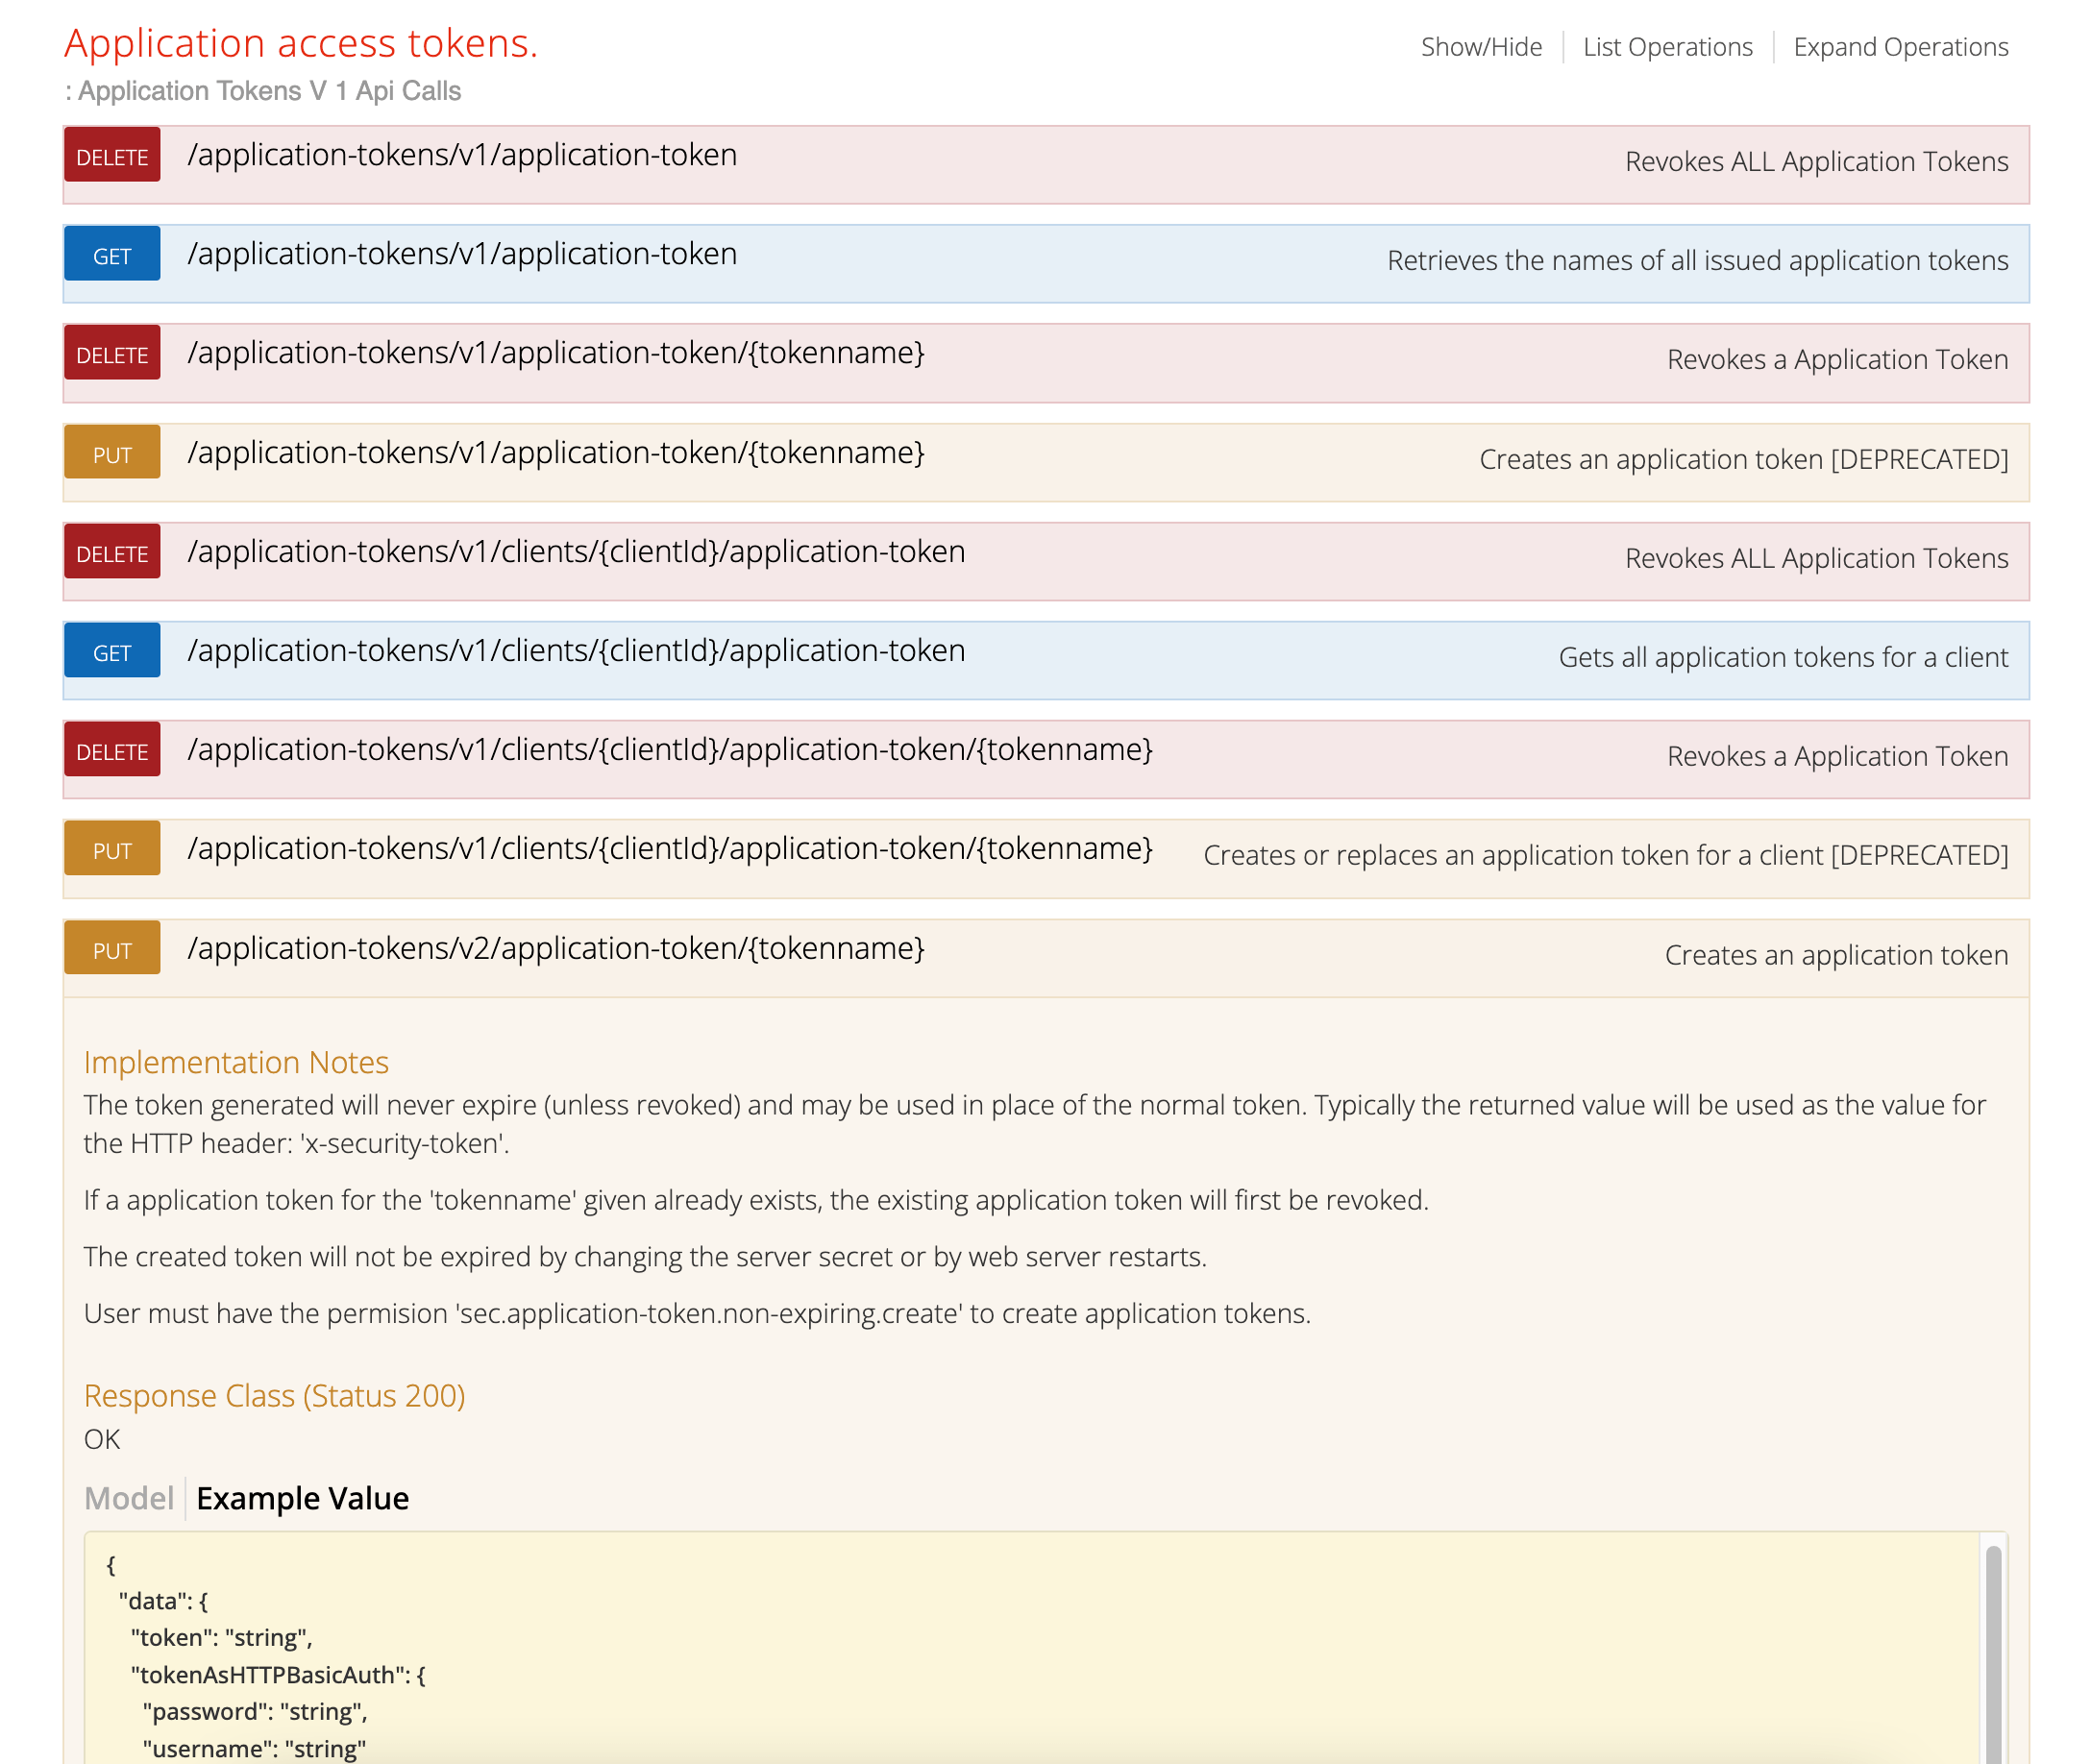
-
Enter a name (for example,
webdav-access) for your token in the tokenname field then click the execute button. This runs the API call and generates a token for you to use.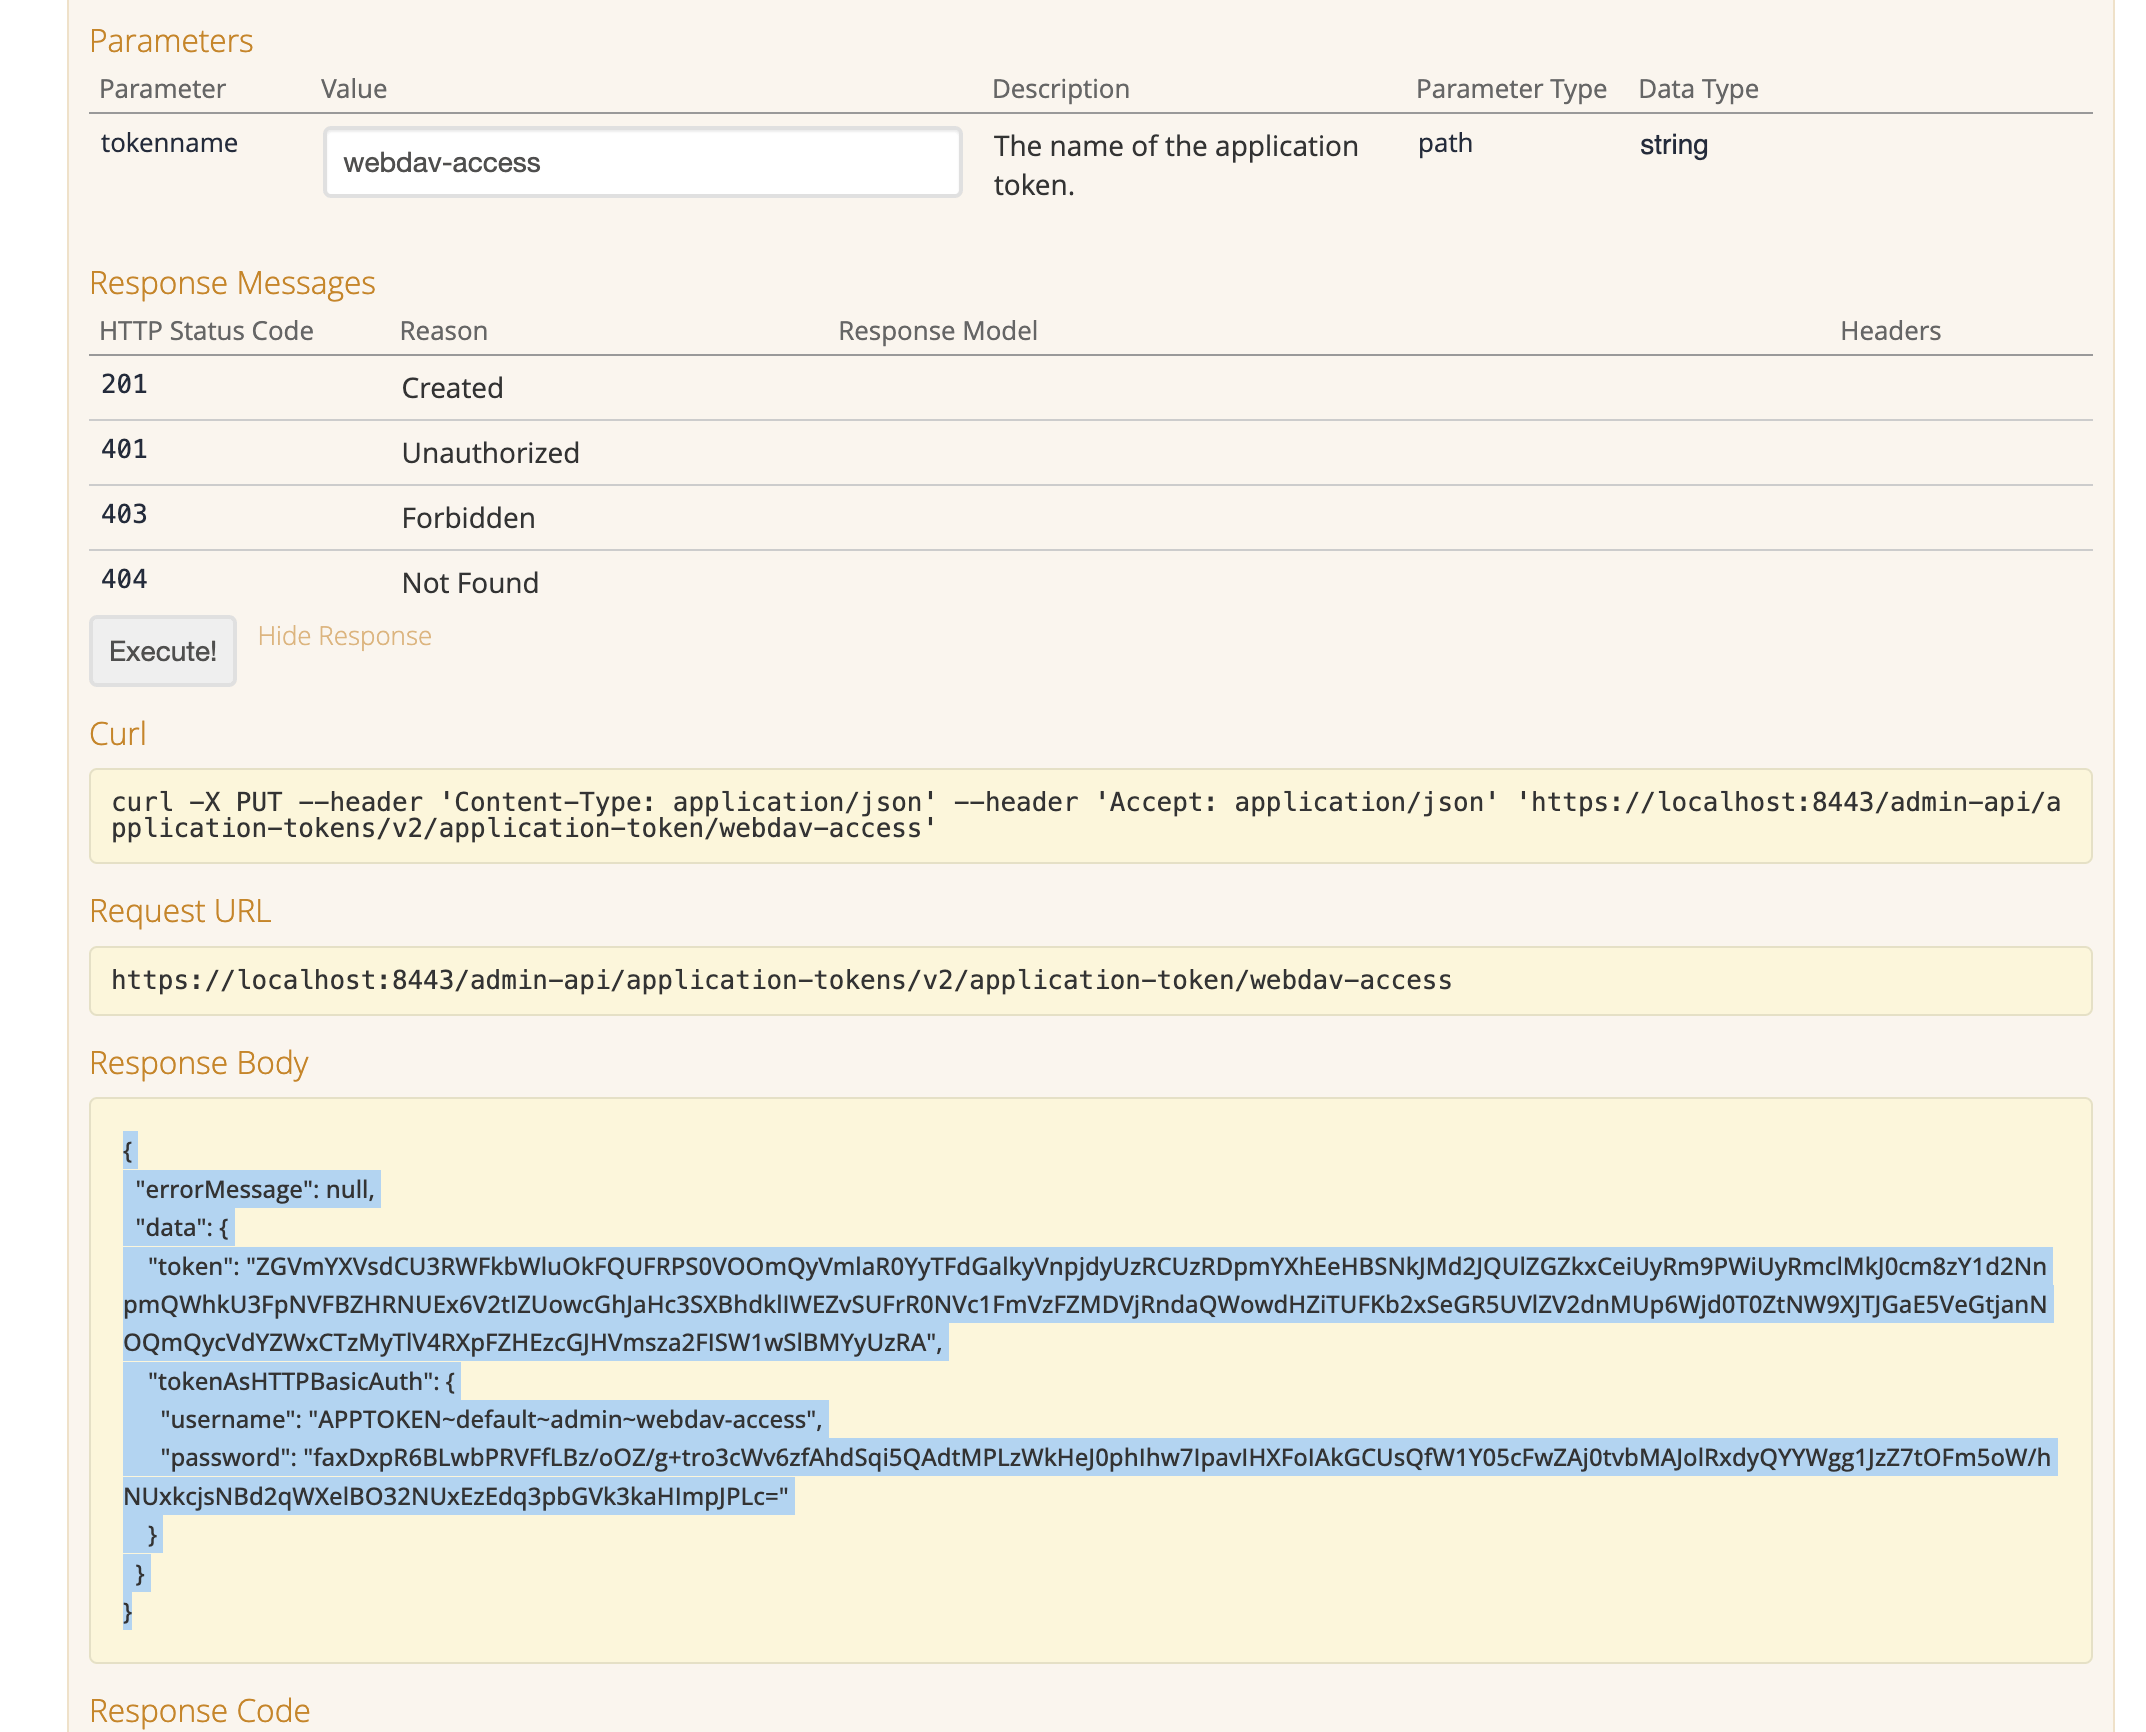
-
Make a careful note of the JSON response which includes a token as well as a username and password, which will look something similar to:
{
"errorMessage": null,
"data": {
    "token": "ZGVmYXVsdCU3RWFkbWluOkFQUFRPS0VOOmQyVmlaR0YyTFdGalkyVnpjdyUzRCUzRDpmYXhEeHBSNkJMd2JQUlZGZkxCeiUyRm9PWiUyRmclMkJ0cm8zY1d2NnpmQWhkU3FpNVFBZHRNUEx6V2tIZUowcGhJaHc3SXBhdklIWEZvSUFrR0NVc1FmVzFZMDVjRndaQWowdHZiTUFKb2xSeGR5UVlZV2dnMUp6Wjd0T0ZtNW9XJTJGaE5VeGtjanNOQmQycVdYZWxCTzMyTlV4RXpFZHEzcGJHVmsza2FISW1wSlBMYyUzRA",
    "tokenAsHTTPBasicAuth": {
        "username": "APPTOKEN~default~admin~webdav-access",
        "password": "faxDxpR6BLwbPRVFfLBz/oOZ/g+tro3cWv6zfAhdSqi5QAdtMPLzWkHeJ0phIhw7IpavIHXFoIAkGCUsQfW1Y05cFwZAj0tvbMAJolRxdyQYYWgg1JzZ7tOFm5oW/hNUxkcjsNBd2qWXelBO32NUxEzEdq3pbGVk3kaHImpJPLc="
        }
    }
}
This username and password will be used to authenticate your WebDAV client when you access Funnelback (for example, using Windows Explorer of MacOS Finder).
If you don’t see the tokenAsHTTPBasicAuthfields being returned in your JSON check that you ran the correct API call. This information is only returned when executing the V2 API call.
Tutorial: Mount Funnelback in MacOS using WebDAV
| This exercise applies if you are running MacOS. See the following exercise for Windows. |
This exercise shows how to access your Funnelback templates and web resources directly from Finder.
-
Open Finder.
-
Select from the menu bar, or press ⌘ Command+K.
-
Enter the path to the WebDAV endpoint into the server address field:
https://localhost:8443/admin-api/file-management/v1/webdav/ -
(optional) add to your favourites by clicking the + button.
-
Click connect.
-
Enter the token HTTP Basic Authentication details (from the token you generated in the previous exercise) when prompted for a username and password (optional: select the save password option).
-
You should be able to then browse the files and folders located on the Funnelback server via your Finder window.
| Finder will not let you create any new files in the live folders but will allow you to open the files and edit them. If you try to save a file that is located in the live folder (which is read only) the operation will not succeed and you will not receive any feedback to indicate that it has failed. This means that it will look like the file has saved normally but you will silently lose the changes. |
Tutorial: Mount Funnelback on Windows using WebDAV
| This tutorial is only relevant if you are accessing Funnelback from a Windows PC. See the previous exercise for MacOS. |
This exercise shows how to access your Funnelback templates and web resources directly from Windows File Explorer.
Windows File Explorer’s WebDAV support is a bit buggy and sometimes will fail to connect. Retrying the connection sometimes solves the problem. Setting the following registry key: ServerNotFoundCacheLifeTimeInSec to 0 seems to resolve this issue when the problem occurs. See: https://docs.microsoft.com/en-us/iis/publish/using-webdav/using-the-webdav-redirector#webdav-redirector-registry-settings for information on the registry key and warnings about editing of registry keys. Failing this, we recommend using the Cyberduck WebDAV client.
|
-
Right click on 'computer' in the start menu and select map network drive.
-
Enter the path to the WebDAV endpoint into the network location field:
https://localhost:8443/admin-api/file-management/v1/webdav/ -
(optional) check the reconnect on logon option if you wish the drive to be auto-mounted on boot.
-
Click connect.
-
Enter the token HTTP Basic Authentication details (from the token you generated in the previous exercise) when prompted for a username and password (optional: select the save password option).
-
You should be able to then browse the files and folders located on the Funnelback server via Windows explorer.
| If you attempt to save a file in a read only folder (such as the live view of a results page) Windows will return an error message saying that the save failed. |
Tutorial: Edit a template using WebDAV
This exercise demonstrates how templates can be edited in a locally installed text editor.
-
Edit the
simple.ftltemplate for the inventors results page. Open Finder (MacOS) or Windows File Explorer (Windows) and open your Funnelback network drive (which you mounted in the previous exercise)>. Browse to the folder. Right click on thesimple.ftlthen select open with from the popup menu and choose a suitable text editor.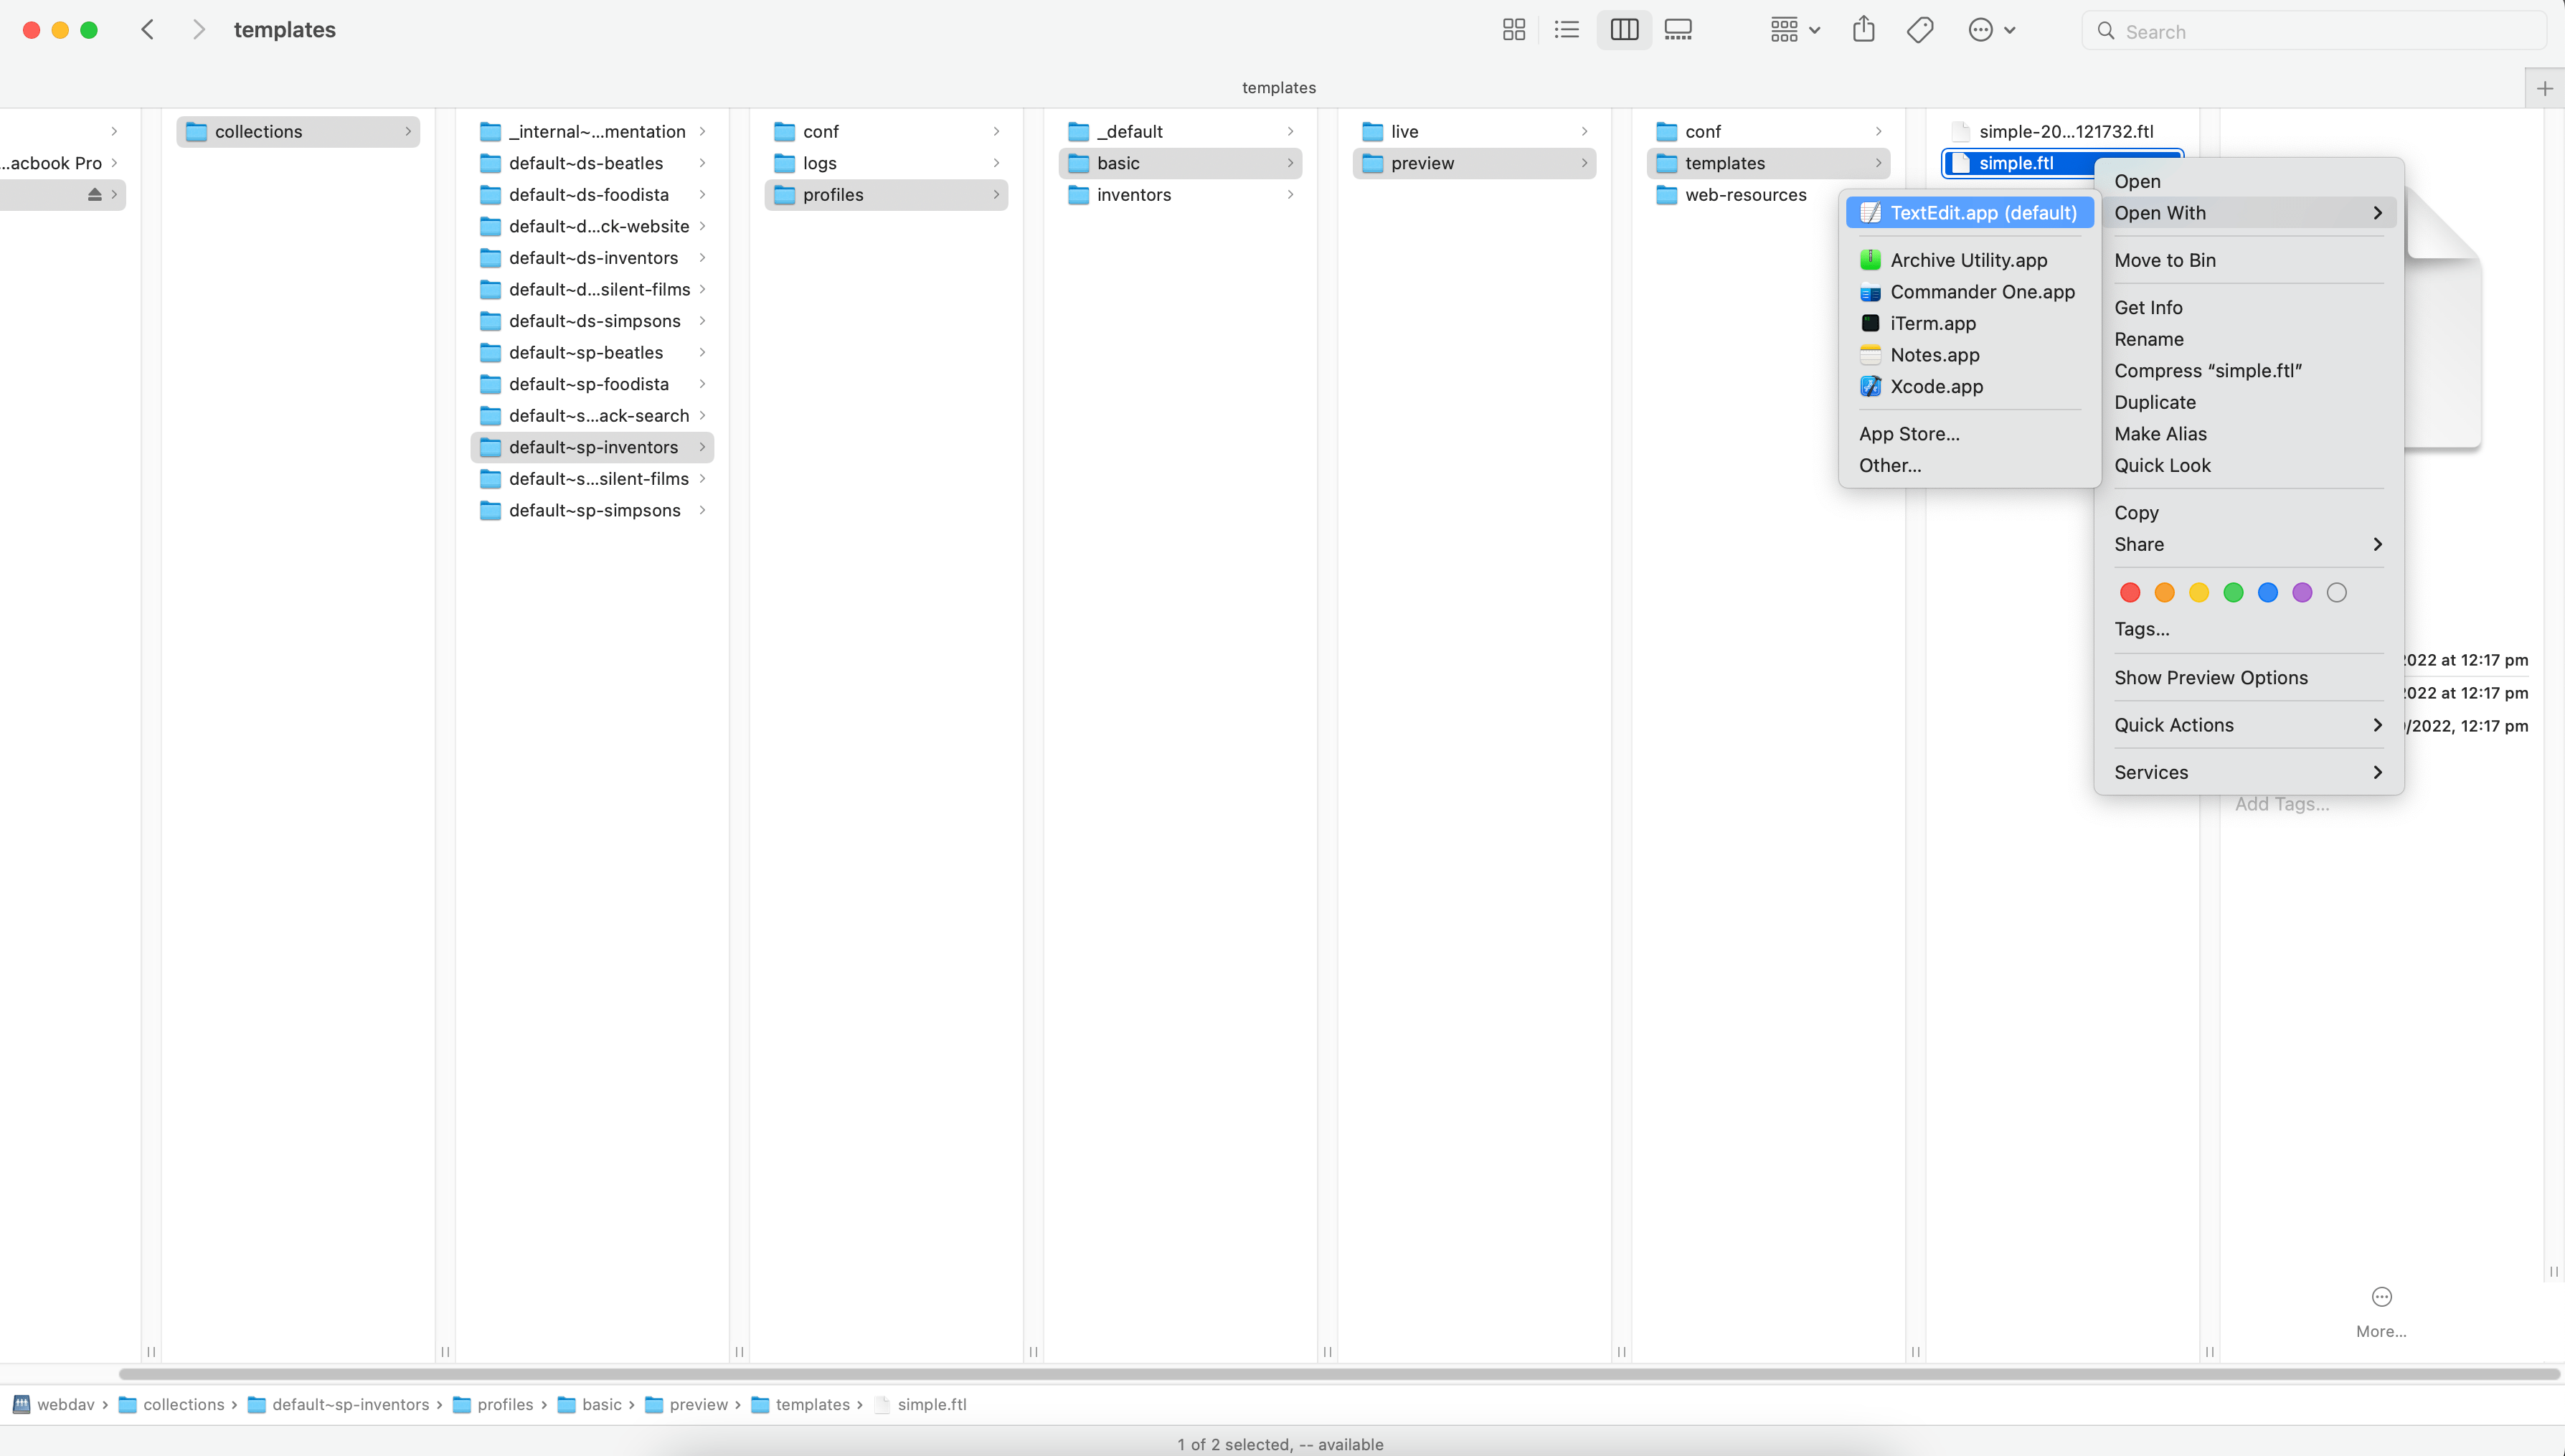
-
The file will open in your text editor. Add a title immediately before the
<ol>tag:<h1>Title added via WebDAV</h1>then save the file. This will update on the Funnelback server.when you save a file this way it overwrites the file on the server without creating an automatic backup of the file. Changes will be reflected when viewing the file on the Funnelback server. If you wish to publish the file you will need to do this from the admin interface. 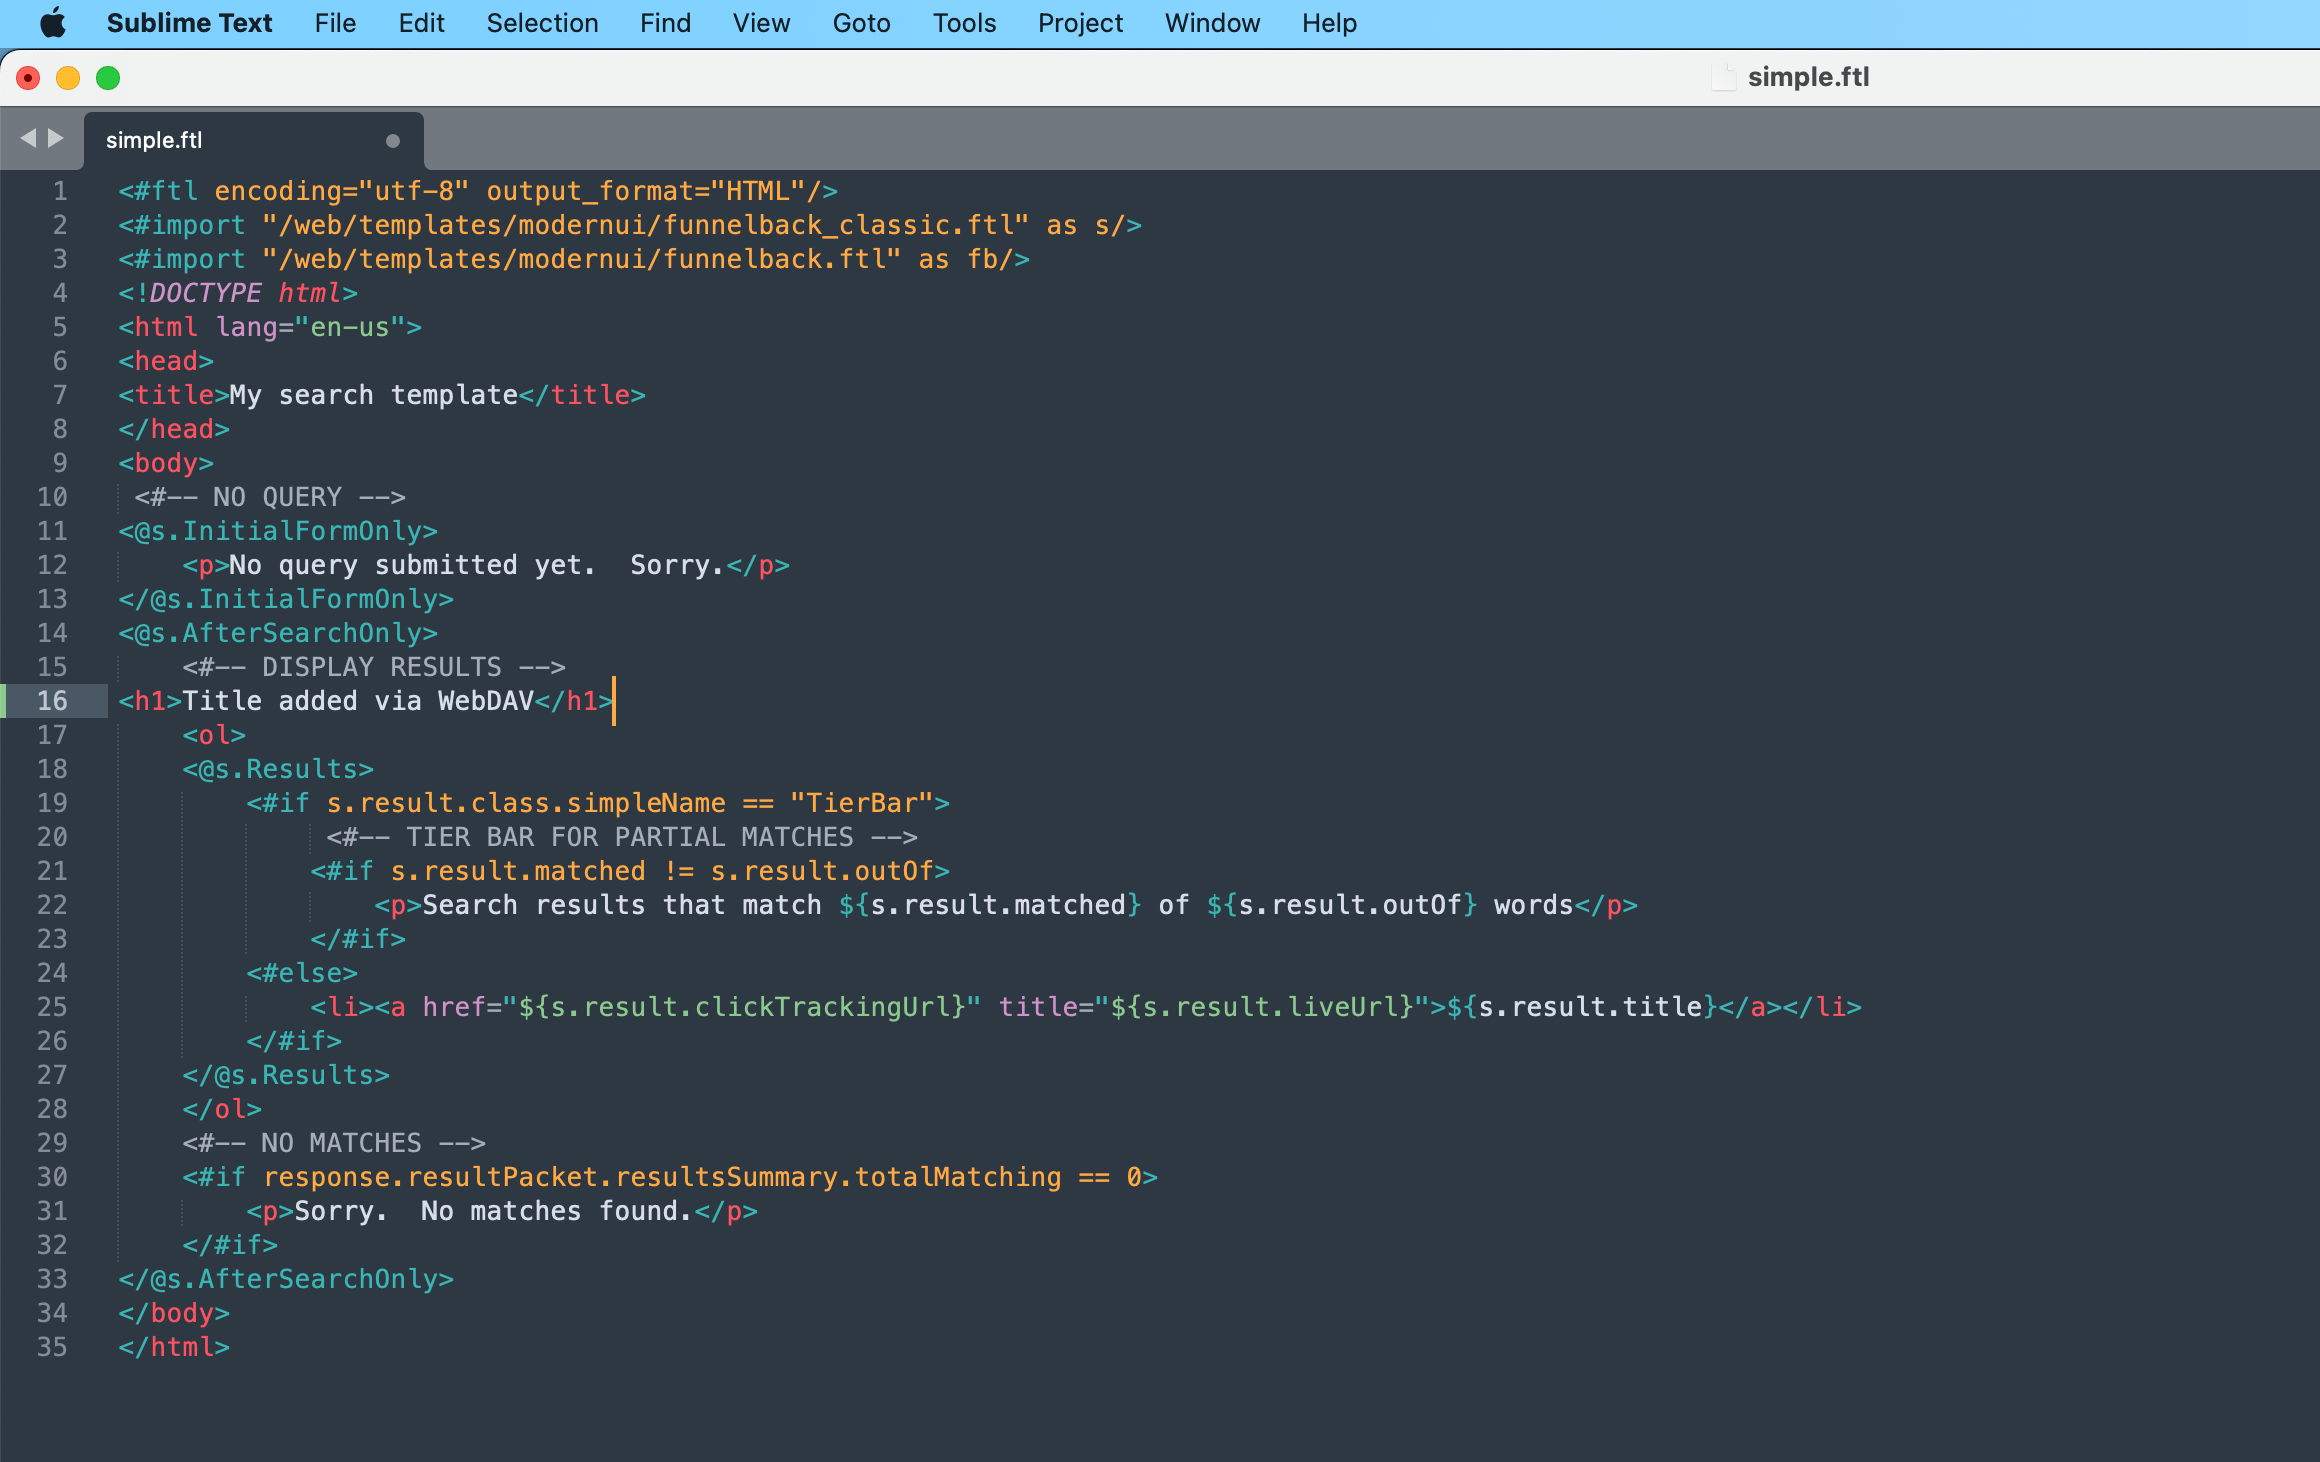
-
Open the administration interface, select the basic results page on the female inventors search package, then open the results page manage screen and click the edit results page templates item. Observe that unpublished changes are recorded for the
simple.ftlfile. Click on this and observe that the text you just added and saved in your text editor is showing inside the built-in editor.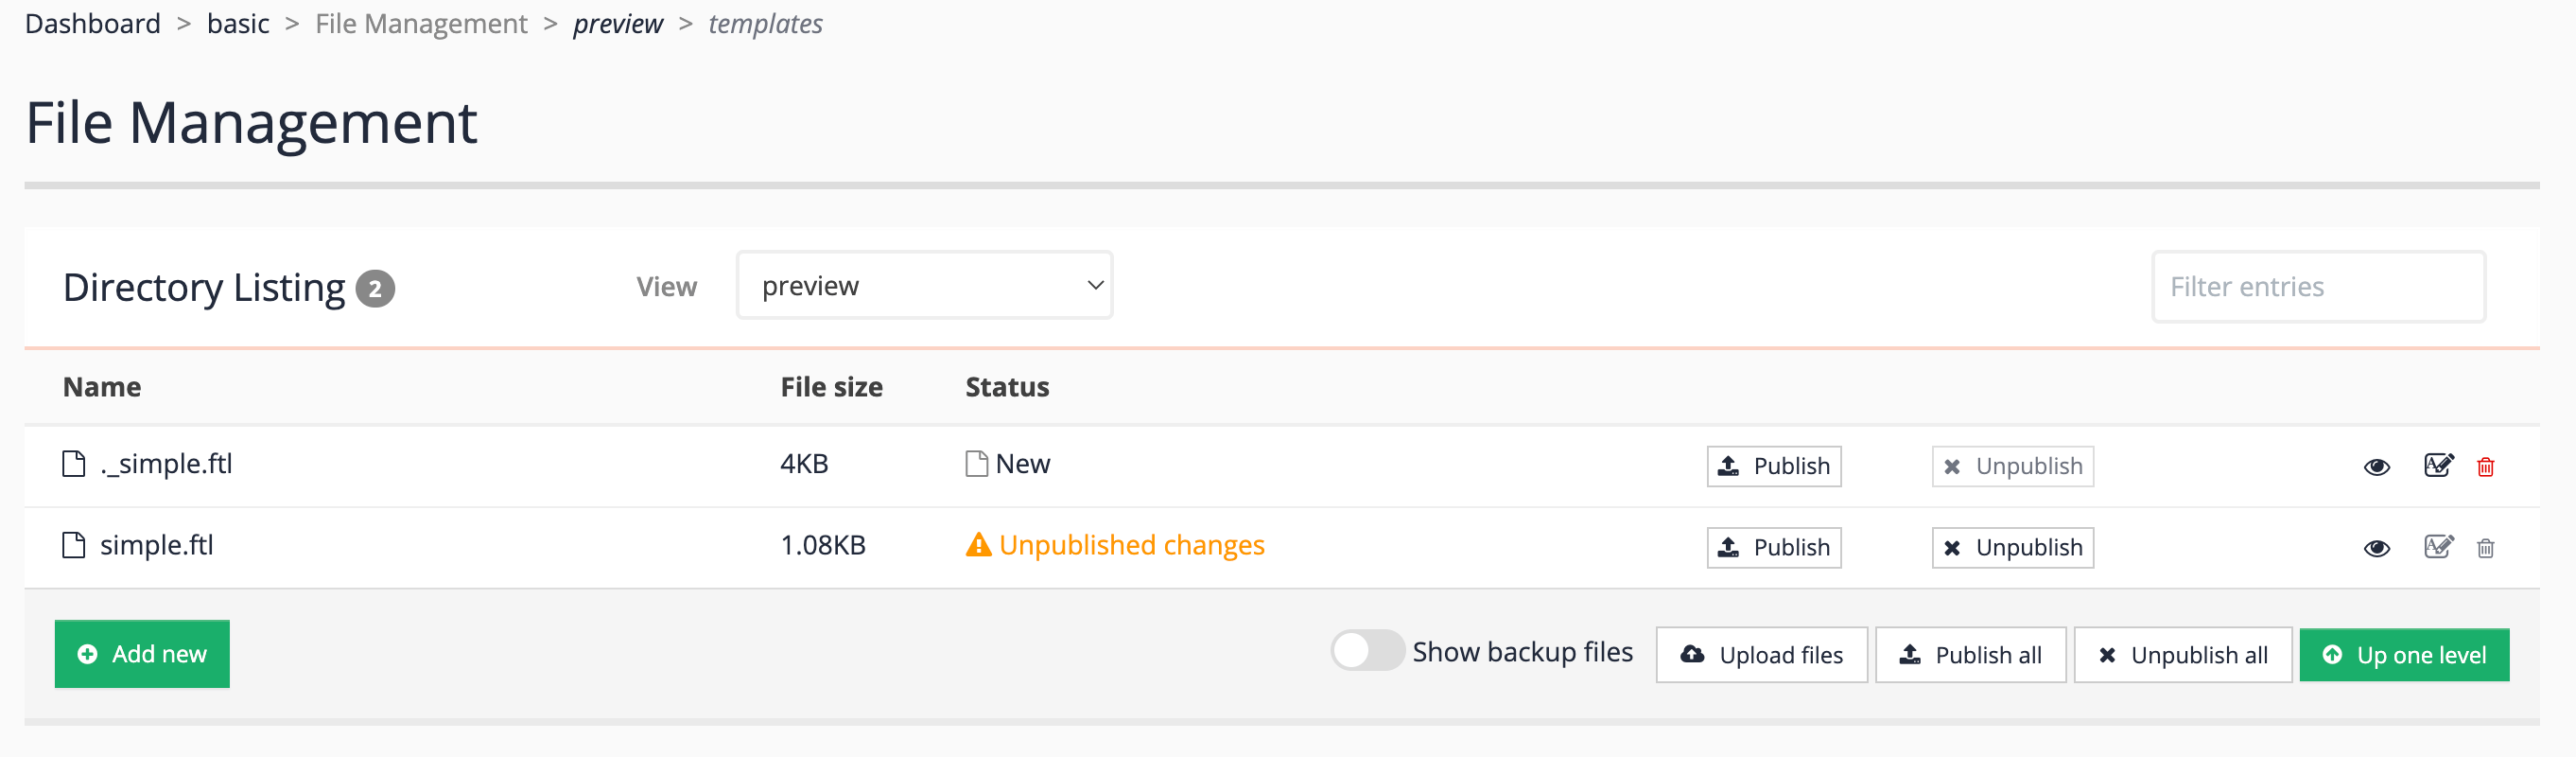
-
View the template by running a search using that template and observe that the title is displaying. http://localhost:9080/s/search.html?collection=default~ds-inventors&profile=basic_preview&form=simple&query=test
-
The file will still need to be published using the administration interface as the live folder when mounted via WebDAV is read only.
Tutorial: Add web resources using WebDAV
In this exercise you will manage your web resources directly from your desktop.
-
Download this image and save it locally https://docs.squiz.net/training-resources/inventors-resources/Professor-Frink.jpg.
-
Navigate and click into the web-resources folder for the female inventors search package, again attached to the inventors results page.
-
Observe that the
cssfolder that you created via the admin interface is displayed. Create a new folder calledmystuff(inside the same folder as thecssfolder) by selecting new folder from the menu. -
Navigate into this folder and drag the image you just saved into this folder.
-
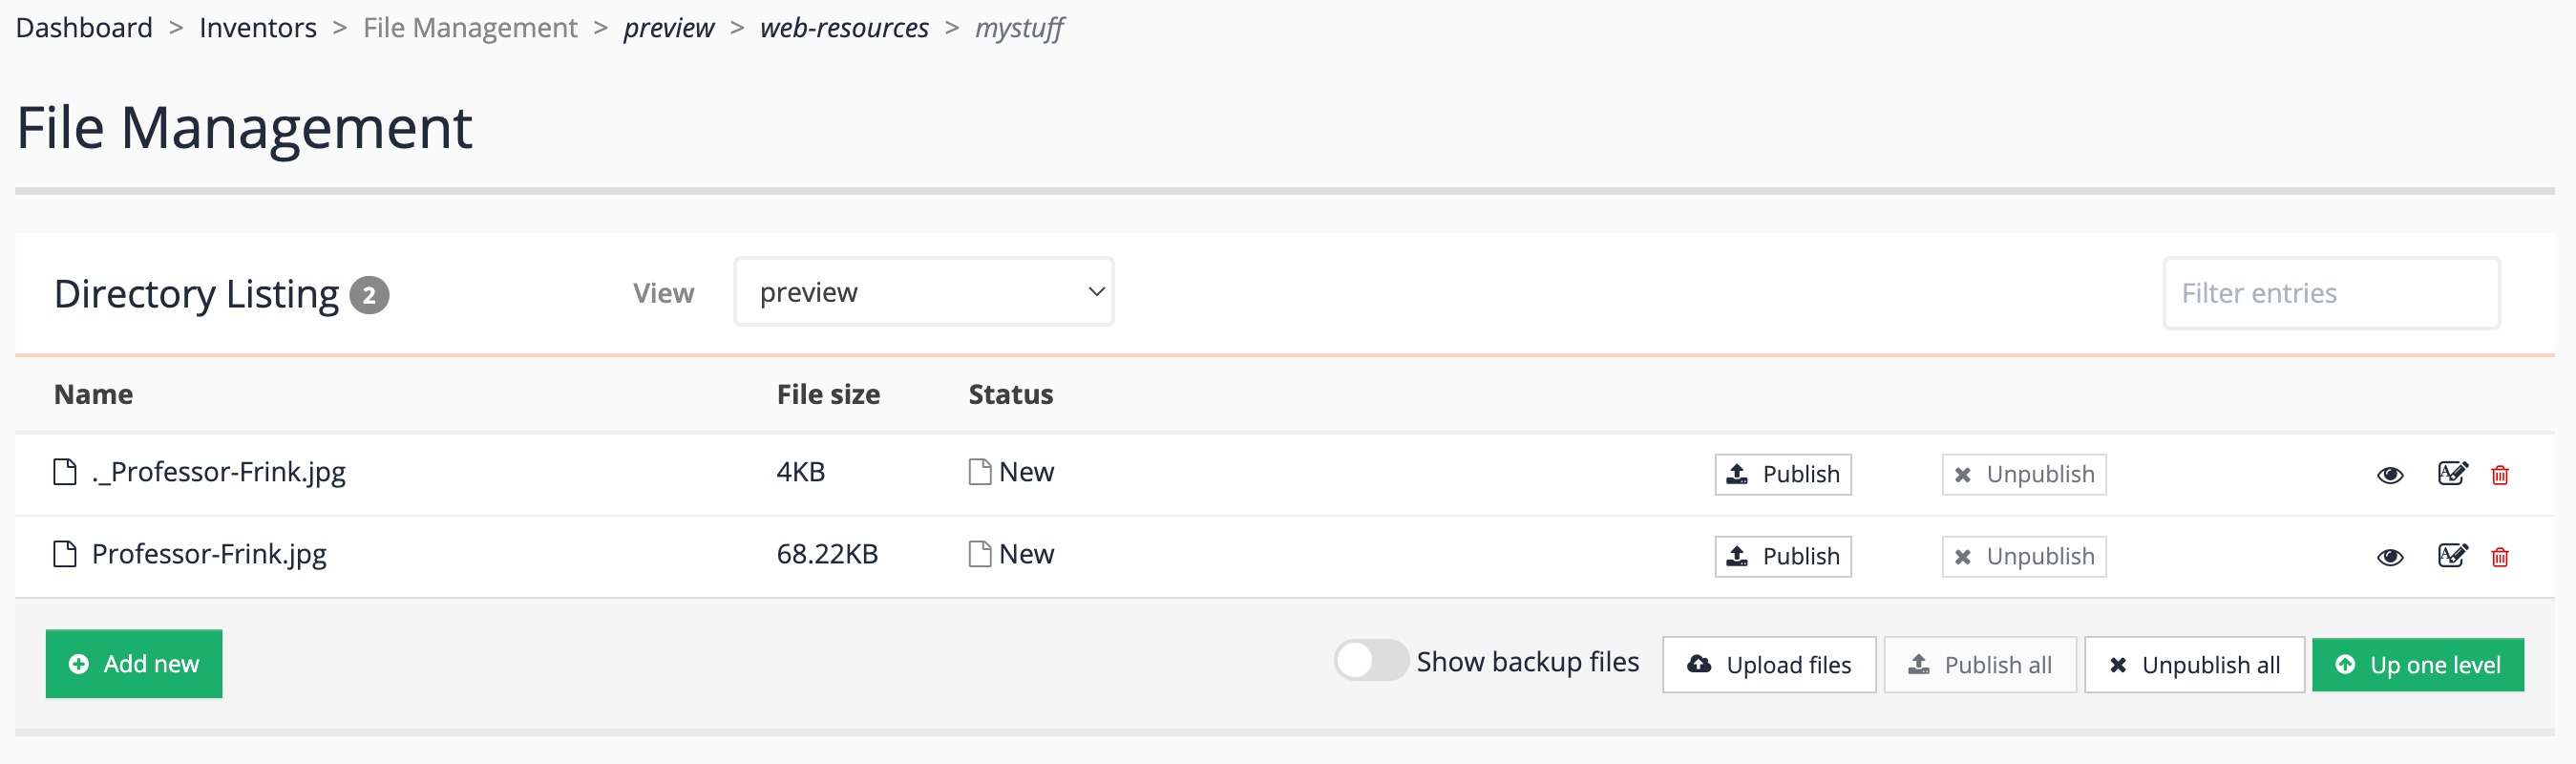
Return to the search dashboard and view the web resources for the inventors results page (female inventors search package).
-
Observe that the
mystufffolder you created is displayed as a subfolder to the web resources, and that the file you just uploaded is also present.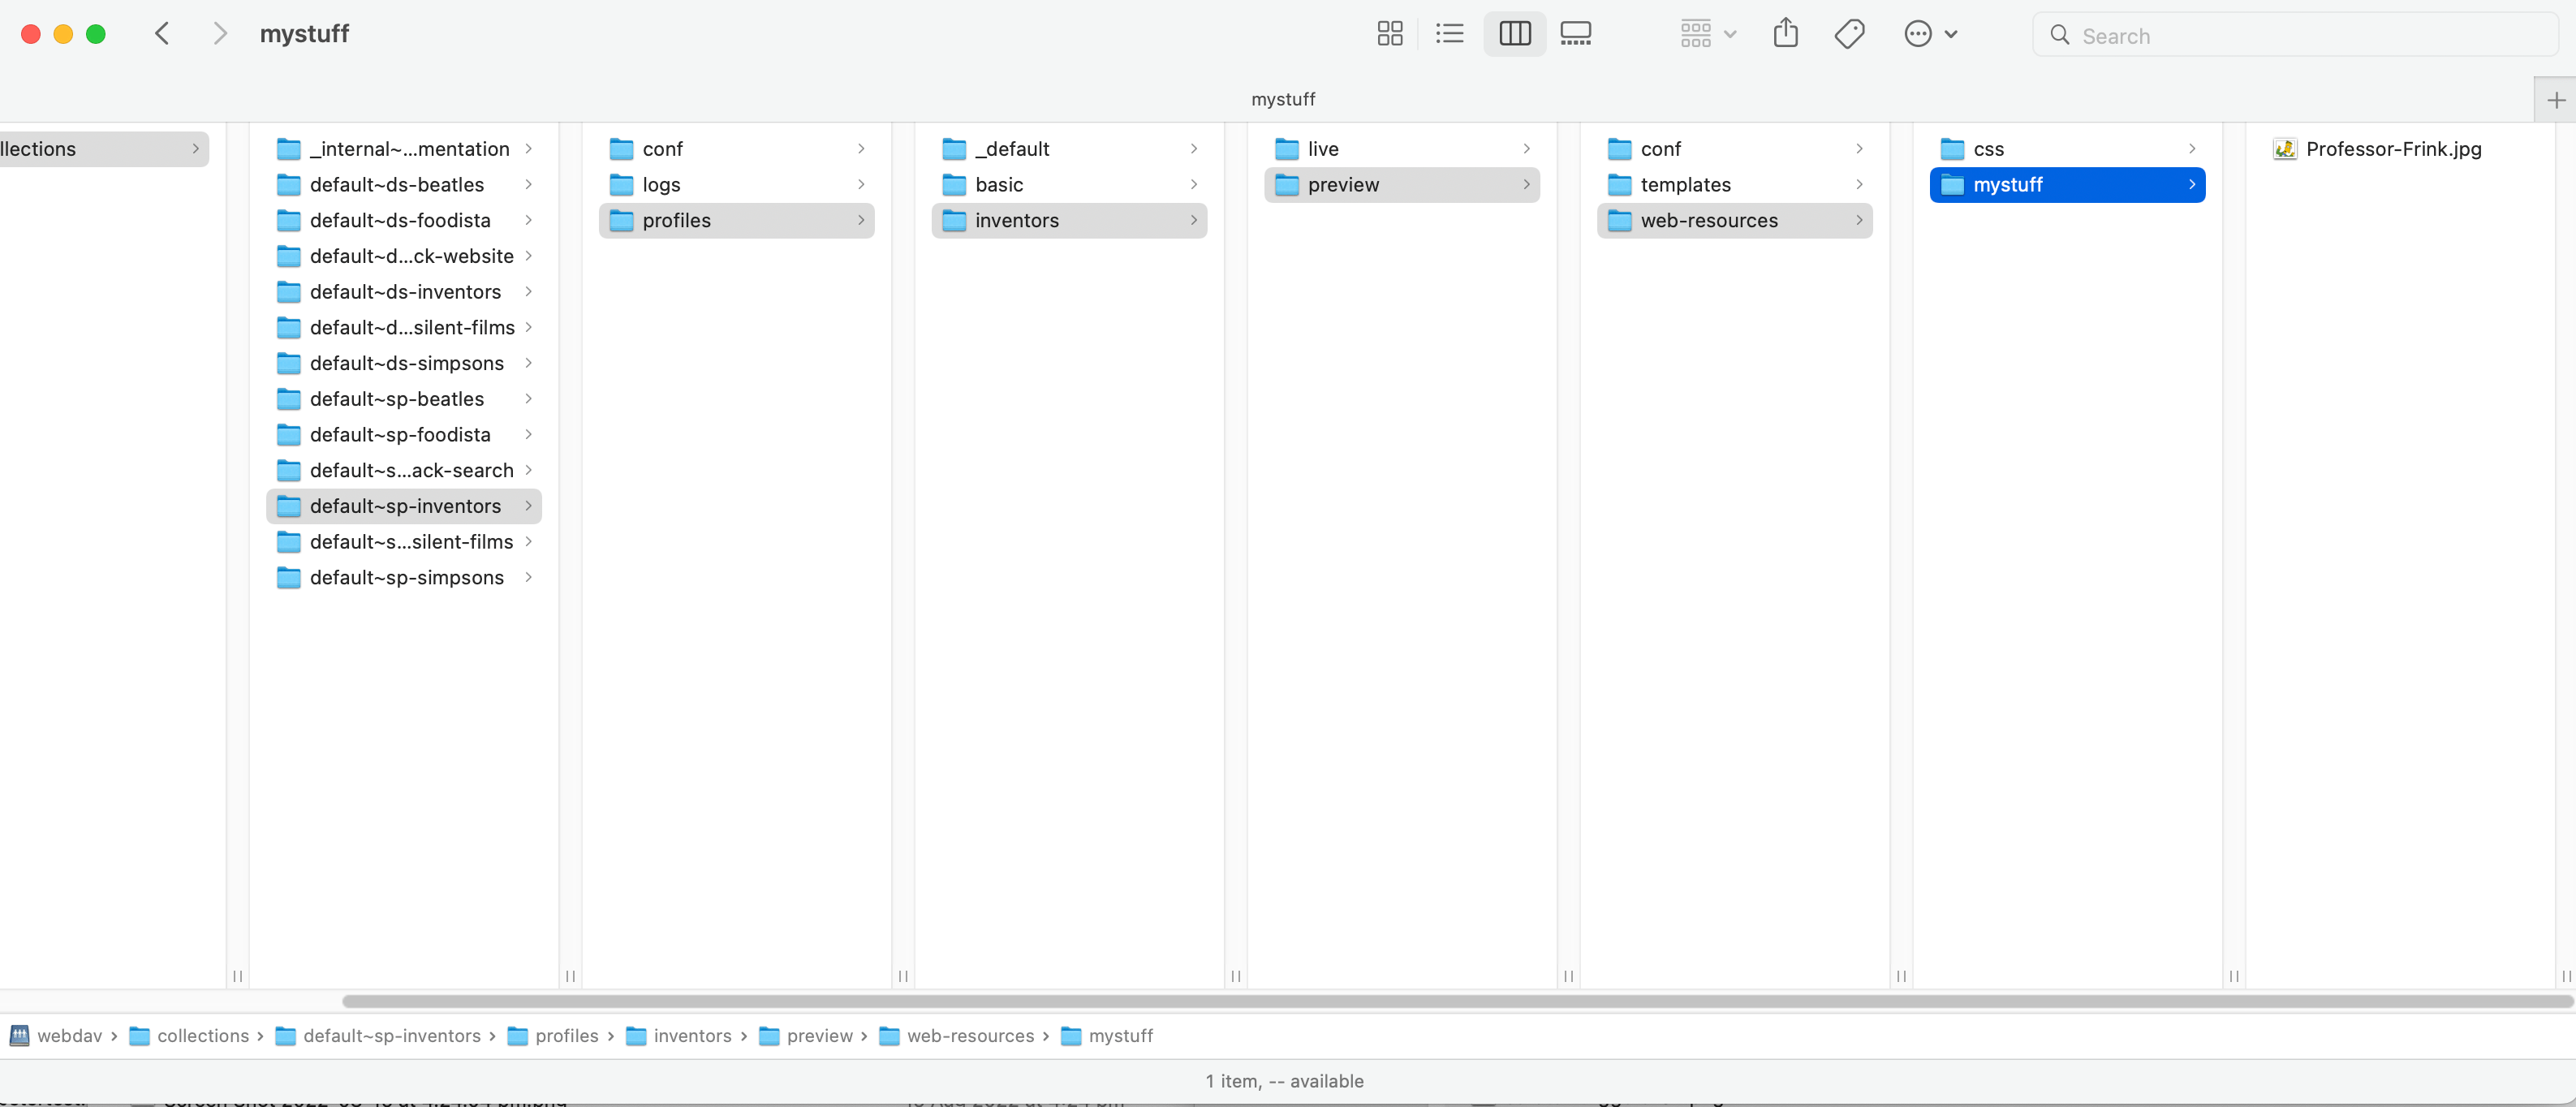
-
The folder and file will still need to be published using the administration interface as the live folder when mounted via WebDAV is read only.
6. Best bets
Best bets allows an administrator to configure a featured result item to be displayed when a user conducts a specific search.
A best bet is not a search result, but it can feature or promote a page / URL that is not part of a website that is being indexed.
For example, when a user searches for the term Foodista a best bet to featuring the Wikipedia page on Foodista wiki is displayed above the search results. This is presented in addition to the search results.
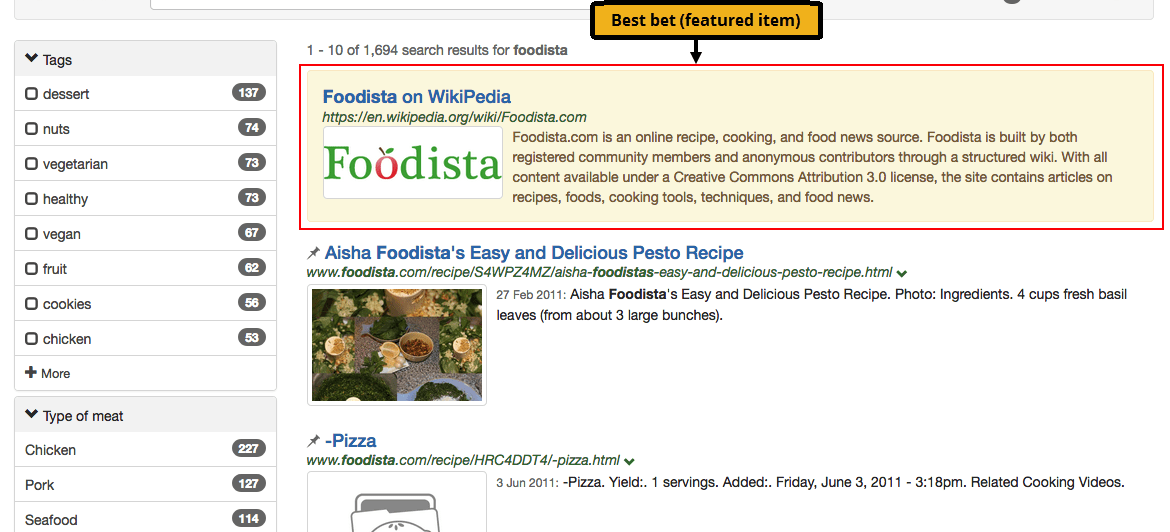
The style and appearance of the best bets in the search results is governed by the stylesheets that are applied to the search results template, and the position in the search results can be controlled by a search administrator with the ability to edit the templates. A best bet can include HTML formatting.
In the example above a HTML snippet including an image of the Foodista logo has been returned with the best bet.
6.1. Managing best bets
Best bets are managed from the best bets section of the insights dashboard. The best bets screen provides tools for creation, editing, cloning and deletion of best bets, and also the ability to publish and unpublish.
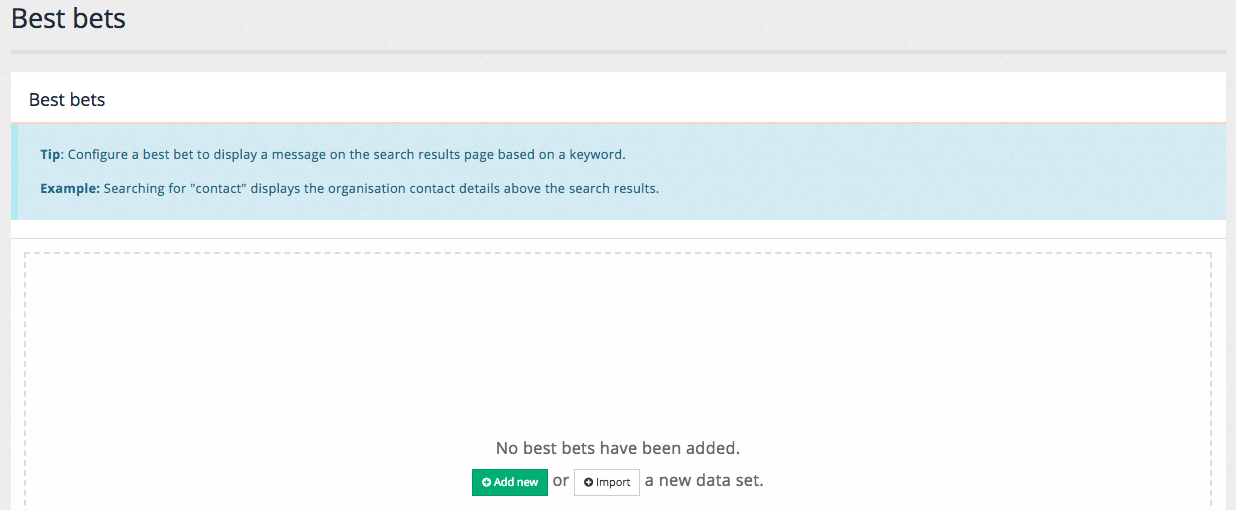
6.1.1. Initial view
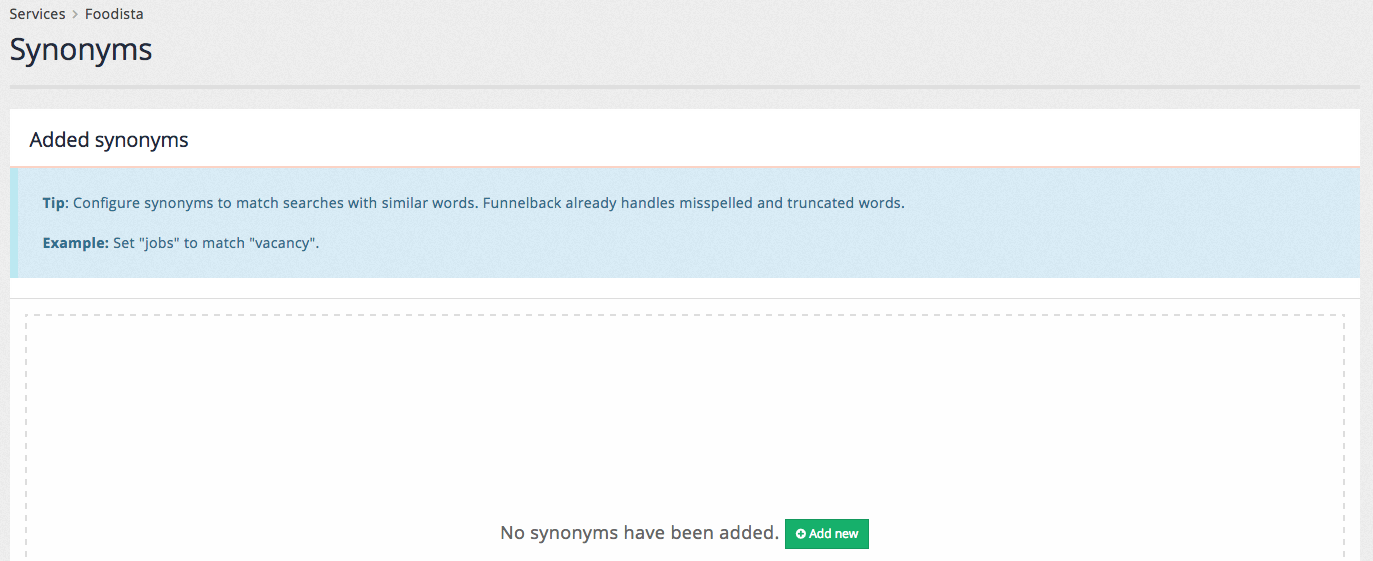
If your results page does not have any best bets defined the following screen is displayed when accessing the best bets screen:
6.1.2. Manage view
If your results page has existing best bets defined, a table listing the configured best bets is displayed. Clicking on a best bet opens the best bet inside the editor. Administrators also have the ability to publish, un-publish, clone and delete a best bet:
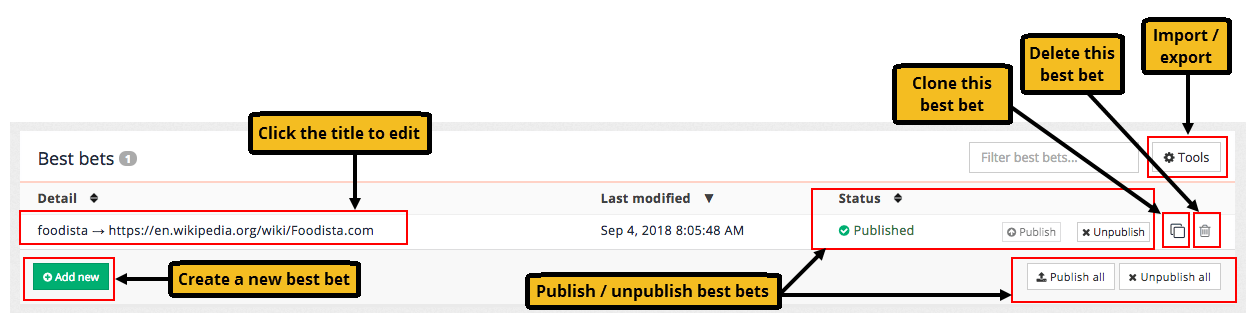
Cloning an item makes a copy of an existing best bet that can then be edited.
Best bets are not available in the live search until they are published. This allows a best bet to be created and tested before release, or staged for later use.
Clicking the add new button opens the best bet editor.
To remove a best bet it must first be set to an unpublished status by clicking the un-publish button. Once unpublished the best bet can be deleted by clicking on the delete icon.
All best bets can be removed by selecting the menu item.
6.2. Creating and editing best bets
Best bets are created, edited and published using a simple edit screen on the administration and insights dashboards.
6.2.1. Best bets edit screen
The example below shows the configuration for a simple best bet.
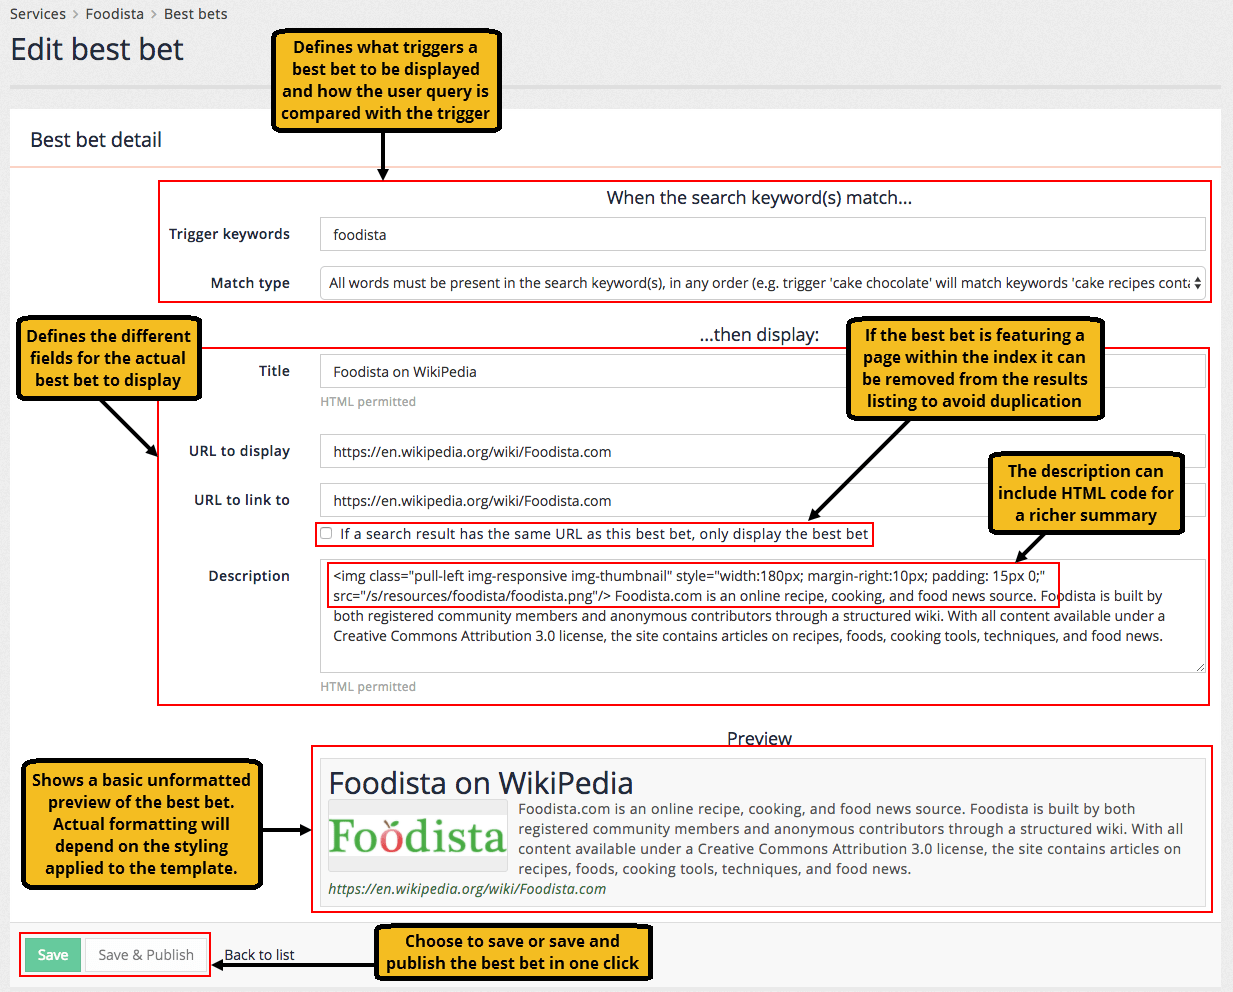
Each best bet requires the following:
- Title
-
used for the hyperlinked text for the best bet result
- Description
-
used for the summary text presented below the title. This can include HTML formatting.
- URL
-
this is the URL to link to when the best bet is clicked on. The URL can be any URL and does not need to be part of the search. There is an option that allows the URL to be removed from the set of search results if it matches the URL for the best bet.
- Trigger
-
these are the search terms that will cause the best bet to be displayed.
- Trigger type
-
this controls how Funnelback compares the user’s query to the best bet trigger. There are four types of triggers:
-
The search keyword(s) exactly matches: This will only trigger if the user’s keyword is identical to the trigger.
-
All words must be present in the search keyword(s), in any order: This is the most commonly used trigger and matches when all the trigger terms appear within the user’s query. For example, the best bet using a trigger of "red wine" will appear as long as the words "red" and "wine" both appear somewhere in the user’s query.
-
Substring match: The best bet is returned if the trigger is a substring of the user’s query. For example, a best bet with a trigger of "red" will be returned for the following queries: red wine, reduction, blackened redfish.
-
Regular expression match: (advanced) The best bet is returned if the trigger regular expression matches the user’s query. This is an advanced match type for power users allowing advanced matching such as wildcards. If you are unfamiliar with regular expressions then don’t use this trigger type. The trigger is expressed as a Perl5 regular expression.
-
| A bulk import/export option is also provided, allowing you to edit all of your best bets inside a CSV file. |
6.2.2. Previewing and publishing a best bet
Funnelback provides the ability to preview changes made to best bets and other configuration allowing changes to be made and viewed without the live search being affected.
The changes are then published to make them visible on the live search.
Best bets once live can also be unpublished - this removes them from the live search and allows them to be previewed and edited for future use.
When an item is saved but marked as unpublished it can be viewed by selecting preview from the menu attached to the search box located at the top of the insights dashboard.
This will run a search using the live index, but apply anything that is marked as unpublished. This allows a best bet to be created and tested before it is released.
Selecting live from the search box menu will run the search against the live index applying only configuration that has been published and is equivalent to what public users of the search will see.
Tutorial: Creating a best bet
In this exercise you will create a simple best bet and see how it is returned in the search results.
-
Log in to the search dashboard and open the results page manage screen for the inventors results page, linked to the female inventors search package.
-
Select customize best bets from the customize panel.
-
The insights dashboard will open on the best bets screen.

-
You can also access the best bets editor from within the insights dashboard by either selecting it from the left-hand menu of the dashboard or via the default dashboard screen of your service.
-
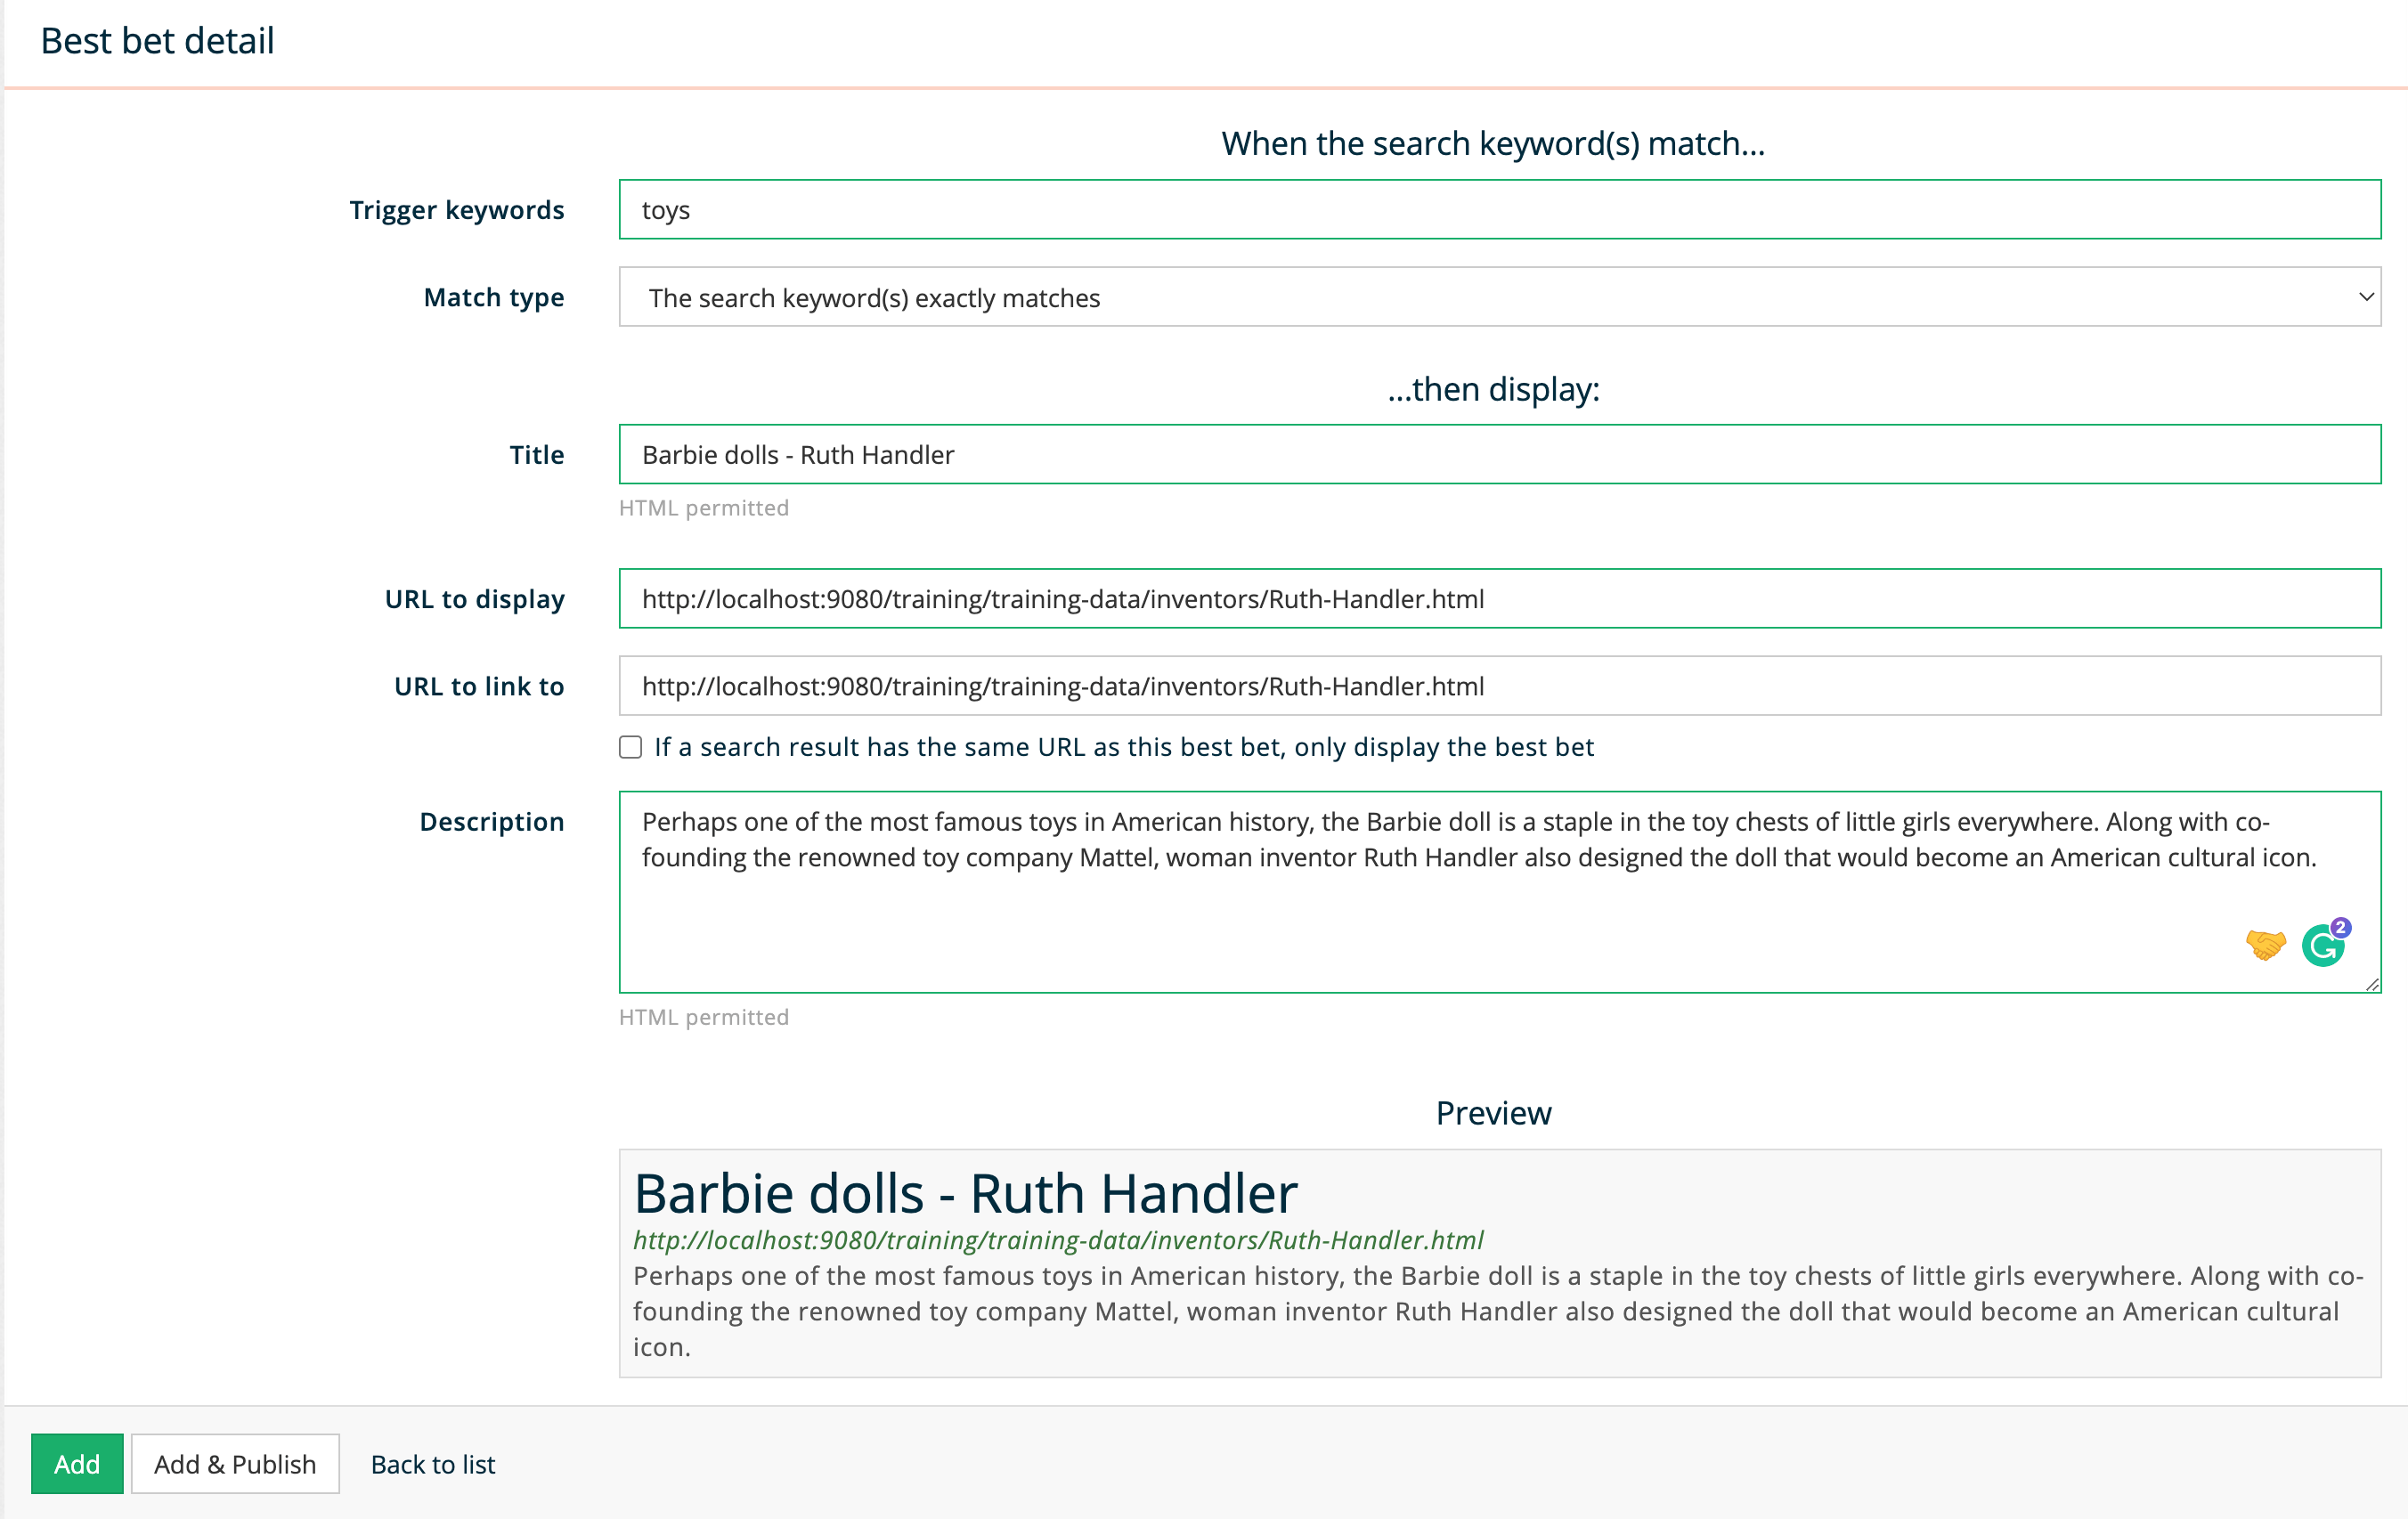
Click the add new button to open the best bets editor. Observe that the preview is updated dynamically as data is entered into the form. Enter the following into the best bets:
-
Trigger keywords: toys
-
Match type: The search keyword(s) exactly matches
-
Title: Barbie dolls - Ruth Handler
-
URL to display/link to:
https://docs.squiz.net/training-resources/inventors/Ruth-Handler.html -
Description: Perhaps one of the most famous toys in American history, the Barbie doll is a staple in the toy chests of little girls everywhere. Along with co-founding the renowned toy company Mattel, woman inventor Ruth Handler also designed the doll that would become an American cultural icon.
-
-
Click the add button (not add and publish) to create the best bet.
-
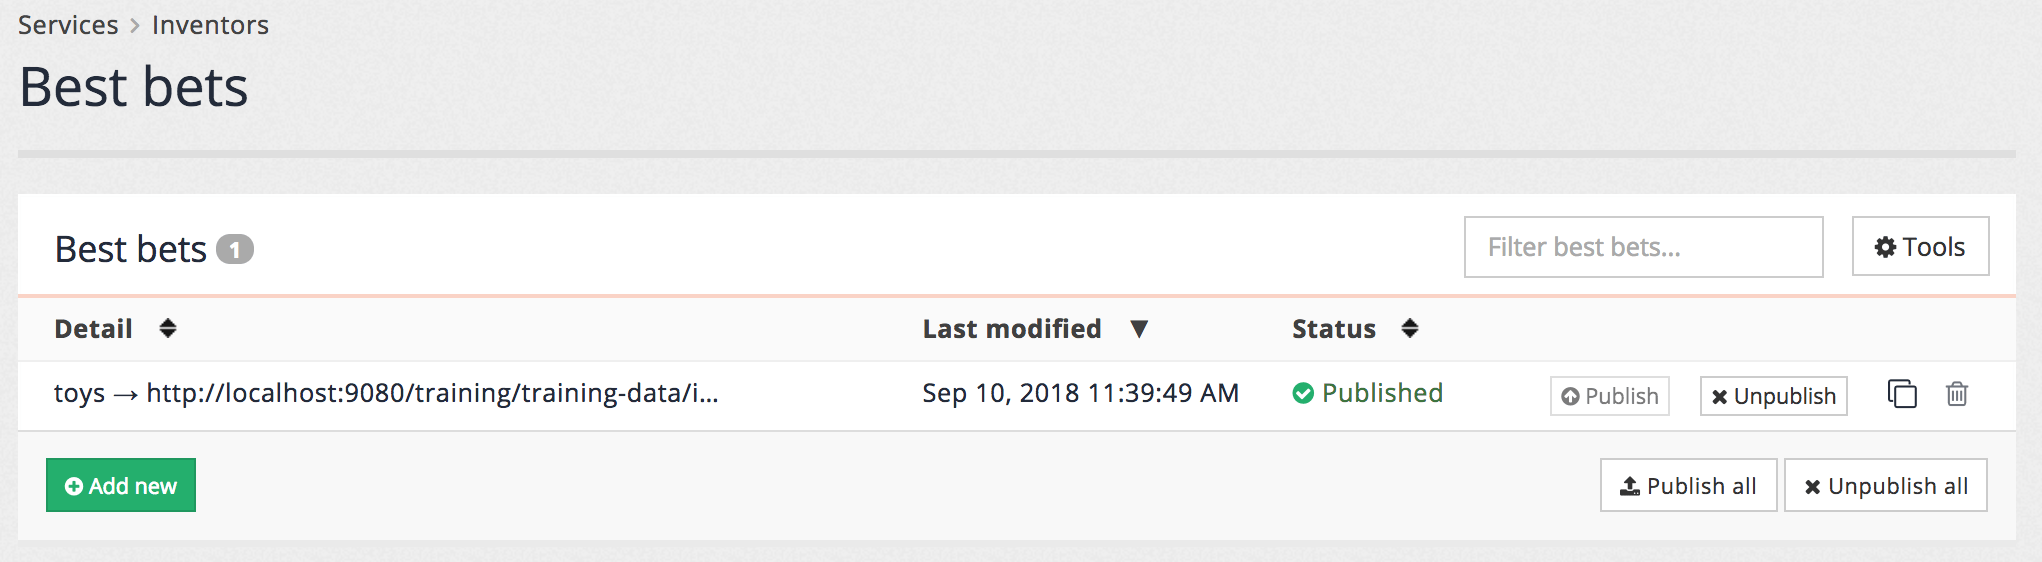
Observe that the best bet now appears in the list of best bets, and that it has a status of new. There is also a button available to publish the best bet (don’t click this yet).

-
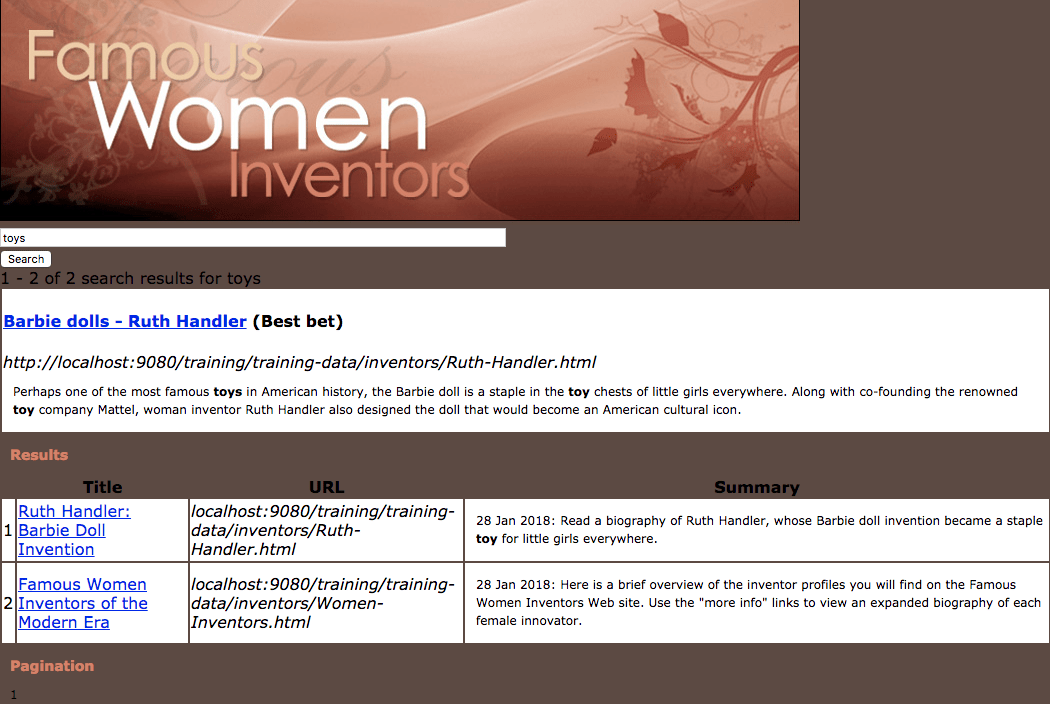
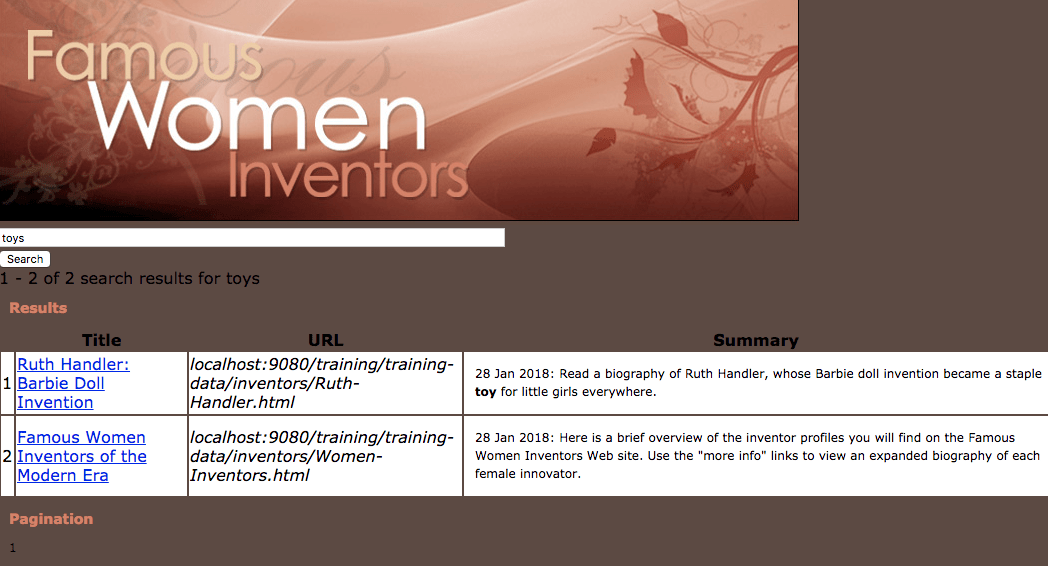
Run a search for toys using the search box at the top of the insights dashboard. Ensure that preview is selected from the drop-down menu.

-
Observe the best bet appearing above the search results.
-
Return to the insights dashboard and run the query again, this time ensuring that live is selected from the drop-down menu. Observe that the same results are returned, but the best bet is not displayed. This is because the best bet has not yet been published.
-
Return to the best bets editor and publish the best bet, observing that the status now changes to published, and that the unpublish button is now clickable. Clicking unpublish will return the best bet to the new / unpublished state.
-
Re-run the query ensuring that live is selected from the drop-down menu. Observe that the best bet is now returned with the results. Clicking add and publish on the best bet creation / editor screen has the same effect as clicking the publish button on the listing screen.
-
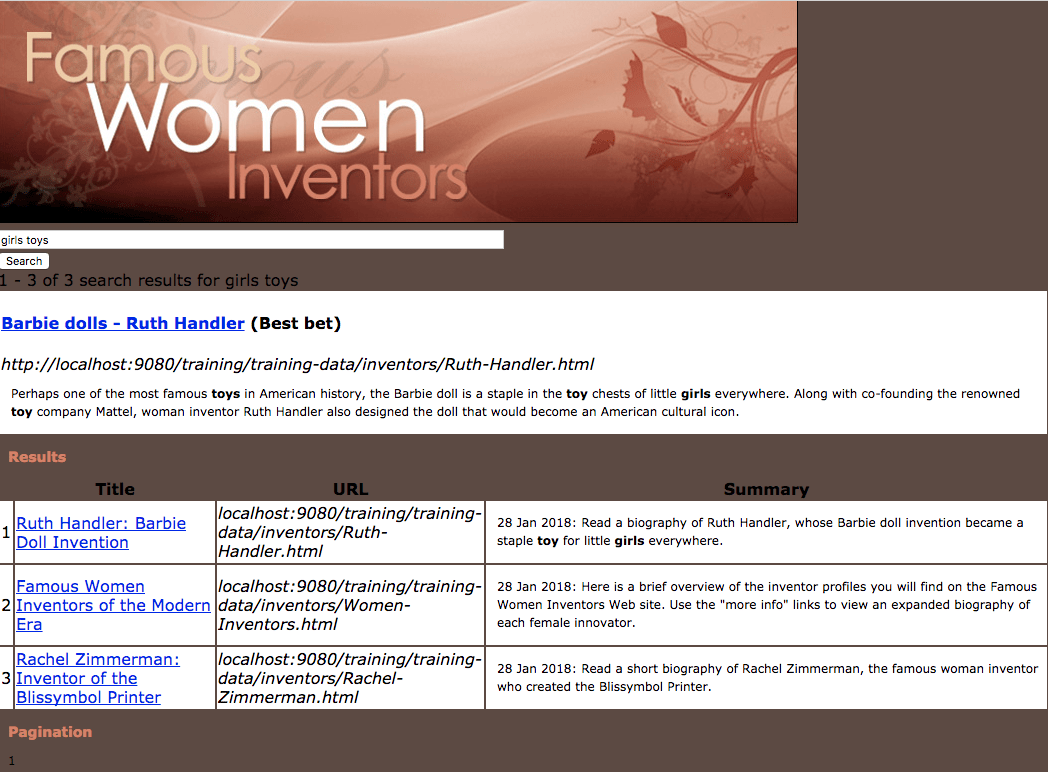
Run a search for girls toys. Observe that the best bet is not returned. This is because the trigger for the best bet has been set to the search keyword(s) exactly matches - this means that the best bet will only trigger if the user’s query exactly matches toys. Return to the best bets editor and change the trigger to substring match. Save and publish the best bet and rerun the search for girls toys. Observe that the best bet is returned. This is because the trigger toys is a substring of (or contained within) the user’s query, girls toys.
Extended exercises: best bets
-
Experiment creating some additional best bets with different trigger types and ensure that the trigger matching makes sense.
-
Add some HTML formatting to a best bet so that the thumbnail image of the inventor is displayed beside the best bet. Hint: you may need to use the
<#noescape>Freemarker function.
7. Synonyms
A synonym by definition is any word that has the same or nearly the same meaning as another in the same language (for example, lawyer, attorney, solicitor). When compiled together in a database or system of these terms, the result is a thesaurus.
Funnelback supports user-defined synonyms that are configured in a similar manner to best bets.
Funnelback uses the defined synonyms to expand or modify the user’s query terms behind the scenes. This allows an administrator to use synonyms for additional query modification beyond the thesaurus-like definition of a synonym.
Synonyms in Funnelback can be used to:
-
expand a term into a set of equivalent terms. For example, when somebody includes the word lawyer somewhere in a query also search for attorney or solicitor.
-
expand acronyms. For example, if query includes the term moj also search for ministry of justice
-
map user language to internal language, or non-technical language to the equivalent technical terms. Users often don’t know the exact technical words to use and this can prevent them from finding what they are looking for. For example, map bird flu to H1N1.
-
auto-correct known misspellings. For example, if a query includes the word qinwa automatically replace this with quinoa. Funnelback does include a spelling suggestion system, but synonyms can enhance the user experience by fixing a misspelling without a user needing to click on an extra did you mean link.
|
Tutorial: Synonyms
This exercise shows how you can use synonyms to alter the words entered by a user when they run a search.
-
Log in to the administration interface and select the inventors reults page. Open the synonyms editor by selecting customise synonyms from the customise tab, or switching to the insights dashboard and selecting synonyms from the left hand menu or by clicking on the synonyms tile.
-
The synonyms listing screen loads and is very similar to the screen used for listing best bets. Create a new synonym by clicking the add new button.
-
The synonyms editor screen appears allowing the quick entry of multiple synonyms. Create synonyms rules to equate the words nappy and diaper. This requires the creation of three rules that expand each of the words into a search for any of the two words. Add a rule with the following:
-
When these keywords are submitted:
nappy -
Transform them to:
[nappy diaper] -
Apply the transformation if: all words must be present in the search keyword(s), in any order
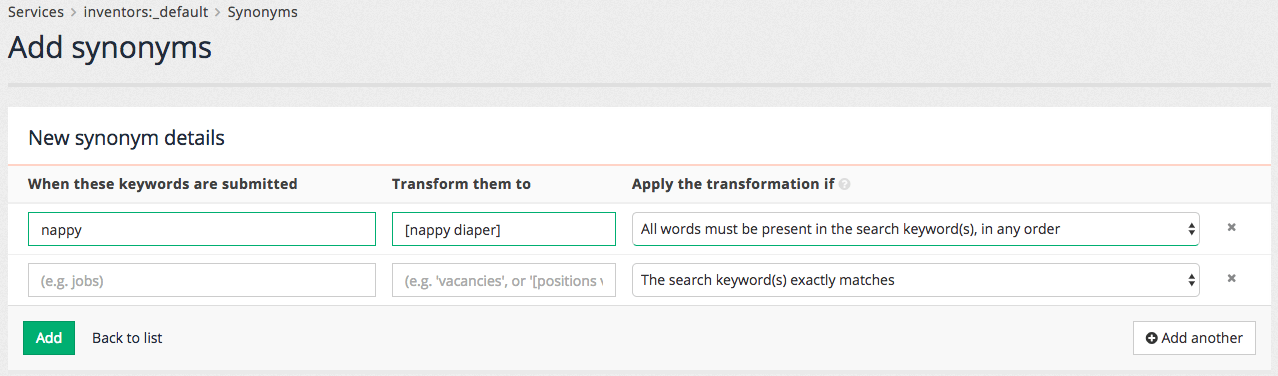
The first column contains the trigger term (nappy) and is compared with the search query entered by the user. If a match is found (as per the match type in the third column) then the term is transformed to the value in the second column. The square brackets indicate that the terms should be ORed together.
With this in mind the synonym translates as:
If the word nappy appears anywhere within the user’s query then search for nappy OR diaper.
To ensure the words are equated add a second synonym that provides the same expansion, but when diaper is the trigger word.
-
-
Add another synonym with the following details:
-
When these keywords are submitted:
"white out" -
Transform them to:
["liquid paper" "white out"] -
Apply the transformation if: the search keyword(s) exactly matches
The quotes tell Funnelback to treat the phrase as a single word for the purposes of the expansion.
With this in mind the synonym translates as:
If the query matches the phrase white out exactly then search for "liquid paper" OR "white out"
-
-
Press the add button. The synonyms screen loads showing the defined synonyms:
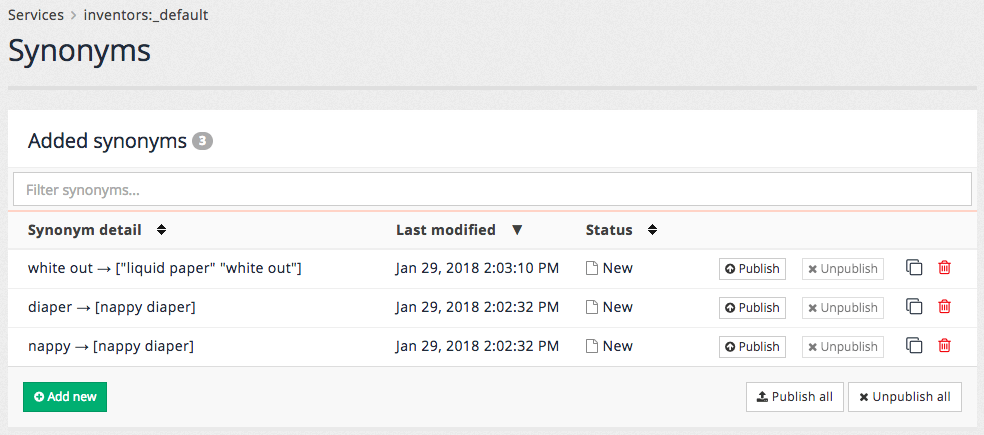
-
Test the synonym by searching for nappy from the search box at the top of the insights dashboard screen, ensuring the preview option is selected from the drop-down menu. Observe that the search results include items for diaper. If the word nappy appeared anywhere in the search results then it would be highlighted along with the word diaper.
-
Publish all the synonyms by clicking the publish all button.
Extended exercises: synonyms
-
Create a synonym to auto-correct the spelling for barby. Add a rule with the following:
-
When these keywords are submitted:
barby -
Transform them to:
barbie -
Apply the transformation if: all words must be present in the search keyword(s), in any order
-
-
Rewrite the white out synonym rule to perform the same synonym expansion rule using a regular expression. You will need to delete the existing rule added in the previous exercise before testing. Hint: the regular expression to use is
(?i)\bwhite out\b|\bliquid paper\b. Word boundary operators should be used to prevent substring style matching from occurring.
8. Curator
Curator allows an administrator to define rules and actions that are applied to a query. Each curator rule sets consist of one or more triggers, and one or more actions to perform.
8.1. Curator manage screen
The curator management screen allows an administrator to create, edit, clone, publish and unpublish curator rules.
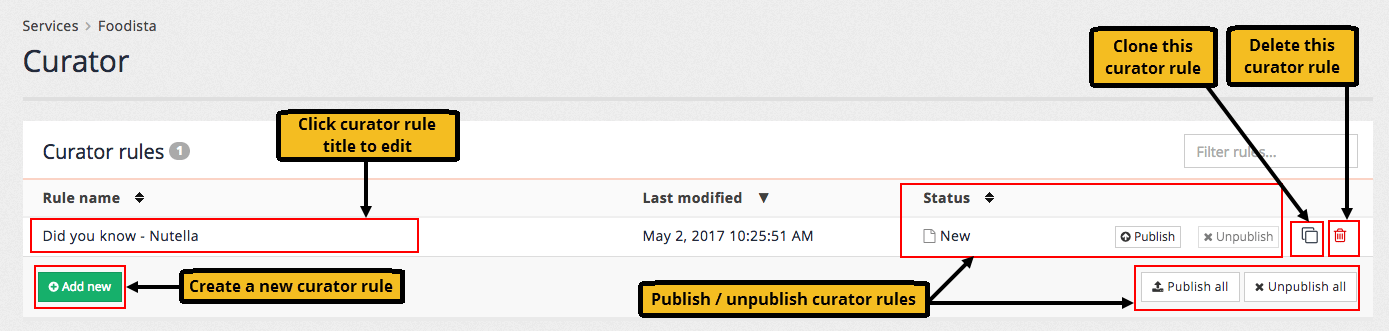
8.2. Curator triggers
Triggers are added on the When the search request match this criteria … tab.
A curator trigger is a set of conditions that when satisfied result in the curator rule running.
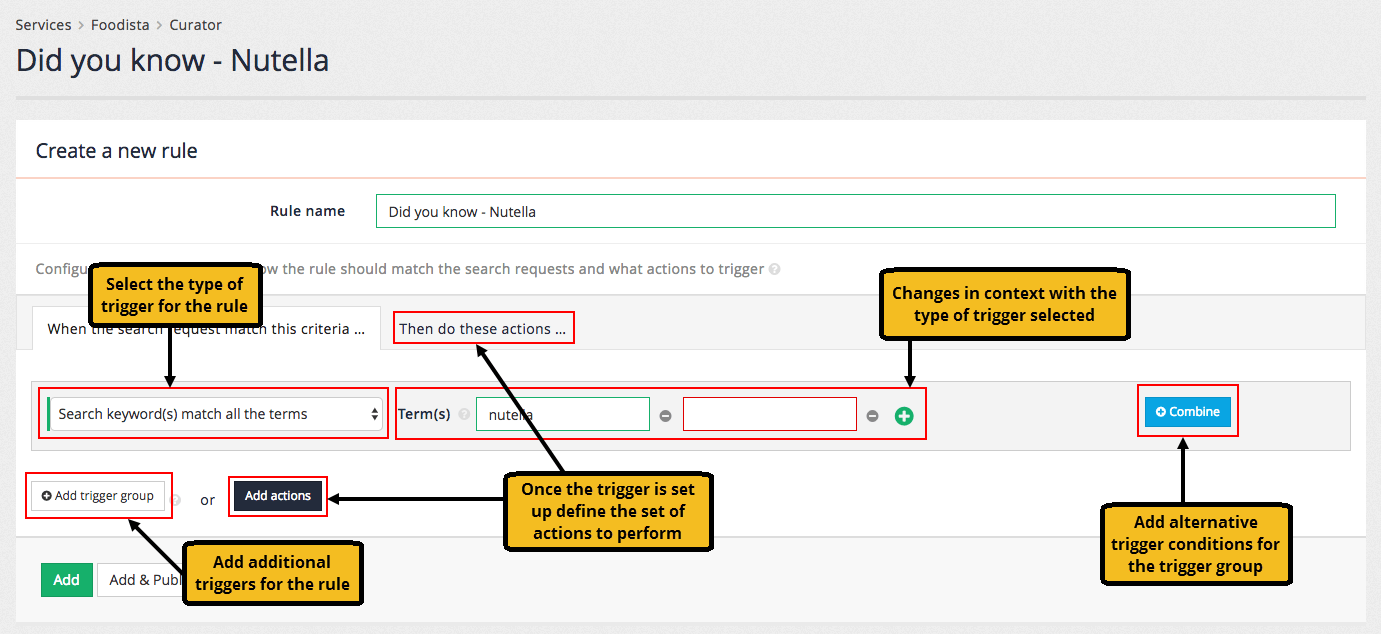
The curator trigger can be made up of a number of different trigger conditions that are combined to form the overall curator trigger.
Each of the curator trigger conditions consist of a trigger type and any additional fields that are required for the type.
Trigger conditions are collected into trigger groups. Each trigger group contains one or more trigger conditions

8.2.1. Trigger types
Curator supports a selection of different trigger types that are used for each condition that makes up a trigger group. Additional fields are required for each trigger and vary depending on the chosen trigger type. Most triggers have a positive and negative form (indicated below in the parentheses).
- Facet selection
-
trigger if a specified facet is selected (or not selected)
- Country of origin
-
trigger if a search originates (or does not originate) from a specific set of countries. Country of origin is determined from a reverse IP address lookup on the user’s IP address.
- Date range
-
trigger if the search is made within (or outside of) a specific date period.
- Keyword
-
trigger if the search matches (or does not match) specified keywords. The keywords can be matched to the search as an exact match, substring match, regular expression match or if the search contains all the keywords. The
queryparameter is the default comparison target, but this can be changed with theui.modern.curator.query-parameter-patternresults page option.To create a trigger where the search matches any of the words, create several exact match triggers for your rule (containing the words) and these will be ORed together. - Modify extra search run
-
trigger activates when extra search is enabled with specified ID. It allows modifying extra search run i.e. change of query.
- Number of search results
-
trigger based on a numeric comparison with the number of search results returned. The comparison supports standard numeric comparisons to the number of results (equals, not equals, greater than, greater than or equal to, less than, less than or equal to).
- URL parameters
-
trigger if the search URL contains (or does not contain) specific parameter/value combinations.
- Segment/attribute
-
trigger if the user belongs to (or does not belong to) an industry segment of attribute derived from the user’s IP address.
- Query is empty or not provided
-
trigger if the search is submitted without providing any query terms - this includes null, empty string or a whitespace query.
If you are using this trigger with an older Freemarker template and are displaying a message or advert as an action you may need to update the template code for these to display.
8.3. Curator actions
Once you’ve added your rule triggers, define what the rule does by setting up at least one action. Actions are added on the Then do these actions … tab.
The action is executed on search when:
-
curator trigger conditions are fulfilled
-
and the
queryparameter is provided, or the trigger Query is empty or not provided is set.
|
8.3.1. Action types
The curator supports a selection of different action types. Additional fields are required for each action and vary depending on the chosen action type.
- Add to, replace or transform search keywords
-
modifies the user’s query to add, replace or transform terms within the query. Can be used to provide similar behaviour to synonyms but conditionally triggered.
- Add URL parameters
-
allows adding URL parameters to a request before executing search.
You should not add the
queryparameter to your request using this action.If you do add
query, it is added to the search request and will appear in your input parameters field in data model. However, neitherquestion.querynorresponse.queryAsUpdatedfields will be updated and will hold original value, as this parameter is handled specially.Modifications to the
queryparameter should be made using the Add to, replace or transform search keywords curator action.The
collectionparameter cannot be modified and adding this will have no effect. - Disable extra search run
-
allows disabling specified extra search run.
- Display a simple message
-
allows a simple informational message to be returned along with the search results.
- Display an advert
-
allows an item equivalent to a best bet to be returned along with the search results. Custom attributes can also be returned in the data model when this trigger fires.
- Promote results
-
promotes specific URLs to the top of the set of search results. The specified URL for promotion must match the indexed URL (
result.indexUrlin the data model) and will not work with URL modifications made using thealter-live-urlplugin.The promote results action will not work if you have either -daat=0or-service_volume=lowset amongst the query processor options in the results page settings. - Remove results
-
removes specific URLs from the set of search results. The specified URL for removal must match the indexed URL (
result.indexUrlin the data model) and will not work with URL modifications made using thealter-live-urlplugin.The remove results action will not work if you have either -daat=0or-service_volume=lowset amongst the query processor options in the results page settings. - Remove URL parameters
-
allows removing URL parameters from a request before executing search.
- Set sorting options
-
specifies how the search results will be sorted, overriding any other sort configuration.
- Select facet category
-
allows adding URL parameters for facet category before executing search.
- Deselect facet category
-
allows removing URL parameters for facet category before executing search.
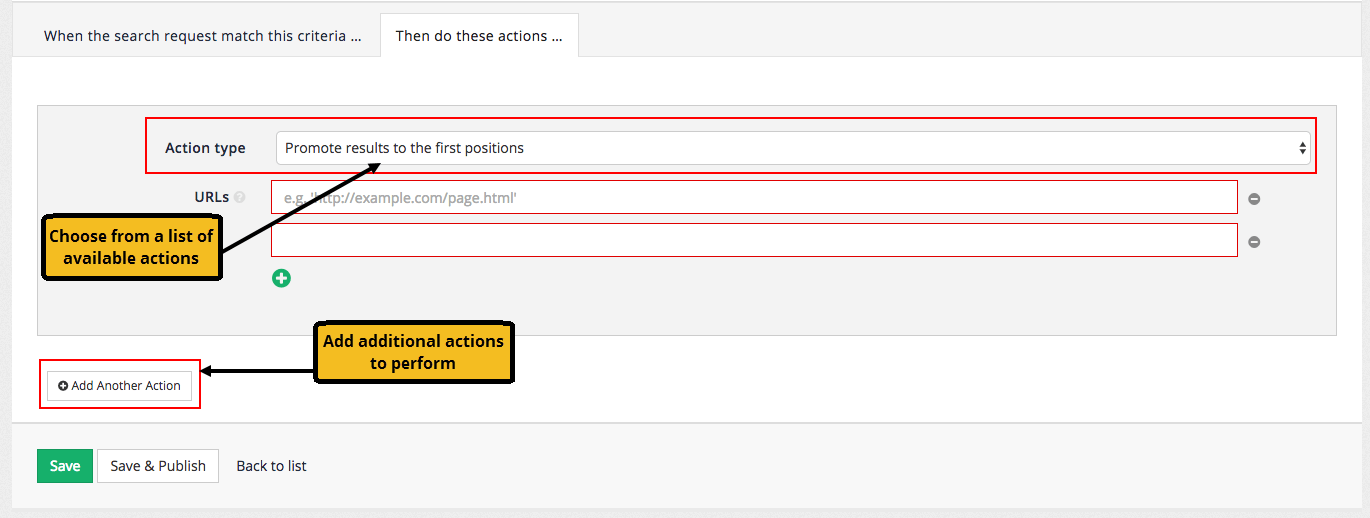
Actions are added and combined in a similar manner to triggers.
Tutorial: Create a simple message curator rule
In this exercise a curator rule will be created to add a simple factual message when a specific keyword is entered.
-
Log in to the insights dashboard, select the inventors collection then open the curator manager by clicking on curator in the left hand menu, or clicking on the curator tile.
-
Add a new curator rule by clicking the add new button
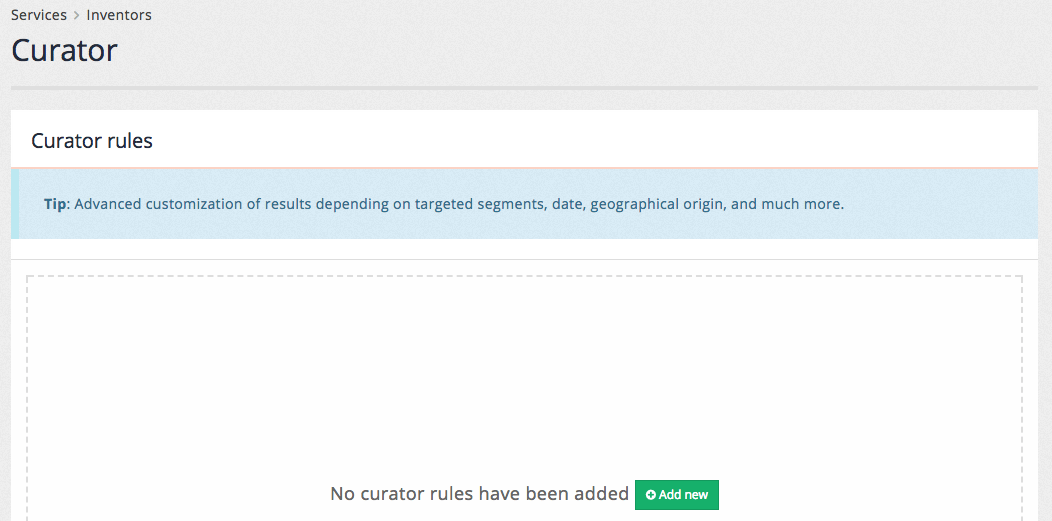
-
The curator rule editor loads. Define a name for the curator rule. The rule name needs to be unique and is used to identify the rule in the curator manager. Observe that the title updates as the rule name is entered.
-
Rule name: Inventors day - Germany
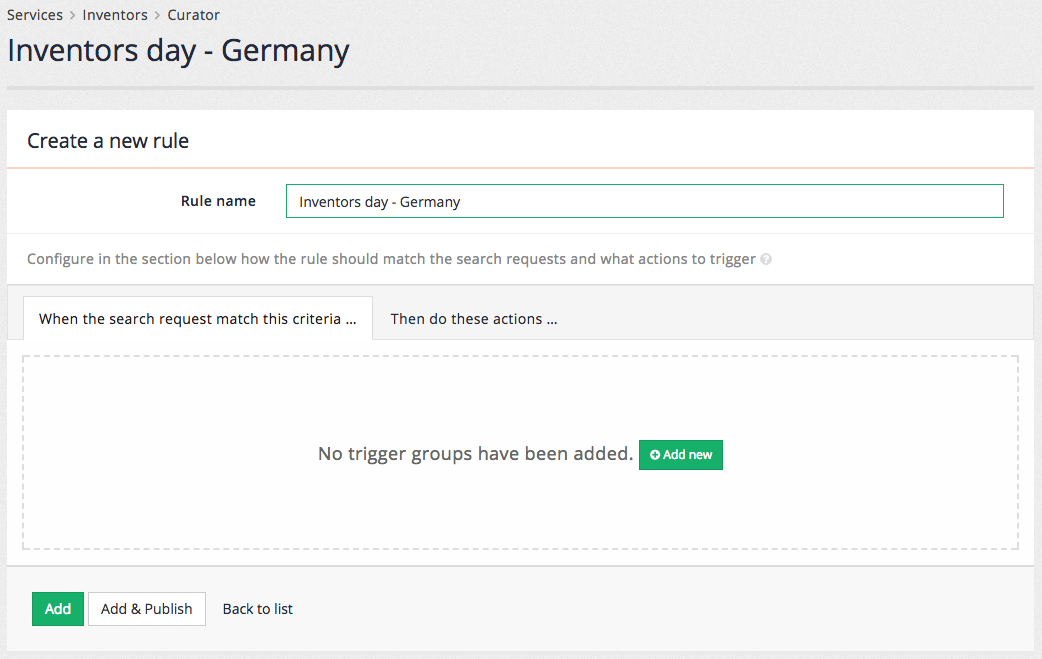
-
-
Create a trigger for the curator rule. The trigger defines the conditions that will cause the rule to run. A rule that will be triggered whenever someone searches for anything including the word lamarr will be defined. Add a trigger group for the curator rule by clicking the add new button. This creates a new trigger group and populates it with a blank rule.
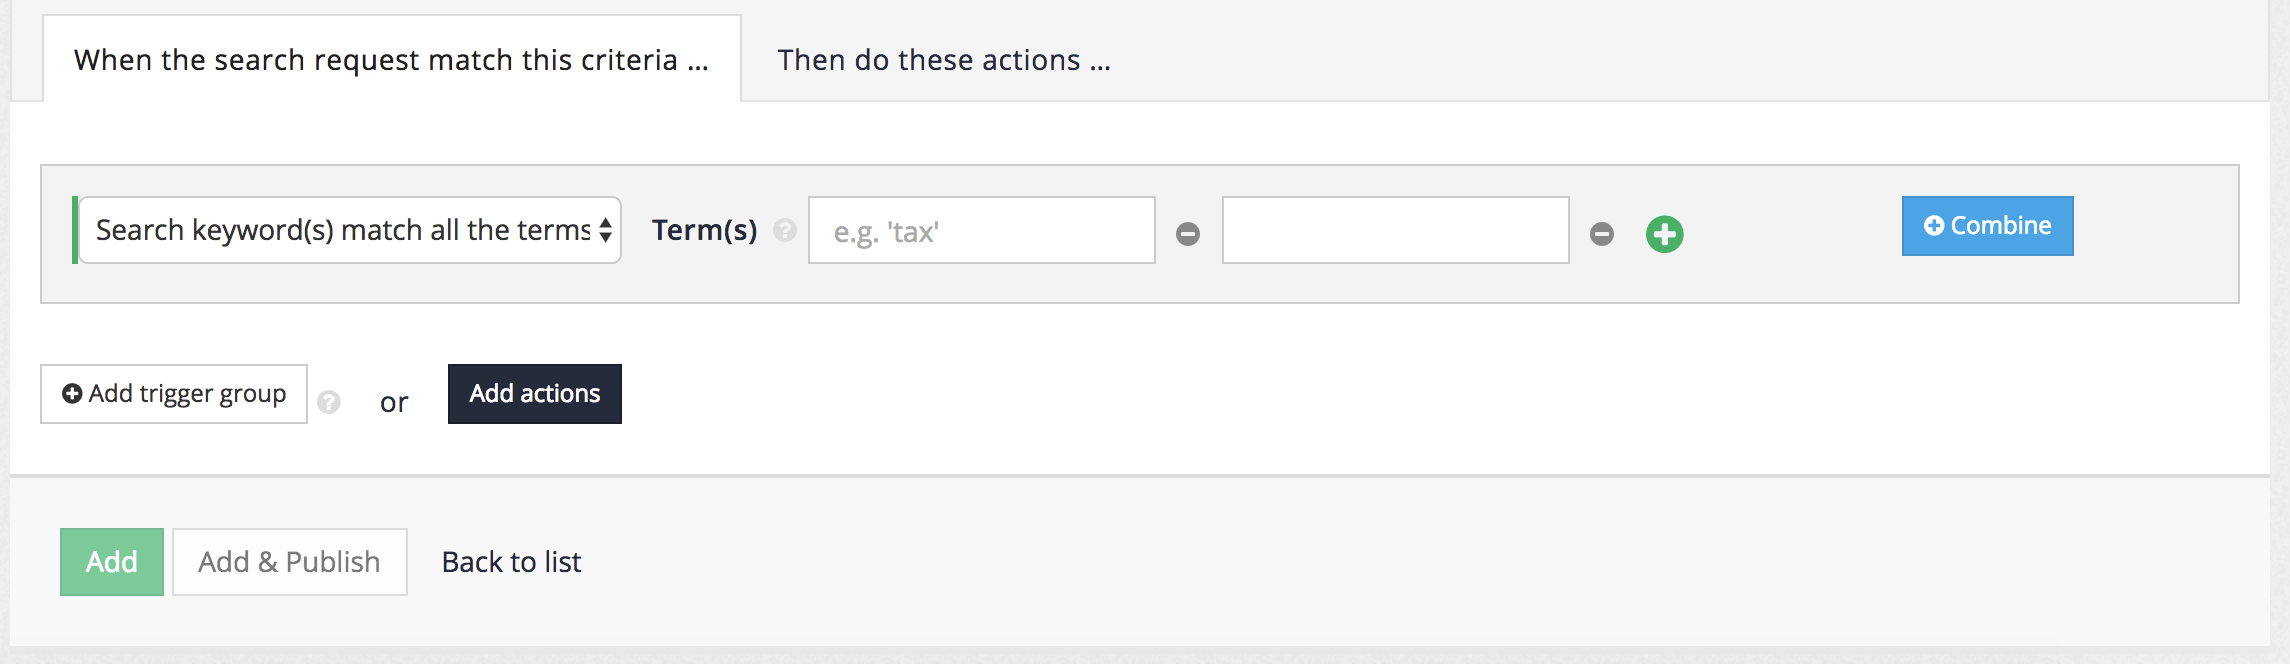
-
Choose the trigger type by clicking on the dropdown menu. This displays all the trigger options that are available when configuring curator. For this rule we want the default value of search keyword(s) match all the terms.
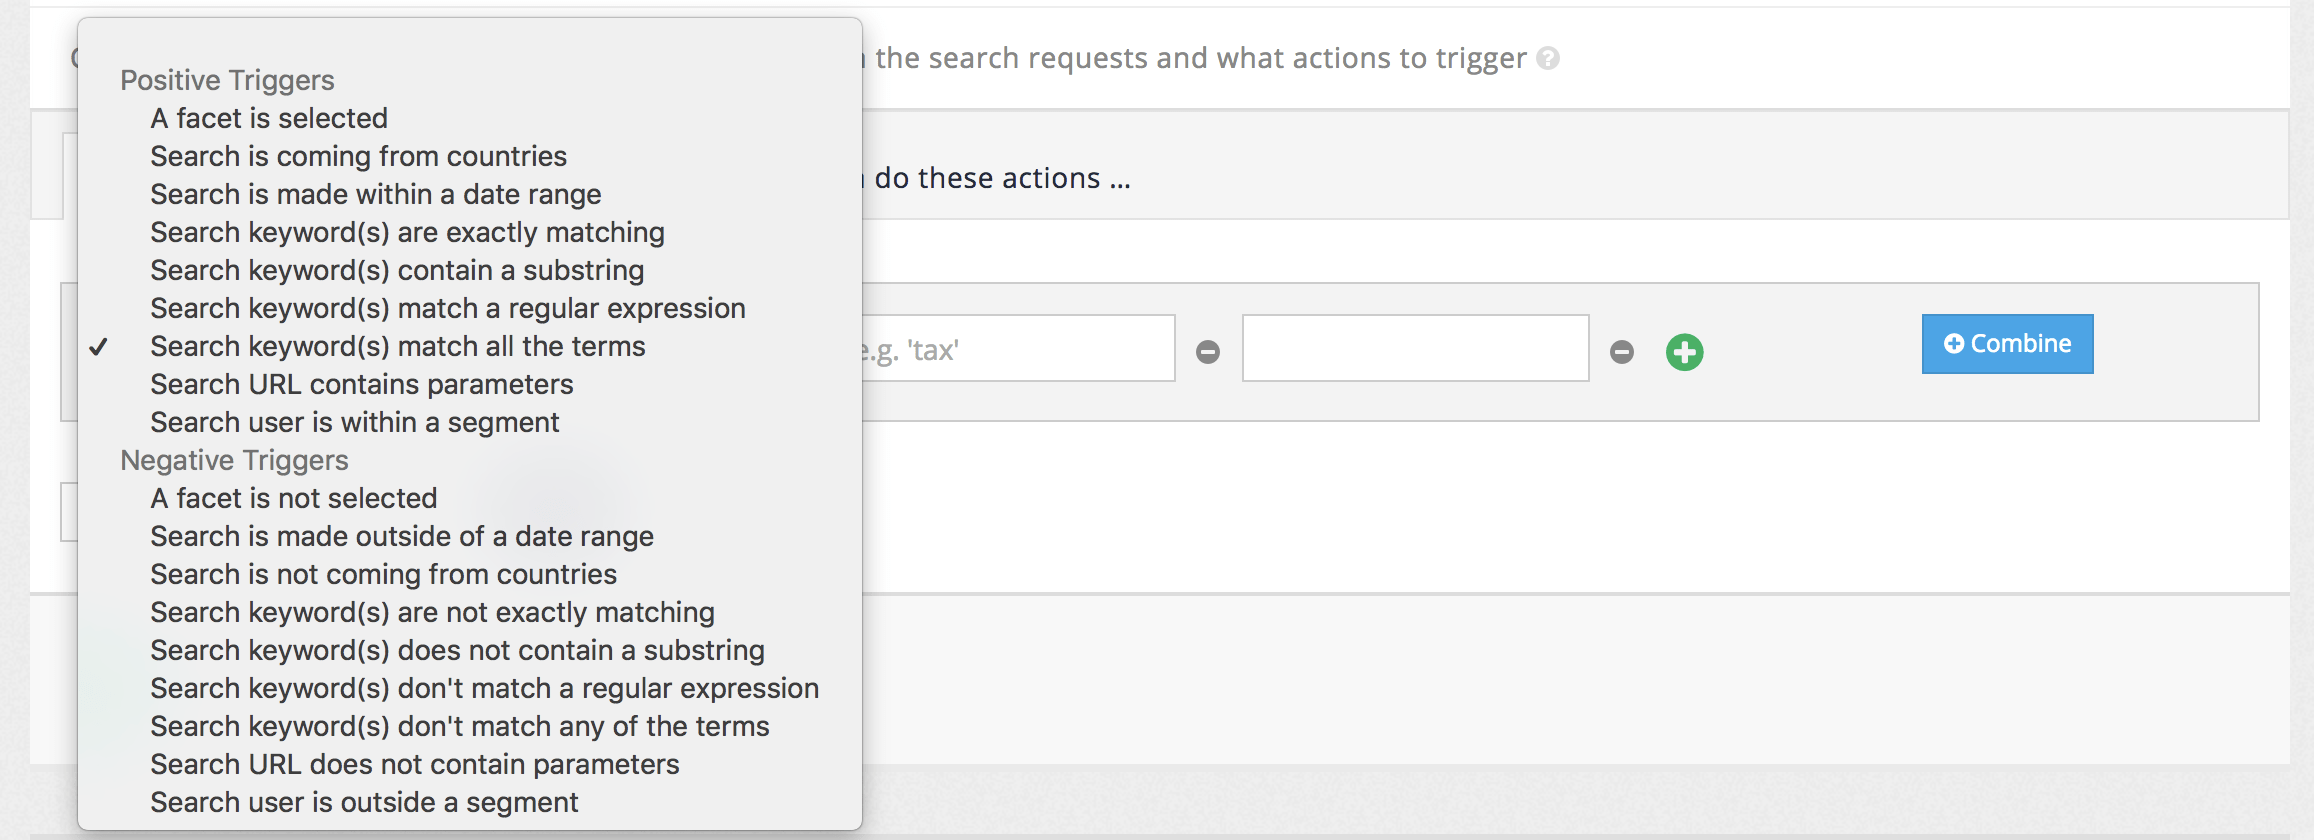
-
Define the additional values required for the trigger type. Enter
lamarrinto one of the term fields. Remove the other empty term field by clicking the adjacent - button.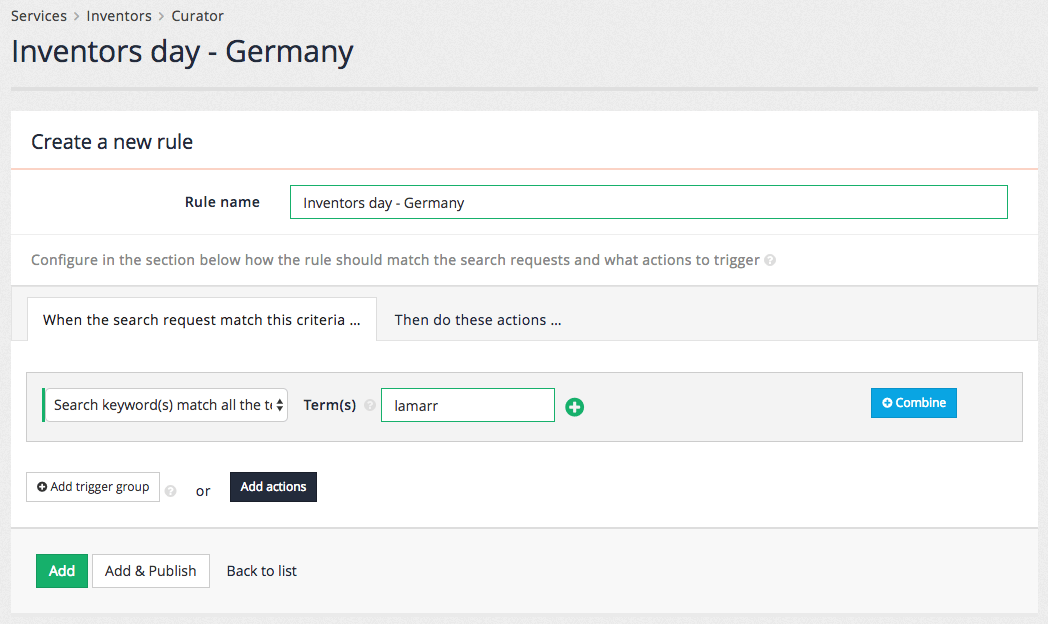
-
This completes the definition for the trigger. Add an action by either clicking on the then do these actions… tab then clicking the add new button, or by clicking the add new button on the trigger screen.
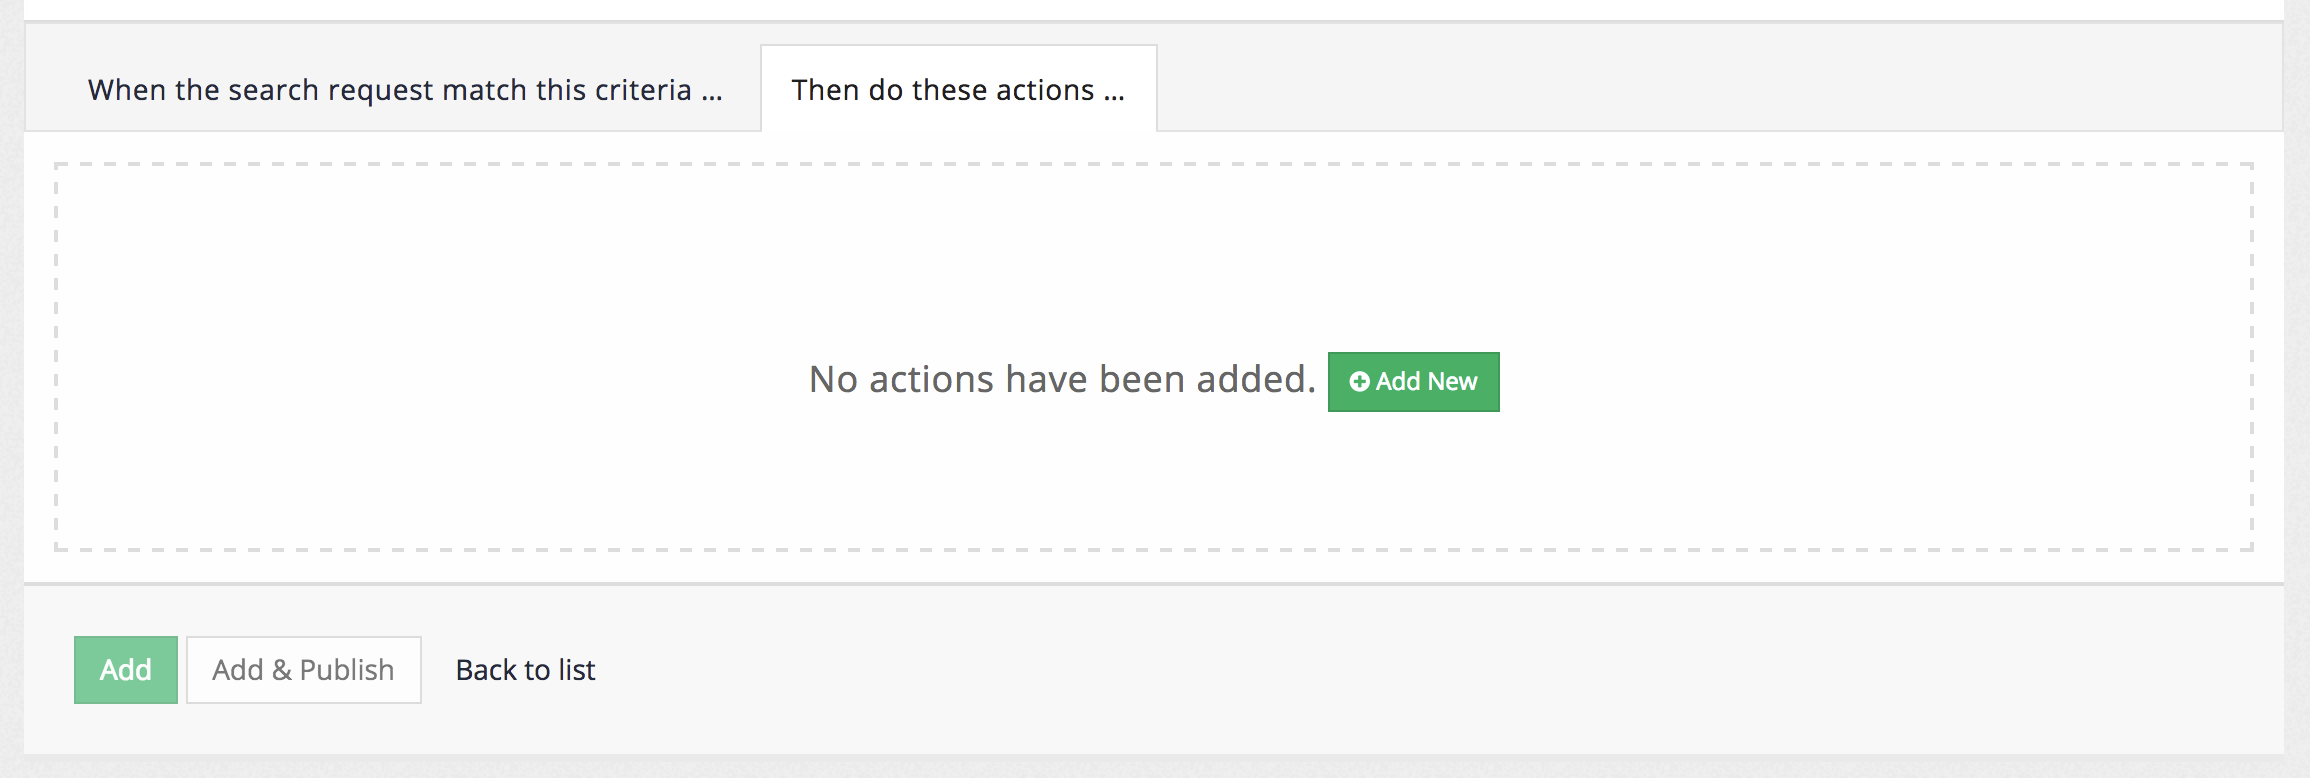
-
Choose an appropriate action type from the action type dropdown menu. Choose:
-
Action: display a simple message
Observe that the list of fields updates when the action is changed. The fields for defining an action are dependent on the type of action chosen.
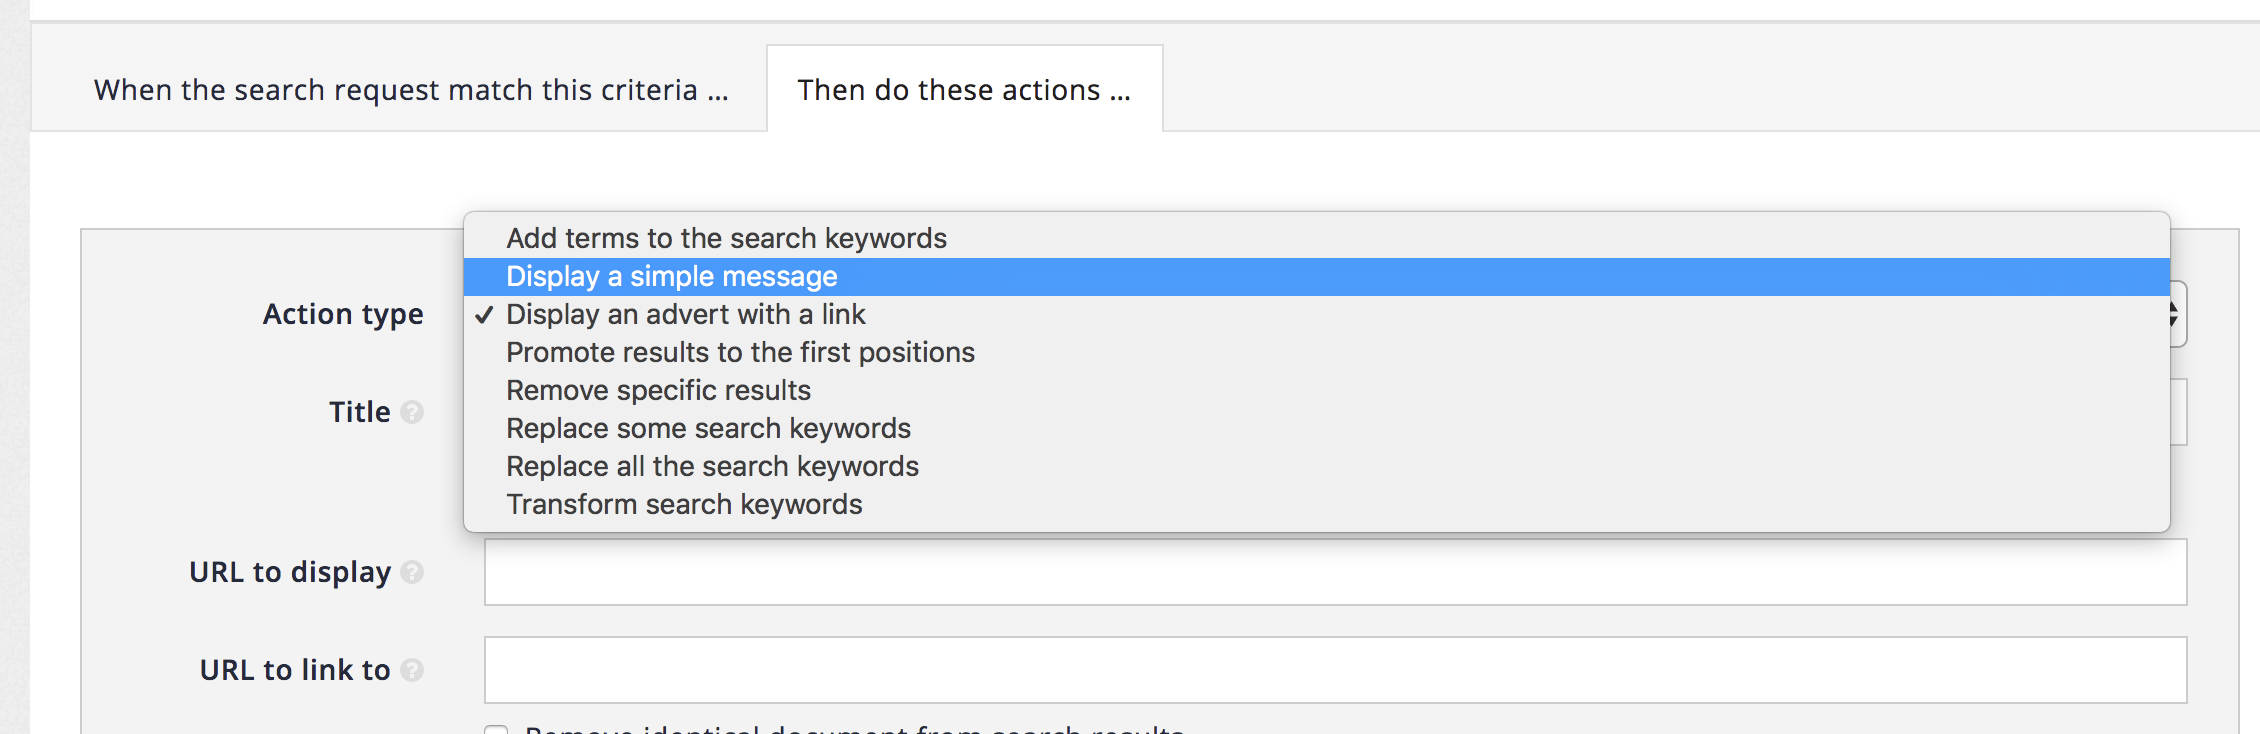
-
-
Define the additional action fields. Enter the message into the message box.
-
Message: Did you know that Hedy Lamarr’s birthday, November 9, is Inventors' Day in the German-speaking countries Germany, Austria and Switzerland?
HTML code can be input into this field and observe that a preview is displayed as the message is input. The preview gives a rough idea of how the message may look, but the actual look and feel in the search results page will be governed by the CSS style sheets that the website designer applies.
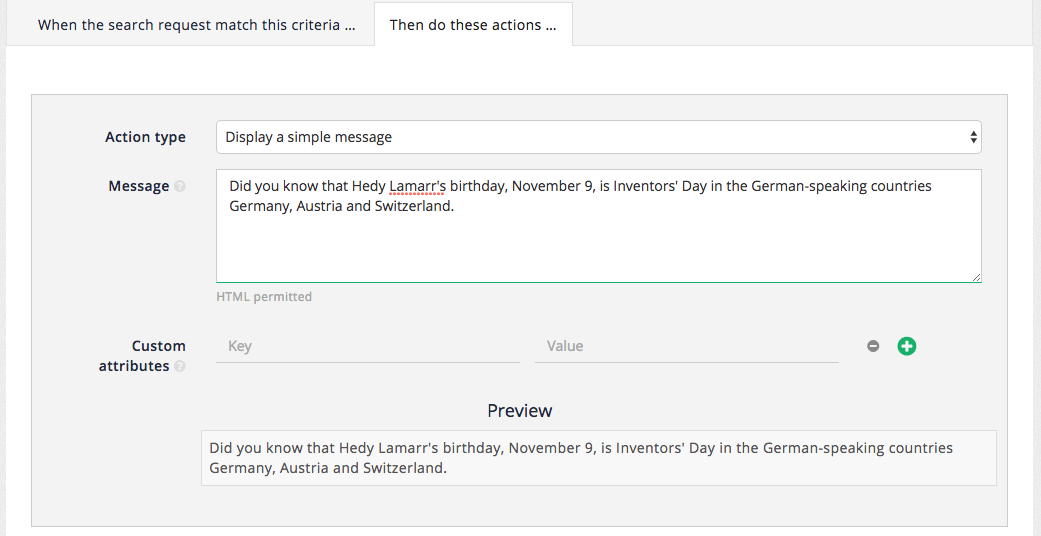
-
-
This completes the definition of the action for this curator rule. Save the rule by clicking the green add button. The curator manager reloads displaying the curator rules that are defined for the service.
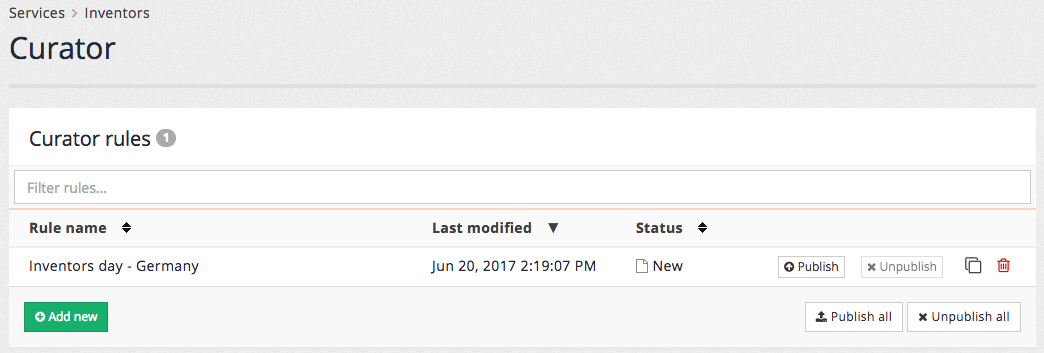
-
The curator rule is now saved but unpublished. This means that it can be previewed using the search box at the top of the insights dashboard, by running a search and ensuring that preview is selected. Test the rule by running a search for lamarr.

-
Observe that the search results for lamarr are displayed and that the message that was just configured is displaying above the search results.
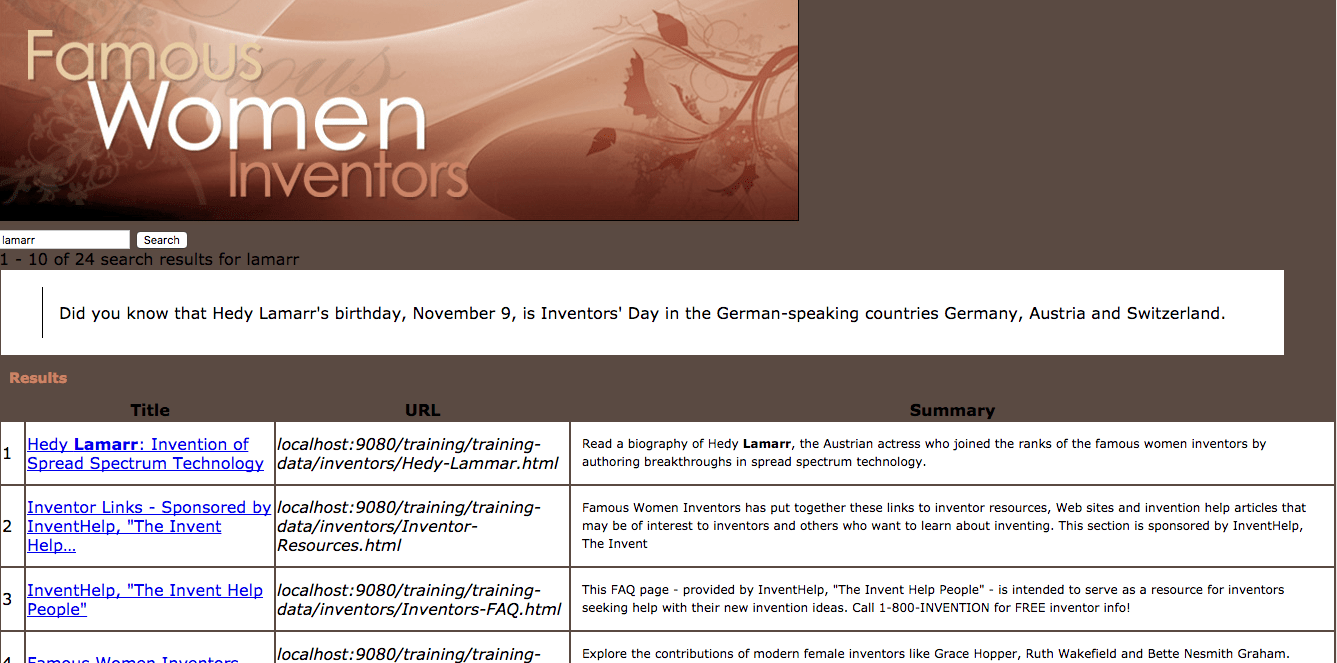
-
Return to the curator manager and edit the curator rule by clicking on the rule name. The editor reopens allowing modification of the rule.
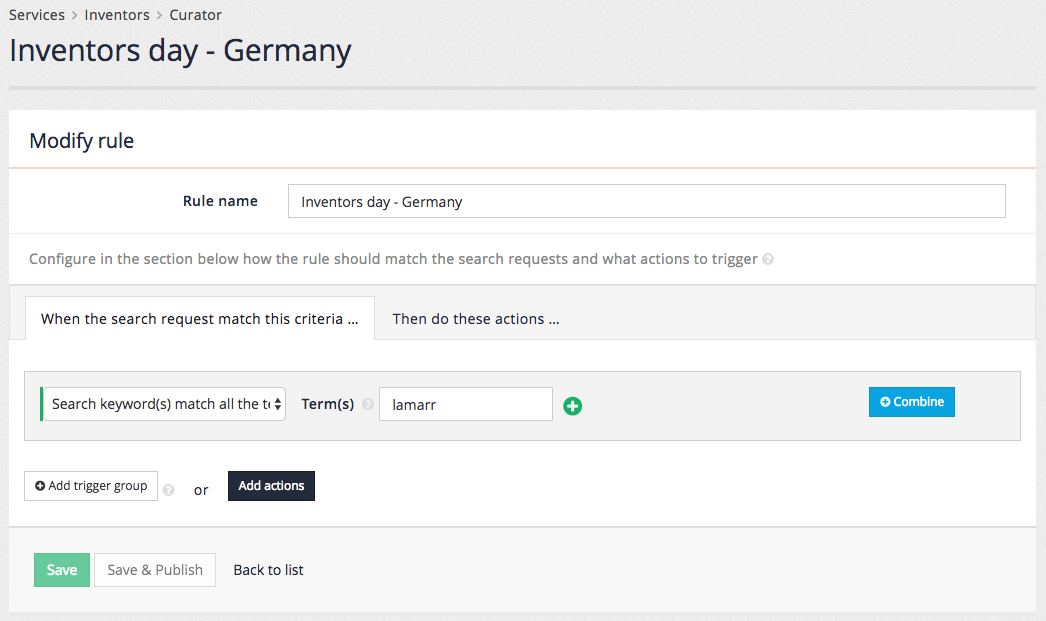
-
Add a second action. Click on the add actions button, or select the then do these actions… tab then click the add another action button. Observe that an empty action is added below the first action.
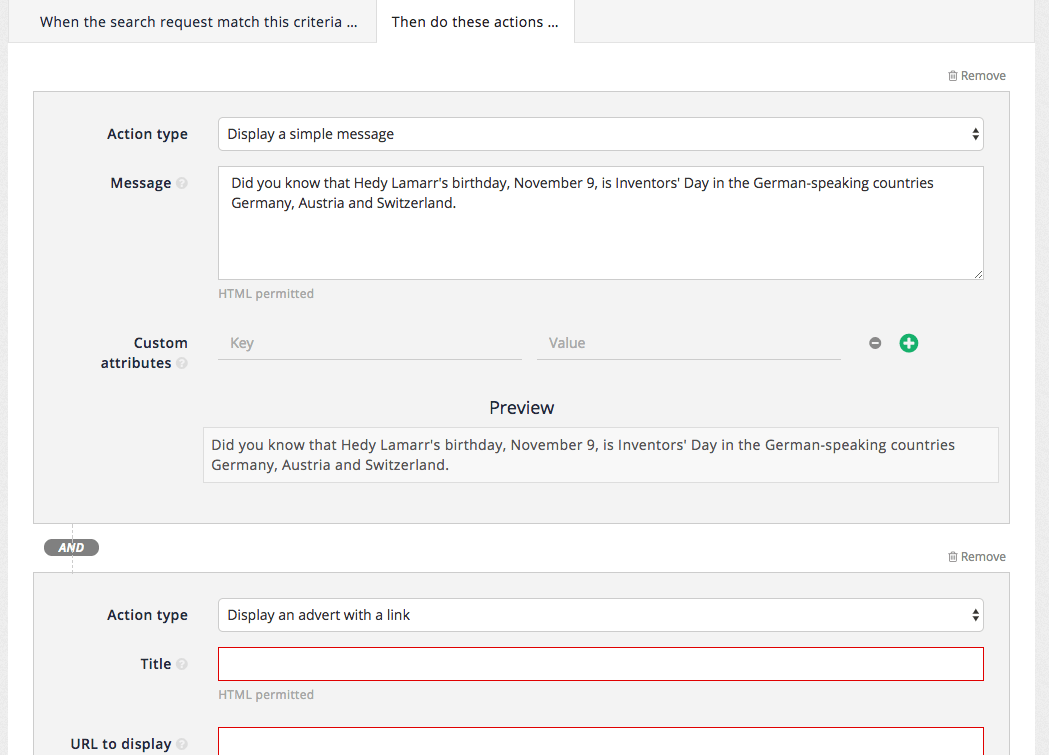
-
Change the action type of the new action to add terms to the search keywords, and enter
technologyinto the terms field. Save the action then re-run the search for lamarr.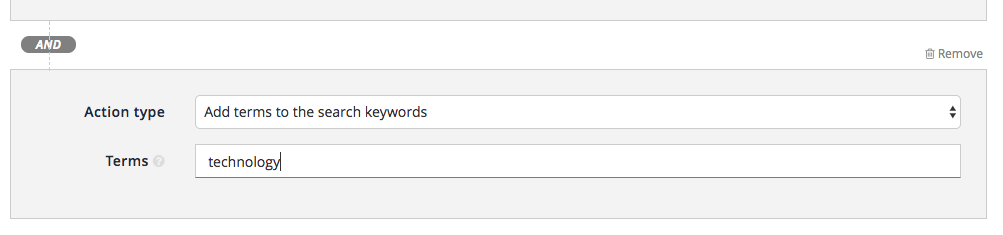
-
Observe that the order of results returned changes, and that the word technology is highlighted in the result summaries. Also observe that the message is still being displayed. This demonstrates a curator rule that has two actions for a single trigger.
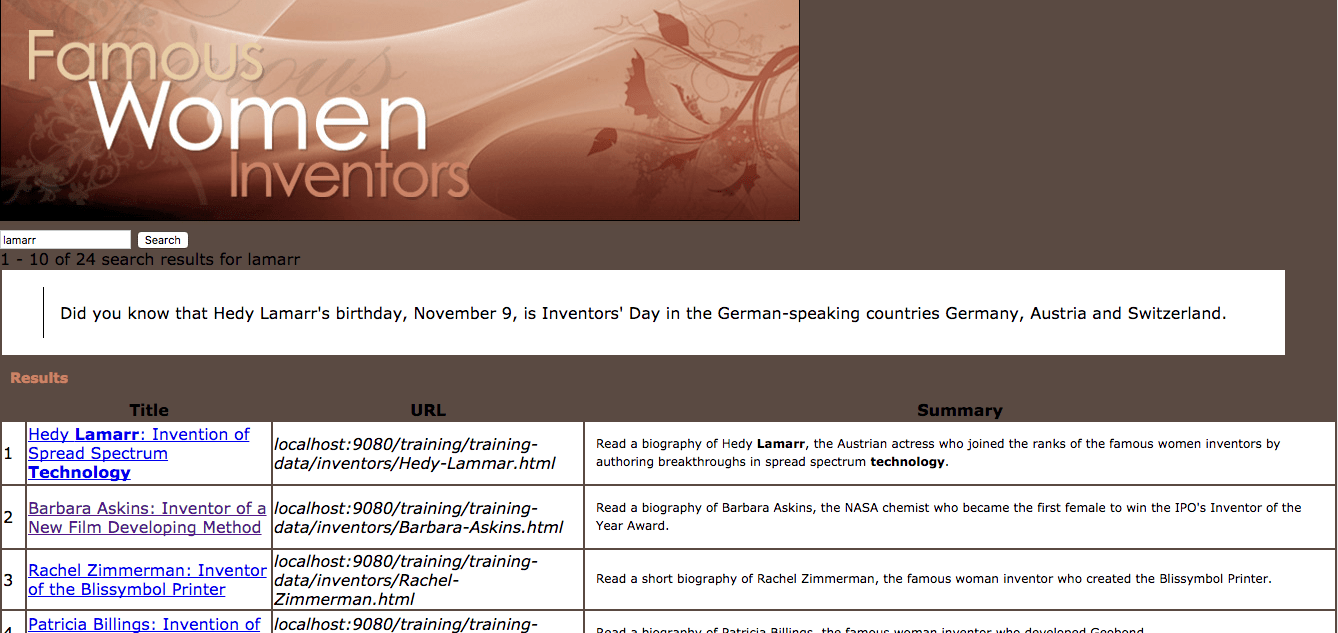
-
You can also combine multiple triggers with ANDs and ORs. For example you may want the Inventor’s Day message to be displayed on the actual date, November 9th.
-
To do so, return to the curator manager and edit the rule.
-
You may want the rule to trigger when the query "lamarr" is entered AND the date is November 9th. To do so, click on add a trigger group. This will combine triggers with AND. To combine triggers with OR, use the Combine button.
-
Select the Search is made within a date range trigger type and select the 9th of November for the current year.

-
Save the rule and run the search again. The message should not be displayed anymore. You can edit the rule again, change the date today’s date, save, and confirm the rule is displayed again.
-
Return to the curator manager and publish the curator rule to make it live.
9. Metadata
9.1. What is metadata?
Metadata is information about a document. Metadata can come from a number of sources - it can be defined in HTML <meta> tags within a web page (such as description metadata), other HTML tags (such as the document’s <title> element), or inferred from other information about an item (such as the size of the document in bytes, or the URL of the document).
In Funnelback metadata is also used for fielded information such as those sourced from XML, JSON, CSV or databases.
9.2. Why use metadata?
Metadata can be used in a number of different ways by Funnelback to enhance your search results and provide users with an enhanced search experience.
In general metadata can be used in the following ways:
-
To provide additional keyword data for the purposes of improving ranking
-
To provide information that can be used for display purposes (such as for custom result summaries)
-
As a way of classifying documents, allowing for enhanced functionality (such as filtering search results by fields of particular values)
-
As additional information that Funnelback can use for other features (such as to generate structured auto-completion).
Metadata can also be incorporated from an external source (such as a database) by producing external metadata. External metadata is covered in a later exercise.
The screenshot below illustrates how metadata can be used to enhance your search results. For this search the metadata values contained within tag metadata are used to produce faceted navigation that allows the search results to be filtered based on the selected tags. A metadata field containing a URL to a thumbnail image is also used to add a thumbnail to each search result that has a defined thumbnail image.
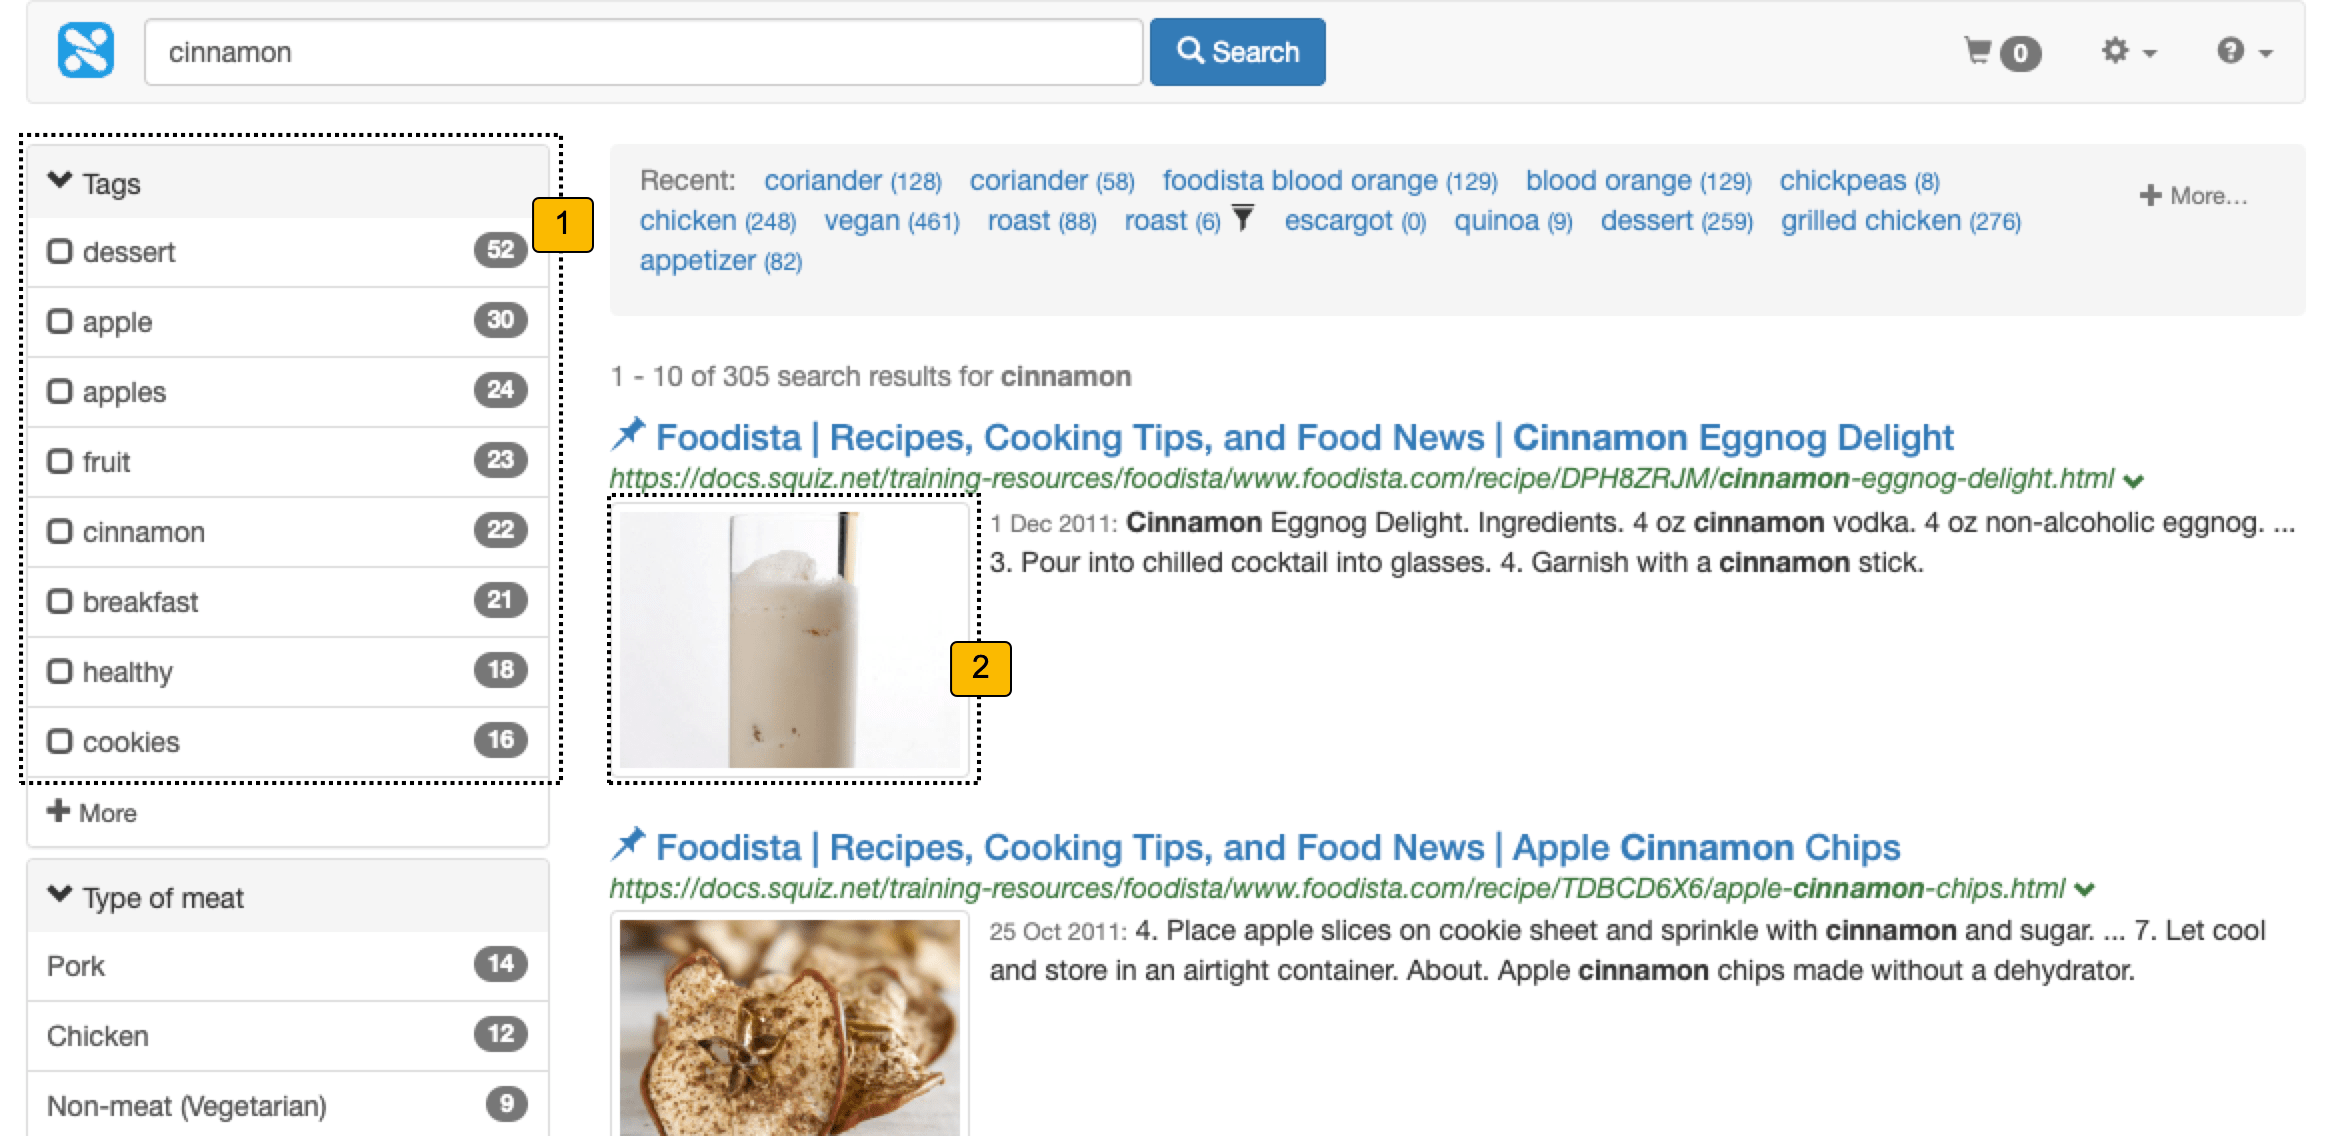
-
Faceted navigation categories based on the tag metadata values
-
Result thumbnail using URL in the
og:imagemetadata
The amount of enhancement to the results that can be achieved is really only limited by the metadata you have available and could be used for example to conditionally display things in the search results. For example:
-
If it’s a video then open a Javascript lightbox to play the video when you click on the link.
-
Display a curated description for items where description metadata has been authored.
-
Display some extra fielded information about each item (type, location, position information)
-
Provide a small map for each result that contains geospatial metadata plotting the item on the map and populating an info bubble.
-
Display file type icons next to each binary file search result.
9.3. Metadata classes and mapping
Metadata is read by Funnelback as part of the process of building the search indexes. The source and type of any metadata that should be included needs to be configured before it will be indexed.
The configuration involves identifying the metadata source (for example, a metadata field name), assigning a type and defining a mapping to a Funnelback metadata class. Once this has been configured, metadata will become available in the search index.
9.3.1. Metadata classes
Metadata classes are used by Funnelback to organise and access metadata. Metadata classes are given a unique identifier and type and one or more metadata sources are mapped to each class.
Metadata classes are used when configuring other Funnelback features that use metadata such as faceted navigation or contextual navigation.
9.3.2. Mapping metadata sources to classes
Metadata can come from a number of different sources, and these sources must be mapped to a metadata class in order for the metadata to be searchable by Funnelback.
Funnelback currently supports the following sources of metadata:
-
HTML meta tags such as
<meta name="dc.title" content="This is the title">. -
HTML tags such as
<h1>or<title>. Note: CSS-class style selectors are not supported. -
HTTP headers such as
Content-TypeorX-Funnelback-Custom-Header. -
XML X-Paths such as
/books/book/titleor//author. Note: not all X-Paths are supported.
A metadata source can only be mapped to a single Funnelback metadata class, however multiple metadata fields can be mapped to the same Funnelback metadata class. This is useful if there are different fields that contain the same functional information (for example, dc.description, dcterms.description, description).
Metadata sources are grouped into two types:
-
HTML type sources (HTML
<meta>tags, HTML tags and HTTP headers) are only considered when indexing web pages and PDF documents. -
XML type sources are only considered when indexing an XML document.
| Funnelback uses XML to represent most non-web data source types such as database and LDAP directory records, social media content, JSON and CSV files. The XML source configuration is required when configuring metadata for these. |
9.3.3. Metadata class types
Funnelback supports five types of metadata classes:
-
Text: The content of this class is a string of text.
-
Geospatial x/y coordinate: The content of this field is a decimal latlong value in the following format:
geo-x;geo-y(for example,2.5233;-0.95) This type should only be used if there is a need to perform a geospatial search (for example, This point is within X km of another point). If the geospatial coordinate is only required for plotting items on a map then a text type field is sufficient. -
Number: The content of this field is a numeric value. Funnelback will interpret this as a number. This type should only be used if there is a need to use numeric operators when performing a search (for example,
X > 2050). If the field is only required for display within the search results a text type metadata class is sufficient. -
Document permissions: The content of this field is a security lock string defining the document permissions. This type should only be used when working with an enterprise search that includes document level security.
-
Date: A single metadata class supports a date, which is used as the document’s date for the purpose of relevance and date sorting. Additional dates for the purpose of display can be indexed as either a text or number type metadata class.
9.3.4. Metadata class search behavior
Text-type metadata is included in the search index for two main reasons - and this affects how the metadata is considered when a user makes a search.
-
Display only: The contents of this field will be indexed but is not considered as document content by Funnelback and will not influence the ranking when making a query. The value can be used for display purposes. It can be searched over only when the field is explicitly defined in the search query (for example,
author:shakespeare). -
Searchable as content: The contents of this field will be considered a part of the document content by Funnelback. Queries will match within this field and the value will contribute to the document’s ranking. The contents of this field will also be automatically considered for spelling and simple auto-completion suggestions. As for display-only metadata the field can be explicitly searched and the content of this field can also be used for display purposes.
9.4. Configuring metadata mappings
Metadata mappings are configured for a data source, with search packages and results pages inheriting the metadata classes from all the attached data sources.
Metadata mappings in Funnelback are defined using the search dashboard configure metadata mappings tool, which can be accessed via the data source configuration .
The metadata mapping configuration is accessed from the settings panel of the data source management screen.
| Run an initial update of your data source before configuring the metadata mappings. This is because the indexer auto-detects available metadata sources when it scans the content. This in turn makes setting up the metadata mappings a lot simpler because the detected classes can be picked from list of available sources. |
The metadata mappings screen lists the metadata mappings that are defined for the current data source. Funnelback’s default configuration also includes commonly-used metadata from HTML and binary file content. Metadata fields from the Dublin Core, AGLS and Open Graph standards have pre-defined mappings as part of the default configuration.
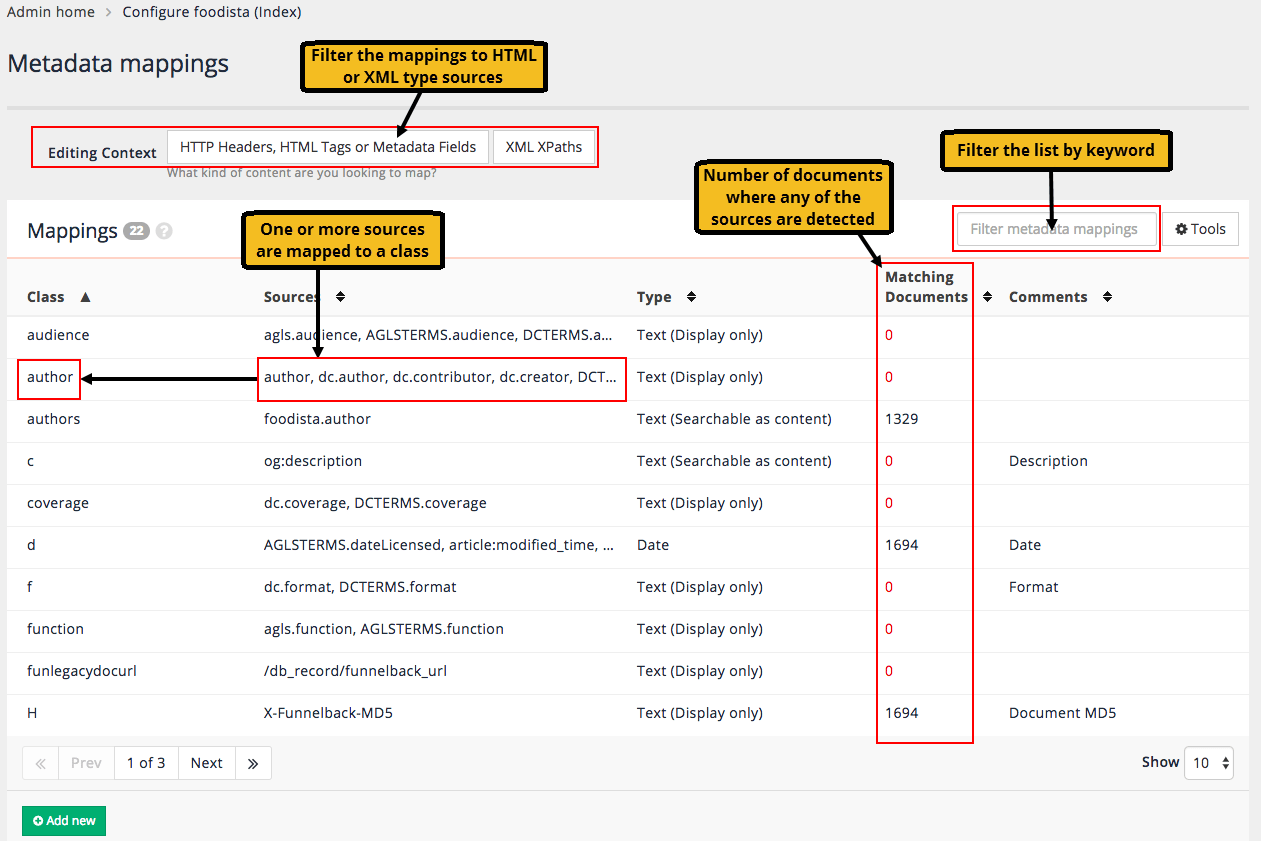
The metadata mappings listing also provides information on the number of documents where the metadata is detected and allows the list to be filtered by keyword, or metadata content type (HTML/XML).
Additional mappings are created by clicking the add new button, and existing mappings can be modified by clicking on the metadata class name in the listing. The metadata mapping editor screen allows configuration of the mapping, allowing multiple metadata sources to be mapped to a single metadata class.
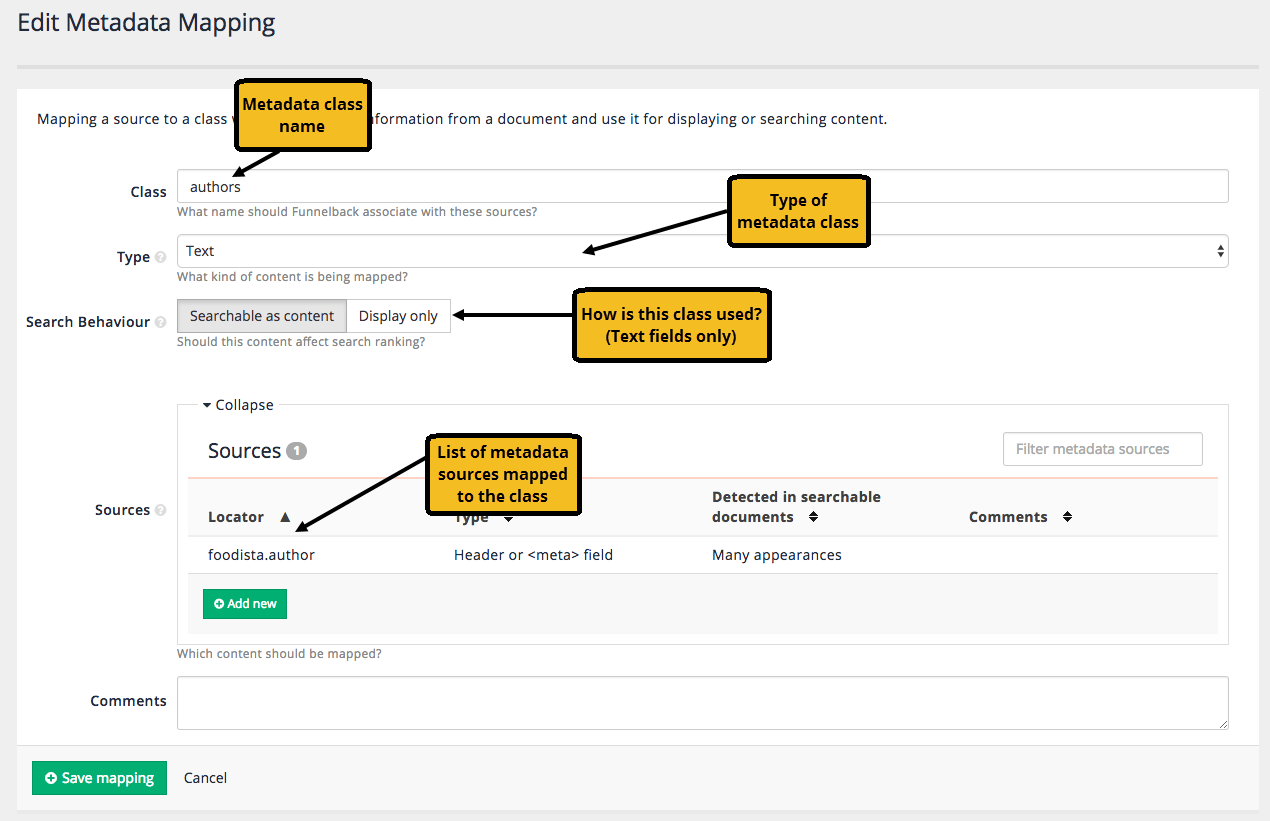
The metadata sources screen allows presents a list of metadata sources that were detected during indexing as well as commonly used HTML tags. In addition, metadata sources can be manually added as a source.

Tutorial: Configuring metadata
-
Log in to the search dashboard where you are doing your training.
See: Training - search dashboard access information if you’re not sure how to access the training. Ignore this step if you’re treating this as a non-interactive tutorial. -
Locate the silent films search package.
-
Run a search for death against the silent films search results page. A set of results similar to those below will be returned. The results are returned in using Funnelback’s default search results template.
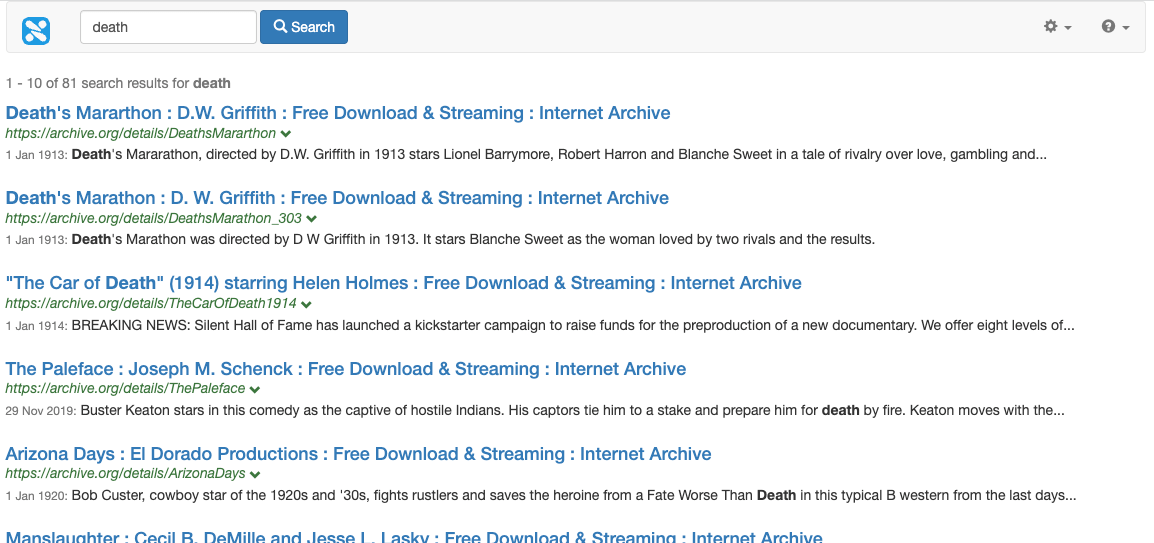
-
Click on the search results for The car of death. The page will load in your browser.
-
View the page source and inspect the meta tags in the head region of the document.
-
Note down any metadata fields that are listed that contain information that might be useful for the search. Useful information is information that you might use in the search results (for example, a good description, or URL to a thumbnail image) or keyword metadata (that can be used to contribute to the discoverability of the document). Inspect a few other result pages as well to see if the same fields exist in other pages and if they also seem useful. In the above example the open graph (
og) tags appear to have useful content that could add value to the search results listing. -
Log in to the search dashboard and open the silent films - website data source management screen.
-
Open the metadata mappings configuration by selecting configure metadata mappings from the settings section.
-
The currently defined mappings are listed. The default list contains pre-defined mappings of commonly used HTML metadata fields. For many searches this will be sufficient without adding any additional mappings.
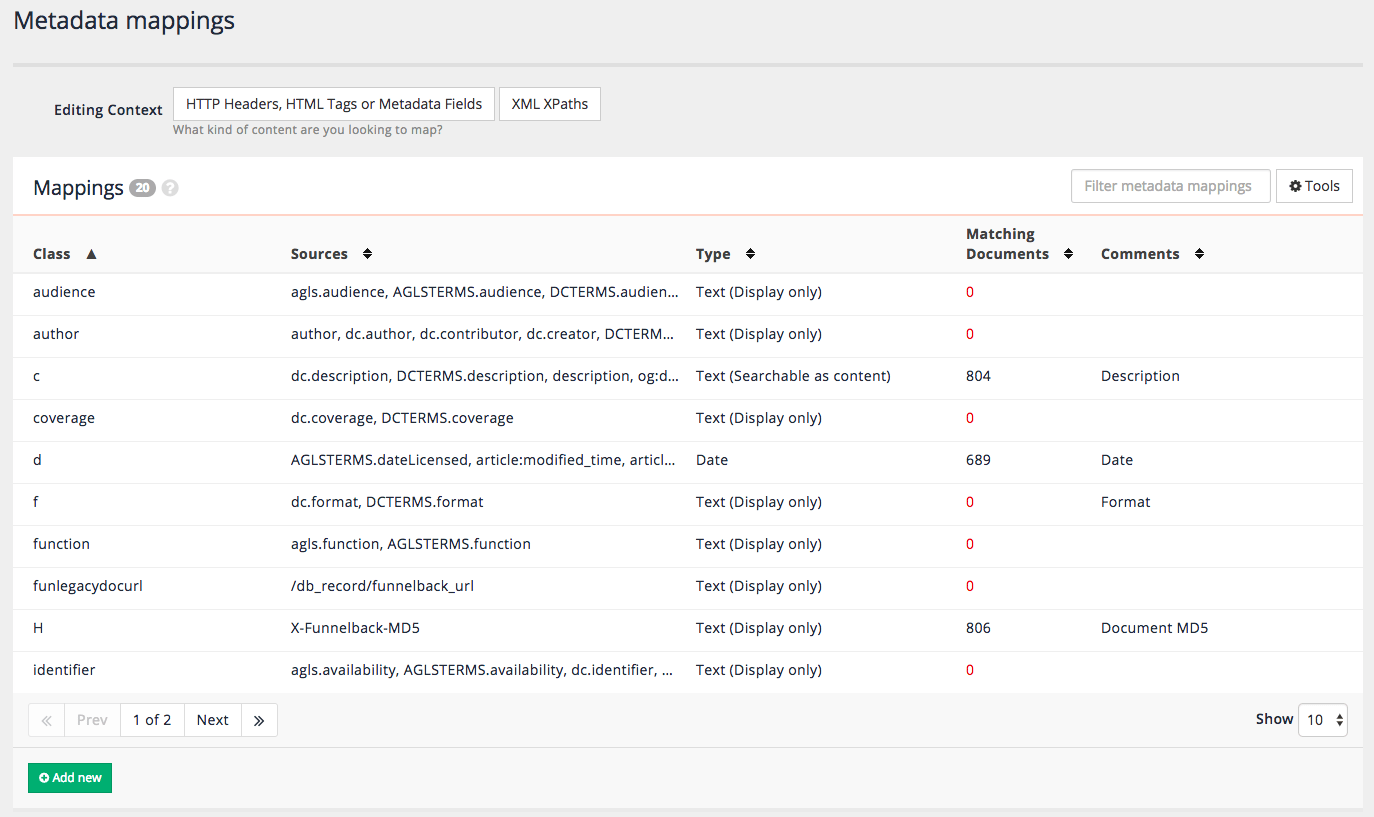
-
The search result summaries could be enhanced by utilizing text sourced from the title, description and image metadata - from tags that we identified (
og:title,og:descriptionandog:image). Confirm that theog:title.og:descriptionandog:imagemetadata sources are mapped to classes by typing each into the filter metadata mappings box above the metadata listing. Because these tags all appear in the current set of mappings, the metadata has already been included in the search index and is available for use in the search results. -
In order to use metadata in your search results template four conditions need to be satisfied:
-
The metadata source needs to exist in the content that is being indexed. (for example, the HTML page needs to have meta tags populated with values).
-
The metadata source needs to be mapped to a Funnelback metadata class.
-
The metadata class needs to be included in the list of results page summary fields to display (if this is not set anywhere it will default to returning the
author,c,publisherandkeywordmetadata classes) and the results page must not have summaries disabled (SM=off). -
The template needs to be configured to print out the metadata appropriately.
-
-
Make a note of the class names to which the
og:title.og:descriptionandog:imagesources are mapped. You will need these for future steps. -
Return to the search results for the search for death and view the JSON response (reminder: edit the URL so the
search.htmlreadssearch.json). Inspect the results element that sits underneath the response element and observe the available result item fields and how they are used in the HTML search results page.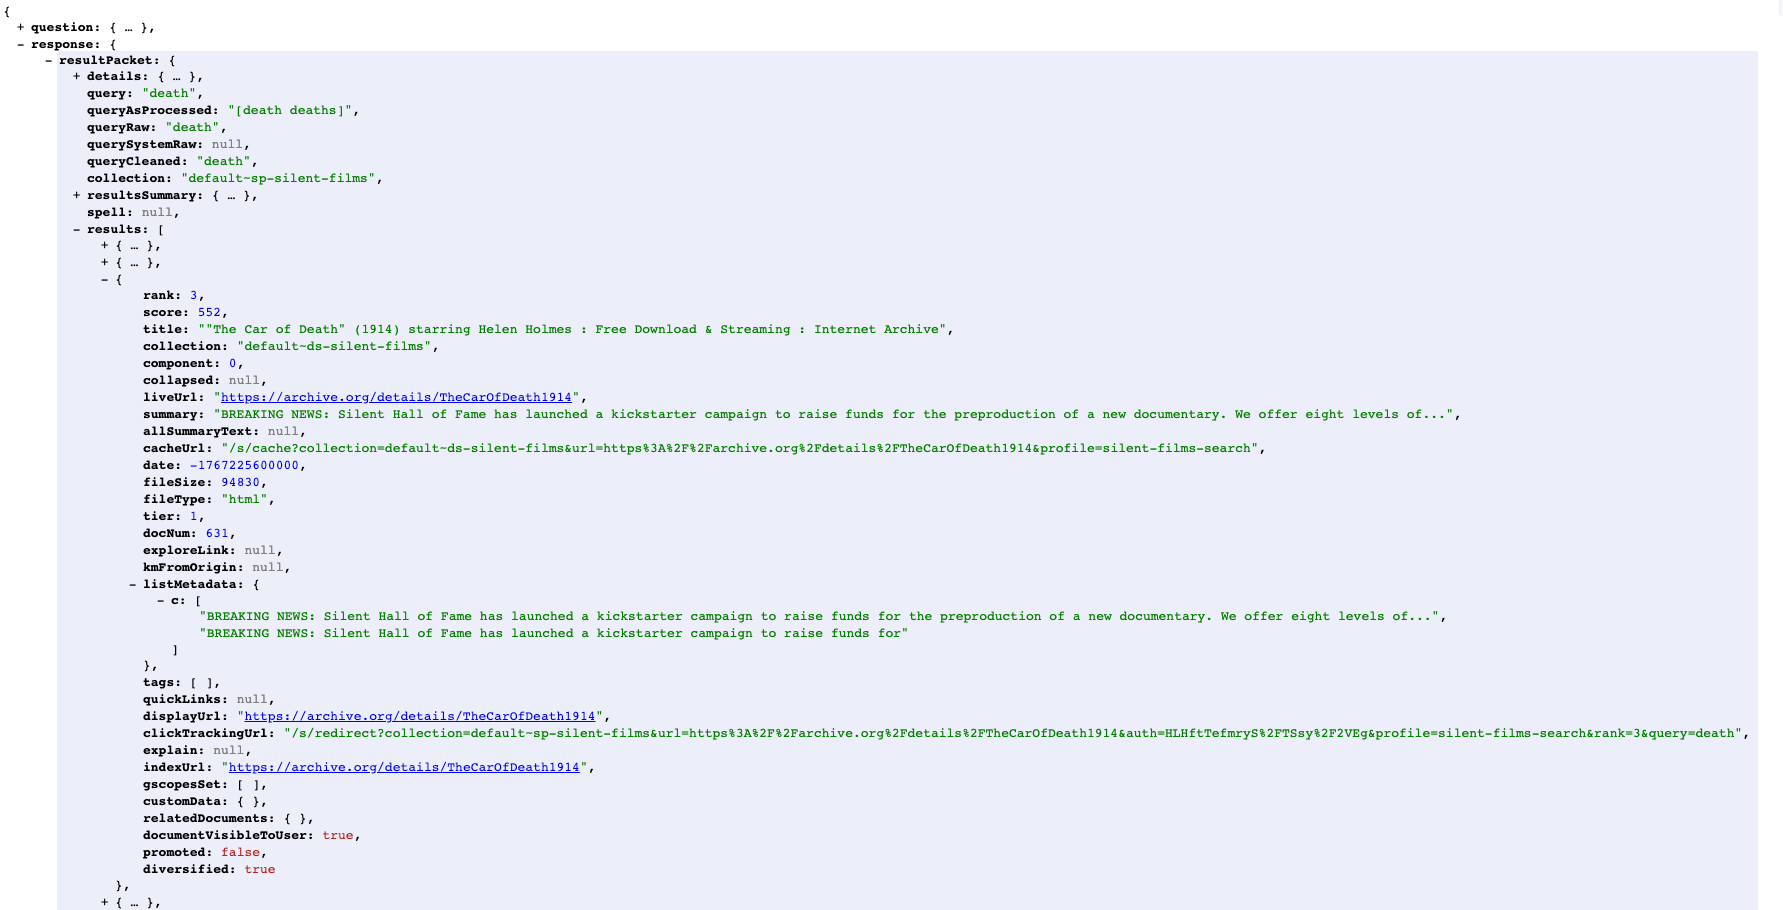
-
Inspect the result for the car of death (we previously inspected the HTML source for suitable metadata tags. Observe all the fields that are available within the JSON (or XML) response. Each of these fields can be returned within the result set. Available metadata is returned within the
listMetadatasub element, which is currently displaying metadata from thecmetadata class. Only metadata in thec,author,keywordorpublishermetadata classes will be displayed by default. Recall that there the list of metadata classes returned by Funnelback can be controlled using the summary fields (SF) display option. -
Return to the results page management screen for silent films search and select edit results page configuration from the customize section. Add a query_processor_options parameter (which sets the display options) and add a summary fields option. The summary fields value (
SF) which takes a comma separated list of fields as the parameter value defines the fields to return (the default value is-SF=[author,c,publisher,keyword]). TheSFparameter also supports regex expressions that match the metadata field classes. Checking our earlier notes we find thatc(description),t(title) and image (thumbnail URL) are the internal classes used for the fields that we are interested in. Add-SF=[c,t,image]to the query processor options.the order of classes in the list is not important, but the comma separated list must sit within square brackets. Save the changes. 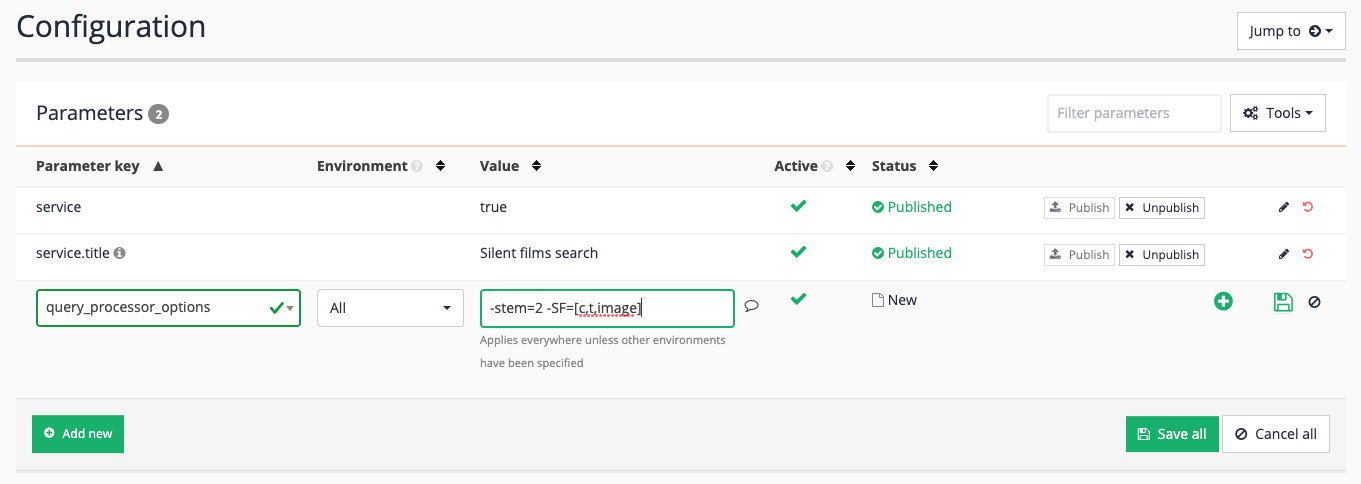
-
Return to the JSON output and refresh the page. Observe that
c,tandimagemetadata values are now returned. You may notice that thetvalue appears to be duplicated - this is because there are multiple metadata fields mapped to the same class (for example,titleandog:title), and that value is duplicated across those fields. The image class also contains multiple values as there are multiple fields mapped to the same class (og:imageandtwitter:image).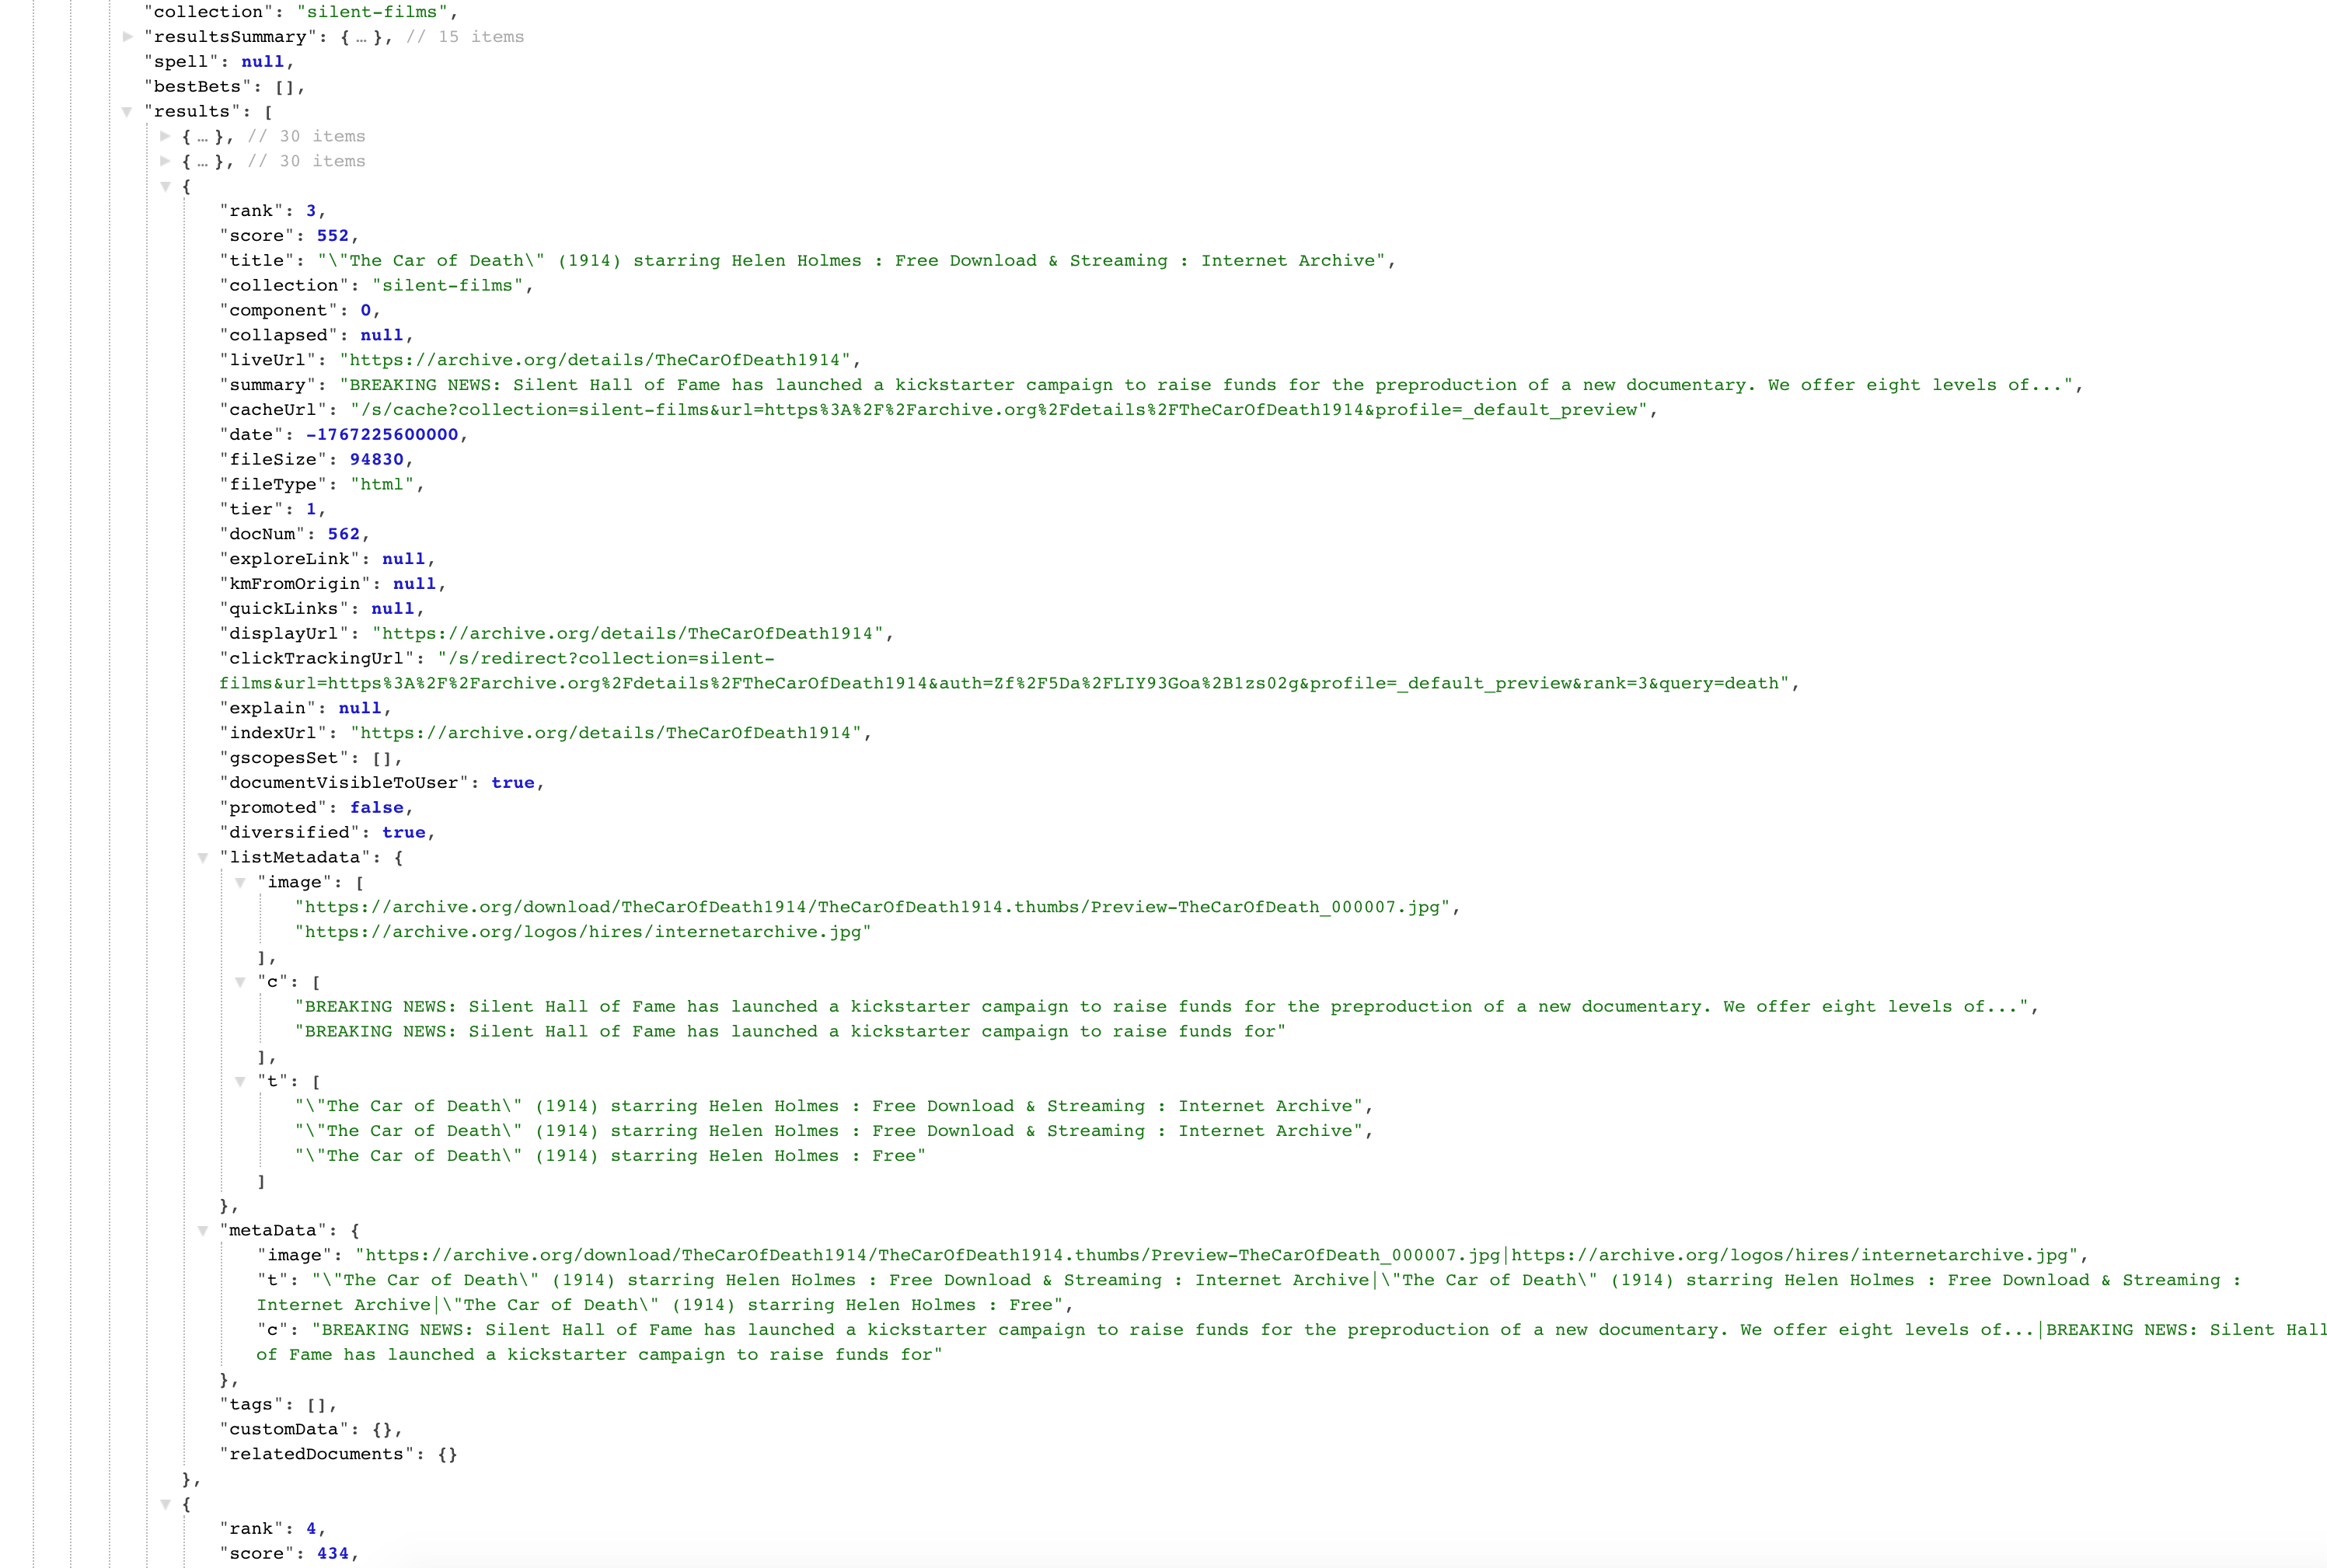
9.4.1. Fields containing multiple values
Metadata fields can hold multiple values - this occurs automatically if multiple sources are mapped to the same metadata class and exist in the document being indexed (for example, description and dc.description may map to the same metadata class, and both fields may appear in an HTML document). Funnelback will also split metadata fields that contain a delimiter (a vertical bar character (|) by default).
| It is possible to change the delimiter used for a specific metadata field using the metadata delimiters plugin, available from the extensions screen. |
9.5. Spelling suggestions and simple auto-completion
Metadata field content is used for spelling and simple auto-completion suggestions in the following circumstances:
-
Text type metadata that is searchable as content is added to the general page content and will be considered for spelling and simple auto-complete suggestions if threshold conditions are met.
-
Text metadata that is display only can also be added as an explicit metadata source for spelling and auto-complete suggestions by setting the
spelling.suggestion_sourcesdata source configuration option.
9.6. Metadata sources for contextual navigation
Metadata field content can also be used as a source for contextual navigation (or related search) suggestions.
By default, the keyword and c metadata classes are considered for contextual navigation suggestions. This list of fields can be adjusted by changing the contextual_navigation.summary_fields list within the contextual navigation settings.
The settings are editable from within the search package management screen, by selecting edit data source configuration and choosing contextual navigation from the sidebar (or see the previous exercise on configuring contextual navigation).
Tutorial: Customize metadata field mappings
In the previous example we discovered that the default mappings for both the title and image result in duplication in the metadata as a result of the website containing variants of the tags with the same value.
In this exercise we will alter the mappings so that we select one of the fields as the one that will be used for printing and map it to a unique field. We will use the og:title, og:description, og:image and also the og:video values as the fields for display.
-
Log in to the search dashboard where you are doing your training.
See: Training - search dashboard access information if you’re not sure how to access the training. Ignore this step if you’re treating this as a non-interactive tutorial. -
Locate the silent films search package.
-
Open the data source management screen for the silent films - website data source.
-
Edit the metadata mappings (by selecting configure metadata mappings from the settings section).
-
Locate the entry for
og:descriptionby using the keyword filter. Metadata sources can only be mapped to a single metadata class, so it needs to be removed from the existing mapping before being set up as a new class.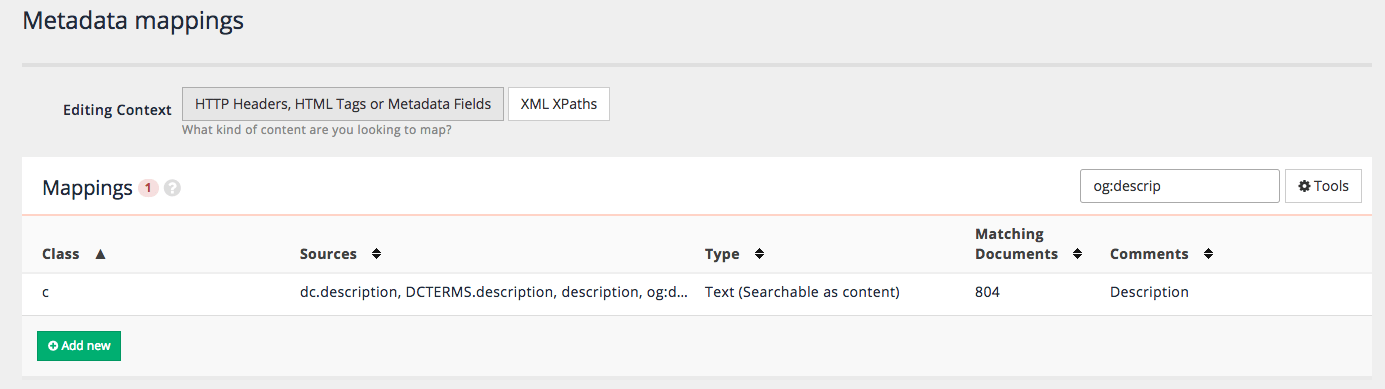
-
Edit the
cmetadata class entry by clicking on the row. Five different sources are mapped to thecmetadata class - remove the mapping forog:descriptionby locating it in the sources list and clicking on the delete icon that appears when you hover over the row. After removing the source click the save mapping button to update the configuration.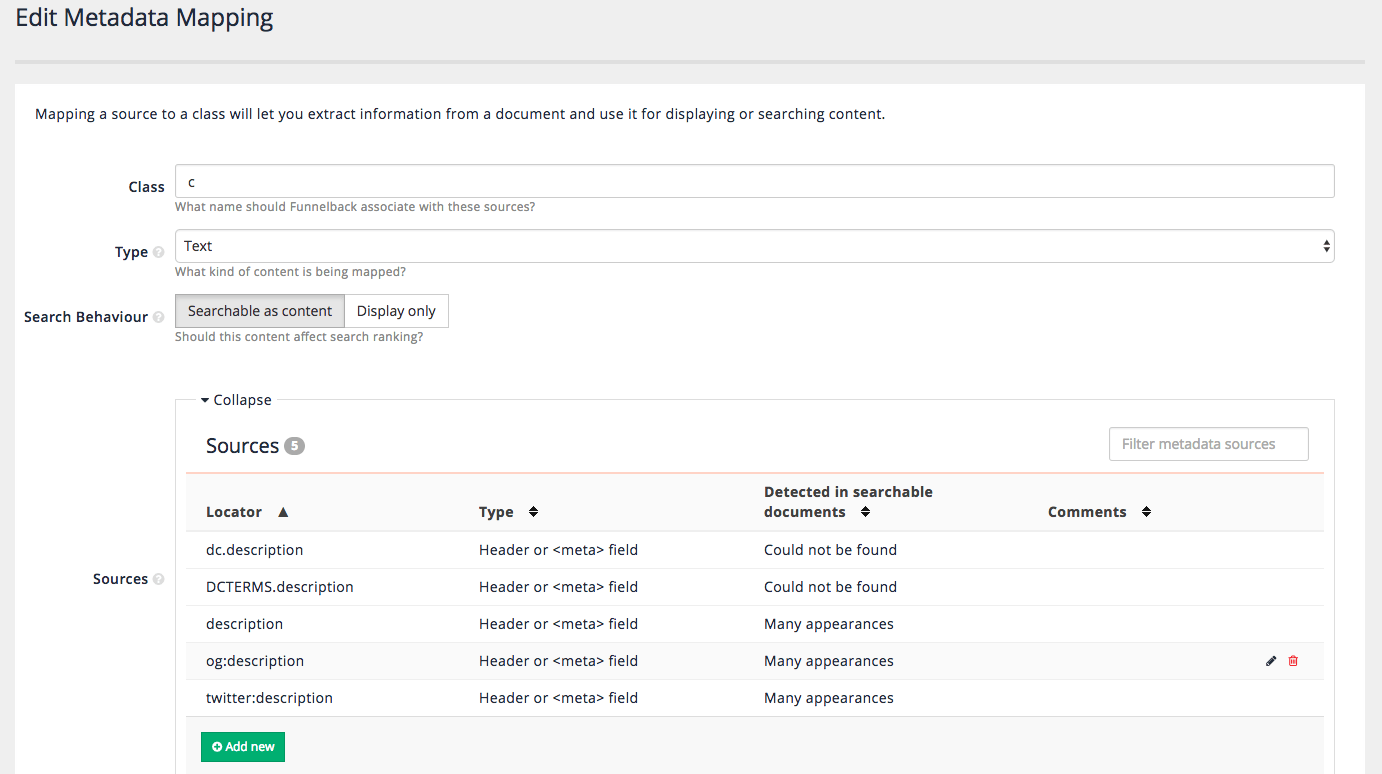
-
You are returned to the listing screen. Create a new class called
displayTextby clicking the add new button. The field should be created as a text type field (it is a description) and be searchable as content (this field contains information that’s useful to consider as content). Click the add new button from the sources panel. This opens a window that shows all the detected metadata sources that have not been mapped to anything, along with controls to filter the list. Locate theog:descriptionsource and tick the checkbox under the add source column. Multiple sources can be added by checking multiple boxes. Click the save button to add the source.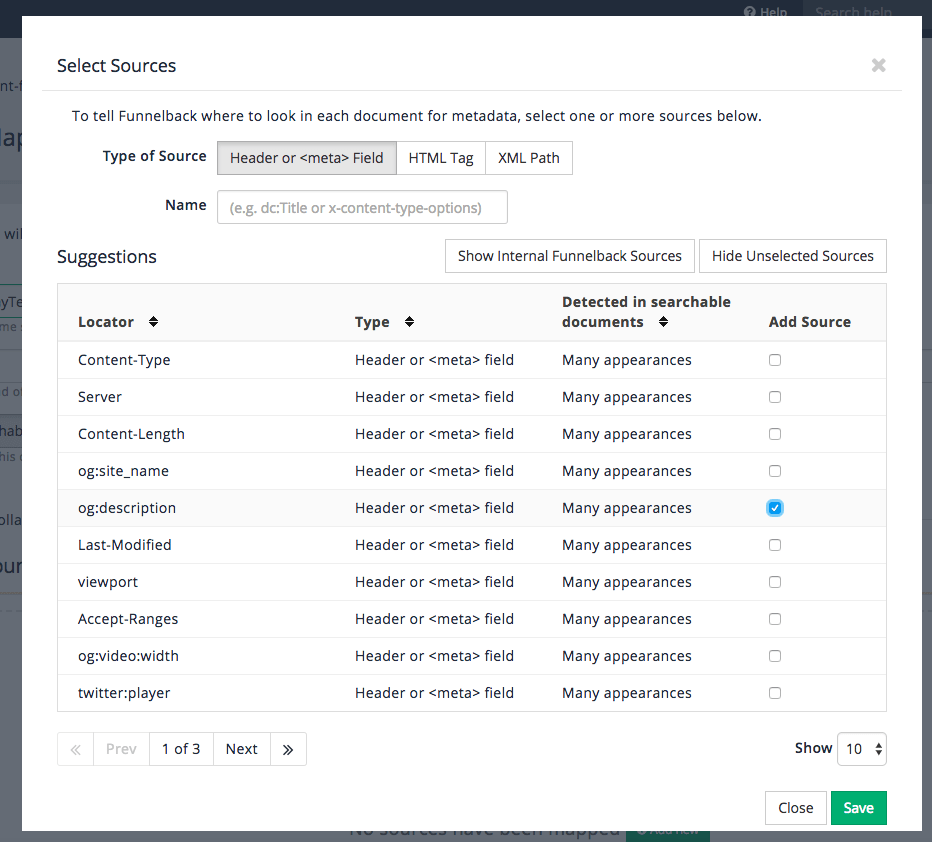
-
Optionally add a description (describing the metadata mapping) before clicking add new mapping.
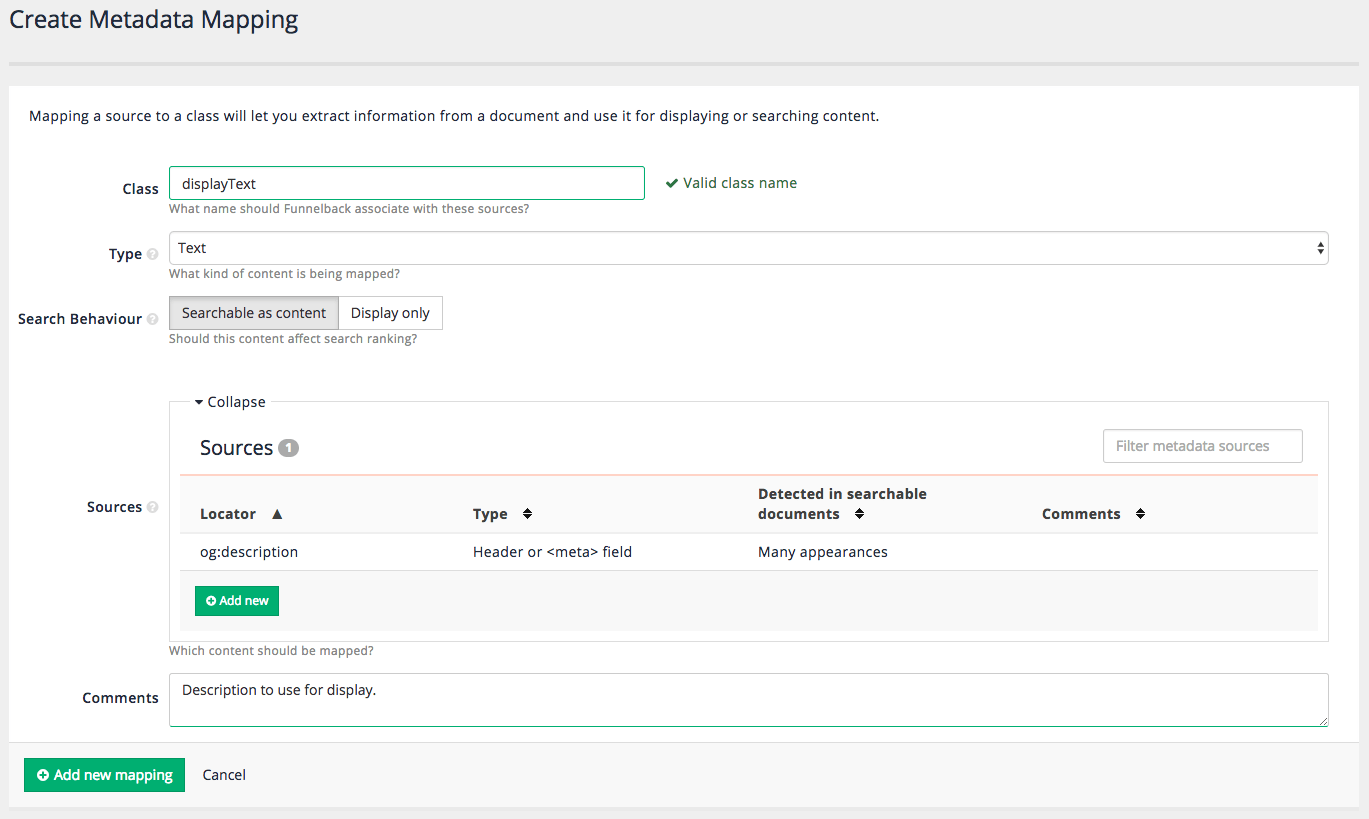
-
Locate the entry for
og:title. Update it so that it’s mapped to a class calleddisplayTitle. -
Locate the entry for
og:image. Update it so that it’s mapped to a class calleddisplayImage. -
There isn’t an existing entry for
og:video. Add a mapping forog:videoto a class namedvideoUrl. Set this as display only metadata, noting that the value of the URL doesn’t provide any useful information for the purposes of ranking the document. Click the save button once you are done. -
The index will need to be rebuilt because the metadata mappings have changed. This is done by running an advanced update to rebuild the index. Click on the menu:[silent films - website] breadcrumb tail item to return to the data source management screen, then click the start advanced update item in the update panel.

-
Select the rebuild live index option then click the update button.

-
Once the re-index has completed update the display options so that
displayTitle,displayText,displayImageandvideoUrlare returned in the search results, in addition to the existing metadata fields. (Hint: amend theSFparameter for the query processor options on the silent films search results page to something like-SF=[c,t,image,displayTitle,displayText,displayImage,videoUrl]).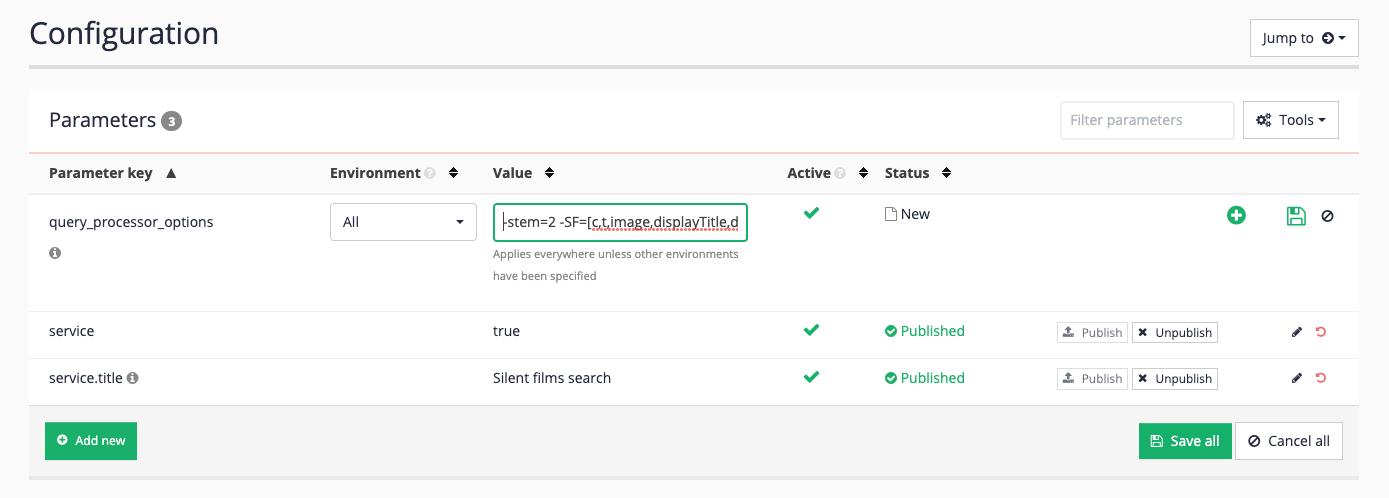
-
Search for death again and inspect the JSON or XML output and confirm that the metadata values are returned in the result metadata.
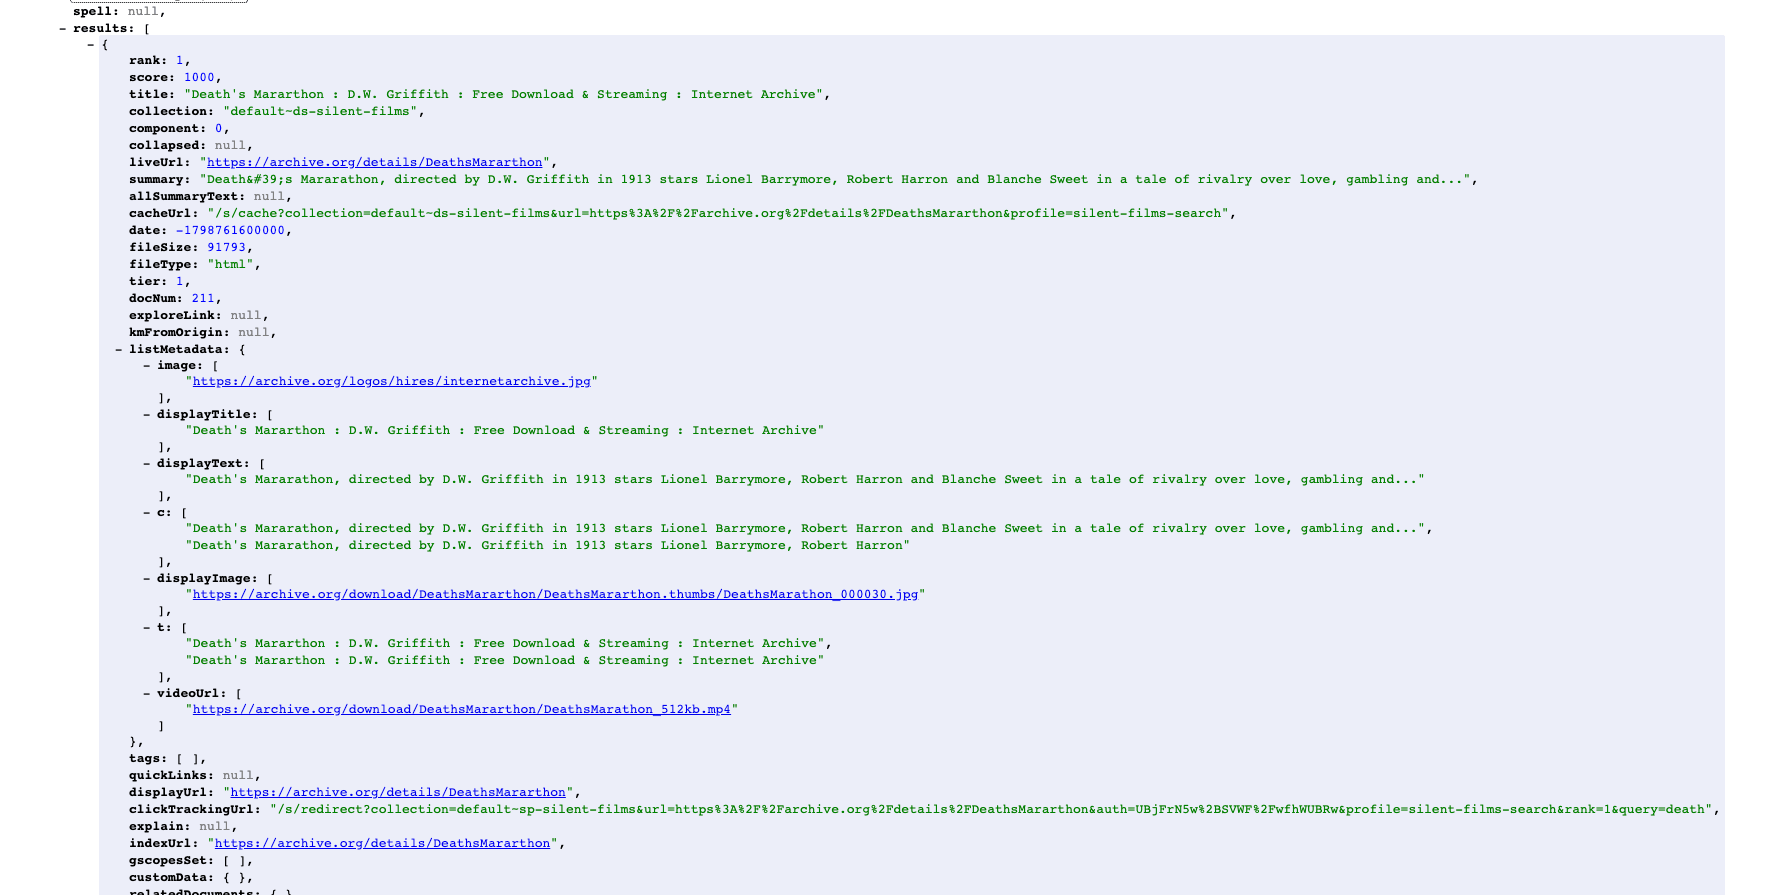
Tutorial: Add metadata to search result summaries
In this exercise the template will be configured to print the metadata in the search result summary if available.
-
Log in to the search dashboard where you are doing your training.
See: Training - search dashboard access information if you’re not sure how to access the training. Ignore this step if you’re treating this as a non-interactive tutorial. -
Locate the silent films search package.
-
Load the results page management screen for the silent films search results page.
-
Edit the template (by selecting edit results page templates from the templates panel)
-
The default template will load in the editor. This template includes a lot more Freemarker than in previous examples which was stripped back to the bare bones required to format the search results. It is designed to handle most of Funnelback features if the relevant data is returned in the data model. Locate the results block and add the following code to print the metadata. Insert the code immediately after the
<cite>tag containing the document URL then click the save button (approx line 530).<#if s.result.listMetadata["displayTitle"]?first??><p>Display title: ${s.result.listMetadata["displayTitle"]?first}</p></#if> <#if s.result.listMetadata["displayText"]?first??><p>Display text: ${s.result.listMetadata["displayText"]?first}</p></#if> <#if s.result.listMetadata["displayImage"]?first??><p><img src="${s.result.listMetadata["displayImage"]?first}"/></p></#if>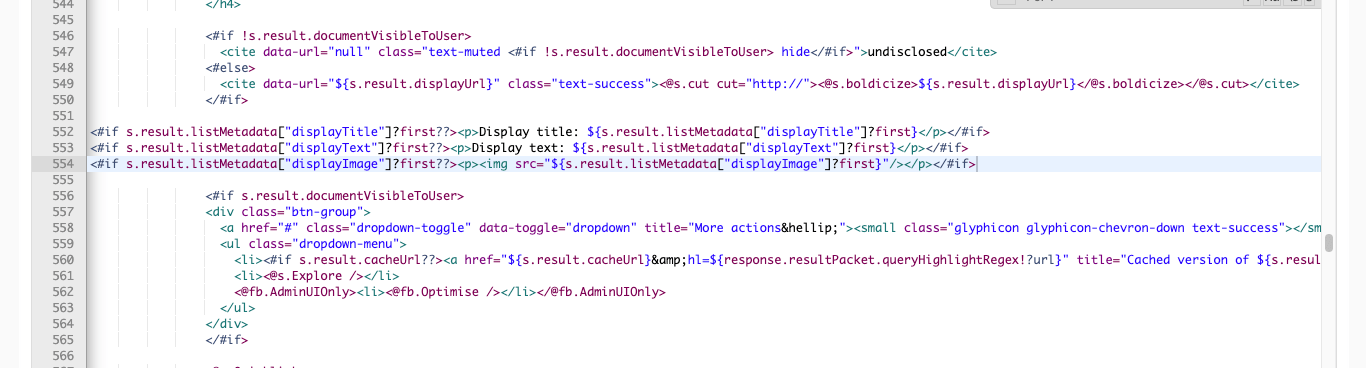
-
Rerun the search for death and confirm that the metadata and thumbnails are appearing.
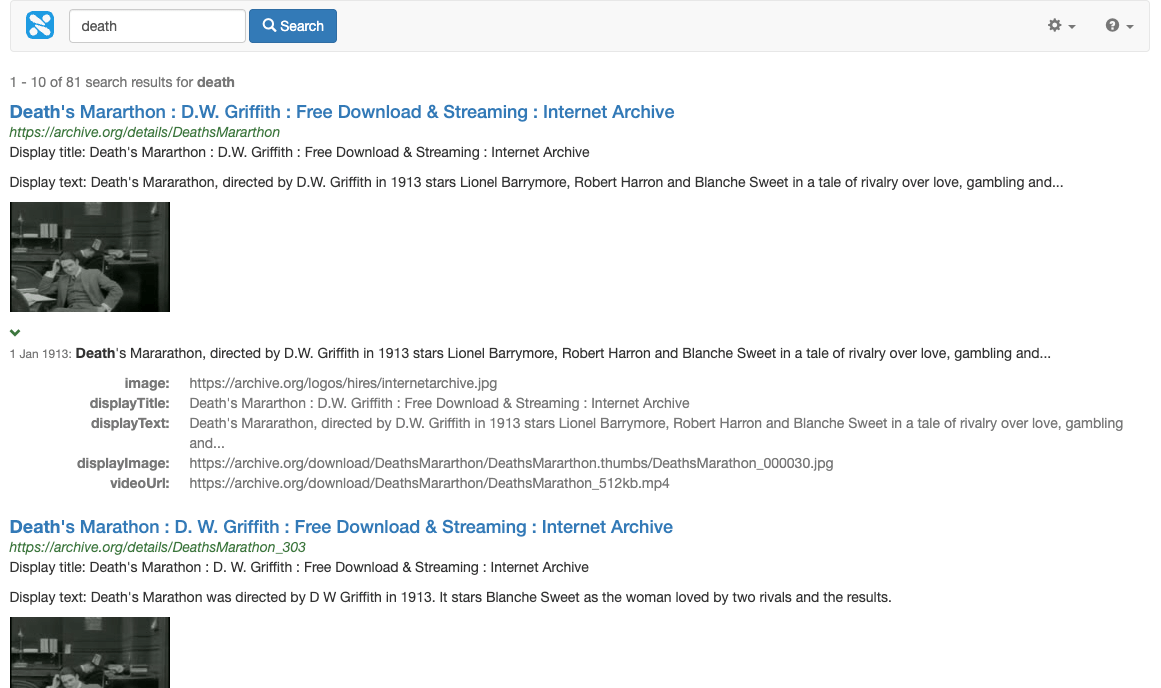
9.6.1. Review questions
-
Can you map a metadata field to multiple metadata classes?
-
Why would you want to map different metadata fields to the same Funnelback metadata class?
9.6.2. Extended exercises: metadata
-
Change the result formatting so that the thumbnail is displayed to the left of the text.
-
Map the video duration and add this information to the search results summary.
-
Hyperlink the thumbnail image so that it loads the video when clicked upon.
-
Alter the video link to load the video using a JavaScript lightbox.
-
Update the summary fields (
SF) expression to use a regular expression to match all the metadata classes that start with display. Hint: the expression to use isdisplay.+.
9.7. Configuring external metadata
External metadata provides administrators with a method of attaching metadata from an external source to documents within a search index based on URL rules.
The metadata defined in the external metadata file is attached to all URLs that start with a specific URL base. This can be used to quickly apply some metadata structure to a site with a human friendly URL scheme.
Any metadata applied this way is accessed in the same manner as standard metadata configured via the metadata mappings configuration tool once the index is built.
Tutorial: External metadata
-
Log in to the search dashboard where you are doing your training.
See: Training - search dashboard access information if you’re not sure how to access the training. Ignore this step if you’re treating this as a non-interactive tutorial. -
Locate the silent films search package.
-
Load the data source management screen for the silent films - website data source.
-
Navigate to the file manager (select manage data source configuration files from the settings panel).
-
Create an
external_metadata.cfgfile by clicking the add new button, selectingexternal_metadata.cfgfrom the drop-down menu, then clicking the save button.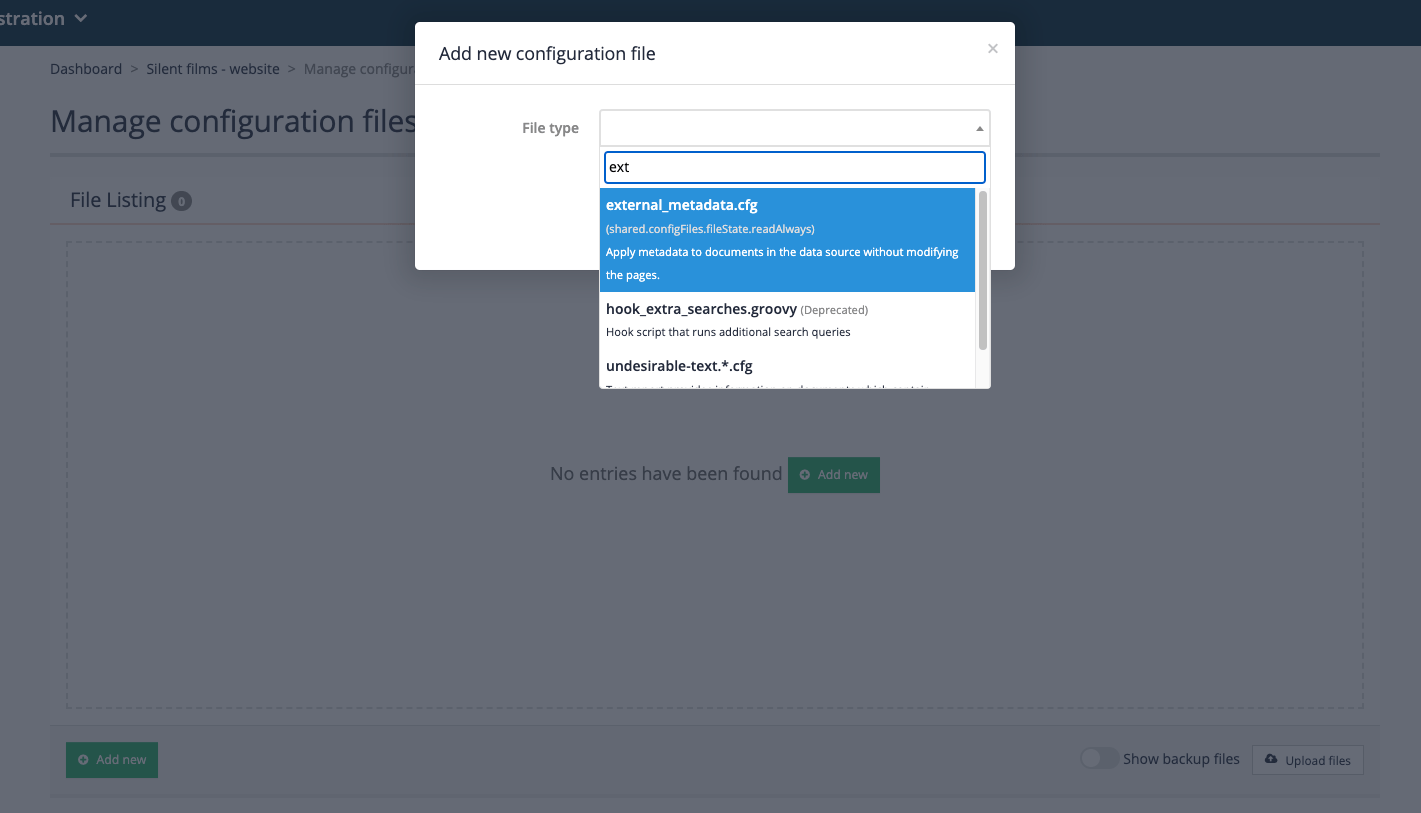
-
Edit the external_metadata.cfg by clicking on the file name. A blank file editor screen will load.
External metadata will be defined for a set of specific URLs.
The first line attaches common metadata to all the documents in the data source - type=Silent film. This is applied to all documents that have a URL starting with
https://archive.org/details(which is every document in this data source).The second line attaches common metadata of director=Charlie Chaplin to all URLs that start with
https://archive.org/details/CC_which is a subset of films featuring Charlie Chaplin.The rest of the lines attach specific metadata to the URLs listed - again all these URLs are treated as left matching - but as they are specific the pattern will only match a single URL.
Copy and paste the following into the editor and click the save button:
https://archive.org/details filmType:"Silent film"
https://archive.org/details/CC_ director:"Charlie Chaplin"
https://archive.org/details/Downhill_1927 director:"Alfred Hitchcock" year:1927 language:English runningTime:82
https://archive.org/details/EasyVirtue1928 director:"Alfred Hitchcock" year:1928 language:English runningTime:85
https://archive.org/details/CannedHarmony director:"Alice Guy Blaché" year:1912 runningTime:13
https://archive.org/details/TheBurstrupHomesMurderCase director:"Alice Guy Blaché" year:1911 runningTime:18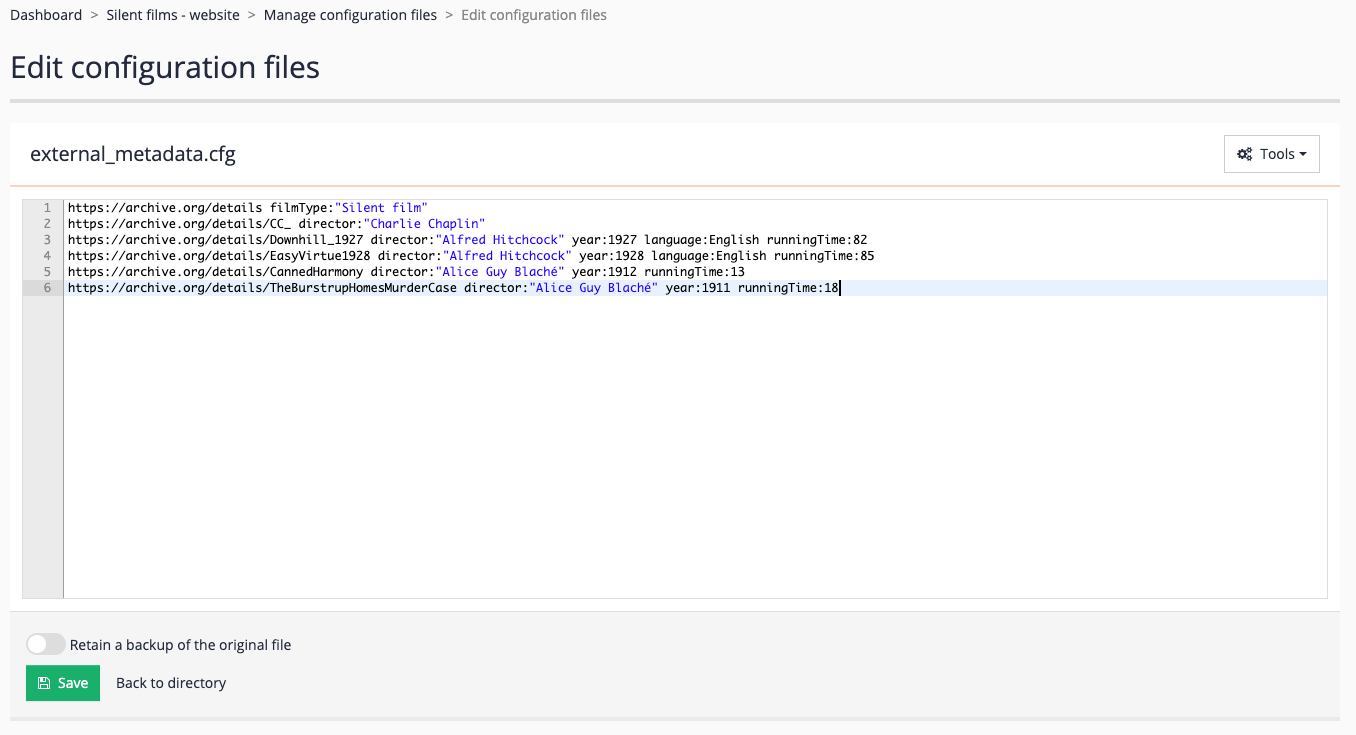
-
When defining new fields as external metadata it is good practice to ensure any external metadata fields have metadata classes defined in the metadata class definitions. This allows you to see what fields are defined for the data source and more importantly to tell the indexer what type of metadata the field values contain. Edit the metadata mappings (select edit metadata mappings from the settings panel) and add the following definitions to the mappings:
Metadata class name Source Type filmType
EXTERNAL_METADATA_filmType
Text (display only)
director
EXTERNAL_METADATA_director
Text (Searchable as content)
year
EXTERNAL_METADATA_year
Text (display only)
runningTime
EXTERNAL_METADATA_runningTime
Text (display only)
language
EXTERNAL_METADATA_language
Text (display only)
When defining the mappings ensure the class name exactly matches the field name (including any capitals) used in the external_metadata.cfg.When adding the field mapping add the class as for a normal metadata field, but when adding the source(s) to the mapping you will need to type in the source name instead of picking from a list of detected sources. The actual value you type here doesn’t really matter - best practice is to use a label similar to
EXTERNAL_METADATA_<field_name>where<field_name>corresponds to the field from the external metadata file. For example, setting up a mapping for thefilmTypefield (appearing asfilmType:valuein the external metadata file) would look similar to: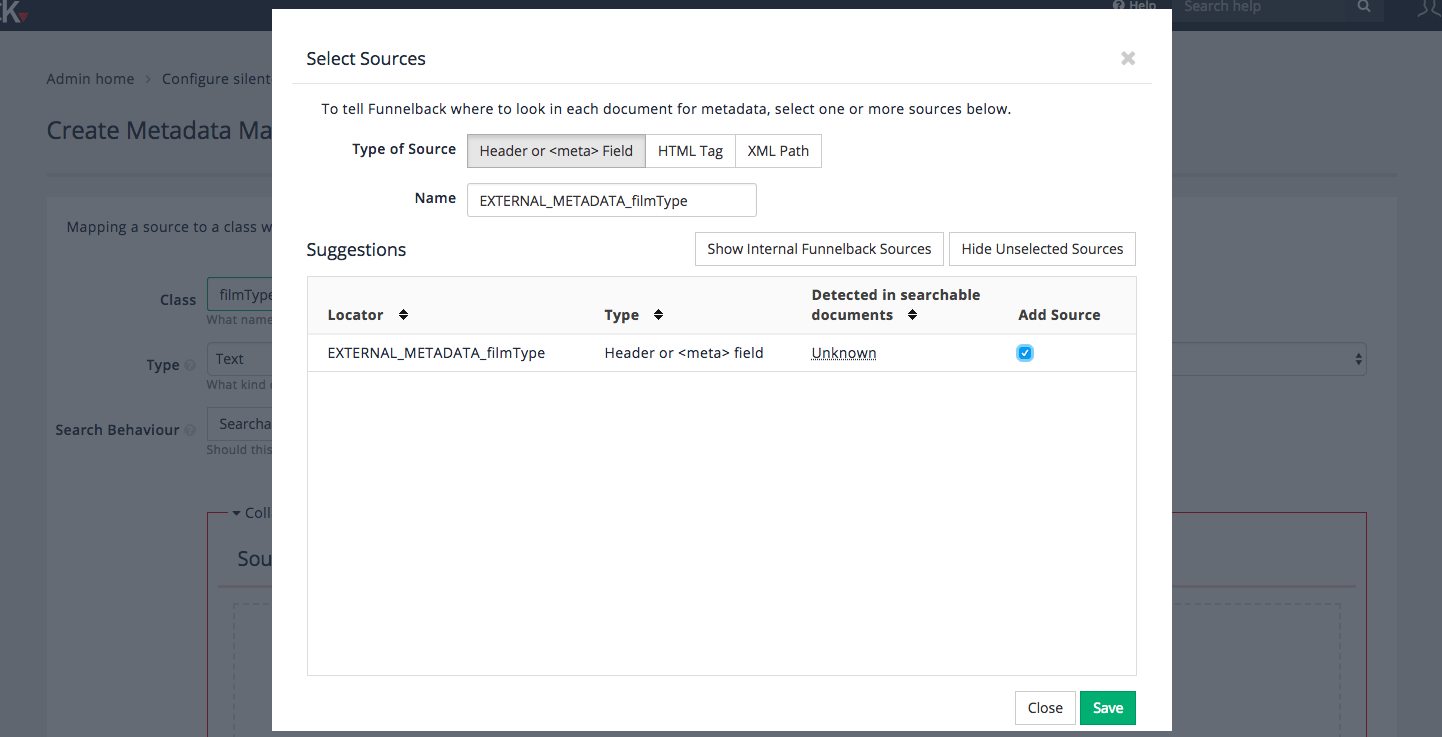
Observe the typed value of the name (
filmType):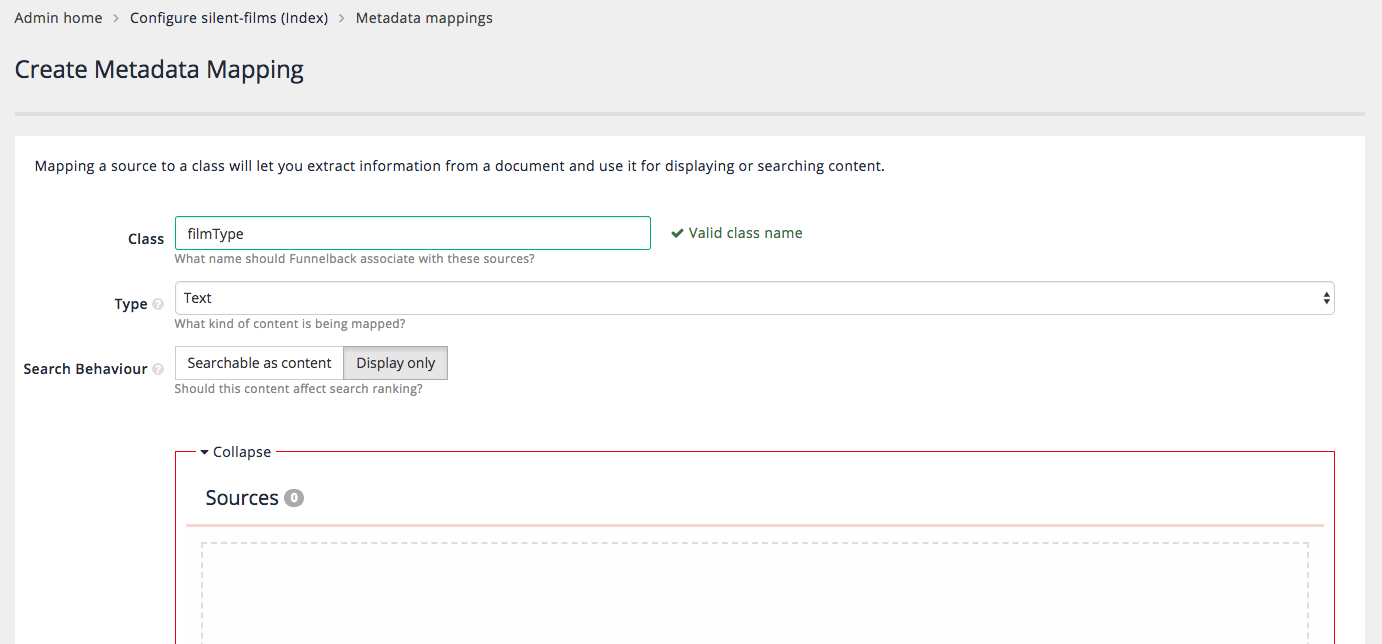
Add metadata entries for the other fields sourced from external metadata. You will find that language is already defined - for this field add the source to the existing field instead of creating a new field.
-
Rebuild the index. (Select start advanced update from the update panel, then select re-index live view and click the update button).
-
Add the new metadata fields to the display options configured for the results page. Add the new metadata classes to the summary fields (
-SF=[displayText,displayTitle,displayImage,videoUrl,filmType,director,runningTime,language,year](Edit results page configuration option from the customize panel). -
Run a search for hitchcock and view the JSON page source and confirm that additional metadata is returned in the data model with the result summaries (edit the URL to change
search.htmltosearch.json).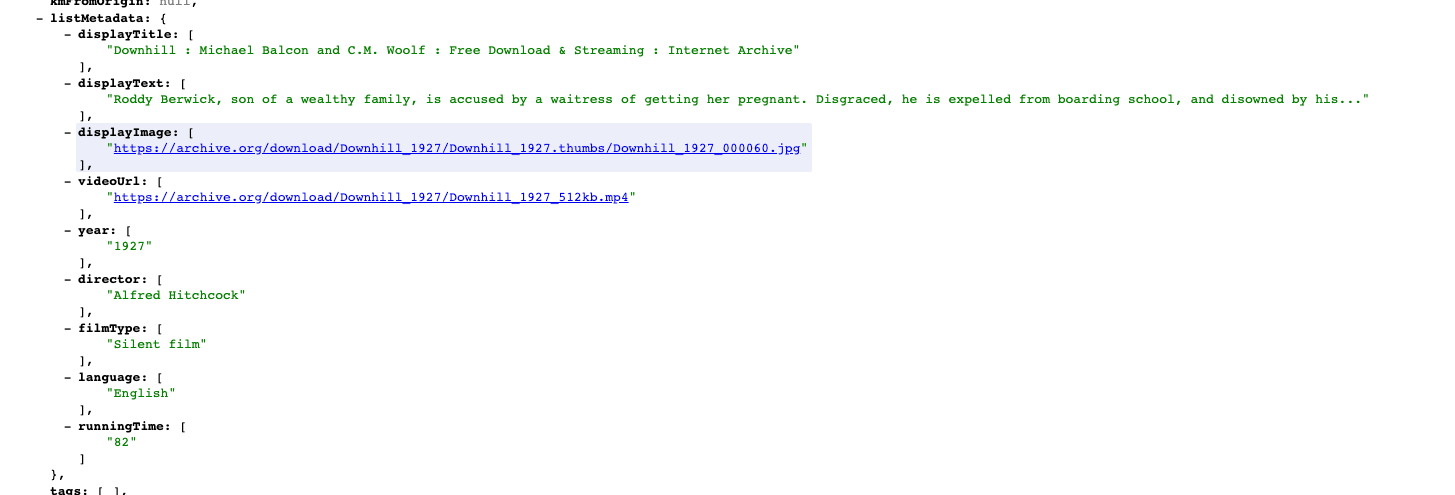
10. Auto-completion
Funnelback’s auto-completion provides the user with real-time suggestions as query terms are typed into the search box.
THe auto-completion returns one or more columns of suggestions, with each column derived from independent sources.
10.1. Auto-completion datasets
Funnelback supports auto-completion returned from one or more sources (auto-completion datasets), usually formatted as separate columns in the auto-completion drop down menu.

The datasets supported are:
-
Up to 1 simple auto-completion dataset: simple auto-completion is quick and easy to set up and returns suggestions that are words and phrases found within the content.
-
Zero or more structured auto-completion datasets: Structured auto-completion provides advanced auto-completion based on structured CSV data. The suggestions can be grouped by type and provide rich content (such as thumbnail images and other data) in the suggestion. Clicking on a suggestion can run a query, take the user directly to a resource or run some JavaScript.
-
Up to 1 recent searches dataset: Recent searches auto-completion is derived from the user’s search history. This is available when sessions are enabled on a user’s search.
The example above shows auto-completion from three independent datasets. The suggestions column is simple auto-completion from words and phrases present in the complete index being searched. The people and courses columns are both structured auto-completion based on structured CSV data.
The general approach for configuring the datasets is to have the simple auto-completion configured on the results page that is queried by the user, and additional results pages created for each CSV dataset.
For this approach to work the results page that the user queries should be configured to generate auto-completion using spelling suggestions and results page CSV files.
By default, Funnelback will generate simple auto-completion. If you are using the default Funnelback template the simple auto-completion should automatically work after you have updated your search.
Tutorial: Attach auto-completion to a Funnelback template
This exercise outlines the bits of code you need to add to a template in order to get auto-completion working with the Concierge plugin. If you’re using the default Funnelback template the code will already be there.
-
Log in to the search dashboard where you are doing your training.
See: Training - search dashboard access information if you’re not sure how to access the training. Ignore this step if you’re treating this as a non-interactive tutorial. -
Open up the results page management screen for the inventors results page (female inventors search package).
-
Edit the default template (
simple.ftl) by selecting edit results page templates from the templates panel. -
Locate the search box (hint: it is an input with a
name=query) and ensure it has a unique ID parameter. The search box should already haveid=queryset so no change is required to the search box for this page in order to add the auto-completion. When working with your own search boxes you will need to ensure you have a unique id assigned. This provides a unique identifier can be used to attach the auto-completion.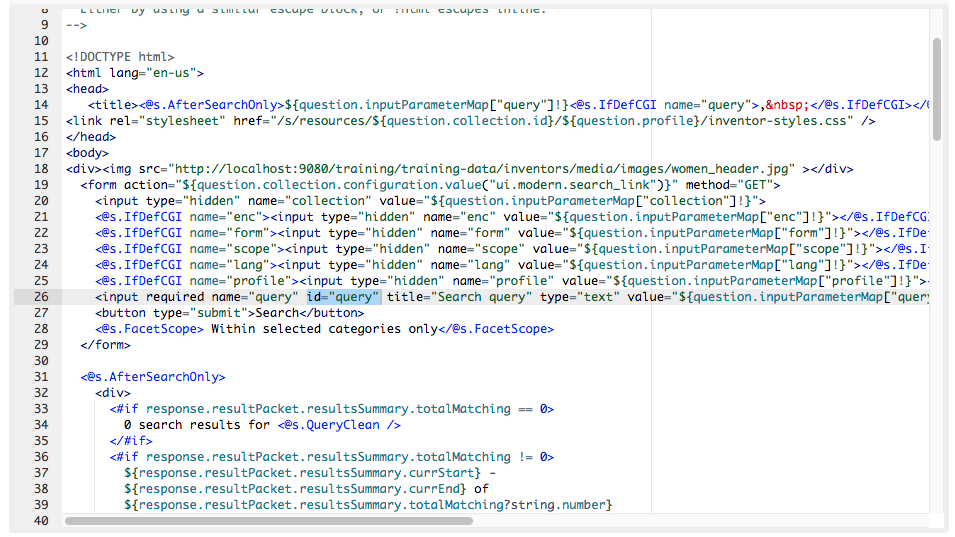
-
Load the required JavaScript libraries. Ensure that the jQuery, Typeahead, Handlebars and the
funnelback.autocompletion-2.6.0.jsJavaScript libraries are loaded from the template source. Add the following code to the bottom of the template, before the</body>tag. The${GlobalResourcesPrefix}variable is expanded into the base path on the Funnelback server so that the full URL will reference the correct file. The<#if>statement just checks to see if auto-completion is enabled for the search before importing the JavaScript libraries. Note: these files should be loaded in the order below.<script src="${GlobalResourcesPrefix}thirdparty/jquery-3.6/jquery.min.js"></script> <#-- Standard typeahead and handlebars libraries - required for auto-completion --> <#if question.currentProfileConfig.get('auto-completion') == 'enabled'> <script src="${GlobalResourcesPrefix}js/typeahead.bundle-0.11.1.min.js"></script> <script src="${GlobalResourcesPrefix}thirdparty/handlebars-4.7/handlebars.min.js"></script> <script src="${GlobalResourcesPrefix}js/funnelback.autocompletion-2.6.0.js"></script> </#if> -
Configure auto-completion options for the
funnelback.autocompletion-2.6.0.jsby adding the following block of JavaScript to the bottom of the file, immediately after thefunnelback.autocompletion-2.6.0.jsis loaded. This block of code attaches theautocompletionfunction to the element with the ID ofqueryand configures a list of parameters that will be passed to the auto-completion web service by the JavaScript function.<#if question.currentProfileConfig.get('auto-completion') == 'enabled'> <script> jQuery(document).ready(function() { jQuery('#query').autocompletion({ datasets: { <#if question.currentProfileConfig.get('auto-completion.standard.enabled')?boolean> organic: { collection: '${question.collection.id}', profile : '${question.profile}', program: '<@s.cfg>auto-completion.program</@s.cfg>', format: '<@s.cfg>auto-completion.format</@s.cfg>', alpha: '<@s.cfg>auto-completion.alpha</@s.cfg>', show: '<@s.cfg>auto-completion.show</@s.cfg>', sort: '<@s.cfg>auto-completion.sort</@s.cfg>', group: true }, </#if> }, length: <@s.cfg>auto-completion.length</@s.cfg> }); }); </script> </#if>If you wish to attach auto-completion to a search box with an ID of
searchboxthen you would replacejQuery('#query').autocompletion({with
jQuery('#searchbox').autocompletion({You can also define multiple code blocks similar to the one above, but attaching to different IDs if you wish to have auto-completion bind to more than one search box. Each code block can be configured with different auto-completion sources and configuration parameters.
-
Add CSS styling to handle the auto-completion suggestions. Add the following CSS import to the
<head>section of the template, then save the changes to your template.<#if question.currentProfileConfig.get('auto-completion') == 'enabled'> <link rel="stylesheet" type="text/css" href="${GlobalResourcesPrefix}css/funnelback.autocompletion-2.6.0.css" /> </#if> -
Test the auto-completion by previewing the search results page and start typing a query into the search box. Suggestions should be returned as you type.

10.2. Attach auto-completion to any search box
The above process can be used to attach Funnelback driven auto-completion to any search box on your website - the search box does not need to be part of a Funnelback search results page.
The HTML code needs to be cleaned when attaching to a search box that is not part of a Funnelback template (.ftl) file - any Freemarker macros or variables in the above examples will need to be removed for these non-Funnelback template pages. This means that full paths to the funnelback.autocompletion-2.6.0.js will be required and the configuration options that are auto-filled in the JavaScript configuration code (see above exercise) will need to be expanded to suitable values.
The simplest way to achieve this may be to view the HTML source of a search results page that includes the configured auto-completion and copy this into your web page, then fix any URLs that need to be made into absolute URLs.
For example: inspect the source code for the page in the previous example and observe the auto-completion JavaScript block.
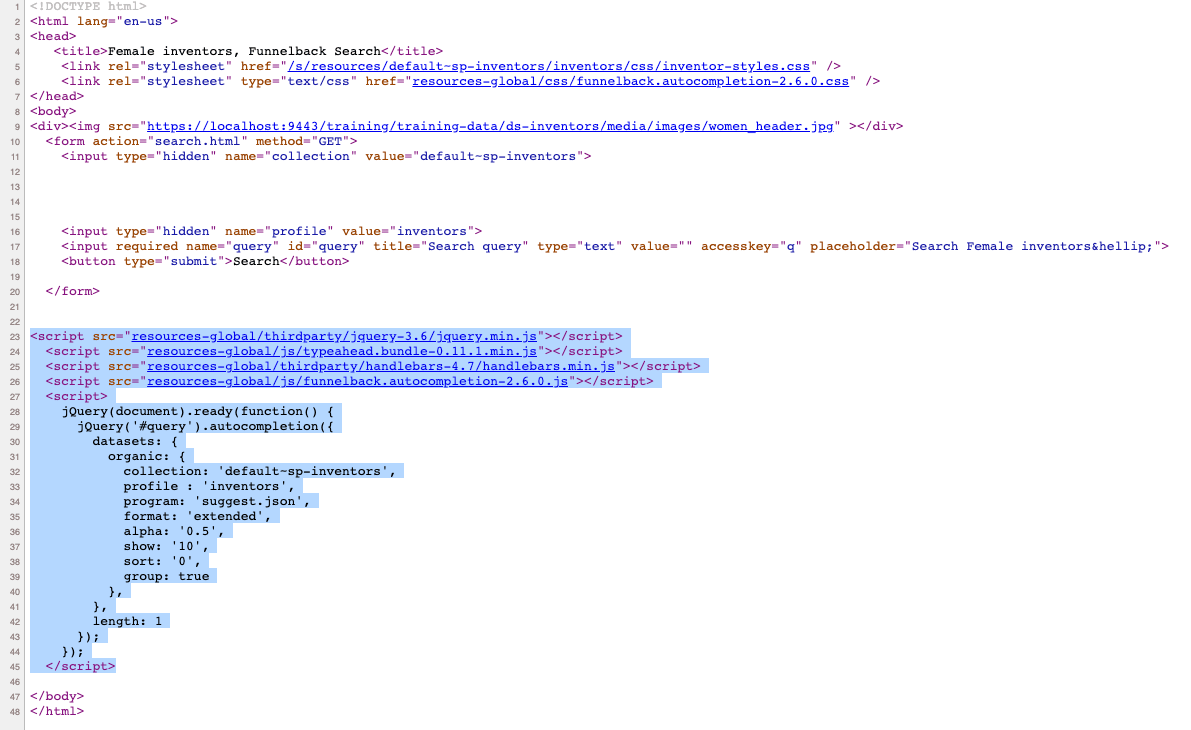
Placing the highlighted code, plus the JavaScript imports (jQuery, Typeahead etc.) and the auto-completion stylesheet include into your own web page or site template allows you to attach auto-completion to your website’s search box. You will also need to include relevant styling to display the auto-completion (or also include the CSS file in your page code).
| If your web page already uses any of the dependencies (JQuery, Typeahead etc.) then you shouldn’t import these again, just make sure you load the auto-completion Javascript code (and the configuration code) after the dependencies have loaded. |
10.3. Auto-completion Javascript plugin compatibility
The funnelback.autocompletion-2.6.0.js library that ships with Funnelback has some Javascript dependencies.
The funnelback.autocompletion-2.6.0.js code is only tested the bundled versions of jQuery, Typeahead and Handlebars. Although it has been found to be compatible with other versions, correct functioning is not guaranteed and the funnelback.autocompletion-2.6.0.js file should be treated as a sample implementation of integrating with the auto-completion web service. It should also be noted that if it is integrated with a website that also uses any of these dependencies then the website should be updated to use the same versions of as Funnelback, or some changes might be required to the funnelback.autocompletion-2.6.0.js code that is imported into existing website designs.
| Funnelback’s auto-completion web service which returns the suggestions as a JSON packet is not tied to any particular technologies or versions of JQuery, and you could implement your own auto-completion Javascript code to talk to the auto-completion web service. |
10.4. Auto-completion configuration
There are a numerous options available when configuring auto-completion.
A number of settings control the generation of auto-completion indexes and how they are interpreted by the auto-completion web service.
The other settings control how the Javascript auto-completion plugin interacts with the web service and displays the suggestions.
These options configure parameters that are sent to Funnelback’s auto-completion web service controlling behavior such as the number of suggestions to request, the number of keystrokes that are entered before the first request is made and how to sort the suggestions. Options also define how the auto-completion is displayed and other aspects of how the auto-completion behaves.
These options can be adjusted via the search dashboard and configure the integration of funnelback.autocompletion-2.6.0.js with the auto-completion web service.
The auto-completion options set via the search dashboard will only have an effect if you use the included JavaScript (funnelback.autocompletion-2.6.0.js) or if your implementation is designed to read the same options from Funnelback’s configuration and will only affect pages generated by Funnelback. A site search box that has been configured to display auto-completion has the values hardcoded in the JavaScript.
|
Tutorial: Configure simple auto-completion
-
Access the results page management for the inventors results page (female inventors search package).
-
Select edit results page configuration from the customize panel.
-
Configure a simple auto-completion dataset. Check to see if an
auto-completion.sourceparameter is set for the results page. Clickadd newand look up theauto-completion.source. For simple auto-completion this needs to be set to a value ofinternal. Save and then publish the setting.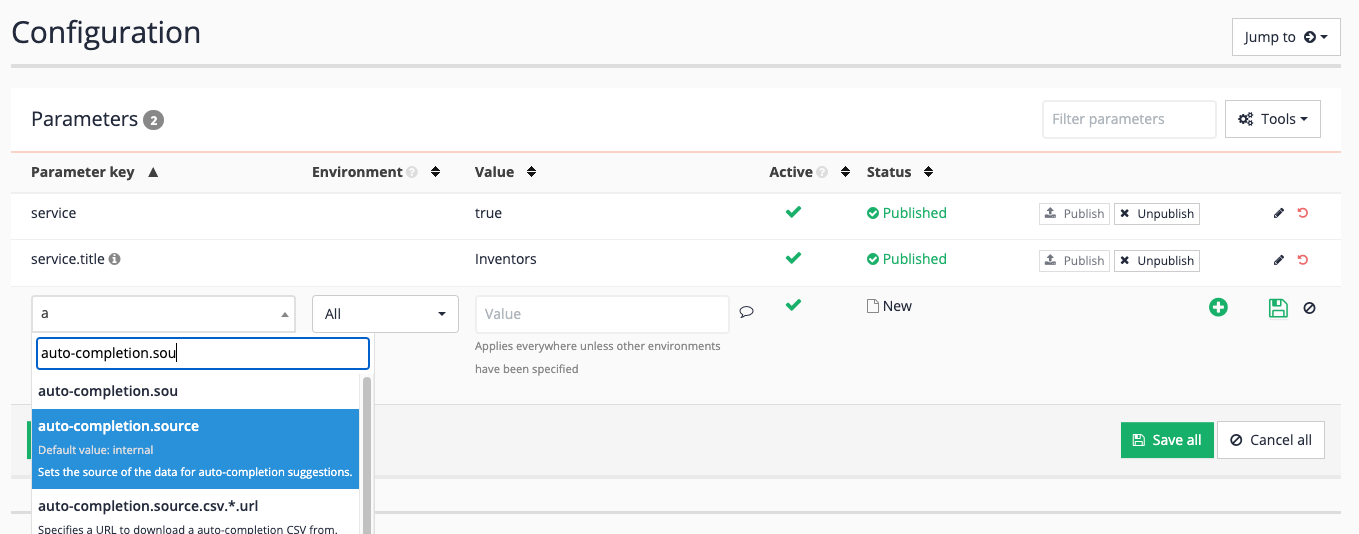
Observe that the default value for
auto-completion.sourceisinternal. This means you don’t need to set theauto-completion.sourcebut you can if you want to. For this example set the value as it will mean that you can see that this has been set when you view the results page configurations. This is all that is required to configure a simple auto-completion source. If you change the value ofauto-completion.sourceyou will need to rebuild the search index. -
We now make some basic changes to configure how the auto-completion widget works. The auto-completion widget is a Javascript program that is designed to interact with Funnelback’s auto-completion web service - sending through the user’s keystrokes as they are typed and formatting the set of returned suggestions.
Set auto-completion to occur when only one character is entered by the user. Adjust the minimum number of keystrokes before auto-completion is triggered. Set the following configuration key:
auto-completion.lengthto a value of1. Don’t forget that you need to publish the setting for it to take effect on the live version of the results page.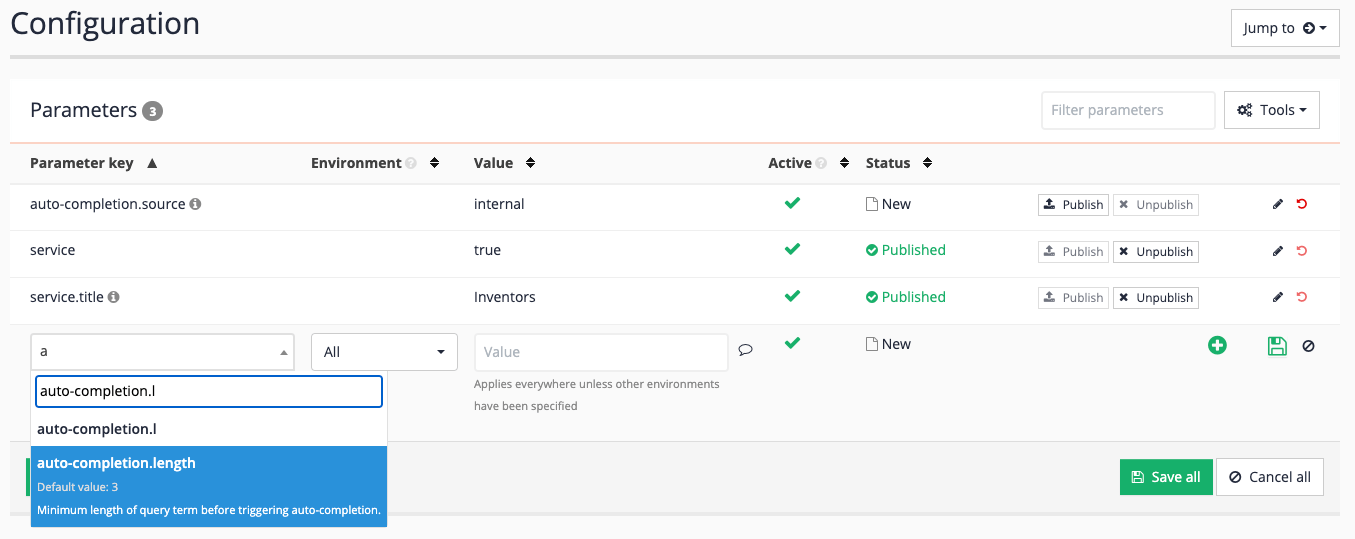
-
Preview the search and test the effect of this change. Auto-completion suggestions should now start to appear after a single character is entered into the search box.

-
Inspect the page source and observe the JavaScript configuration block at the end of the HTML file has been populated with the values from the administration interface. The other values within the configuration are populated from the default configuration values.
If you are integrating auto-completion with your site’s search box use this generated code as a guide for how to set the options in your page code. <script> jQuery(document).ready(function() { jQuery('#query').autocompletion({ datasets: { organic: { collection: 'inventors', profile : '_default_preview', program: '../s/suggest.json', format: 'extended', alpha: '0.5', show: '10', sort: '0', group: true }, }, length: 1 }); }); </script>
10.5. Structured auto-completion
The search suggestions displayed in simple auto-completion are words found in the indexed content. This improves a user’s search experience by reducing the chance of running a search that doesn’t return any results. These suggestions are generated automatically as part of the update and are a very powerful enhancement that can be added to the search.
Structured auto-completion is an extension of the functionality provided by simple auto-completion. Structured auto-completion generates suggestions based off auto-completions defined in CSV data, or by configuring the auto-completion plugin to generate structured auto-completion from metadata contained within the search index. The suggestions can be grouped by type and provide rich content (such as thumbnail images and other data) in the suggestion. The action performed when clicking on a suggestion is configurable and can run a query, take the use directly to a resource or run some JavaScript.
The CSV file can be edited directly from within Funnelback or uploaded via the file manager.
The CSV file format used by auto-completion is detailed in the Funnelback documentation
The CSV file contains 8 columns:
-
Trigger: This is the word, or set of words that will trigger the suggestion to display. The keywords that are input by the user are left matched against this trigger.
-
Weight: This is the weighting to apply to the suggestion. Range is 0 - 999. This weight is used to determine the order that suggestions will display when default sorted. Choose a high value (for example, 900) as your starting point and work from there - for most applications having the same weight of 900 for all the rich suggestions works well. The weighting is returned in the JSON (when you view the auto-completion web service response - see earlier section from the organic auto-completion exercise).
-
Display content: This is what is displayed to the user - it can be plain text (like for the organic suggestions, a html fragment (as nested within a DIV), a JavaScript statement to execute or JSON data.
-
Display type: This field indicates the type of the display content used by the display content field.
-
Category group: This field can contain a string that is used to group the suggestions.
-
Category type: This field is currently unused and is left blank.
-
Action: This field contains either a keyword string, a URL or a JavaScript callback function. A keyword string will be run as a search (as though the user input the string into the search box, a URL will take a user directly to the URL and the JavaScript callback will be executed.
-
Action type: This field indicates the type of action above.
U(for URLs) is the most common choice for rich auto-completion.
Tutorial: Create structured auto-completion from a CSV file
-
Access the search dashboard and locate the female inventors search package. .
-
Create a results page for the CSV dataset. Click on the results page tab, then create a new results page called
Wikipedia autocompletion dataset. We will add custom structured auto-completions coming from Wikipedia data. -
Results pages automatically inherit the simple completions from the content included in the results page (which is whatever data sources are included in the parent search package, unless you scope the result set of your results page). To ensure we only get CSV completion in this profile, we need to configure the source data for completions and limit it to the CSV data only.
-
Configure a structured auto-completion dataset. Select edit results page configuration from the customize panel, and add an
auto-completion.source(similar process as you followed in the previous exercise). Set the value tocsvthen save and publish the setting. This configures Funnelback to generate the auto-completion for the Wikipedia autocompletion dataset results page using a CSV file namedauto-completion.csvthat is configured as part of the results page.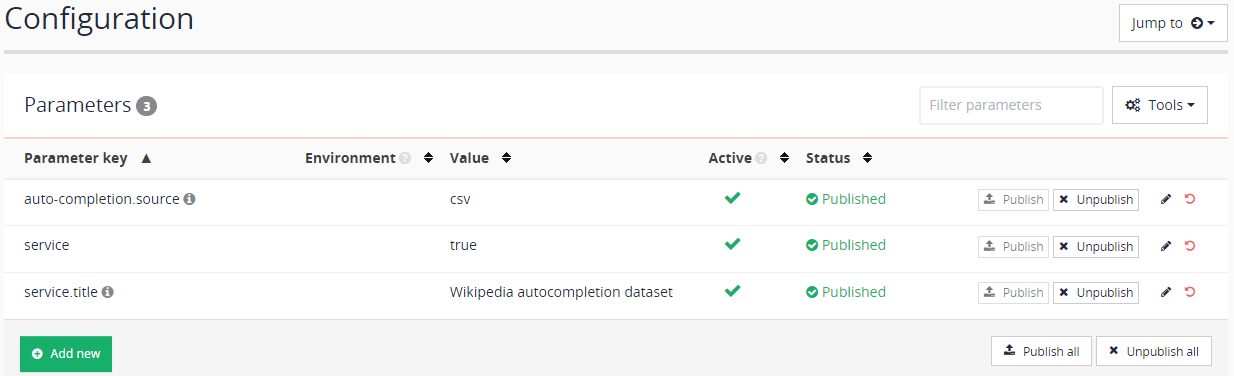
-
Return to the results page manage screen by clicking the Wikipedia autocompletion dataset link in the breadcrumb trail, then access the results page configuration file manager by clicking the manage results page configuration files item in the customize panel.
-
Create a new
auto-completion.csvfile. Click the add new button, then select auto-completion.csv from the drop-down menu. Click the save button to create the file.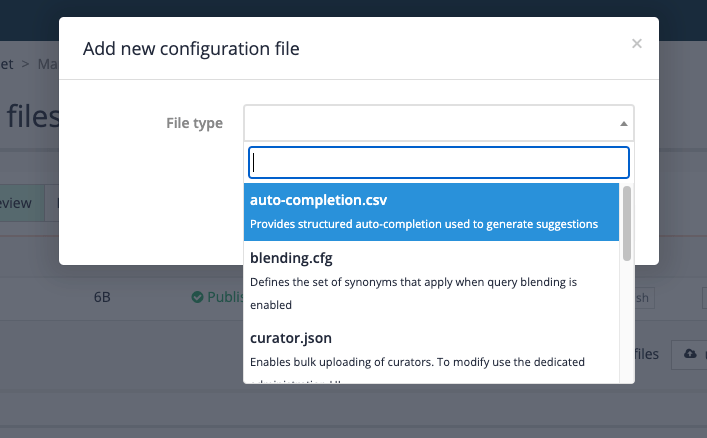
-
Observe that the file listing now displays an
auto-completion.csventry. Click on this entry to edit the file, then paste the following CSV into the editor window and save and publish the file.mary anderson,900,{\"name\":\"Mary Anderson\"\, \"yob\":\"1866\"\, \"yod\":\"1953\"\, \"thumb\":\"https://docs.squiz.net/training-resources/inventors-resources/mary_anderson.jpg\"\, \"inventions\":\"windshield wipers (1903)\"},J,Inventors,,https://en.wikipedia.org/wiki/Mary_Anderson_(inventor),U anderson,890,{\"name\":\"Mary Anderson\"\, \"yob\":\"1866\"\, \"yod\":\"1953\"\, \"thumb\":\"https://docs.squiz.net/training-resources/inventors-resources/mary_anderson.jpg\"\, \"inventions\":\"windshield wipers (1903)\"},J,Inventors,,https://en.wikipedia.org/wiki/Mary_Anderson_(inventor),U windshield wipers,900,{\"name\":\"Mary Anderson\"\, yob:\"1866\"\, yod:\"1953\"\, \"thumb\":\"https://docs.squiz.net/training-resources/inventors-resources/mary_anderson.jpg\"\, \"inventions\":\"windshield wipers (1903)\"},J,Inventors,,https://en.wikipedia.org/wiki/Mary_Anderson_(inventor),U wipers,890,{\"name\":\"Mary Anderson\"\, \"yob\":\"1866\"\, \"yod\":\"1953\"\, \"thumb\":\"https://docs.squiz.net/training-resources/inventors-resources/mary_anderson.jpg\"\, \"inventions\":\"windshield wipers (1903)\"},J,Inventors,,https://en.wikipedia.org/wiki/Mary_Anderson_(inventor),U barbara askins,900,{\"name\":\"Barbara Askins\"\, \"yob\":\"1939\"\, \"yod\":\"\"\, \"thumb\":\"https://docs.squiz.net/training-resources/inventors-resources/barbara_askins.jpg\"\, \"inventions\":\"new method for developing film (1978)\"},J,Inventors,,https://en.wikipedia.org/wiki/Barbara_Askins,U askins,890,{\"name\":\"Barbara Askins\"\, \"yob\":\"1939\"\, \"yod\":\"\"\, \"thumb\":\"https://docs.squiz.net/training-resources/inventors-resources/barbara_askins.jpg\"\, \"inventions\":\"new method for developing film (1978)\"},J,Inventors,,https://en.wikipedia.org/wiki/Barbara_Askins,U margaret knight,900,{\"name\":\"Margaret Knight\"\, \"yob\":\"1838\"\, \"yod\":\"1914\"\, \"thumb\":\"https://docs.squiz.net/training-resources/inventors-resources/margaret_knight.jpg\"\, \"inventions\":\"flat bottomed paper bag (1978)\"},J,Inventors,,https://en.wikipedia.org/wiki/Margaret_E._Knight,U knight,890,{\"name\":\"Margaret Knight\"\, \"yob\":\"1838\"\, \"yod\":\"1914\"\, \"thumb\":\"https://docs.squiz.net/training-resources/inventors-resources/margaret_knight.jpg\"\, \"inventions\":\"flat bottomed paper bag (1978)\"},J,Inventors,,https://en.wikipedia.org/wiki/Margaret_E._Knight,U ruth handler,900,{\"name\":\"Margaret Knight\"\, \"yob\":\"1916\"\, \"yod\":\"2002\"\, \"thumb\":\"https://docs.squiz.net/training-resources/inventors-resources/ruth_handler.jpg\"\, \"inventions\":\"Barbie doll (1959)\"},J,Inventors,,https://en.wikipedia.org/wiki/Ruth_Handler,U handler,890,{\"name\":\"Margaret Knight\"\,\"yob\":\"1916\"\, \"yod\":\"2002\"\, \"thumb\":\"https://docs.squiz.net/training-resources/inventors-resources/ruth_handler.jpg\"\, \"inventions\":\"Barbie doll (1959)\"},J,Inventors,,https://en.wikipedia.org/wiki/Ruth_Handler,U baby,900,"Disposable diaper (1949)",T,Inventions,,baby,Q baby,900,"Snugli baby carrier (1969)",T,Inventions,,baby,Q windshield wipers,900,"Windshield wipers (1903)",T,Inventions,,windshield wipers,Q car,900,"Windshield wipers (1903)",T,Inventions,,windshield wipers,QThis creates eight different suggestions, some of which have been duplicated several times with different triggers. The suggestions are grouped into two types - inventors and inventions. In this CSV file the inventor suggestions are JSON type suggestions that have Wikipedia pages as the target when you click on the suggestion. The inventions suggestions are text type suggestions that result in a query being run when you click on the suggestion.
Auto-completion is only generated for live results pages, so it is important that you do not forget to publish the CSV file. -
For auto-completion indexes to get generated you must run an update on any of the data sources that are contained in the parent search package. Navigate to the parent Female inventors search package by clicking on the Female inventors link in the breadcrumb trail, then scroll to the bottom of the page to manage the Female inventors - website data source. Rebuild the index by clicking the > advanced update menu item, from the female inventors data source quick actions.
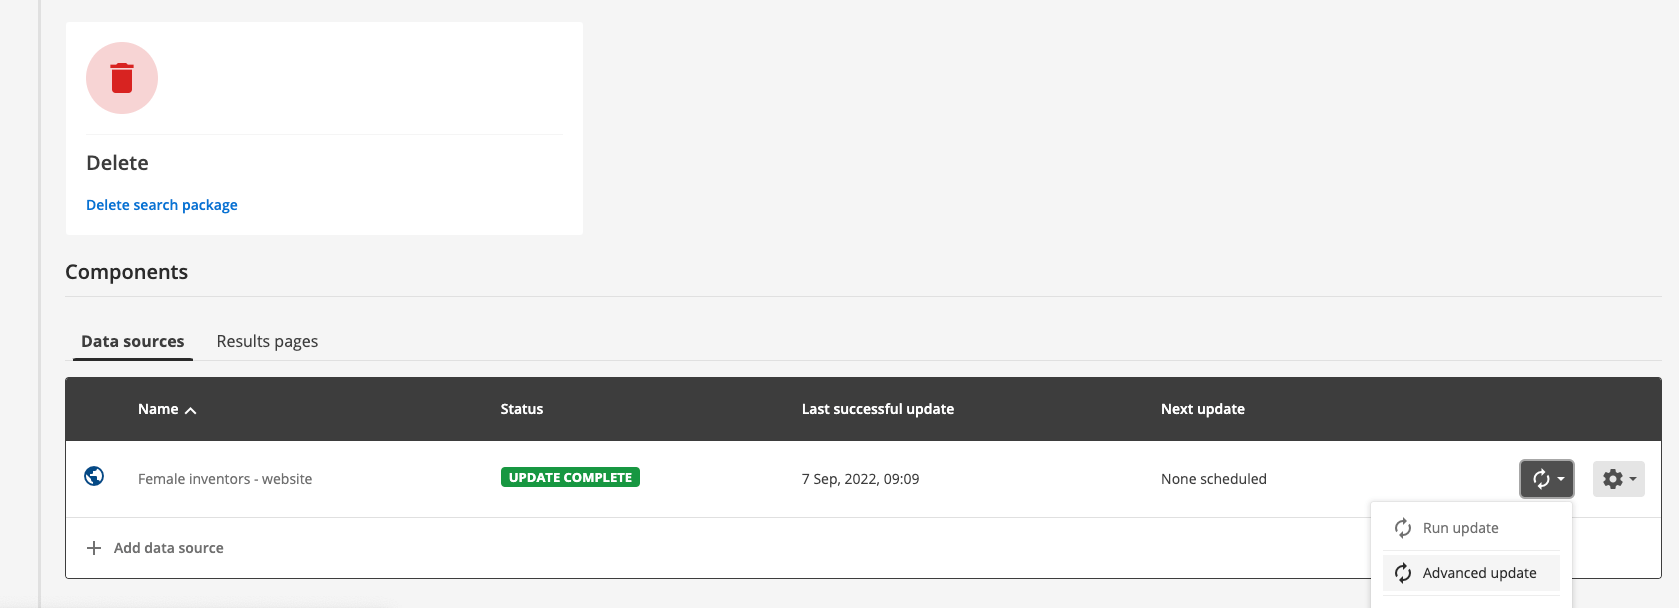
The advanced update option can also be accessed from the search dashboard home page, and the management page for the data source you want to update. -
Select the rebuild live view option from the rebuild index category, then click the update button. When you rebuild the live index this just rebuilds the indexes for your data source using the data that was previously downloaded. This differs from a full update which will also regather the content from the website.
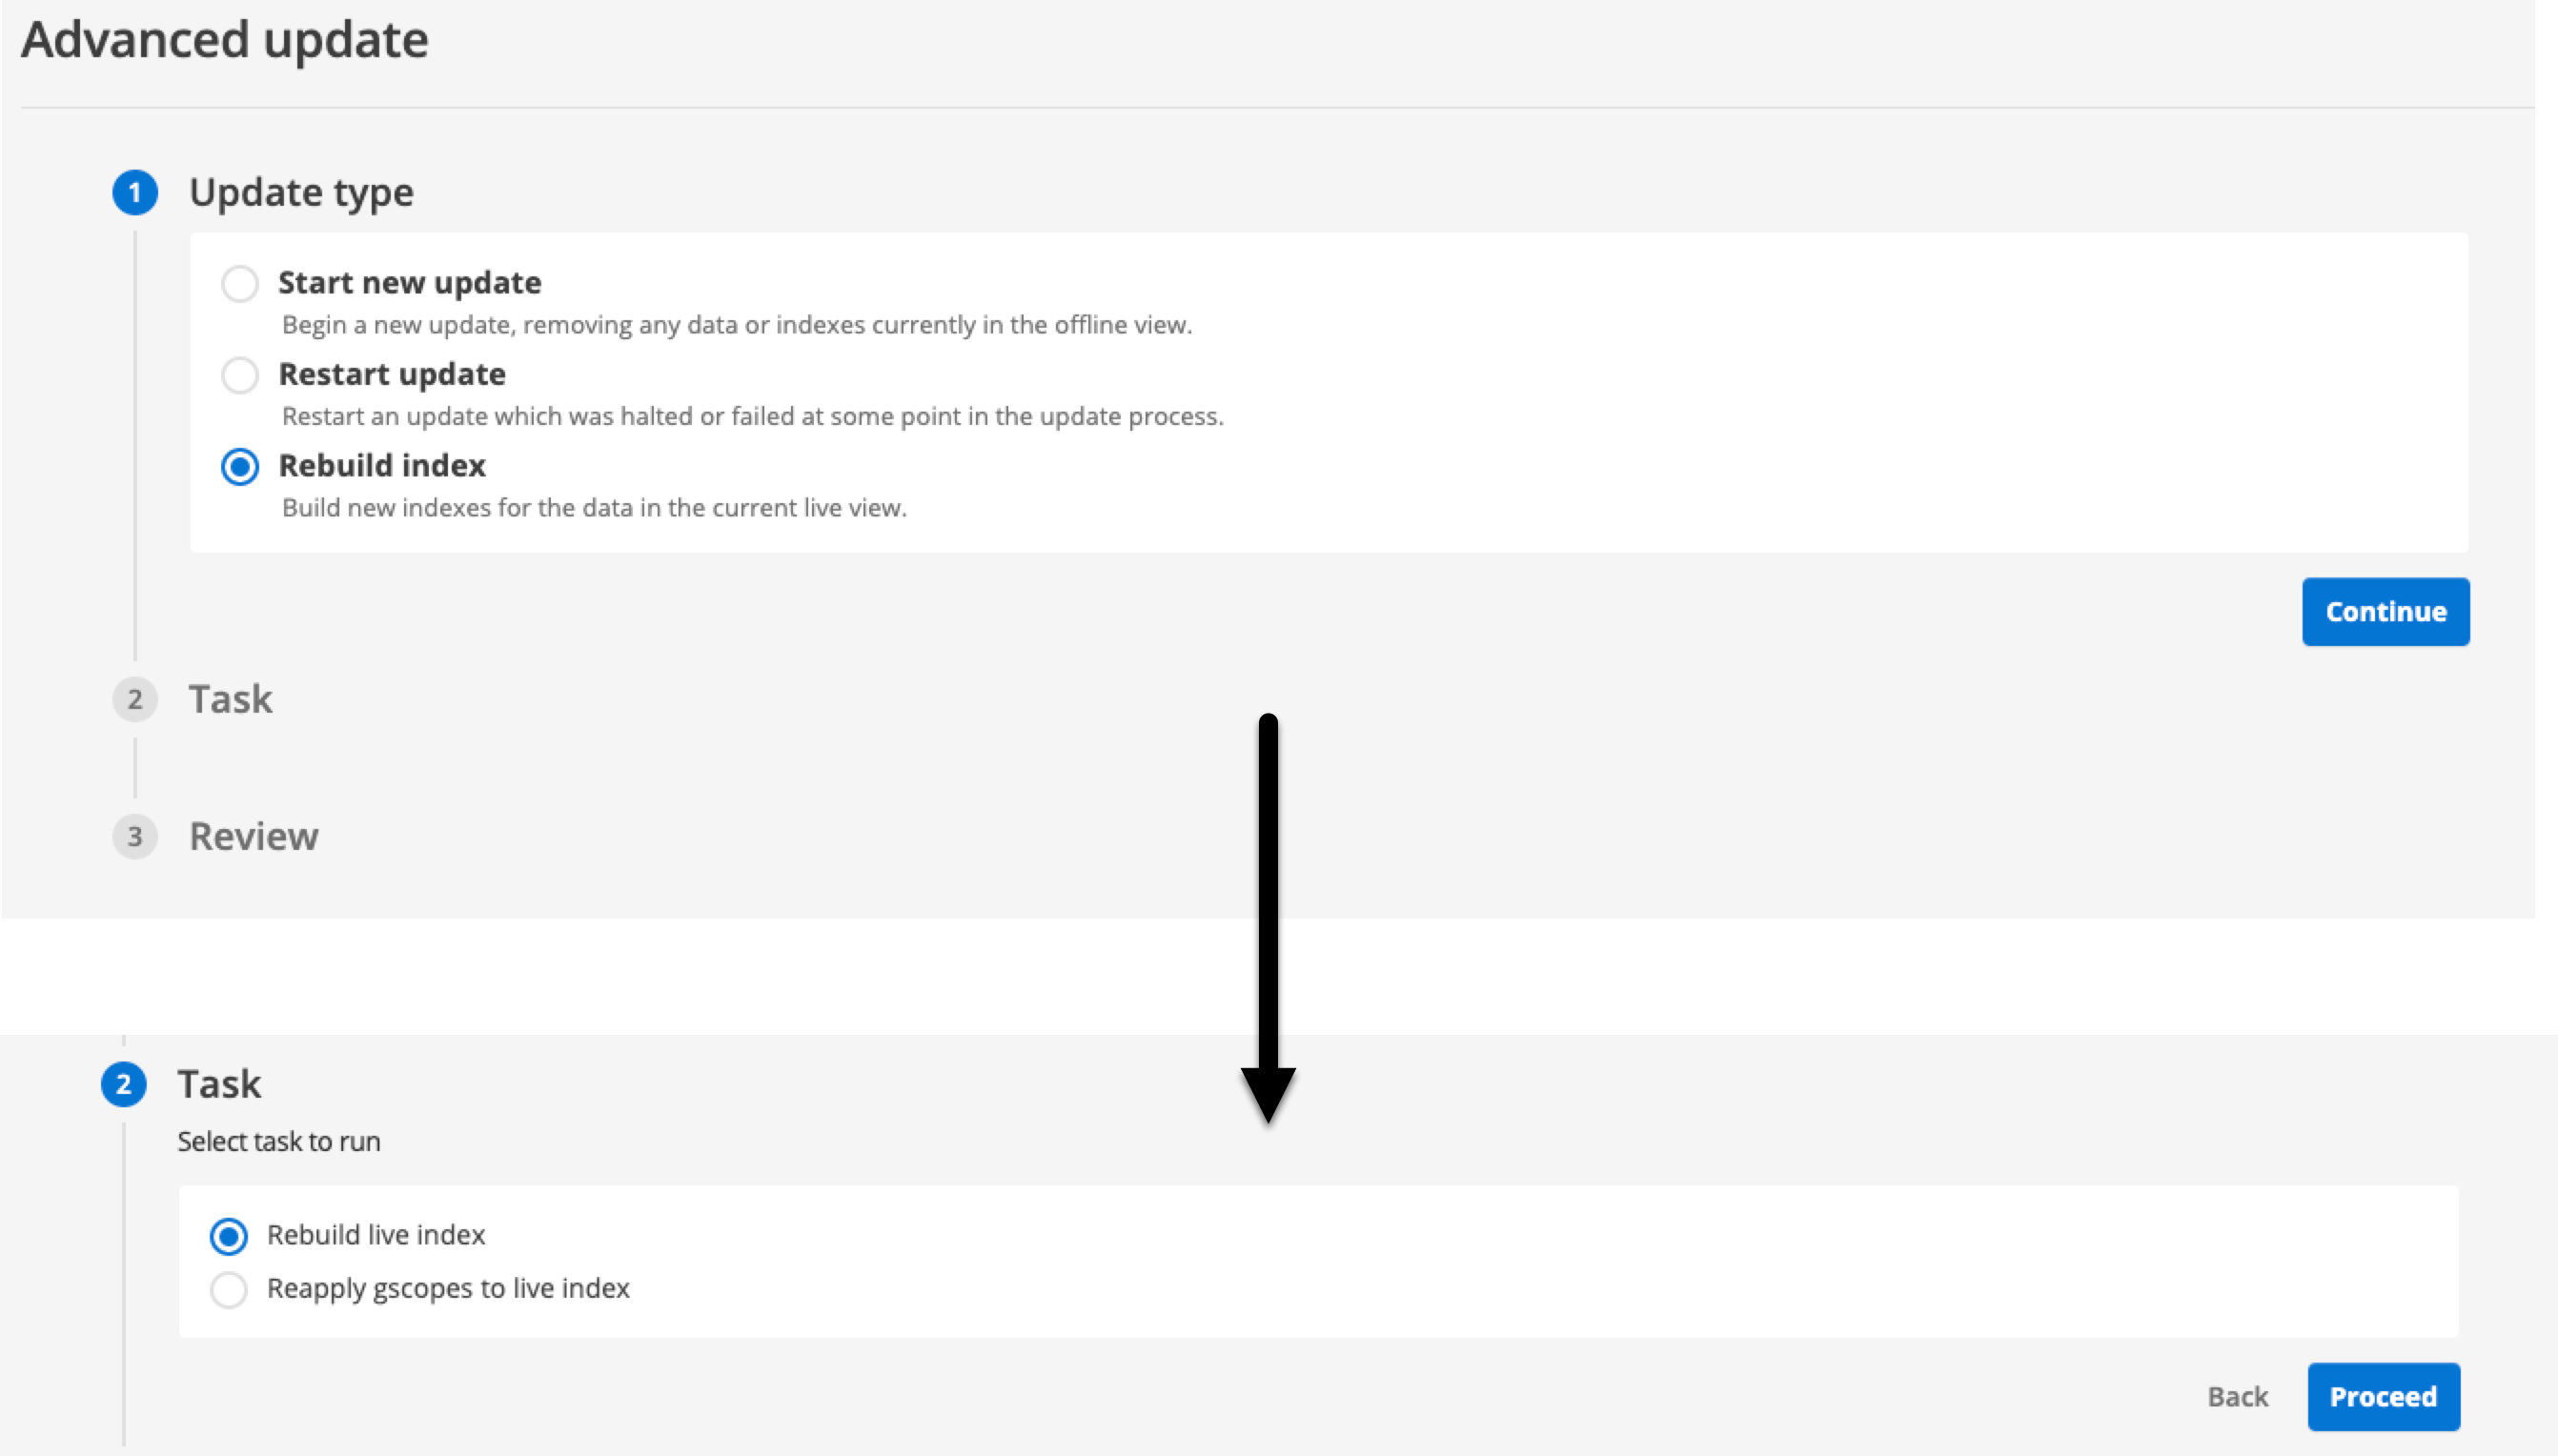
(select start advanced update from the update panel, then select rebuild live index and click update) to generate the auto-completion.
-
View the search results and perform a search for margaret observing the suggestions have not changed. This is because the JavaScript needs to be reconfigured to request the additional auto-completion dataset.
-
Update the JavaScript code as shown below (hint: you will need to edit your template on the inventors results page):
-
Add a dataset called
wikipediato the JavaScript auto-completion configuration. Note: make sure the case for the profile parameter matches the results page ID you created (wikipedia-autocompletion-dataset).<#if question.currentProfileConfig.get('auto-completion') == 'enabled'> <script> jQuery(document).ready(function() { jQuery('#query').autocompletion({ program: '<@s.cfg>auto-completion.program</@s.cfg>', (1) horizontal: true, (2) datasets: { <#if question.currentProfileConfig.get('auto-completion.standard.enabled')?boolean> organic: { collection: '${question.collection.id}', profile : '${question.profile}', format: '<@s.cfg>auto-completion.format</@s.cfg>', alpha: '<@s.cfg>auto-completion.alpha</@s.cfg>', show: '<@s.cfg>auto-completion.show</@s.cfg>', sort: '<@s.cfg>auto-completion.sort</@s.cfg>', template: { header: '<h4>Suggestions</h4>' (3) }, group: true }, wikipedia: { (4) collection: '${question.collection.id}', profile : 'wikipedia-autocompletion-dataset', show: '3', template: { header: '<h4>Wikipedia</h4>', suggestion: '<div>{{#if label.name}}{{#if label.thumb}}<img src="{{label.thumb}}" style="height:40px; float:left; clear:both; padding:1px; border:1px solid #333; margin-right:2px;"/>{{/if}}{{label.name}} ({{label.yob}} - {{label.yod}})<br/><span style="font-size:80%;"><em>Invented: {{label.inventions}}{{else}}{{label}}{{/if}}</em></span></div>', group: '<h5>{{label}}</h5>' }, group: true }, </#if> }, length: <@s.cfg>auto-completion.length</@s.cfg> }); }); </script> </#if>1 configure the auto-completion program at the global level. 2 configure the auto-completion to display in columns 3 add a header to the organic suggestions 4 configuration for the wikipediadataset, which sources the auto-completion suggestions from thewikipedia-autocompletion-datasetresults page. -
Start to search for baby and observe the two columns of suggestions and how they change as you type. If this doesn’t work, double check that you have published the results page configuration and the
auto-completion.csvfile (and performed a re-index if needed).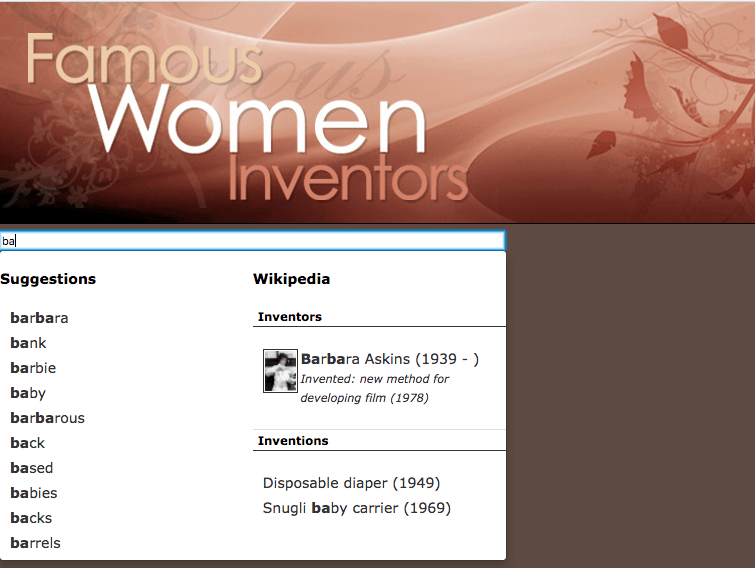
-
Click on the Barbara Askins suggestion and observe that you are taken directly to the Wikipedia page that you configured.
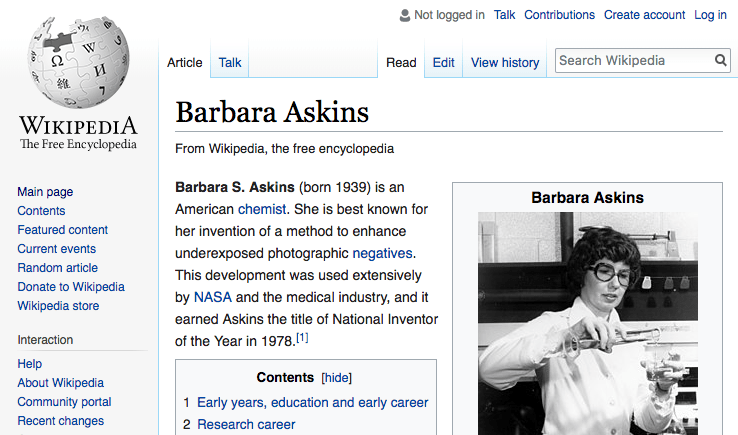
-
Repeat the search and this time click on the disposable diaper suggestion. Observe that a search for baby is run - this aligns with the action that was configured in the CSV.
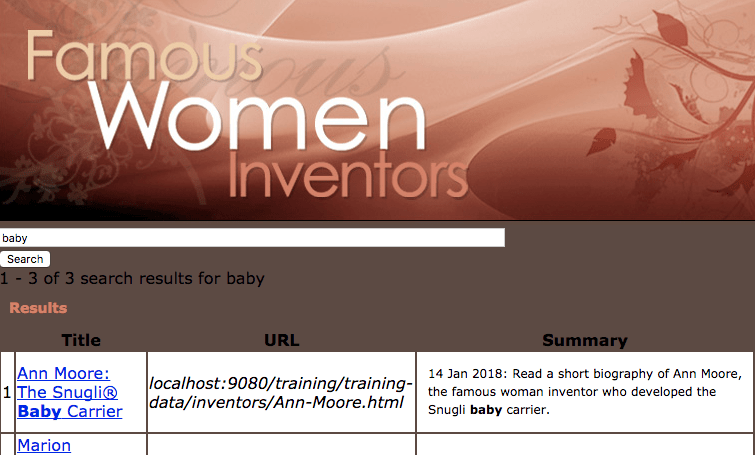
10.6. Auto-completion web service
Many of the auto-completion configuration options available via the search dashboard only control the call made to the JSON endpoint producing suggestions.
The funnelback-completion-2.6.0.js JavaScript is responsible for requesting auto-completion suggestions based on what has been entered into the search box, submitting the request after each keystroke and transforming the JSON response from the web service into the HTML presented to the end user.
As a front-end developer might wish to use other JavaScript frameworks or libraries to interact with the web service - your code will need to form these calls on the user’s behalf and transform and insert the response into page DOM.
Any implementation that interacts with the auto-completion web service will need to handle the construction of the suggest.json request URL and also the processing and conversion of the JSON response into the final HTML that’s returned to the end user.
Tutorial: Auto-completion web service
This exercise examines the raw request that is submitted to the auto-completion web service and JSON response.
-
Load the inventors results page in your browser by using the preview function from the administration interface.
-
Open up your browser debugger and ensure network traffic is being inspected.
-
Start typing a query into the search box and observe that a call to
suggest.jsonis made to each configured auto-completion dataset for each keystroke.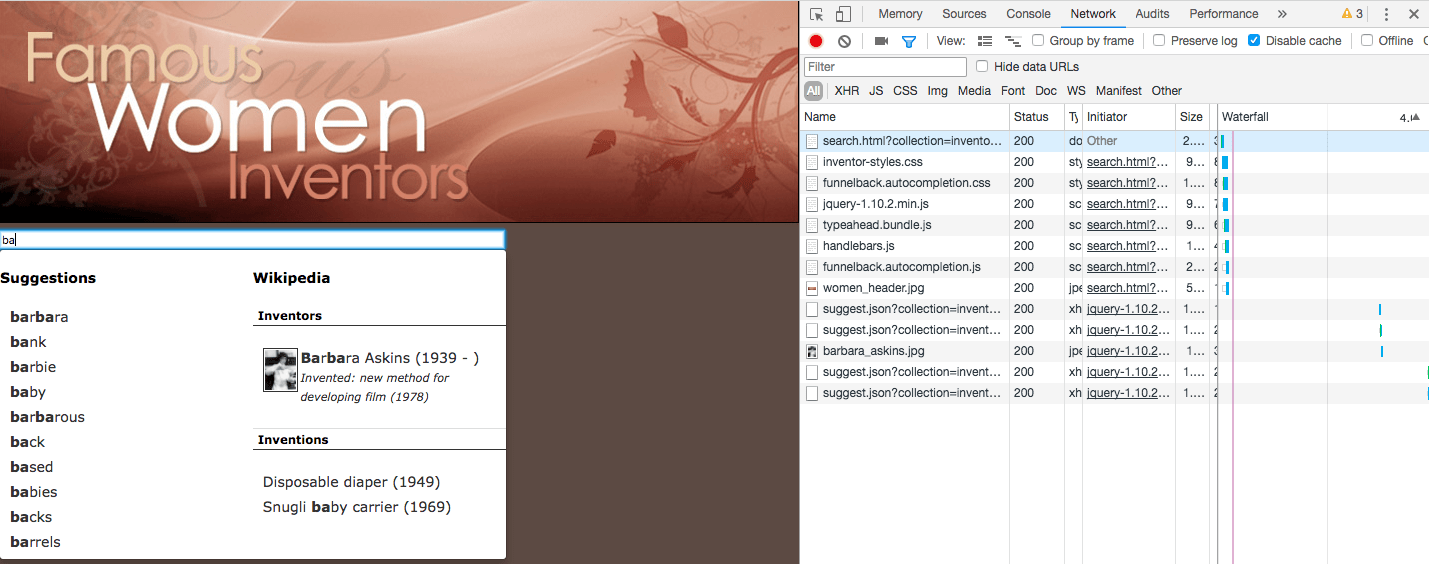
-
Each
/s/suggest.jsoncall is a request to the auto-completion web service. Observe that each call specifies the options set in the JavaScript and the only difference between subsequent calls is the value of the partial query which reflects the current partially entered query of the search box.FUNNELBACK-SERVER/s/suggest.json?collection=default~ds-inventors&fmt=json%2B%2B&alpha=0.5&profile=wikipedia&show=3&partial_query=b FUNNELBACK-SERVER/s/suggest.json?collection=default~ds-inventors&fmt=json%2B%2B&alpha=0.5&profile=wikipedia&show=3&partial_query=ba -
Open one of the URLs in your browser and inspect the JSON that is returned.
If you don’t know what FUNNELBACK-SERVERis then run a search from the search dashboard for your inventors results page to find out what your Funnelback server URL is - your URL will be something likehttp:/FUNNELBACK-SERVER/s/search.html?.... ReplaceFUNNELBACK-SERVERin the example above with this hostname.Compare this with what was returned in the list of suggestions displayed in the search box when you typed.
This is an example of simple auto-completion (note: the JSON has been truncated in this example):
[
  {
    "key": "barbara",
    "disp": "barbara",
    "disp_t": "T",
    "wt": "4.899",
    "cat": "",
    "cat_t": "",
    "action": "",
    "action_t": "S"
  },
  {
    "key": "bank",
    "disp": "bank",
    "disp_t": "T",
    "wt": "1.414",
    "cat": "",
    "cat_t": "",
    "action": "",
    "action_t": "S"
  },
  {
    "key": "barbie",
    "disp": "barbie",
    "disp_t": "T",
    "wt": "1.414",
    "cat": "",
    "cat_t": "",
    "action": "",
    "action_t": "S"
  },
  {
    "key": "baby",
    "disp": "baby",
    "disp_t": "T",
    "wt": "1.414",
    "cat": "",
    "cat_t": "",
    "action": "",
    "action_t": "S"
  }
]
And this is an example of the structured auto-completion returned:
[
  {
    "key": "barbara askins",
    "disp": {
      "name": "Barbara Askins",
      "yob": "1939",
      "yod": "",
      "thumb": "https://docs.squiz.net/training-resources/inventors-resources/barbara_askins.jpg",
      "inventions": "new method for developing film (1978)"
    },
    "disp_t": "J",
    "wt": "900",
    "cat": "Inventors",
    "cat_t": "",
    "action": "https://en.wikipedia.org/wiki/Barbara_Askins",
    "action_t": "U"
  },
  {
    "key": "baby",
    "disp": "Disposable diaper (1949)",
    "disp_t": "T",
    "wt": "900",
    "cat": "Inventions",
    "cat_t": "",
    "action": "baby",
    "action_t": "Q"
  },
  {
    "key": "baby",
    "disp": "Snugli baby carrier (1969)",
    "disp_t": "T",
    "wt": "900",
    "cat": "Inventions",
    "cat_t": "",
    "action": "baby",
    "action_t": "Q"
  }
]
10.7. Auto-completion plugin
Funnelback includes a plugin that can be used to generate auto-completion indexes using metadata that exists within the Funnelback search index.
The plugin allows you to define a number of properties that are used for configuring the auto-completion.
Consider a very simple web page:
<html>
<head>
    <title>King Lear</title>
    <meta name="author" content="William Shakespeare">
    <meta name="characters" content="Lear|Earl of Kent|Fool|Edgar|Edmund|Goneril|Regan|Cordelia|Duke of Albany|Duke of Cornwall|Gentleman|Oswald|King of France|Duke of Burgundy|Old man|Curan">
    <meta name="image.thumbnail" content="http://shakespeare.example.com/king-lear.jpg">
</head>
<body>
...
</body>
</html>
You define:
-
the auto-completion trigger: this is usually a field or set of fields from the data model. The values from these fields will be used to trigger a suggestion. For example, you might configure the
listMetadata.authorandtitlefields, resulting in suggestions triggered. The above html would generate an auto-completion suggestion triggered by somebody starting to enterking learorwilliam shakespeareinto the search box. There’s also an additional trigger expansion option which will trigger suggestions from the other words in a multi-word value. For the above example this would also return the suggestion if you started typinglearorshakespeare. -
the auto-completion action: This is usually a choice between going directly to a URL, or running a query. If you go to a URL, then clicking the suggestion will load the page that you generated the suggestion from. If you run a query you’ll need to define what the query is to run as part of configuring the suggestion.
-
the auto-completion suggestion data: This is a set of fields from the data model that will be returned as the data for the suggestion. For example, for the above example you might return the title, metadata image thumbnail URL and summary fields which can then be used in a template to generate a suggestion containing the title, short description and a thumbnail image.
Tutorial: Generate auto-completion using the auto-completion plugin
Generating auto-completion requires suitable metadata to exist within the search index. This metadata should ideally be included within your page content, or you could use another method (such as the metadata scraper, or external metadata) to provide additional metadata.
For the purpose of this training exercise we’ve included some in-page metadata that will be used to create the auto-completion. If you inspect the source for the female inventors pages you’ll see two metadata fields for pages that are about an inventor.
For example: viewing the source for: https://docs.squiz.net/training-resources/inventors/Mary-Anderson.html shows two metadata fields (inventor.name and inventor.thumbnail) that we can use to present an auto-completion that suggests inventors from the index. We will also use the keywords field as our triggers.
<title>Mary Anderson: Inventor of Windshield Wipers</title>
<meta http-equiv="Content-Type" content="text/html; charset=iso-8859-1" />
<meta name="keywords" content="mary anderson, inventor mary anderson, mary ann anderson, inventor of windshield wipers, windshield wiper inventor, invention of windshield wipers, windshield wipers" />
<meta name="description" content="Read a biography of Mary Anderson, whose invention of windshield wipers changed the American auto industry." />
<meta name="Rating" content="General" />
<meta name="robots" content="index, follow" />
<meta name="Copyright" content="Copyright © 2008 Famous Women Inventors" />
<meta name="inventor.name" content="Mary Anderson" />
<meta name="inventor.thumbnail" content="bio_anderson.jpg" />-
Map the two identified metadata fields: Open the female inventors - website data source management screen and select configure metadata mappings from the settings panel.
-
Create mappings for the two fields: map the
inventor.namefield to a metadata class calledinventorName, andinventor.thumbnailto a metadata class calledinventorThumb, then reindex the data source by selecting from the update panel on the data source management screen . Thekeywordsfield is already mapped, so we don’t need to set up a mapping for it. -
Return to the metadata mapping screen and locate the metadata mappings you just created. Observe that metadata was successfully detected for both of the fields you mapped.

-
Open the search dashboard and locate the Female inventors search package.
-
Create a new results page called Plugin autocompletion dataset. The name of the results page is not important, but a results page should be created for each auto-completion data set that you are creating.
-
Open the plugin management screen - click the Plugins menu item from the navigation panel.
-
Locate the Generate auto-completion from search index plugin. Click on the plugin tile to open the plugin setup screen.
-
Access the documentation for setting up the auto-completion plugin by clicking the view documentation button (you can also access the plugin documentation directly from the tile on the previous screen). Spend some time familiarizing yourself with how the plugin works.
-
Return to the plugin screen and work through the setup wizard. On the location step, select the results page you just created from the select list the click the continue button.
-
The configuration keys step is where you configure how the plugin works. If you read the documentation you will have noted that you need to configure trigger, action and display fields for the plugin. This is where you can set this up. Add the following configuration, then click the proceed button:
Configuration option Value Description Trigger sources
/listMetadata/keyword,/titleConfigures the fields that will provide the words that are used to trigger the suggestions.
Action type
USets the action to go to the page (indicated by the
liveURLfield in the data model) when the suggestion is clicked. (Q means run a search for the suggestion).Display fields
/listMetadata/inventorName,/listMetadata/inventorThumbReturns the
inventorNameandinventorThumbfields inside the auto-completion JSON, for use in your display template.Match each word in a multi-word trigger
true
When enabled if you have a multi-word trigger then the user’s input will be matched to all the words of the multi-word trigger instead of only the start of the trigger.
-
The review screen shows a summary of your plugin configuration. Read through this to ensure your configuration is correct then click the finish button to apply the configuration to your results page.
-
You are returned to the results page management screen. For the auto-completion plugin there is an additional step that you need to perform to ensure that the auto-completion that the plugin builds only contains the generated plugins. This involves setting an additional configuration key in the results page configuration. Click on the edit results page configuration option from the customize panel to open the configuration key editor.
-
You’ll see all the configuration keys that are defined for your results page (including the ones you just added for the plugin). Click the add new button and add and publish the following configuration key:
Parameter key Value Description auto-completion.source
<set this to an empty value>
This ensures that we don’t include additional suggestions in the auto-completion index which are words and phrases in the index (and that run a query for the word or phrase when you click the suggestion).
-
Return to the results page configuration screen and publish the plugin - scroll to the plugins section (at the bottom of the page) and select > publish.
-
Run an advanced update to rebuild the live index (on the female inventors - website data source). This will ensure that the auto-completion indexes are generated.
-
Check the log files for the female inventors search package to ensure that auto-completion was successfully generated. In the live log files, locate the
Step-BuildAutocompletion.plugin-autocompletion-dataset.logand verify that suggestions were generated. The log file name will include the results page ID where you enabled your plugin.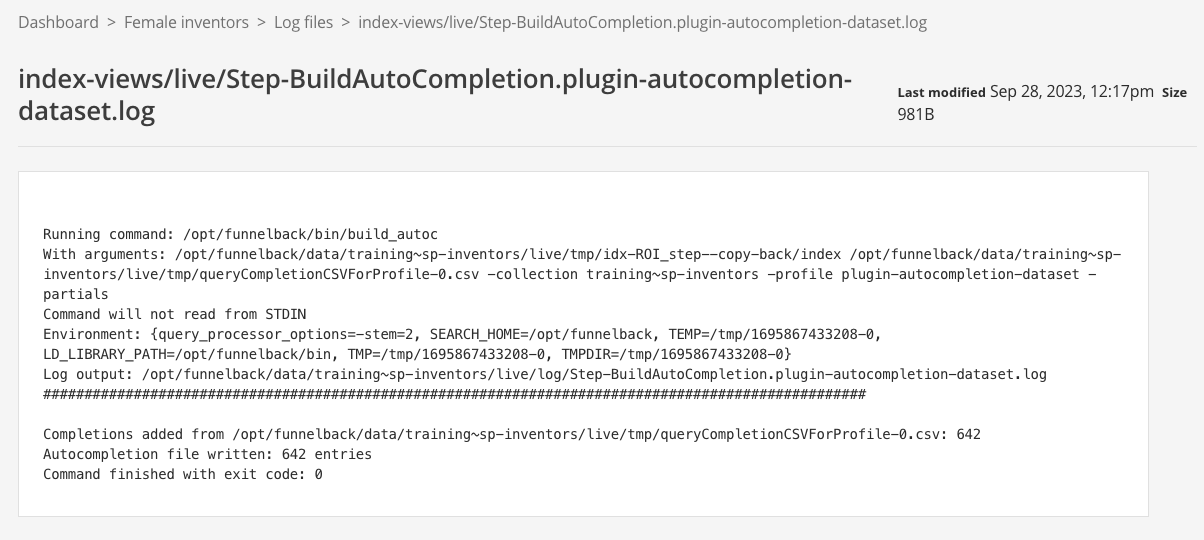
-
We now need to configure out results page template to include the auto-completion suggestions from this newly generated dataset. Edit the template for the inventors results page. Locate the Javascript block at the bottom of the template file, which configures the auto-completion. Add an additional dataset that sources suggestions from the dataset that you’ve just created. You can replace the entire script block with the following, noting that
pluginblock adds the auto-completion dataset you have created in the steps above.<script> jQuery(document).ready(function() { jQuery('#query').autocompletion({ datasets: { <#if question.currentProfileConfig.get('auto-completion.standard.enabled')?boolean> organic: { collection: '${question.collection.id}', profile : '${question.profile}', program: '<@s.cfg>auto-completion.program</@s.cfg>', format: '<@s.cfg>auto-completion.format</@s.cfg>', alpha: '<@s.cfg>auto-completion.alpha</@s.cfg>', show: '<@s.cfg>auto-completion.show</@s.cfg>', sort: '<@s.cfg>auto-completion.sort</@s.cfg>', group: true }, plugin: { collection: '${question.collection.id}', profile : 'plugin-autocompletion-dataset', }, </#if> }, length: <@s.cfg>auto-completion.length</@s.cfg> }); }); </script> -
Run a search against the live version of your results page. After the search results are returned start typing invent into your search box and observe that you get a bunch of additional suggestions returned at the bottom of the suggestions, but these all look like
[object Object]
This is expected because the auto-completion is returning a JSON object to the auto-completion widget, but we haven’t told the widget what to do with JSON, so it returns a default
[object Object]value. -
Open your browser debugger and view the network panel while typing into the search box you will see
suggest.jsoncalls to the auto-completion web service. Two calls are made for each keystroke, corresponding to the two datasets that are configured (organicandplugin). If you inspect the JSON that is returned you’ll see the object containing your suggestion data.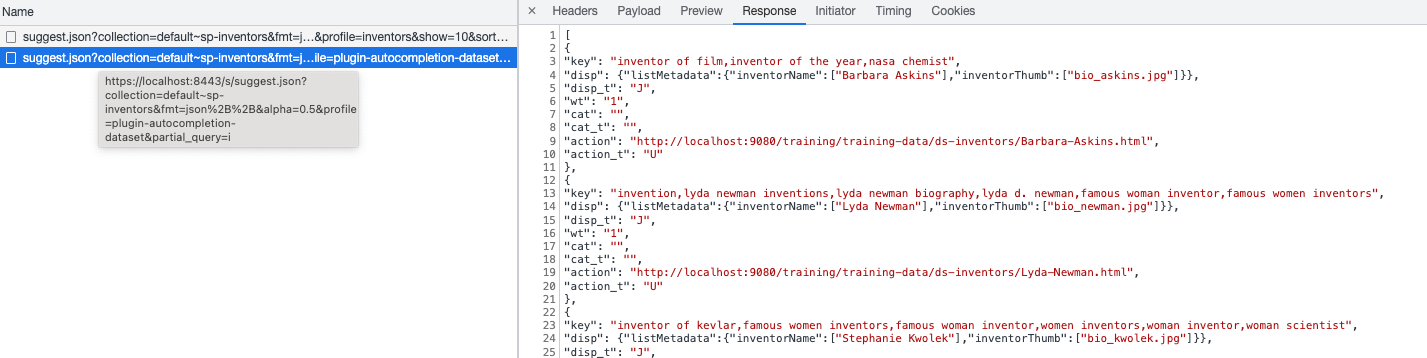
-
To get rid of the
[object Object]we need to configure a template to display the JSON - this is a handlebars template that converts the JSON into HTML that the browser can display. We’ll also add options to limit the number of suggestions from the plugin dataset and switch to a column display.<script> jQuery(document).ready(function() { jQuery('#query').autocompletion({ datasets: { <#if question.currentProfileConfig.get('auto-completion.standard.enabled')?boolean> organic: { collection: '${question.collection.id}', profile : '${question.profile}', program: '<@s.cfg>auto-completion.program</@s.cfg>', format: '<@s.cfg>auto-completion.format</@s.cfg>', alpha: '<@s.cfg>auto-completion.alpha</@s.cfg>', show: '<@s.cfg>auto-completion.show</@s.cfg>', sort: '<@s.cfg>auto-completion.sort</@s.cfg>', group: true }, plugin: { collection: '${question.collection.id}', profile : 'plugin-autocompletion-dataset', show: '3', (1) template: { (2) suggestion: '<div><img src="https://docs.squiz.net/training-resources/inventors/media/images/{{label.listMetadata.inventorThumb}} ">{{label.listMetadata.inventorName}}</div>' }, }, </#if> }, horizontal: true, (3) length: <@s.cfg>auto-completion.length</@s.cfg> }); }); </script>1 Limit the number of plugin suggestions to a maximum of 3 2 Template for formatting the JSON 3 Show each dataset in a separate column. -
Switch back to your search results page, refresh the page and start running a search for mary. Observe that you now see two columns of suggestions and the
[object Object]text is now replaced with the formatted suggestion.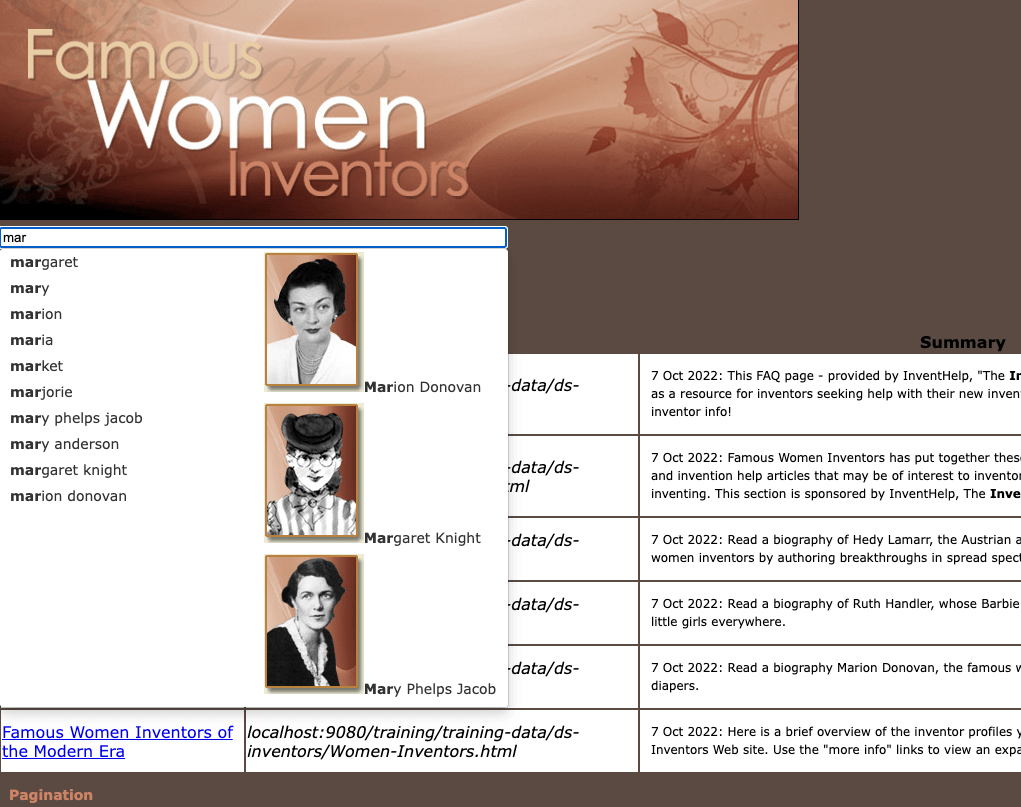
We could obviously do a lot more to improve the formatting of the suggestions, but this is not the aim of this exercise. The widget includes many options that can be applied to the auto-completion suggestions.
Extended exercises
-
Update the auto-completion suggestions so that headings are presented for each column.
-
Configure the no suggestions template for the plugin column (this configures what is returned when your input doesn’t trigger any suggestions).
-
Change or augment the information returned in the auto-completion JSON to include additional fields that you can then add to your suggestion template.
Extended exercises: Auto-completion
The following resources will assist in the extended exercises and also provide additional information and options for configuring the auto-completion plugin.
-
In the browser debugger observe that separate calls to
suggest.jsonare made for to each dataset each time auto-completion is triggered. Inspect the JSON for each dataset and compare to the menus that are rendered in the browser, and also the template defined in the JavaScript configuration -
Configure the plugin to return 5 organic suggestions, and 1 wikipedia suggestion. (hint: configure the
auto-completion.showoption) -
Configure the plugin to return the different datasets stacked (hint: see the
horizontalJavaScript option) -
Configure the plugin to only return suggestions after 3 keystrokes (hint: configure the
auto-completion.lengthoption) -
Configure the plugin to display some default suggestions before the user types (hint: see the
defaultCallJavaScript option) -
Configure no suggestion templates for each dataset (hint: see the
notFoundtemplate) -
Attach auto-completion to a non-Funnelback search form.
11. Related searches (contextual navigation)
Search queries are often short, vague and ambiguous. Contextual navigation helps a user to narrow their search and extract additional context from a user’s intent by suggesting types and topics related to their current search query. Contextual navigation is built dynamically by Funnelback by analysing patterns in the text contained within the search results which are used to suggest a number of related searches.
Clicking on a suggestion will always return search results.
Contextual navigation is enabled by default and returns related searches grouped by type, topic and site.
|
Each related search suggestion runs what is known as a proximity search. A proximity search is where the search terms must appear near to each other in the content. Proximity searches are specified in the Funnelback query language using backtick ( The nearness is controlled by the prox query processor option and defaults to 15 words. For example: a search for |
11.1. Contextual navigation basic configuration options
The following options change the basic behavior of contextual navigation:
contextual-navigation.enabled-
This setting enables display of the contextual navigation output for the selected results page. Note that contextual navigation will not appear on the search results page without a valid template.
contextual-navigation.categorise_clusters-
This setting groups the suggestions into types and topics based on the query. The categorization algorithm is not always accurate, but in most cases provides a helpful grouping of the suggestions. If set to false, types and topics are grouped together into topics. The default is true.
contextual-navigation.type.max_clusters-
This setting limits the number of type suggestions displayed on the search results page. The default is 15 type suggestions.
contextual-navigation.topic.max_clusters-
This setting limits the number of topic suggestions displayed on the search results page. The default is 15 topic suggestions.
contextual-navigation.site.max_clusters-
This setting limits the number of site suggestions displayed on the search results page. The default is 8 site suggestions.
contextual-navigation.kill_list-
Suggestions containing any of these words or phrases will not be displayed as a related search.
contextual-navigation.cannot_end_with-
Suggestions ending in any of these words or phrases will not be displayed as a related search.
contextual-navigation.case_sensitive-
Words in this list found in any suggestions will be treated as case-sensitive when generating the suggestions and case will be preserved.
contextual-navigation.summary_fields-
The summary fields are Funnelback metadata classes that are analyzed in addition to the page content for the purpose of generating the suggestions. The default summary fields are description (
c) and subject (keyword) metadata. Any other metadata classes that contain descriptive information can be added to this list to further enhance the quality of suggestions.
Tutorial: Configuring contextual navigation
The default configuration for contextual navigation provides default values that allow you to use the feature without making any changes. The most common change is to change the number of suggestions returned. In this exercise we will show the effect of disabling contextual navigation and then the how to change the number of suggestions that are returned.
-
Log in to the search dashboard where you are doing your training.
See: Training - search dashboard access information if you’re not sure how to access the training. Ignore this step if you’re treating this as a non-interactive tutorial. -
Locate the silent films search package.
-
Open the silent films search results page and run a search for comedy.
-
Observe the related searches that appear below the search results. These related searches are also known as contextual navigation.
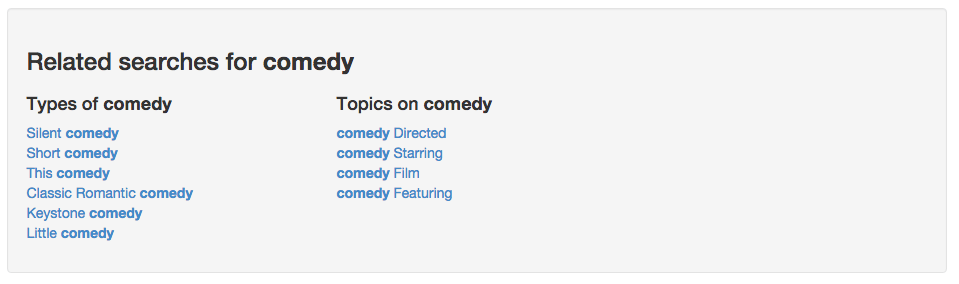
-
Contextual navigation is configured by setting a number of search package configuration settings.
-
Return to the search package listing screen and manage the silent films search package. Select edit search package configuration from the settings panel.

-
Select contextual navigation from the navigation. Disable contextual navigation by changing the value of the
contextual_navigation.enabledsetting fromtruetofalse: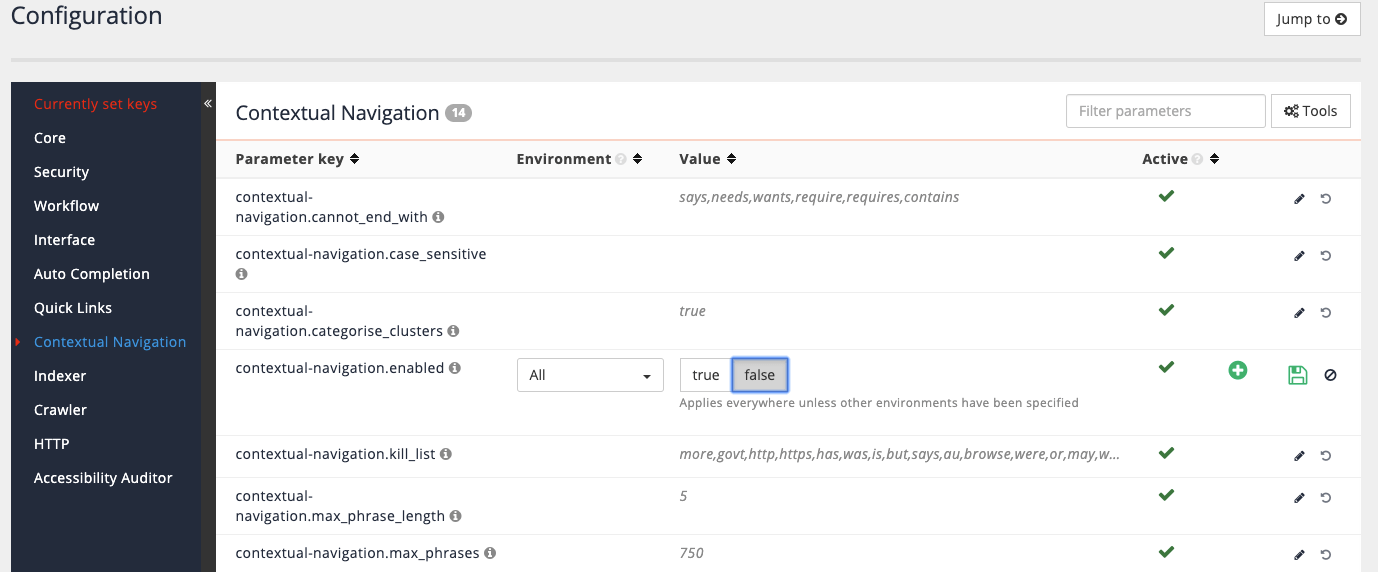
-
Re-run the search for comedy, observing that the contextual navigation suggestions disappear.
-
Return to the configuration editor screen and re-enable the contextual navigation by reverting the configuration setting. Change the number of type and topic clusters (
contextual-navigation.topic.max_clustersandcontextual-navigation.type.max_clusters) displayed to a maximum of 2 then save the changes. -
Rerun the search for comedy and confirm that no more than two suggestions are appearing under each heading:
12. Setting display options
There are numerous display options that can be set, controlling various aspects of the display. Display options are a subset of the query processor options which control how a search runs when a query is submitted.
These options can be set as default behavior for your search, or passed in as parameters when a search is run.
The options below are some of the more commonly used display options:
-
Number of results per page: this is the number of search results to return for each page of search results. Parameter name is
num_ranks. (Default is 10 results:num_ranks=10) -
Summary mode: controls the type of result summaries returned with each result. Possible modes are:
-
Automatic: Summaries will be returned for each result. Summary source will be determined automatically by Funnelback. This is the default. (
SM=auto) note: this is also equivalent to the oldSM=bothsummary mode. (SM = Summary Mode) -
Disabled: Summaries are disabled for all search results (set using
SM=off). This also prevents metadata from being included in the data model response. -
Snippet: A short snippet from the start of the document is returned as the result summary. (set using
SM=snip) -
Query biased: A series of short extracts are returned for each result. Each extract is biased to the keywords used for the search and shows the matched term(s) in context to the surrounding words. The number and order of extracts can be controlled using the
EORDERandSQEoptions (set usingSM=qb) -
Metadata only: Return only metadata fields as defined by the
SF(Summary Fields) parameter (set usingSM=meta).
-
-
Metadata fields: Controls the metadata fields that are returned with the search results (as long as the summary mode is not set to off). Set using the
SFparameter. -
Summary length: Controls the size (in number of characters) of the buffer used to store the summaries. Increasing this will result in longer summaries being returned. Set using the
SBLparameter. -
Metadata length: Controls the size of the buffer used to store metadata summaries. This value may need to be increased if metadata values are being cut off. Set using the
MBLparameter. -
Sort mode: Controls the sort order for the search results. Sort can be by relevance/search score (default), title, metadata field, date or URL, in either ascending or descending direction. Set using the
sortparameter.
A full list of display options is available in the documentation.
Tutorial: Dynamically alter the sort using URL parameters
Several sort modes are provided for results - relevance is set as the default, but we can easily experiment with others by adding URL parameters to any search results page.
-
Perform a search against the silent films search results page for death.
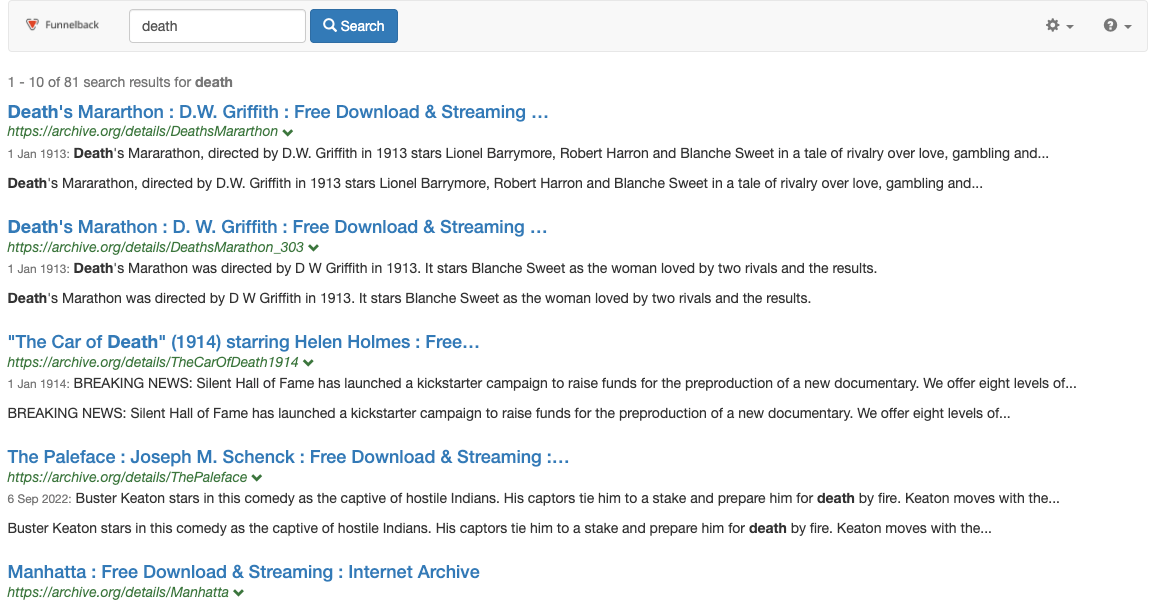
-
Add
&sort=titleto the URL and observe the same number of results in the set, reordered by title (A-Z).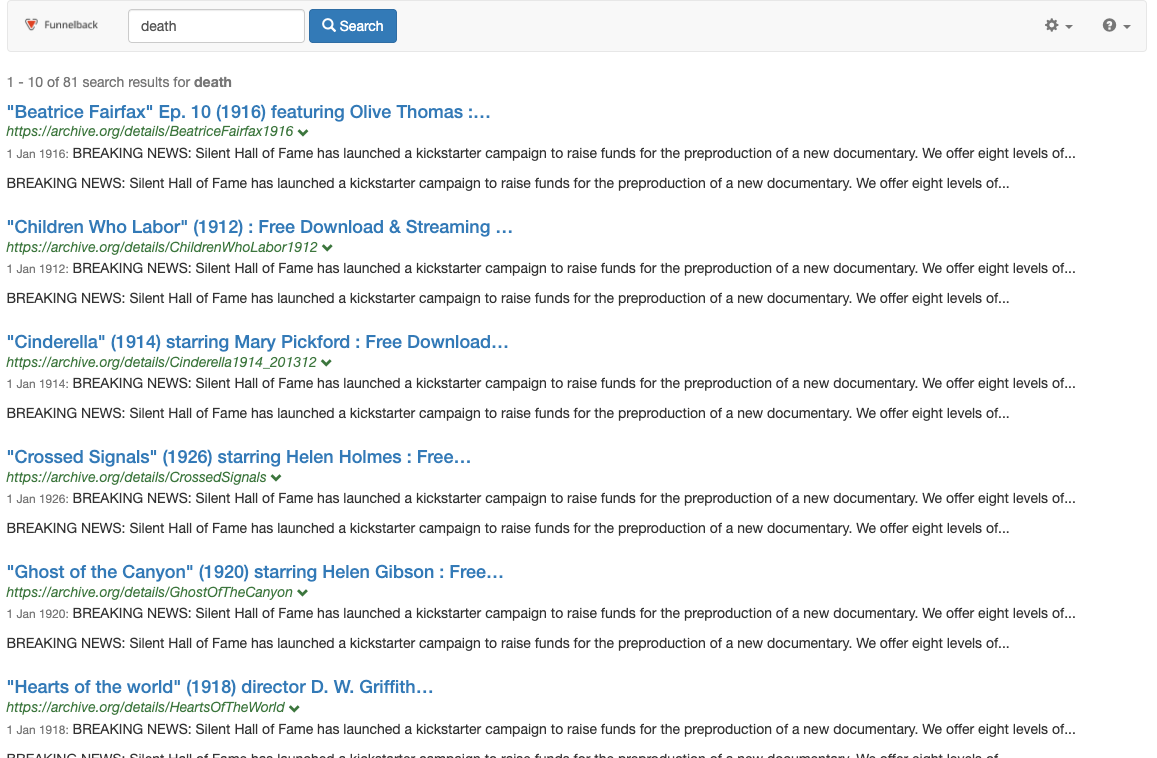
-
Edit the URL to sort by URL
&sort=urland observe the same number of results in the set, this time reordered by URL (A-Z).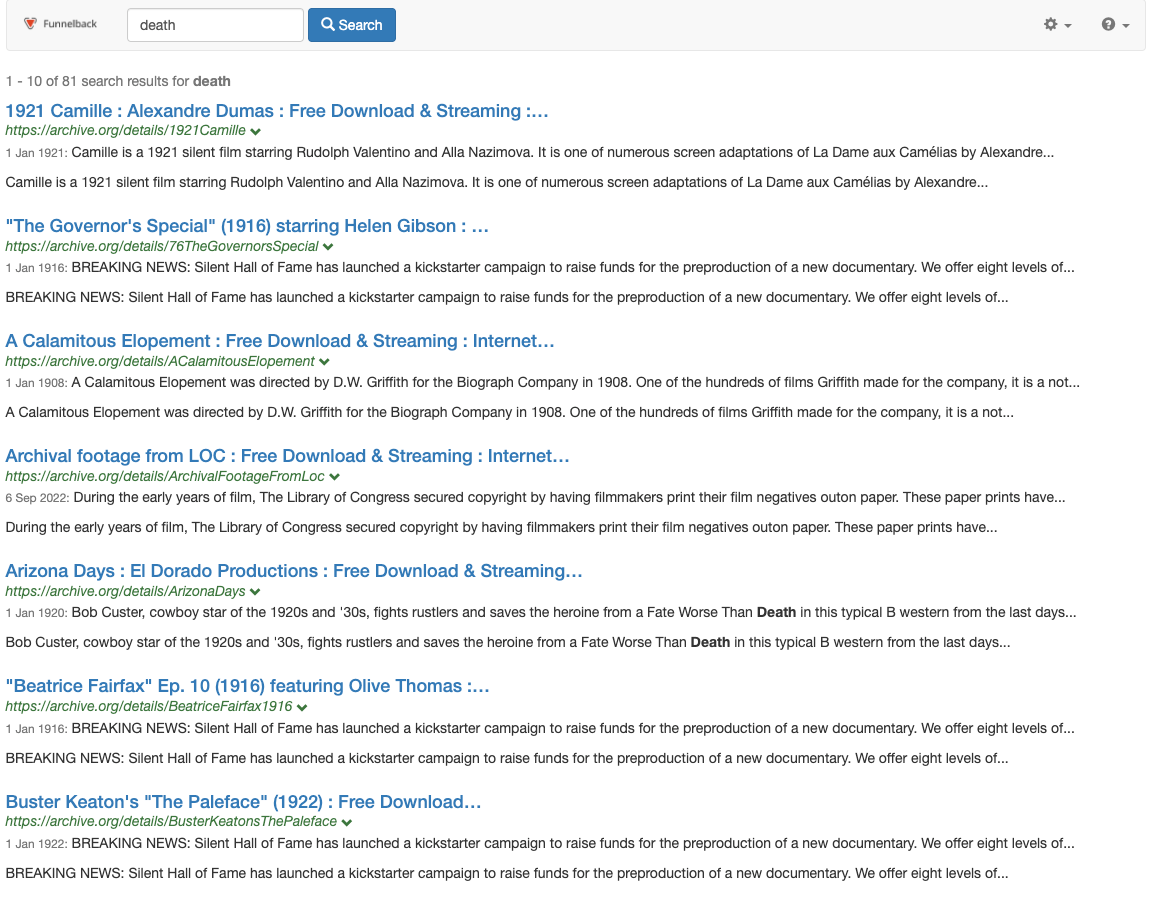
A full list of sort modes is detailed in the Funnelback documentation.
Tutorial: Change the default sort mode
The default sort mode is to sort by relevance (or search score). The default can be changed by setting a display option inside the results page configuration.
-
Log in to the search dashboard where you are doing your training.
See: Training - search dashboard access information if you’re not sure how to access the training. Ignore this step if you’re treating this as a non-interactive tutorial. -
Locate the silent films search package.
-
Open the silent films search results page and select edit results page configuration from the customize panel.
-
Add a setting called
query_processor_optionsby clicking on the add new button, then selecting query processor options from the drop-down list.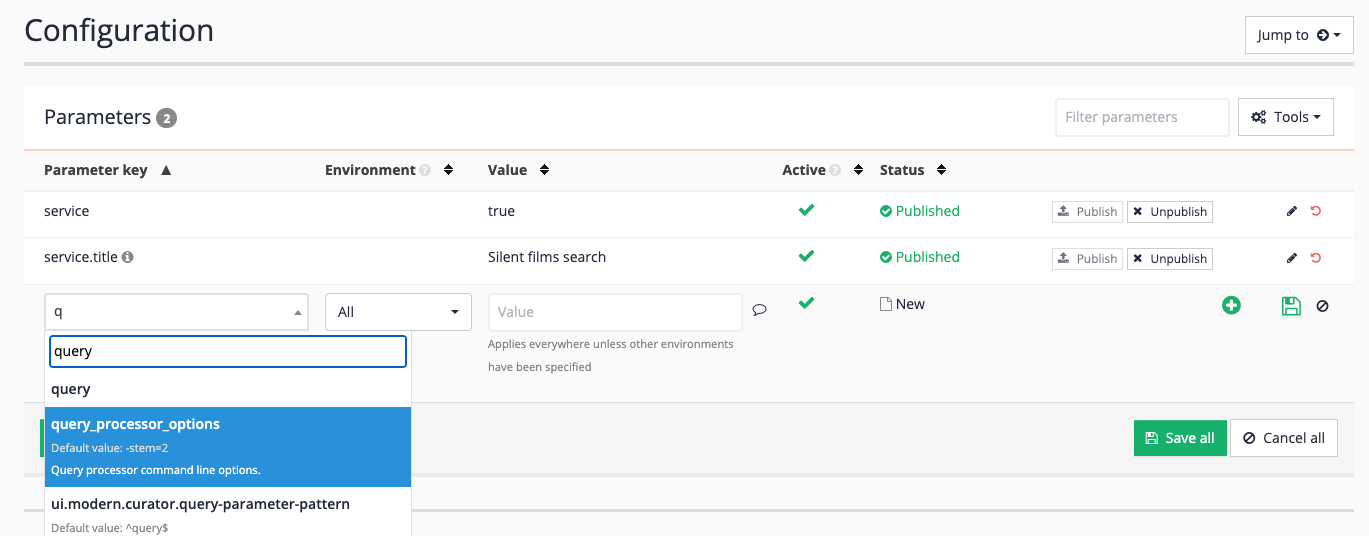
-
The query processor is the Funnelback program that returns search results from the index based on search keywords. Query processor options are the ranking and display options that are passed to the query processor when it runs the search. Add
-sort=titleto the set of options then save the setting. This will set sort by title as the default sort mode. The value (title) can be substituted for any of the other sort modes that are available from the documentation page above.
-
Run a search against the silent films search results page for death.
-
Observe that the sorting is now alphabetic. Experiment by modifying the URL (as in the previous exercise) and observe that the sort mode can be overridden at the time the query runs, but will also be alphabetic when no sort parameter is supplied.
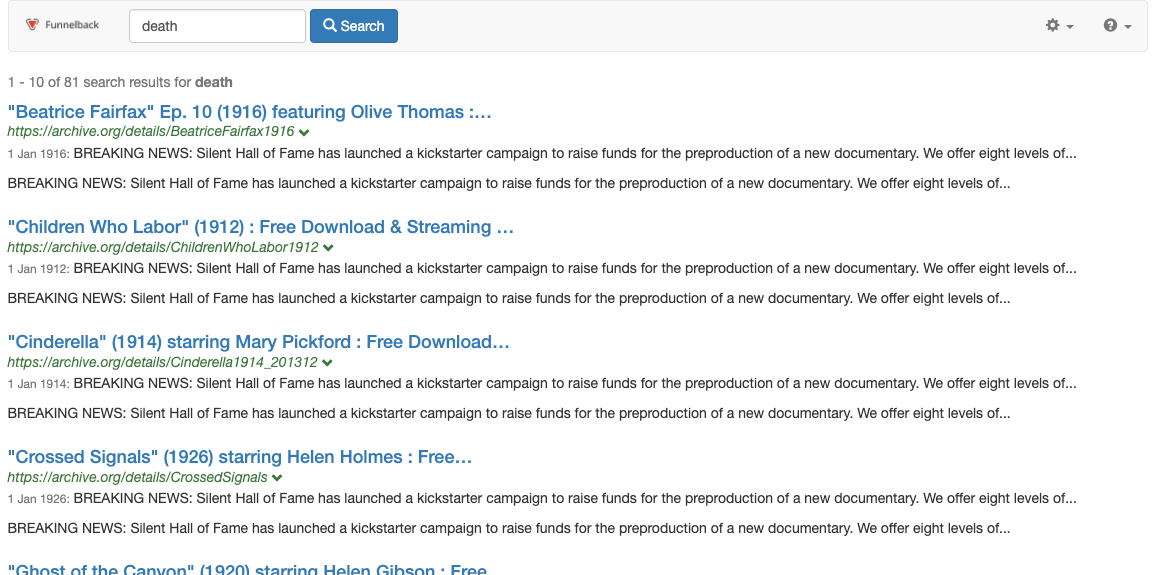
-
Return to the configuration editor and revert the options, removing the
-sort=titleoption to restore relevancy as the default search. An option can be reverted (set back to the default value) by clicking the button for the option you wish to revert. Alternatively you can edit the item and remove the-sort=title, which will have the same effect.
The previous two exercises have demonstrated the setting of sort both via configuration and dynamically at the time the query is run.
It’s important to understand that both methods are important for providing a useful search interface, with certain settings being set dynamically (for example, via options you choose in your search form), and some values set as the defaults.
Tutorial: Create a sort-mode switcher in the template
In this example a switch control will be added to the search results listing to enable the user to re-sort the result set.
-
Log in to the search dashboard where you are doing your training.
See: Training - search dashboard access information if you’re not sure how to access the training. Ignore this step if you’re treating this as a non-interactive tutorial. -
Locate the silent films search package.
-
Open the silent films search results page and select edit results page template from the templates panel.
-
Add the following code snippet above your result set output (for example, just before the
ol id="search-results"(approx line 501). Save and publish once complete:<#-- SEARCH AGAIN --> <form action="${question.currentProfileConfig.get("ui.modern.search_link")}" method="GET" id="sortform"> <#-- PRE-FILL PARAMETERS --> <input type="hidden" name="collection" value="${question.collection.id}" /> <input type="hidden" name="form" value="${question.form }" /> <input type="hidden" name="profile" value="${question.profile}" /> <input type="hidden" name="query" value="<@s.QueryClean/>" /> <#-- SORT MODE --> <label for="sort">Sort</label> <@s.Select id="sort" name="sort" options=["=Relevance ", "date=Date (newest first)", "adate=Date (oldest first)","title=Title"] /> <input type="submit" value="Go" /> </form> -
Run a search for death.
-
Observe that a sort dropdown is returned above the search results. Experiment with the sort mode drop-down observing the change in sort order while maintaining the same set of search keywords.
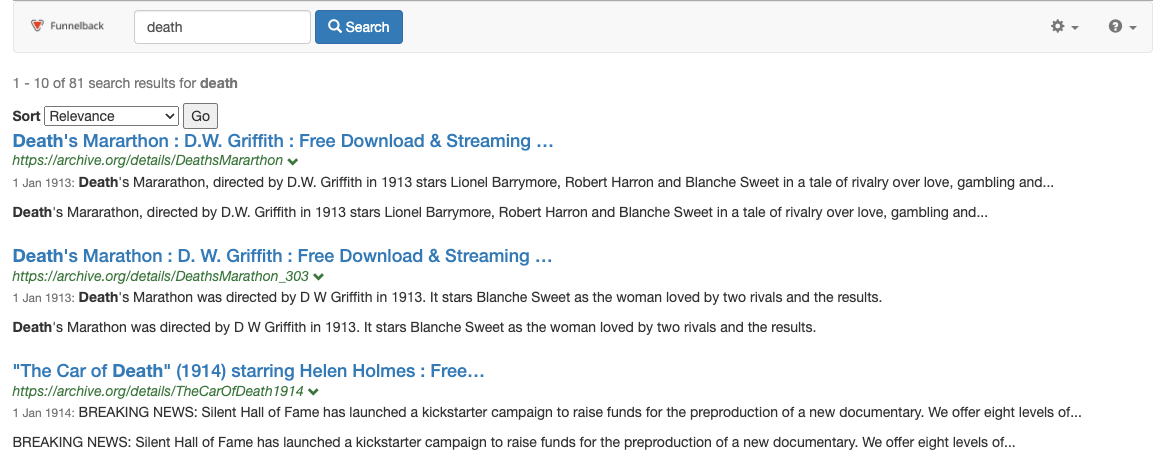
Extended exercises: display options
-
Create a switcher that allows a user to choose the number of results that they wish to see.
-
Experiment with changing the summary mode setting by editing your URL and observe the effect on the search results.
13. Search result filters (faceted navigation)
Faceted navigation can be used to filter or refine a set of search results, allowing users to quickly drill down on items or subsections of interest within a search that may contain hundreds of thousands of results.
Faceted navigation is designed to help users refine their search by providing a set of filters that are applicable to the set of search results returned by the search query.
Facets contain categories and the default display shows a count of matching results for each category. Categories without any matching results are hidden, preventing users from running a search that returns no results.
13.1. Facets and category values
A facet represents a way in which your documents can be categorized (for example, job, location or author).
Category values are the individual values that can be filtered on.
For example: For a facet holding various authors: the author is the facet while Ada, Alan and Bob are the category values that the user might select to restrict the documents to.
13.2. Types of facets
Funnelback supports five types of facets. Each type allows a user to filter the result set.
The types differ by proving choice in how the filtering is applied - allowing filtering on single or multiple categories and providing options on how the filters are combined and how they apply to the result set.

13.2.1. Filter on a single category
Allows a user to filter the result set using a single category value chosen from the facet. Upon selection the facet displays only the selected category value.
13.2.2. Filter on a single category, with drill down
This is sometimes referred to as a hierarchical facet.
Allows a user to filter the result set using a single category value chosen from the facet. After the filter is applied sub-categories may be displayed for the facet.
13.2.3. Filter on multiple categories
This is sometimes referred to as multi-select or checkbox faceting.
Allows a user to filter the result set using multiple categories from the same facet. The categories can be combined using either AND or OR logic.
13.2.4. Toggle between categories
Sometimes also referred to as a radio facet.
Allows a user to filter the result set on a single category. The set of categories remain after the filter is applied allowing a user to toggle through the different categories.
13.2.5. Toggle between tabs
This is a special type of facet that is presented as a series of tabs. It is designed to allow a search to be separated into a series of tabs, with other facets then being used to further filter the result set. Because of this the tab facet isn’t treated the same way as other facets, and the selected tab does not appear within the list of selected facets.
Tutorial: Add a facet
In this exercise a filter on single category facet, with categories sourced from an existing metadata field will be configured for the silent films search results page. Use of metadata as a category source requires metadata to be configured for the data source prior to faceted navigation being configured.
Before you configure faceted navigation you need to work out what you will use for the faceted navigation - in this case we’ll use the metadata fields that we configured via external metadata (director, language, year, etc.).
-
Log in to the search dashboard where you are doing your training.
See: Training - search dashboard access information if you’re not sure how to access the training. Ignore this step if you’re treating this as a non-interactive tutorial. -
Locate the silent films search package.
-
Load the results page management screen for the silent films search results page.
-
Open the faceted navigation editor by selecting customize faceted navigation from the customize panel.
-
Create a new facet by clicking on the add new button. A facet is a filter that will be returned with the search results.
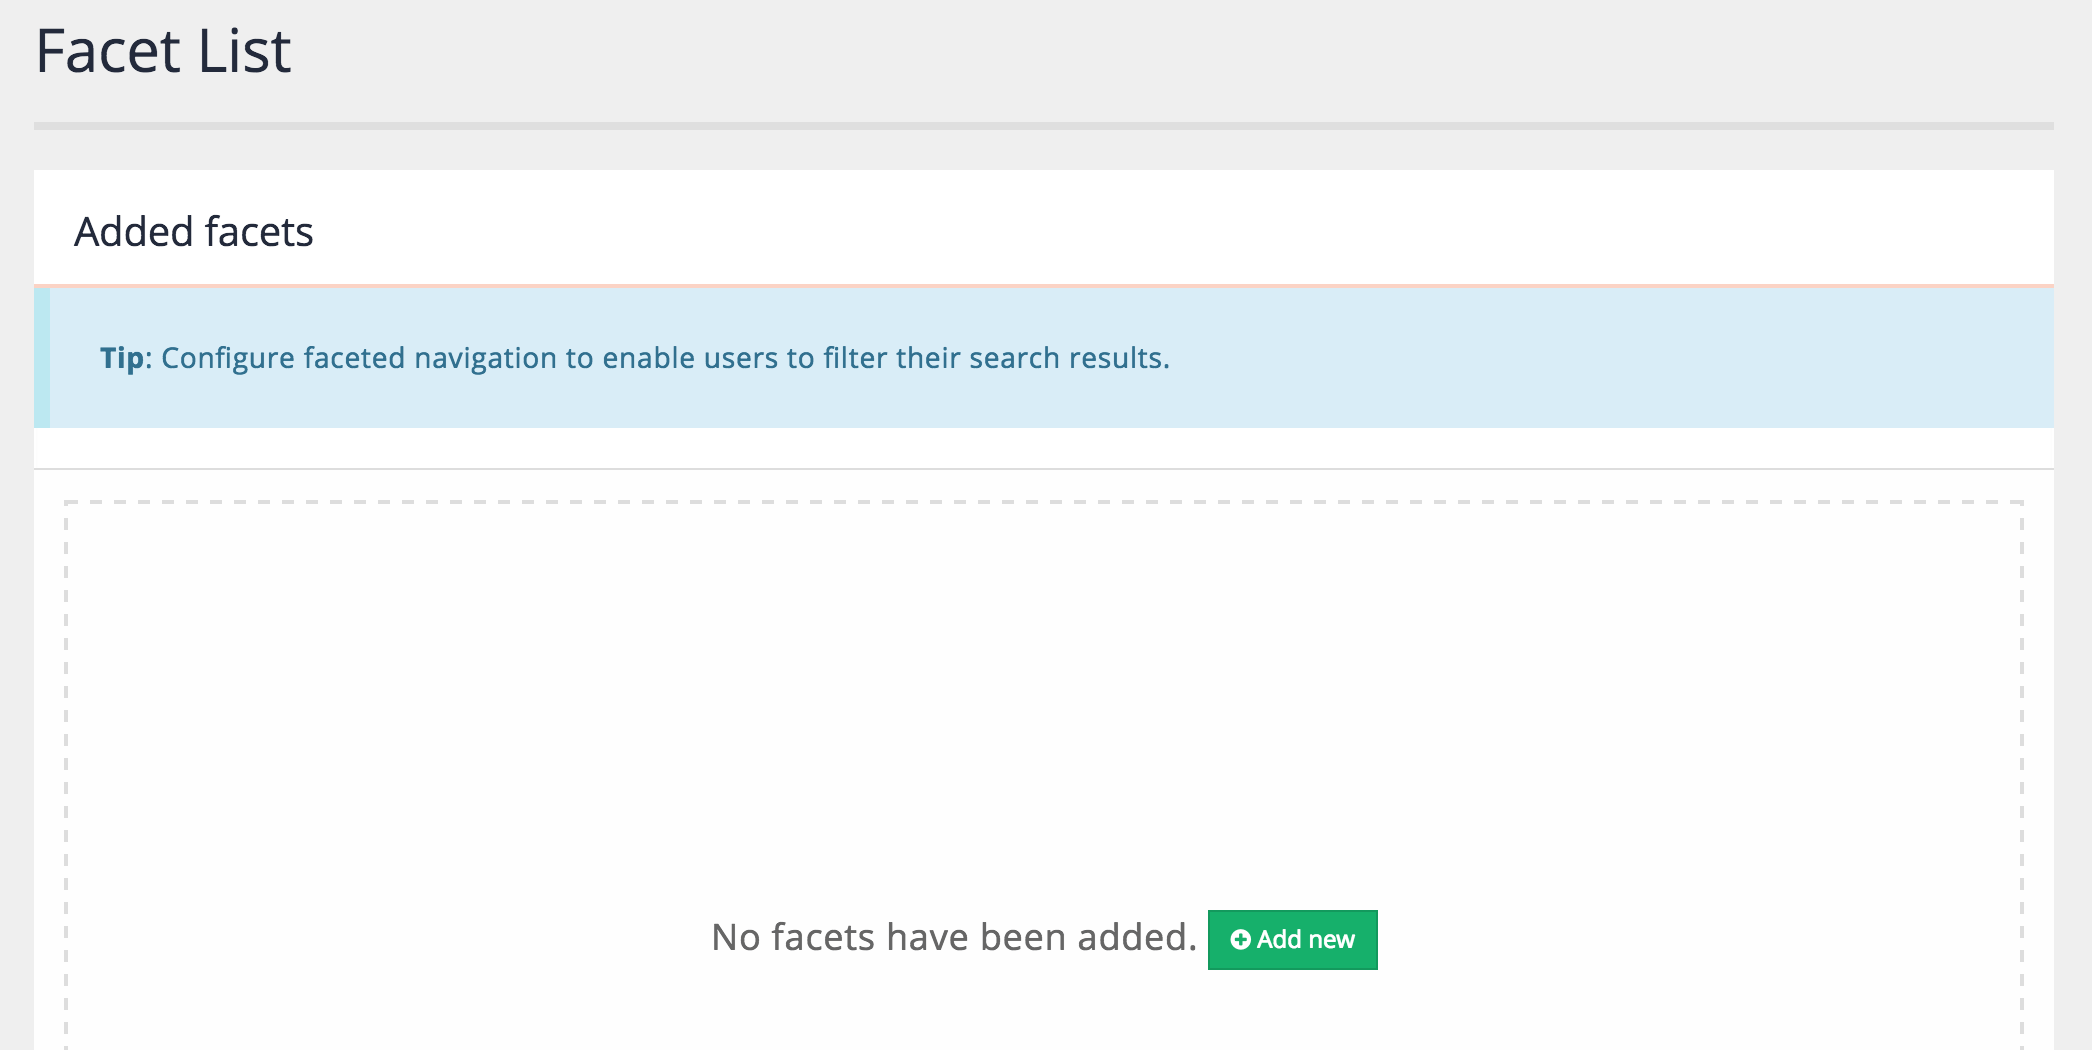
-
The new facet screen allows you to choose from 6 different types of facets. Hovering over the images provides some immediate feedback on how the facet behaves. Click on the filter on a single category tile.
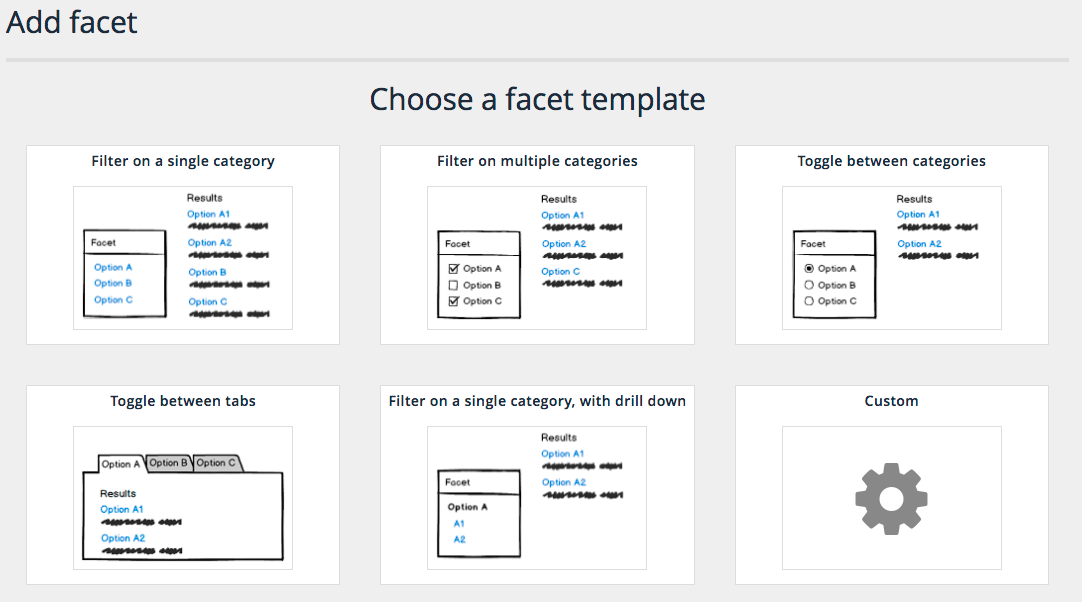
-
Enter
Directoras the name for the facet.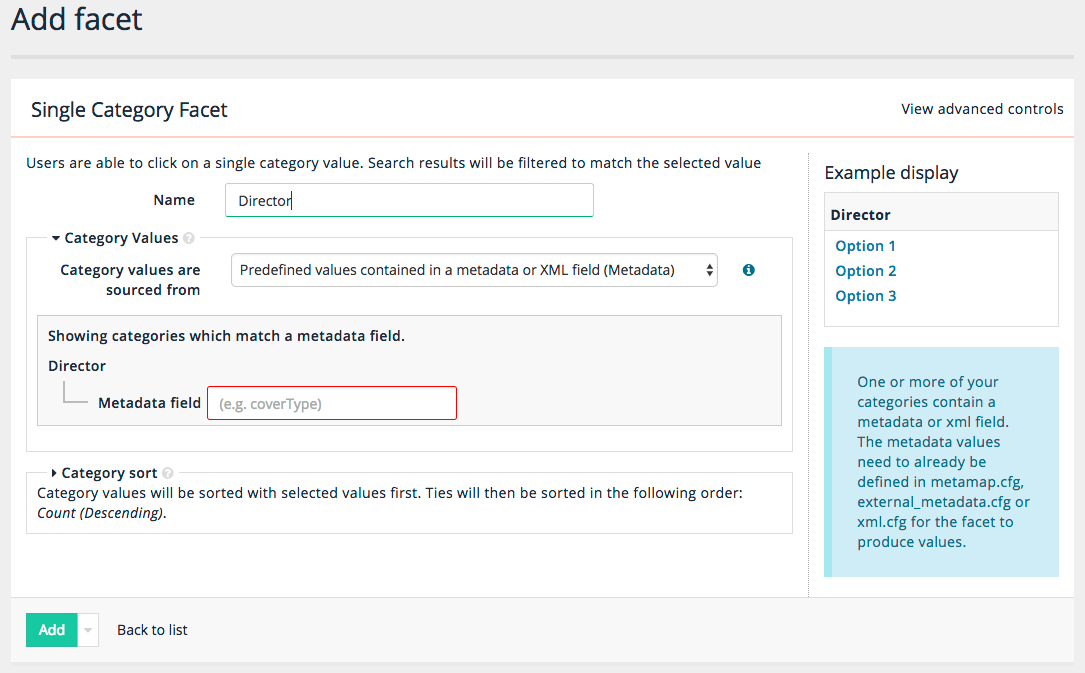
-
The category source then needs to be selected by choosing an item from the drop-down that appears beneath the category values heading. Select predefined values contained in a metadata or XML field (metadata) from the list and select
director(the metadata class name that you defined in the data source metadata mappings) as the value for the metadata field. If there are many fields defined you may need to start typing the name of the class you are looking for then select it from the items returned. Note that metadata field names are case-sensitive and must exactly match the class name that is defined in the mappings. Click the add button.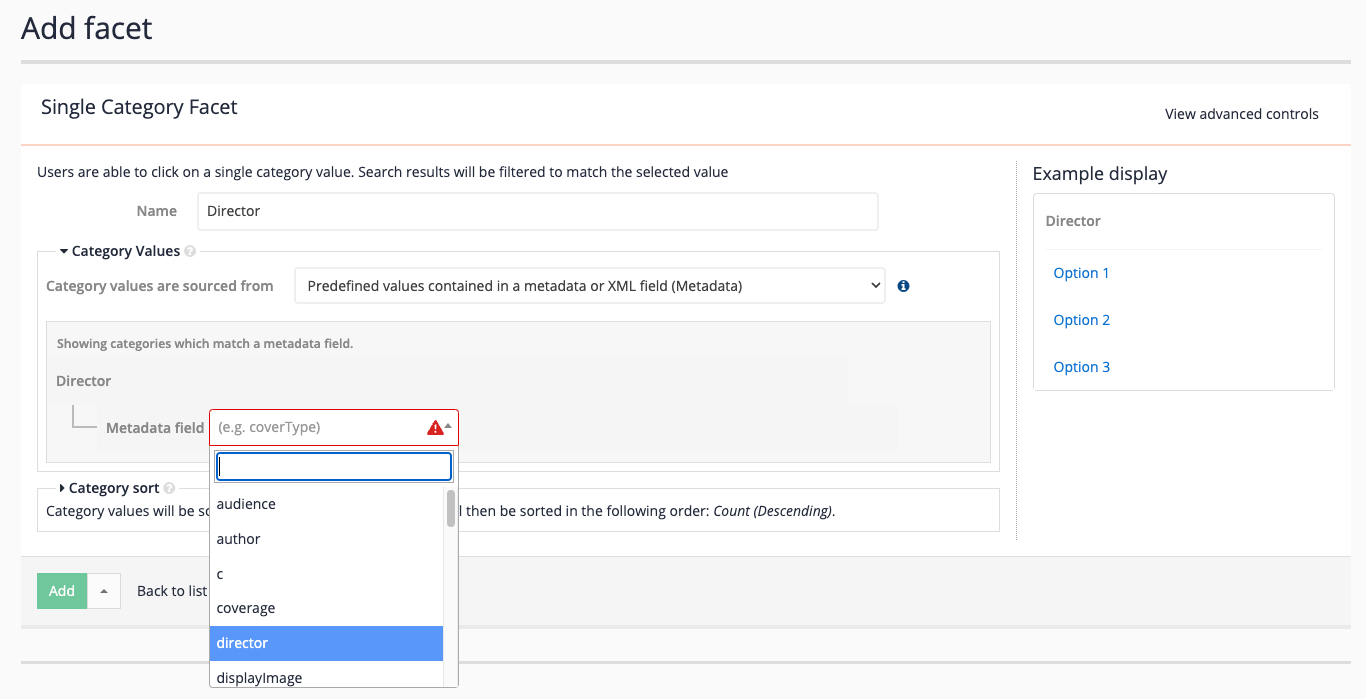
-
The facet listing screen updates to display the director facet. Observe that the facet is currently unpublished and there is a button available to publish the facet definition.
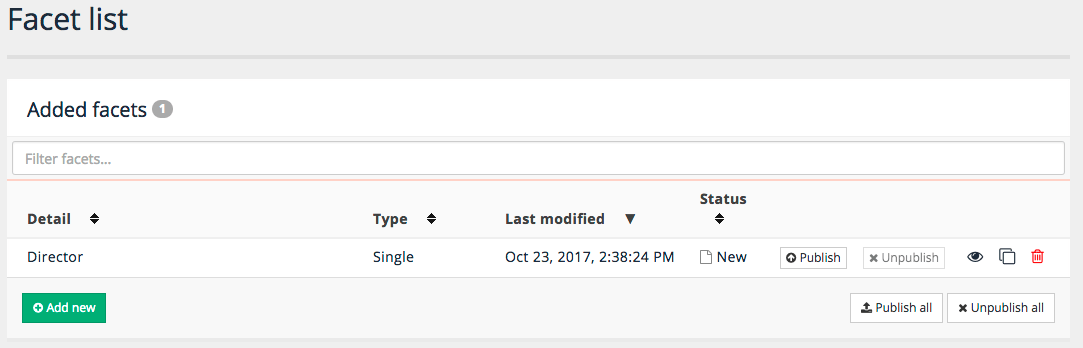
-
Add a second facet called
Release yearthat sources the metadata values from theyearmetadata class. This time click the add and publish button.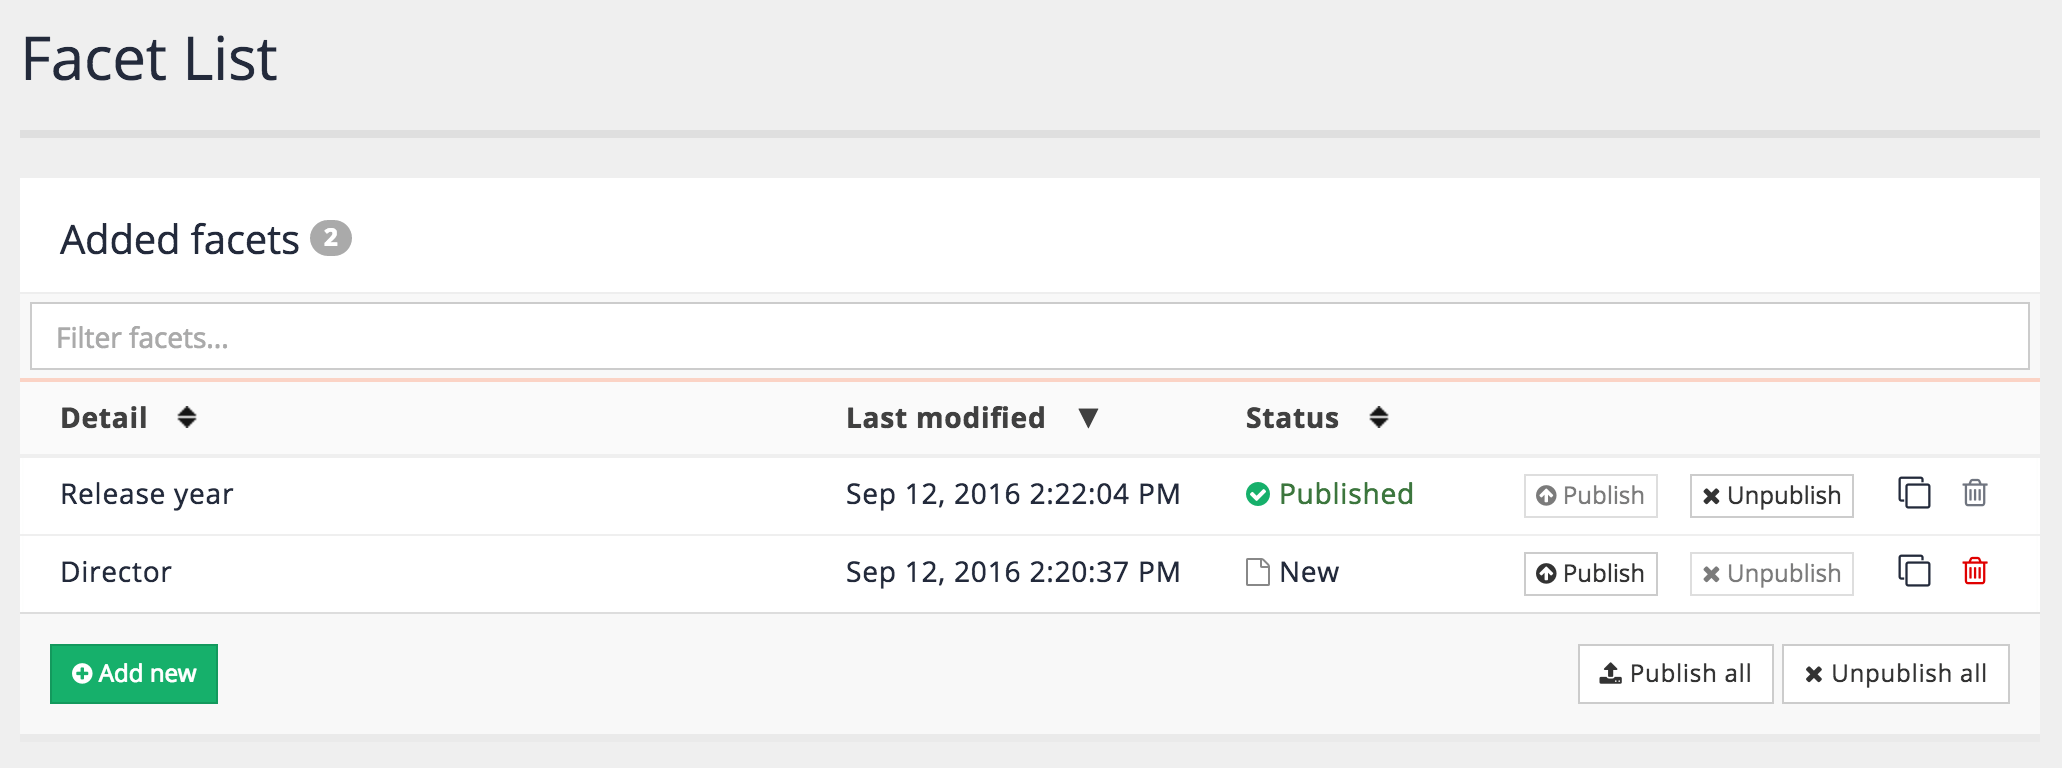
-
Run a search for !showall against the live version of the silent films search results page and observe that there is one facet (Release year) and the values returned for each facet are the individual values that are defined for the metadata fields. Observe that the Director facet is not displaying. This is because the facet has not been published. If you repeat the query on the preview version of the search you will see both facets.
-
Return to the faceted navigation editor and click the publish button for the director facet. Repeat the live search above and observe that both facets now display.
-
Click unpublish on the release year facet and rerun the live search observing that the director facet is now the only facet returned.
-
Faceted navigation counts the different values it finds - so for a facet to be effective you need to make sure your metadata field is populated with consistent values - where the same values are used on many items (such as a controlled list of keywords).

-
Observe that the facet categories presented are all lower case - this is because Funnelback treats the keywords as case-insensitive when counting the facets (i.e. Hitchcock = hitchcock). The capitalization can be preserved to match the metadata field values, but be aware that you may start to see duplicate terms if the capitalization of the keywords doesn’t match for all pages. A display option (
-rmc_sensitive) must be set to make the facet categories case-sensitive. In the results page configuration add an additional display option to the query processor options. Add-rmc_sensitive=trueto the list values and then click the save button. -
Reload the search results page and observe that all the categories are now case-sensitive.
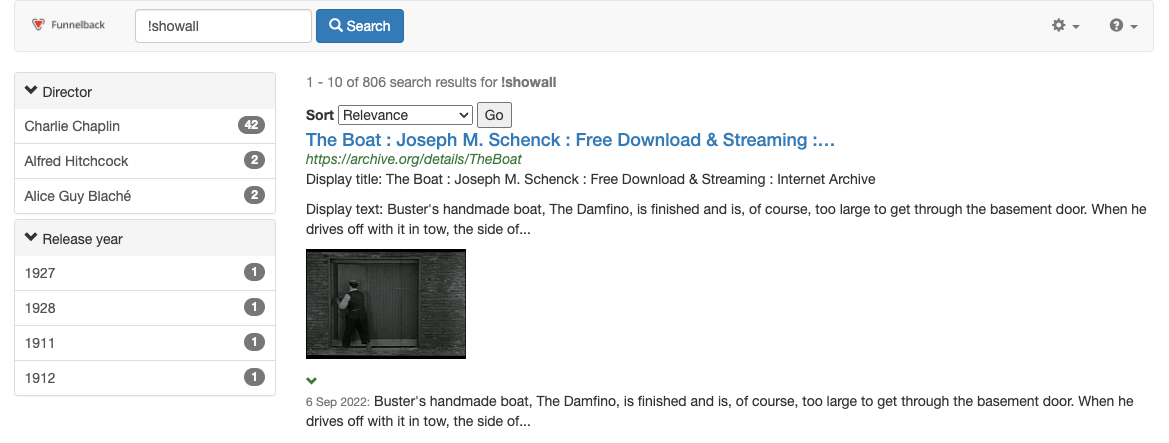
13.3. Facet categories
Facet category values are the individual filter choices that appear beneath a facet.
Each facet contains one or more facet categories. Selecting a facet category will filter the search results and include only results that include the category (subject to any other selected categories and the matching logic).
13.3.1. Category sources
Facet categories are sourced from a number of different things. Understanding how the facets and facet categories relate to the source data is important for creating effective faceted navigation (and for planning site redevelopments to make use of facets).
Categories based on metadata
A facet that has category values sourced from predefined values contained within a metadata or XML field (metadata) has a 1:1 relationship between the facet and a Funnelback metadata class.
The categories that can appear beneath a metadata facet are all the unique values found within the metadata class. The count for each category is the number of unique times that the metadata value is found within the result set.
Categories based on URL patterns or gscopes
A facet that has category values sourced from predefined URL sets (generalized scopes or gscopes) or a set of URL patterns (URL pattern) has a 1:1 relationship between each category and a defined URL pattern set or generalized scope.
The category label is determined by the label assigned when creating the facet.
The count for each category is the number of items in the result set that belong to the defined URL pattern set or gscope.
| Generalized scopes are used to define sets of URLs and are covered in the SEARCH 202 training course. |
Categories based on URL path or directory structure
A facet that has category values sourced from the item’s location in a URL path or directory structure (URL fill) has a 1:1 relationship between the facet and a defined root URL or folder.
The categories are determined by splitting the URL on the folder structure (with folder names as the possible categories) to a determined depth. The depth defines a hierarchical structure to apply to the facet.
The count for each category is the number of results that sit beneath the folder.
Categories based on date
A facet that has category values sourced from groupings based on the item’s date (dynamic date fill) has a 1:1 relationship between the facet and the document’s indexed date value.
The categories that are determined from hardcoded groupings of dates and the counts are based on the number results with a date value such as yesterday, last week, last month, 2014.
Categories based on results from a query
A facet that has category values sourced from documents which match a particular query has a 1:1 relationship between each category and the set of URLs returned for the defined query.
The category label is determined by the label assigned when creating the facet.
The count for each category is the number of items in the result set that are in the set of results returned for the defined query.
Categories based on data source
A facet that has category values sourced from documents which belong to a particular data source has a 1:1 relationship between each category and membership to sets of data sources.
The category label is determined by the label assigned when creating the facet.
The count for each category is the number of items in the result set that belong to each defined set of data sources.
Categories based on numerical range
A facet that has category values sourced from documents whose metadata value lies within a numerical range has a 1:1 relationship between each category and the number of results returned that belong to each defined range.
The category label is determined by the label assigned when creating the facet.
The count for each category is the number of items in the result set that are in each of the pre-defined ranges.
13.3.2. Category counts
The counts displayed for categories are estimates that are calculated based on the result set. Because of this the accuracy will reduce as the search index becomes larger. The numbers may also change when a facet is selected as the estimates are recalculated every time the result set is produced.
13.3.3. Sorting category values
Facet category values can be sorted by a number of different attributes:
-
count: the category values are sorted by the category count, either largest to smallest, or smallest to largest.
-
label: the category values are sorted by the label, either alphabetically (A-Z) or reverse alphabetically (Z-A).
-
numeric label: the category values are sorted by the label, but with numbers interpreted numerically. For example, a numeric label sort would sort as follows: 1, 10, 11, 100, compared with a label sort which would sort: 1, 10, 100, 11.
-
date: the category values are sorted by date, either most recent to oldest, or oldest to most recent.
-
selected values first: selected category values are placed above unselected category values.
-
configuration order: for facet types where the individual category values are defined, the order in which they appear in the configuration will be the order that is used to display the facets. The order can be changed by dragging the items around in the configuration.
-
custom sort logic: custom sort logic, implemented via a plugin, is used to sort the category values. Can be used to apply custom sort ordering to metadata based facets.
13.3.4. Renaming category values
Categories can be renamed by using the rename facet categories plugin.
13.3.5. Blacklisting and whitelisting category values
Two search package configuration options can be used to restrict the category values that can be displayed within a facet.
-
faceted_navigation.black_list: category values listed will be removed from the facet if they are returned in the list of facets. -
faceted_navigation.white_list: only the category values listed will be displayed if they are returned in the list of facets. Other category values are removed.
Tutorial: Query based faceted navigation
In this exercise query based facets will be configured for the silent films search results page from previous exercises.
-
Log in to the search dashboard where you are doing your training.
See: Training - search dashboard access information if you’re not sure how to access the training. Ignore this step if you’re treating this as a non-interactive tutorial. -
Locate the silent films search package.
-
Load the management screen for the silent films search results page.
-
Open the faceted navigation editor by selecting customize faceted navigation from the customize panel.
-
Create a new filter on single category facet by clicking on the add facet button then selecting the filter on single category tile. The two metadata facets from the previous example will be displayed in the editor.
-
Enter
Director (query)as the name for the facet and select documents which match a particular query from the category values are sourced from dropdown. Enter"charlie chaplin"(including the double quotes) into the query field andCharlie Chaplininto the label field. The double quotes ensure that the query is run as a phrase. The value inside the label field is what the user will see as a choice to click on.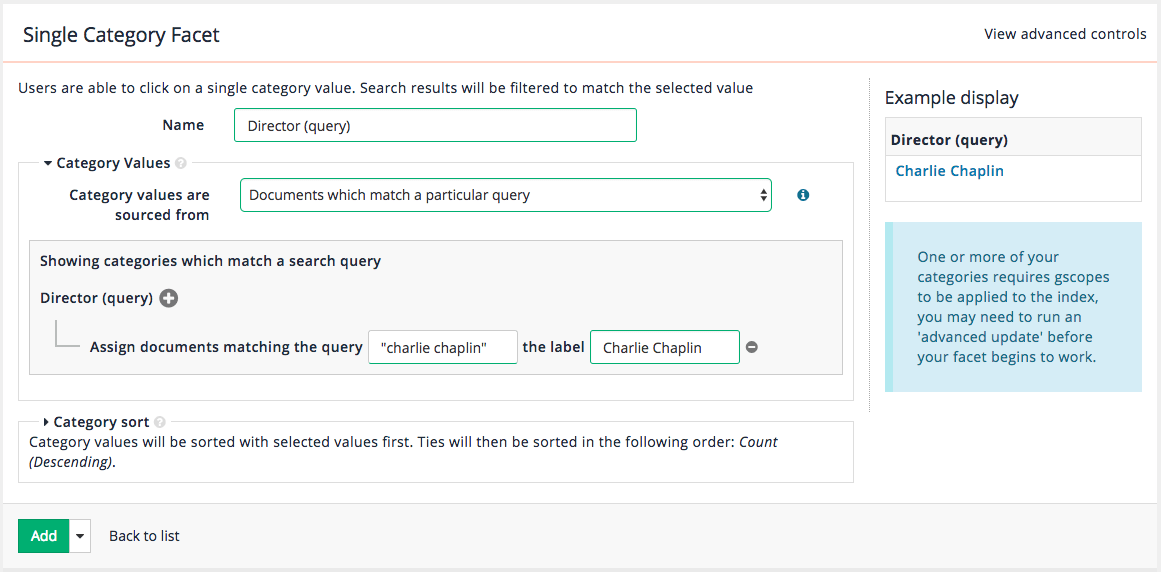
A re-index is required after adding or changing any query based faceted navigation categories. -
Add a second category by clicking the
+button next to the Director (query) facet. Enter a second item for Buster Keaton using"buster keaton"as the query andBuster Keatonas the label.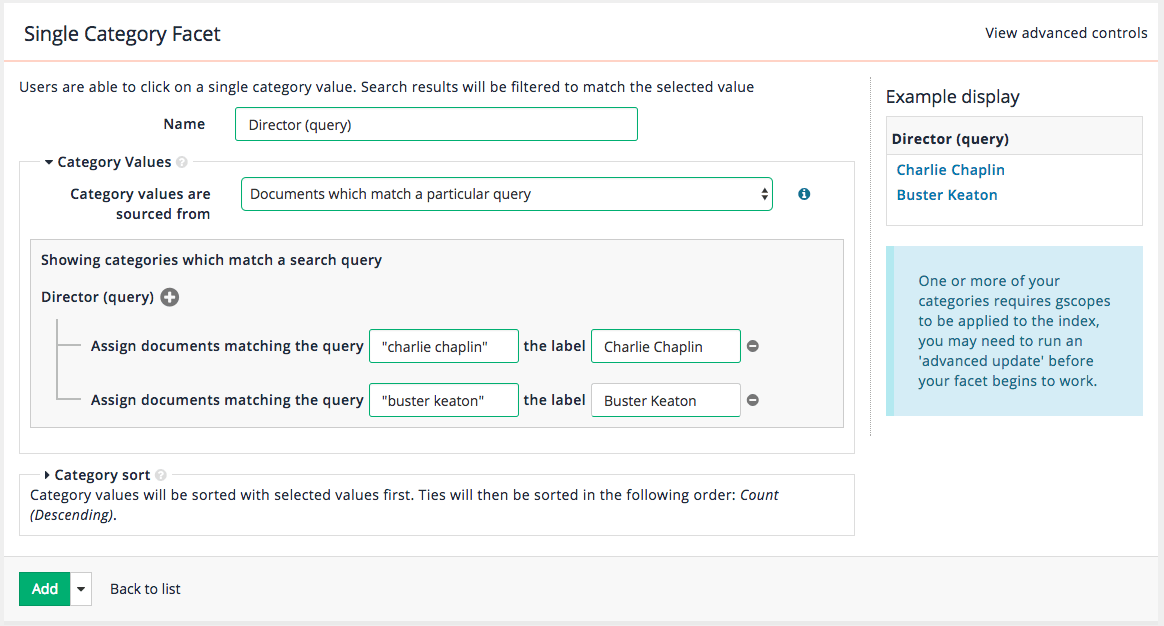
-
Then select add and publish from the dropdown on the add button.
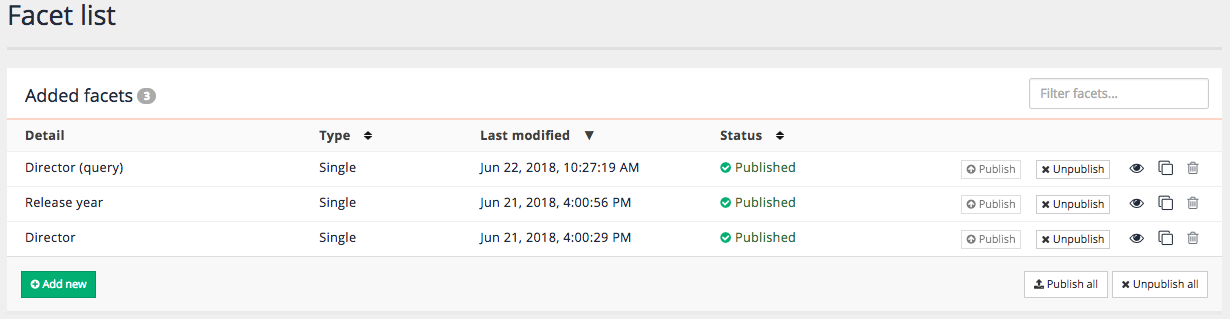
-
Switch to the silent films - website data source and run an advanced update. Rebuild the index by running the re-apply gscopes to the live view option. This is required to generate the generalized scopes that underpin the categories for the query-based facets. Running a re-index of the live view will also regenerate the facets but may take longer as a number of other operations are run as part of the re-index.
Gscopes (or generalized scopes) allow an administrator to define sets of pages based on the URL matching a pattern or query that can be used for query scoping, defining the set of pages in a results page and fot faceted navigation. Gscopes are covered in detail in the SEARCH 202 training course. -
Run a search for !showall against the silent films search results page and observe that there is an additional facet Director (query) and the values returned for each facet are the two categories that you just defined. Faceted navigation for query categories (and predefined URL set/gscope based categories) requires a separate entry for each category that will counted. The counts refer to the number of items in the result set that match the query defined in the facet configuration. This differs from metadata facets that count all the unique metadata values that appear within a metadata field. For this reason query and gscope facets are more difficult for an administrator to maintain as the faceted navigation configuration must be updated every time a new category is added. For metadata based facets new categories that are added to an existing metadata field will automatically appear.
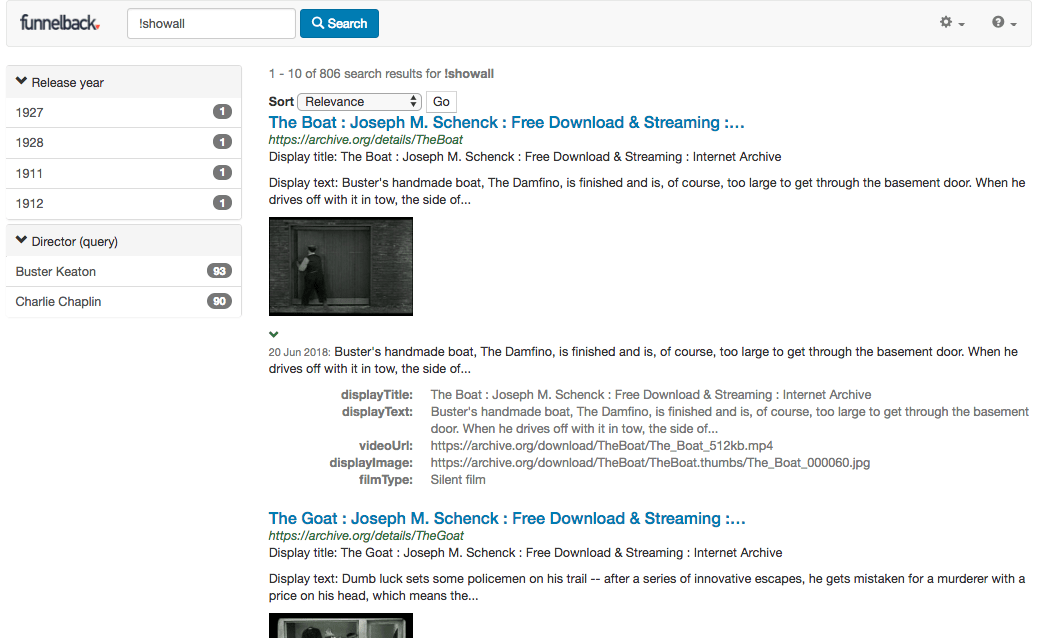
Extended exercises: Faceted navigation
-
Create a dates field fill facet that builds a facet based on the document dates.
-
Recreate the director facet as a filter on multiple categories facet.
-
Update the template code to apply an ordering to the facets. (hint: instructions are provided in the documentation link below)
-
Change the sort order for the release year to be alphabetic
14. Using remote includes
Website owners spend a lot of time crafting the look and feel of their templates and pages. The styles and templates used for website pages can be applied to the Funnelback search results pages without the need for a front-end developer to remember to manually update the search template whenever a change to a site’s look and feel occurs.
It is very important to plan the remote includes carefully so that the search results page returned by Funnelback is of a valid page structure when all the remote code is included.
The best way to plan this is to ensure each include is a distinct and well-formed code chunk (such as code that you might nest inside a <div>).
Funnelback’s remote inclusion requires information on where to capture the include from within the remote page. This can be specified either with a start and end regular expression, or by CSS selectors. CSS selectors are preferred if the source page is well-structured. Where start and end patterns are required the best way to make this work effectively and be easy to maintain is to add additional HTML comments to your page that you can use to mark where each include starts and ends.
The remote include is implemented in a macro: IncludeUrl. This macro takes a number of parameters including:
-
url: the URL of the remote page to include -
start: string of text where the included text should start. Any double quote characters should be escaped with a backslash as the string is a Java regular expression. -
end: string of text where the included text should end. Any double quote characters should be escaped with a backslash as the string is a Java regular expression. -
expiry: number of seconds to cache the response. This value should not be surrounded in double quotes as it is an integer. -
convertrelative: (true/false) determines if relative links are converted to absolute links. This value should not be surrounded in double quotes as it is a boolean. -
cssSelector: CSS selector to use to select the HTML which should be included. -
removeByCssSelectors: A list of CSS selectors which match elements to be removed from the included HTML.
Full documentation for IncludeUrl is available in the Funnelback documentation (and includes additional parameters)
Tutorial: Remotely include header and styling for a search results template
This exercise will apply the look and feel of the Famous Women Inventors website to the search that we have created for this content.
-
Browse to the mirror of the Famous Women Inventors site at
https://docs.squiz.net/training-resources/inventors/The screenshot below identifies the regions of the home page we’d like to use as the header and footer includes.
-
View the HTML source code and identify appropriate start and end points within the markup of this page for the page header and footer and make a note of the code that outlines where this should start and end as you will need to supply this to the
IncludeUrlmacro in your Freemarker template. For this training we have added some HTML comments into the source code for the inventors site that indicates where the Funnelback includes should begin and end.If your website’s template is constructed appropriately you may be able to use the CSS selector method of including your headers and footers instead of specifying a startandendparameter.Use of web developer tools built into your web browser will assist in identifying appropriate start and end points. For the header include we want to include everything from the
<!-- begin funnelback header -->comment until the
<!-- end funnelback header -->comment. For the footer we want to use the corresponding footer comments.
-
Log in to the search dashboard where you are doing your training.
See: Training - search dashboard access information if you’re not sure how to access the training. Ignore this step if you’re treating this as a non-interactive tutorial. -
Locate the Female inventors search package and create a new results page called
Inventors styled -
Edit the results page template for this new results page. Add the following code immediately after the
<body>tag (approx line 50). Note the remote include specifies an expiry of 1 second to assist with testing.<!--start included header--> <@fb.IncludeUrl url="https://docs.squiz.net/training-resources/inventors/" start="<!-- begin funnelback header -->" end="<!-- end funnelback header -->" expiry=1 convertrelative=true/> <!--end included header--> -
Repeat the above step and add an include for the footer.
<!--start included footer--> <@fb.IncludeUrl url="https://docs.squiz.net/training-resources/inventors/" start="<!-- begin funnelback footer -->" end="<!-- end funnelback footer -->" expiry=1 convertrelative=true/> <!--end included footer--> -
Save and publish the template then run a search for inventor against the inventors styled results page. Observe that the header and footer is now included in the template, but the styling is not correct. Also view the HTML source of your search results to see what was inserted.
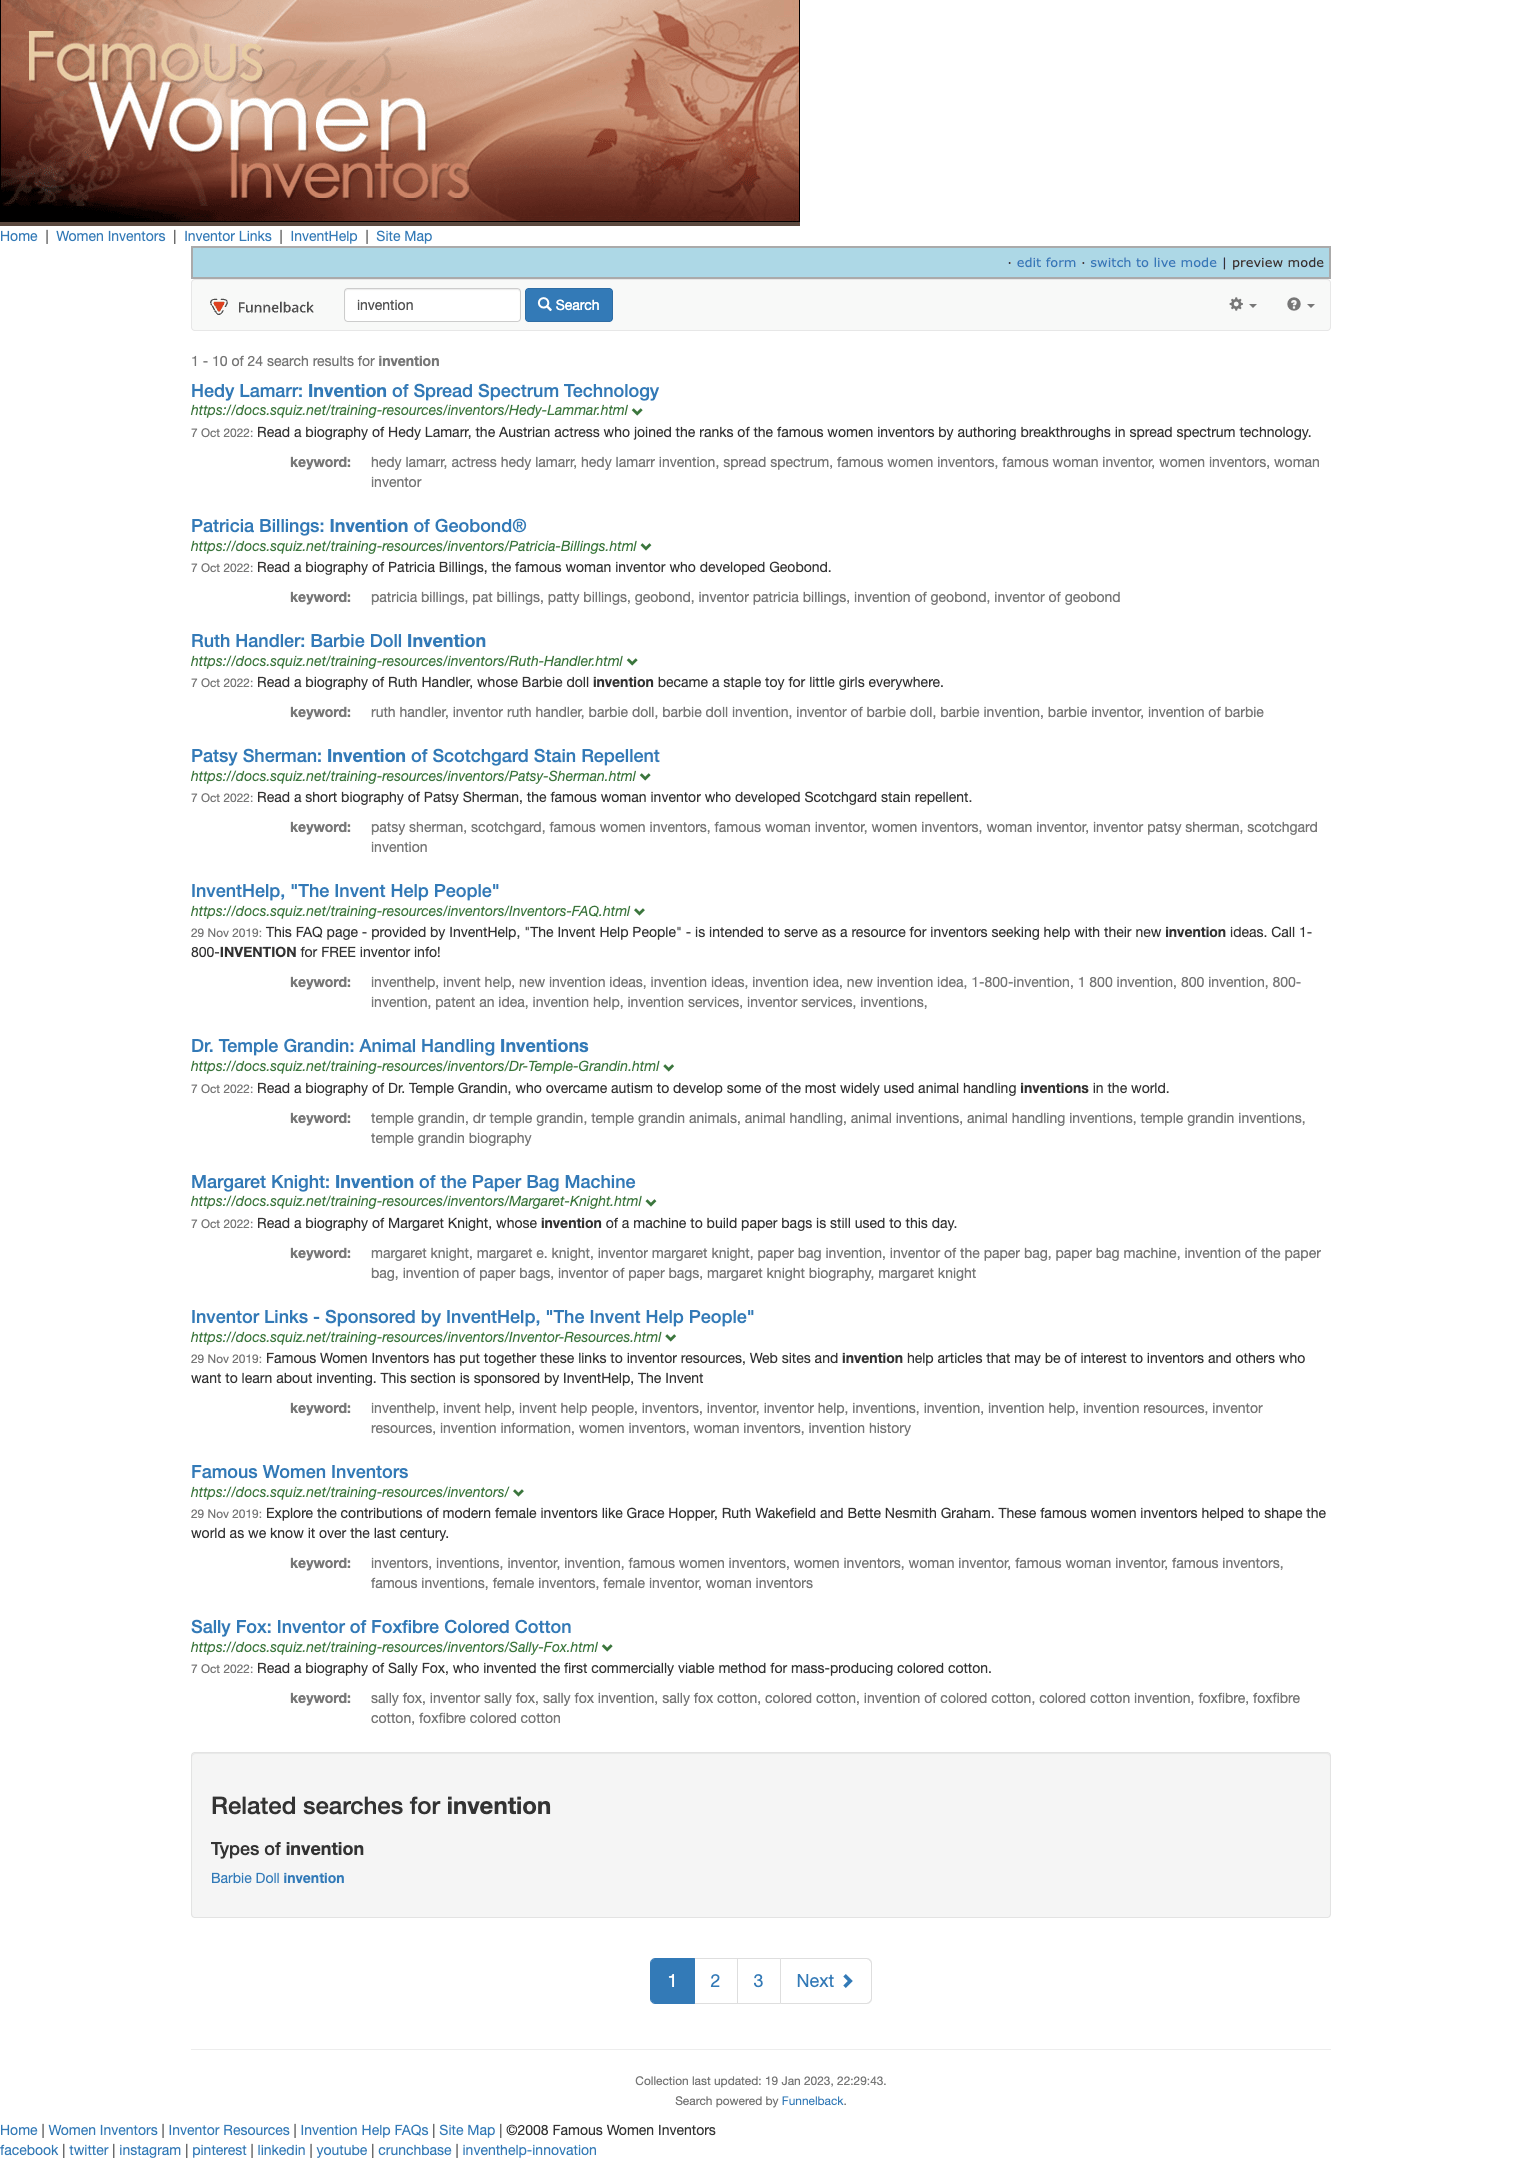
-
Inspect the source code for the inventors site again and look for any appropriate include for required resources such as JavaScript, fonts, favicons and styles from the header and footer blocks. You will need to make a decision on what is required to produce a working search results page. This will require any site style sheets and may also require some Javascript dependencies depending on how the site is constructed. Some things won’t be required though (for example analytics tracking code may not be appropriate to include, or stylesheets for specific functions that are not used in the search).
For the inventors site we just need to include the CSS stylesheet from the
<head>region of the page. There is nothing of value in the footer Javascript so we don’t need to include anything from there. Once again, we have included HTML comments in the site’s source code to assist Funnelback in accessing the required document header resources. Add the following to your template. Where you insert this within the<head>section will depend on what is being imported, but you will generally want to include a site stylesheet before the Funnelback-specific stylesheets, and definitely before the in-page<style>block.<!--start included docheader--> <@fb.IncludeUrl url="https://docs.squiz.net/training-resources/inventors/" start="<!-- begin funnelback docheader -->" end="<!-- end funnelback docheader -->" expiry=1 convertrelative=true/> <!--end included docheader--> -
Save and publish the template then rerun a search for inventor against the inventors styled results page. Observe that the header and footer is styled correctly but the styling for the search results is not correct. There will need to be some page-level styles added, or changes to the Freemarker template for the search results block that need to be made.
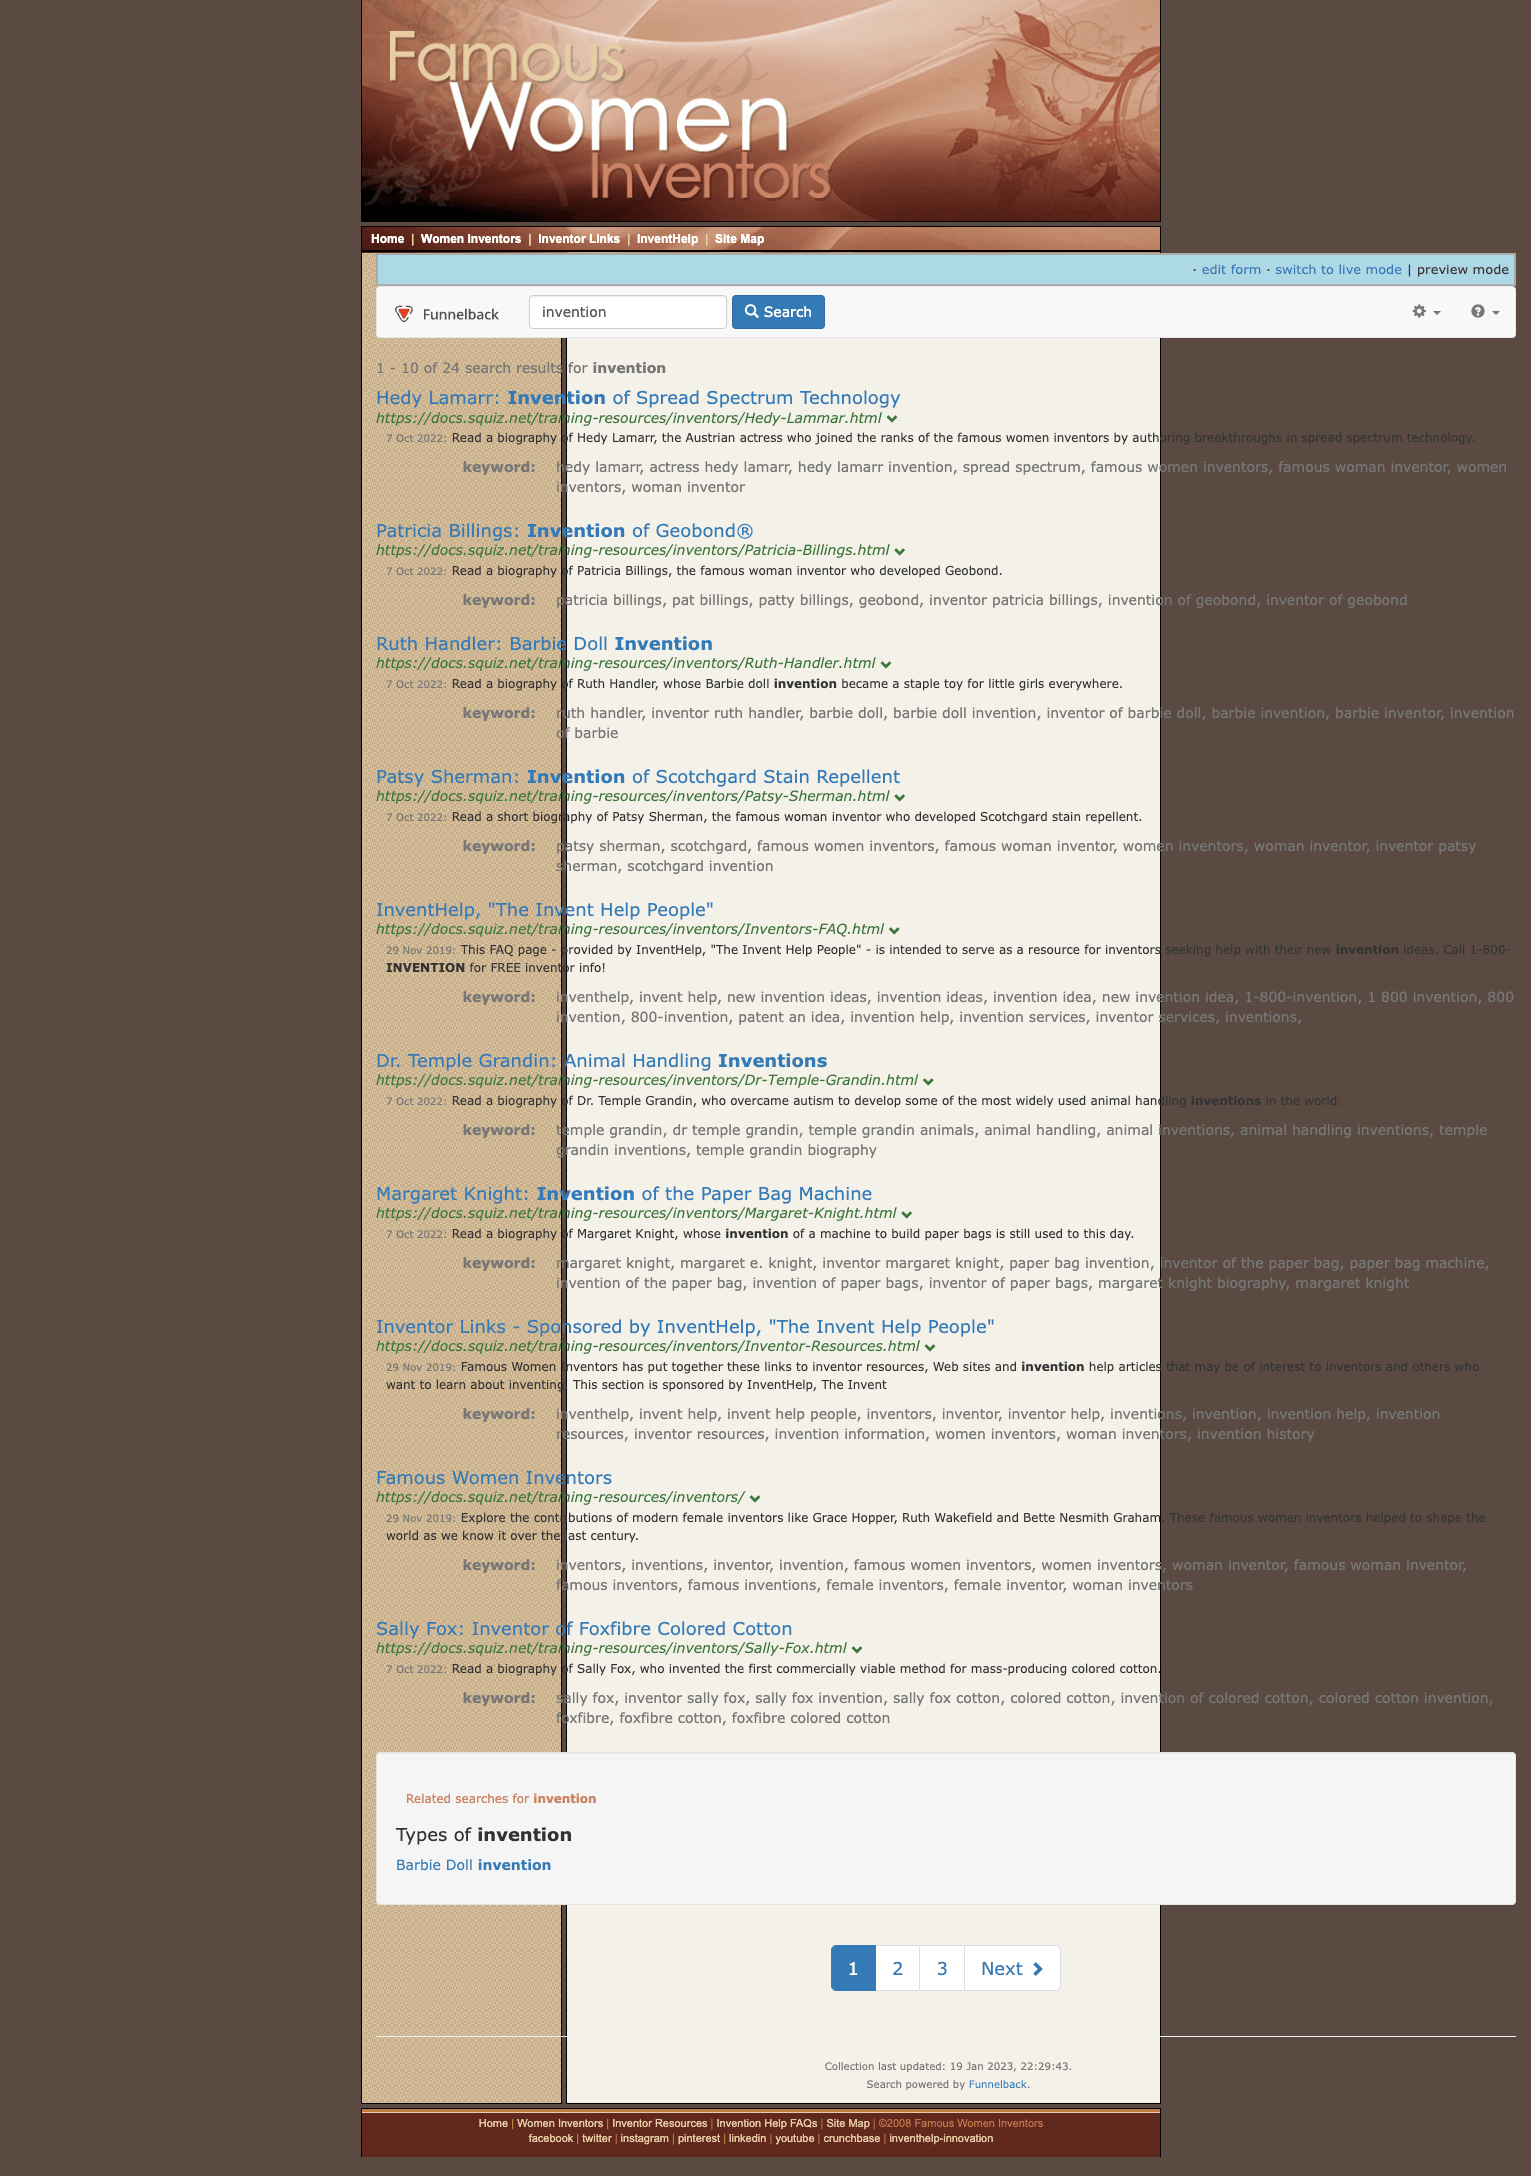
-
The browser debugger will again assist you in identifying what needs to be changed. We can fix the formatting issues by defining CSS styles to override the default container style for the Funnelback search results to set a background color and width:
#bodycopyArea .container {
    background-color:#fff;
    width: auto;
}
Add this to the bottom of the
<style>block (approx L40) in the Freemarker template then click the save and publish button. -
Rerun a search for inventor against the inventors styled results page and observe that the search results are now nested nicely within the famous women inventors site design.

-
Once you are happy with how the template is functioning you should update your
IncludeUrlcalls within the Freemarker template to specify a sensibletimeoutvalue. Thetimeoutvalue specifies how long (in seconds) that Funnelback should cache the include. This should be set to something like 24 hours (timeout=86400) so that the headers and footers are only checked once a day for changes. If the timeout is set to a short value it will affect the speed of returning your search results because Funnelback has to make a web request (for each relevantIncludeUrlcall to update the include).
|
Extended exercise: Remote includes
-
The nested search results are styled using default Funnelback styling. Update the styling to fit in with the Female inventors site design.
15. Configuring content auditor
The content auditor provides a series of reports on various aspects of a result page’s content.
The content auditor is primarily designed for web and file content but could be adapted to other content sources.
The content auditor reports can be customized in a number of ways. Customizations include:
-
Reporting on custom metadata
-
Specifying undesirable text
-
Defining acceptable reading grades
Most customizations are applied as soon as the configuration change is saved, however some require an update of related data sources for the changes to take effect.
Tutorial: Content auditor reports
-
Log in to the insights dashboard where you are doing your training.
See: Training - search dashboard access information if you’re not sure how to access the training. Ignore this step if you’re treating this as a non-interactive tutorial. -
Navigate to the foodista service then click on the content auditor tile, or select content auditor from the sidebar menu.
-
The content auditor - recommendations screen will then load.
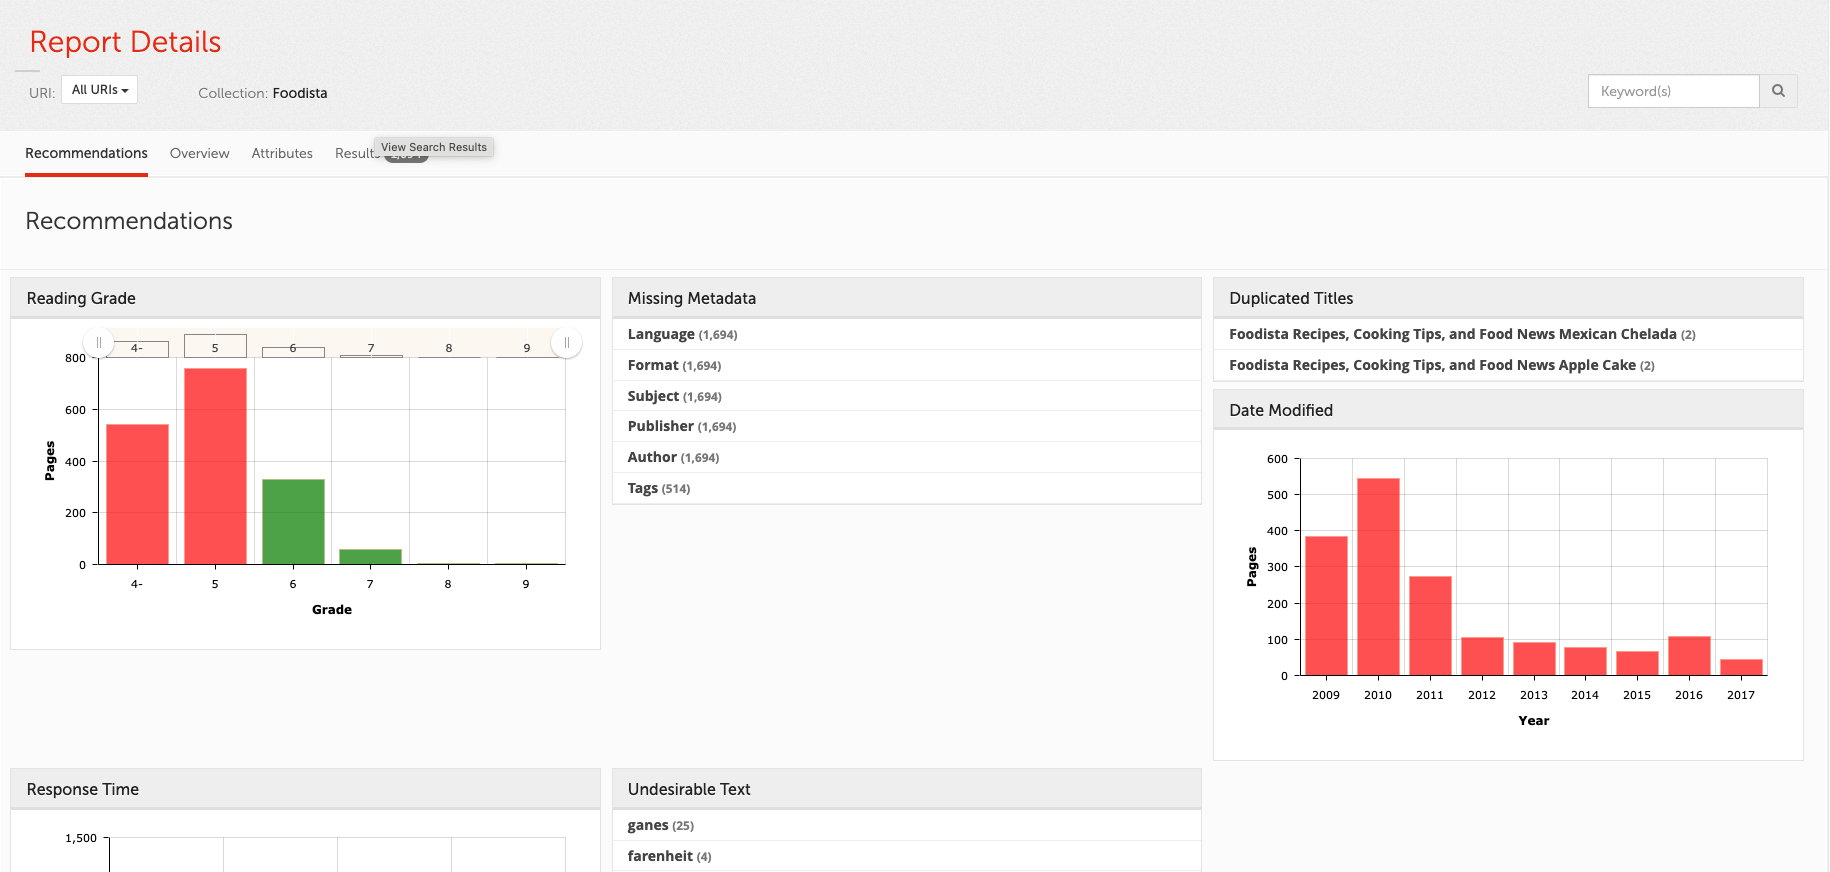
-
Observe that the report is organized into several sections - recommendations (currently showing), overview (which provides information on the top values for the metadata fields covered by the report), attributes (which breaks down the different metadata fields) and search results (which provides page level information for items that match the current report’s search criteria).
-
Spend a few minutes exploring the different sections of the content auditor report.
15.1. Customize the undesirable text
The undesirable words report in content auditor identifies URLs that contain words that are seen as undesirable. This includes common misspellings, but can be augmented with organisation-specific words - such as avoid words in company style policy, or industry specific terms.
Funnelback uses Wikipedia’s common misspellings list to identify undesirable words. This list can be replaced or augmented with custom lists of terms.
Customization of undesirable text requires a full update of the data source to apply the changes.
15.1.1. Add additional words and phrases to the undesirable text report
Add individual words and phrases
If you have a small number of additional words that you would like to include in the content auditor undesirable text report then these can be added via individual configuration keys set in the data source configuration.
Add a list of words and phrases
If you have a list of additional words and phrases that you would like to include in the content auditor undesirable text report then these can be added as an additional undesirable text source.
| a full update is required – an incremental update is not sufficient because filter changes won’t be applied to content that is not downloaded. . After the update completes return to the content auditor report for the results page and observe that occurrences of the words added to the custom undesirable text file are now included in the words listed as undesirable text. Clicking on one of the terms will filter the report to only pages containing the selected word. |
15.1.2. Add additional undesirable text reporting as separate reports
Content auditor doesn’t currently support multiple undesirable text reports. However, the metadata reporting functionality within content auditor can be used to report on additional undesirable text sources.
To set up separate reporting for the additional sources:
-
add the additional sources as outlined above : Add additional words and phrases to the undesirable text report
-
Configure the undesirable text filter to use the separated additional word lists. See:
filter.jsoup.undesirable_text-separate-lists=true. -
Configure content auditor to display the additional word list metadata for the extra metadata fields (
X-Funnelback-Undesirable-Text-ID). See:Content auditor overview and attributes metadata report customizationThe extra metadata fields will need to be mapped to Funnelback metadata classes using standard metadata mapping rules.
Tutorial: Configuring undesirable text
There are two methods of adding additional words to the undesirable text list. This exercise will use both methods to add to the undesirable text list.
-
From the search dashboard switch to the foodista data source. Click the edit data source configuration item on the settings panel. A configuration key,
filter.jsoup.undesirable_text.[key_name]can be used to add individual values to the undesirable text list.
-
Click the add new button and add a configuration option named
filter.jsoup.undesirable_text.abbrev-abtand set this to the value ofabt.
-
Run a full update of the foodista data source.
A full update is required because the undesirable text report is produced using a filter that analyzes the page content. . After the update completes view the content auditor report on the foodista results page. Observe that abt is now included in the list of undesirable text detected for the site. -
Return to the foodista data source. We’ll add some more undesirable text items, but this time in an undesirable text file. Use this method if you have a set of words that you need to detect.
-
Create an undesirable text configuration file for a non-preferred terms list. Select the manage data source configuration files item on the settings panel teh click the add new button. Create an
undesirable-text.non-preferred.cfgfile. You can create multiple lists of undesirable text that can be reported on separately. We’ll create a list with an ID ofnon-preferred: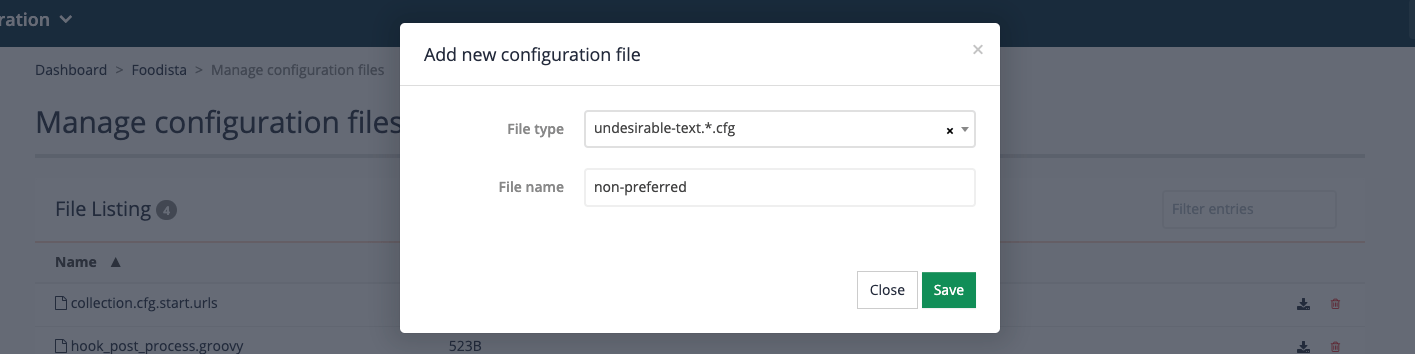
-
Click on the
undesirable-text.non-preferred.cfgitem in the file listing to edit the configuration file and enter the following list of words into the editor, then click the save button.prawn prawns corianderThis will configure content auditor to identify pages that contain these words. In this example we might want to identify prawn(s) and coriander as non-preferred or banned words. This would allow for these to be updated to say shrimp, cilantro and about if these were the preferred terms in a site’s content guidelines.
-
Return to the foodista data source management screen and select edit data source configuration from the settings panel. We need to tell content auditor to use the non-preferred word list that we just configured. Add a new configuration key:
-
Parameter key:
filter.jsoup.undesirable_text-source.* -
Key:
npt -
Value:
non-preferred

-
-
Run a full update of the foodista data source.
-
After the update completes return to the content auditor report for the foodista results page and observe that occurrences of the words added to the custom undesirable text file are now included in the words listed as undesirable text. Clicking on one of the terms will filter the report to only pages containing the selected word.
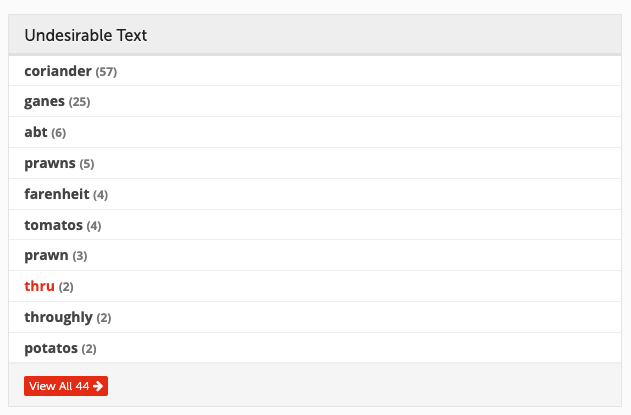
15.2. Customize the reading grade chart
The reading grade chart reports on performance against the Flesch-Kincaid reading grade level scale. Pages that fall within a target reading grade band are displayed with green bars, while those that fall outside this range are displayed with red bars.
The range of acceptable grade levels can be configured in the results page configuration by setting ui.modern.content-auditor.reading-grade parameter keys, which control the lower and upper bounds of the reading grades that are rendered in green.
Customization of the reading grade chart does not require an update of the data source.
16. Set the acceptable reading grade limits
-
Log in to the search dashboard, switch to the results page that corresponds to the content auditor report and view the results page configuration.
-
Select edit results page configuration and add
ui.modern.content-auditor.reading-grade.lower-ok-limitandui.modern.content-auditor.reading-grade.upper-ok-limitparameter keys.For example: to set the acceptable (green) range of reading grades of 5-7 add the following lines:
Parameter key Value ui.modern.content-auditor.reading-grade.lower-ok-limit
5
ui.modern.content-auditor.reading-grade.upper-ok-limit
7
-
Return to the content auditor report and observe that the reading graph has updated to display the new acceptable range in green. Observe that the changes take place as soon as the configuration changes are saved
Tutorial: Set the reading grade limits
-
Log in to the search dashboard where you are doing your training.
See: Training - search dashboard access information if you’re not sure how to access the training. Ignore this step if you’re treating this as a non-interactive tutorial. -
Navigate to the foodista results page.
-
View the content auditor report and observe the acceptable range for reading grade lies between 6 and 9.
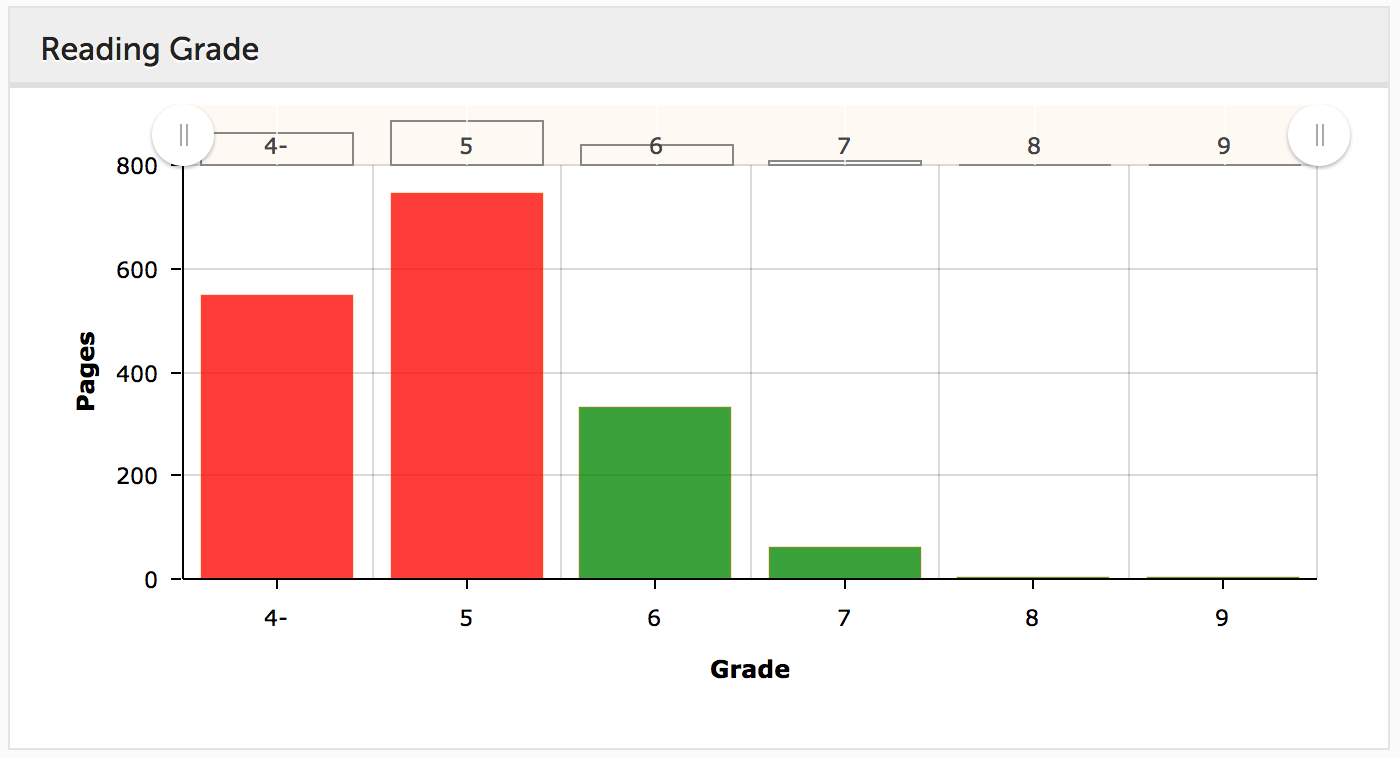
-
Change the acceptable reading grade levels to grades 5-7. This must be changed in the parent search package. Edit the search package configuration of the foodista search package and add the following settings:
ui.modern.content-auditor.reading-grade.lower-ok-limit=5 ui.modern.content-auditor.reading-grade.upper-ok-limit=7 -
Return to the content auditor report and observe that the reading graph has updated to display the new acceptable range in green. Observe that the changes take place as soon as the configuration changes are saved - no update of the linked foodista data source is required.
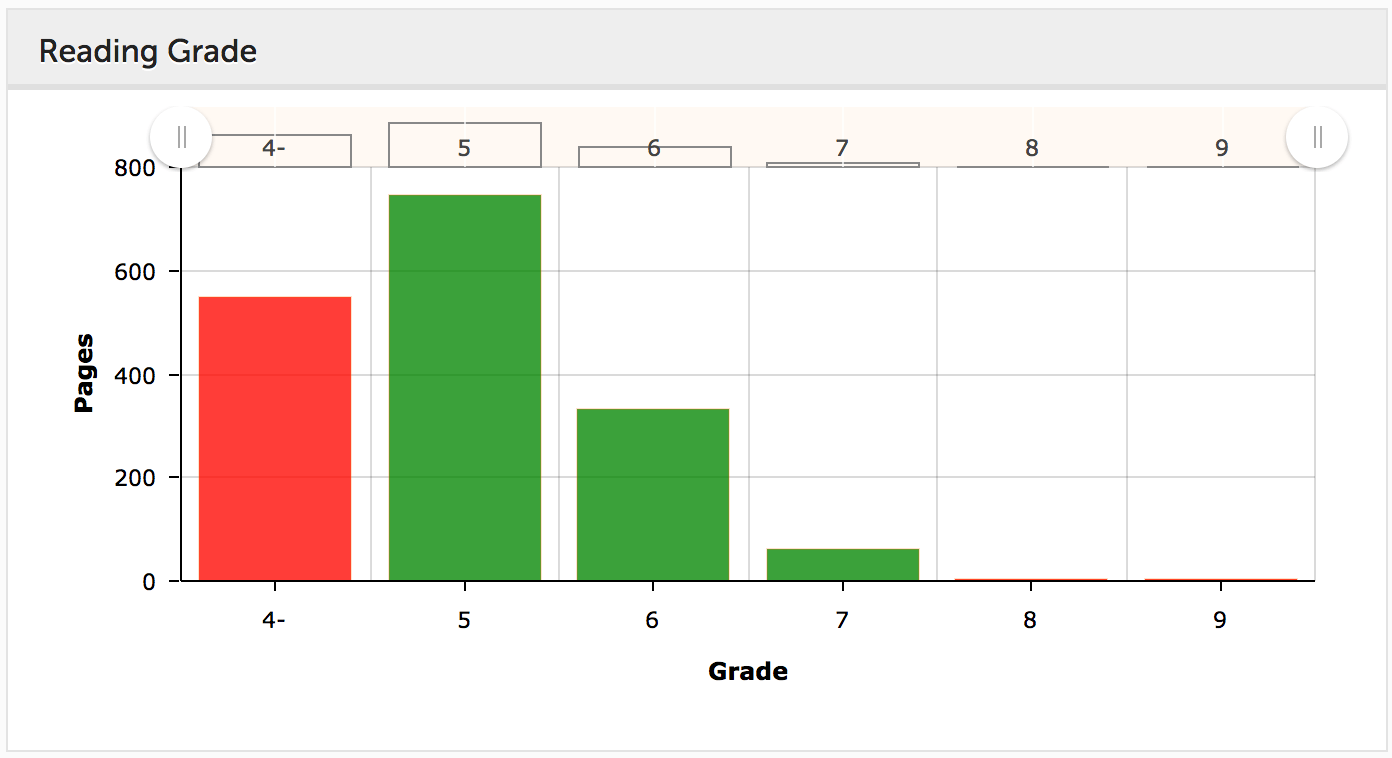
16.1. Customize overview and attributes metadata
The overview and attributes screens in content auditor report various pre-defined document properties. The screens can be configured to display arbitrary metadata fields allowing the report to be tailored to the metadata that is available.
Custom metadata fields can be added to the overview and attributes screens by adding ui.modern.content-auditor.facet-metadata.FIELD_NAME parameters keys lines to the results page configuration for each field that should be displayed.
Customization of the overview and attributes reports does not require an update of the collection, unless the metadata fields are not currently mapped and indexed.
17. Add custom metadata to the overview and attributes screens
-
Log in to the search dashboard, switch to the results page that corresponds to the content auditor report and view the results page configuration.
-
Select edit results page configuration and add a
ui.modern.content-auditor.facet-metadata.*parameter key.For example: Add an Authors field to the overview and attributes screens in content auditor.
Parameter key Value ui.modern.content-auditor.facet-metadata.authors
Authors
-
Open the content auditor report and observe that the custom metadata is now included in the report.
Tutorial: Add custom metadata to the overview and attributes screens
-
Log in to the search dashboard where you are doing your training.
See: Training - search dashboard access information if you’re not sure how to access the training. Ignore this step if you’re treating this as a non-interactive tutorial. -
Navigate to the foodista search results page.
-
View the content auditor report and observe the overview and attributes screens.
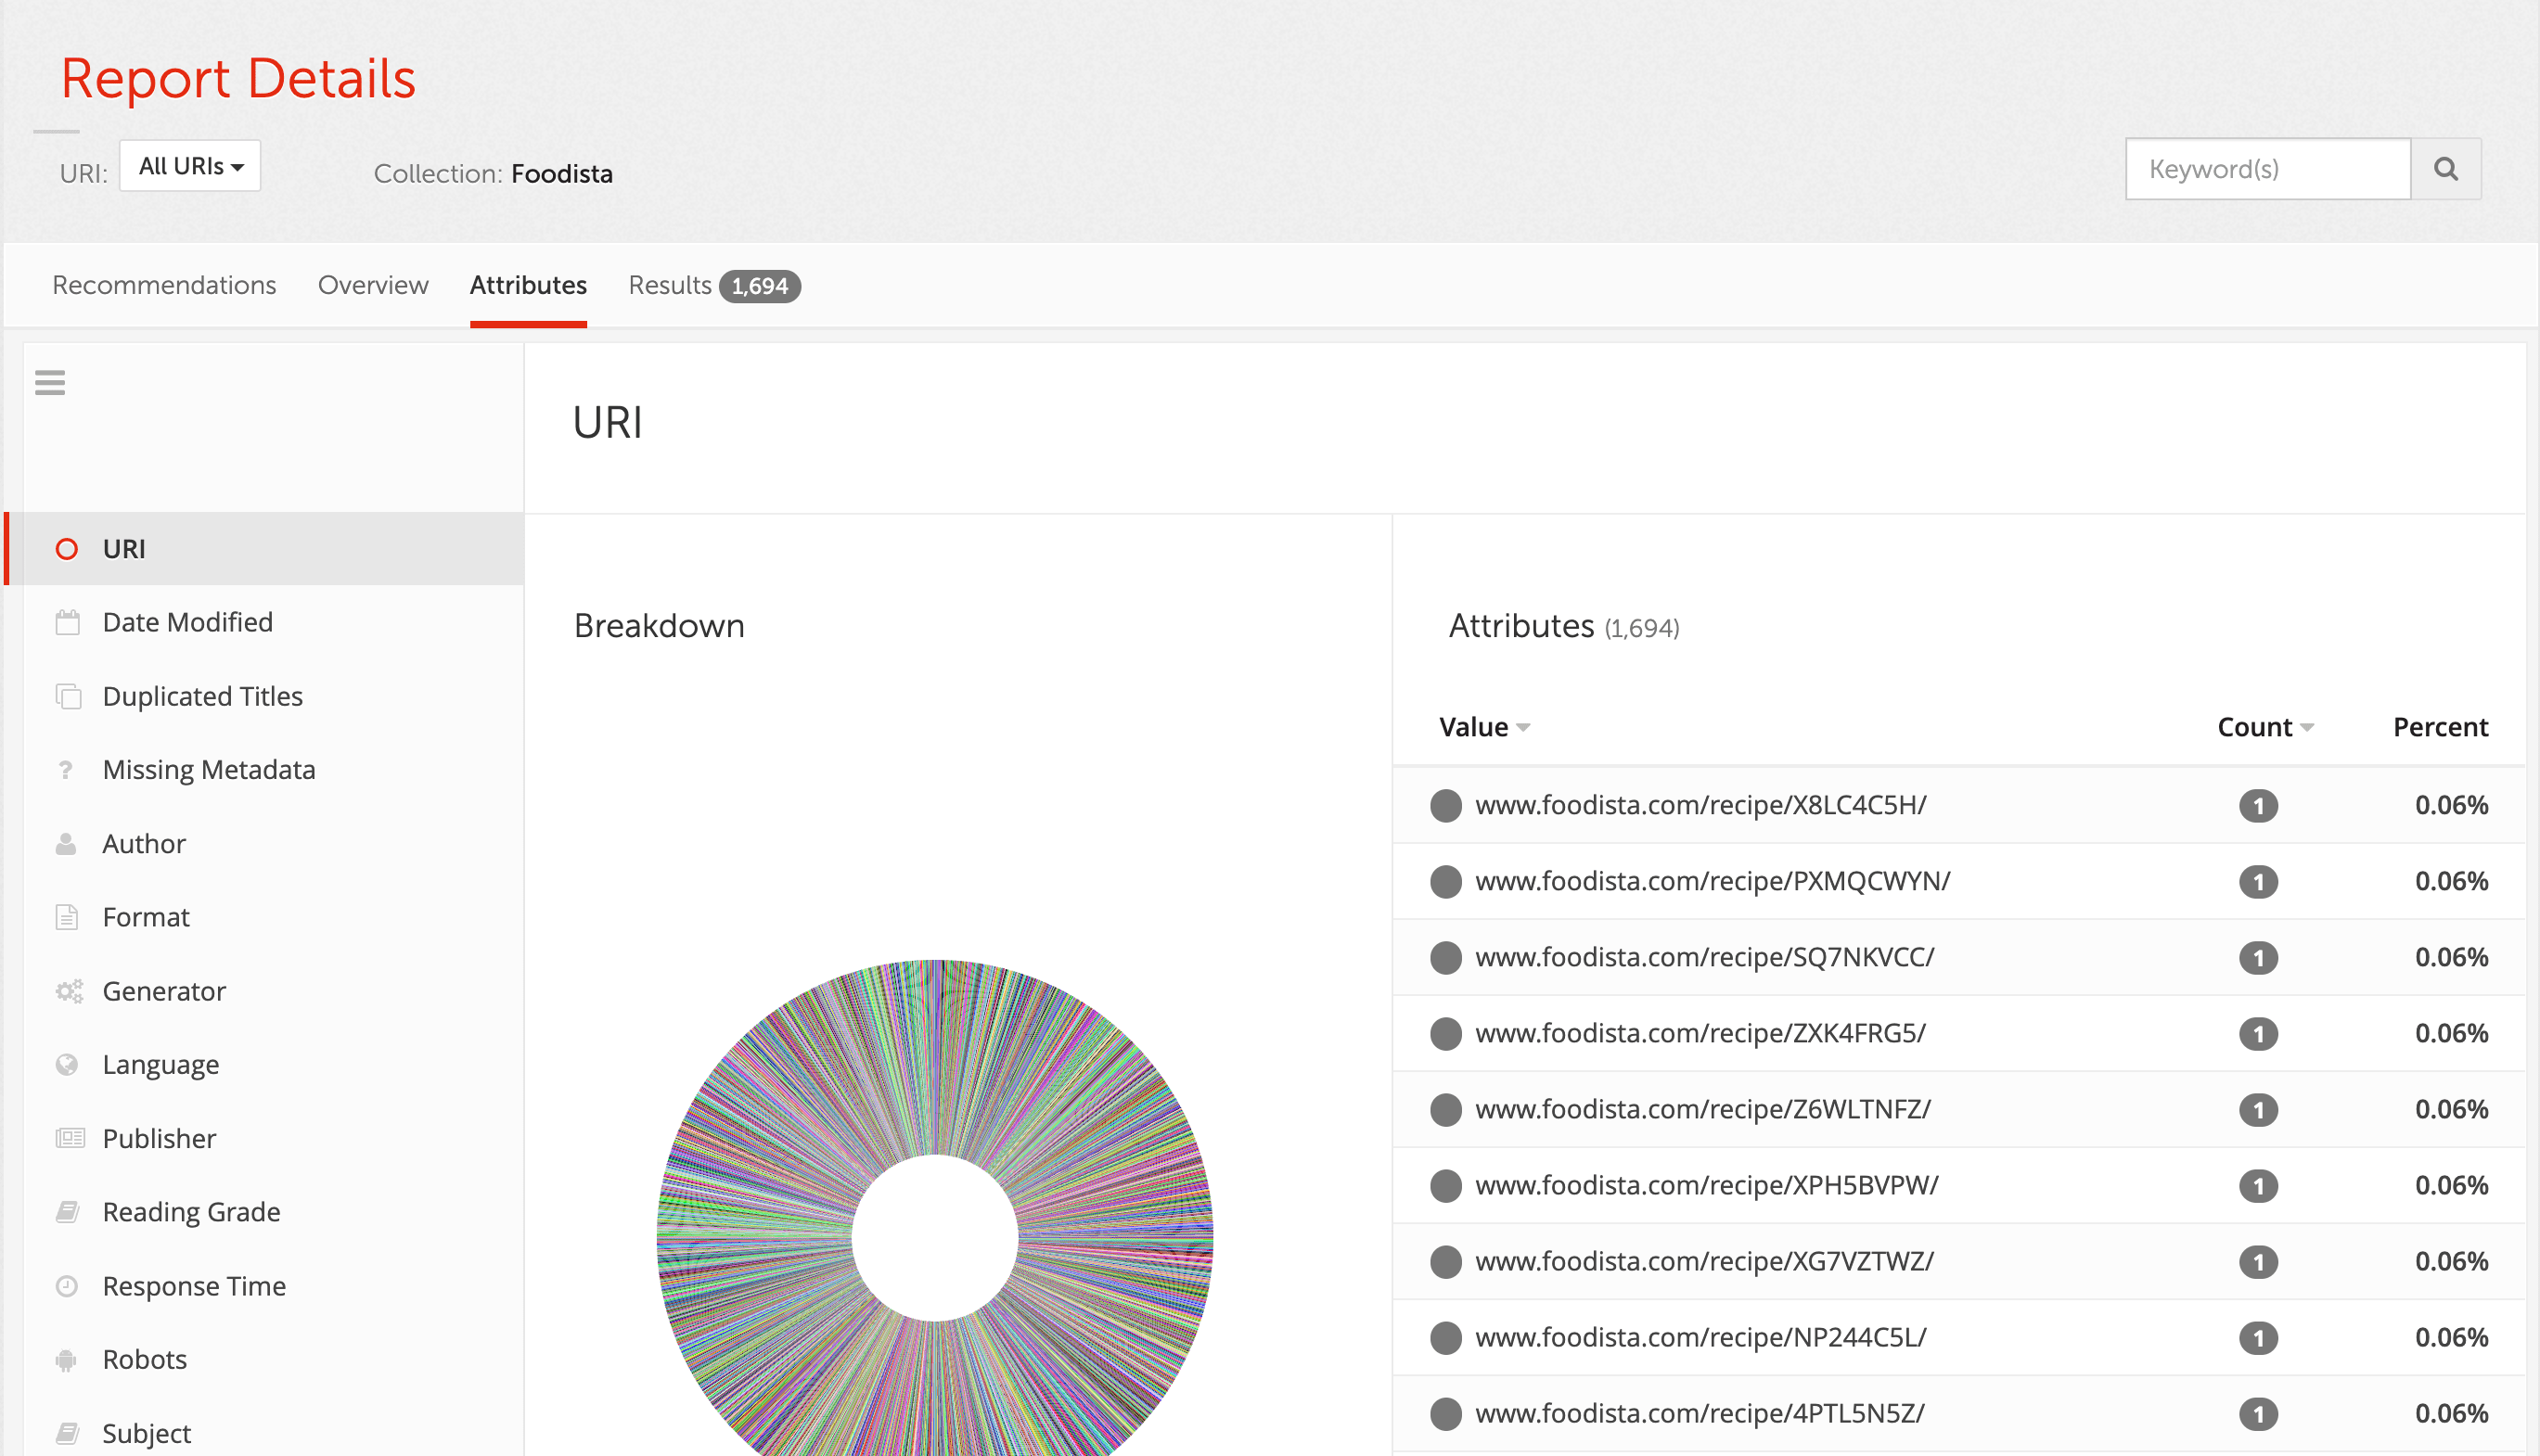
-
Edit the results page configuration and add the following setting then save and publish. This will add an Authors field to the overview and attributes screens.
-
Parameter key:
ui.modern.content-auditor.facet-metadata.* -
Metadata name:
authors -
Value:
Authors
-
-
Return to the content auditor search results and observe that the changes are now reflected in the report.
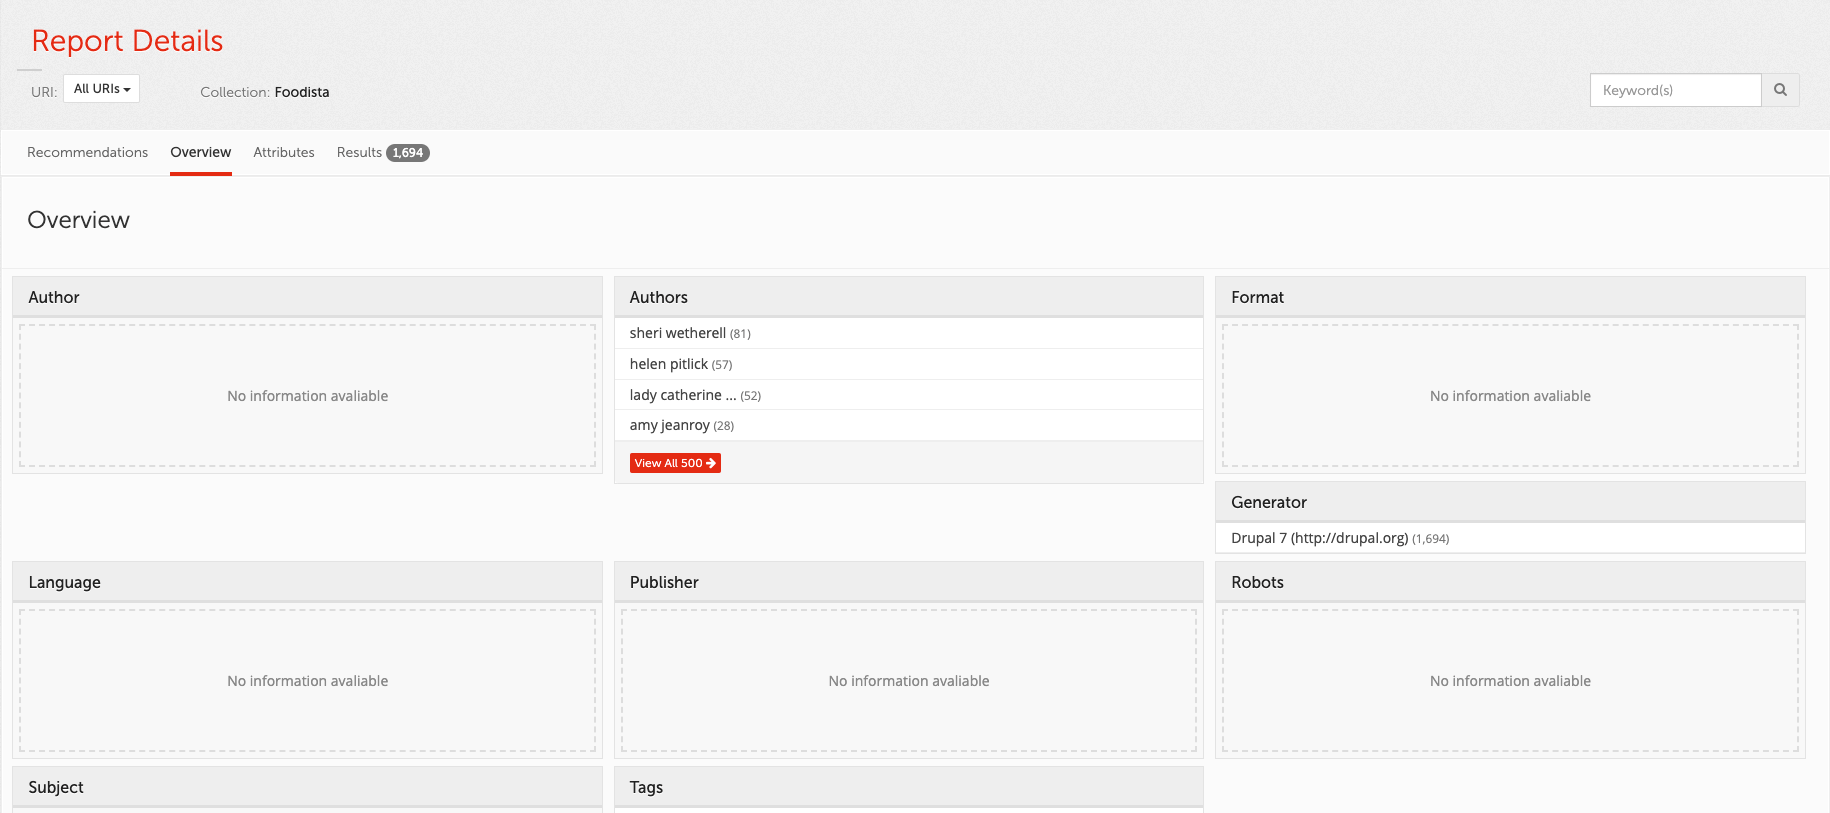
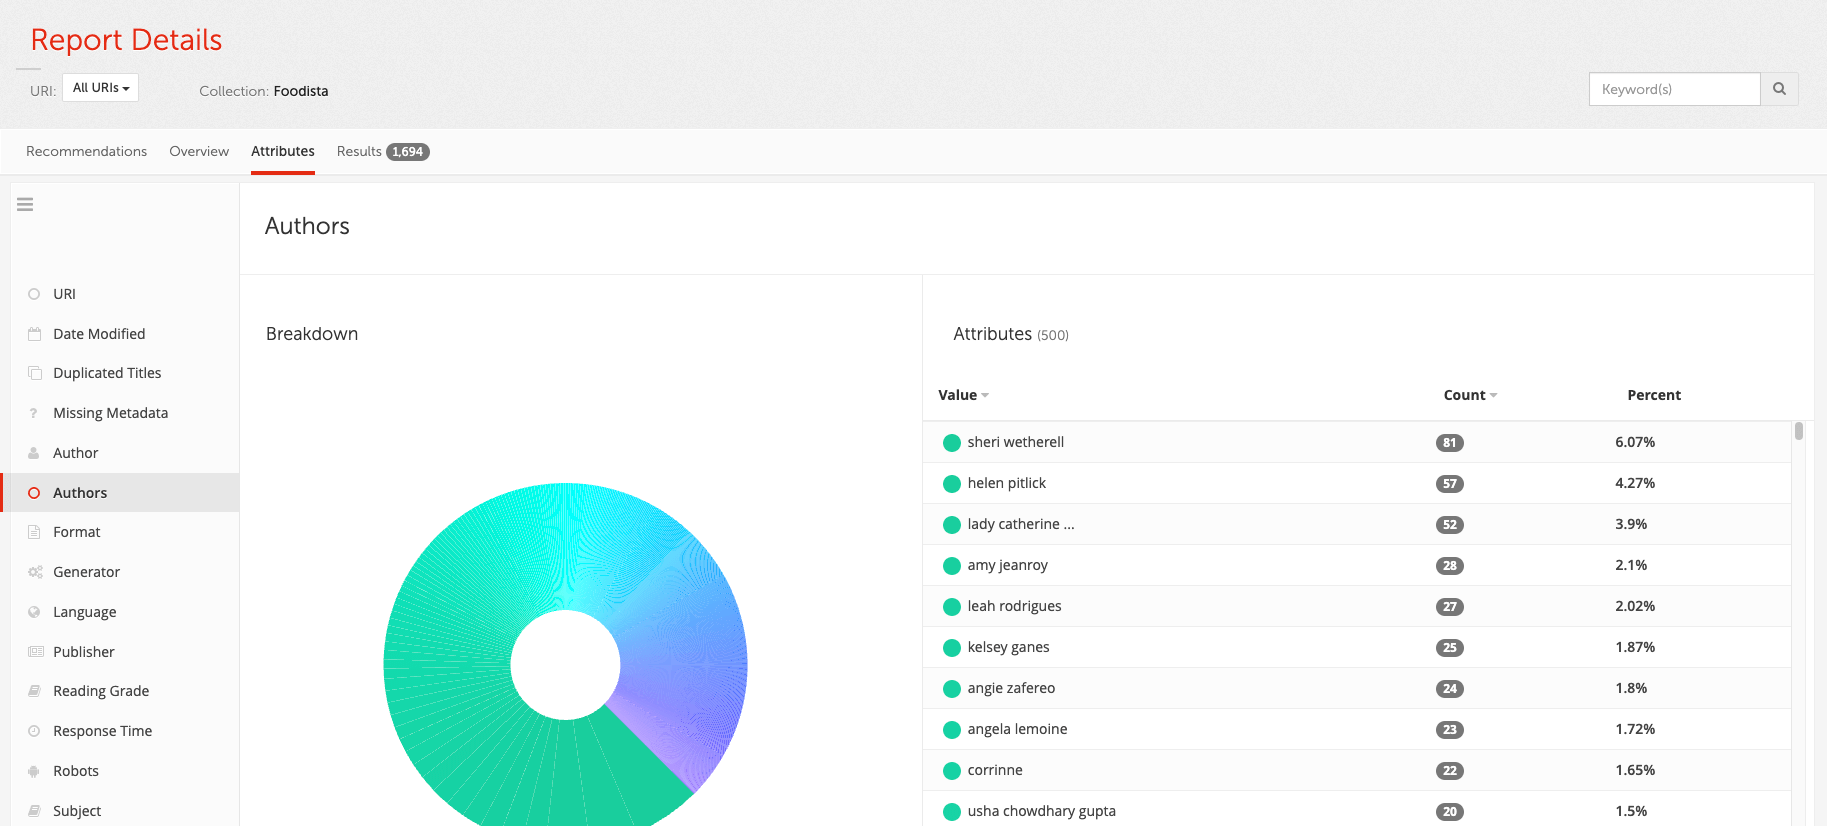
17.1. Customize the search results display
The search results screen in content auditor lists out all the documents that match the search query and different filters applied on the various screens in content auditor.
The columns displayed for each result can be customised to report on additional metadata.
Customization of the search results report does not require an update of the collection, unless the metadata fields are not currently mapped.
18. Add custom metadata columns to the content auditor search results
-
Log in to the search dashboard, switch to the results page that corresponds to the content auditor report and view the results page configuration.
-
Select edit results page configuration and add
ui.modern.content-auditor.*parameter keys.For example: This will remove the format and subjects columns and add columns that display the author and tags metadata field content.
Parameter key Value ui.modern.content-auditor.display-metadata.f
<blank>
ui.modern.content-auditor.display-metadata.s
<blank>
ui.modern.content-auditor.display-metadata.authors
Author
ui.modern.content-auditor.display-metadata.tags
Tags
-
Return to the content auditor search results and observe that the changes are now reflected in the report.
Tutorial: Add custom metadata columns to the search results
-
Log in to the search dashboard where you are doing your training.
See: Training - search dashboard access information if you’re not sure how to access the training. Ignore this step if you’re treating this as a non-interactive tutorial. -
Navigate to the Foodista search results page.
-
View the content auditor report and select the search results screen

-
Select the edit results page configuration from the customize panel and add the following settings. This will remove the format and subjects columns and add columns that display the author and tags metadata field content.
ui.modern.content-auditor.display-metadata.f= ui.modern.content-auditor.display-metadata.keyword= ui.modern.content-auditor.display-metadata.authors=Author -
Return to the content auditor search results and observe that the changes are now reflected in the report.
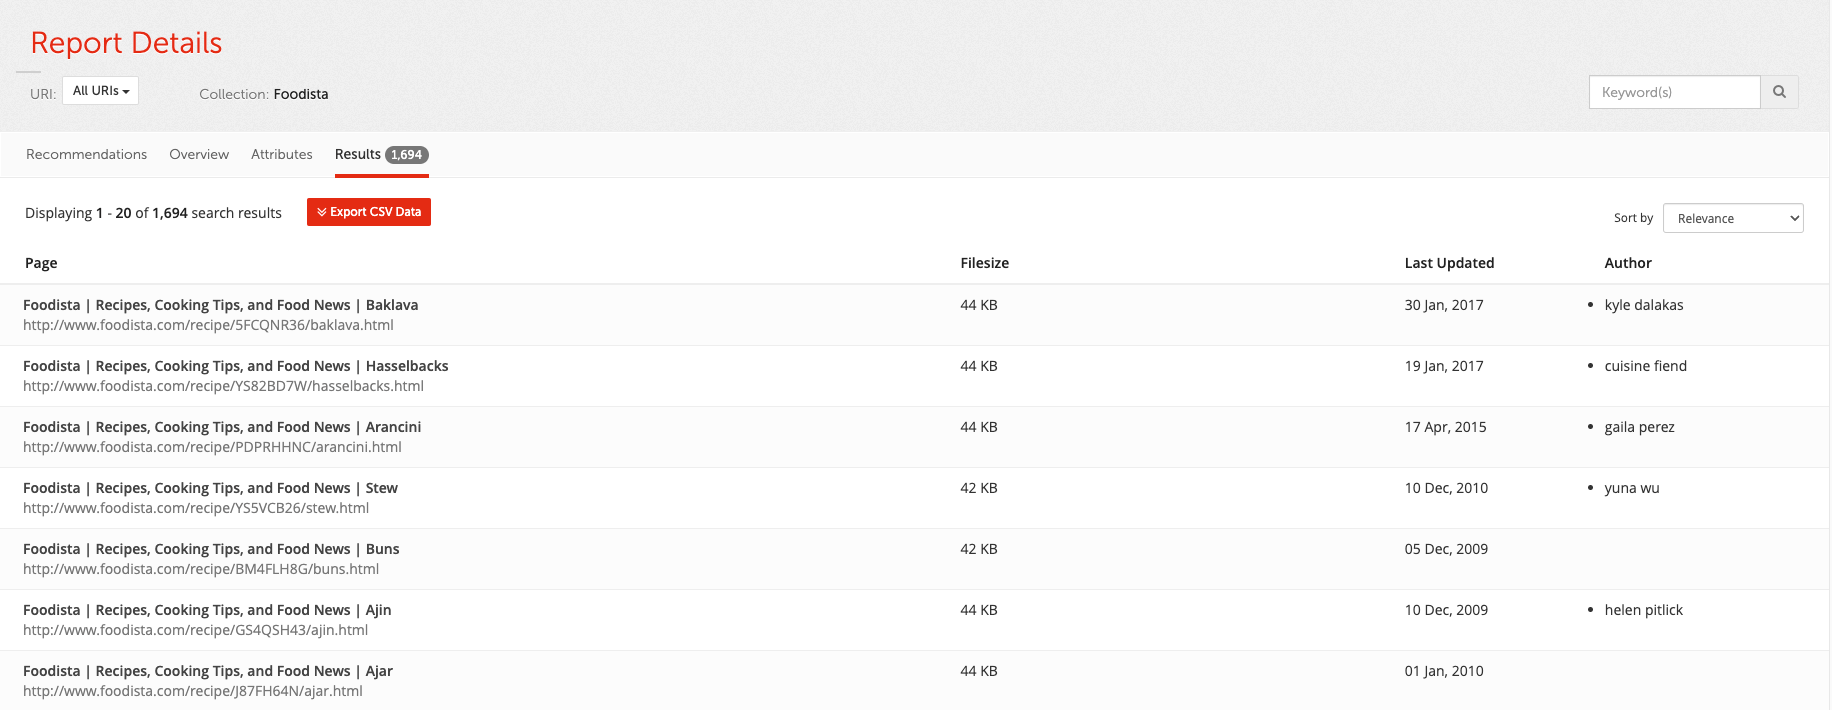
18.1. Customize the insights dashboard summary tile
The attribute displayed on the content auditor summary tile can be customized by setting a results page configuration parameter.
Customization of the tile source does not require an update of any linked data sources, unless the metadata fields are not currently mapped.
Tutorial: Change the content auditor summary tile
-
Log in to the insights dashboard where you are doing your training.
See: Training - search dashboard access information if you’re not sure how to access the training. Ignore this step if you’re treating this as a non-interactive tutorial. -
Open the insights dashboard for the Foodista search results page observe the content auditor summary tile:

-
Switch to the search dashboard, Foodista search results page manage screen and select edit results page configuration from the customize panel. Observe that there is a configuration option setting the summary tile to the date modified:
ui.modern.content-auditor.preferred-facets=Date Modifiedthis option has already been customized for the Foodista search results page - when setting the tile default it is normal for this setting to be missing from the results page configuration. -
Edit the configuration setting to display
Tagsif available, with second preference forDate Modified. Save and publish the setting.ui.modern.content-auditor.preferred-facets=Tags,Date Modified
-
Reload the insights dashboard and observe that the content auditor is now displaying tags on the summary tile.