Calendar screens
|
This section describes a deprecated feature. The feature may only be mentioned in the documentation for the purpose of warning readers. You should not enable or use deprecated features for new development. Read Deprecated assets and features for more information about the deprecation level of this feature before trying any suggested procedures or actions described for this feature. Contact Squiz Support for assistance if you are still uncertain about whether you should use this deprecated feature after reading these resources. |
Once you have created a Calendar asset, you can configure its settings on its associated asset screens.
The majority of these screens are the same as (or similar to) those for a standard page. Read the Asset screens documentation for more information about common screens in Matrix.
This chapter will describe the Details and Day labels screens, which are different for a Calendar asset.
| Before you create a Calendar asset, make sure that the head design area has been added to the design that you will use. Without this design area, the Calendar asset will not use the default CSS and, hence, not all features will work correctly. Read the Designs documentation for more information on how to add the head design area. |
Additional dependant assets
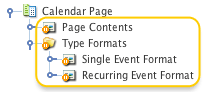
When you create a Calendar asset, several assets are automatically created beneath it. You can use these assets to define the contents and layout of the Calendar asset.
- Page contents
-
This bodycopy is used to define the overall layout of the Calendar asset.
- Single event format
-
This bodycopy is used to define the layout for a single calendar event and any single events on the multi-date calendar event.
- Recurring event format
-
This bodycopy is used to define the layout for a recurring calendar event and any recurring events on the multi-date calendar event.
Details screen
The Details screen allows you to configure the Calendar asset settings, including the events to list and the settings for the different view types.
Read the Asset details screen documentation for more information on the status, future status, thumbnail, and details sections.
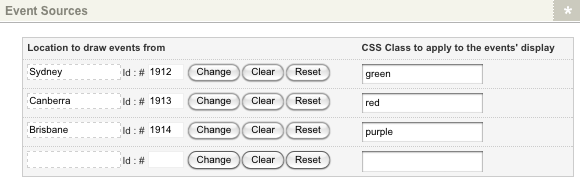
Event sources
This section allows you to select which events to show in the calendar. The event sources section of the Details screen is shown in the figure below.
The fields available are as follows:
- Location to draw events from
-
Select from which section of the system to get the events. For example, if you want to show all of your site’s events, select your site in this field. You can select more than one section in your system. NOTE: The status of an event must be live for it to appear on the Calendar asset.
- CSS class to apply to the events' display
-
Enter the name of a CSS class that has been defined in the design applied to the Calendar asset. If you are using the default CSS provided with the Calendar asset, you can use one of the pre-defined classes to format the events.
These classes are:
-
Blue
-
Black
-
Fuchsia
-
Gray
-
Green
-
Lime
-
Maroon
-
Navy
-
Olive
-
Purple
-
Red
-
Silver
-
Teal
-
White
-
Yellow
-
The class that is entered into this field will be used when displaying the events in the calendar. By doing this, you can show different events in different styles. For example, you can show training courses in blue and seminars in red. For this to work, you need to group similar events in a folder in the asset tree and select each root node in the Location to draw events from field.
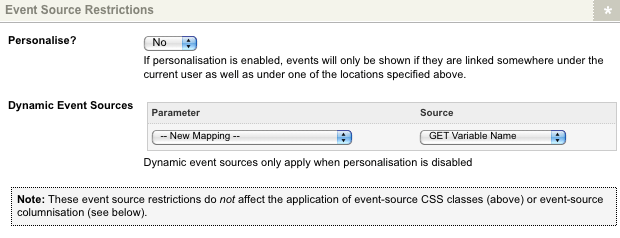
Event source restrictions
This section allows you to restrict which events to show based on either the user account or the page the user is viewing. The event source restrictions section of the Details screen is shown in the figure below.
The following fields are available:

- Personalize
-
If this is set to
Yes, the Calendar asset will only show the events linked under the current user and under one of the locations specified in the events sources section above. For example, say you have created a Calendar asset that shows the events from the Sydney, Canberra, and Brisbane folders, as shown. If you log in as the editor and go to the Calendar asset, it will only show theMATR 330andMATR 210events linked under both the editor account and the folders. - Dynamic event sources
-
This section allows you to specify an alternate event source for the calendar based on GET, POST or SESSION variables, current asset, current user, current site, set value, or any superglobal.
-
Select Replacement event source in the parameter field
-
Select a source from the second list
-
Click Save
-
An additional field will appear in the source field where you can enter a value
-
To delete a dynamic parameter:
-
Select the Delete box
-
Click Save
Overall presentation settings
This section allows you to format the views for the Calendar asset. The overall presentation settings section is shown in the figure below.
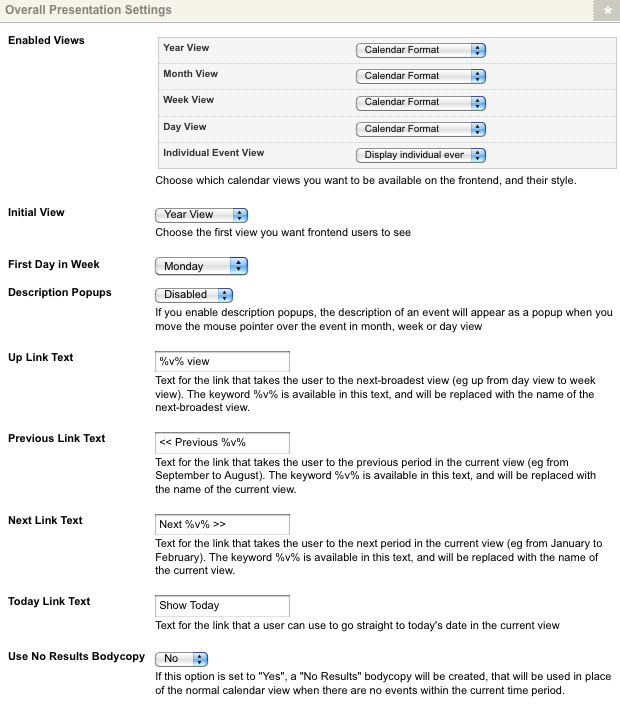
The fields available are as follows:
- Enabled views
-
This section allows you to select which views are available on the calendar and display each view. By default, all views are visible in the calendar, and each view will use the calendar format.
- Year view
-
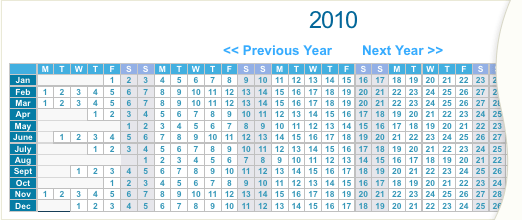
This view will show all days for one year by default. It allows the user to navigate to the previous and next year and view a month or day by clicking on a hyperlink.
The options available for this view are as follows:
-
(none) Select this option to disable the year view for the calendar.
-
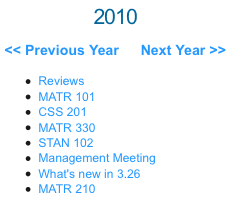
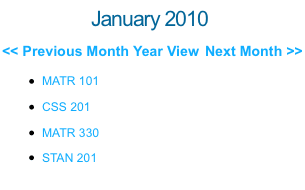
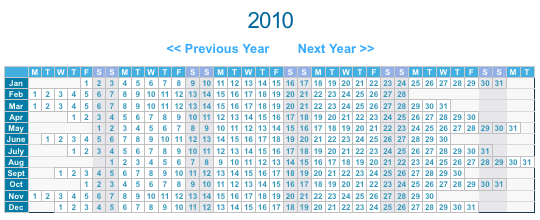
List without headings This will show a list of scheduled events for the selected year, as shown. When you select this option, the for each list entry field will appear. This field allows you to use the title for each event or the format defined in the type format bodycopies located under the asset tree calendar.
-
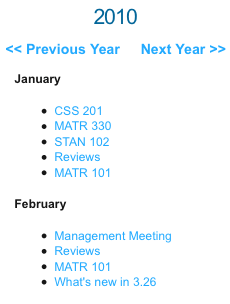
List with month headings This will show a list of all events for the selected year grouped under the month that they occur in, as shown in the figure. The For each list entry field will appear when you select this option This field allows you to use either the title for each event or the format defined in the type format bodycopies located under the calendar in the asset tree.
-
Calendar format This is the default format used for the year view.
-
- Month view
-
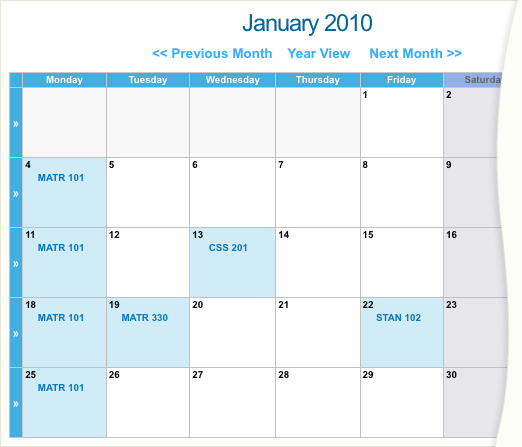
By default, this view will show all days in a month. It allows the user to navigate to the next and previous months, switch to the year view, and view a week or day by clicking on a hyperlink.
The options available for this view are as follows:
-
(none) Select this option to disable the month view for the calendar.
-
List without headings This will show a list of events that are scheduled for the selected month. The For each list entry field will appear when you select this option. This field allows you to use the title for each event or the format defined in the type format bodycopies located under the calendar in the asset tree.
Recurring calendar events will only be listed once in this view and not for each event’s recurrence. 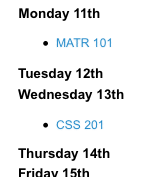
-
List with day headings This will show a list of all events for the selected month grouped under each day that they occur on, as shown. When you select this option, the for each list entry field will appear. This field allows you to use the title for each event or the format defined in the type format bodycopies located under the calendar in the asset tree.
-
Calendar format This is the default format used for the month view.
-
- Week view
-
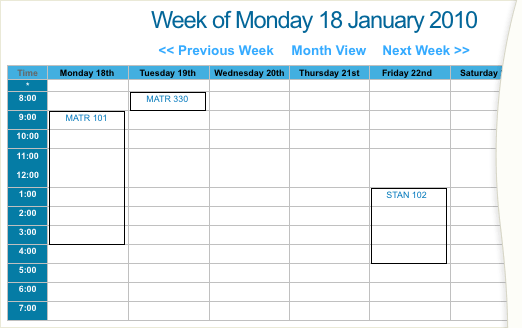
This view will show all days in a week by default. It allows the user to navigate to the next and previous weeks, switch to month view, and view a day by clicking on a hyperlink.
This view is shown in the figure below.
The options available for this view are as follows:
-
(none) Select this option to disable the week view for the calendar.
-
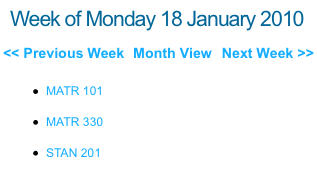
List without headings This will show a list of events that are scheduled for the selected week, as shown in the figure to the right. When you select this option, the for each list entry field will appear. This field allows you to use the title for each event or the format defined in the type format bodycopies located under the calendar in the asset tree.
-
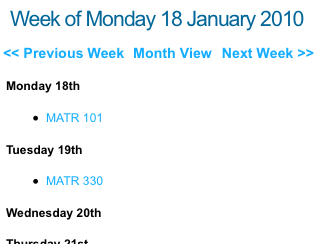
List with day headings This will show a list of all events for the selected week, grouped under the day on which they occur, as shown. The For each list entry field will appear when you select this option. This field allows you to use either the title for each event or the format defined in the type format bodycopies located under the calendar in the asset tree.
-
Calendar format This is the default format used for the week view.
-
- Day view
-
This view will show all events for a day by default. It allows the user to navigate to the next and previous day and change to the week view.

The options available for this view are as follows:
-
(none) Select this option to disable the day view for the calendar.
-
List without headings This will show a list of events that are scheduled for the selected day. When you select this option, the for each list entry field will appear. This field allows you to use the title for each event or the format defined in the type format bodycopies located under the calendar in the asset tree.
-
Calendar format This is the default format used for the day view.
-
- Individual event view
-
This field allows you to select how to show a single event in the calendar. By default, it will display individual events. This setting means that when the user views an event in the calendar, it will display the event’s details without changing the URL or lineage. If you select show individual event assets at their URLs, the user will be taken to the asset, and the URL and lineage will change when they view an event. Select (none) to disable the event view for the calendar.
- Initial view
-
Select which view to display when the user initially visits the calendar. By default, this is set to year view. The other available options include month, week, day, and event view.
- First day in week
-
Select which day to use as the first day of the week. By default, this is set to Monday. This option means when the user views the year, month, or week view in the calendar, Monday will be the first day. If, for example, you change this to Wednesday, the first day in each of the views will change to Wednesday.
- Description pop-ups
-
This option is disabled by default. If it is enabled, when a user hovers the mouse over an event in the calendar, a pop-up showing the event’s description will appear. For this to work, you need to be using the default CSS file provided for the Calendar asset. For more information on this, refer to the Look and feel section below.
- Up link text
-
Enter the text to show for the hyperlink to the next-broadest view. By default, this is
%v%view, where %v% is the name of the next-broadest view. For example, if you are in month view, this hyperlink will be year view. This hyperlink is shown when the keyword replacement Up link is added to the page contents bodycopy. - Previous link text
-
Enter the text to show for the hyperlink to the previous period. By default, this is
<< Previous %v%,where %v% is the current view’s name. For example, if you are in month view, this will be << Previous month. This hyperlink is shown when the keyword replacement previous list is added to the page contents bodycopy. - Next link text
-
Enter the text to show for the hyperlink to the next period. By default, this is
Next %v% >>, where %v% is the name of the current view. For example, if you are in month view, this will be Next month >>. This hyperlink is shown when the keyword replacement next link is added to the page contents bodycopy. - Today link text
-
Enter the text to show for the hyperlink to the current day. By default, this is set to show Today. This hyperlink is shown when the keyword replacement link to jump to today’s date in the current view is added to the page contents bodycopy.
- Use no results bodycopy
-
When this is set to
Yes, the Page contents (no results) bodycopy will be created under the asset tree’s Calendar asset. The layout defined in this bodycopy is used when there are no events to display for the calendar’s current view. - Event click javascript
-
Specify whether or not to include javascript code to help users click on events spanning across multiple time slots:
clickchild()andsq_cal_redirect(). By default, this setting is enabled.
Settings for year view
This section allows you to change the title format for the year view and is shown in the figure below.
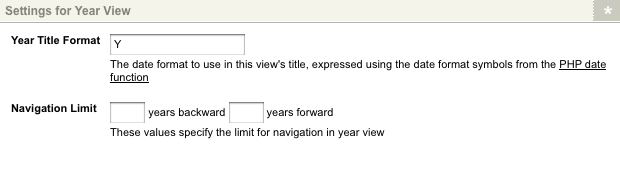
The fields available in this section are as follows:
- Year title format
-
This field uses the PHP date function to determine what values to show, and by default, it is set to
y. This setting means that it will show four digits for the year, for example, 2008. For more information on what values you can enter into the year title format field, click on the PHP date function hyperlink. If you enter your text, you will need to escape each character by adding\in front of it. - Navigation limit
-
Specify a period to limit navigation in the year view. For example, if it is 2008, and this field is set to
2years backward3years forward, users will only be able to navigate from 2006 to 2011.
Settings for month view
This section allows you to change the month view settings and is shown in the figure below.
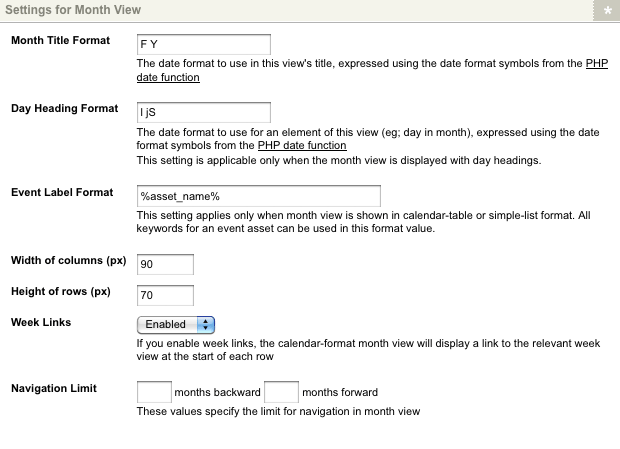
The fields available in this section are as follows:
- Month title format
-
Enter the text to show for the title of the month view. This field uses the PHP date function determines what values to show, and by default, it is set to
F Y. This setting means that it will show month in words plus the four digits for the year, such as November 2008. For more information on what values you can enter into this field, click on the PHP date function hyperlink. If you enter your text, you will need to escape each character by adding\in front of it. - Day heading format
-
Enter the text to show for the day heading for the month view. This heading only appears when you have selected list with day headings for the month view in the enables views section. This field uses the PHP date function to determine what values to show, and by default, it is set to
l jS. This setting will show the day in words, the day of the month, and the suffix for the date. For more information on what values you can enter into this field, click on the PHP date function hyperlink. If you enter your text, you will need to escape each character by adding\in front of it. - Event label format
-
Enter the text to show for each event in the month. By default, it is set to .
- Width of columns (px)
-
Enter the columns' width in pixels for the month view. By default, it is set to
90. - Height of rows (px)
-
Enter the rows' height in pixels for the month view. By default, it is set to
70. - Week links
-
Select whether or not to show the hyperlinks to the week view. These hyperlinks are shown at the start of each row. This is set to
enabledby default. - Navigation limit
-
Specify a period to limit navigation in the month view. For example, if it is June and this field is set to
3months backward1months forward, users will only be able to navigate from March to July.
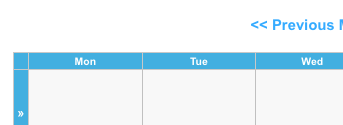
Settings for week view
This section allows you to change the settings for the week view and is shown in the figure below.
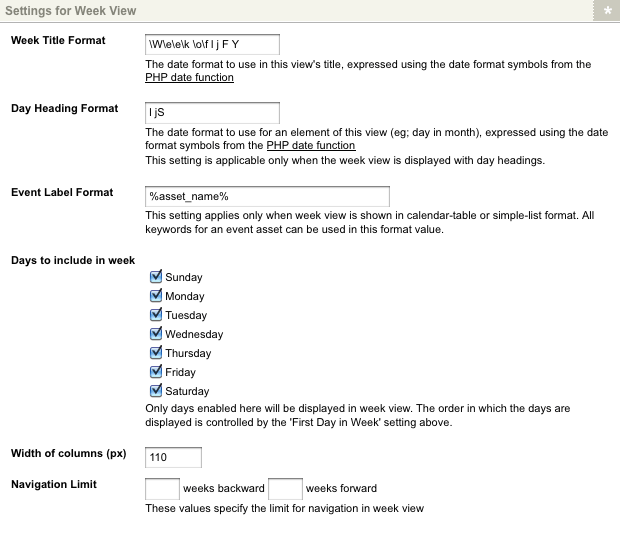
The fields available in this section are as follows:
- Week title format
-
Enter the text to show for the title of the week view. This field uses the PHP date function to determine what values to show. You need to escape each character of plaintext by adding
\in front of it. The default setting is:\W\e\e\k \o\f l j f y.This default will show a title comprised of the following elements:
-
"Week of"
-
[the day in words]
-
[the date of the day]
-
[the month in words]
-
[the year in four digits]
For example, Week of Monday 10 November 2008.
For more information on what values you can enter into this field, click on the PHP date function hyperlink. -
- Day heading format
-
Enter the text to show for the day heading for the week view. This heading only appears when you have selected list with day headings for the week view in the enables views section. This field uses the PHP date function to determine what values to show. You need to escape each character of plaintext by adding
\in front of it. The default setting is:l jS. This default will show a title comprised of:-
[the day in words]
-
[the date of the day]
-
[the suffix for the date]
For example, Monday, 10th.
For more information on what values you can enter into this field, click on the PHP date function hyperlink. -
- Event label format
-
Enter the text to show for each event in the week. By default, it is set to .
- Days to include in week
-
Select which days to include in the week view. By default, all days are shown. To hide a day, clear the box.
- Width of columns (px)
-
Enter the width of the columns in pixels for the week view. By default, it is set to
90. - Navigation limit
-
Specify a period to limit navigation in the week view. For example, if it is week
10and this field is set to1weeks backward, and1weeks forward, users will only be able to navigate from week9to week11.
Settings shared by week and day views
This section allows you to change the common settings for the week and day views and is shown in the figure below.
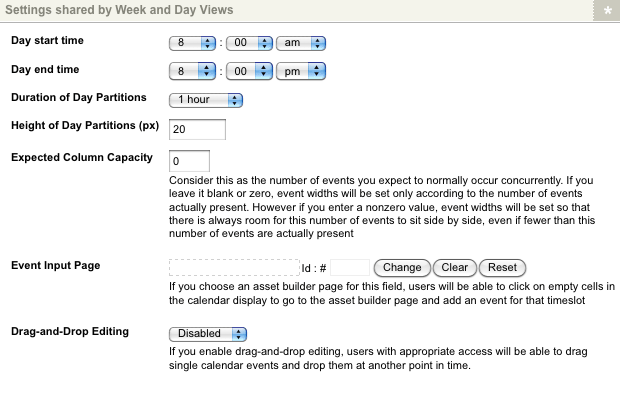
The fields available are as follows:
- Day start time
-
Enter the start time for each day in the view. By default, this field is set to
12:00 AM. - Day end time
-
Enter the end time for each day in the view. By default, this field is set to
12:00 AM. - Duration of day partitions
-
Select the time frame for each interval of the day. By default, this is set to
1hour, meaning that it will show in one-hour intervals, for example,9:00 AM,10:00 AM,11:00 AM. The options available include 10 mins, 15 mins, 20 mins, 30 mins, and 1 hour. - Height of day partitions (px)
-
Enter the height in pixels for each interval in a day. By default, this is set to
20. - Expected column capacity
-
Enter the number of events you expect to occur concurrently in one column. If you leave this blank or set it to zero, event widths will be set according to the present number. If you enter a value greater than zero, event widths are set so that there is always room for this number of events to sit side by side. This spacing is the same even if fewer events are present. For example, if you enter
5, the column will be wide enough to show five events side-by-side, even if there are only three events. - Event input page
-
If you select an asset builder page in this field, users will create events from the calendar. When they are in week or day view, they can click on a time slot. The asset builder page will appear where they can create an event for that time.
- Drag-and-drop editing
-
Select whether users can modify events on the calendar by using drag-and-drop. When it is enabled, and a user has at least write permission to an event and are in week or day view, they can drag the event to a new start time or a new day in the view. This setting will modify the details of the event asset.
Settings for day view
This section allows you to change the settings for the day view and is shown in the figure below.
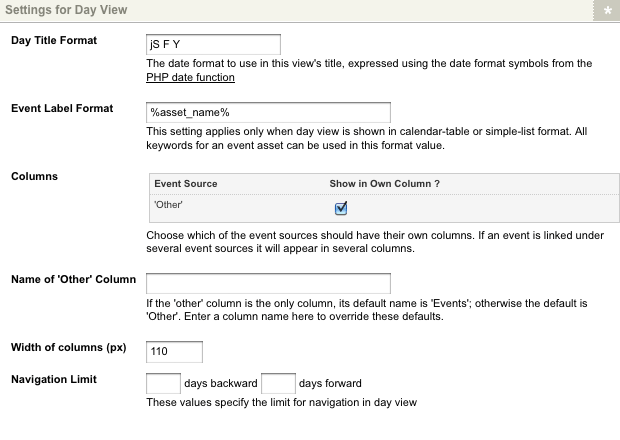
The fields available in this section are as follows:
- Day title format
-
Enter the text to show for the title of the day view. This field uses the PHP date function to determine what values to show, and by default, it is set to
jS F Y. This setting means that it will show the date of the day, the suffix for that date, the month in words, and the four digits for the year, for example, 10th November 2008. For more information on what values you can enter into this field, click on the PHP date function hyperlink. If you enter your text, you will need to escape each character by adding\in front of it. For example, in the default text, week of has been added with a\in front of each character. - Event label format
-
Enter the text to show for each event in the day. By default, this is set to .
- Columns
-
Select which events to show in their own column. By default, all events will be shown in one column. To show a group of events in a separate column:
-
Select Show in own column
-
Click Save
The title that will be used for the column is displayed in the Event source field. This title is the name of the root node selected for the events. Consider a scenario where you have a folder called training events, and you have selected to show these events in their own column. In this scenario, training events will appear as the title of the column. If an event has been linked under multiple root nodes, it will appear in more that one column. To display all events in one column, only select Show in own column for other.
-
- Name of 'other' column
-
Enter the name of the other column. If you are showing all events in one column, the default value is events. Otherwise, the default value is other.
- Width of columns (px)
-
Enter the width of the columns in pixels for the day view. By default, it is set to 110.
- Navigation limit
-
Specify a period to limit navigation in the day view. For example, if it is Wednesday, and you set this field to
4days backward1days forward users will only be able to navigate from Saturday to Thursday.
Look and feel
This section allows you to download the default CSS file for the Calendar asset to modify the styles.
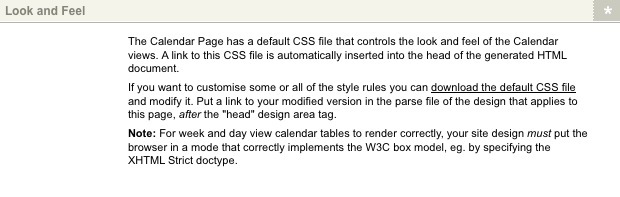
To use the default CSS file provided with the Calendar asset, you need to include the head design area within the parse file of the design applied to the asset. If you do not include this design area, the default CSS will not be used, and some of the features for the Calendar asset will not work. For example, the description pop-ups will not appear when you hover over an event.
If you want to customize the styles available in the default CSS, you need to download a copy of the file. Download a copy of the file by clicking on the Download the default CSS file hyperlink. Once you have made your changes, upload it as an associated file of the design applied to the asset. In the design’s parse file, add a link to the CSS after the head design area. Once you have done this, you can modify the styles within the CSS, and it will be used for the Calendar asset.
Read the Designs documentation for more information on adding the link, uploading an associated file, and editing a CSS file.
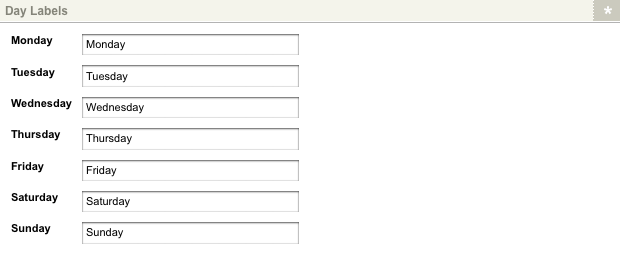
Day labels screen
The Day labels screen allows you to specify alternate labels for each day of the week, replacing the default names used on the Calendar asset.
Day labels
In this section, enter the alternate labels for the days of the week. These labels could be abbreviations of the days or the days written in a different language. The day labels section of the Day labels screen is shown in the figure below.
The following fields are available:
- Monday
-
Enter an alternate label for Monday. For example,
MonorLundi. By default, this field will read Monday. - Tuesday
-
Enter an alternate label for Tuesday. For example,
TueorMardi. By default, this field will readTuesday. - Wednesday
-
Enter an alternate label for
Wednesday. For example,WedorMercredi. By default, this field will readWednesday. - Thursday
-
Enter an alternate label for
Thursday. For example,ThuorJeudi. By default, this field will readTuesday. - Friday
-
Enter an alternate label for
Friday. For example,FriorVendredi. By default, this field will readFriday. - Saturday
-
Enter an alternate label for
Saturday. For example,SatorSamedi. By default, this field will readSaturday. - Sunday
-
Enter an alternate label for
Sunday. For example,SunorDimanche. By default, this field will readSunday.
Changes made to these fields will be reflected in the default week and month calendar views. The first letter of the new labels will also be used in the default year calendar view.
Page contents bodycopy
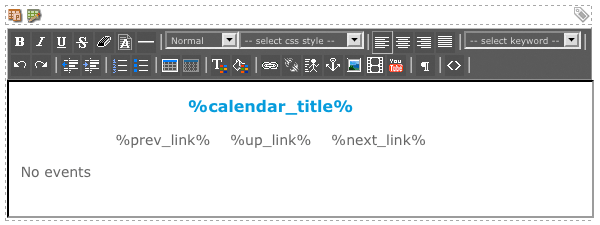
The page contents bodycopy asset is used to define the Calendar asset’s overall layout, including where to display the calendar, the heading for the page, and the Previous and Next hyperlinks.
In the following example, a heading, the previous and next hyperlink, and the calendar are shown. This design has been defined in the page contents bodycopy.
To change what information is shown:
-
Right-click on the page contents bodycopy in the asset tree and select Edit contents
-
Click on the
 icon
icon -
The WYSIWYG editor will appear. You can use keyword replacements and formatting to layout the information to show on the page. By default, the information shown in the figure below will appear in the WYSIWYG editor.
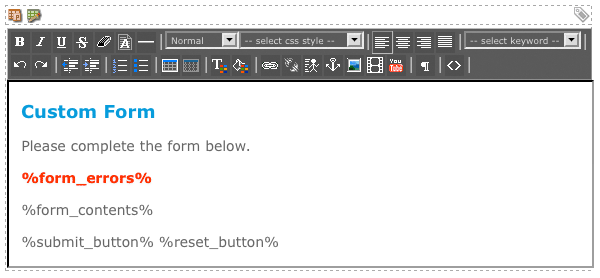
| If you do not include the keyword replacement calendar contents on the page contents bodycopy, the calendar will not appear. |
Keyword replacements on the page contents bodycopy
A list of keyword replacements is provided in the WYSIWYG editor toolbar on the Edit contents screen of the page contents bodycopy.
You can use these keyword replacements in conjunction with text, images, and links to layout what to show for the calendar.
Read the Keyword replacements documentation for more information about the standard keyword replacements. The other keyword replacements that are available include the following:
- Calendar contents
-
This will show the calendar. If you do not include this keyword replacement, the calendar will not appear on the page.
- Calendar Title
-
This will show the title of the view. You can change the wording of the title for each view on the Calendar asset’s Details screen.
- Up link
-
This will show a hyperlink to the next-broadest view. For example, if you are in month view, this hyperlink will be year view. You can change the wording of this hyperlink in the Up link text field on the Calendar asset’s Details screen.
- Previous link
-
This will show a hyperlink to the previous period. For example, if you are in month view, this will be << Previous month. You can change the wording of this hyperlink in the previous link text field on the Calendar asset’s Details screen.
- Next link
-
This will show a hyperlink to the next period. For example, if you are in month view, this will be Next month >>. You can change the wording of this hyperlink in the next link text field on the Calendar asset’s Details screen.
- Name of current user
-
This will show the name of the signed-in user.
- Link to jump to today’s date in the current view
-
This will show a hyperlink to today’s date for the current view. You can change the wording of this hyperlink in the today link text field on the Calendar asset’s Details screen.
Single event format bodycopy
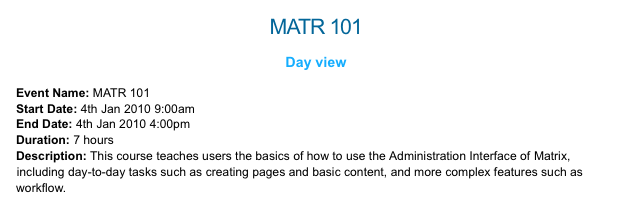
The single event format bodycopy is used to define the layout for a single calendar event and any single instances on the multi-date calendar event that appear in the calendar. For example, for the event shown in the figure below, the event’s name and its details are being shown. This layout has been defined in the single event format bodycopy.
To change what information is shown:
-
Right-click on the single event format bodycopy in the asset tree and select Edit contents
-
Click on the
icon -
The WYSIWYG editor will appear. You can use keyword replacements and formatting to layout the information to show on the page. By default, the keyword replacement will appear in the WYSIWYG editor.
Keyword replacements on the single event format bodycopy
A list of keyword replacements is provided in the WYSIWYG editor toolbar on the Edit contents screen of the single event bodycopy. You can use these keyword replacements in conjunction with text, images, and links to layout the calendar events.
Read the Keyword replacements documentation for more information about the standard keyword replacements. The other keyword replacements that are available include the following:
- Event start (ISO8601 format)
-
This will show the date and time that the event starts in ISO8601 format.
- Event end (ISO08601 format)
-
This will show the date and time that the event finishes in ISO8601 format.
- Description of the event
-
This will show the description of the event.
- Event start (readable date)
-
This will show the date the event starts, such as 10th Nov 2008.
- Event end (readable date)
-
This will show the date the event finishes, such as 10th Nov 2008.
- Event start (readable date/time)
-
This will show the date and time the event starts, such as 10th Nov 2008 10:00 AM.
- Event end (readable date/time)
-
This will show the date and time the event finished, such as 10th Nov 2008 11:00 AM.
- Event start (12 hour time)
-
This will show when the event starts, for example, 10:00 AM.
- Event end (12 hour time)
-
This will show when the event finishes, for example, 11:00 AM.
- Event start (24 hour time)
-
This will show when the event starts in 24 hour time, for example, '13:00`.
- Event end (24 hour time)
-
This will show when the event finished in 24 hour time, for example,
14:00. - Short start time (12 hour time, without minutes if on the hour)
-
This will show when the event starts without the minutes if it starts on the hour, for example, 10 AM. If the event does not start on the hour, it will show the full time, such as 10:30 AM.
- Short end time (12 hour time, without minutes if on the hour)
-
This will show the time that the event finishes without the minutes if it finishes on the hour, for example, 11 AM. If the event does not finish on the hour, it will show the full time, for example, 11:30 AM.
- Event start (iCalendar)
-
This will show the date and time that the event starts in iCalendar format.
- Event end (iCalendar)
-
This will show the date and time that the event finishes in iCalendar format.
- Event start/end summary
-
This will show the date and time that the event starts and finishes, for example, 10th Nov 2008 10:00 AM-11:00 AM.
- Event duration
-
This will show how long the event is scheduled.
- Link to edit this event in limbo (if the user has permission)
-
This will show a hyperlink to the simple edit interface to edit the event (if the signed-in user has write permission to the event).
- Link to delete this event altogether (if the user has permission)
-
If the signed-in user has write permissions to the event, this will show a hyperlink to allow the users to delete the event.
- Event start expressed with PHP date format, which follows the keyword’s last underscore character
-
This will show the date and time that the event starts in the PHP date format that you specify in the keyword replacement. For example, if you want to show the date as 10th November 2008, add the following keyword replacements.
- Event end expressed with PHP date format, which follows the keyword’s last underscore character
-
This will show the date and time that the event finishes in the PHP date format that you specify in the keyword replacement. For example, if you want to show the date as 10th November 2008, add the following keyword replacements.
Recurring event format bodycopy
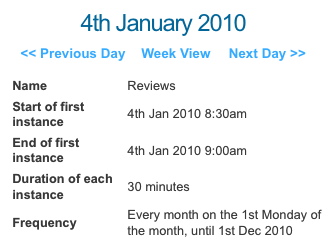
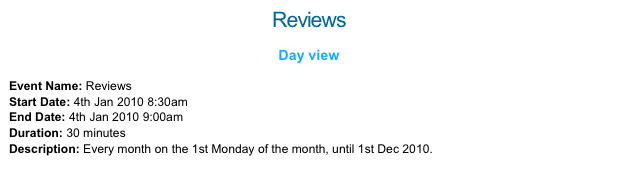
The recurring event format bodycopy is used to define the layout for a recurring calendar event and any recurring instances on the multi-date calendar event shown in the calendar. In the following example, the name of the event and its details are shown. This layout has been defined in the recurring event format bodycopy.
To change what information is shown:
-
Right-click on the recurring event format bodycopy in the asset tree
-
Select Edit contents
-
Click on the
icon -
The WYSIWYG editor will appear. ou can use keyword replacements and formatting to layout the information to show on the page. By default, the keyword replacement will appear in the WYSIWYG editor.
Keyword replacements on the recurring event format bodycopy
A list of keyword replacements is provided in the WYSIWYG editor toolbar on the Edit contents screen of the recurring event bodycopy. You can use these keyword replacements in conjunction with text, images, and links to layout the events for the calendar. For a full list of standard keyword replacements, refer to the concepts manual.
The other keyword replacements that are available include the following:
- Description of the event
-
This will show the description of the event.
- First instance end (ISO8601)
-
This will show the date and time when the first instance of the event finishes. For example, say you have created a recurring calendar event that starts on the 17th November 2008 at 9 AM and finishes at 5 PM, and repeats every Monday. This keyword replacement will show 2008-11-17 5:00 PM for all events.
- First instance start (ISO8601)
-
This will show the date and time when the first instance of the event starts. For example, say you have created a recurring calendar event that starts on the 17th November 2008 at 9 AM and finishes at 5 PM, and repeats every Monday. This keyword replacement will show 2008-11-17 9:00 AM for all events.
- Link to delete this event altogether (if the user has permission)
-
If the signed-in user has write permissions to the event, this will show a hyperlink to allow the users to delete the event.
- Link to edit this event in limbo (if the user has permission)
-
If the signed-in user has write permission to the event, this will show a hyperlink to the simple edit interface where they can edit the event.
- Event start/end summary
-
This will show the date and time that the first instance of the event starts and finishes, for example, 17th Nov 2008 9:00 AM-5:00 PM.
- Duration of each instance
-
This will show how long the event is scheduled.
- First instance end (readable date)
-
This will show the date the first instance of the event finishes. For example, say you have created a recurring calendar event that starts and ends on the 17th November and repeats every Monday. This keyword replacement will show 17th Nov 2008.
- First instance end (readable date/time)
-
This will show the date and time when the first instance of the event finishes. For example, say you have created a recurring calendar event that starts on the 17th November 2008 at 9 AM and finishes at 5 PM, and repeats every Monday. This keyword replacement will show 17th Nov 2008 5:00 PM for all events.
- First instance end expressed with PHP date format, which follows the last underscore character of the keyword
-
This will show the date and time when the first instance of the event finishes in the PHP date format that you specify in the keyword replacement. For example, say you have created a recurring calendar event that starts on the 17th November 2008 at 9 AM and finishes at 5 PM, and repeats every Monday. If you add the keywords, it will show 17th November 2008 for all events.
- First instance end (12 hour time)
-
This will show the time the first instance of the event finishes. For example, say you have created a recurring calendar event that starts on the 17th November 2008 at 9 AM and finishes at 5 PM, and repeats every Monday. The keyword replacement will show 5:00 PM for all events.
- First instance end (24 hour time)
-
This will show the time when the first instance of the event finishes in 24-hour time. For example, say you have created a recurring calendar event that starts on the 17th November 2008 at 9 AM and finishes at 5 PM, and repeats every Monday. The keyword replacement will show 17:00 for all events.
- First instance end (iCalendar)
-
This will show the date and time when the first instance of the event finishes in iCalendar format.
- Description of the event’s frequency
-
This will show a description of how often the event is scheduled. For example, say you have created a recurring calendar event that starts on the 17th November 2008 at 9 AM and finishes at 5 PM, and repeats every Monday. The keyword replacement will show every week on Monday until further notice.
- List of exceptions (iCalendar)
-
This will show any exceptions that may occur in iCalendar format.
- Event frequency (iCalendar)
-
This will show how frequent the event is scheduled in iCalendar format.
- Short end time (12 hour time, without minutes if on the hour)
-
This will show the time when the first instance of the event finishes without the minutes if it finishes on the hour. For example, say you have created a recurring calendar event that starts on the 17th November 2008 at 9 AM and finishes at 5 PM, and repeats every Monday. The keyword replacement will show 5 PM for all events. If the event does not finish on the hour, it will show the full time, for example, 5:30 PM.
- Short start time (12 hour time, without minutes if on the hour)
-
This will show the time when the first instance of the event starts without the minutes if it finishes on the hour. For example, say you have created a recurring calendar event that starts on the 17th November 2008 at 9 AM and finishes at 5 PM, and repeats every Monday. The keyword replacement will show 9 AM for all events. If the event does not start on the hour, it will show the full time, for example, 9:30 AM.
- First instance start (readable date)
-
This will show the date when the first instance of the event starts. For example, say you have created a recurring calendar event that starts and ends on the 17th November and repeats every Monday. This keyword replacement will show 17th Nov 2008.
- First instance start (readable date/time)
-
This will show the date and time when the first instance of the event starts. For example, say you have created a recurring calendar event that starts on the 17th November 2008 at 9 AM and finishes at 5 PM, and repeats every Monday. This keyword replacement will show 17th Nov 2008 9:00 AM for all events.
- The first instance start time expressed with PHP date format, which follows the last underscore character of the keyword
-
This will show the date and time when the first instance of the event starts in the PHP date format that you specify in the keyword replacement. For example, say you have created a recurring calendar event that starts on the 17th November 2008 at 9 AM and finishes at 5 PM, and repeats every Monday. If you add the keywords, it will show 17th November 2008 for all events.
- First instance start (12 hour time)
-
This will show the time when the first instance of the event starts. For example, say you have created a recurring calendar event that starts on the 17th November 2008 at 9 AM and finishes at 5 PM, and repeats every Monday. The keyword replacement will show 9:00 AM for all events.
- First instance start (24 hour time)
-
This will show the time when the first instance of the event starts in 24-hour time. For example, say you have created a recurring calendar event that starts on the 17th November 2008 at 9 AM and finishes at 5 PM, and repeats every Monday. The keyword replacement will show 9:00 for all events.
- First instance start (iCalendar)
-
This will show the date and time when the first instance of the event starts in iCalendar format.
- Event stop date expressed with PHP date format, which follows the last underscore character of the keyword
-
This will show the date and time when the event stops occurring in the PHP date format that you specify in the keyword replacement. For example, say you have created a recurring calendar event that starts on the 17th November 2008 and repeats every Monday until the 5th of January 2009. If you add the keywords, it will show 5th January 2009 for all events.
- Current instance end (ISO8601 format)
-
This will show the date and time when the current instance of the event finishes in ISO8601 format.
- Current instance end expressed with PHP date format, which follows the last underscore character of the keyword
-
This will show the date and time when the current instance of the event finishes in the PHP date format that you specify in the keyword replacement.
- Current instance start (ISO8601 format)
-
This will show the date and time when the current instance of the event starts in ISO8601 format.
- The current instance start expressed with PHP date format, which follows the last underscore character of the keyword
-
This will show the date and time when the current instance of the event starts in the PHP date format that you specify in the keyword replacement.
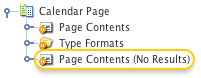
Page contents (no results)
The page contents (no results) bodycopy is used to define the Calendar asset’s layout when there are no events to show.
To change what information is being shown:
-
Right-click on the page contents (no results) bodycopy in the asset tree
-
Select Edit contents
-
Click on the
icon -
The WYSIWYG editor will appear. You can enter the information to show on the page. By default, the information shown in the figure below will appear in the WYSIWYG editor.