Adding triggers
The trigger asset is used to perform automated actions whenever certain events happen in your Content Management system.
Read About triggers for more information about trigger structure.
Adding a trigger
When you add a trigger, it will always get added under the trigger manager. If you set a category value for the trigger, it will be created under a folder with that category name.
If you create a trigger outside the trigger manager, it will automatically get a link created under the trigger manager.
Details screen
This screen allows you to configure the events, conditions, and actions of the trigger.
Details
- Status
-
Select whether to enable the trigger. If the trigger is not enabled, it will not fire when the event occurs. By default, when a trigger is created, it is disabled. Once you have set up the trigger, select enabled from the list provided.
- Blocking
-
Select whether the trigger should block the event (and any subsequent triggers) from running if it fails. For example, if the trigger fired when an asset’s status changed and failed to complete the actions, the trigger would stop the status from being changed and stop other triggers from running. The blocking setting applies to the following trigger events:
- Before asset deleted
-
With blocking enabled, asset trashing (asset linking to trash exclusively) is aborted if any trigger actions fail.
- After URLs updated
-
With blocking enabled, URL update is aborted if any trigger actions fail.
- Before status changed
-
With blocking enabled, asset status change is aborted if any trigger actions fail.
- Before permission updated
-
With blocking enabled, asset permission change is aborted if any trigger actions fail.
- Before asset content updated
-
With blocking enabled, asset content change on Bodycopy is aborted if any trigger actions fail.
Read the Trigger events documentation for more information about these events.
- Name
-
The name for the trigger.
- Description
-
A description of the trigger to explain what it does.
- Category
-
The category to which the trigger belongs. When you enter a category, a folder with this name is created in the asset tree under the trigger manager, and the trigger is stored under that folder. You can group multiple triggers in the same folder by using the same category name. To create multiple categories, separate each folder name with a
/. For example, Folder1/Folder2 will create two folders, with Folder2 a child of Folder1. To move triggers between folders, change the category name.
Events
This section allows you to select which types of Trigger events for which the trigger is listening.
When an event that is selected occurs, the trigger conditions will be checked to determine whether the actions specified need to be performed.
- IMPORTANT
-
If no events are selected, the trigger will fire when any event occurs within the system. This can affect the performance of your system, and at least one event should be selected. On the other hand, selecting too many events can also affect the performance of your system.
Conditions
This section allows you to add Trigger conditions to the trigger. These conditions will be checked when the event that is selected occurs. If the conditions are true, the actions specified will be performed.
To add a new condition to the trigger:
-
Select the condition from the list provided.
-
Click Save.
Additional fields will appear in the Conditions section. For example, the following figure shows the asset status condition in the Conditions section.
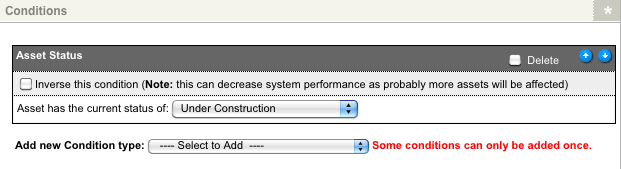
A condition can be inverted by selecting the Inverse this condition field. When a condition is inverted, the inverted logic of that condition will be used. For example, the asset status condition can be set to check if the status of an asset is live. This condition would match on all live assets. However, if this condition were inverted, it would match on assets that were not live, such as safe edit or archived assets.
Please note that as the inverted logic of a condition will likely be met in a large number of scenarios, as such, it is recommended to use this option sparingly as system performance may decrease.
To add multiple conditions to a trigger:
-
Select the new condition in the Add new condition type field.
-
Click Save.
| Some conditions can only be added once; hence they will not appear in the list if they have already been added. Read the Trigger conditions documentation for more information on each of the conditions. |
When you add a new condition, it will appear at the bottom of the Conditions section. If you add a condition but do not change its settings, it will automatically fail.
To disable an existing condition:
-
Select the Disable checkbox on the condition.
-
Click Save; the condition will be greyed out, indicating that it is currently disabled.
When a condition has been disabled, its settings will not be checked against when the trigger is fired.
To enable a disabled condition:
-
Clear the Disable field.
-
Click Save.
To delete an existing condition:
-
Select the Delete checkbox on the condition.
-
Click Save. The condition will be removed from the trigger and will need to be added again if you wish to reinstate it.
|
When an event is fired, the configured conditions will be checked in the order presented on the Details screen of the trigger. If these conditions pass, the set action(s) will be executed. Because of this, it is recommended that you list conditions based on their expected processing time. Conditions that work on checking exact values (such as a specific status or tree location) should be listed above conditions that check against a range of values, which generally take longer to process (such as all page type assets). This will allow the collection of assets being checked to be filtered down before going through some of the more lengthy condition checks. This will customarily lead to an overall performance improvement when checking the conditions of your trigger. |
Actions
This section allows you to add the Trigger actions that the trigger will perform. These actions will only be performed when the conditions specified in the section above are true.
To add a new action to the trigger:
-
Select the action from the list provided.
-
Click Save.
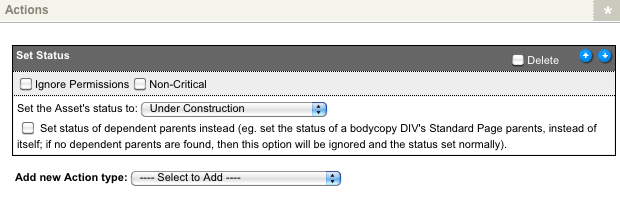
Additional fields will appear in the Actions section. For example, the following figure shows the set status action.
To add multiple actions to a trigger.
-
Select the new action in the Add new action type field.
-
Click Save.
The actions configured on a trigger are executed in the order they are presented on its Details screen. By default, if one of these actions cannot be run, the trigger will fail, and any subsequent actions will not be executed. You can, however, specify an action as non-critical; this will allow any remaining actions to continue to be run if another action fails. For example, in the previous figure, if the non-critical option was selected and the trigger was unable to set the asset’s status, the remaining actions configured on the trigger would still be performed. By default, the non-critical option is not selected on trigger actions.
- NOTE
-
Triggers within Matrix have individual transactions for each action configured. This means that, under most circumstances, any actions that have already been executed will not be rolled back if a trigger fails.
By default, the actions are performed as the user that caused the trigger to fire (that is, the currently signed-in user). This means that some actions may fail, as the user does not have permission to perform the action. For example, a backend user with write permission to an asset cannot change the asset’s status to live. If this user causes a trigger to fire that changes the status of an asset to live, it will not work. However, if the Ignore permissions option is selected, Matrix will ignore the access rights the user has been given and perform the action. Hence, the asset’s status will be changed to live even though the user cannot do this manually.
To disable an existing action:
-
Select the Disable checkbox on the action.
-
Click Save; the action will be greyed out, indicating that it is currently disabled.
When an action has been disabled, it will not be performed when the trigger is fired.
To enable a disabled action:
-
Clear the Disable field.
-
Click Save.
To delete an existing action:
-
Select the Delete checkbox on the action.
-
Click Save. The action will be removed from the trigger and will need to be added again if you wish to reinstate it.
Action on other assets
By default, triggers will be actioned on the broadcasting asset, that is, the asset that fired the configured event. The Action on other assets option allows you to modify these settings and specify an alternate set of assets on which the trigger will be actioned.
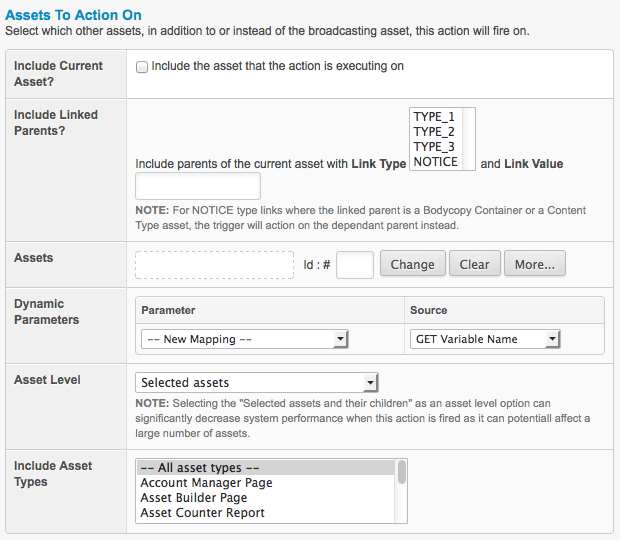
When this option is enabled, the Assets to action on section will be displayed, as shown in this figure:
The fields available in this section are as follows:
- Include current asset?
-
This field allows you to specify whether to include the asset that the action is executing on (the default).
- Include linked parents?
-
This field allows you to include parents of the current asset, matching a specified link type(s) and link value.
- Assets
-
This field allows you to select the individual assets on which the trigger will act.
- Dynamic parameters
-
This field allows you to configure a dynamic parameter to set the assets that the trigger will action on through a comma-separated list of asset ids.
- Asset level
-
This field allows you to specify the level of assets on which the trigger will act.
- The following options are available
-
-
Selected assets.
-
Selected assets and their dependents.
-
Selected assets and their children.
-
- Include asset types
-
This field allows you to specify the assets types on which the trigger will act. By default, this field will be set to All asset types.
Enabling triggers
Triggers are disabled by default when they are created. This means that the trigger will not fire, and associated actions will not be performed. In the asset tree, (disabled) will appear at the end of the name of the trigger asset.
To enable a trigger:
-
Go to the Details screen of the trigger asset.
-
Select Enabled in the status list.
-
Click Save.
Editing a trigger
Once you have created a trigger, go to the Details screen of the trigger asset to add or remove any events, conditions, or actions. Each trigger asset is located under the trigger manager in the asset tree.
Categorising triggers
By default, when a trigger is created, it will automatically be stored under the trigger manager in the asset tree. If you create several different triggers, this list can be long, and it can be difficult to find the trigger you want.
To make it easier to find triggers, you can categorize each trigger in the category field on the details screen.
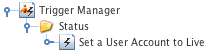
When you enter a category, a folder will be created under the trigger manager in the asset tree.
The name of the folder will be the name that is entered into the category field.
For example, if you enter status into the category field, a folder called status will be created, as shown in the figure to the right.
To create multiple categories, separate each category name with a /.
For example, Folder1/Folder2 will create two folders, with Folder2 a child of Folder1.
To move triggers between folders, change the category name.
Moving, linking and cloning triggers
Because triggers are shadow assets, they can’t be moved in the asset tree, like typical assets such as standard pages or folders. For example, you can’t drag and drop a trigger to move it into a different trigger folder (category). You need to edit the trigger’s category field to do this.
You are, however able to:
-
Link a trigger to be located under another asset outside of the trigger manager, for example, under a folder.
-
Clone a trigger.