Asset selections screen
The Asset selections screen allows you to configure the list of assets to select assets from the list and submit them. These selections can then be passed onto another asset in the system.
Asset selections
This section allows you to specify whether to show radio buttons, a drop-down list, or text boxes for each asset. By default, no asset selections will be added.
To add a new selection:
-
Enter a name into the Add new selection field
-
Click Save
Additional fields will appear in the Asset selections section:
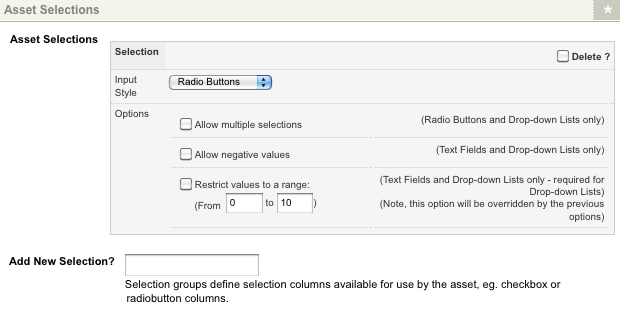
The fields that are available in the Asset selections section are as follows.
- Input style
-
Select the style of box to show on the asset listing page. You can select radio buttons, a drop-down list, or a text field.
- Options
-
The following options are available.
- Allow multiple selections
-
Select this option if you want to allow the user to select multiple assets. This option will only be used if the input style is either radio buttons or drop-down list.
- Allow negative values
-
Select this option to allow users to enter negative values for an asset. This value will only be used if the input style is either text fields or drop-down list.
- Restrict values to a range
-
Select this option to restrict the number of selections a user can make in the list. This value is only used if the input style is either text fields or drop-down list.
- Delete
-
To delete a selection:
-
Select Delete
-
Click Save
-
Showing the selection on the asset listing page
Once you have created an asset selection on the Asset selections screen, you need to tell the asset listing where to show it. This action is done through a keyword replacement on the default format bodycopy.
-
Right-click on the default format bodycopy in the asset tree
-
Select Edit contents
-
Add the keyword replacement for the asset selection in the WYSIWYG editor.
This keyword replacement will be in the format %<selection>_asset_selection%, where <selection> is the name of the asset selection that you created.
You can use the keyword %<selection>_asset_selection_input%, where <selection> is the name of your asset selection, which will print an HTML5 input field for the specified asset selection in a format similar to the following:
<input type="numeric" name="Purchase[16500]" value="0" size="3" min="5" max="33" step="1" id="Purchase_16500" class="sq-form-field" />
Asset targets
This section allows you to specify where to submit the selected assets on the asset listing page. By default, no targets will be added.
At least one target is required when using an asset selection. To add a new target:
-
Enter a name into the add new target field
-
Click Save.
Additional fields will appear in the asset targets section, as shown in the figure below.
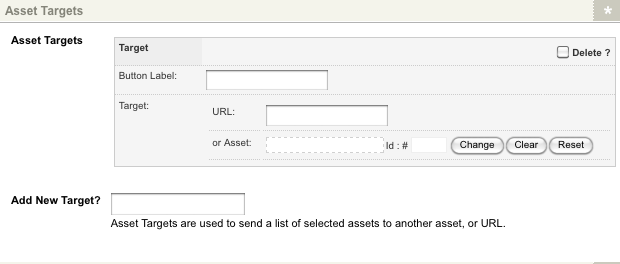
The fields that are available in the asset targets section are as follows.
- Button label
-
Enter the text you want to appear on the button on the asset listing page.
- Target
-
Enter one of the following options:
- URL
-
Enter the URL of the target page to which the selected asset list has to be submitted.
- Asset
-
Select the target asset that the selected asset list has to be submitted to, for example, the ecommerce cart.
- Delete
-
To delete a target:
-
Click the Delete box
-
Click Save
-
Showing the target on the asset listing page
Once you have created a target on the Asset selections screen, you need to tell the asset listing where to show it on the page. This action is done through a keyword replacement on the page contents bodycopy.
-
Right-click on the page contents bodycopy in the asset tree
-
Select Edit contents
-
Add the keyword replacement for the target in the WYSIWYG editor.
This keyword replacement will be similar to Asset Target button (test target). The test target is the name you entered into the add new target field when you created the target.