Step 3: Add includes and design customizations
|
Make the switch from legacy Standard Pages to Content Pages in Page Builder. Get A/B testing, Personalization, Layouts and Templates, ongoing feature improvements, and a great authoring experience compared with Standard Pages. Read the standard page and content page feature comparison page for more information. |
In step 3 of these instructions, you will add include files and make design customizations to display a header and footer on your site.
Add includes to your design
Includes are discrete assets that are pulled in to your Parse file. They allow the Parse file to remain uncluttered while providing design flexibility. Many asset types can be used as includes. Standard pages are used in this example.
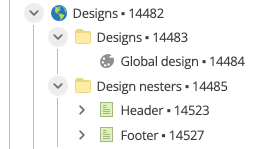
Includes are created as nested assets in the Design nesters folder. Nested assets are placed in the nest_content design area. The template code is held in Standard pages.
As an example, you can nest headers and footers:
-
Create a standard page in the folder. Call it Header.
-
Edit the content of the Header asset as a code component:
-
Click Save.
-
Hover over the component content section, and select the settings icon. This image shows the content settings cog icon.
-
Select Code as the component type.
-
Select Advanced settings.
-
Select Raw (no formatting) from the Presentation tag drop down.
-
Click Save.
-
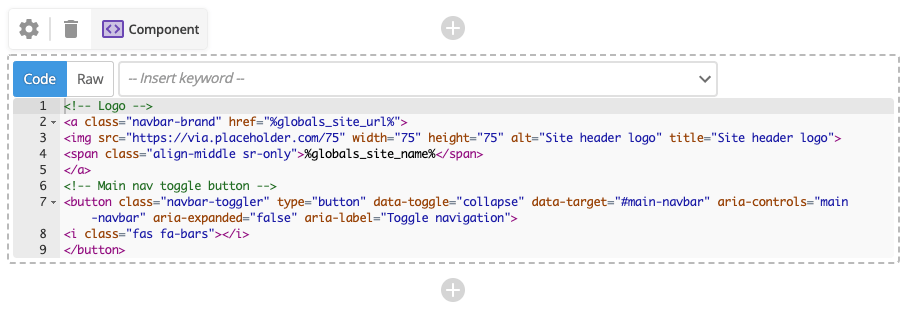
Add the following code to the component content. This code provides support for the logo image and a navigator button.
<!-- Logo --> <a class="navbar-brand" href="%globals_site_url%"> <img src="https://via.placeholder.com/75" width="75" height="75" alt="Site header logo" title="Site header logo"> <span class="align-middle sr-only">%globals_site_name%</span> </a> <!-- Main nav toggle button --> <button class="navbar-toggler" type="button" data-toggle="collapse" data-target="#main-navbar" aria-controls="main-navbar" aria-expanded="false" aria-label="Toggle navigation"> <i class="fas fa-bars"></i> </button> -
Click Save.
-
-
Locate the
<div class="container" id="navbar-toggle">line in the parse file. -
Add the following design area to the Parse file after this line:
<MySource_AREA id_name="header" design_area="nest_content" /> -
Create a standard page in the folder. Call it Footer.
-
Change the component type and the formatting type, as described for Header.
-
Add the following code to the component content:
<footer class="pt-4 my-md-5 pt-md-5 border-top">
<div class="container">
<div class="row">
<div class="col-12 col-md">
<img class="mb-2" src="%globals_site_metadata_site-logo_asset_url%" alt="" width="24" height="24">
<small class="d-block mb-3 text-muted">© 2022</small>
</div>
<div class="col-6 col-md">
<h5>About</h5>
</div>
</div>
</div>
</footer>
The %globals_site_metadata_site-logo_asset_url%keyword is used later to load a site logo dynamically. -
Check that the resulting structure looks similar to this example:
-
Add the following design area to the Parse file as the last entry in the
<body>section:<MySource_AREA id_name="footer" design_area="nest_content" />
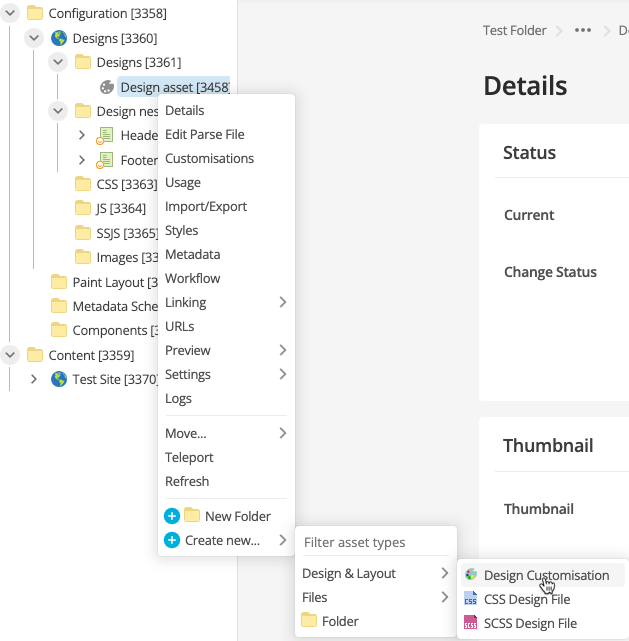
Add design customizations
To enable the nested assets' functionality, you must configure your design to use the includes within the nest content areas. To do this, you need to add a design customization.
To create a landing page design customization:
-
Right-click on the Design asset you created and create a new child Design customization asset.
-
Give it the name
DESIGN - Landing Page, whereDESIGNis the friendly name of your site. Keeping this friendly name within the customization name is very useful later when you are identifying which designs are applied to a given asset. -
Select Create.
-
Right-click on the design customization asset and select Details.
-
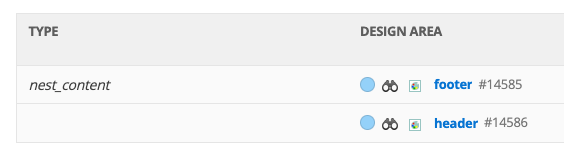
Click Save and then select the Customize? checkboxes for both nest_content entries in the Design areas section.
-
Click Save.
Assign the nested asset to the nested content area
When you have created your design customization assets, you need to assign them to the nested content area.
To assign your nested assets to the nested content area:
-
Right-click on the DESIGN - Landing Page customization.
-
Select Details.
-
Scroll down to the Design areas section, where you will see the nested asset customizations that you enabled in the last step.
-
Select Header. This will take you to the nested contents Details screen for the Header customization.
-
Click Save and scroll down to the Link section.
-
Add the Header asset ID to the NESTING THE CONTENTS OF field.
-
Click Save.
-
Go back to the Details screen of the DESIGN - Landing Page.
-
Go back down to the Design areas section.
-
Select Footer to load the Footer details screen.
-
Click Save and scroll down to the Link section.
-
Add the Footer asset ID to the NESTING THE CONTENTS OF field.
-
Click Save.
Apply the design customization to the site
Now you must assign your design customization to the site asset.
-
Right-click on the site asset and select .
-
Click Save.
-
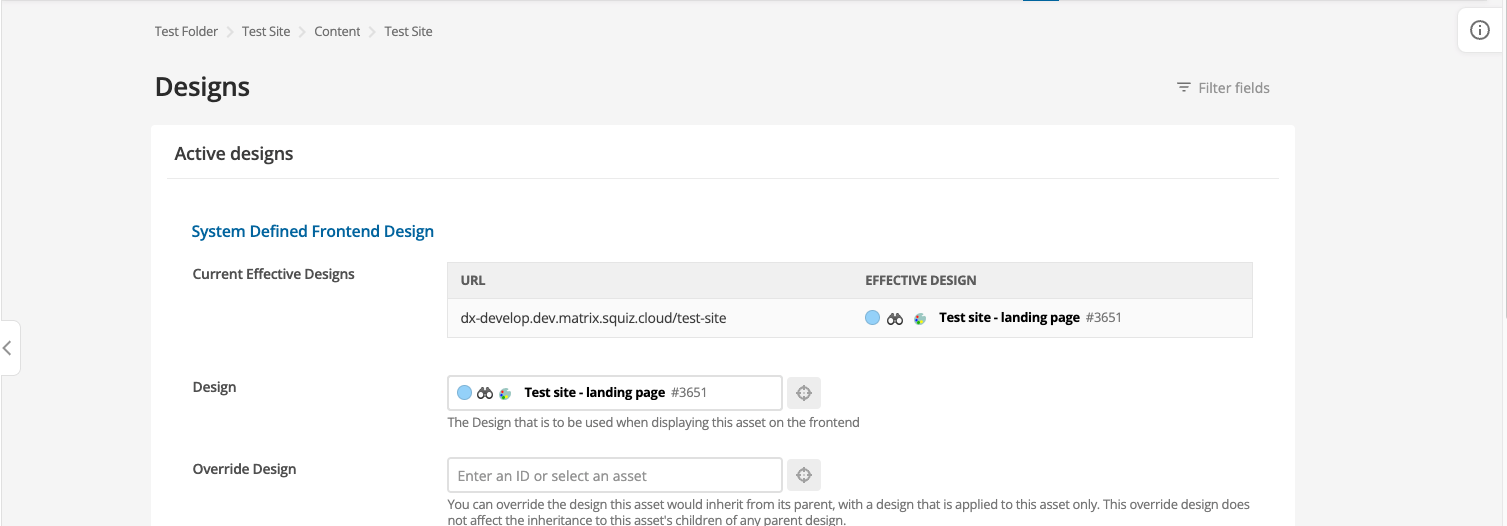
Scroll to the System Defined Frontend Design section.
-
Add the asset ID of the DESIGN - Landing Page customization asset to the Design field.
-
Click Save.
Test your changes
You can test your site in a browser in two ways:
-
Copy the URL from the site asset and paste it into a browser.
OR
-
Right-click on the site asset and select .

You will see your site in the new tab.

The footer image is not loaded yet but will be loaded dynamically in a later step of this guide.
In the next part of this guide, you will style your site.