Structured file import tool
The structured file import tool allows you to build assets and create content and files in Squiz Content Management based on the hierarchy of the headings in an imported HTML file.
| This tool is not available for Squiz Content Management systems hosted in Squiz Experience Cloud environments. |
The tool is available from in the toolbar.
The HTML import file
The HTML import file determines the structure of assets to create on import based on the HTML headings displayed. A heading one, for example, would be a top-level asset under a site, while a heading two would be created as a child asset of the heading one.
In the following example, the HTML import file contains one heading one, two heading twos, and one heading three. When this file is imported, it will create four assets, one for each heading in the document, as shown in the figure:
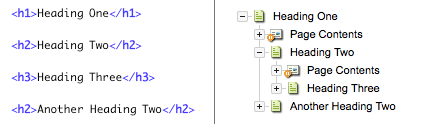
Alternatively, you can choose to import your entire HTML import file under just one asset or only create new assets for certain heading types. These options are configurable on the Structured file import tool screen.
When creating your HTML file, ensure that headings are nested correctly in the appropriate order. Ensure that your heading titles are no longer than 255 characters long and only contain standard ASCII characters.
| The asset name limit within Squiz Content Management is 255 characters. |
Any content, such as text or images, added under a heading in the HTML file will be added as the content of that standard page asset when imported into Squiz Content Management. For example, in the next figure, the text and image referenced under the heading one will be created as the content of the Heading 1 asset.
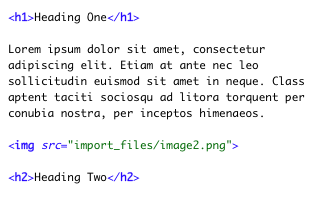
Any images referenced within the HTML file must be stored in a separate folder within the same directory to be correctly imported within Squiz Content Management.
This folder should be titled <html_filename>_files.
For example, in the previous figure, our HTML file is titled import.HTML, and our files folder is titled import_files.
|
Structured file import tool screen
The Structured file import tool screen allows you to configure and import your HTML import file’s content and files. The structured file import tool and HTML tidying options sections of the Structured file import tool screen are shown in the figure:
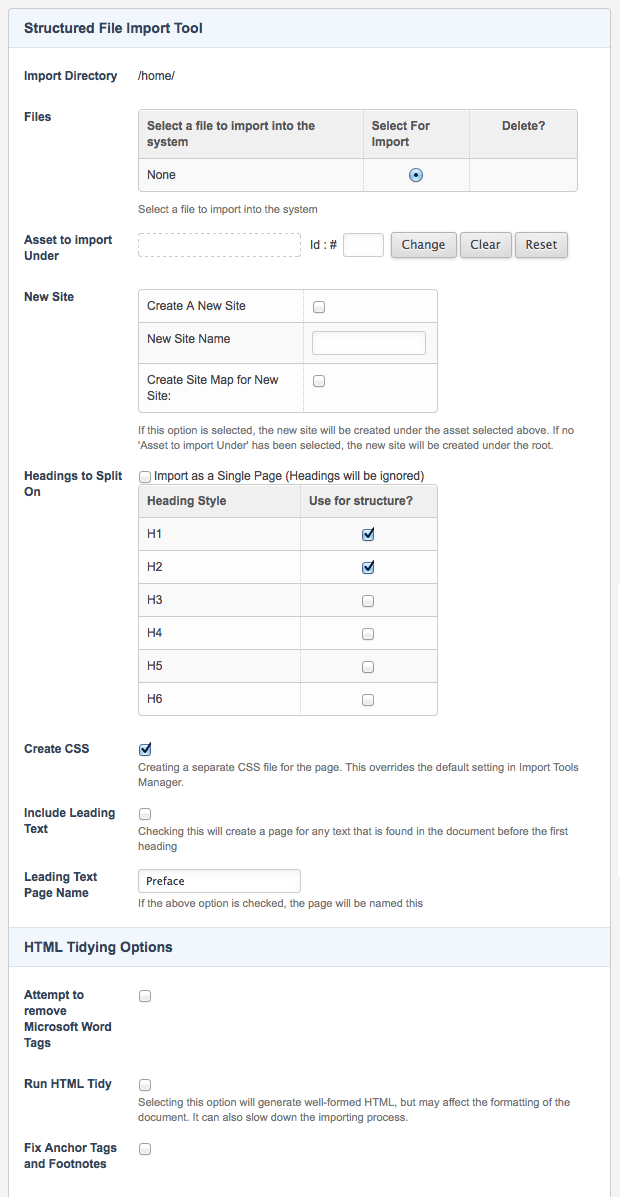
The fields available are as follows:
- Import directory
-
This is the directory on the server where the import files are stored. If this is not correct, you can change it on the import tools manager.
- Files
-
Listed in this section are the import files that have been stored in the import directory on the server. To import a file:
-
Click the Select for import box. You can only import one file at a time.
-
To delete the file from the server:
-
Click the Delete box.
-
Click Save.
- Asset to import under
-
Select where in the asset tree you want to create the new assets. For example, if you want to create them under a folder, select the folder asset in this field.
- New site
-
This section allows you to create a new site using the structure that has been created in the document. The site will be created under the asset selected in the Asset to import under field. Otherwise, it will be created as a top-level asset.
- Create a new site
-
Select this box to create a new site.
- New site name
-
Enter a name for the new site.
- Create site map for new site
-
Select this box to create a site map for the new site.
- Heading to split on
-
Select for which heading to create new assets. For example, if you select H1, H2, and H3, a new asset will be created for each heading style in the import file. Select
Import as a single pageif you want to import the document into one asset. - Create CSS
-
Select whether to create a CSS file for the file that is imported.
- Include leading text
-
If you select this, a new asset will be created for any content at the beginning of your document without a heading.
- Leading text name
-
If you have selected include leading text, enter a name for the asset that will be created. By default, this is set to preface.
- Attempt to remove Microsoft word tags
-
Select whether to remove any Microsoft word tags from the content of the assets that will be created. This feature is useful if your import file has been created from a Microsoft Word document.
- Run HTML tidy
-
Select whether to run HTML tidy when the assets are created. If you select this option, it may slow down the importing process depending on the import file’s size.
- Fix anchor tags and footnotes
-
Select this option to fix any anchor tags and footnotes that may be contained within the content of the import file. Anchors will be converted into hyperlinks and will point to the new asset.
Using the structured file import tool
To import a file:
-
Click .
-
In the files section, choose the Select for import option for the file that you want to import.
-
In the Asset to import under field, choose where you want to create the new assets.
-
In the Headings to split on field, choose the headings for which to create an asset.
-
Select Import.
The content in the file will be imported, and the assets will be created in the asset tree.