Step 4: Add CSS and JavaScript
In step 4 of these instructions, you will build on your new site by adding a Cascading Style Sheet (CSS) for styling and JavaScript (JS) for extra functionality. You will do the following in this part of the tutorial:
-
Include an external library to get CSS and JS to manage cookie consent.
-
Include an external library - Bootstrap 5 - to add global layout styles.
-
Include a global style sheet for your own styles.
| There are more advanced options for managing CSS and JS, such as using a Git File Bridge^. |
Get the file contents from a third-party library
You will now add some cookie consent functionality, which comes from a third-party library. Using a third-party cookie consent library helps with GDPR cookie law compliance.
You could use any third-party library feature you want to; however, this example is an easy way to demonstrate both JavaScript and CSS in action.
-
Go to the third-party Github repo https://github.com/orestbida/cookieconsent.
-
Download the
LICENCEfile from the root folder. Keep this Licence file with any copies of the code. -
Download the
cookieconsent.cssandcookieconsent.jsfiles from the dist folder.
Need help with downloading content from Github?
-
Locate the file in Github.
-
Right-click on the file.
-
Select Save as.
-
Enter the name and location you want to save your file to.
-
Select Save.
Create the assets needed to add CSS and JavaScript
CSS and JavaScript elements must be included in different parts of the HTML in the parse file. They need a basic underlying structure:
-
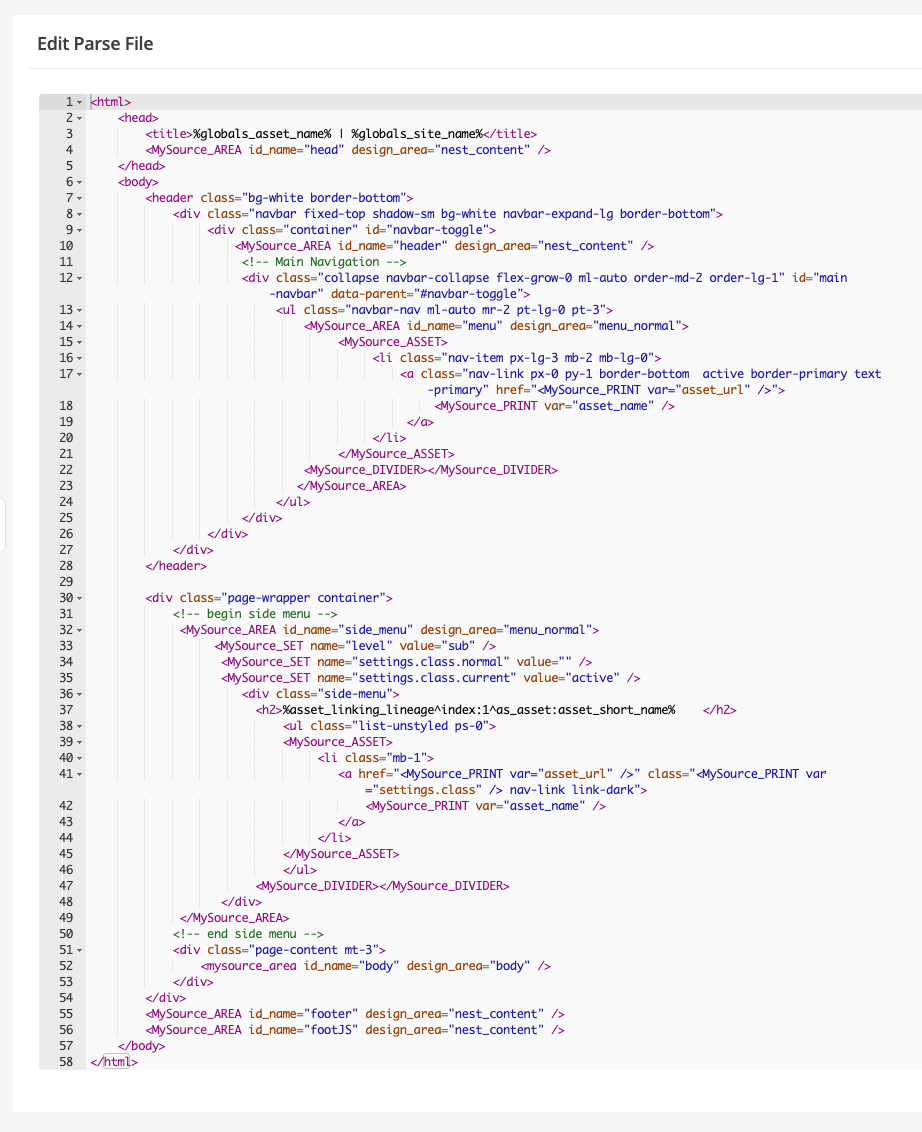
Add more lines to the parse file:
-
This code will be used to include CSS and any JS tags that need to be included at the beginning of the Parse file. Add the following nest content design area before the first closing
</head>tag:<MySource_AREA id_name="head" design_area="nest_content" />This line is used for JS to be loaded at the end of the Parse file. It allows for content to be loaded and rendered before JS is loaded.
-
Add the following nest content design area just before the closing
</body>tag:<MySource_AREA id_name="footJS" design_area="nest_content" />
-
-
Create two includes called Head JS and Foot JS in the Design nesters folder.
Nest these into the design customization as described in Assign the nested asset to the nested content area. -
Make the Head and FootJS includes into code components:
-
Right-click on the asset and select Contents.
-
Click Save and mouse over the entry area. A menu will appear containing a cog icon.
-
Select
 and then select Code from the Component type field.
 -
Select Advanced settings.
-
Select the down arrow on the Presentation tag field.
-
Select Raw.
-
Click Save.
-
-
Create two CSS files^ in the CSS folder. Call one CSS file
styles.css, and the second onecookieconsent.css. To create a CSS file.-
Right-click on the CSS folder.
-
Select .
-
Enter the name of the CSS file in the Title field.
-
Select Create.
-
-
Create a JavaScript file in the JS folder. Name the JavaScript file
cookieconsent.js.-
Right-click on the JS folder.
-
Select .
-
Enter the name
cookieconsent.jsinto the Title field. -
Select Create.
-
-
Create a text file asset in the JS folder, call it LICENSE, and add the contents of the LICENSE file downloaded from the third-party Github repo.
-
Add the following code to the Head include asset in the Design nesters folder:
<link href="https://cdn.jsdelivr.net/npm/bootstrap@5.1.3/dist/css/bootstrap.min.css" rel="stylesheet" integrity="sha384-1BmE4kWBq78iYhFldvKuhfTAU6auU8tT94WrHftjDbrCEXSU1oBoqyl2QvZ6jIW3" crossorigin="anonymous"> (1)
<script src="https://cdn.jsdelivr.net/npm/bootstrap@5.1.3/dist/js/bootstrap.bundle.min.js" integrity="sha384-ka7Sk0Gln4gmtz2MlQnikT1wXgYsOg+OMhuP+IlRH9sENBO0LRn5q+8nbTov4+1p" crossorigin="anonymous"></script> (2)
<link href="./?a=XXXX" rel="stylesheet" > (3)
<link href="./?a=YYYY" rel="stylesheet" > (4)
1 Loads the third-party Bootstrap 5 CSS from a Content Delivery Network (CDN). 2 Loads the JS libraries, which are served from a CDN instead of from Squiz Content Management. 3 In the third line, replace XXXX with the asset ID of the cookieconsent.cssfile you created earlier.4 In the fourth line, replace YYYY with the asset ID of the styles.cssfile you created earlier. This code will load the custom global stylesheetstyles.css, which is served from Squiz Content Management. -
Upload the JavaScript code from the
cookieconsent.jsfile you downloaded earlier:-
Right-click on the cookieconsent.js file asset.
-
Select Details.
-
Scroll down to the Details section.
-
Select Choose file.
-
Select the
cookieconsent.jsfile you downloaded earlier. -
Click Save.
Alternatively, you can copy and paste the contents of the downloaded file into the Edit File screen of the cookieconsent.js asset. -
-
Add some code to the CSS files in your CSS folder:
-
For
cookieconsent.css, add the contents of thecookieconsent.cssfile you downloaded earlier. -
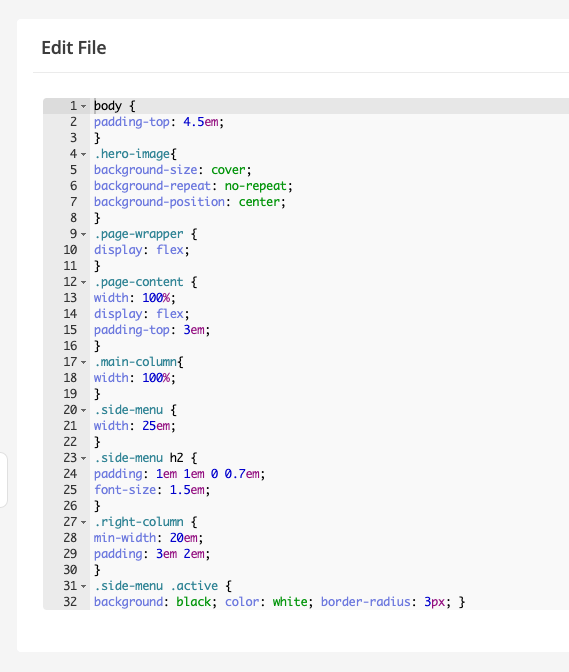
For styles.css:
-
Right-click on styles.css and click Save File.
-
Add the following code to the file:
body { padding-top: 4.5em; } .hero-image{ background-size: cover; background-repeat: no-repeat; background-position: center; } .page-wrapper { display: flex; } .page-content { width: 100%; display: flex; padding-top: 3em; } .main-column{ width: 100%; } .side-menu { width: 25em; } .side-menu h2 { padding: 1em 1em 0 0.7em; font-size: 1.5em; } .right-column { min-width: 20em; padding: 3em 2em; } .side-menu .active { background: black; color: white; border-radius: 3px; } -
-
Click Save.
-
Add JavaScript to start the cookie consent plugin
Now that you have added the libraries, you need to add some code to start up the cookie consent plugin on page load.
Add the following two code snippets to the Foot JS include:
-
The first script tag loads the cookie-consent.js file. Replace XXXX with the asset ID of your
cookie-consent.jsfile.<script src="./?a=XXXXX"></script> -
The second script tag will run a JavaScript function to load the Cookie Consent plugin. It contains a JavaScript object with initialization information. You can read more about the cookie consent plugin from the GitHub repository.
<script>
var cookieconsent = initCookieConsent();
cookieconsent.run({
autorun: true,
current_lang: 'en',
autoclear_cookies: true,
page_scripts: true,
languages: {
en: {
consent_modal: {
title: 'I use cookies',
description: 'Hi, this website uses essential cookies to ensure its proper operation and tracking cookies to understand how you interact with it. The latter will be set only upon approval. <a aria-label="Cookie policy" class="cc-link" href="#">Read more</a>',
primary_btn: {
text: 'Accept',
role: 'accept_all'              // 'accept_selected' or 'accept_all'
},
secondary_btn: {
text: 'Settings',
role: 'settings'                // 'settings' or 'accept_necessary'
}
},
settings_modal: {
title: 'Cookie preferences',
save_settings_btn: 'Save settings',
accept_all_btn: 'Accept all',
reject_all_btn: 'Reject all',       // optional, [v.2.5.0 +]
cookie_table_headers: [
{col1: 'Name'},
{col2: 'Domain'},
{col3: 'Expiration'},
{col4: 'Description'},
{col5: 'Type'}
],
blocks: [
{
title: 'Cookie usage',
description: 'I use cookies to ensure the basic functionalities of the website and to enhance your online experience. You can choose for each category to opt-in/out whenever you want.'
}, {
title: 'Strictly necessary cookies',
description: 'These cookies are essential for the proper functioning of my website. Without these cookies, the website would not work properly.',
toggle: {
value: 'necessary',
enabled: true,
readonly: true
}
}, {
title: 'Analytics cookies',
description: 'These cookies collect information about how you use the website, which pages you visited and which links you clicked on. All of the data is anonymized and cannot be used to identify you.',
toggle: {
value: 'analytics',
enabled: false,
readonly: false
},
cookie_table: [
{
col1: '^_ga',
col2: 'google.com',
col3: '2 years',
col4: 'description ...',
col5: 'Permanent cookie',
is_regex: true
},
{
col1: '_gid',
col2: 'google.com',
col3: '1 day',
col4: 'description ...',
col5: 'Permanent cookie'
}
]
}, {
title: 'More information',
description: 'For any queries in relation to my policy on cookies and your choices, please <a class="cc-link" href="#yourwebsite">contact me</a>.',
}
]
}
}
}
});
</script>
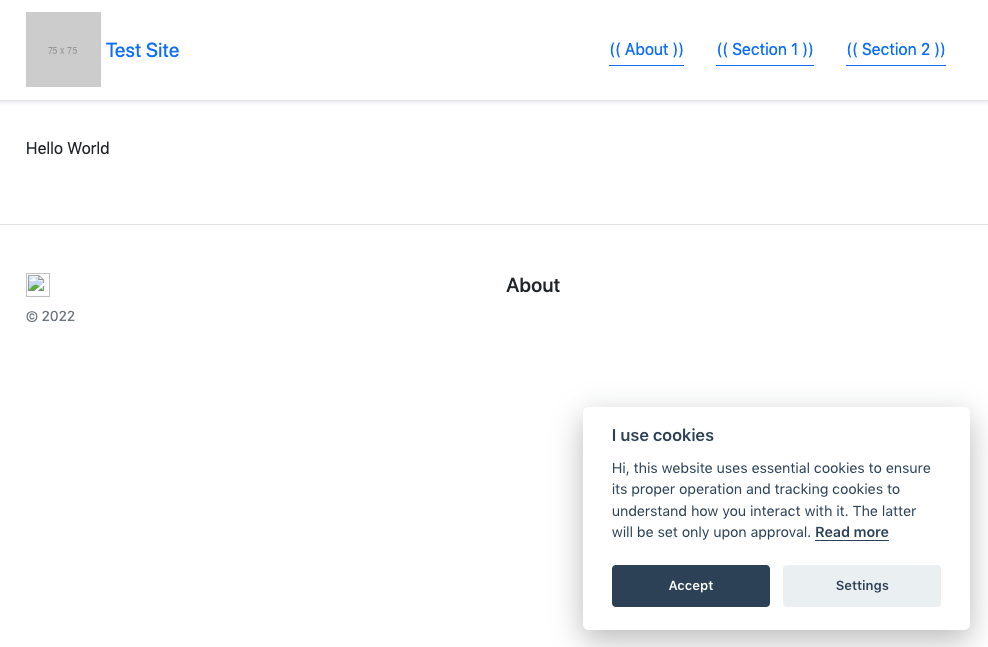
Test your site
You can test your site in a browser in two ways:
-
Copy the URL from the site asset and paste it into a browser.
OR
-
Right-click on the site asset and select .

You will see your site in the new tab.
Your site will now look like this: