Configure workflow schemas
The Details screen of the workflow schema allows you to set up your workflow schema by adding workflow streams, steps, and conditions. Read the Asset details screen documentation for more information about the status section.
The Usage screen shows the assets in the system that are using the workflow schema.
For more information on steps and conditions, refer to the workflow steps and conditions chapter in this manual.
Details screen
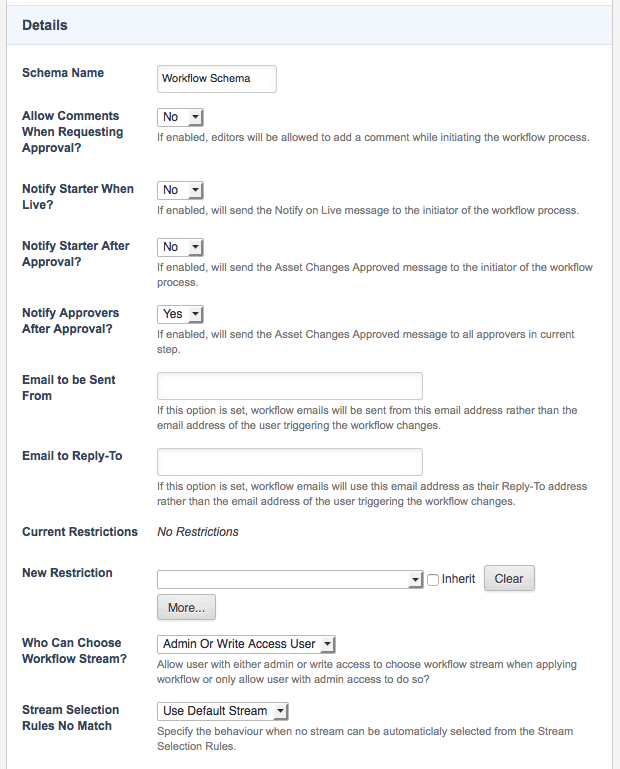
- Schema name
-
By default, the name entered into the Schema name field during the workflow schema creation will appear here. You can change the name of the workflow schema by clicking into the Schema name field and entering the new name for the workflow schema.
- Allow comments when requesting approval?
-
Select whether to allow your site editors to leave a comment as part of the workflow initiation, as shown:
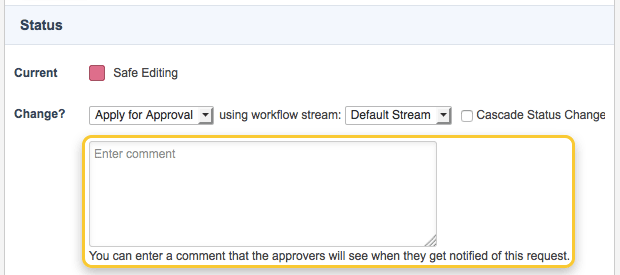 Figure 2. The comment field when initiating the workflow approval process
The comment provided by the workflow initiation can then be included in the custom message configuration for the workflow invitation message using the
%log_message%keyword replacement. For more information on the invite notification, refer to the Custom messages documentation in Matrix Manuals.By default, this field is disabled.
- Notify starter when live?
-
Send an email notification to the user who initiated the workflow process when it completes, and the asset is live. The email format is configured in the Notify on live message settings on the Custom messages screen of the workflow schema.
- Notify starter after approval?
-
Send an email notification to the user who initiated the workflow process when the changes are approved. Similarly, enabling the Notify approvers after approval? field will send an email notification to the users who have approved asset changes. You can configure the format of this email in the asset changes approved settings on the Custom messages screen of the workflow schema.
For more information on these email notifications, refer to the Custom messages documentation in Matrix Manuals.
- Email to be sent from
-
Allows you to override the default from email address value in workflow notification emails. The address entered into this field will be used as the from value on workflow emails sent by Matrix, rather than the user’s address.
- Email to reply to
-
Allows you to override the default reply-to email address value in workflow notification emails. The address entered into this field will be used as the reply-to value on workflow emails sent by Matrix, rather than the user’s address.
- The current restrictions
-
Lists the restrictions set on the workflow schema. Restrictions allow you to regulate the asset types to which the schema will be applied. For example, you can restrict the workflow schema to only apply to standard page assets. By default, no restrictions are in this field. To create a restriction, select the asset type in the new restriction field and click Save.
- Who can choose workflow stream?
-
Specify who can choose the workflow stream; only users with admin access or users with either admin or write access. By default, this field will be set to Admin or write access user.
- Stream selection rules no match
-
Allows you to specify the schema behavior when no streams can be automatically selected from the stream selection rules. You can choose to either use the default stream on the workflow schema or make all streams available to the user for selection. For more information, refer to the Stream selection rules section in this chapter.
Workflow streams
This section allows you to add and edit the workflow streams associated with the workflow schema.
Adding multiple workflow streams to a workflow schema allows you to define multiple sets of steps, which users with admin permissions can select when starting workflow.
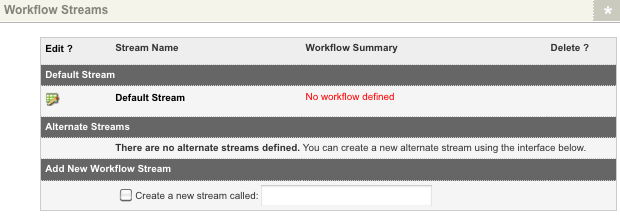
Default stream
This section displays the default stream for the workflow schema. This stream is used when no alternate streams have been created or when no alternate streams are selected when workflow is started. Please note that the default stream cannot be moved or deleted.
To add and edit the steps of the default stream, click on the  edit icon.
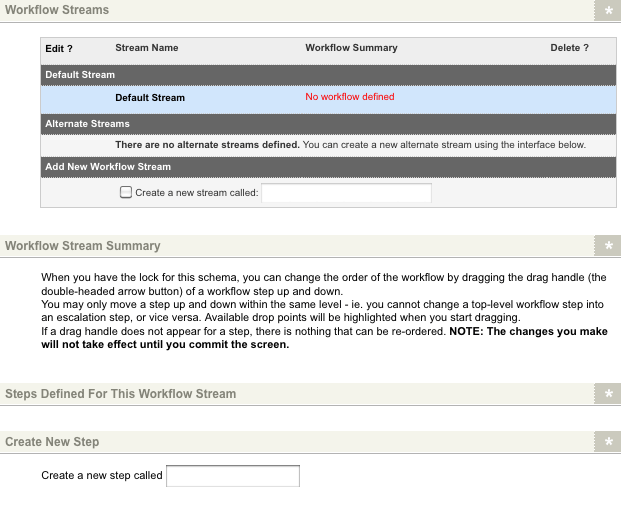
Alternate streams
This section displays any configured alternate streams for the workflow schema. Use these streams to create alternate sets of steps for use when starting workflow. For example, you can choose to create alternate streams to differentiate between significant, insignificant, and urgent changes. These streams are configurable to require different approval methods, appropriate for the significance of the changes. By default, no alternate streams will be displayed in this section, as shown in the figure above. Because there are no alternate streams, the default stream will always be used when workflow is started on an asset.
When alternate streams are available, they will be listed in the section, as shown in the figure below. For more information on how to create alternate streams, refer to the Add new workflow stream section in this chapter.
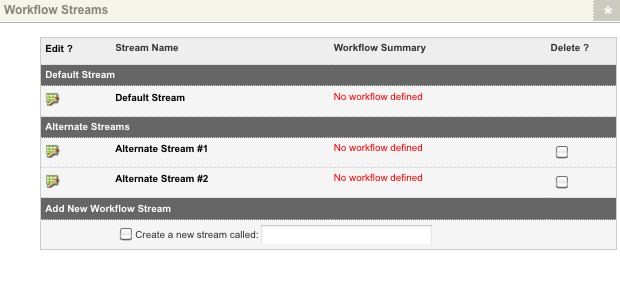
To add and edit the steps of any alternate streams, click on the edit icon.
Add new workflow stream
This section allows you to create alternate streams for the workflow schema.
To create a new stream:
-
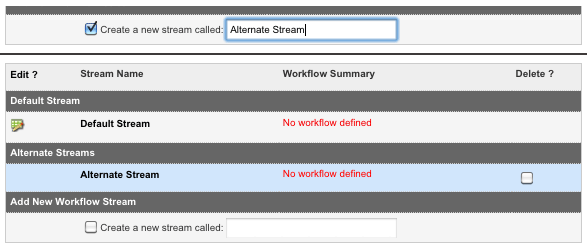
Select the Create a new stream called: checkbox and enter a name for the stream.
-
Click Save.
This stream will now appear in the Alternate streams section, as shown:
Stream selection rules
This section allows you to create rules, enabling workflow streams to be automatically selected based on a keyword replacement value.
If the stream selection rules evaluate as true for the configured rule logic, the stream will be available to select when initiating workflow.
If the rule(s) evaluate as false, the stream will not be available.
The selector will not be displayed if only one stream is available for a user after all rules have been evaluated. The remaining stream will be automatically set.
If no streams can be selected automatically from the stream selection rules, the schema will use the default stream or let the user pick from any of the streams.
This outcome will depend on the option set in the Stream selection rules no match field on the Details screen of the schema.
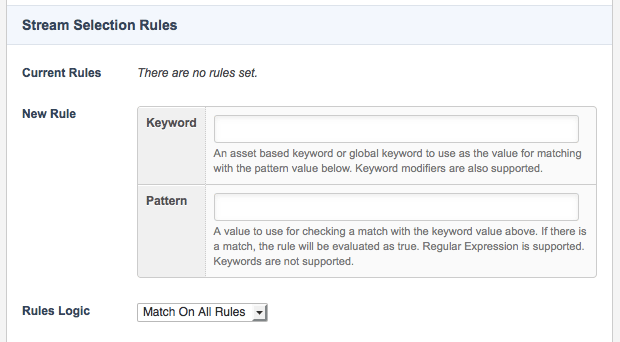
The fields available are as follows:
- Current rules
-
This field will display the stream selection rules configured on the current workflow stream. You can modify an existing rule by changing the keyword and pattern fields' set values and selecting Save. To delete a rule, select the Delete checkbox for the rule you want to delete and click Save.
- New rules
-
Allows you to create new stream selection rules for your workflow stream.
The following values must be specified to create a new rule:
- Keyword
-
An asset-based or global keyword replacement to use as the value for matching against the pattern value. Keyword modifiers are supported in this field.
- Pattern
-
The value to check against the keyword value. If this value matches, the rule will be evaluated as
true. Regular expression values are supported in this field.
- Rules logic
-
Select the logic for matching rules on the workflow stream. You can specify to either match on all rules or match on any rule. The Match on all rules option is selected by default, meaning that all rules must match before the stream is selected.
Workflow stream summary
This section allows you to reorder the steps of a workflow stream by dragging and dropping them into a new location. If you have not added any steps, no information will appear in this section.
Once you have added steps, they will appear in this section, as shown:

To reorder a step:
-
Click and hold the double-headed arrow icon on the left-hand side of the step. When you move the mouse, the step will follow.
-
Place the cursor on the gray line where you want to put the step. For example, in the figure shown, the cursor has been placed on the gray line above Step 1.
 Figure 9. An example of reordering the workflow steps
 -
Drop the step in the new location.
-
Click Save.
You have reordered the steps in the workflow stream.
Steps defined for this workflow stream
This section shows the steps added to the workflow stream. It allows you to edit and delete each step. If you have not added any steps, no information will appear in this section. When you add a step, it will appear in this section of the screen, as shown:

Each blue heading represents a step in the workflow stream. For example, in the figure, two blue headings are visible: Content authors and System administrators. This appearance means that two steps have been added to this workflow stream.
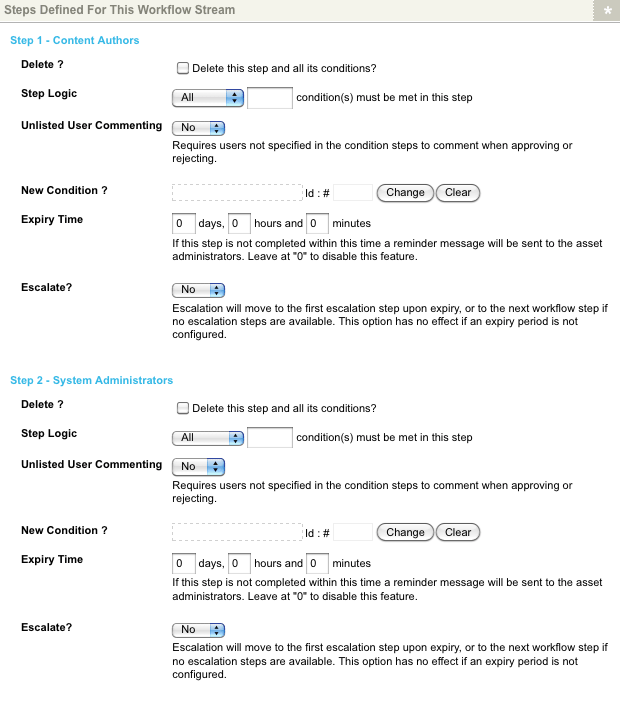
For each step listed, the following fields are available:
- Delete?
-
To delete a step and all of its condition, select this checkbox and click Save. This action removes the step from the workflow stream.
- Step logic
-
This field allows you to define the logic applied to this step’s conditions. You can choose from the following options:
-
All: Select this option to specify that all conditions listed must be met before this step is complete.
-
At least: Select this option and enter the number of steps that need to be met in the text field. This condition means that at least that number of steps need to be met before the step is complete.
-
- Conditions
-
This section lists the conditions added to this step in the workflow stream. It allows you to edit and delete each condition. If you have not added any conditions, no information will appear in this section. When you add a condition, it will appear in this section of the screen, as shown in the figure below.
 Figure 12. A condition on a workflow step
For each field listed, the following fields are available:
- Condition name
-
This field shows the user, user group, or role that is part of that condition. For example, in the figure above, the Content authors user group is part of the first condition in the list.
- Notify when live
-
Select this checkbox to notify the user, user group, or role when the asset goes live. This notification is sent as an email.
- Require comment
-
Select this checkbox if you want to require the user, user group, or role to enter a comment when they are approving or rejecting a step in the approval process.
- Group logic
-
This field will only appear if you have selected a user group or role for the condition, as shown in the figure above.
You can choose from the following options:
-
At least: Select this option and enter the number of users from the user group or role that need to approve the changes.
-
All: Select this option to specify that all users in the user group or role need to approve the changes.
-
- Delete?
-
To delete a condition from the step, select this checkbox and click Save.
- New condition?
-
This field allows you to add a new condition to a step. Select either the user, user group or role and click Save. If you want the system administrators to be part of a condition, you can select the system administrators folder under the system management folder instead of a user group.
- New dynamic condition?
-
This field allows you to dynamically configure an approval condition within the workflow process, based on a keyword replacement value evaluated against the asset. This ability means that instead of hardcoding the user or user group to be the approver in a condition, you can dynamically set the condition based on a specified keyword. This dynamic condition also allows you to pass multiple user IDs, as either an array of IDs, an array of IDs as strings, or in json format:
({ "user1": "100", "user2": "200"}). Dynamic conditions are evaluated and set when the workflow on the asset is initiated. - Unlisted user commenting
-
Select whether a user not specified in a condition needs to enter a comment when they reject a step in the workflow stream. This option will only apply to system administrators or the root user since they can reject a step while not part of the approval process.
- Expiry time
-
This field allows you to set an expiry time for the step. If this step is not completed within this time frame, a reminder message will be sent to the asset administrators. Enter the number of days, hours, and minutes into the fields provided. By default, these values are
0, meaning that the expiry time is disabled. If escalation is part of this step, this time frame will apply to this process. For more information on escalation, refer to the Workflow escalation chapter in this manual. - Escalate?
-
This field allows you to specify whether to use escalation as part of this step. This option means that if this step is not approved within a configured time, it will escalate to either a sub-step or the next step in the workflow stream. For this to work, the expiry time needs to be filled out. For more information on escalation, refer to the workflow escalation chapter in this manual.
Usage screen
The Usage screen shows the assets in the system that are using the workflow schema. The schema usage section of the Usage screen is shown in the figure below.

By default, if the workflow schema has not been used on any assets, no information will appear on the screen, as shown in the figure above. Once the workflow schema has been used on an asset, the information shown in the figure below will appear.
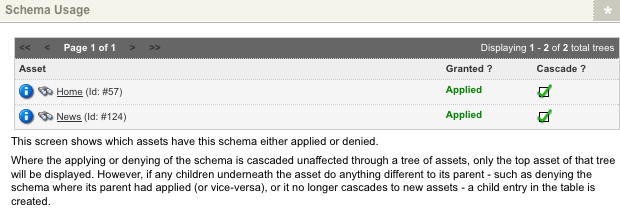
The top-level assets where the workflow schema has been applied are shown. Child assets will be displayed in the table when their schema options differ from their parents. You can select the name of an asset to go to its Settings screen.
Applying a workflow schema
Once you have built a workflow schema, you can apply it to various assets within your system. You can apply a workflow schema to an asset on the Schemas screen. For more information on this screen, refer to the Schemas manual.
Once a schema has been applied, the approval process is enforced. For more information on the approval process, refer to the The approval process chapter in this manual.
Changing and deleting a workflow schema
Once a workflow schema has been applied to an asset, it can still be changed. For example, you can add, remove, or change steps and conditions for any schema’s workflow streams.
If, however, an asset is currently going through the approval process, its workflow process will not change until it has been completed.
Consider a situation where a workflow schema has been applied to the home page, and the approval process started. If a change is then made to that specific workflow stream, it will not affect the home page until the changes have been approved or rejected. This process also applies if the workflow schema or the workflow stream is deleted. Any asset currently going through the approval process will not be affected until it has been approved or rejected.