Asset syncing tool
| Access to this feature can be provided by a root user through the Feature toggles section of the System configuration screen. |
Asset syncing lets system administrators deploy changes to a set of assets repeatedly between Squiz Content Management systems. This method of synchronizing assets is best suited for creating template and component changes on a development environment and releasing these changes to a production site in a batch.
The tool is available from in the toolbar.
How does asset syncing differ from import/export?
Asset syncing works differently from the Tools features Import assets from XML and Export assets to XML.
With the Import and Export tools, you can only upload an exported set of changes once. This single-export method can be helpful when you need to import a large section of your site to another Squiz Content Management instance before developing areas of the site between instances.
Asset syncing takes a different approach to asset import and export. The process lets you repeatedly update changes for a section of your site based on a set of filtering options set when exporting the asset structure. This repeatable sync method lets you first build and test a design or template on one Squiz Content Management instance. You can then use the asset syncing feature to move the assets to another instance.
Considerations when creating an outbound sync file
Asset syncing is ideal for synchronizing templates and designs between Squiz Content Management systems. It is generally not suitable for synchronizing content between systems, such as:
-
Large content migrations
-
High-volume asset syncs
-
Many binary files such as images or PDFs.
The import file size is limited to 50 MB on Squiz Content Management SaaS systems. You can increase this limit on dedicated Squiz Content Management systems by adjusting the upload file size in your global settings. The larger the import file, the longer the import process takes. Take these considerations into account when planning your syncing deployments.
If you find that your asset syncing file size exceeds the file size limits, you can try breaking up the export into multiple sync files. This method also has the advantage of making the import process faster, which will help you iterate and test changes between your systems more efficiently.
The asset syncing interface
You access the asset syncing feature from in the toolbar.
The asset syncing interface has three main sections:
- Inbound sync
-
This section lets you import a set of assets exported using the Outbound sync feature.
- Outbound sync
-
This section lets you export an XML archive file containing a set of assets.
- Sync activity
-
This section shows you the last 20 inbound and outbound sync activities made by all users across the system.
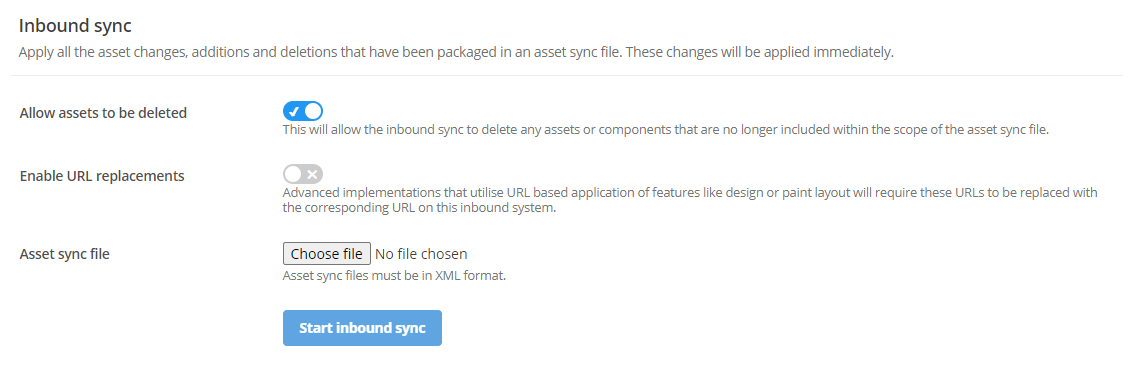
Inbound sync
The inbound sync feature lets you import an entire section of the asset tree from another Squiz Content Management instance and then keep this section synchronized with all future changes.
To provide the most reliable import experience, the outbound and inbound Squiz Content Management instances must both be running the same software version.
Import a new asset tree structure using inbound sync
When you import assets for the first time into the destination system, the imported structure is placed into a temp folder so you can verify the import was successful.
Once you have verified that the import was successful, move the assets from this temporary location to the desired location in the asset tree.
-
Select Choose file to select the Outbound sync XML file you exported from the target system.
-
Leave the Allow assets to be deleted option enabled.
-
Select Upload to begin the synchronization process.
-
Refresh the screen to show the status during the import process.
-
Open the .
-
Review the imported files and check that the import contains all the assets.
-
Once you are satisfied with the imported assets, move the imported asset tree structure to the required location in the asset tree.
| If you run an inbound sync with Allow assets to be deleted disabled, assets deleted on the source system are not removed on the target system (including components on pages). Unless testing or debugging, this setting should be left enabled. |
Update an existing asset tree structure using inbound sync
After you have created a matching set of assets in both Squiz Content Management systems, any changes you make in the source system can then be applied to the destination system using subsequent inbound sync actions. Once the changes are complete and you have generated an updated asset sync file from the source system, you are ready to perform an inbound sync on the destination system.
| If an asset sync file does not include all the dependencies required by the selected assets, the inbound sync may appear that it has been completed. The logs will indicate any relevant errors about the missing assets. |
To update an existing asset tree structure:
-
Select Choose file to select the asset sync file you exported from the target system.
-
Select Upload to begin the synchronization process.
-
Refresh the screen to show the status during the import process.
-
Open the for any new orphaned assets added by the latest inbound sync process.
-
Move any new orphaned assets into the correct position in the asset tree structure.
| You must use the Enable URL replacements option to map your URLs if an asset sync file includes assets configured to use URL-specific or user-specific paint layouts and designs. |
Sync URL and user-specific paint layouts by enabling URL replacements
For Squiz Content Management implementations that use URL-specific and user-specific paint layouts and design features, you must configure asset sync at import time to map the source and target URLs.
If you do not do this, Matrix can not sync your URL-specific or user-specific settings.
|
If syncing a site for the first time, run a full inbound sync without using the URL replacements first, then apply the local production URLs. After completing the full inbound sync, check that any URL-specific and user-specific paint layout and design settings are correctly synced across. |
To map URLs when running an inbound sync:
-
Toggle the Enable URL replacements option.
-
Enter a source URL to replace (for example,
dev-www.example.com) and a target URL to overwrite it with (for examplewww.example.com). -
If you have multiple URL patterns to replace, you can add additional sets of source and target URLs to replace.
-
Start the inbound sync.
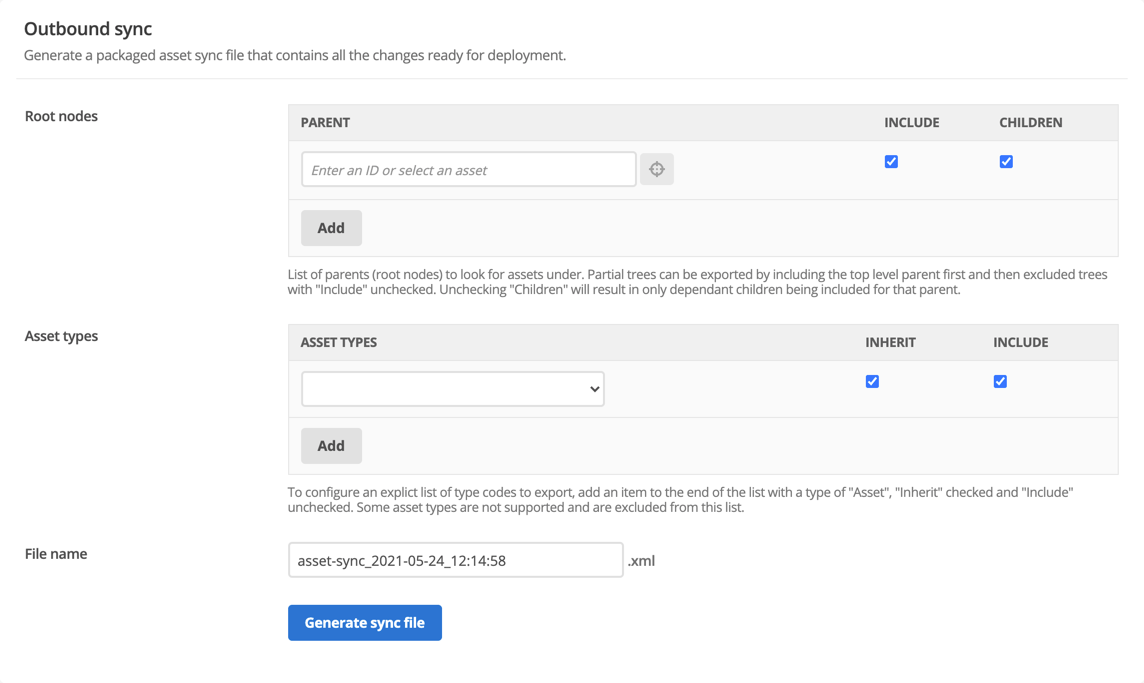
Outbound sync
The outbound sync feature generates an asset sync file which is a packaged set of assets. The selected assets are chosen based on the root node and asset types you select.
Once generated, you can download the asset sync file, which you can use to perform an Inbound sync and have these assets replicated or updated on your destination system.
Root nodes
The root nodes section lets you select which section of the asset tree you want to include in your Asset sync file. You can choose whether to include a single top-level asset tree structure or a selection of multiple asset tree sections.
How to sync a complete asset tree structure
-
Choose the top-level asset tree folder containing your template, component, or site.
-
Click the Include and Children checkboxes.
-
Select Generate sync file.
-
Refresh the screen to show an updated progress status.
| Large outbound sync files may take a long time to generate. |
How to sync an asset tree structure with some parts excluded
Sometimes you may want to sync an asset tree structure that excludes a specific part of the structure.
-
Choose the top-level asset tree folder containing your template, component, or site.
-
Select the Include checkbox against the top-level asset tree folder.
-
Choose the child asset structure that you want to exclude from the import.
-
Leave the Include checkbox cleared against the child asset structure.
-
Select Generate sync file.
-
Refresh the screen to show an updated progress status.
| Large outbound sync files may take a long time to generate. |
How to sync multiple asset tree structures
Sometimes you may want to sync multiple trees of assets in one outbound sync. For example, you might want multiple content templates that share dependencies between templates.
If you decide, for example, to include multiple content templates that reference each other, the references between the templates will be maintained.
| The outbound sync file is assembled based on the listed order of each inclusion or exclusion condition. |
-
Add each top-level asset tree structure you want to include in the outbound sync file as a separate root node parent.
-
For the first entry, select from the following options:
-
Select Include and Children if you want all assets beneath the selected node to be added to the outbound sync file.
-
Select Include if you only want the top-level asset to be added to the outbound sync file.
-
Select Childrenif you only want that asset’s children to be included.
-
-
Continue adding entries, being careful not to contradict the previous entries.
-
-
Optionally select any asset types you want to filter on, based on the filtering guidelines in the Asset types section.
-
Select Generate sync file.
Asset types
The asset types selector lets you choose which user-creatable asset types to include in the outbound sync file.
The following asset types are not available as conditions in an outbound sync file:
- Dependent and shadow assets
-
These assets need an associated parent asset and can not be synchronized independently.
- Assets that may contain sensitive data
-
These assets include the following types:
-
User account type assets
-
Form submission asset
-
Order asset
-
Ecommerce order asset.
-
Filtering options
The Asset type filtering options let you choose how asset types and their children are handled in an outbound sync file.
| Inherit | Include | Result |
|---|---|---|
✔️ |
✔️ |
Include all assets of that type along with its children asset types. |
✔️ |
✘ |
Exclude exporting all assets of that type and its children types. |
✘ |
✔️ |
Include all assets of that type, but do not export any children asset types. |
✘ |
✘ |
Exclude this specific asset type. |
| Inbound sync errors can occur if you include a set of assets but exclude their dependencies (such as linked designs or metadata schemas). |
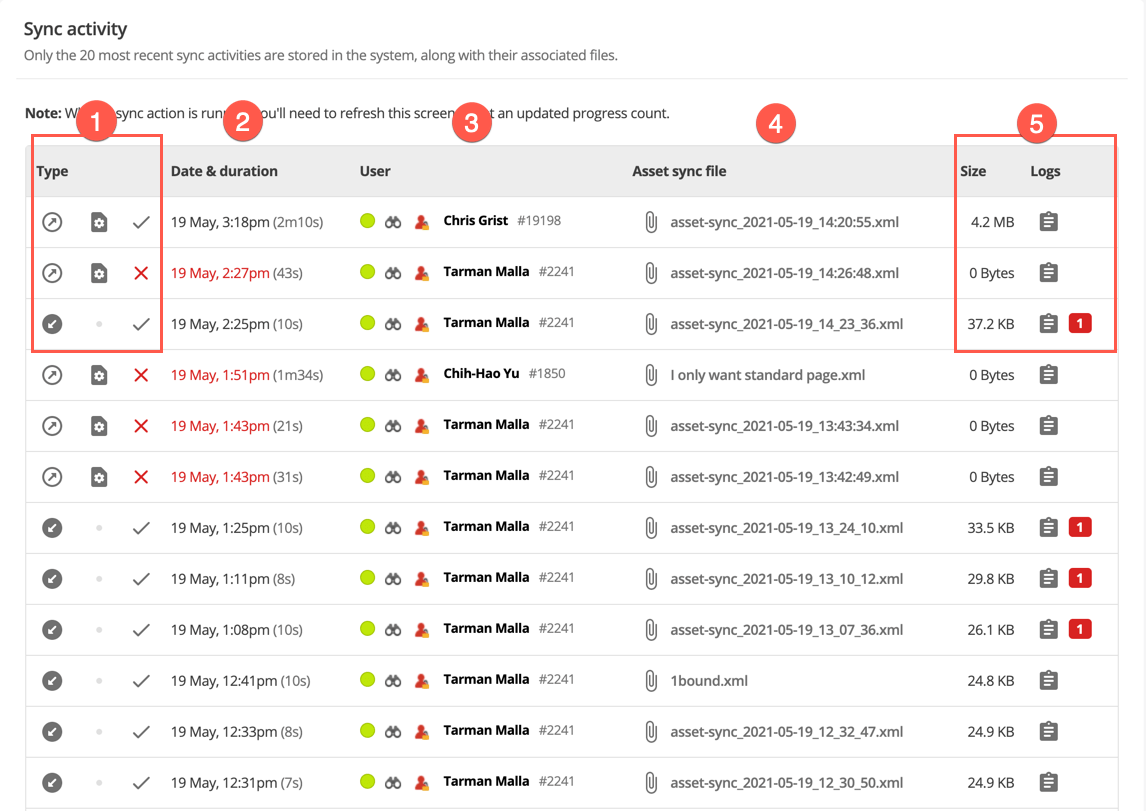
Sync activity
This section shows you the last 20 inbound and outbound sync activities made by all users across the system. As more sync activities run, older entries are removed from the sync activity table. You can also stop a running asset sync process from this section.
| You can only run one inbound or outbound sync process at a time. Each sync process must complete before you can start another. |
-
Displays the sync type and its status. This section also displays the percentage complete for currently running sync tasks and indicates whether the task was completed or stopped.
-
You can cancel a stalled or running sync task using the Stop this sync button.
If you stop an inbound sync process before it completes, changes made are not rolled back. -
The Matrix user that performed the asset synchronization.
-
The asset sync file for the outbound or inbound sync task.
-
The log file indicates any errors encountered during asset sync file generation or inbound sync tasks. If you see an error count next to the log entry, review the log and take action to remedy these if appropriate.