SagePay payment gateway
The SagePay payment gateway asset allows users in the United Kingdom and Ireland to create a SagePay payment gateway, providing users with a secure way to pay for their items.
| SagePay is now Opayo. While the vendor name has changed, the way you integrate with the service is unchanged in Matrix. |
To use the SagePay payment gateway, you will need an Opayo vendor account.
The SagePay payment gateway accepts the following card types:
-
Visa
-
Visa Delta/Debit
-
Visa Electron
-
MasterCard
-
UK Maestro
-
Solo
-
American Express
-
Diners Club
-
JCB
-
International Maestro
-
Laser
Once you have added a SagePay payment gateway, you can configure its settings on its associated asset screens. The majority of these screens are the same as a standard page. Read the Asset screens documentation to learn more about the common screens in Matrix assets.
This page covers the unique Details and Display formatting screens in the SagePay payment gateway asset.
Additional dependant assets
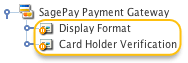
When you create a SagePay payment gateway, the display format and cardholder verification bodycopy assets are automatically created beneath it, as shown. You can use these bodycopies to define the contents and layout of the payment and cardholder verification forms. The display format bodycopy can be accessed through the Display formatting screen.
Details screen
The Details screen allows you to configure the settings of the SagePay payment gateway. Read the Asset details screen documentation to learn more about the Status, Future status, Thumbnail, and Details sections.
Configuration
This section allows you to enter your account details, allowing you to accept payments from the payment gateway, and configure the SagePay payment gateway’s general settings.
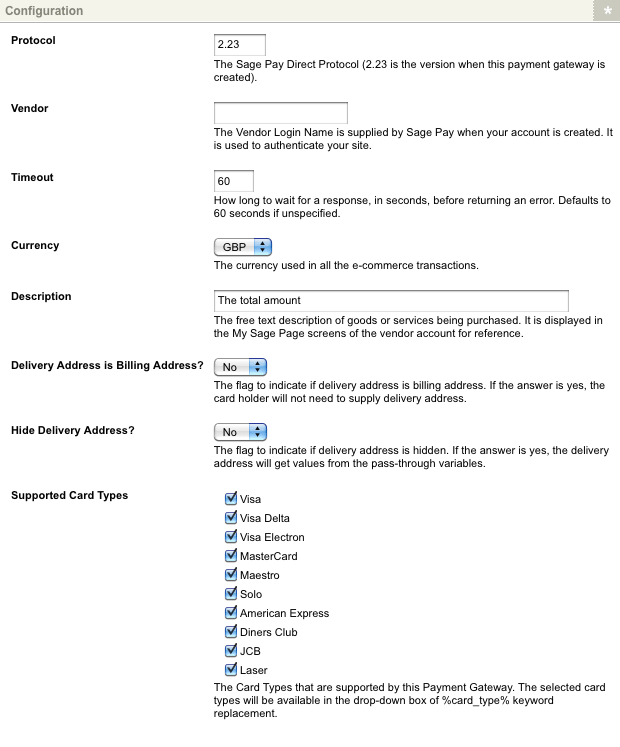
The fields available in this section are as follows:
- Protocol
-
Enter the VPSProtocol for your SagePay setup, supplied by Opayo. By default, this field will read
2.23. - Vendor
-
Enter your vendor login name, supplied by Opayo, when your account is created.
- Timeout
-
Select the amount of time in seconds that the payment gateway will wait for the user’s response before returning an error. By default, this field is set
60seconds. - Currency
-
Select the currency used in all ecommerce transactions processed by the SagePay payment gateway. The following currencies are available:
-
Great British Pound (GBP)
-
Australian Dollar (AUD)
-
United States Dollar (USD)
-
Euro (EUR)
-
Japanese Yen (JPY)
-
- Description
-
Enter a description of the items purchased from the ecommerce store. This description will be displayed on the Opayo administration area of the vendor account on the Opayo website. By default, this field will read the total amount.
- Delivery address is billing address?
-
Select whether to use the billing address provided by users as the delivery address for purchased items. If this field is set to
Yes, users will not need to provide a delivery address during the transaction process. By default, this field is set toNo. - Supported card types
-
Select the card types that will be available on the SagePay payment gateway. If a card type is not selected, users can not select that card type during the transaction process. By default, all card types are selected.
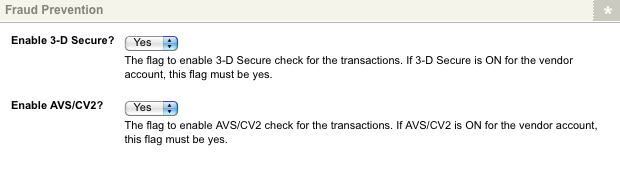
Fraud prevention
This section allows you to configure 3-D secure protocol, address verification service (AVS), and card verification value (CV2) systems for added security.
Please note that not all credit and debit cards can provide 3-D secure protection and that the AVS system is not available in all countries. The fraud prevention section of the Details screen:
The fields available in this section are as follows:
- Enable 3-D secure?
-
Select whether to enable 3-D secure protection for transactions made on the SagePay payment gateway. If this field is set to
Yes, users will be taken to the cardholder verification screen to display the 3-D secure service configured to your Opayo account. For more information, visit the Opayo website. - Enable AVS/CV2?
-
Select whether to enable the address verification service and card verification value checks for transactions made on the SagePay payment gateway. If this field is set to
Yes, address and CV2 fields must be included on the payment gateway using keyword replacements. For more information, refer to the Display formatting screen section in this chapter. Alternatively, pass-through variables can be configured to source the address from the user’s ecommerce form responses. For more information, refer to the pass-through variables section.
Pass-through variables
This section allows you to source address information for Gift Aid and the address verification service (AVS) from the user’s ecommerce form responses. For example, a user’s response to a city form field on an ecommerce form could be passed through the payment gateway to provide the AVS city. The pass-through variables section of the Details screen is shown in the figure:
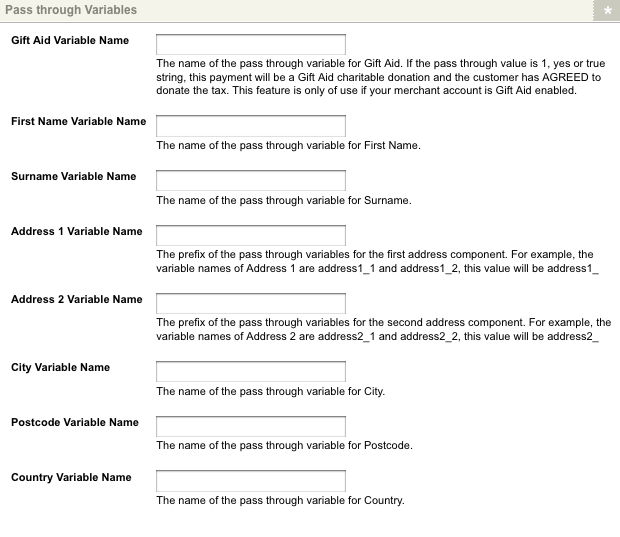
In the available fields, enter the pass-through variable keys for the corresponding form fields. These keys must be configured on the ecommerce rules screen of the ecommerce form page. Read the Ecommerce form page documentation for more information about the ecommerce rules screen section.
The fields that are available in this section are as follows:
- Gift Aid variable name
-
Enter the pass-through variable key for Gift Aid. If the value passed is equal to
1,Yes, or aTruestring, this payment will be classified as a Gift Aid charitable donation. The customer has agreed to donate the tax. This feature is only available for Opayo merchant accounts that are Gift Aid enabled. For more information, visit the Opayo website. - First name variable name
-
Enter the pass-through variable key for the first name.
- Surname variable name
-
Enter the pass-through variable key for the surname.
- Address 1 variable name
-
Enter the pass-through variable key for the first line of the address.
- Address 2 variable name
-
Enter the pass-through variable key for the second line of the address.
- City variable name
-
Enter the pass-through variable key for the address city.
- Postcode variable name
-
Enter the pass-through variable key for the address postcode.
Interface options
The section allows you to change the wording of the buttons for the payment gateway.
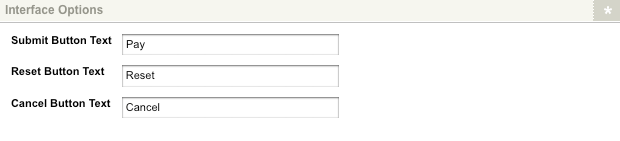
The fields that are available in this section are as follows:
- Submit button text
-
Enter the text to display as the Submit button. By default, this button will read
Pay. This button is displayed when the keyword replacement Submit button is used on the display format bodycopy. - Reset button text
-
Enter the text to display as the Reset button. By default, this button will read
Reset. This button is displayed when the keyword replacement Reset button is used on the display format bodycopy. - Cancel button text
-
Enter the text to display as the Cancel button. By default, this button will read
Cancel. This button is displayed when the keyword replacement Cancel button is used on the display format bodycopy.
Run mode
The section allows you to modify the payment gateway to function in Simulator, Test, or Live modes.
The run mode section of the Details screen is shown in the figure:

In the Run mode field, select the mode that the SagePay payment gateway will be running in. The following options are available:
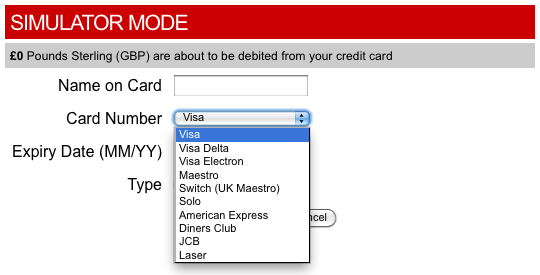
- Simulator
-
This mode simulates the Opayo test and live systems. Simulator accounts are trial accounts provided free of charge by Opayo. If this mode is selected, the payment gateway will not process any payments. The card number field on the SagePay payment gateway form will be replaced with the test drop-down menu, as shown in the figure:
- Test
-
This mode will run the payment gateway under test mode. If this mode is selected, the payment gateway will not process any payments. The card number field on the SagePay payment gateway form will be replaced with the test drop-down menu.
- Live
-
This mode will run the payment gateway under live mode. If this mode is selected, the payment gateway will be fully functional and able to process payments.
Display formatting screen
The display formatting screen allows you to edit the display format bodycopy. To edit this bodycopy:
-
Right-click on the display format bodycopy in the asset tree.
-
Selecting Edit contents.
Display format bodycopy
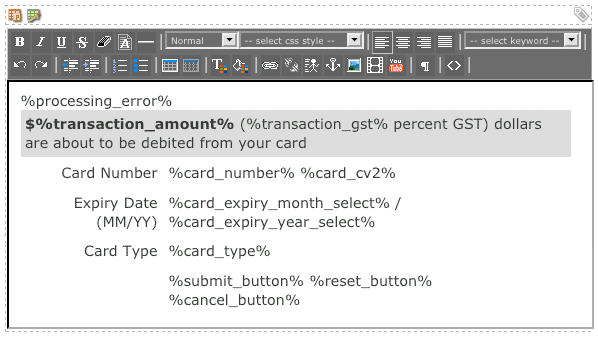
The display format bodycopy is used to define the layout of the SagePay payment gateway page. The default layout of the payment gateway is shown in the figure:
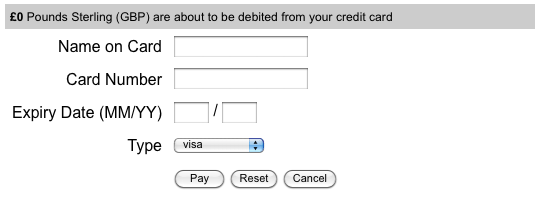
To change the information that is being shown:
-
Click on the edit
 icon – the WYSIWYG editor will appear.
 -
Use the keyword replacements and formatting to set the information’s layout to show on the payment gateway page. By default, the information shown in the figure will appear in the WYSIWYG editor.
| By default, the transaction amount on the SagePay payment gateway will be listed in British pounds. This setting may need to be changed depending on the currency you have selected on the Details screen. |
Keyword replacements on the display format bodycopy
A list of keyword replacements is provided in the WYSIWYG editor toolbar on the Edit contents screen of the display format bodycopy. You can use these keyword replacements in conjunction with text, images, and links to configure the payment gateway page’s layout. The standard keyword replacements that are available include the following:
- Name on card
-
This will show the name in the card field.
- Card number
-
This will show the credit card number field.
- Card start month
-
This will show the credit card start month field.
- Card start month select
-
This will show the credit card start month select field, allowing users to select a month from a drop-down menu.
- Card start year
-
This will show the credit card start year field.
- Card start year select
-
This will show the credit card start year select field, allowing users to select a year from a drop-down menu. The keyword replacement will display the current year and previous five years in the drop-down menu by default. Altering this keyword replacement can configure the number of years back displayed by appending
_xx, wherexxis the number of years in addition to the current year to display. For example, it will show the current year as well as ten years backward. If the current year is2010, the menu will display all years from2000to2010. - Card expiry month
-
This will show the credit card expiry month field.
- Card expiry month select
-
This will show the credit card expiry month select field, allowing users to select a month from a drop-down menu.
- Card expiry year
-
This will show the credit card expiry year field.
- Card expiry year select
-
This will show the credit card expiry year select field, allowing users to select a year from a drop-down menu. The keyword replacement will display the current year and next five years in the drop-down menu by default. Altering this keyword replacement can configure the number of years forward displayed by appending
_xx, wherexxis the number of years in addition to the current year to display. For example, it will show the current year as well as ten years forward. If the current year is2010, the menu will display all years from2010to2020. - Card issue number
-
This will show the card issue number field.
- Card CV2
-
This will show the card verification value (CV2) field. This field is required for CV2 verification checks.
- Card type
-
This will show the card type menu field. Only card types selected in the supported card types field on the Details screen will be available in this field.
- Billing first names
-
This will show the billing first names field.
- Billing surname
-
This will show the billing surname field.
- Billing address 1
-
This will show the first line of billing address field.
- Billing address 2
-
This will show the second line of billing address field.
- Billing city
-
This will show the billing city field.
- Billing postcode
-
This will show the billing postcode field.
- Billing country
-
This will show the billing county field.
- Billing state
-
This will show the billing state field.
- Billing phone
-
This will show the billing phone number field.
- Delivery first name
-
This will show the delivery first name field.
- Delivery surname
-
This will show the delivery surname field.
- Delivery address 1
-
This will show the first line of delivery address field.
- Delivery address 2
-
This will show the second line of delivery address field.
- Delivery city
-
This will show the delivery city field.
- Delivery postcode
-
This will show the delivery postcode field.
- Delivery country
-
This will show the delivery county field.
- Delivery state
-
This will show the delivery state field.
- Delivery phone
-
This will show the delivery phone number field.
- Transaction amount
-
This will show the amount of money that is to be paid in the transaction.
- Transaction currency
-
This will show the transaction currency. For example, AUD.
- Processing error(empty if no error)
-
This will show any processing errors. For example, if the user forgets to fill out a field.
- Submit button
-
This will show the Submit button.
- Cancel button
-
This will show the Cancel button.
- Reset button
-
This will show the Reset button.
| A number of these fields are compulsory when creating an active payment gateway. If the required fields are not available to the user, the transaction will not be able to be completed. |
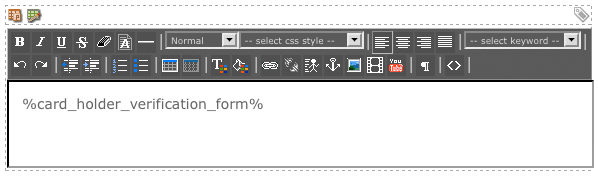
Cardholder verification bodycopy
The cardholder verification bodycopy is used to define the SagePay payment gateway’s 3-D secure verification page layout. By default, the 3-D secure service configured to your SagePay account will be nested within this page. For more information, visit the Opayo website.
To change the information that is being shown:
-
Click on the edit
icon – the WYSIWYG editor will appear. -
Use the keyword replacements and formatting to set the information’s layout to show on the verification page.
By default, the information shown in the figure will appear in the WYSIWYG editor.
Keyword replacements on the cardholder verification bodycopy
A list of keyword replacements is provided in the WYSIWYG editor toolbar on the Edit contents screen of the cardholder verification bodycopy. You can use these keyword replacements in conjunction with text, images, and links to configure the verification page’s layout. The standard keyword replacements that are available include the following:
- Cardholder verification form
-
This will show the 3-D secure service configured to your Opayo account.