Step 2: Add menus
|
Make the switch from legacy Standard Pages to Content Pages in Page Builder. Get A/B testing, Personalization, Layouts and Templates, ongoing feature improvements, and a great authoring experience compared with Standard Pages. Read the standard page and content page feature comparison page for more information. |
In step 2 of these instructions, you will enhance the design of your Hello World site by adding a main menu and a side menu.
Adding a menu to your site
Squiz Content Management is very flexible and allows menus to be created in many ways. This example will use the Menu Design Areas within the Design asset.
To find out more about Menu Design Areas, read the Menu normal design areas^ documentation.
The menu will automatically list pages on your site, so you need to add some content pages to the site.
Add content pages
To add content pages to your site:
-
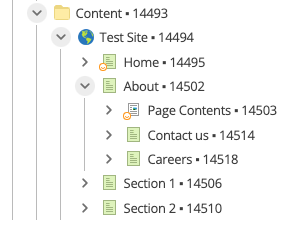
Create the following Standard Page assets as children under the Test Site asset
-
A Standard Page called About. To create a Standard Page under the Test Site asset:
-
Right-click on the Test Site asset.
-
Select .
-
Enter the name.
-
Select Create .
-
-
-
Two more Standard Pages called Section 1 and Section 2.
-
Under the About page, create two more Standard Pages called Contact us and Careers.
-
At the end of these steps, you will have a structure like the one shown below:
Add a menu to your site
To add a menu to your site:
-
Edit the Parse file.
-
Add the following code to the Parse file in the
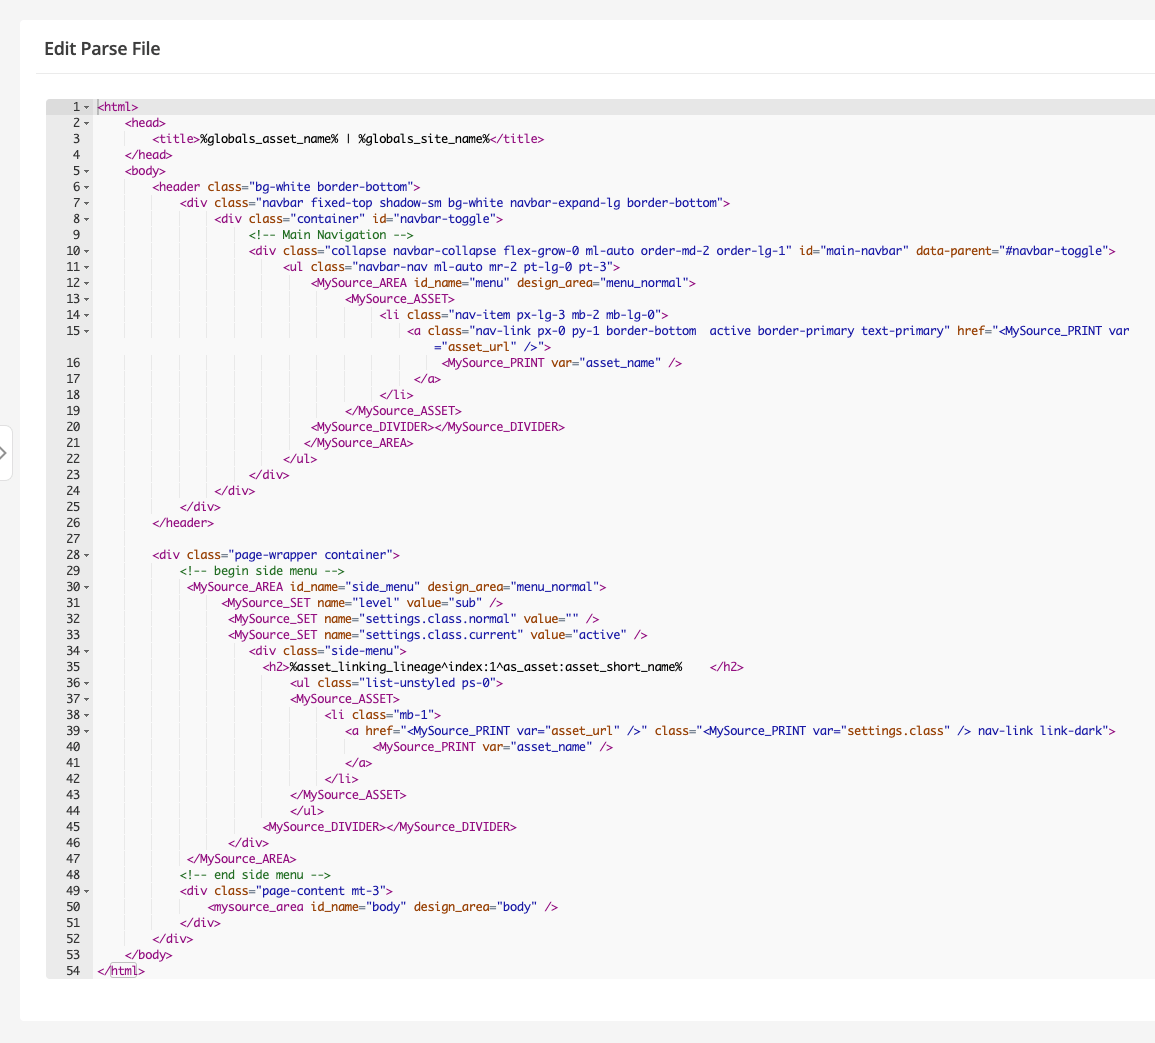
<body>section. Place this code between the existing<header class="bg-white border-bottom">and</header>tags:<div class="navbar fixed-top shadow-sm bg-white navbar-expand-lg border-bottom"> <div class="container" id="navbar-toggle"> (1) <!-- Main Navigation --> (2) <div class="collapse navbar-collapse flex-grow-0 ml-auto order-md-2 order-lg-1" id="main-navbar" data-parent="#navbar-toggle"> <ul class="navbar-nav ml-auto mr-2 pt-lg-0 pt-3"> <MySource_AREA id_name="menu" design_area="menu_normal"> (3) <MySource_ASSET> (4) <li class="nav-item px-lg-3 mb-2 mb-lg-0"> <a class="nav-link px-0 py-1 border-bottom active border-primary text-primary" href="<MySource_PRINT var="asset_url" />"> <MySource_PRINT var="asset_name" /> </a> </li> </MySource_ASSET> <MySource_DIVIDER></MySource_DIVIDER> </MySource_AREA> </ul> </div> </div> </div>1 The first two lines are static HTML that use Bootstrap 5 classes to add some layout and styling to the page, which will take effect in Part 3 of this guide. 2 The next 3 lines are more static HTML. 3 The next MySource_AREAtag starts a menu_normal design area. Theid_namefield in the design area gives it the name menu, referenced later in the design customizations section.4 The next section of HTML, within the MySource_ASSETtag, will be printed for each menu item in the menu. In this tag, there are twoMySource_Printtags. One prints out the URL of the asset, and one prints the asset name, which generates a link in the menu. -
Check that the parse file looks similar to this example:
-
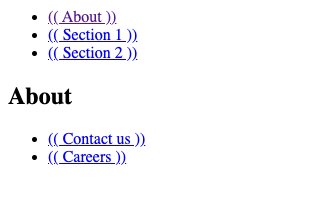
Test your changes by opening the site in a browser. Your site will now look like this:

Add a side menu
To aid in your site’s usability, add a side menu to your design. The side menu will be used to navigate inside pages.
To add a side menu:
-
Edit the Parse file.
-
Add the following code between the
<div class="page-wrapper container">tag and the<div class="page-content mt-3">tag.
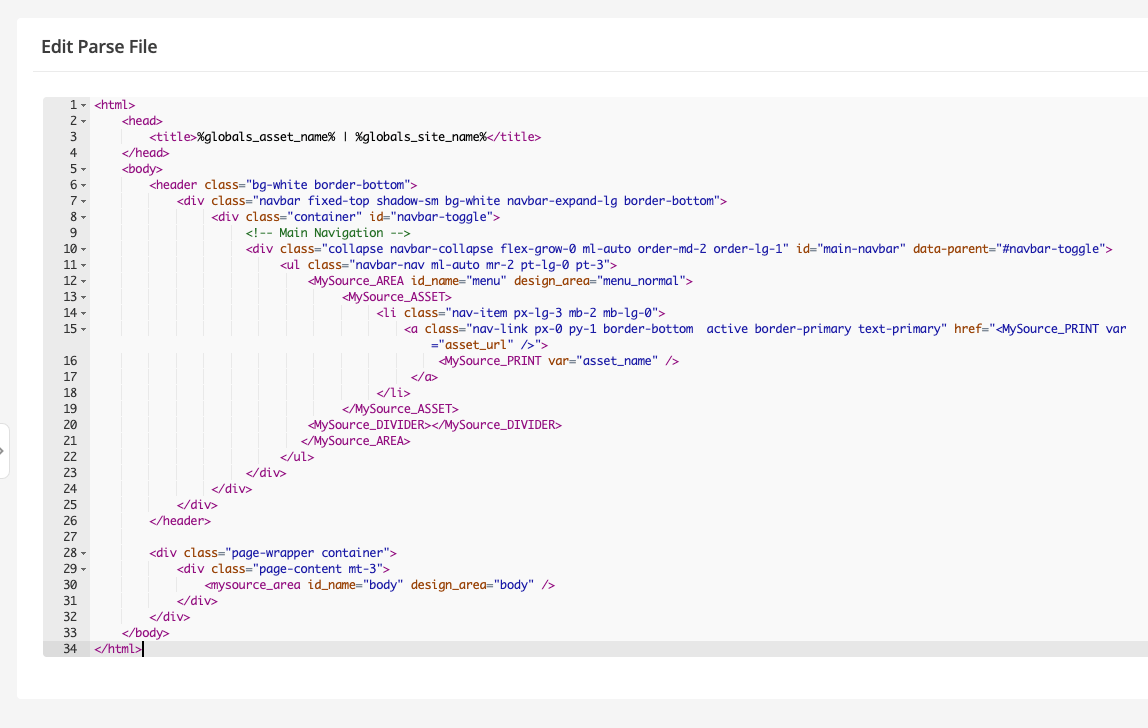
This code will create a side menu on the page, which will display when you are on a sub-page of the site.<!-- begin side menu --> <MySource_AREA id_name="side_menu" design_area="menu_normal"> (1) <MySource_SET name="level" value="sub" /> (2) <MySource_SET name="settings.class.normal" value="" /> <MySource_SET name="settings.class.current" value="active" /> (3) <div class="side-menu"> <h2>%asset_linking_lineage^index:1^as_asset:asset_short_name%</h2> (4) <ul class="list-unstyled ps-0"> <MySource_ASSET> <li class="mb-1"> <a href="<MySource_PRINT var="asset_url" />" class="<MySource_PRINT var="settings.class" /> nav-link link-dark"> <MySource_PRINT var="asset_name" /> </a> </li> </MySource_ASSET> </ul> <MySource_DIVIDER></MySource_DIVIDER> </div> </MySource_AREA> <!-- end side menu -->1 The MySource_AREAtag is the same design tag as the menu code but with some extra configuration. Note theid_nameisside_menu, but the design area is still menu_normal.2 The MySource_SETtags set variables for the design area. The level is set to sub, making this act as a sub-menu.3 The settings are set up to show the class active for the currently selected menu item. 4 Within the h2tag, a keyword is used, along with keyword modifiers and a nested keyword, to access the top-level page in the asset lineage of the currently selected page and print out the short name of the asset.For more information about keywords, read Keyword replacements and modifiers^. -
Check that the parse file looks similar to this example: