Formatting the custom form
By default, Matrix will provide a layout for the custom form, which shows the sections and fields. On the layout, the form fields that have been added to the form will appear before sections. The order of the form fields will be the same as the order in which they were added.
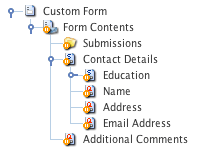
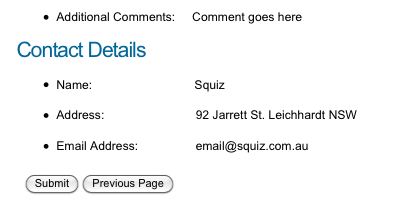
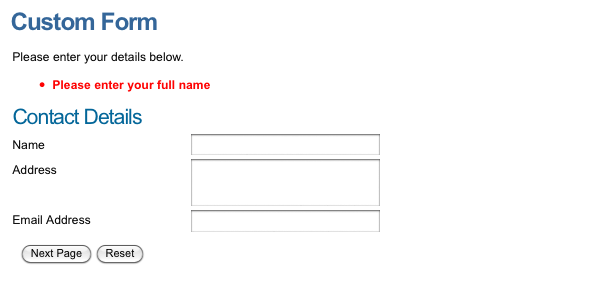
Say you have set up a custom form with a contact details section and four form fields. The default layout for this form is shown in the figure below. The additional comments form field is first as it was added to the form. The name form field is first in the contact details as it was the first form field added to that section. This layout is known as the page contents layout.
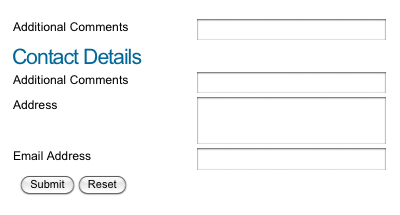
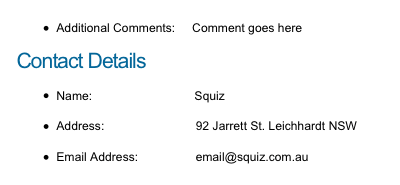
A default layout is also shown as a confirmation message when the user submits the form. This layout is known as the thank you layout.
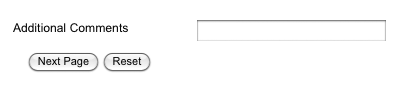
The custom form may also use the confirmation page and multi-page features. In a multiple paged form, form fields that have not been created within a section are shown on the unattached form fields page. By default, Matrix will provide a layout for both the confirmation page and the unattached form fields page. For example, if you turn the multi-page option for the custom form shown in the figures the additional comments form field shows on the unattached form fields page as it was created outside of a section.
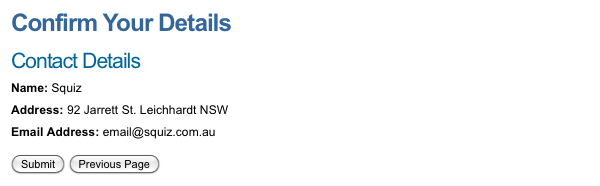
A confirmation page is also shown as a verification message, allowing the user to confirm the information entered in the form before submitting it.
There is no default layout for the exit page.
When using the Exit & Save feature, you must use the exit page contents bodycopy to customize a layout.
You can customize these layouts using the page contents, thank you, confirmation page contents, unattached form fields, and exit page contents bodycopies.
These bodycopies will allow you to define the form’s layout and add things like a title, a blurb about the form, where the errors should appear, and the form fields' layout.
Additionally, if you have set a submission limit on the form, the "Submission limit reached" bodycopy defines the error format displayed when this limit is exhausted.
Adding the bodycopy assets
To add the page contents, confirmation page contents, thank you, unattached form fields format, and exit page contents bodycopies:
-
Right-click on the form contents asset in the asset tree.
-
Select Form contents.
-
Select page contents, confirmation page contents, thank you, unattached form fields format or exit page contents, or any number of options in the formatting section.
-
Click Save.
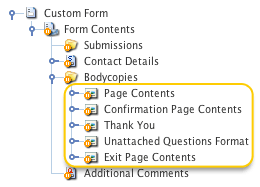
A bodycopies folder containing the bodycopy assets will be added under the asset tree’s custom form asset.
The submission limit reached bodycopy asset will automatically be added to the custom form when a submission limit has been configured.
Read the Custom form contents documentation for more information on configuring this setting.
Editing the page contents layout
To edit the page contents:
-
Right-click on the page contents bodycopy in the asset tree.
-
Select Edit contents to display the Edit contents screen.
-
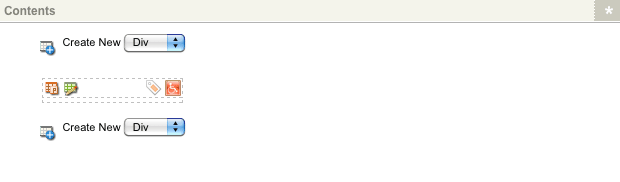
Click on the
 icon to display the editor.
You can layout the page contents bodycopy using this WYSIWYG editor as you would with a standard page.
You can use conditional content rules on the page contents bodycopy by clicking the ![]() icon.
Conditions for this bodycopy can be configured on the Conditions screen of the custom form.
Read the Asset conditions screen documentation for more information about conditional content rules.
Read the Content components documentation for more information about the available content components.
icon.
Conditions for this bodycopy can be configured on the Conditions screen of the custom form.
Read the Asset conditions screen documentation for more information about conditional content rules.
Read the Content components documentation for more information about the available content components.
Keyword replacements on the page contents bodycopy
A list of keyword replacements is provided in the WYSIWYG editor toolbar on the Edit contents screen of the page contents bodycopy. You can use the keyword replacements in conjunction with text, images, and links to layout the page contents. The standard keyword replacements that are available include the following:
- Form contents
-
This will display the form fields' default layout and sections fields, as configured in the page contents bodycopy. This keyword is useful if you are not individually formatting each section’s layout and form field on the custom form.
- List of submission errors
-
This will show any errors the user may have received when they select Submit. On the default layout, these errors appear at the bottom of the page. When using the page contents bodycopy, you may want to show them at the top of the page. Please note that form field and CAPTCHA errors will be displayed next to their corresponding fields if the accessible format option is enabled on the form. This keyword will only display general form errors.
- Message indicating that there were errors
-
This will show the message that has been defined in the error message format field on the Form contents screen. By default, this message is:
There were errors submitting the form.
Please correct the marked fields and try again.
- Reset button
-
This will show the Reset button on the form. This button is not mandatory.
- Submit button
-
This will show the Submit button on the form. If you do not add this keyword replacement, the user can not submit the form.
- CAPTCHA
-
This will show the CAPTCHA fields on the form.
- CAPTCHA image
-
This will show the image for the CAPTCHA field.
- CAPTCHA input field
-
This will show the input field for the CAPTCHA field.
- CAPTCHA regeneration link
-
This will show the link so the user can regenerate the CAPTCHA field.
You can use the following submission limit keyword replacements to control how information is displayed:
%form_submissions_limit%-
This will display the submission limit that has been configured on the custom form. Read the Custom form contents documentation for more information on configuring the contents of the form.
%form_submissions_count%-
This will display the current number of submissions on the custom form.
%form_submissions_left%-
This will display the number of submissions remaining on the custom form until the submission limit is reached.
Along with these keyword replacements, you can also display each field by using the keyword replacements listed:
%question_label_<parent_id>_<question_id>%-
This will show the name of the form field. Is the asset ID of the section the form field has been added to or the asset ID of the form contents asset if the form field does not belong to a section.
<question_id>is the asset ID of the form field. %question_note_<parent_id>_<question_id>%-
This will show the note for the form field. Is the asset ID of the section the form field has been added to or the asset ID of the form contents asset if the form field does not belong to a section.
<question_id>is the asset ID of the form field. %question_id_<parent_id>_<question_id>%-
This will show the asset ID of the form field. Is the asset ID of the section the form field has been added to or the asset ID of the form contents asset if the form field does not belong to a section.
<question_id>is the asset ID of the form field. %question_field_<parent_id>_<question_id>%-
This will show the box where the user can enter their response to the field.
<parent_id>is the asset ID of the section the form field has been added to or the asset ID of the form contents asset if the form field does not belong to a section.<question_id>is the asset ID of the form field.
Editing the confirmation page contents layout
To edit the confirmation page contents layout:
-
Right-click on the confirmation page contents in the asset tree.
-
Select Edit contents to load the Edit contents screen.
-
Click on the
icon to load the editor.
You can layout the confirmation page contents bodycopy using this WYSIWYG editor with a standard page.
You can use conditional content rules on the confirmation page contents bodycopy by clicking the ![]() icon.
icon.
Conditions for this bodycopy can be configured on the Conditions screen of the custom form. Read the Asset conditions screen documentation for more information about conditional content rules. Read the Content components documentation for more information about the available content components.
Keyword replacements on the confirmation page contents bodycopy
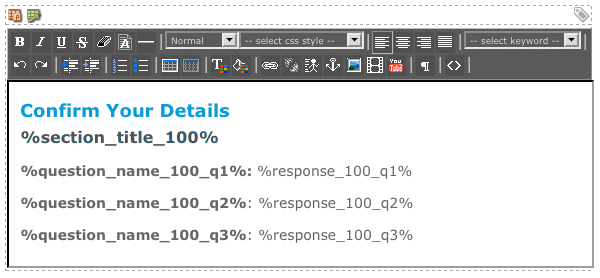
A list of keyword replacements is provided in the WYSIWYG editor toolbar on the Edit contents screen of the confirmation page contents bodycopy. You can use the keyword replacements in conjunction with text, images, and links, to layout the confirmation page. The standard keyword replacements that are available include the following:
- Submission summary
-
This will show the user’s responses to each form field on the form.
- Submission info
-
This will show information about the custom form, including the asset ID, name and URL of the form, and the name and asset ID of the site.
- Reset button
-
This will show the Reset button on the form. This button is not mandatory.
- Submit button
-
This will show the Submit button on the form. If you do not add this keyword replacement, the user will not submit the form.
- Previous page button
-
This will show the Previous page button on the form. This button is not mandatory.
- Captcha
-
This will show the CAPTCHA fields on the form.
- Captcha image
-
This will show the image for the CAPTCHA field.
- Captcha input field
-
This will show the input field for the CAPTCHA field.
- Captcha regeneration link
-
This will show the link so the user can regenerate the CAPTCHA field. Along with these keyword replacements, you can also display each section name, individual form field, and response to each form field by using the keyword replacements listed:
%section_title_<parent_id>%-
This will show the name of the section.
<parent_id>is the asset ID of the section. %question_name_<parent_id>_<question_id>%-
This will show the name of the form field. Is the asset ID of the section the form field has been added to or the asset ID of the form contents asset if the form field does not belong to a section.
<question_id>is the asset ID of the form field. %question_note_<parent_id>_<question_id>%-
This will show the note for the form field. Is the asset ID of the section the form field has been added to or the asset ID of the form contents asset if the form field does not belong to a section.
<question_id>is the asset ID of the form field. %response_<parent_id>_<question_id>%-
This will show the response the user-submitted for the form field. Is the asset ID of the section the form field has been added to or the asset ID of the form contents asset if the form field does not belong to a section.
<question_id>is the asset ID of the form field.
Editing the thank you layout
To edit the thank you layout:
-
Right-click on the thank you bodycopy in the asset tree.
-
Select Edit contents; the Edit contents screen will appear.
-
Click on the
icon; the WYSIWYG editor will appear.
You can layout the thank you bodycopy using this WYSIWYG editor as you would with a standard page.
You can use conditional content rules on the thank you bodycopy by clicking the ![]() icon.
Conditions for this bodycopy can be configured on the Conditions screen of the custom form.
Read the Asset conditions screen documentation for more information about conditional content rules.
Read the Content components documentation for more information about the available content components.
icon.
Conditions for this bodycopy can be configured on the Conditions screen of the custom form.
Read the Asset conditions screen documentation for more information about conditional content rules.
Read the Content components documentation for more information about the available content components.
Keyword replacements on the thank you bodycopy
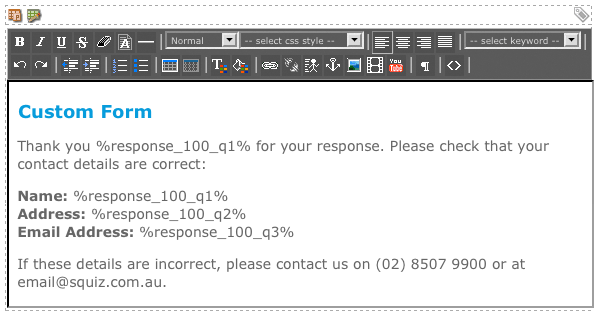
A list of keyword replacements is provided in the WYSIWYG editor toolbar on the Edit contents screen of the thank you bodycopy. You can use the keyword replacements in conjunction with text, images, and links, to layout the thank you page. The standard keyword replacements that are available include the following:
- Submission summary
-
This will show the user’s responses to each form field on the form.
- Submission info
-
This will show information about the custom form, including the asset ID, name and URL of the form, and the name and asset ID of the site.
- Submission id
-
This will show the id that the submission has been given.
- Submission IP address
-
This will show the IP address of where the submission was made.
- Time of submission (yyyy-mm-dd hh:mm:ss)
-
This will show the date and time the user submitted the form in the specified format.
- Time of submission (yyyy-mm-dd)
-
This will show the date the user submission the form in the specified format.
- Time of submission (dd m yyyy h:mm[am pm])
-
This will show the date and time the user submitted the form in the specified format.
- Time of submission (date only; dd m yyyy)
-
This will show the date the user submission the form in the specified format.
- Time of submission (time only; h:mm[am pm])
-
This will show the time the user submission the form in the specified format.
- Time of submission (iso8601 format)
-
This will show the date and time the user submission the form in the specified format.
- Time of submission (rfc2822 format)
-
This will show the date and time the user submission the form in the specified format.
- Time of submission (rfc2822 format, date only)
-
This will show the date and time the user submission the form in the specified format.
- Time of submission (iCalendar format)
-
This will show the date and time the user submission the form in the specified format. Along with these keyword replacements, you can also display responses to individual form fields using the keyword replacements listed below.
%response_<parent_id>_<question_id>%-
This will show the response the user-submitted for the form field. Is the asset ID of the section the form field has been added to or the asset ID of the form contents asset if the form field does not belong to a section. <question_id> is the asset ID of the form field.
%response_<parent_id>_<question_id>_raw%-
This will show the raw value for the response the user-submitted for the form field. Is the asset ID of the section the form field has been added to or the asset ID of the form contents asset if the form field does not belong to a section. <question_id> is the asset ID of the form field.
Editing the unattached form fields format
To edit the unattached form fields format layout:
-
Right-click on the unattached form fields format bodycopy in the asset tree.
-
Select Edit contents; the Edit contents screen will appear.
-
Click on the
icon to load the editor.
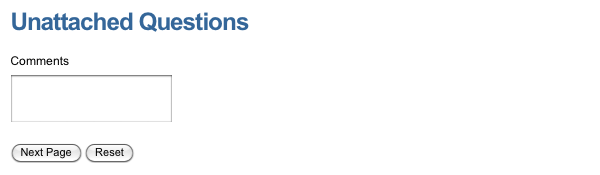
You can layout the unattached form fields format bodycopy using this WYSIWYG editor as you would with a standard page.
You can use conditional content rules on the unattached form fields bodycopy by clicking the ![]() icon.
Conditions for this bodycopy can be configured on the Conditions screen of the custom form.
Read the Asset conditions screen documentation for more information about conditional content rules.
Read the Content components documentation for more information about the available content components.
icon.
Conditions for this bodycopy can be configured on the Conditions screen of the custom form.
Read the Asset conditions screen documentation for more information about conditional content rules.
Read the Content components documentation for more information about the available content components.
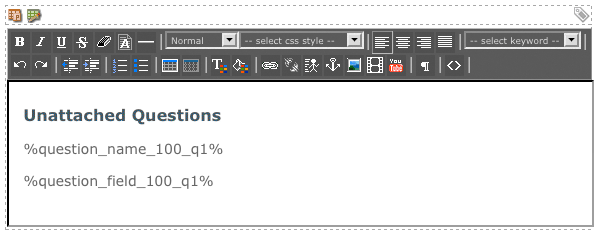
Keyword replacements on the unattached form fields bodycopy
You can display each form field by using the keyword replacements listed below.
%question_name_<parent_id>_<question_id>%-
this will show the name of the form field. Is the asset ID of the section the form field has been added to or the asset ID of the form contents asset if the form field does not belong to a section.
<question_id>is the asset ID of the form field. %question_note_<parent_id>_<question_id>%-
this will show the note for the form field. Is the asset ID of the section the form field has been added to or the asset ID of the form contents asset if the form field does not belong to a section.
<question_id>is the asset ID of the form field. %question_id_<parent_id>_<question_id>%-
this will show the asset ID of the form field. Is the asset ID of the section the form field has been added to or the asset ID of the form contents asset if the form field does not belong to a section.
<question_id>is the asset ID of the form field. %question_field_<parent_id>_<question_id>%-
this will show the box where the user can enter their response to the field. Is the asset ID of the section the form field has been added to or the asset ID of the form contents asset if the form field does not belong to a section.
<question_id>is the asset ID of the form field.
Editing the exit page contents
To edit the exit page contents layout:
-
Right-click on the exit page contents bodycopy in the asset tree.
-
Select Edit contents; the Edit contents screen will appear.
-
Click on the
icon; the WYSIWYG editor will appear.
You can layout the exit page contents bodycopy using this WYSIWYG editor with a standard page.
You can use conditional content rules on the exit page contents bodycopy by clicking the ![]() icon.
Conditions for this bodycopy can be configured on the Conditions screen of the custom form.
Read the Asset conditions screen documentation for more information about conditional content rules.
Read the Content components documentation for more information about the available content components.
icon.
Conditions for this bodycopy can be configured on the Conditions screen of the custom form.
Read the Asset conditions screen documentation for more information about conditional content rules.
Read the Content components documentation for more information about the available content components.
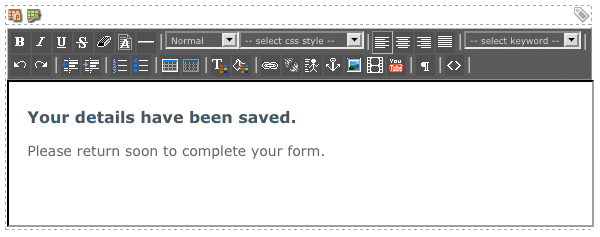
Example exit page contents layout
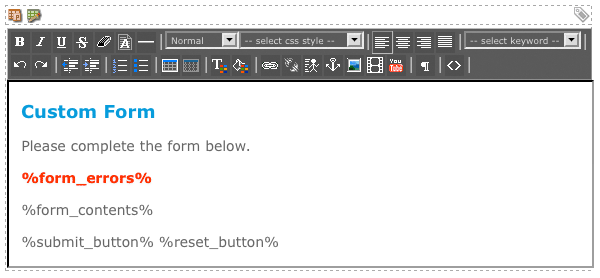
Below is an example exit page contents layout that has been created a public custom form. The first figure shows the WYSIWYG editor on the exit page contents bodycopy. The second figure shows the layout on the form.

If the custom form is for signed-in users, form data is stored in submission assets. To allow your users to return to their submission, you must provide a link in the exit page contents bodycopy, as shown in the figure below.
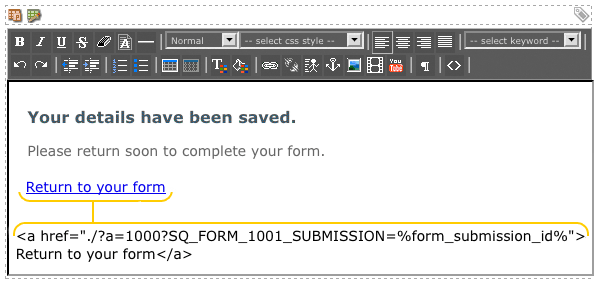
The format of the 'return to form' link, where <asset_id> is the asset ID of the custom form and <form_id> is the asset ID of the form, is as follows:
<a href="./?a=<asset_id>?sq_form_<form_id>_submission=%form_submission_id%">return to your form</a>
Editing the submission limit reached format
The submission limit reached bodycopy allows you to define the format of the message that appears to users when the submission limit of the custom form has been exhausted. The default layout of the submission limit reached message.

To edit this message:
-
Right-click on the submission limit reached bodycopy in the asset tree.
-
Select Edit contents to load the Edit contents screen.
The submission limit reached bodycopy will appear once a submission limit has been set on the custom form. Read the Custom form contents for more information on how to configure the submission limits.
-
Click on the
icon; the WYSIWYG editor will appear.
You can edit the submission limit reached message using the Wysiwyg editor, as you would with a standard page asset.
You can use conditional content rules on the submission limit reached bodycopy by clicking the ![]() icon.
Conditions for this bodycopy can be configured on the Conditions screen of the custom form.
Read the Asset conditions screen documentation for more information about conditional content rules.
Read the Content components documentation for more information about the available content components.
icon.
Conditions for this bodycopy can be configured on the Conditions screen of the custom form.
Read the Asset conditions screen documentation for more information about conditional content rules.
Read the Content components documentation for more information about the available content components.
You can use the Number of submissions allowed for this form, Number of submissions completed for this form, and Number of submissions left for this form keyword replacements to display information on the submission limit set on the custom form.