Account manager page
An account manager page can be added to allow your users to create new accounts for themselves and edit their account details. When a user goes to the URL of the account manager page, they can either sign in or create an account for themselves. Once they have created a user account, they can sign in and edit their account details.
If you only want authorized users to create accounts, you should use an asset builder page instead.
Account manager user process
This figure shows how this process works using the bodycopy assets created under the asset tree’s account manager page.
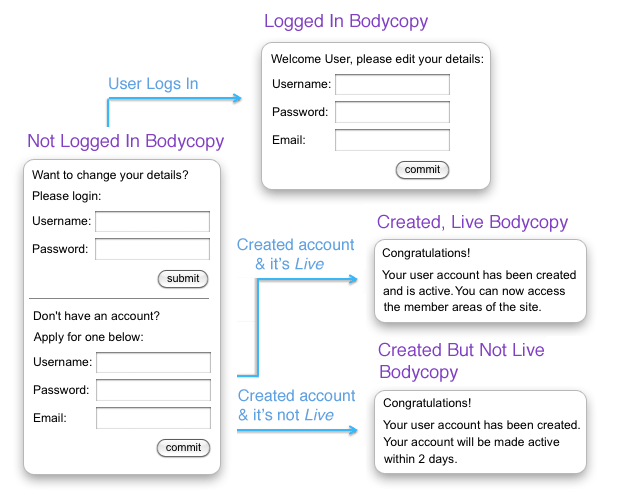
The account manager page can also be set up so that users have to verify their details before their user account is activated (or made live). When the user creates an account, an email will be sent to the email address they entered. The email will contain a URL, which they click to validate their account.
The figure shows how this process works using the bodycopy assets created under the asset tree’s account manager page. For more information about each of these bodycopies, refer to the additional dependant assets section in this chapter.

Once your account manager page is created, you can configure its settings on its associated asset screens. Read the Asset screens documentation for more information about the common screens in Matrix. This chapter will describe the Details, Create locations, Required attributes, Messages, and Pending accounts screens, which are different for an accounts manager page.
Additional dependant assets
When you create an account manager page, several assets are automatically created beneath it, as highlighted in the figure. You can use these assets to define the contents and layout of the account manager page.
- Not logged-in
-
This bodycopy is used to define what to show the user when they are not signed in. This layout should invite users to sign in or allow them to create a user account for themselves.
- Created but not live
-
This bodycopy is used to define the layout once a user account has been created with Under construction status. This layout should inform the user that their account has been created but will not be active.
A user account needs to have a live status for it to be active. If it is not live, the user will not be able to sign in. - Created, live
-
This bodycopy is used to define the layout once a user account has been created with live status. This layout should inform the user that their account has been created and is active.
- Logged in
-
This bodycopy is used to define what to show the user when they sign into the system. This layout should allow users to update their account details.
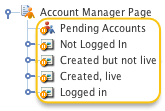
If you are using email validation, a different set of assets will be available under the account manager page in the asset tree, as highlighted in the figure: The not logged-in and logged-in bodycopy are the same as those outlined above. The additional assets are as follows:
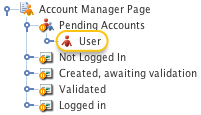
- Pending accounts
-
When an account is created, it is stored under the pending accounts user group until verified. Once it has been verified, it is moved into the correct location.
- Created, awaiting validation
-
This bodycopy is used to define the layout once a user account has been created. It should inform the user that an email has been sent to their email address with further instructions.
- Validated
-
This bodycopy is used to define the layout once the user has verified their account. They will see this layout when they click on the URL within the email.
Details screen
The Details screen allows you to configure the settings for the account manager page.
Read the Asset details screen documentation for more information about the Status, Future status, Thumbnail and Details sections of the Details screen.
Read the Custom form contents documentation for more information about the CAPTCHA, Google RECAPTCHA, hCaptcha, Mollom spam check, Honeypot question, and Submission time threshold sections.
Account manager settings
This section allows you to select which type of account to create and the status in which to create them. The account manager settings section of the Details screen is shown:
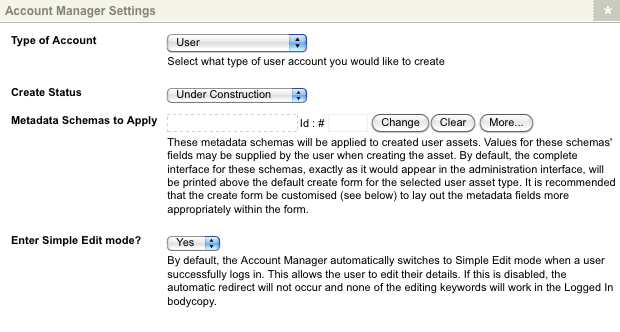
The fields available are as follows:
- Type of account
-
Select the type of user to be created on the account manager page. Select from
User,Backend user, orSystem administrator. - Create status
-
Select the status that the created user account will have. To create active accounts, select
Live. To create inactive accounts, selectUnder construction. - Automatically sign user in
-
Select whether new user accounts will be made live and signed-in automatically after creation. This setting will overwrite the create status setting and disable the email validation function if this field is enabled. By default, this field is set to
No. - Metadata schemas to apply
-
This field allows you to select a metadata schema that will automatically be applied to the created user accounts. The user can then fill in the metadata fields when they are creating an asset. By default, the metadata fields will appear above the create form on the account manager page. Customize the Create form so that the metadata fields can be laid out using the keyword replacement
%metadata-f_<fieldid>%, where<fieldid>is the metadata field asset ID. Refer to the Customizing the layout of the create form section for more information. - Enter inline edit mode?
-
By default, when a signed-in user accesses the account manager page, they will automatically be taken to the simple edit interface to edit their account details. This option allows you to disable this automatic redirect so that a signed-in user can create user accounts instead of editing their details.
Email validation
This section allows you to define whether users have to verify their details before their user account is activated (or made live). When the user creates an account, an email will be sent to the email address they entered. The email will contain a URL, which they click to validate their account. The email validation section of the Details screen is shown:

By default, this option is set to No, meaning that their account will not be verified and will be made active if you have selected a create status of live.
If you want the user to verify their account:
-
Set use email validation to
Yes. -
Click Save.
Additional fields will appear within this section, as shown:
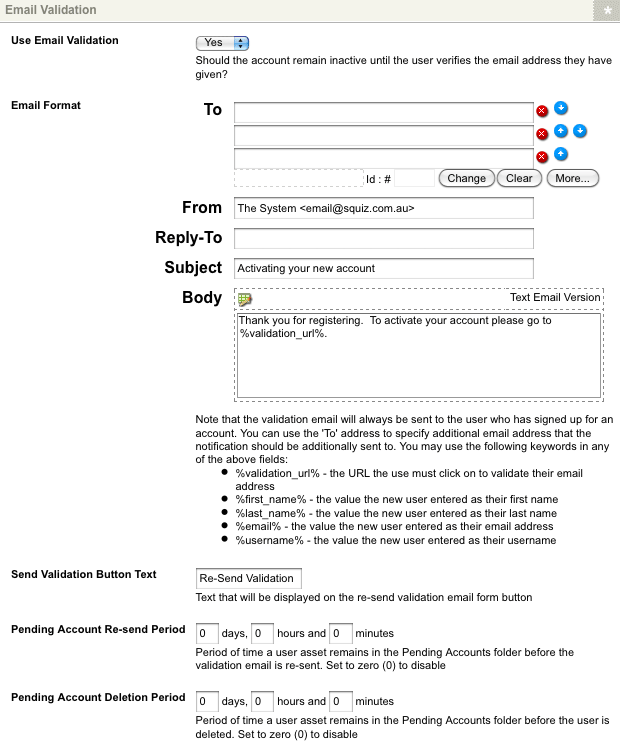
The fields available are as follows:
- Email format
-
This section allows you to configure the email sent to the user once they have created their user account. The fields available are as follows:
- To
-
By default, the email will be sent to the address the user entered when they created their account. This field allows you to enter additional email addresses of the people who should also receive the email, for example, a system administrator. You can enter their email address in the text fields or select their user account in the Asset finder field.
- From
-
Enter the email address that will appear in the From field in the email. By default, the email entered on the system configuration screen will be used.
- Reply-to
-
Enter the email address to which a user can reply. If no reply-to address is configured, the header will not be sent on the email.
- Subject
-
Enter the text to be used as the subject of the email. You can use the keyword replacements displayed under the body within this field. By default, Activating your new account will appear in this field.
- Body
-
Enter the body of the email. You can enter either the text or HTML version of the email in this field. To edit the HTML version, click on the
 icon – a WYSIWYG editor will appear.
You can use the keyword replacements displayed under the body within the email.
These keyword replacements are as follows:
icon – a WYSIWYG editor will appear.
You can use the keyword replacements displayed under the body within the email.
These keyword replacements are as follows:-
%validation_url%: This will show the URL the user must click to verify their account. This keyword replacement needs to be included within the email; otherwise, the user cannot verify their account. -
%first_name%: This will show the value the user entered into the first name field when they created their user account. -
%last_name%: This will show the value the user entered into the last name field when they created their user account. -
%email%: This will show the value the user entered into the email field when they created their user account. -
%username%: This will show the value the user entered into the username field when they created their user account.
-
- Send validation button text
-
Enter the text to be shown on the resend validation button to include on the Not logged-in bodycopy. The user can click this button to resend the original validation email for their user account. By default, resend validation is used.
- Pending account resend period
-
Enter a period after which the validation email is resent to the users who have not verified their user account. For example, if you enter
2 daysand the user has not verified their account two days after creating it, the validation email is resent. By default,0is entered, meaning that this option is disabled. - Pending account deletion period
-
Enter a period after which a user account is deleted if the user has not verified it. For example, if you enter
5 daysand the user has not verified their account five days after creating it, their user account is deleted. By default,0is entered, meaning that this option is displayed.
Post login redirect
This section allows you to select an asset the user is redirected to once they have created their account and signed in.
Advanced settings
This section allows you to change the advanced options for the account manager page.
The fields available are as follows:
- Form submission URL
-
This option controls where the form is submitted. This option is useful if you nest an account manager page in another page. By default, this is the current URL, and the form is submitted to the current page you are viewing (the page in which the account manager page is nested). This setting means that account manager messages will be shown within the original page. If you set this option to the page’s URL, the account manager page will submit to its URL. This setting means that the success or error message will not be nested in another page because the user will be redirected to the account manager page itself. The URL, the lineage, and the menu will change to be the account manager page.
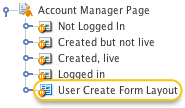
- Create form customization
-
This field allows you to create a customization of the create form. To customize the layout:
-
Select Create form customization
-
Click Save.
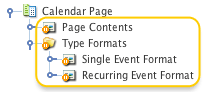
A layout asset will be created under the account manager page in the asset tree, as highlighted in the figure: This layout asset is then used to layout the create form for the page. Refer to the Customizing the layout of the create form for more information.
-
- Confirm password on create
-
This option controls whether to display a confirmation input field for the password option when creating a new user account.
Create locations screen
The create locations screen allows you to specify where the user account will be created. You can either:
-
Select a fixed location where the user accounts will be created by default.
-
Create a list of options where the user can select a location.
-
Create a list based on a particular root node. The user then selects a location from the list.
-
Select to create the user account in a particular location based on a set of rules. For example, the username the user entered.
Each create location must be either a user group or role. For example, if you use email validation on the Details screen the user account is created in the pending accounts user group under the account manager page in the asset tree. Once the user has verified their user account, it gets moved into the correct create location.
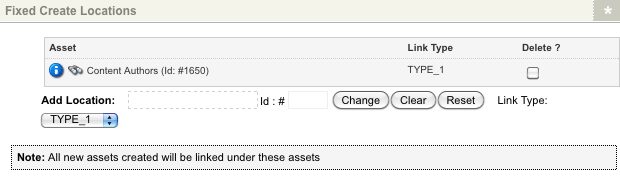
Fixed create locations
This section allows you to specify the locations where the user accounts are created by default. For example, say you have created an account manager page to allow your users to create a member account. You can create a user group called Site members and select this user group as a fixed create location. Any user accounts that are created will be stored under this user group in the asset tree.
By default, no fixed create location is selected.
-
Select the user group to use in the Add location field.
-
Select what type of link to create the user account as in the Link type field.
The available options include Menu link, Hidden link, invisible link and reference link. Read the Linking assets documentation for more information on each of these link types.
Once you have filled out these fields, click Save. The location will appear within the list, as shown:
To delete a location from the list:
-
Click the Delete box
-
Click Save.
To add additional locations to the list, use the add location field located under the list. If you select multiple locations, the user account will be linked under each location. The same asset with the same asset ID will appear in multiple locations in the asset tree). Each location can also have a different link type. For example, one create location can have a Menu link link, and another location can have a Hidden link link.
Selectable create locations
This section allows you to create a list of locations. The user can then select a location from the list of values. You can create several different lists, and each list can be shown in many different formats.
By default, no selectable create location will be created. To create a new list, enter a name for the list in the add new set field, and click save. Additional fields will appear on the screen:
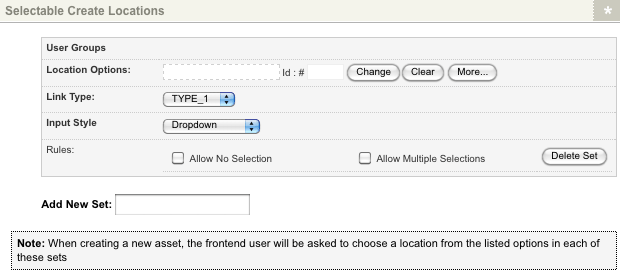
The fields available are as follows:
- Location options
-
Select the locations that will appear in the list to the user. You can add as many locations as you want to the list.
To remove a location from the list:
-
Click the Clear button.
-
Click Save.
-
- Link type
-
Select what type of link to create the user account as. The available options include Menu link, Hidden link, invisible link and reference link. Read the Linking assets documentation for more information on each of these link types.
- Input style
-
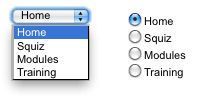
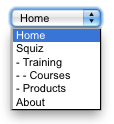
Select the style of the list you want to show on the account manager page. The options that are available include dropdown and radio buttons.
Both of these formats are shown:
- Rules
-
The rules that are available for each selectable create location are as follows:
- Allow no selection
-
Select this option if you want to allow the user to select no location from the list. If you select Allow no selection, you will need to select at least one fixed Create location. Otherwise, the user account cannot be created as the system does not know where to create it.
- Allows multiple selections
-
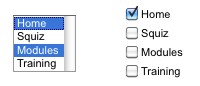
Select this option to allow the user to select multiple locations from the list. If they select more than one location, the user account will be linked under each location. In other words, it will be the same asset, with the same asset ID, appearing in multiple locations in the asset tree. If you select this option, depending on what value you have selected in the input style field, the list’s format will change. If you have selected dropdown, the list will appear in a box where the user can hold down the Ctrl key to select multiple values. If you have selected radio buttons, a check box list will appear to tick multiple values. Both of these formats are shown:
- Delete set
-
Click the Delete set button to delete a selectable create location.
Once you have filled in the required fields, you need to add a keyword replacement to the account manager page so that the list will appear to the user.
By default, this keyword replacement should be added on the Not logged-in bodycopy.
The name of the keyword replacement will reflect the name you entered in the add new set field.
For example, if you entered User group when you created the selectable Create location, the keyword replacement you need to add will be User group field.
To add additional selectable create locations:
-
Enter the name of the location in the add new set field.
-
Click Save.
Dynamic create locations
This section allows you to create a list of locations based on a specific root node.
For example, if you select the Users folder as the root node for this list, you can show all user groups and roles under the Users folder.
The user can then select a location under the Users folder to create their user account.
When user groups or roles are added under the root node, they will automatically appear in the list to the user if they match the dynamic create location’s selected criteria.
By default, no dynamic create location will be created. To create a new list:
-
Enter a name for the list in the add new set field.
-
Click Save.
Additional fields will appear on the screen, as shown in the figure:
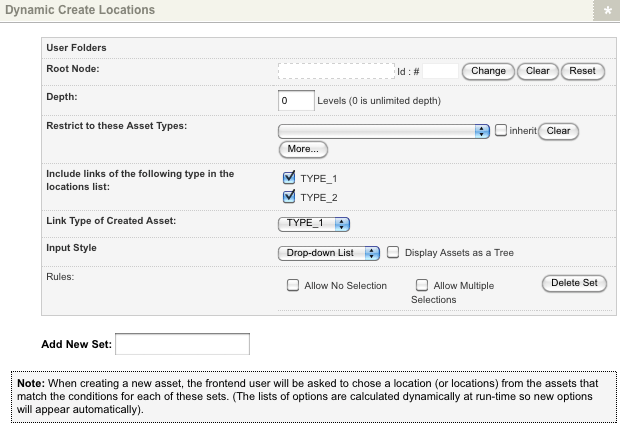
The fields available are as follows:
- Root node
-
Select a root node for the list. For example, if you want to create a list based on the assets in the
Usersfolder, select theUsers folderin this field. - Depth
-
Enter the number of levels of the asset hierarchy you want to show in the list. For example, if you only want to show the root node’s child assets, enter
1. By default, this value is0, meaning that all levels will be shown in the list. - Restrict to these asset types
-
Select which asset types will be available in the list. For example, if you only want to show the user groups under the root node in the list, select
User group.To select more than one asset type:
-
Click on the More… button. An additional list will appear on the screen.
To remove an asset type from the list:
-
Click the Clear button.
-
Click Save.
-
- Include links of the following type in the locations list
-
Select what type of link the asset must be included in the list. For example, if you only want to show the Menu link assets under the root node, only select Menu link.
- Link type of created asset
-
Select what type of link to create the asset as. The available options include Menu link, Hidden link, invisible link and reference link. Read the Linking assets documentation for more information on each of these link types.
- Input style
-
Select the style of the list you want to show on the account manager page. The options that are available include dropdown and radio buttons. Both of these formats are shown in the figure:
- Display assets as a tree
-
Select this option if you want to show the assets' hierarchy in the list based on the asset tree. An example of this is shown in the figure:
- Rules
-
The rules that are available for each dynamic create location are as follows::
- Allow no selection
-
Select this option if you want to allow the user to select no location from the list. If you select
Allow no selectionyou will need to select at least one fixed create location. Otherwise, the user account cannot be created as the system does not know where to create it. - Allows multiple selections
-
Select this option to allow the user to select multiple locations from the list. If they select more than one location, the user account will be linked under each location. In other words, it will be the same asset, with the same asset ID, appearing in multiple locations in the asset tree. If you select this option, depending on what value you have selected in the input style field, the list’s format will change. If you have selected dropdown, the list will appear in a box where the user can hold down the ctrl key to select multiple values. If you have selected radio buttons, a check box list will appear to tick multiple values. Both of these formats are shown in the figure:
- Delete set
-
Click the Delete set button to delete a dynamic create location. The list will be deleted. Once you have filled in the required fields, you need to add a keyword replacement to the account manager page so that the list will appear to the user. By default, this keyword replacement should be added on the Not logged-in bodycopy. The name of the keyword replacement will reflect the name you entered in the add new set field. For example, if you entered
Users folderwhen you created the dynamic create location, the keyword replacement you need to add will be Users folder field.To add additional dynamic create locations:
-
Enter the name of the location in the add new set field.
-
Click Save.
-
Create location rules
This section allows you to specify where the user account will be created based on a set of rules. For example, if the username starts with a, create it under the user group called A-K users.
To create a new rule:
-
Click the New rule link. Additional fields will appear:
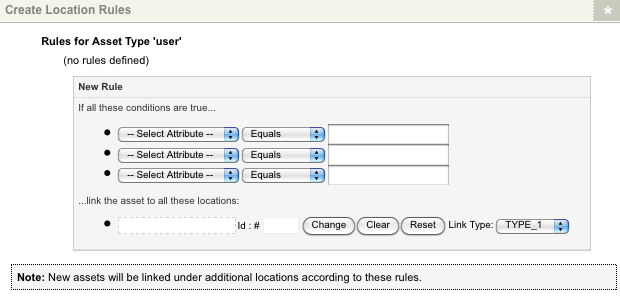
The fields available are as follows:
- If all these conditions are true
-
Add the conditions for this rule. Each condition consists of an attribute, a comparison rule, and a comparison value. The list of available comparison rules will include equals, starts with, ends with, and contains. To add a condition, select an attribute from the first list, select a comparison rule in the second list, and enter a value in the text box provided. You can add as many conditions as you want to the list. The rule is met when all conditions are true.
- Link the asset to all these locations
-
Select where you want to create the user account when the conditions have been met.
- Link type
-
Select what type of link to create the asset as. The available options include Menu link, Hidden link, invisible link and reference link. Read the Linking assets documentation for more information on each of these link types.
- Delete rule
-
Click the delete rule button to delete a rule. The rule will be deleted.
To add additional rules for an asset type:
-
Click the New rule hyperlink. Additional fields will appear in the create locations rules section.
-
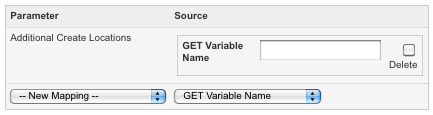
Additional create locations
This section allows you to specify where the user account will be created based on several different sources and should only be used by advanced users.
The fields available in this section are as follows.
- Additional location data sources
-
This section allows you to select which source to use to create the asset. To add a new data source:
-
Select additional create locations from the parameter list.
-
Select an option from the source list.
-
Click Save. Additional fields will appear in this section, as shown:
-
Enter the required value into the fields provided.
-
Click Save.
The options that are available in the source list include the following:
- GET variable name
-
This option allows you to enter a get parameter. For example, if you call the parameter
create_inthe account manager page can be called with a get string of?create_in=123to specify that the user account will be created as a child of asset123. You can then create a hyperlink with this get parameter to the account manager page on another page in your site. You can also pass-through what type of link the asset should be. For example, if you use the get string of?create_in=123-2, the user account will be created as a child of asset123and have a link type of Hidden link. - POST variable name
-
This allows you to enter a post parameter. When using this option, you can also pass-through the type of link to create the user account. For example, if you want to create the asset under asset
145and not show it in the menu, you can pass-through145-2. This setting will create the user account as a child of asset145, and it will have a link type of Hidden link. - SESSION variable name
-
This allows you to enter a session parameter.
- Current asset
-
This allows you to set the create location according to the asset the user is viewing.
- Current user
-
This allows you to set the create location to the user currently viewing the page. This can be a signed-in user.
- Current site
-
This allows you to set the create location to the site the user is currently viewing.
-
- Set value
-
This allows you to enter a static value.
- Any super global
-
This allows you to enter a value for any of the major super global arrays. The SESSION, POST, and GET variables will be checked in succession until a value is found.
To delete a source:
-
Click the Delete box.
-
Click Save.
To add additional sources, use the lists provided in the additional location data sources section.
- Default link type
-
Select what type of link to create the user account. This setting will only be used if the link type has not been specified in the additional location data sources section. The available options include Menu link, Hidden link, invisible link and reference link. Read the Linking assets documentation for more information on each of these link types.
- Permitted tree locations
-
This field allows you to specify that the new user account can only be created in specified locations beneath a particular root asset. To add additional tree locations:
-
Click the More… button – an additional field will appear on the screen. To remove a tree location:
-
Click the Clear button.
-
Click Save.
-
- Permitted asset types
-
This field allows you to specify that the create location specified must be of a particular asset type, for example, a user group. You can select as many asset types as you want by clicking on the More… button. To delete an asset type from the list:
-
Click the Clear button.
-
Click Save.
-
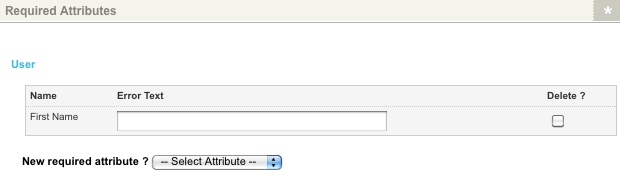
Required attributes screen
The required attributes screen allows you to select which fields are mandatory when creating a user account.
From the list provided:
-
Select the attribute you want to make required.
-
Click Save. Additional fields will appear, as shown:
-
Enter an error message to show the user if they have not filled in this field.
-
Click Save.
If you no longer want to make this attribute mandatory:
-
Click Delete
-
Click Save.
For example, if you use email validation on the Details screen, the username and email become mandatory. Error messages appear on the required attributes screen, as shown in the figure:
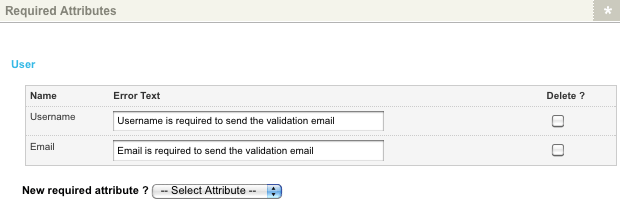
You can change the error message that is shown for either field in the error text field. To add additional attributes to the required fields:
-
Select the attribute from the new required attribute list.
-
Click Save.
Messages screen
The message screen allows you to change the messages shown to the user on the account manager page.
Login
This section allows you to specify the messages to be displayed to the user on the Not logged-in bodycopy if they are signing in.
The messages available are as follows:
- Invite
-
enter a message to show to the users to invite them to sign in. This message will appear when the keyword replacement login invite is used. To edit the message, click on the
icon – a WYSIWYG editor will appear where you can edit the message.
By default, this message will be:If you already have an account, sign in using the form below.
- Error
-
Enter a message to show to the user if they have entered an incorrect user name or password when they were trying to sign in. This message will appear when the keyword replacement login error message is used. To edit the message, click on the
icon – a WYSIWYG editor will appear where you can edit the message.
By default, this message will be:Incorrect username or password entered. Please try again.
Create account
This section allows you to specify the messages displayed to the user on the Not logged-in bodycopy when they are creating their user account.
The messages available are as follows:
- Invite
-
enter a message to show to the users to invite them to create a user account. This message will appear when the keyword replacement create asset invite is used. To edit the message, click on the
icon – a WYSIWYG editor will appear where you can edit the message.
By default, this message will be:Sign up for an account using the form below.
- Error
-
enter a message to show to the user if the new user account cannot be created. This message will appear when the keyword replacement create asset error message is used. To edit the message, click on the
icon – a WYSIWYG editor will appear where you can edit the message.
By default, this message will be:Your account was not created. Ensure you have entered a username and password and try again.
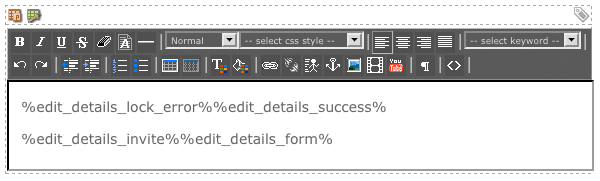
Edit your details
This section allows you to specify the messages displayed to the user on the signed-in bodycopy when editing their account details. The messages available are as follows:
- Invite
-
Enter a message to show to the user to invite them to edit their user account. This message will appear when the keyword replacement edit details invite is used. To edit the message, click on the
icon – a WYSIWYG editor will appear where you can edit the message.
By default, this message will be:
Edit your details using the form below.
- Success
-
enter a message to show to the user once they have edited their account details. This message will appear when the keyword replacement edit details success message is used. To edit the message, click on the
icon – a WYSIWYG editor will appear where you can edit the message.
By default, this message will be:Your account details have been updated.
- Lock error
-
enter a message to show to the user if they cannot get the lock to edit their account details. This message~ will appear when the keyword replacement lock error message is used. To edit the message, click on the
icon – a WYSIWYG editor will appear where you can edit the message.
By default, this message will be:Failed to acquire lock for editing. Your account details are displayed below.
Send validation
This section allows you to specify the message to be displayed to the user when resending the validation email.
The messages available are as follows:
- Success
-
enter a message to show to the user when they have successfully resent the validation email. This message will appear when the keyword replacement resend validation success is used. To edit the message, click on the
icon – a WYSIWYG editor will appear where you can edit the message. - Error
-
enter a message to show to the user when they cannot resend the validation email. This message will appear when the keyword replacement resend validation error is used. To edit the message, click on the
icon – a WYSIWYG editor will appear where you can edit the message.
Pending accounts screen
If you decided to use email validation on the details screen, the pending accounts screen allows you to manage the user account that the user has not verified.

By default, if no user accounts are awaiting validation, the manually validate list will be empty, as shown in the figure above. When a user account has been created and awaiting validation, it will appear in the pending accounts user group under the asset tree’s account manager page. It will also be listed on this screen, as shown:

For each user account listed, you can manually validate the account by clicking the validate field and clicking save. This validation will move the user account from the pending accounts user group into the correct location. If you want to delete the user account:
-
Click the Delete box.
-
Click Save.
This action will permanently delete the user account from the system.
Not logged-in bodycopy
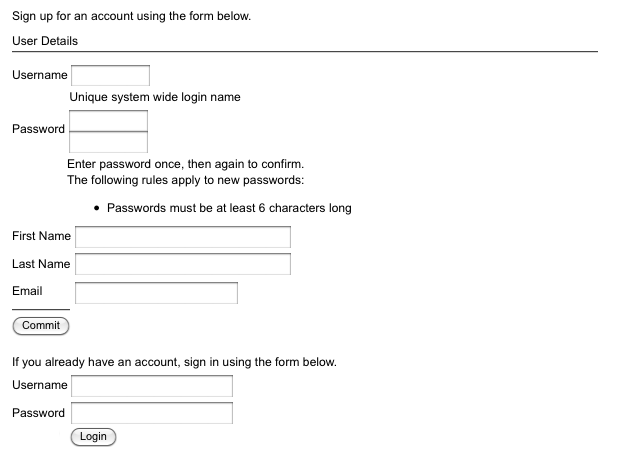
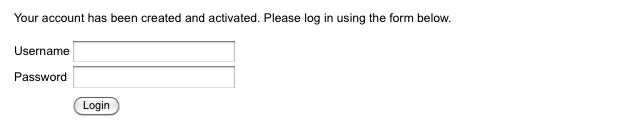
The Not logged-in bodycopy asset is used to define what to show the user when they are not signed-in. This layout should invite users to sign in or allow them to create a user account for themselves. For example, for the account manager page shown in the figure, the form allows the user to create an account, and the login fields are being shown. This layout has been defined in the Not logged-in bodycopy.
To change what information is being shown:
-
Right-click on the Not logged-in bodycopy in the asset tree.
-
Select Edit contents.
-
Click on the
icon – the WYSIWYG editor will appear. -
Use keyword replacements and formatting to layout the information to show on the page.
By default, the information shown in the figure will appear in the WYSIWYG editor.
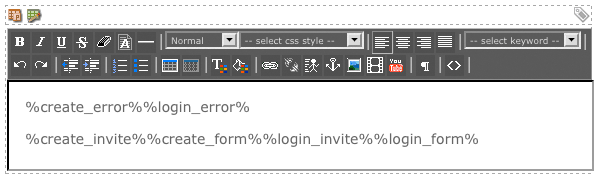
Keyword replacements on the Not logged-in bodycopy
A list of keyword replacements is provided in the WYSIWYG editor toolbar on the edit contents screen of the Not logged-in bodycopy.
The keywords mentioned in this section are available in the Account manager keyword replacements chapter if you need to access them outside the WYSIWYG editor.
You can use these keyword replacements in conjunction with text, images, and links to layout what to show for each asset in the list. The standard keyword replacements that are available include the following:
- Login invite
-
This will show the login invite message that has been defined on the messages screen.
- Login form
-
This will show the login form with a username and password field.
- Login error message
-
This will show the login error message that has been defined on the messages screen.
- Create asset invite
-
This will show the create account invite message that has been defined on the messages screen.
- Create asset form
-
This will show the form where the user can create their user account.
- Create asset error message
-
This will show the create account error message that has been defined on the messages screen.
- Resend validation error
-
This will show the send validation success message that has been defined on the messages screen. You should include this keyword replacement if you are using email validation.
- Resend validation form
-
This will show the form that will allow the user to resend the validation email to themselves. You should include this keyword replacement if you are using email validation.
- Resend validation success
-
This will show the send validation error message that has been defined on the messages screen. You should include this keyword replacement if you are using email validation.
Customizing the create form layout
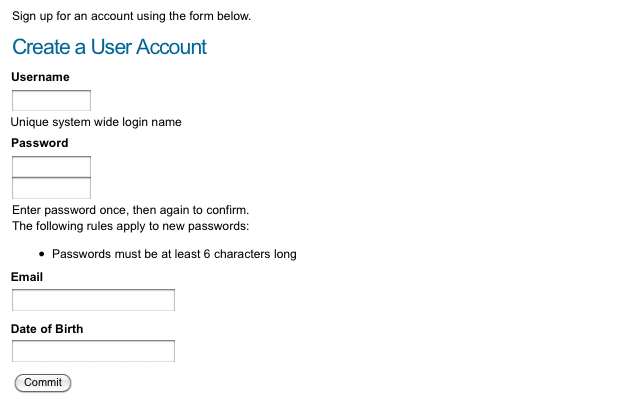
On the account manager page, you can change the layout of the create form. By default, when you add a user account, the default create form that is seen in the administration interface is used, as shown:
To create a customization:
-
Go to the Details screen of the account manager page.
-
Click the
Create form customizationoption. -
Click Save.
A layout asset will be added under the account manager page in the asset tree.
If you would like to change this layout, add attribute fields, or add metadata fields, you can customize the create form.
To change what information is being shown:
-
Right-click on the layout asset in the asset tree.
-
Select Edit contents.
-
Click on the
icon – the WYSIWYG editor will appear. -
Use keyword replacements and formatting to layout the information to show on the page.
An example layout is shown:
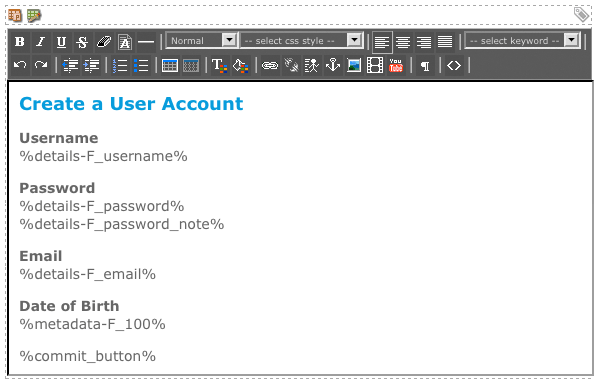
This layout includes the Username Field, Password Field, Password Rules, Email Field, and the Date Of Birth Metadata Field. When a user creates a user account, the fields shown in the figure will be shown instead of the default create form.
Keyword replacements on the layout assets
To find out what keyword replacements you can use on the layout asset:
-
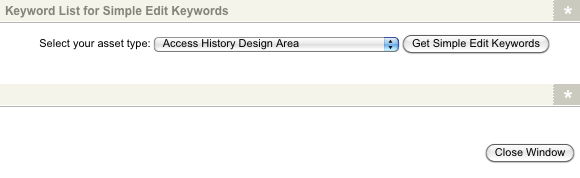
Click on a list of specific asset keywords available for use in inline edit mode hyperlink on the edit contents screen. A pop up will appear as shown in the figure:
-
Select the user asset type in the list provided.
-
Click
Get simple edit keywords. The list of available keyword replacements will appear, as shown: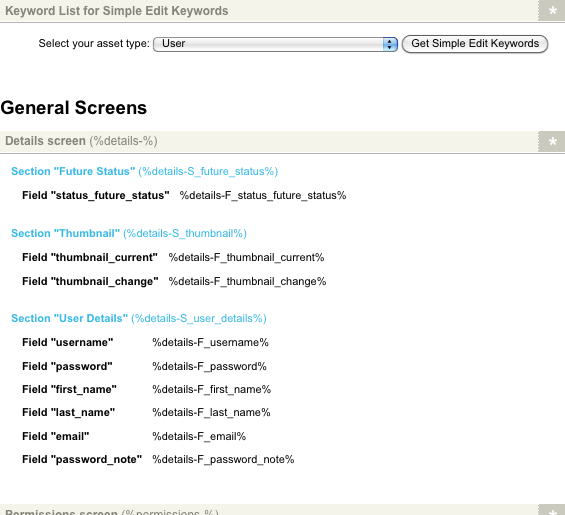
-
Copy the keyword replacements you want to use and paste them into the WYSIWYG editor.
Keyword replacement for the save button
In addition to the keyword replacements for each field, you need to add the Save button; otherwise, the user can not submit their information to create the user account.
This keyword replacement is %save_button%.
Keyword replacement for metadata fields
You can change the layout of the fields by using the metadata field keyword replacements.
This keyword replacement has the format %metadata-f_<fieldid>% where <fieldid> is the asset ID of the metadata field.
For example, in the layout created above, the keyword replacement %metadata-f_676% was used to show the description field from the metadata schema.
Created but not live bodycopy
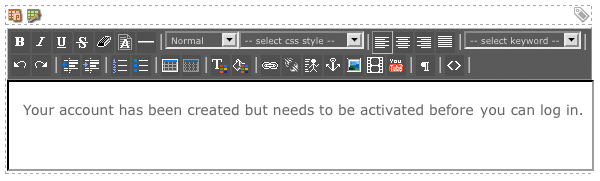
The Created but not live bodycopy is used when email validation is not being used. It defines the layout once a user account has been created with Under construction status. This layout should inform the user that their account has been created but will not be active. For example, for the account manager page shown in the figure, a message is shown informing the user that their account has been created but is not active. This layout has been defined in the created but not live bodycopy.

To change what information is being shown:
-
Right-click on the Created but not live bodycopy in the asset tree.
-
Select Edit contents.
-
Click on the
icon – the WYSIWYG editor will appear. -
Use keyword replacements and formatting to layout the information to show on the page.
By default, the information shown in the figure will appear in the WYSIWYG editor.
Keyword replacements on the created but not live bodycopy
A list of keyword replacements is provided in the WYSIWYG editor toolbar on the edit contents screen of the created but not live bodycopy.
The keywords mentioned in this section are available in the Account manager keyword replacements chapter if you need to access them outside the WYSIWYG editor.
You can use these keyword replacements in conjunction with text, images, and links to layout what to show for each asset in the list. The standard keyword replacements that are available include the following:
- Created asset ID
-
This will show the ID of the user account that has been created.
- Created asset name
-
This will show the first and last name of the created user account.
- Created asset short name
-
This will show the first and last name of the created user account.
- Created asset URL
-
This will show the URL of the user account that has been created.
- Created asset simple edit URL
-
This will show the URL of the user account that will take the user to the simple edit interface.
- Created asset admin interface URL
-
This will show the URL of the user account that will take the user to the administration interface.
- Created account invite
-
This will show the create account invite message that has been defined on the messages screen.
- Create account form
-
This will show the form where the users can create their user account.
- Create account error message
-
This will show the create account error message that has been defined on the messages screen.
- Resend validation form
-
This will show the form that will allow the user to resend the validation email to themselves. You should include this keyword replacement if you are using email validation.
Created, live bodycopy
The created, live bodycopy is used when email validation is not being used and defines the layout once a user account has been created with live status. This layout should inform the user that their account has been created and is active. For example, for the account manager page shown in the figure on the following, a message is shown informing the user that their account has been created and can sign in. This layout has been defined in the created, live bodycopy.
To change what information is being shown:
-
Right-click on the Created, live bodycopy in the asset tree.
-
Select Edit contents.
-
Click on the
icon – the WYSIWYG editor will appear. -
Use keyword replacements and formatting to layout the information to show on the page.
By default, the information shown in the figure will appear in the WYSIWYG editor.

Keyword replacements on the created, live bodycopy
A list of keyword replacements is provided in the WYSIWYG editor toolbar on the edit contents screen of the created, live bodycopy.
The keywords mentioned in this section are available in the Account manager keyword replacements chapter if you need to access them outside the WYSIWYG editor.
You can use these keyword replacements in conjunction with text, images, and links to layout what to show for each asset in the list. The standard keyword replacements that are available include the following:
- Created asset ID
-
This will show the ID of the user account that has been created.
- Created asset name
-
This will show the first and last name of the created user account.
- Created asset short name
-
This will show the first and last name of the created user account.
- Created asset URL
-
This will show the URL of the user account that has been created.
- Created asset simple edit URL
-
This will show the URL of the user account that will take the user to the simple edit interface.
- Created asset admin interface URL
-
This will show the URL of the user account that will take the user to the administration interface.
- Created account invite
-
This will show the create account invite message that has been defined on the messages screen.
- Create account form
-
This will show the form where the users can create their user account.
- Create account error message
-
This will show the create account error message that has been defined on the messages screen.
- Resend validation form
-
This will show the form that will allow the user to resend the validation email to themselves. You should include this keyword replacement if you are using email validation.
Logged in bodycopy
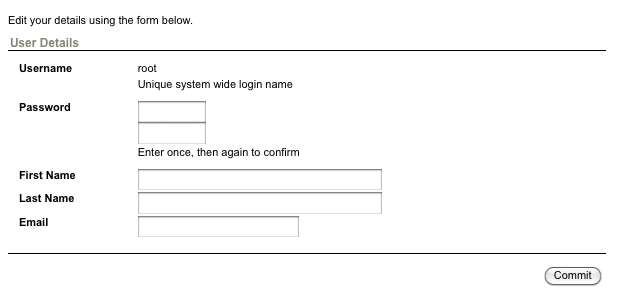
The signed-in bodycopy is used to define what to show the user when they sign into the system. This layout should allow users to update their account details. For example, for the account manager page shown in the figure, the user can edit their details. This layout has been defined in the signed-in bodycopy.
To change what information is being shown:
-
Right-click on the signed-in bodycopy in the asset tree.
-
Select Edit contents.
-
Click on the
icon – the WYSIWYG editor will appear. -
Use keyword replacements and formatting to layout the information to show on the page.
By default, the information shown in the figure will appear in the WYSIWYG editor.
Keyword replacements on the signed-in bodycopy
A list of keyword replacements is provided in the WYSIWYG editor toolbar on the edit contents screen of the signed-in bodycopy.
The keywords mentioned in this section are available in the Account manager keyword replacements chapter if you need to access them outside the WYSIWYG editor.
You can use these keyword replacements in conjunction with text, images, and links to layout what to show for each asset in the list. The standard keyword replacements that are available include the following:
- Create asset invite
-
This will show the create account invite message that has been defined on the messages screen. You should include this keyword replacement if you have set enter inline edit mode to no.
- Create asset form
-
This will show the form where the user can create their user account. You should include this keyword replacement if you have set enter inline edit mode to no.
- Create asset error message
-
This will show the create account error message that has been defined on the messages screen. You should include this keyword replacement if you have set enter inline edit mode to no.
- Edit details invite
-
This will show the edit your details invite message that has been defined on the messages screen.
- Edit details form
-
This will show the form where the user can edit their account details.
- Edit details success message
-
This will show the edit your details success message that has been defined on the messages screen.
- Lock error message
-
This will show the edit your details lock error message that has been defined on the messages screen.
- Logout form
-
This will show a button that allows the user to logout of the site.
Created, awaiting validation bodycopy
The created, awaiting validation bodycopy is used when email validation is used and defines the layout once a user account has been created. It should inform the user that an email has been sent to their email address with further instructions. For example, for the account manager page shown in the figure, a message is shown informing the user that their account has been created, and it needs to be verified. This layout has been defined in the created, awaiting validation bodycopy.

To change what information is being shown:
-
Right-click on the Created, awaiting validation bodycopy in the asset tree.
-
Select Edit contents.
-
Click on the
icon – the WYSIWYG editor will appear. -
Use keyword replacements and formatting to layout the information to show on the page.
Keyword replacements on the created, awaiting validation bodycopy
A list of keyword replacements is provided in the WYSIWYG editor toolbar on the edit contents screen of the created, awaiting validation bodycopy.
The keywords mentioned in this section are available in the Account manager keyword replacements chapter if you need to access them outside the WYSIWYG editor.
You can use these keyword replacements in conjunction with text, images, and links to layout what to show for each asset in the list. The standard keyword replacements are the same as those available for the created but not live bodycopy.
Validated bodycopy
The Validated bodycopy is used when email validation is used and defines the layout once the user has verified their account. They will see this layout when they click on the URL within the email. For example, for the account manager page shown in the figure, a message is shown informing the user that their account has been created and can sign in. This layout has been defined in the Validated bodycopy.

Keyword replacements on the Validated bodycopy
A list of keyword replacements is provided in the WYSIWYG editor toolbar on the edit contents screen of the Validated bodycopy.
The keywords mentioned in this section are available in the Account manager keyword replacements chapter if you need to access them outside the WYSIWYG editor.
You can use these keyword replacements in conjunction with text, images, and links to layout what to show for each asset in the list. The standard keyword replacements are the same as those available for the created but not live bodycopy.