Details screen
The Details screen allows you to configure various settings, including what types of assets to list, the assets' status to list, and where to find the assets to list.
Read Asset details screen for more information about the status, future status, thumbnail, and details sections of the regular Details screen.
Asset selection
This section allows you to define which asset types to show and their status to include in the list.
The fields that are available in this section are as follows:
- Asset types to list
-
Select the types of assets to list on the page. To select more than one asset type, click on the More button. An additional list will appear on the screen. You can also check the Inherit box to specify that the asset listing should include all child types of the selected asset type.
- Asset statuses to list
-
Select the asset’s status to be included in the asset listing. For example, if you want to show all Under Construction and Live assets, select both statuses. To select multiple statuses, hold down the Ctrl key on the keyword and click on the status in the list. If no statuses are selected, the asset listing will work out which assets to show based on the user’s permissions viewing the page. For example, a public user will only see the live assets that have Public read permission granted.
By not selecting anything in the Asset statuses to list field, you can improve the asset listing performance. If no statuses are selected, the asset listing will only have to filter the list based on permissions and not perform a second filter on the asset status. - Asset access to list
-
Select what permission the user must have on the asset to be included in the list. For example, if you select Write, it will only show the assets for which the user has write permission. Include effective permissions allows you to select whether the user only sees the assets if they have that specific permission. For example, selecting Write and Include effective permissions will show the assets on which the user has write and admin permission. If you clear this option, it will only show the assets on which the user has write permission.
- Exclude assets
-
Select which assets from the asset tree to exclude in the asset listing. For example, if you do not want to show the home page in the list, select it from the asset tree in this field.
- Exclude root node
-
Select which root nodes to be excluded from the asset listing. For example, if you do not want to show the files in the documents folder in the list, select it from the asset tree in this field.
- Exclude this asset
-
Select whether to list the asset that is currently being viewed. For example, if the asset listing page is nested in the site design, it will not list an asset if a user is currently viewing it.
Asset locations
This section allows you to define where to find the assets to show on the asset listing page.
The fields that are available in this section are as follows:
- Root nodes
-
Select which section of the system to show in on the asset listing page. For example, if you want to list all of the PDF files under your site, select your site asset in this field.
To select another root node:
-
Click the More button.
-
An additional field will appear.
To remove a root node:
-
Click the Clear button.
-
Click Save.
-
- Root node logic
-
Select whether the asset must be a child of all root nodes or at least one root node. For example, if you have two or more root node folders selected, you must select whether the asset must be a child of both folders or at least one folder.
- Direct links only
-
Select
Yesto only show direct child assets of the root node. These are the assets that are directly linked to the root node.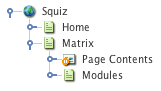
In this example, if the root node was the Squiz site and direct links only were set to
Yes, it will only show the home page and the matrix page.If this is set to
No, all assets above or below the root node will be shown. In other words, it will show the Home page, the Matrix page, and the Modules page. - Lookup direction
-
Select the
Up the treeoption to list assets above the root node. Select theDown the treeoption to list assets below the root node. - Minimum depth/height
-
Enter the minimum level from which to list assets.
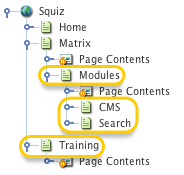
As shown in the example, when this field is
2, the asset listing includes Modules (level 2), CMS (level 3), Search (level 3), and Training (level 2) assets.It will not print the Home and Matrix assets as they are level 1 assets. This option is only used if Direct links only is set to
No. - Maximum depth/height
-
Enter the maximum level from which to list assets.
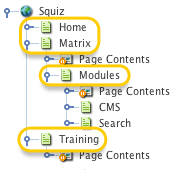
In this example, if Squiz was the root node, the Minimum depth/height field was set to
1, and this field was set to2, the asset listing will include Home (level 1), Matrix (level 1), Modules (level 2) and Training (level 2) assets.It does not include the "CMS" and "Search" assets as they are level
3assets.This option is only used if Direct links only is set to
No.Setting the Minimum depth/height field to 0, the assets selected in the root node field will be shown in the asset listing.When the Maximum depth/height field is set to
0, only the assets selected in the root node field will be shown. By doing this, you can show only the assets you choose.For example, if you only want to show the Home, Search page, and Site Map, select these three assets in the root node field and set the minimum and maximum depth/height field to
0. Only these three assets will be shown. - Link types
-
Select the type of link the assets must be included on the asset listing page. The default value for this field is Menu and Hidden. This setting only applies if the Direct links only field is on. To select multiple link types from the list, hold down the Ctrl key on the keyboard and click on the link type.
- Link value
-
Enter a value by which to filter the listed assets. This value will be checked against what you enter on the linking screen of an asset-based on the selected Link value filtering logic. For this to work, the field Enable link value filtering needs to be set to Yes.
- Link value filtering logic
-
Select if the listed assets should have link values equal or different to the link value. The values available in this field are
MatchandDoes not Match. For example, choose an image orientation on the Linking screen of each image. You can create an asset listing that will only show images in that orientation using that choice as the link value and setting the Link value filtering logic toMatch. If the Link value filtering logic were set toDoes not match, the asset listing would only show images not in the chosen orientation. By default, this field is set toMatch. - Enable link value filtering
-
Select whether to enable filtering by the link value. If this is set to
Yes, only assets with the link value that meets the Link Value and Link Value Filtering Logic criteria will be returned.
List formatting
This section allows you to change the format of the asset listing page.
The fields that are available for this section are as follows:
- List format
-
This option allows you to change the format of the list. The options that are available in this list are as follows:
- Standard list
-
This format allows you to display the list on a single page or broken up across multiple pages, such as ten assets per page.
- A-Z
-
This format displays the list grouped by the first character of the asset’s short name. If you select this option, add the keyword replacement page list on the page contents bodycopy. This format will show a hyperlink to each character in the alphabet. When you click on the hyperlink, it will list the assets that start with that character. Assets that start with numbers or other characters will be listed under a hyperlink called [Other]. You can change this hyperlink’s wording in the Non-A-Z page text field, outlined below. An A-Z listing can also be created on a single page by configuring the A-Z Listing Style and A-Z Letter Format fields, outlined below. For more information on this format, refer to the A-Z Listing chapter in this manual.
- Custom grouping
-
This format displays assets grouped by the grouping conditions set up on the Asset Grouping screen. For more information about this screen, refer to the Asset Grouping Screen chapter in this manual.
- Random
-
This format randomly displays results from the list. For more information about setting up a random list, refer to the Random Listing chapter in this manual.
- Assets per page
-
Enter the number of assets to show on a page. You can use this field to restrict the number of assets seen on the page or break up the assets into several pages. To do this, add the keyword replacements Previous page link and Next page link to the page contents bodycopy so a user can navigate to the next page of the asset on the frontend. Keyword replacements can also be used within this field to set the number of assets per page dynamically.
Matrix will throw a warning that the listing exceeds the performance threshold if you try to list more than 1000 assets on a single page. However, the system will allow you to list as many assets as the PHP web memory limit will allow. Therefore the recommendation is to stay under 1000. - Start position
-
This field allows you to specify an asset position to start the listing. By default, this field is set to
0, meaning it is disabled, and the listing will list the assets as usual. Setting this field to5, for example, will start the listing from the fifth asset and list the remaining assets from that position, as shown: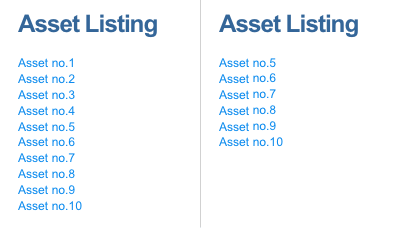
When using custom groupings, this setting will apply to the individual group listings.
- A-Z listing style
-
This preference allows you to determine whether to list assets on a single page or multiple pages using the A-Z list format. By default, this preference will be set to Multiple pages. This default means that users will navigate through pages of assets, with each page representing a different letter. A single page A-Z listing will list all these assets on the one page, categorized under letter headings. Clicking a letter on the page list at the top of the screen will automatically take you to the page’s corresponding section. For more information on the A-Z list format, refer to the A-Z Listing chapter in this manual.
- A-Z letter format
-
This field allows you to format the letter headings on an A-Z listing using multiple pages. This format uses the keyword replacement
%letter_group%to display the letters in the headings. For more information on the A-Z list format, refer to the A-Z Listing chapter in this manual. - Previous link
-
Enter the text used for the hyperlink to the previous results page. This text will be shown when you add the keyword replacement Previous page link to the page contents bodycopy. By default, this is set to
Previous. - Next link
-
Enter the text used for the hyperlink to the next results page. This text will be shown when you add the keyword replacement Next page link to the page contents bodycopy. By default, this is to
Next. - Non-A-Z page text
-
By default, this field will only appear on the Details screen when the list format has been set to A-Z listing. It allows you to change the wording for the hyperlink [Other]. This hyperlink will display the assets that start with numbers or special characters. For more information on the A-Z listing, refer to the A-Z Listing chapter in this manual.
- Page link format
-
This field defines the individual layout of items on the listing’s linked page list when you list results over multiple pages. If you are using the A-Z list format, this will define the individual layout of items on the linked character list.
- Current page format
-
This format defines the layout of the current page number on the listing’s linked page list when listing results over multiple pages. For example, you can use the A-Z listing format to define an item’s layout in the linked character list when no results are found under that particular letter.
- Hide unlinked navigation text
-
This option allows you to hide any unlinked navigation text on the search results when you list results over multiple pages. That means the previous page link will not appear on the first page of the results, and the next page link will not appear on the last page of the results.
Customize bodycopies
This section allows you to specify whether the asset listing should use the Page contents (no results) bodycopy.
By default, the Customize no results bodycopy will be set to Yes.
This default means that the asset listing will use the contents that have been specified in the Page contents (no results) bodycopy.
Set this field to No if you do not want to use this Bodycopy.
List position settings
This section allows you to specify that a particular asset is displayed in a particular position in the list.
For example, if you want the Home page to always appear as the first asset in the list, you would specify an asset position of 1 for the Home page.
By default, no positions have been set.
To set a position in the New asset position field:
-
Enter the position number in the first box.
-
Select the asset in the second box.
-
The position setting will appear in the asset positions list:
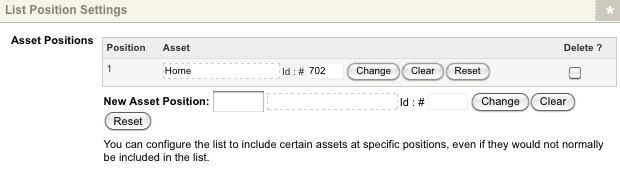
-
Use the fields available in the New asset position field to add additional position settings.
-
Click the Change button if you wish to change an existing asset position setting.
-
Select the Delete box and then click Save to remove a list position setting.
Dynamic parameters
This section allows you to specify an alternate root node for the asset listing based on numerous parameters such as:
-
GET, POST or SESSION variables
-
current asset, user, or site
-
Set Value or any global value.
Any dynamic root node passed to the asset listing must be located under the asset(s) specified in the root node field on the Details screen.
The fields that are available in this section are:
- Parameter
-
Select the parameter to replace in this field. The options available include Replacement root node for the listing or Array of specific asset IDs or selection group.
- Replacement root node for the listing
-
This will allow you to supply one or more asset IDs as the root nodes for the asset listing.
To pass multiple root nodes, use a comma-separated list: "1111,2222,3333" - Array of specific asset IDs or selection group
-
This will allow you to supply one or more asset IDs as the specific assets to list.
Multiple specific IDs for the Array of specific asset IDs option can be entered as a set value, delimited by commas or semicolons.
The value can also be written as an array. For example:
"[1234, 5678]". - Source
-
Select where the asset listing should source the alternate root node. You can select one of the following options:
- GET Variable Name
-
This allows you to enter a GET parameter. You can set a link on another page to call this page with the appropriate GET parameter. Alternatively, this can be used in conjunction with the structured root selector options to set the root node to an asset the user selects from a list. For more information on setting up the structured root selector, refer to the Structured root selector options.
- POST Variable Name
-
This allows you to enter a POST parameter.
- SESSION Variable Name
-
This allows you to enter a SESSION parameter.
Use the list_current_asset_idsession variable on a nested asset listing page to display additional information from the listed assets' children.
For more information, refer to the List current asset ID chapter in this manual.
- Current Asset
-
This allows you to set the asset listing root node according to the asset the user is viewing. For example, say you have an article folder on your site. There are several topic pages with articles for that topic stored beneath it in the hierarchy under that folder. When a user views a topic page, you want to display the articles for that page in the design sidebar. In this case, you would nest an asset listing in your design and set the root node for the asset listing in the dynamic parameters section to be the current asset. The asset listing will then list the articles for the topic the user is currently viewing.
- Current user
-
This allows you to set the asset listing root node to the user who is currently viewing the page. This function can be a signed-in user.
- Current site
-
This allows you to set the asset listing root node to the site the user is currently viewing.
- Set value
-
This allows you to enter a static value. You can set multiple root nodes using this source type by entering a comma-separated list of asset IDs. For example, 2020,2021,2025.
- Any global value
-
This allows you to enter a value for any of the major "super global" arrays. The SESSION, POST, and GET variables will be checked in succession until a value is found.
- If dynamic root not found
-
Specify the action to take when no dynamic root is returned from the configured Dynamic Parameter. The options available are:
- Use static root node
-
Reverts back to the asset listing Page’s static root node settings. This setting will either be an asset(s) configured in the Root Nodes field or the asset listing page itself.
- Return empty result
-
Returns no results on the asset listing Page. This option is the default value for this field.
- If asset selection not specified
-
Specify the action to take when no asset selection is returned from the configured Dynamic Parameter. The options available are:
- Use static root node
-
Reverts back to the asset listing Page’s static root node settings. This setting will either be an asset(s) configured in the Root Nodes field or the asset listing page itself.
- Return empty result
-
Returns no results on the asset listing page.
To set up a dynamic parameter:
-
Select the parameter you want to use from the first list.
-
Select a source from the second list, and click Save.
-
An additional field will appear in the Dynamic Parameter section:
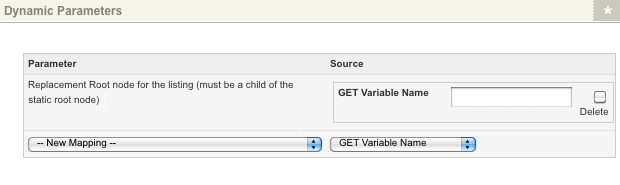
-
Enter the value for the source into the field.
-
Select the Delete box and click Save to delete a dynamic parameter.
Using multiple sources
If you use multiple sources, only the first one that returns a non-empty value will be used.
In an example where we have three different GET sources, Matrix first checks the first source, root-a, and if it contains a value, it will use that as the root node and ignore all the other sources. If root-a returns an empty string, then Matrix will check the next value, which is root-b, and so on.
|
If you add an array of specific asset IDs parameter source, it will always overwrite any replacement root node parameter sources you might have already added.
Even if the array returns an empty value, it will NOT proceed to check the replacement root nodes. In summary, only one method can be used at any time. |
Structured root selector options
This section allows you to set up a list of root nodes that the user can select from the page to use as a base for the listing.
The following fields are available in this section:
- Name
-
Enter the name for the structured root selector. The name you enter into this field must be the same as the name you use for the GET variable name parameter in the Dynamic Parameters section.
- Root node
-
Select the parent asset for the list of assets.
- Depth
-
Enter the number of levels of assets to include in the list. For example, if you only want to show the assets under the root node, enter
1into this field. If you enter0, it will show all the specified asset types under the root node. - Asset types
-
Select the asset types to show in the list. For example, if you only want to show the folders under the root node in the list, select Folder.
You can also select the Inherit box to specify that the list should include all child types of the selected asset type. To add additional asset types, select More. An additional field will appear on the screen. To delete an asset type from the list, select Clear.
- Style
-
Choose the style of the list to show on the asset listing page. You can choose from a drop-down list, radio buttons, or checkboxes.
- Width
-
Enter the width of the list. If you leave this as
0, the list will automatically resize to the longest name. - Height
-
Enter the height of the list.
- Separator
-
Enter the separator character to use in the list to show the asset’s hierarchy. By default, this is set to
-.
For more information on how to set up the structured root node list, read the Structured root selector options documentation in this documentation.
Button text
This section allows you to change the wording of the buttons for the asset listing page.
The available fields are as follows:
- Submit button text
-
Enter the text to show on the Submit button. By default, this text is Submit. This button is shown when the keyword replacement submit button is used on the page contents bodycopy.
- Reset button text
-
Enter the text to show on the Reset button. By default, this text is Reset. This button is shown when the keyword replacement reset button is used on the page contents bodycopy.