Create main menus using edge side includes (ESIs)
Main menus can often hold a long list of page names and links. They can also sometimes include dynamically-updated listings, such as the latest three media releases posted in the News area. With dynamically-updated menus like these, it’s often tricky to clear the proxy cache sitewide when elements within the menu change.
Proxy cache issues disappear if you are running Squiz Content Management behind a caching proxy that supports ESI (like Squiz Edge). You can bring in your menu using an ESI tag and instantly update it on every page of your site using a single cache clearing request.
This tutorial shows you how to create main menus in Squiz Content Management that you can include in your design using an Edge Side Include (ESI) tag.
This example uses a simple two-level main menu. However, the concept applies to custom mega menus that feature things like asset listings.
Before you start
Meet the following prerequisites before continuing with this tutorial:
-
You have a basic understanding of what ESIs are and how ESI tags work. Some starting resources include:
-
You have verified that your site uses ESIs by inspecting one of your pages and verifying that it contains the
viaheader withsquizedge.netin it. For examplevia: 1.1 squizedge.net. -
You have downloaded the website starter assets used in this tutorial and have imported them into your Squiz Content Management system using the Import Assets from XML tool.
Create the menu design asset
The first thing to do is to create the design that powers the menu. The standard way of doing this in Squiz Content Management is using the Menu Design Area (which is included in the Starter Template you imported).
-
Within the Menu Design Area, create a new Design asset named "Main Menu (ESI)" for the menu.
-
Go to the edit screen of the Design and add the following code for the main menu HTML markup:
<mysource_area id_name="nav" design_area="menu_normal"> <mysource_set name="show_subs" value="always" /> <ul class="nav"> <mysource_asset> <li class="nav-item dropdown"> <a href="<mysource_print var='asset_link'/>" class="nav-link"><mysource_print var='asset_short_name'/></a> <mysource_sub design_area="menu_normal"> <mysource_set name="show_subs" value="always" /> <ul class="dropdown-menu"> <mysource_asset> <li class="nav-item"> <a href="<mysource_print var='asset_link'/>" class="nav-link"><mysource_print var='asset_short_name'/></a> </li> </mysource_asset> </ul> </mysource_sub> </li> </mysource_asset> </ul> </mysource_area> -
Click Save and keep the asset open for now.
Apply the design to the site
You render the menu based on the URL of the current site. To do that, apply the "Main Menu (ESI)" design to the Site asset using custom design code.
-
Go to the Settings screen of the Site asset.
-
Scroll down to the Create New User Defined Design section.
-
Add the menu design asset with the Design Code of "menu".
-
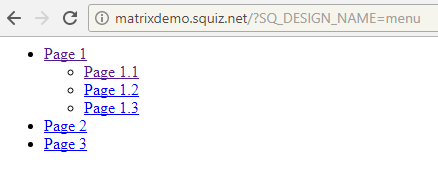
Preview the Site asset with
?SQ_DESIGN_NAME=menuin the URL.
Your site should have a menu that looks like this example:
Include the menu as an ESI
Update the main site design to render the menu using an ESI tag instead of inline menu design tags.
-
Find where the menu prints in the site design.
In the Project Template it is within <mysource_sub design_area="menu_normal">. -
Replace the whole
menu_normaldesign area with the following ESI tag:<nav class="navbar-inverse"> <div class="container"> <mysource_area id_name="header_content" design_area="nest_content" <esi:include src="%globals_site_url%?SQ_DESIGN_NAME=menu"/> <!-- Main Menu--> </div> <!--.container--> </nav> <!--.navbar-inverse-->
Add active classes
If you have a keen eye, you may have noticed that the new "Main Menu (ESI)" design does not have the mysource_set tags for printing the "active" class.
Currently, the menu area is not aware of which asset gets printed on the frontend.
To achieve this functionality, you use the ESI arguments feature.
When you include the ESI tag in the design, you can pass some additional information about the current page that the user is viewing, using standard Squiz Content Management keywords. You can then pass these as ESI arguments that the menu design can subsequently interpret and use to print conditional content.
Because the menu goes down to two levels, you need to pass two values to the ESI tag:
- The URL of the current level 1 section
-
%frontend_asset_linking_lineage^index:1^as_asset:asset_url% - The URL of the current level 2 section
-
%frontend_asset_linking_lineage^index:2^as_asset:asset_url%
For example, if the current URL of the page is /https://www.site.com/about/our-history/2000, the above keywords print:
Add the keywords to the ESI URL as two separate ESI arguments (which makes the tag pretty long).
<esi:include src="%globals_site_url%?SQ_DESIGN_NAME=menu&esi_section1=%frontend_asset_linking_lineage^index:1^as_asset:asset_url%&esi_section2=%frontend_asset_linking_lineage^index:2^as_asset:asset_url%"/>You can now use these ESI arguments in the menu design area to print some conditional content based on their values.
You do this by using the <esi:choose> tag to print the "active" class for each level of the menu, providing that the menu item’s URL matches the section URL.
<li class="<esi:choose><esi:when test="$(ESI_ARGS{section1}) == '<mysource_print var='asset_link'/>'">active</esi:when></esi:choose>">This code checks if the value of the ESI argument section1 is equal to the current menu item on the frontend. If it is, the code prints the string active.
If you apply this evaluation logic to both menu levels, you end up with a menu design area that looks like this example:
<mysource_area id_name="nav" design_area="menu_normal">
  <mysource_set name="show_subs" value="always" />
  <ul class="nav">
    <mysource_asset>
      <li class="nav-item <esi:choose><esi:when test="$(ESI_ARGS{section1}) == '<mysource_print var='asset_link'/>'">active</esi:when></esi:choose>">
        <a href="<mysource_print var='asset_link'/>" class="nav-link"><mysource_print var='asset_short_name'/></a>
          <mysource_sub design_area="menu_normal">
          <mysource_set name="show_subs" value="always" />
          <ul class="dropdown-menu">
            <mysource_asset>
              <li class="nav-item <esi:choose><esi:when test="$(ESI_ARGS{section2}) == '<mysource_print var='asset_link'/>'">active</esi:when></esi:choose>">
                <a href="<mysource_print var='asset_link'/>" class="nav-link"><mysource_print var='asset_short_name'/></a>
              </li>
            </mysource_asset>
          </ul>
        </mysource_sub>
      </li>
    </mysource_asset>
  </ul>
</mysource_area>
Navigate around the different pages of your site. You should see that the active class is correctly applied based on which page and section of the site you are viewing.
Summary
This concept can take a while to understand fully. But once you understand the concept, you can apply this method to many other implementation challenges.
Whenever you do a hard-refresh on any page, doing so clears the cache on the main menu and updates the cache on any other page using the menu.
You could also use a Trigger to clear the Edge cache on the URL of the menu ESI tag whenever a level-1 or level-2 page has its name or URL updated.