Online quiz
The online quiz allows you to build a page on your site where your users can answer a series of multiple-choice questions and receive a mark based on their answers. It can be set up to select several random questions from a pool. Once the user has answered the questions, their results will be displayed on the screen. An email containing their results can also be sent to a specified email address.
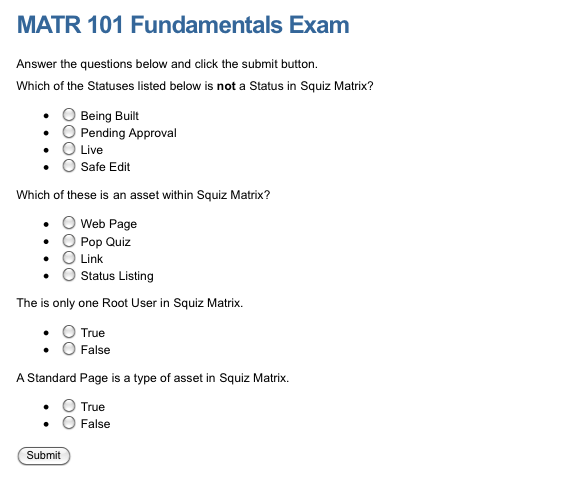
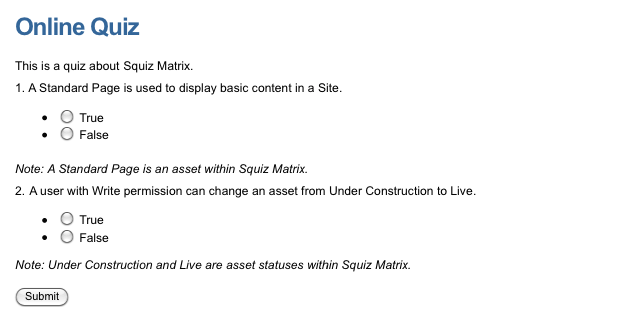
An example of a quiz is shown in the figure:
The online quiz has several different functionalities that can be used when you are creating a quiz.
Some of these functionalities include:
-
Grouping similar questions and showing information in the results based on the user’s score for these questions.
For example, if they get a score of10out of10for a group of questions, show Excellent. -
Randomly picking which questions to show each time a user does the quiz.
-
Requesting the users' details before they complete the quiz.
-
Showing additional information in the results if the user gets the question wrong.
The Export online quiz to XML tool allows you to take an online quiz and its associated assets, exporting its details to an XML file. This field’s format is Shareable Content Object Reference Model (SCORM) compliant and provides compatibility with other e-learning software.
The online quiz allows you to build a page on your site where your users can answer a series of multiple-choice questions and receive a mark based on their answers. These questions are sourced from a pool of online quiz multiple-choice questions.
Once you have added an online quiz, you can configure its settings on its associated asset screens. The majority of these screens are the same as (or similar to) those for a standard page. Read the Asset screens documentation for more information about common screens in Matrix. This chapter will describe the Details and Submission logs screens, which are different for an online quiz.
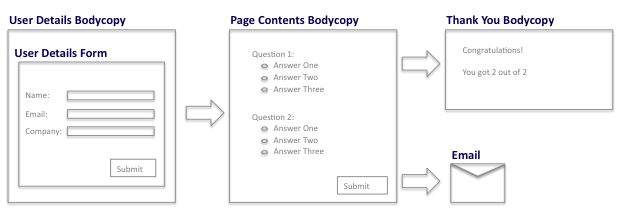
Additional dependant assets
When you create an online quiz, several assets are automatically created beneath it, as highlighted in the figure: You can use these assets to define the contents and layout of the online quiz.
- Online quiz question form
-
This bodycopy is used to define what information to display for each quiz question.
- Page contents
-
This bodycopy defines the quiz’s overall layout, including where to put the questions, a heading for the page, and information about the quiz.
- Thank you bodycopy
-
This bodycopy is used to define the page’s layout once the user has completed the quiz.
- User details bodycopy
-
This bodycopy defines the page’s overall layout when displayed by user details. By default, this is displayed to a public user before they can complete the quiz.
- User details form
-
This asset is used to define what fields to use to obtain the user’s details and how to layout each field on the page.
The additional dependant assets created under the online quiz are similar to the asset listing page’s dependant assets and custom form. Read the Asset listing and Custom form documentation for more details about these asset types.
The figure shows how the online quiz works through the use of these dependant assets.
Showing the user details bodycopy is optional. Instead, you can obtain the user’s details from their user account if they are logged in.
Details screen
The Details screen allows you to configure the settings of the quiz and the questions used. Read the Asset details screen screen for more information about the Status, Future status, Thumbnail, and Details sections.
You can also learn more about the List formatting, Customize bodycopies, List position settings, Dynamic parameters, and Button text sections in this documentation.
Quiz settings
This section allows you to change general settings to do with the online quiz. The quiz settings section of the Details screen:
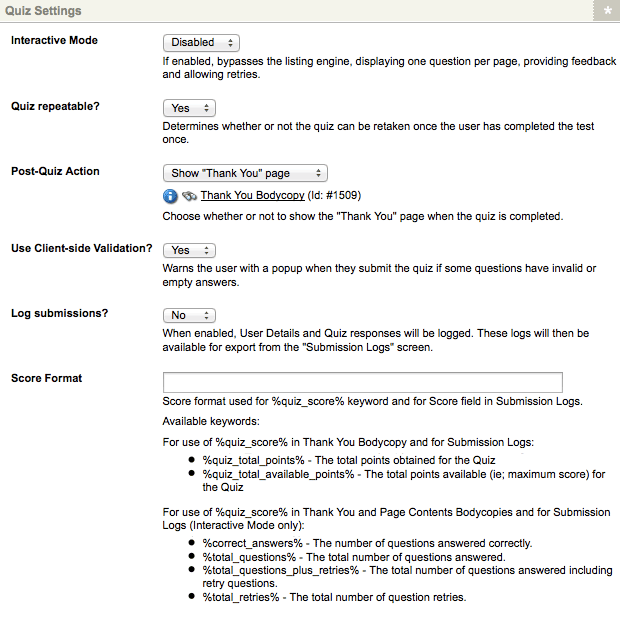
The fields available in this section are as follows:
- Interactive mode
-
This field enables the use of interactive mode on the online quiz. This mode transforms the regular listed quiz format into a one-question-per-page format, with the option of allowing users to retry incorrectly answered questions. When this field is enabled, the question selection section of the Details screen will be replaced with the question setup section, allowing you to configure the interactive online quiz. Read the Question setup (interactive mode) section for more information about this feature. By default, interactive mode is disabled on the online quiz asset.
- Quiz repeatable?
-
Select whether the user can repeat the quiz. By default, this setting is
Yes, meaning that the user can do the quiz more than once. - Post-quiz action
-
Select whether to show the thank you bodycopy once the user has completed the quiz. This bodycopy can show the user their results, including which questions they got wrong and their final mark. By default,
Show thank you pageis selected, meaning that it will be shown. SelectReturn to quiz immediatelyif you do not wish to show the thank you bodycopy. - Use client-side validation?
-
Select whether to turn on client-side validation. If it is turned on, the quiz is validated before being submitted to the server. This validation can be more efficient as it means that a user will be informed if they have not entered a valid answer to a question. However, some older browsers do not support client-side validation, so you may choose to use server-side validation. Server-side validation is used by default to trap invalid input after the quiz is submitted. Turn on client-side validation to provide an extra layer of validation. By default, client-side validation is
On. - Log submissions?
-
Select whether to log submissions. By default, this is set to
No, meaning that when a user submits the quiz, the details will not be stored within the database, and you will not be able to view it later on. Set this field toYesif you want to be able to view these details in the future. - Score format
-
This field allows you to define the score field’s format in submission logs of the online quiz and the
%quiz_score%keyword replacement on the thank you and page contents bodycopies.The keyword replacements available on the score format are:
%quiz_total_points%-
The score the user received.
%quiz_total_available_points%-
The total score available for the quiz. Additional keyword replacements are also available when configuring the score format on an online quiz with interactive mode enabled. These are as follows:
-
%correct_answers%: The number of correct answers the user-provided. -
%total_questions%: The number of questions answered on the quiz (minus retries). -
%total_questions_plus_retries%: The number of questions (including retries) answered. -
%total_retries%: The number of retries the user attempted.
-
Question selection
This section allows you to select which questions to use for the quiz.
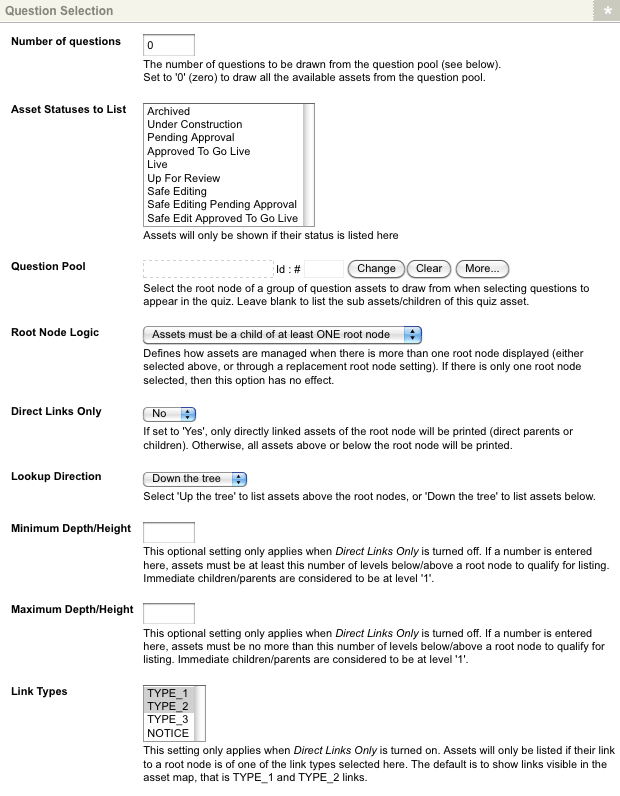
The fields available are as follows:
- Number of questions
-
Enter the total number of questions to use in the quiz. If this number is less than the total number of available questions, the questions will be randomly selected. To use all of the available questions, set this option to 0.
- Asset statuses to list
-
Select the status the question must be included in the pool of available questions. For example, if you want to use all under construction and live questions, select both of these statuses. To select multiple statuses:
-
Hold down the Ctrl key on the keyboard.
-
Click on the list’s status. If no statuses are selected, the asset listing will work out which questions to show based on the user’s permissions viewing the page. For example, if a public user is viewing the page, they will only see the live assets that have public read permission granted.
By not selecting anything in the Asset statuses to list field, you can improve the online quiz’s performance. If no statuses are selected, the online quiz will only have to filter the available questions based on permissions. It will not have to perform a second filter on the status of the asset.
-
- Question pool
-
Select which section of the system from which to draw the questions. You can select multiple pools by clicking the More… button; additional fields will appear, allowing you to make further selections. Leaving this field blank will use the child assets of the online quiz as the questions to list.
- Root node logic
-
Select whether the question must be a child of all questions pools or at least one question pool. For example, if you have selected two question folders in the question pool field, select whether the question must be a child of both folders or at least one folder. This logic will only come into effect if more than two question pools are selected.
- Direct links only
-
Select yes to only show questions that are direct child assets of the question pool. These are the questions that are directly linked to the assets.
- Lookup direction
-
Select Up the tree to list questions above the question pool, or Down the tree to list questions below the question pool.
- Minimum depth/height
-
Enter the minimum level from which to get the questions. This option is only used if direct links only is set to no.
- Maximum depth/height
-
Enter the maximum level from which to get the questions. This option is only used if direct links only is set to no.
- Link types
-
Select the type of link the questions must be included in the questions pool. The default value for this field is
Menu linkandHidden link. This setting only applies if the direct links only field is turned on. To select multiple link types from the list:-
Hold down the Ctrl key on the keyboard
-
Click on the link type.
-
Question setup (interactive mode)
This section allows you to configure the questions on the online quiz when Interactive mode is enabled. The question setup section of the Details screen is shown in the figure:
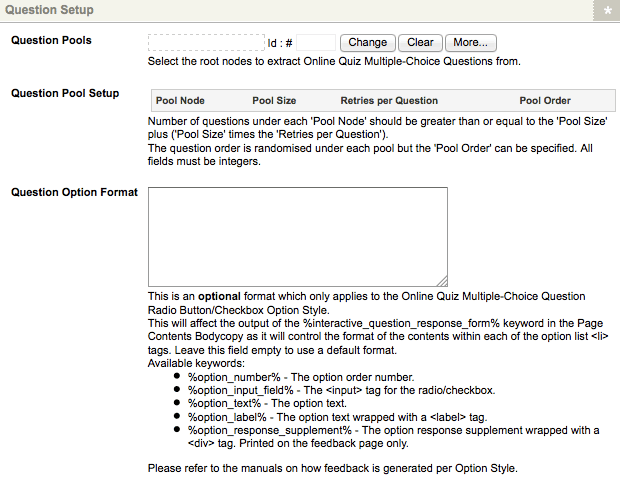
The fields available are as follows:
- Question pools
-
Select the section of the system from which to draw the questions. You can select multiple pools by clicking the More… button; additional fields will appear, allowing you to make further selections. Leaving this field blank will use the child assets of the online quiz as the questions to list.
- Question pool setup
-
The pool nodes selected in the Question pools field will be listed in this field. For each pool node, the following options are available:
- Pool size
-
Enter the total number of questions to use from this pool node in the quiz. If this number is less than the total number of available questions, then the questions displayed will be randomly selected. To use all of the available questions, set this option to
0. - Retries per question
-
Enter the total number of retries permitted on each question. This setting gives users the option of retrying incorrectly answered questions and answering a new question.
Please note that the number of retries provided must be consistent with the number of questions available under the pool node. For example, if the node’s pool size is set to
6, and each question is allowed one retry, there should be at least twelve questions available under the pool node (six questions and six potential retry questions). - Pool order
-
This field allows you to specify the order to display each pool node’s questions on the online quiz. For example, numbering multiple pool nodes will determine the order in which their questions appear on the quiz (that is, Pool node 1 will display its questions first).
- Question option format
-
This field allows you to define the response form format of online quiz multiple-choice question assets with an option style of radio buttons/checkboxes. This format is displayed through the
%interactive_question_response_form%keyword replacement on the page contents bodycopy. It establishes the layout of each individual available option. The keyword replacements available on the question option format are:%option_number%-
The order number of the response form option.
%option_input_field%-
The <input> tag for the radio button / check-box.
%option_text%-
The text of the response form option.
%option label%-
The text of the response form option wrapped with a <label> tag.
%option_response_supplement%-
The supplement of the response form option wrapped with a <div> tag. This supplement is printed on the feedback page of each question. Leaving this field empty will use the default format for the response form options.
When you are creating interactive quiz questions, you must use the available %interactive_ keyword options instead of the normal keyword options.
The available keywords are:
-
%interactive_button% -
%interactive_question_note% -
%interactive_question_number% -
%interactive_question_response% -
%interactive_question_text%
User settings
This section allows you to select from where to obtain the user details. The user settings section of the Details screen is shown in the figure:
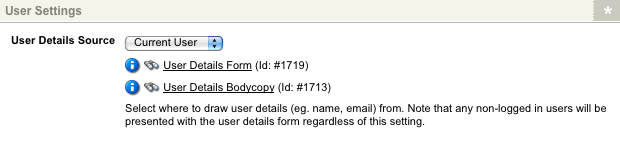
By default, User details source is set to Current user.
This setting means that if the user is logged in, their details will be taken from their user account.
The user details bodycopy will not appear on the screen.
If the user is not logged in, the bodycopy will fill in their details before completing the quiz.
If User details source is set to form, the user details bodycopy will appear even if the user is logged in.
Email settings
This section allows you to set up the email sent once the user has completed the quiz. This email can be sent to several different people, including the user who took the quiz. The email settings section of the Details screen is shown in the figure:
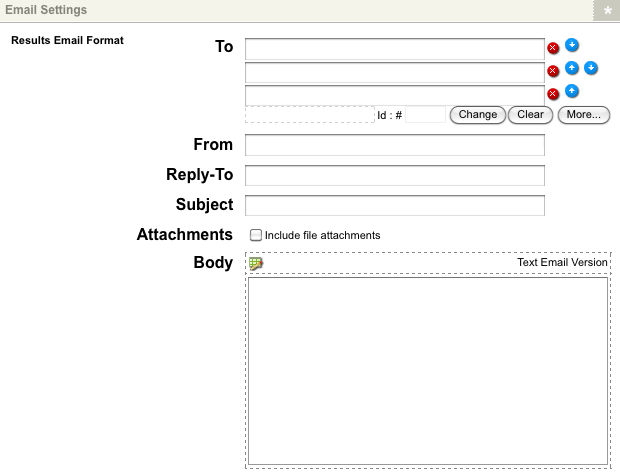
The fields available are as follows:
- To
-
Enter the email address of a person who should receive the email. You can enter their email address in the text fields or select their user account in the asset finder field. To send the email to the user who took the quiz, you can use the following keyword replacements:
%user_details_form_<formid>-<questionid>%-
This will send the email to the email address the user entered on the quiz.
<formid>is the asset ID of the user details form under the online quiz in the asset tree.<questionid>is the asset ID of the question where the user entered their email address. %user_details_current_user_email%-
If the user is logged in, this will send the email to the email address entered on their user account. This keyword replacement should only be used if User details source is set to
Current userin the section above. As the user taking the quiz will either enter their details or use the details of their user account, both of these keyword replacements can be used side-by-side without affecting the online quiz’s functionality.
- From
-
Enter the email address that will appear in the from field in the email.
- Reply-to
-
Enter the email address to which a user can reply. If no reply-to address is configured, the header will not be sent on the email.
- Subject
-
Enter the text to be used as the subject of the email. You can use keyword replacements to show the information the user entered on the form. For more information about these keyword replacements, refer to the body section.
- Body
-
Enter the body of the email. You can enter either the text or HTML version of the email in this field. To edit the HTML version:
-
Click on the
 icon – a WYSIWYG editor will appear.
You can use the following keyword replacements to show information from the quiz:
%results_table_simple%-
This will show a table of results, including the question number, the answer, and the marks the user received.
%results_table_full%-
This will show a table of results, including the question number and text, the answer and answer text, and the marks the user received.
%user_details_form_<formid>-<questionid>%-
Use this keyword replacement to show information that the user entered on the quiz’s user details form. <formid> is the asset ID of the user details form under the online quiz in the asset tree. <questionid> is the asset ID of the question you want to show.
%user_details_current_user_<keyword>%-
Use this keyword replacement to show information for a logged user. This information is sourced from their user account. It is the attribute field that you wish to show from the user account. Some example keyword replacements include
%user_details_current_user_name%,%user_details_current_attribute_first_name%and%user_details_current_user_last_name%. %question_group_<groupid>_score_category_name%-
If you are using online quiz question groups, this will show the category’s name for the score range the user achieved for that group of questions. <groupid> is the asset ID of the online quiz question group you want to show.
%question_group_<groupid>_score_category_supplement%-
If you are using online quiz question groups, this will show the supplementary content for the score range the user achieved for that group of questions. <groupid> is the asset ID of the online quiz question group you want to show.
%question_group_<groupid>_score_category_supplement_text%-
If you are using online quiz question groups, this will show the text version of the supplementary content for the score range the user achieved for that group of questions. <groupid> is the asset ID of the online quiz question group you want to show.
%result_<questionid>_question_number%-
This will show the question number, where is the asset ID of the online quiz multiple-choice question.
%result_<questionid>_question_text%-
This will show the question of the asset ID of the online quiz multiple-choice question.
%result_<questionid>_answer%-
This will show the user’s option for the question, where is the asset ID of the online quiz multiple-choice question.
%result_<questionid>_answer_text%-
This will show the text for the option the user selected for the question, where is the asset ID of the online quiz multiple-choice question.
%result_<questionid>_correct_answer%-
This will show the correct answer for the question, where is the asset ID of the online quiz multiple-choice question.
%result_<questionid>_correct_answer_text%-
This will show the text for the correct answer for the question, where is the asset ID of the online quiz multiple-choice question.
%result_<questionid>_points%-
this will show the number of points the user received for the question.
%result_<questionid>_available_points%-
This will show the total number of available points for the question, where is the asset ID of the online quiz multiple-choice question.
%result_<questionid>_response_supplement%-
This will show the response supplement for the option the user selected for the question, where is the asset ID of the online quiz multiple-choice question.
%result_<questionid>_question_note%-
This will show the question note for the question, where is the asset ID of the online quiz multiple-choice question.
%quiz_total_points%-
This will show the score the user received.
%quiz_total_available_points%-
This will show the total score available for the quiz.
-
Online quiz question format bodycopy
The online quiz question format bodycopy asset is used to define what information to display for each quiz question. This layout should include the text and options for the question.
For example, for the online quiz shown in the figure, the question number, text, options, and note for each question is being shown. This layout has been defined in the online quiz question format bodycopy.
To change what information is being shown:
-
Right-click on the Online quiz question format bodycopy in the asset tree.
-
Select
Edit contents. -
Click on the
icon – the WYSIWYG editor will appear. -
Use keyword replacements and formatting to layout the information to show on the page.
By default, the following information will appear in the WYSIWYG editor.
-
%question_text% -
%response_form%
If you lay out each question individually on the page contents bodycopy, the layout you define in this bodycopy will be ignored.
When interactive mode is enabled, the online quiz question format bodycopy is not used. Instead, the layout of radio button and checkbox option style questions can be defined on the online quiz’s details page.
A list of keyword replacements is provided in the WYSIWYG editor toolbar on the edit contents screen of the online quiz question format bodycopy. You can use these keyword replacements in conjunction with text, images, and links to layout what to show for each question in the quiz. The standard keyword replacements that are available include the following:
- Question text
-
This will show the text for the question.
- Response form
-
This will show either each option for the question and radio buttons or checkboxes or a dropdown list of available options. The formatting of the response form depends on the options selected on the Details screen of the online quiz multiple-choice question.
- Available points
-
This will show the total number of available points for the question.
- Question number
-
This will show the question number.
- Question note
-
This will show the note for the question. At least, you need to include the question text and response form keyword replacements so that the user can answer the questions.
Page contents bodycopy
The page contents bodycopy asset is used to define the quiz’s overall layout, including where to put the list of questions, a heading for the page, and information about the quiz. For example, for the online quiz shown in the figure, a heading, information about the quiz, the list of questions, and the submit button are shown. This layout has been defined in the page contents bodycopy.
To change what information is being shown, right-click on the page contents bodycopy in the asset tree and select edit contents.
Click on the icon – the WYSIWYG editor will use keyword replacements and formatting to layout the information to show on the page.
By default, the following information will appear in the WYSIWYG editor.
-
%asset_listing% -
%submit_button%.
Interactive mode page contents keywords
When Interactive mode is enabled, you need to replace the above keywords with the following:
-
%interactive_question_response_form% -
%interactive_button%.
Keyword replacements on the page contents bodycopy
A list of keyword replacements is provided in the WYSIWYG editor toolbar on the edit contents screen of the page contents bodycopy. You can use these keyword replacements in conjunction with text, images, and links to layout what to show for each question in the quiz.
To show the quiz questions, you can either use the asset listing keyword replacement or layout each question individually using the question keyword replacements. When you use the question keyword replacements, replace x with the asset ID of the question. For example, if you use the keyword replacement %question_x_question_text%, replace x with the asset ID of the question you want to show. If you layout each question individually, the layout you have defined in the online quiz question format bodycopy will be ignored.
You need to either include the asset listing keyword replacement or layout each question individually using the keyword replacements supplied to show the quiz questions.
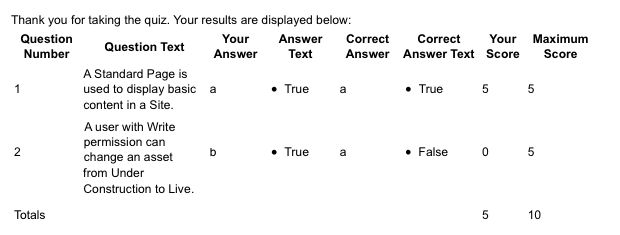
Thank you bodycopy
The thank you bodycopy asset is used to define the page’s layout once the user has completed the quiz. For example, for the online quiz shown in the figure, a thank you message and the full table of results are shown. This layout has been defined in the thank you bodycopy.
To change what information is being shown, right-click on the thank you bodycopy in the asset tree and select edit contents.
Click on the icon – the WYSIWYG editor will use keyword replacements and formatting to layout the information to show on the page.
By default, the following information will appear in the WYSIWYG editor.
-
%asset_listing% -
%submit_button%.
Keyword replacements on the thank you bodycopy
A list of keyword replacements is provided in the WYSIWYG editor toolbar on the edit contents screen of the thank you bodycopy. You can use these keyword replacements in conjunction with text, images, and links to layout what to show for each question in the quiz. The standard keyword replacements that are available include the following:
- Results table (full)
-
This will show the full table of results including the question number, question text, the answer the user selected, the text for the answer the user selected, the correct answer, the text for the correct answer, the score the user received and the maximum score the user could have received for the question.
- Results table (simple)
-
This will show the table of results, including the question number, the answer the user selected, the correct answer, the score the user received, and the maximum score the user could have received for the question.
- Result for question X: Question number
-
This will show the question number, where
Xis the asset ID of the online quiz multiple-choice question you want to show. Use this keyword replacement if you want to format the layout of the results manually. - Result for question X: Question text
-
This will show the question, where
Xis the asset ID of the online quiz multiple-choice question you want to show. Use this keyword replacement if you want to format the layout of the results manually. - Result for question X: Your answer
-
This will show the answer selected for the question, where
Xis the asset ID of the multiple-choice question you want to show. Use this keyword replacement if you want to format the layout of the results manually. - Result for question X: Answer text
-
This will show the text for the answer selected for the question, where
Xis the asset ID of the multiple-choice question you want to show. Use this keyword replacement if you want to format the layout of the results manually. - Result for question X: Correct answer
-
This will show the correct answer to the question, where
Xis the asset ID of the multiple-choice question you want to show. Use this keyword replacement if you want to format the layout of the results manually. - Result for question X: Correct answer text
-
This will show the text for the correct answer, where
Xis the asset ID of the multiple-choice question you want to show. Use this keyword replacement if you want to format the layout of the results manually. - Result for question X: Your score
-
This will show the user’s score for the question, where
Xis the asset ID of the question you want to show. Use this keyword replacement if you want to format the layout of the results manually. - Result for question x: Maximum score
-
This will show the maximum score the user could have received, where
Xis the asset ID of the question you want to show. Use this keyword replacement if you want to format the layout of the results manually. - Result for question x: Response supplement
-
This will show the supplement text for the question, where
Xis the asset ID of the question you want to show. Use this keyword replacement if you want to format the layout of the results manually. - Result for question x: Question note
-
This will show the note for the question, where
Xis the asset ID of the question you want to show. Use this keyword replacement if you want to format the layout of the results manually. - Quiz: Total points obtained
-
This will show the total score the user received for the quiz.
- Quiz: Maximum total points
-
This will show the maximum points the user could have received for the quiz.
- Result for question group x: Score category name
-
If you are using question groups, this will show the category’s name for the score range the user achieved for that group of questions. X is the asset ID of the online quiz question group you want to show.
- Result for question group x: Score category supplementary content
-
If you are using online quiz question groups, this will show the supplementary content for the score range the user achieved for that group of questions. X is the asset ID of the online quiz question group you want to show.
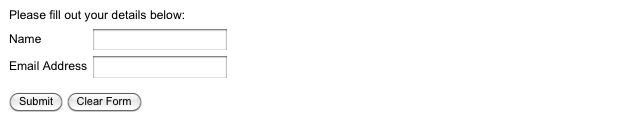
User details bodycopy
The user details bodycopy asset is used to define the page’s overall layout when the user details fields are displayed. By default, this is displayed to a public user before they can complete the quiz. For example, for the online quiz shown in the figure, a heading, information about the quiz, and the details the user needs to fill in is shown. This layout has been defined in the user details bodycopy.
To change what information is being shown:
-
Right-click on the User details bodycopy in the asset tree.
-
Select
Edit contents. -
Click on the
icon – the WYSIWYG editor will appear. -
Use keyword replacements and formatting to layout the information to show on the page.
By default, the following information will appear in the WYSIWYG editor.
Please fill out your details below:

`%form_contents%`
The field list that users need to complete wil not appear if you do not include the form contents keyword replacement on the user details bodycopy.
User details form
The user details form defines fields to use to obtain the user’s details and how to layout each of these fields on the page. For more information about the status, future status, thumbnail, and details sections refer to the Details screen chapter in the asset screens manual.
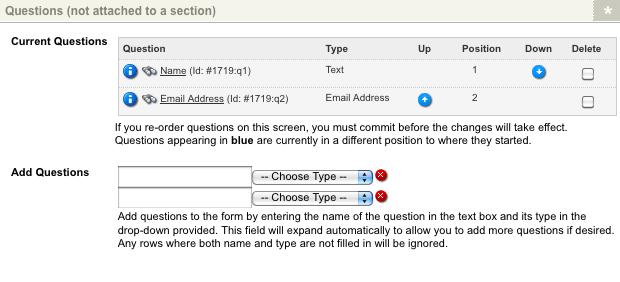
Questions (not attached to a section)
This section lists the questions added to the form and allows you to add new questions. By default, no questions will be listed. To add a question, enter the question’s name in the add questions field, select the question type from the list provided, and click save. The question will be listed in the current questions section, as shown in the figure:
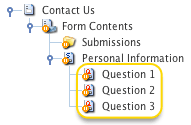
A question asset will also appear in the asset tree for each question added, as shown in the figure:
For each question listed, the following information is shown:
- Question assets question
-
This shows the name of the question. When you click on the question name, the Details screen will be displayed to modify the settings for that question. The content of the Details screen will vary depending on the type of question you have selected. For more information about the Details screen, refer to the question chapter in the custom form manual.
- Type
-
This shows the question type that has been added.
- Up/down
-
These fields allow you to re-order the questions for the form. Click on either the up arrow icon up or down arrow icon down arrow to move the question. Once you have re-ordered the questions, click Save.
- Position
-
This field shows the position number of the question.
- Delete
-
This field allows you to delete a question from the form. To do this, click on the box and click save. You can add additional questions to the form by using the add questions field.
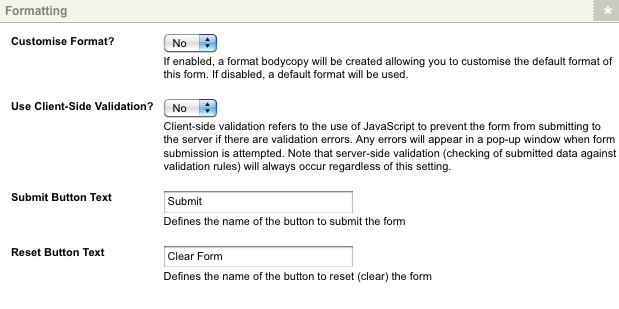
Formatting
This section allows you to format the user details form. The formatting section of the Details screen is shown in the figure:
The fields available are as follows:
- Customize format?
-
Select whether you want to customize the layout of the user details form. By default, this option is no meaning that the default layout will be used. If you select
Yes, a format bodycopy asset will be added under the user details form in the asset tree, as shown: For more information on this asset, refer to the Format bodycopy section. - Use client-side validation?
-
Select whether to turn on client-side validation. If it is turned on, the form is validated before being submitted to the server. This validation can be more efficient as it means that a user will be informed if they have not entered a valid answer to a question. However, some older browsers do not support client-side validation, so you may choose to use server-side validation. Server-side validation is used by default to trap invalid input after the form is submitted. Turn on client-side validation to provide an extra layer of validation. By default, client-side validation is off.
- Submit button text
-
Enter the text to appear on the submit button. By default, this is set to submit.
- Reset button text
-
Enter the text to appear on the reset button. By default, this is set to clear form.
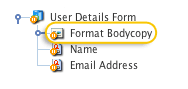
Format bodycopy
The format bodycopy asset allows you to format the user details form for the online quiz.
By default, this bodycopy will not appear in the asset tree, and instead, a default format will be used.
To use this bodycopy, select Yes in the Customize format field on the Details screen of the user details form.
The format bodycopy asset will appear under the user details form in the asset tree, as shown in the figure.
To edit the format bodycopy:
-
Right-click on the Format bodycopy in the asset tree.
-
Select
Edit contents.
The edit contents screen will appear.
-
Click on the
icon – the WYSIWYG editor will appear.
You can layout the format bodycopy using this WYSIWYG editor as you would with a standard page.
Keyword replacements on the format bodycopy
A list of keyword replacements is provided in the WYSIWYG editor toolbar on the edit contents screen of the format bodycopy. You can use the keyword replacements in conjunction with text, images, and links to layout the format bodycopy. This list will include keyword replacements for each question added to the user details form so that you can define how each question looks individually.
Submission logs screen
The submission logs screen allows you to view the submissions for the online quiz. These submissions, however, will only be logged if log submissions are set to yes on the Details screen.
Export
This section allows you to export the submission logs to a CSV file. The export section of the submissions logs screen is shown in the figure:
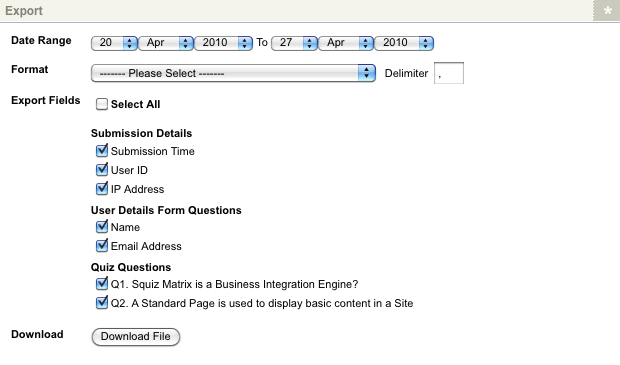
The fields that are available in this section are as follows.
- Date range
-
Select a date range for the submissions you want to export. For example, if you only want to export the submissions that have been made today, enter today’s date in both sets of fields.
- Format
-
Select the format for the exported file. You can choose from the following options:
- Comma-separated values (CSV)
-
This option exports the submissions as comma-separated values. It includes a header row showing the title of each question. You can change the delimiter that is used by changing the value in the delimiter field.
- Comma-separated values (CSV) – no header row
-
This option exports the submissions as comma-separated values, with no header row. You can change the delimiter that is used by changing the value in the delimiter field.
- Export fields
-
Select the fields that you want to include in the exported file. This list of available fields will depend on the fields you have added to the user details form and the questions you have added to the quiz.
- Download
-
Click this button to begin the export of the selected submissions and download the created file. You will be prompted to choose whether to open the file or save it.
Submissions
This section allows you to view the submissions that have been made on the online quiz. The submissions section of the submissions logs screen is shown in the figure:
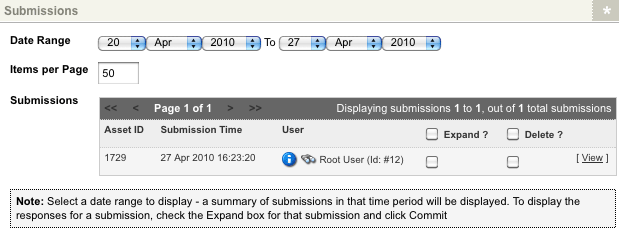
The fields that are available in this section are as follows:
- Date range
-
Select a date range for the submissions you want to view. For example, if you only want to view the submissions that have been made today, enter today’s date in both sets of fields.
- Items per page
-
Enter the number of submissions that you want to view per page. By default, this value is
50. If more than50entries have been submitted, then they are displayed on separate pages. - Submissions
-
The submissions that occurred between the dates selected are displayed in this section. You can see the current page displayed at the top of the list and click on the forward
>and backward<arrows to move through the pages. Clicking on<<or>>takes you to the first or last page, respectively. You can also see the current range of submissions being shown on this page, out of the total number of submissions. For each submission, the asset ID, the date and time it was submitted, and the user’s name are displayed. To view the user’s responses:-
Click the Expand box.
-
Click save or the View hyperlink.
To delete a submission:
-
Click the Delete box.
-
Click Save.
-
Submission logs
When a user fills out and submits the online quiz, the details can be stored in the database as a submission. You can view, edit, delete, and export these submissions through the online quiz.
Enabling and disabling logging of submissions
By default, the logging of submission is turned off. To enable the logging of submissions:
-
Go to the Details screen of the online quiz.
-
Select
Yesin the log submissions field. -
Click Save.
The submissions will be logged to the database.
To disable the logging of submissions:
-
Select
Noin the log submissions field. -
Click Save.
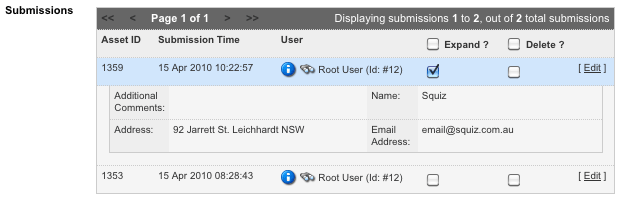
Viewing a submission in the administration interface
To view a submission that has been made and logged to the database:
-
Right-click on the Online quiz asset in the asset tree.
-
Select
Submission logs. -
In the Submissions section:
-
Click on the Expand box for the submission you want to view.
-
Click Save.
-
The information that the user-submitted will appear on the screen, as shown in the figure:
Deleting a submission
To delete a submission that has been made and logged to the database:
-
Right-click on the Online quiz asset in the asset tree.
-
Select
Submission logs. -
In the Submissions section.
-
Click on the Delete box link for the submission you want to delete.
-
Click Save.
-
The submission will be removed from the database.
Finding a submission
If you know the ID of the submission you want to view, enter it into the quick search box in the top right-hand corner of the administration interface. The Details screen for that submission will appear where you can view the details of the submission.
Exporting the submissions
To export the submissions to a CSV or XML file:
-
Right-click on the asset tree’s Online quiz asset.
-
Select
Submission logs. -
In the Export section:
-
Select the type of file you want to download in the Format field.
-
Select the fields you want to export in Export fields.
-
Click Download file.
-
You will be prompted to choose whether to open the file or save it.