Ecommerce form page
|
This section describes a deprecated feature. The feature may only be mentioned in the documentation for the purpose of warning readers. You should not enable or use deprecated features for new development. Read Deprecated assets and features for more information about the deprecation level of this feature before trying any suggested procedures or actions described for this feature. Contact Squiz Support for assistance if you are still uncertain about whether you should use this deprecated feature after reading these resources. |
The ecommerce form page asset allows you to create a form that can be used by site users to complete ecommerce transactions. Form fields can be added to the ecommerce form to provide information for payment and delivery details.
Most of the ecommerce form page set up is performed through the ecommerce form contents asset, created beneath the ecommerce form page in the asset tree.
The majority of the screens available on the ecommerce form contents are similar to those for a standard page or a custom form page and are described in either the Asset screens documentation or the Custom form documentation.
This chapter describes the Details, Ecommerce rules, Display formatting, Order logging, and Submission actions screens, which are different for an ecommerce form contents.
Additional dependant assets
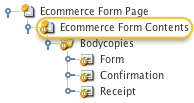
When you create an ecommerce form page, several assets, in addition to the ecommerce form contents asset, are automatically created beneath it. You can use these assets to define the contents and layout of the ecommerce form page.
- Bodycopies
-
Bodycopies are used to define the layout of the pages in the ecommerce form. The following bodycopies are listed in this folder:
- Form
-
This bodycopy defines the page layout of the ecommerce form, including the layout of the form fields, a heading for the page, and information about the form.
- Confirmation
-
This bodycopy defines the layout of the confirmation page, shown after users complete the form, allowing them to confirm their details and proceed to payment.
- Receipt
-
This bodycopy defines the receipt page’s layout, shown after users have completed their payment.
- Orders
-
Ecommerce orders that are successfully processed are stored in this folder.
This folder will not appear until the ecommerce form page creates an order asset.
Details screen
The Details screen for the ecommerce form contents allows you to set up this asset. Read the Asset details screen documentation for more information about the Status, Future status, Thumbnail, and Details sections.
Payment gateway
This section allows you to select the payment gateways for users to pay for the items on a site.

In the Linked gateway field, select a payment gateway for the ecommerce form. This selection will allow the form to display ecommerce functionality. Without a payment gateway, users will not pay for items, and the form will act as a standard custom form. You can add additional payment gateways by clicking the More button. Read the Ecommerce for a list of available payment gateways.
Taxation
This section allows you to select a fixed tax rate that has been applied to all taxable purchases made through the ecommerce form. For example, a 10% GST tax could be entered in these fields and would apply to any taxable items purchased through the ecommerce form.
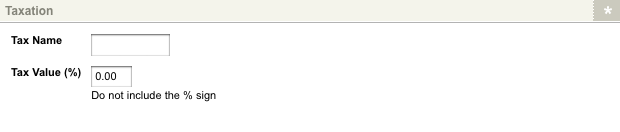
The fields available in this section are as follows:
- Tax name
-
Enter a name for the tax. This name will be shown to customers during the checkout process.
- Tax value (%)
-
Enter a percentage value for the tax. The tax will be included in the price of any taxable purchases. For example, if
10is entered into this field, a taxable item priced at$1.10has$0.10of included tax (10% of $1.00).
| If an item is taxable, the price of the item should include tax. Tax will not be automatically added during the checkout process. |
Asset purchase
This section allows you to configure the request variables and source strings used for providing information about an item to the ecommerce form.
The asset purchase section:
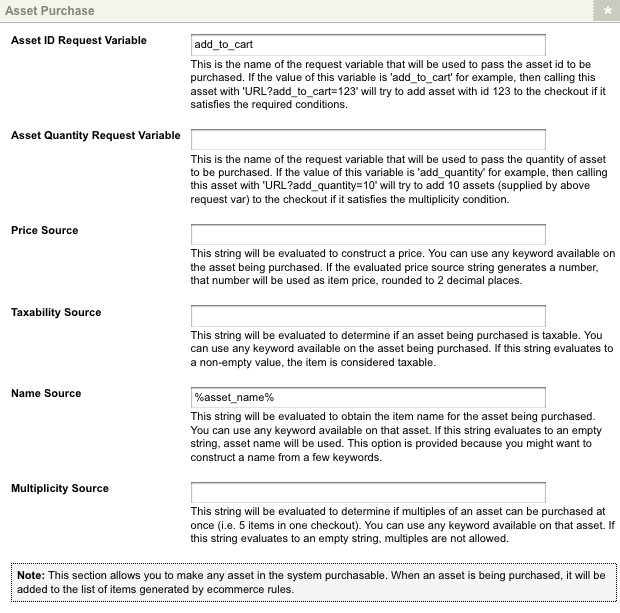
The fields available in this section are as follows:
- Asset ID request variable
-
Enter a request variable that will provide the ecommerce form with the item’s asset ID to be purchased. For example, if
add_to_cartis entered into this field, the URL<URL>?add_to_cart=123(where<URL>is the URL of the ecommerce form) will add the item with the asset ID of123to the checkout process.For an item to be added to the ecommerce form page checkout process, it must satisfy the required conditions, including an attached price. Items with an unknown price (neither a set price nor free) will result in an error. - Asset quantity request variable
-
Enter a request variable that will provide the ecommerce form with the item’s quantity to be purchased. For example, if you define
quantityin this field, the URL<URL>?add_to_cart=&quantity=10(where<URL>is the URL of the ecommerce form and<asset ID>is the asset ID of the item) adds10items to the checkout process. - Price source
-
Enter a source string that will provide the ecommerce form with the item’s price to be purchased. Keyword replacements can be used in this section. For example, if you apply a metadata field to the item with the price entered into the Price field, the keyword replacement relays the price of the item.
- Taxability source
-
Enter a source string that will tell the ecommerce form if the item is taxable. A string evaluating to an empty field will indicate the item is not taxable. In contrast, a non-empty field will indicate the item is taxable. Keyword replacements can be used in this section. For example, if you apply a metadata field to the item with a non-empty Taxable field, the keyword replacement relays that it includes tax.
- Name source
-
Enter a source string that will provide the ecommerce form with any tax added to the item to be purchased. Keyword replacements can be used in this section. For example, the keyword replacement will use the item asset’s name as the ecommerce form’s name.
- Multiplicity source
-
Enter a source string that will tell the ecommerce form whether multiples of an item may be purchased at a time. A string evaluating an empty field will indicate that multiple purchases are not allowed. In contrast, a non-empty field will indicate that they are allowed. Keyword replacements can be used in this section.
For example, if you apply a metadata field to the item with a non-empty Multiple field, the keyword replacement relays that it allows multiple purchases.
Customize the EPS reference ID
This section allows you to specify a source string to determine the Express Payment System (EPS) reference ID of the purchase.
The customize the EPS reference ID section:
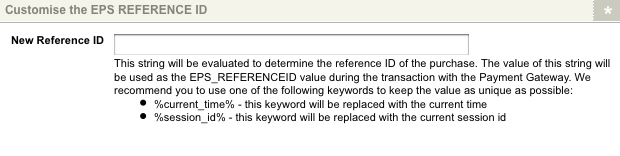
The fields available in this section are as follows:
- New reference ID
-
Enter a source string to use as the
EPS_REFERENCEIDvalue during the payment transaction. Keyword replacements can be used in this section. For example, the keyword replacement will use the current session ID as theEPS_REFERENCEID. This field is not mandatory.
Ecommerce rules screen
The ecommerce rules allow you to set up rules based on the information that the user has entered.
Ecommerce form fields
This section allows you to assign a dollar value to each eligible form field’s answers in the ecommerce form. This value will then be added to the user’s total order value in the checkout process. The ecommerce form fields section with listed fields:
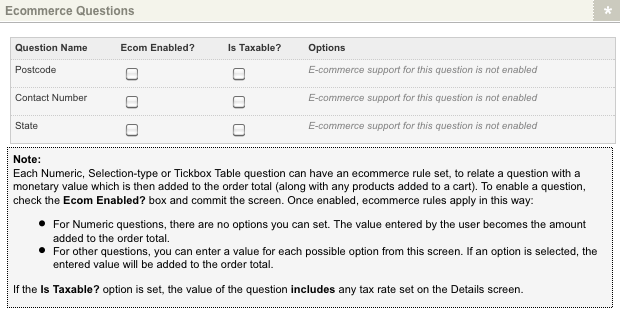
The fields available in this section are as follows:
- Form field name
-
This column lists the form fields available for ecommerce rules. Please note that not all form field types are eligible. Only form fields with predetermined answers, such as a tickbox list or option list form field type and numeric form field types, are eligible.
- Ecom enabled?
-
To enable ecommerce rules for a form field:
-
Select this box.
-
Click Save.
-
- Is taxable?
-
If the dollar value assigned to a form field includes tax, select this box. For more information, refer to the taxation section in this chapter.
- Options
-
When the Ecom enabled? field is selected, new fields will appear in this field:
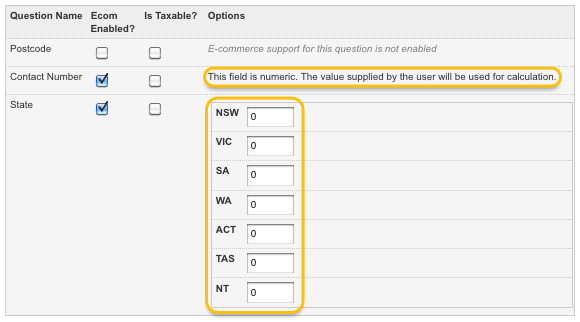
In these new fields, set the ecommerce rule parameters by entering a dollar value for the individual form fields.
| Currency symbols, such as the dollar sign ($), should not be included when inputting values in the ecommerce assets. |
For a multiple option form field, such as an option list, values can be assigned to each option for the form field.
Numeric form fields will use the user-submitted value as the dollar value and, therefore, cannot be configured.
| You can change the currency sign used on the ecommerce form page on the Display formatting screen. |
Pass-through variables form fields
This section allows you to assign variables to the form fields in the ecommerce form and pass response values of those form fields to a configured payment gateway. This function allows you to use user responses when verifying transactions using fraud prevention services, such as the Address Verification Service (AVS). The pass-through variables form fields section with listed form fields is shown:
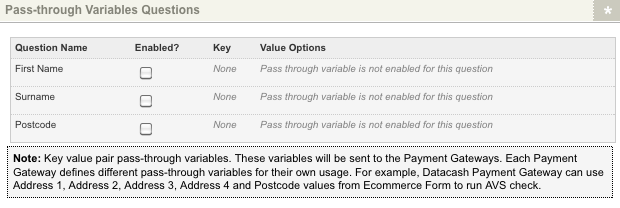
The fields available in this section are as follows:
- Form field name
-
This column lists the form fields on the ecommerce form.
- Enabled?
-
To enable pass-through variables for a form field:
-
Select this box.
-
Click Save.
-
- Key
-
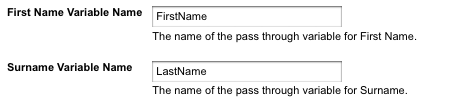
When the Enabled? field is selected, this field will become available, allowing you to enter a key value for the pass-through variable:
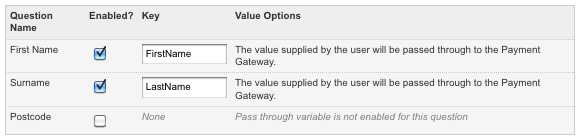
This key can then be entered on a payment gateway to pass the response value:
Display formatting screen
The display formatting screen allows you to configure the format of the ecommerce form pages.
Bodycopies
This section lists the available bodycopies for the ecommerce form. Clicking the name of the bodycopy will take you to its Edit contents screen.

Global strings
This section allows you to configure the taxable item string keyword replacement.
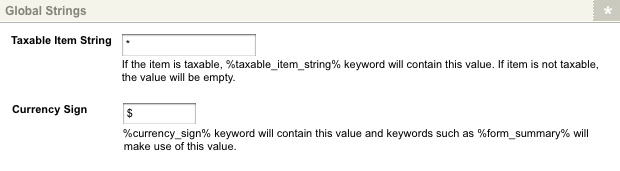
The fields available in this section are as follows:
- Taxable item string
-
Enter the value to use for the keyword replacement. This value will only be displayed if an item is taxable. If the item is not taxable, this value will be empty. By default, this field is set to
*. - Currency sign
-
Enter the currency sign to use on the ecommerce form page. This value will be used for the keyword replacement. By default, this field is set to
$(dollars).
Form view
This section allows you to specify the format for the keyword replacement used on the form page.
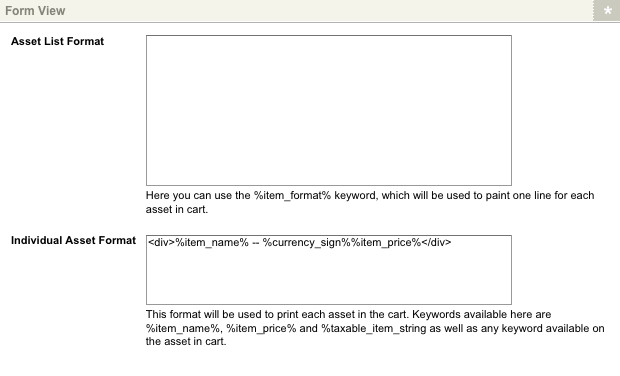
The fields available in this section are as follows:
- Asset list format
-
Enter a format for displaying the list of items on the form pages. This format is displayed when the keyword replacement is used on the form bodycopies.
The following keyword replacements can be used in this field:
%item_format%-
This will display the format of each item on the list as configured in the respective Asset format field.
- Individual asset format
-
Enter a format for displaying the individual items to list on the form page’s item listing. This format is displayed when the keyword replacement is used in the Asset list format field. By default, this field is set to`<div> — </div>`
The following keyword replacements can be used in this field:
%item_name%-
This will display the name of an item charged on the order. An item may include a purchased item or an answer to a form field with a dollar value assigned to it.
%item_price%-
This will display the price charged for the item.
%taxable_item_string%-
This will display the tax value accredited to an item.
Confirmation view
This section allows you to change the text for the buttons available on the confirmation page.
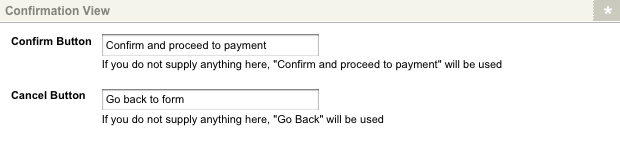
The fields available in this section are as follows:
- Confirm button
-
Enter the text to display as the Confirm button. By default, this button will read confirm and proceed to payment. This button is displayed when the keyword replacement Confirm button is used on the confirmation bodycopy.
- Cancel button
-
Enter the text to display as the Cancel button. By default, this button will read go back to form. This button is displayed when the keyword replacement Cancel button is used on the confirmation bodycopy.
Confirmation and receipt view
This section allows you to specify the keyword replacement format used on the confirmation and receipt pages.
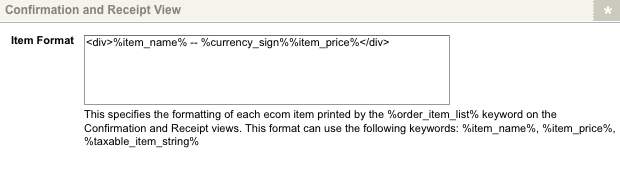
The fields available in this section are as follows:
- Item format
-
Enter a format for displaying the list of ordered items on the confirmation and receipt pages. This format is displayed when the keyword replacement order item list is used on the confirmation and receipt bodycopies.
The following keyword replacements can be used in this field:
%item_name%-
This will display the name of an item charged on the order. An item may include a purchased item or an answer to a form field with a dollar value assigned to it.
%currency_sign%-
This will display the currency sign specified in the Currency sign field of the global settings section of this screen.
%item_price%-
This will display the price charged for the item.
%taxable_item_string%-
This will display the tax value accredited to an item.
Order logging screen
The Order logging screen allows you to log the completed orders of the ecommerce form to a log file in the system and configure the log entries' formatting.
Log to file
This section allows you to enable order logging to a file on the system.

In the Log to file field, select whether to log orders to a system file. If this field is set to enabled, orders will be logged to the file indicated in the Info field.
You can view the log file of the ecommerce form page in the system’s log manager. For more information on viewing log files, refer to the log manager chapter in the system management manual.
Log file formatting
This section allows you to configure the format of the order log entries. For these fields to work, the Log to file field must be enabled and have a working log file.
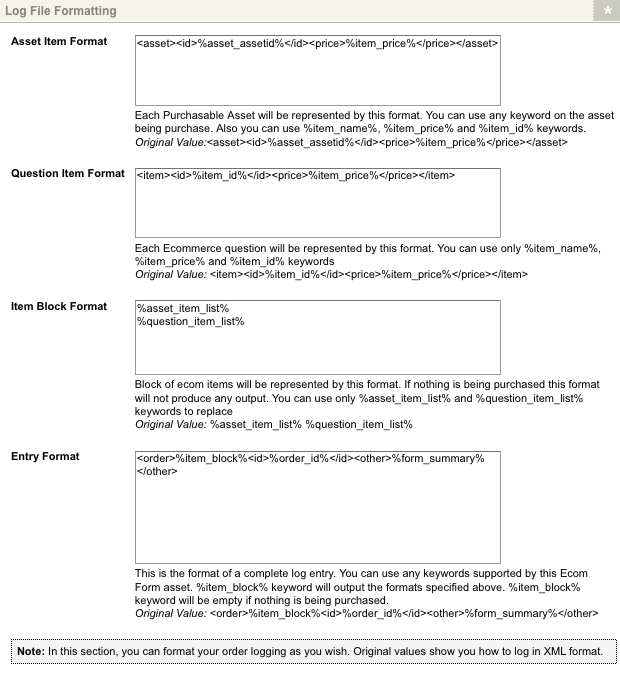
The fields available in this section are as follows:
- Asset item format
-
Enter a format for displaying information on the assets purchased.
- Form field item format
-
Enter a format for displaying the ecommerce form field answers that have prices assigned to them.
- Item block format
-
Enter a display format for the asset item and form field item list blocks, as configured in the Asset item format, and Form field item format fields.
- Entry format
-
Enter a format for displaying the log entries.
Keyword replacements for log file formatting
Keyword replacements can be used to configure the format of the log file formatting fields.
%item_name%-
This will display the name of an item charged on the order. An item may include a purchased item or an answer to a form field with a dollar value assigned to it. This keyword replacement can be used in both the Asset item format and Form field item format fields.
%item_price%-
This will display the price charged for the item. This keyword replacement can be used in both the Asset item format and Form field item format fields.
%item_id%-
This will display the asset ID of the item. This keyword replacement can be used in both the Asset item format and Form field item format fields.
%asset_item_list%-
This will display the asset item list, as configured in the Asset item format field. This keyword replacement can be used in the Item block format field.
%form_field_item_list%-
This will display the form field item list, as configured in the Form field item format field. This keyword replacement can be used in the Item block format field.
%item_block%-
This will display the item block, as configured in the Item block format field. This keyword replacement can be used in the entry format field.
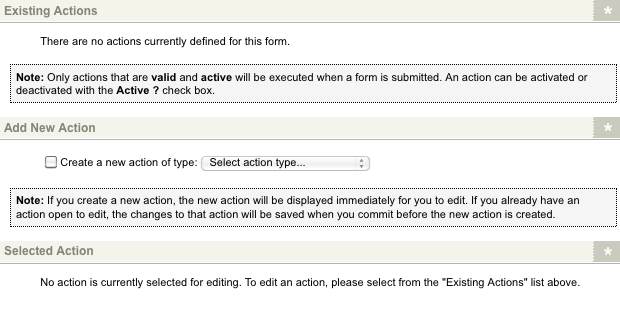
Submission actions screen
The submission actions screen allows you to create custom actions that are run whenever the user submits the form. These actions include sending a message to a remote SOAP server on the submission of a form. The Existing actions, Add new action, and Selected action sections of the Submission actions screen are shown:
Adding a Make SOAP call action
To add a new submission action to send a message to a remote SOAP server:
-
Check the create a new action of type option in the add new action section.
-
Select Make SOAP call.
-
Click Save.
The Make SOAP call action supports both SOAP 1.1 and SOAP 1.2 standards. However, please note that this submission action does not currently support WS-Security features and MIME multi-part attachments.
The action will be added to the existing actions section.
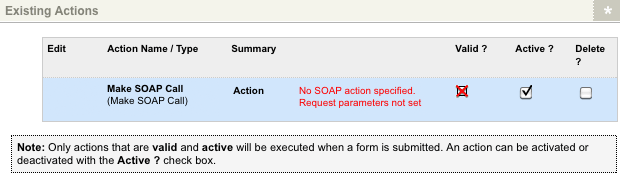
Additional fields will also appear in the selected action section.

For more information on the Make SOAP call action, refer to the Form contents chapter of the Custom form manual.
Form bodycopy
The form bodycopy defines the layout of the form page of the ecommerce form page asset. To create a layout for this page:
-
Right-click on the form bodycopy in the asset tree.
-
Select Edit contents.
-
Click on the
 icon – the WYSIWYG editor will appear to use the keyword replacements and formatting to set the layout of the information to show on the form page.
By default, no information will appear in the WYSIWYG editor.
Keyword replacements on the form bodycopy
A list of keyword replacements is provided in the WYSIWYG editor toolbar on the Edit contents screen of the form bodycopy. You can use these keyword replacements in conjunction with text, images, and links to configure the form page’s layout.
The standard keyword replacements that are available include the following:
- Form contents
-
This will show a default layout of the form fields and section fields. If you do not want to layout each section and form field individually, use this keyword replacement. Otherwise, use the keyword replacements provided to layout each section and form field individually.
- List of submission errors
-
This will show any errors the user may have received when they select Submit.
- Message indicating that there were errors
-
This will show the message that has been defined in the Error message format field on the Ecommerce form contents screen. By default, this message is:
There were errors submitting the form.
Please correct the marked fields and try again.
- Reset button
-
This will show the Reset button on the ecommerce form. This button is not mandatory.
- Submit button
-
This will show the Submit button on the ecommerce form. If you do not add this keyword replacement, the user can not submit the ecommerce form.
- Captcha
-
This will show the CAPTCHA fields on the ecommerce form.
- Captcha image
-
This will show the image for the CAPTCHA field.
- Captcha input field
-
This will show the input field for the CAPTCHA field.
- Captcha regeneration link
-
This will show the link so the user can regenerate the CAPTCHA field.
Along with these keyword replacements, you can also display each field by using the following keyword replacements:
%form field_label_<parent_id>_<form field_id>%-
This will show the name of the form field.
<parent_id>is the asset ID of the section the form field has been added to or the asset ID of the ecommerce form contents asset if the form field does not belong to a section.<form field_id>is the asset ID of the form field. %form field_note_<parent_id>_<form field_id>%-
This will show the note for the form field.
<parent_id>is the asset ID of the section the form field has been added to or the asset ID of the ecommerce form contents asset if the form field does not belong to a section.<form field_id>is the asset ID of the form field. %form field_id_<parent_id>_<form field_id>%-
This will show the asset ID of the form field.
<parent_id>is the asset ID of the section the form field has been added to or the asset ID of the ecommerce form contents asset if the form field does not belong to a section.<form field_id>is the asset ID of the form field. %form field_field_<parent_id>_<form field_id>%-
This will show the box where the user can enter their response to the form field.
<parent_id>is the asset ID of the section the form field has been added to or the asset ID of the ecommerce form contents asset if the form field does not belong to a section.<form field_id>is the asset ID of the form field.
Confirmation bodycopy
The confirmation bodycopy defines the layout of the confirmation page of the ecommerce form page asset. To create a layout for this page:
-
Right-click on the confirmation bodycopy in the asset tree.
-
Select Edit contents.
-
Click on the
icon – the WYSIWYG editor will appear to use the keyword replacements and formatting to set the layout of the information to show on the confirmation page.
By default, no information will appear in the WYSIWYG editor.
Keyword replacements on the confirmation bodycopy
A list of keyword replacements is provided in the WYSIWYG editor toolbar on the Edit contents screen of the confirmation bodycopy. You can use the keyword replacements in conjunction with text, images, and links to configure the confirmation page’s layout. The standard keyword replacements that are available include the following:
- Submission summary
-
This will show the user’s responses to each form field on the ecommerce form.
- Confirm and pay button text
-
This will show the text entered in the Confirm button field on the ecommerce form Contents display formatting screen.
- Text used on "cancel" button
-
This will show the text entered in the Cancel button field on the ecommerce form Contents display formatting screen.
- URL to confirmation screen
-
This will show the URL to confirm the order and proceed to payment.
- URL to cancel screen
-
This will show the URL to cancel the order.
- Count of items being purchased
-
This will show the number of purchasable items in the order.
- Total
-
This will show the total cost of the order, including tax.
- Total minus tax
-
This will show the total cost of the order without tax.
- Total tax
-
This will show the total tax on the order.
- Taxable total
-
This will show the total cost of the taxable items.
- Count of taxable items being purchased
-
This will show the number of taxable items in the order.
- List of items being purchased
-
This will show a list of the items being purchased.
- Tax rate
-
This will show the tax rate is applied to the taxable items in the order. This figure is determined by the value entered into the Tax value field in the ecommerce form contents Details screen.
- Tax name
-
This will show the tax’s name being applied to the taxable items in the order. This name is determined by the value entered into the Tax name field in the ecommerce form contents Details screen.
- String appended to the taxable items
-
This will show the text entered into the Taxable item string field on the ecommerce form Contents display formatting screen.
Along with these keyword replacements, you can also display each section name, individual form field, and response to each field by using the following keyword replacements:
%section_title_<parent_id>%-
This will show the name of the section.
<parent_id>is the asset ID of the section. %form field_name_<parent_id>_<form field_id>%-
This will show the name of the form field.
<parent_id>is the asset ID of the section the form field has been added to or the asset ID of the ecommerce form contents asset if the form field does not belong to a section.<form field_id>is the asset ID of the form field. %form field_note_<parent_id>_<form field_id>%-
This will show the note for the form field.
<parent_id>is the asset ID of the section the form field has been added to or the asset ID of the ecommerce form contents asset if the form field does not belong to a section.<form field_id>is the asset ID of the form field. %response_<parent_id>_<form field_id>%-
This will show the response the user-submitted for the form field.
<parent_id>is the asset ID of the section the form field has been added to or the asset ID of the ecommerce form contents asset if the form field does not belong to a section.<form field_id>is the asset ID of the form field.
Receipt bodycopy
The receipt bodycopy defines the layout of the receipt page of the ecommerce form page asset. To create a layout for this page:
-
Right-click on the receipt bodycopy in the asset tree.
-
Select Edit contents.
-
Click on the
icon – the WYSIWYG editor will appear to use the keyword replacements and formatting to set the layout of the information to show on the receipt page.
By default, no information will appear in the WYSIWYG editor.
Keyword replacements on the receipt bodycopy
A list of keyword replacements is provided in the WYSIWYG editor toolbar on the Edit contents screen of the receipt bodycopy. You can use the keyword replacements in conjunction with text, images, and links to configure the receipt page’s layout.
The standard keyword replacements that are available include the following:
- Submission summary
-
This will show the user’s responses to each form field on the ecommerce form.
- Submission info
-
This will show information about the ecommerce form page, including the asset ID, name and URL of the ecommerce form, and the name and asset ID of the site.
- Submission ID
-
This will show the ID that the submission has been given.
- Submission IP address
-
This will show the IP address of where the submission was made.
- Time of submission (yyyy-mm-dd hh::mm::ss)
-
This will show the date and time the user submitted the ecommerce form.
- Time of submission (yyyy-mm-dd)
-
This will show the date the user submitted the ecommerce form in the format yyyy-mm-dd.
- Time of submission (dd m yyyy h::mm[am pm])
-
This will show the date and time the user submitted the ecommerce form.
- Time of submission (date only – dd m yyyy)
-
This will show that the user submitted the ecommerce form in the format date dd m yyyy.
- Time of submission (time only – h::mm[am pm])
-
This will show the time the user submitted the ecommerce form in the format h::mm[am pm].
- Time of submission (ISO8601 format)
-
This will show the date and time the user submitted the ecommerce form in the iso8601 format.
- Time of submission (RFC2822 format)
-
This will show the date and time the user submitted the ecommerce form in the rfc2822 format.
- Time of submission (RFC2822 format, date only)
-
This will show the date the user submitted the ecommerce form in the rfc2822 format.
- Time of submission (ICALENDAR format)
-
This will show the date and time the user submission the ecommerce form in the iCalendar format.
- Count of items being purchased
-
This will show the number of purchasable items in the order.
- Total
-
This will show the total cost of the order, including tax.
- Total minus tax
-
This will show the total cost of the order without tax.
- Total tax
-
This will show the tax on the order.
- Taxable total
-
This will show the total cost of the taxable items.
- Count of taxable items being purchased
-
This will show the number of taxable items in the order.
- List of items being purchased
-
This will show a list of the items being purchased.
- Tax rate
-
This will show the tax rate is applied to the taxable items in the order. This rate is determined by the value entered into the Tax value field in the ecommerce form contents Details screen.
- Tax name
-
This will show the tax’s name being applied to the taxable items in the order. This name is determined by the value entered into the Tax name field in the ecommerce form contents Details screen.
- String appended to the taxable items
-
This will show the text entered into the Taxable item string field on the ecommerce form Contents display formatting screen.
Along with these keyword replacements, you can also display responses to individual form fields using the following keyword replacements.
%response_<parent_id>_<form field_id>%-
This will show the response the user-submitted for the form field.
<parent_id>is the asset ID of the section the form field has been added to or the asset ID of the ecommerce form contents asset if the form field does not belong to a section.<form field_id>is the asset ID of the form field. %response_<parent_id>_<form field_id>_raw%-
This will show the raw value for the response the user-submitted for the form field.
<parent_id>is the asset ID of the section the form field has been added to or the asset ID of the ecommerce form contents asset if the form field does not belong to a section.<form field_id>is the asset ID of the form field.
Order
Ecommerce system orders are stored in the ecommerce form page asset as order assets. These orders are stored in the orders folder.
An order’s Details screen provides the information entered into the ecommerce form. Read the Asset details screen documentation for more information about the Status, Future status, Thumbnail, and Details sections.
Answers to global form fields
This section displays the user’s responses to the ecommerce form fields that are not part of a section. These responses can be viewed and edited in this field. Order logging can provide more in-depth information about each order, including the ordered items and the total cost.

For more information on order logging, refer to the Order logging section of this chapter.
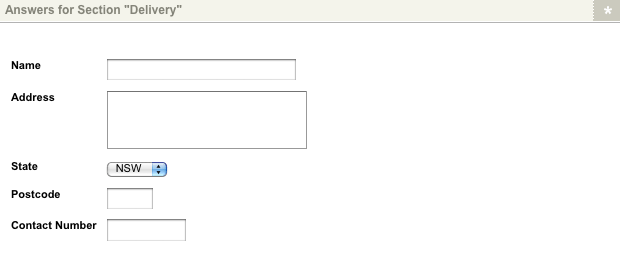
Answers for section
This section displays the user’s responses to form fields in a specific section of the ecommerce form. These responses can be viewed and edited in this field.
Order details
This section displays the billing and delivery information returned by the payment gateway. These fields are system-defined and will be displayed even if no value is returned.
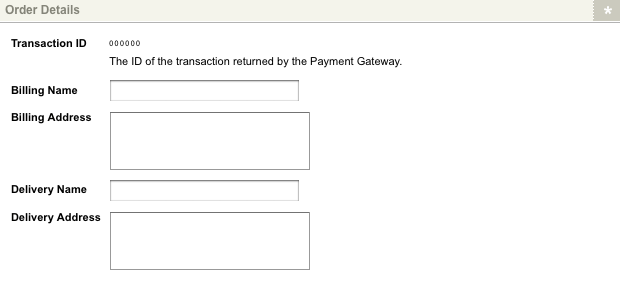
The following information is available:
- Transaction ID
-
The unique ID of the ecommerce transaction will be displayed in this field.
- Billing name
-
The billing name supplied during the transaction process will be displayed in this field. This field can be edited.
- Billing address
-
The billing address supplied during the transaction process will be displayed in this field. This field can be edited.
- Delivery name
-
The delivery name supplied during the transaction process will be displayed in this field. This field can be edited.
- Delivery address
-
The delivery address supplied during the transaction process will be displayed in this field. This field can be edited. The ecommerce form responses can be viewed and edited in this field.
Order logging can provide more in-depth information about each order, including the ordered items and the total cost. For more information on order logging, refer to the Order logging section of this chapter.