Create a training events page using calendar assets
The following example will create a calendar page on your web site to display several training events. Each group of events will be displayed in a different color depending on the location. Users will be able to view events by month.
Remember that you must save any asset changes that you make.
Creating the calendar events

Create three folder assets underneath your site, titled Sydney, Canberra, and Brisbane.
These folders will store each city’s events and allow us to display each group of events in different colors.
Create a single calendar event
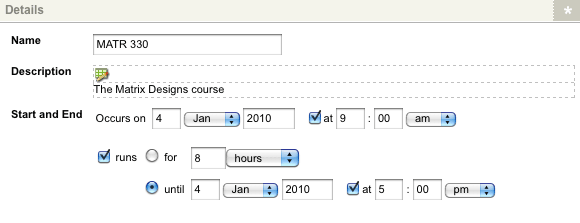
We need to create a one-off training event for Sydney that occurs on the 4th of January 2010 and runs from 9:00 AM to 5:00 PM.
To do this:
-
Create a single calendar event under the Sydney folder.
-
Enter the information for the event on the Create new single calendar event screen.
-
Click Save.
The event will be added under the Sydney folder in the asset tree.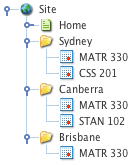
-
Repeat these steps to create additional one-off events to the Sydney, Canberra, and Brisbane folders.
Create a recurring calendar event
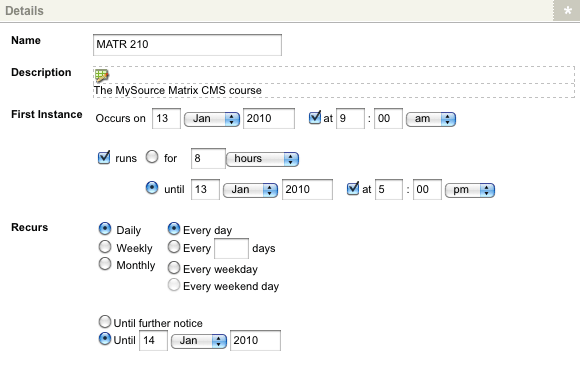
We need to create a recurring training event for Canberra that occurs on the 13th and 14th of January and runs from 9:00 AM to 5:00 PM.
To do this:
-
Create a recurring calendar event under the Canberra folder.
-
Enter the information for the event on the Create new recurring calendar event screen.
-
Click Save.
The event will be added under the Canberra folder in the asset tree.
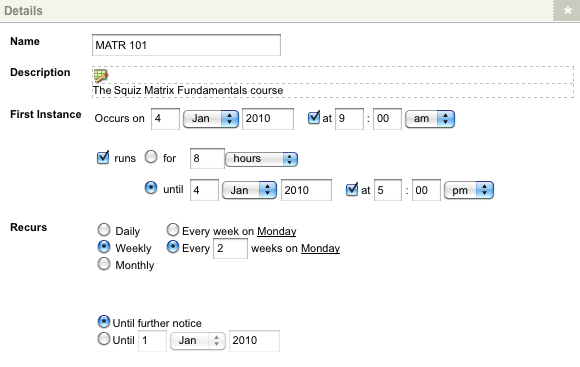
We need to create another recurring training event for Sydney that occurs on the 4th of January and runs every second Monday from 9:00 AM to 5:00 PM.
To do this:
-
Create a recurring calendar event under the Sydney folder.
-
Enter the information for the event on the Create new recurring calendar event screen.
-
Click Save
The event will be added under the Sydney folder in the asset tree.
Cancel a recurring event on a specific day
As the event occurs every second Monday, it is scheduled to run on the 18th of January. However, the Sydney office is closed on that day. We need to cancel the event on this date.
To do this:
-
Create a recurring event cancellation asset under the recurring calendar event.
-
Enter the cancelation information on the Create new recurring event cancelation screen.

-
Click Save. The cancellation is added under the recurring calendar event in the asset tree.
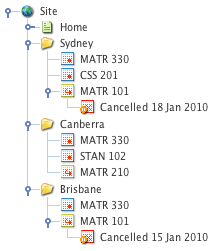
Repeat these steps to add recurring calendar events and recurring event cancelations under the Brisbane folder, as shown in the figure to the right.
Create a multi-date calendar event
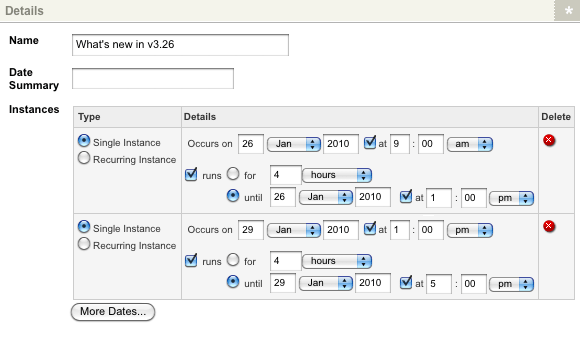
We need to create two additional training events for Sydney. Both of these events are one-off events but are for the same course. The first event occurs on the 26th of January, and the second occurs on the 29th of January. Instead of creating two single calendar events, we can create a multi-date calendar event that contains the details for both these dates.
To do this:
-
Create a multi-date calendar event under the Sydney folder.
-
Enter the event’s information on the Create new multi-date calendar event screen.
-
Click Save. The event will be added under the Sydney folder in the asset tree.
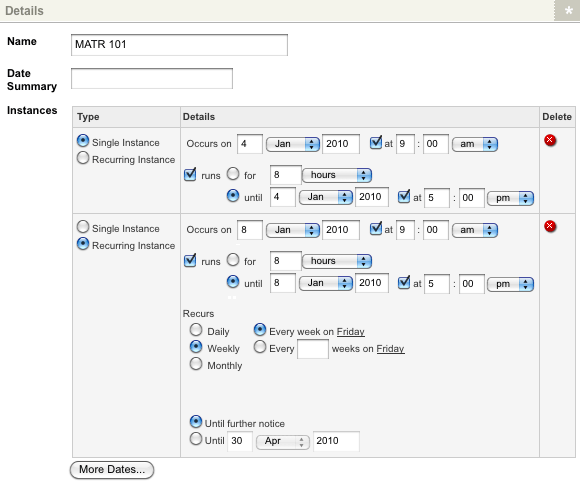
We need to also create two training events for Canberra. The first event is a one-off event occurring on the 4th of January. The second is a recurring event that begins on the 8th of January and runs every Friday. We can use a multi-date calendar event to create both these events.
To do this:
-
Create a multi-date calendar event under the Sydney folder.
-
Enter the event’s information on the Create new multi-date calendar event screen.
-
Click Save.
The event will be added under the Canberra folder in the asset tree. The events status must be live for the them to appear on the calendar page.
Setting up the calendar page
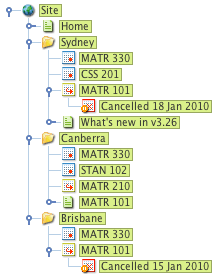
To display the events on the site, we need to create and configure a calendar page.
To do this:
-
Create a calendar page under your site.
-
Navigate to the event sources section of the Details screen of the calendar page.
-
Select the Sydney, Canberra, and Brisbane event folders in the location to draw events from fields.
-
For each event location specified, apply a color CSS class in the CSS class to apply to the events' display field.
This procedure will allow us to display the events of each location in a different color.
In this example, we have set the Sydney events in green, the Canberra events in red, and the Brisbane events in purple.

In the enabled views fields, select the (none) option for the year view, week view, and day view options.
This action will disable the year, week, and day view options on the calendar page. Users will only be able to view events by month. Users can also view the details of each event when clicked on in the calendar.

Defining the layout of the calendar
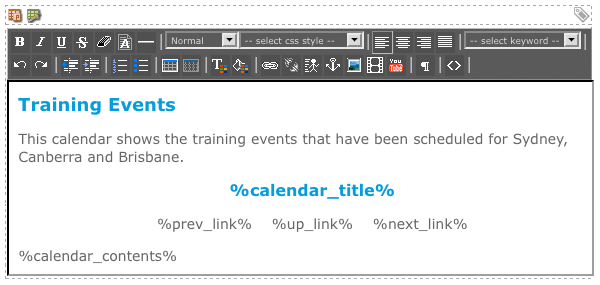
A default layout has been created for the calendar page. We need to modify this layout to add a title for the calendar and add additional information on the page.
To do this:
-
Right-click on the page contents bodycopy in the asset tree and select the Edit contents screen.
-
Enter the content shown in the figure below into the WYSIWYG editor.
Preview the calendar page
By default, the calendar page will display the current month, highlighting the events that have been scheduled, as shown in the figure below.
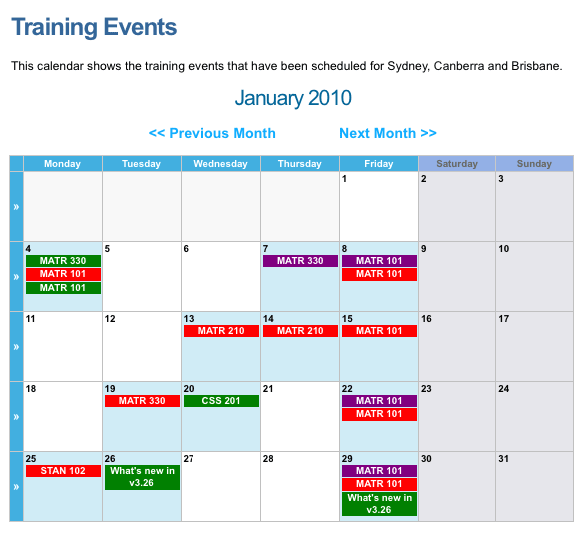
The events for Sydney appear in green, the events for Canberra in red, and Brisbane’s events in purple.
Canceled events (for example, the MATR 101 course for Sydney on Jan 18th) does not appear on the calendar page.
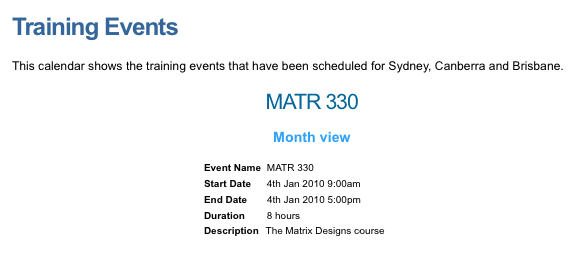
When a user clicks on an event in the calendar, the details of that event will be displayed.
