LDAP bridge
The LDAP bridge allows Matrix to display the structure of your LDAP directory in the asset tree. You can browse your directory from Matrix. You can also use the users and groups as if created in Matrix manually. You can assign LDAP users and groups permissions and apply security restrictions to limit their interaction with the administration interfaces.
The LDAP bridge asset is used to interface to an LDAP directory, either OpenLDAP or Active Directory. Users can then log into the system using their LDAP username and password. You can also use LDAP users in workflow schemas, permissions, and roles.
Adding an LDAP bridge
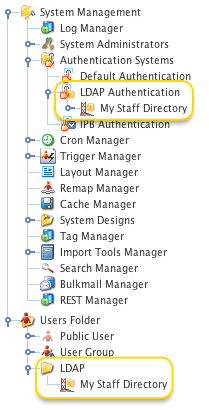
To add an LDAP bridge, go to . You can create an LDAP bridge anywhere in your system where user groups are allowed. The bridge needs to be linked under the LDAP authentication asset to sign in using LDAP accounts. For example, the figure shows an LDAP bridge called my staff directory, created under the user folder and linked under the LDAP authentication asset. Regular users can then access your LDAP directory to change permissions, create and apply roles, and create workflow schemas.
Once you have created your LDAP bridge, you can configure the asset on its associated screens. They are described in the Asset screens documentation. This documentation will only describe the Details, Attribute setup, and LDAP user setup screens, which are different for an LDAP bridge.
Steps to setting up an LDAP bridge
To set up an LDAP bridge, perform the following steps:
-
Create an LDAP bridge. If you do not create it under the LDAP authentication folder in the asset tree, ensure that you link it under this folder.
-
Enter the connection details for the LDAP directory on the Details screen of the LDAP bridge. Once you have entered the details and clicked Save, the connection status should change to connected. If it does not change to Connected, your entered details may be wrong. Read the Details screen section for more information.
-
Enter the user and group attributes on the Attribute setup screen. Read the Attribute setup screen section for more information.
-
On the LDAP user setup screen, select any additional attributes you want to use. Read the LDAP user setup screen section for more information.
-
Change the status of the LDAP bridge to Live. Users can now sign in using their LDAP username and password.
| Users cannot sign in if an LDAP bridge is not linked under the LDAP authentication folder. |
Status of an LDAP bridge
Once you have set up an LDAP bridge, you need to change its status to live so that users can sign in. If the LDAP bridge is under construction, it is considered inactive, and users can not sign in.
Ordering LDAP bridge assets in the asset tree
If you have created multiple LDAP bridge assets in your system, the order of these assets in the asset tree is essential. When a user logs in using their LDAP account, Matrix will check each LDAP bridge for their account details, in the order they appear in the asset tree. As soon as Matrix finds the correct account, it will only use the settings for that LDAP bridge. For example, say you had three LDAP bridge assets set up, and they appear in the order A, B, C in the asset tree. Bill Jones has an LDAP account in the B and C LDAP bridge assets. When he logs in, Matrix will look through each LDAP bridge, find his account in B and use the settings for that LDAP bridge. It will ignore any applied settings with C. If, however, C appeared before B in the asset tree, it will use the C instead.
Using users and groups from the LDAP bridge
Once you have created and set up an LDAP bridge, the LDAP directory and its records appear in the asset tree. You can use these users and groups within the LDAP directory as you would Matrix user accounts and user groups. You can also link LDAP users into user groups within Matrix.
| The functionality of the LDAP bridge within the asset tree has a limitation of 1000 LDAP records on a single level. For example, two groups containing 800 users will function correctly in the asset tree, while a single group containing 1600 users will not. |
LDAP records that do not function in the asset tree can be maintained using the Matrix backend search field.
You can locate specific users and groups using the <bridgeassetID>:<userDN> format, allowing you to edit the permissions and roles of these records individually.
|
Troubleshooting the LDAP bridge
If you cannot see LDAP users or groups in the asset tree, check the following things.
-
On the Details screen of the LDAP bridge, ensure that the Connection status field shows Connected. If it does not show Connected, the connection details on the Details screen may be incorrect for the LDAP directory.
-
On the Attribute setup screen, make sure that you have entered the correct user and group attributes.
-
Ensure that the LDAP bridge has been linked under the LDAP authentication asset in the asset tree.
-
Ensure that the LDAP bridge is Live.
-
On the System configuration screen, ensure that Enable external authentication systems is set to Yes.
How are groups and users identified?
When Matrix looks for users or groups in LDAP, it identifies them using the objectClasses outlined in the tables below. If a group or user in LDAP is not using one of these objectClasses, it will not be displayed in the asset tree.
Searching for LDAP users
Because LDAP users are shadow assets, you can not search for them the same way as normal users or other standard asset types. However, you can go to an LDAP user’s Details screen using the quick search tool. Enter the asset ID of the LDAP bridge, followed by the LDAP CN.
For example:
123:CN=bbanda,OU=Staff,O=Squiz,C=au,DC=ademo,DC=squiz,DC=netAlternatively, if you are using the use user ID as shadow ID setting on the LDAP bridge, you can enter the bridge asset ID followed by the username:
123:bbandaDetails screen
User configuration
- User type
-
Select which user type to use for the LDAP users. You can select to create users as either backend users, simple edit users, or users. You can select to create user accounts if your users do not need to edit the site’s content (for example, they are member accounts). If they need to edit content, you can create either backend user accounts (access to the administration interface) or content editor accounts (access to inline edit modes only). By default, backend user accounts are created for LDAP users.
- Use user ID as shadow ID
-
Enabling this option will use the LDAP user’s user ID attribute value as the shadow asset ID component. For example, an LDAP user’s username would then go from something like this:
123:CN=johnsmith,OU=Staff,O=Squiz,C=au,DC=ademo,DC=squiz,DC=netTo something like this:
123:johnsmithYour LDAP users in Matrix will not be affected if you change the user groups or DN structure in your LDAP configuration or IDP.
If you switch this setting on an existing system, and if there are references to LDAP users outside the bridge, you must run the ldap_update_bridge_references.php to update all existing references in the database.
| You can create system administrator accounts for LDAP users by linking their accounts in the system administrators folder in the asset tree. Once their account is in this folder, Matrix will treat it the same way as a system administrator account. However, you need to create backend user accounts for the LDAP users. |
Connection details
This section allows you to enter the settings for the LDAP directory that you want to use.
- Connection status
-
This field will show whether it can connect to the LDAP directory using the information specified in the fields below. By default, it will show Unable to connect. Once you have entered the required information and clicked Save, this will change to connected if it can connect. If it does not change, it may mean that the information you have entered is incorrect.
- System type
-
Select which type of LDAP directory you are using. These options include OpenLDAP and Active Directory.
- Options
-
The options available are as follows:
- Use protocol version 3
-
Select this option if you use version 3 for the LDAP directory.
- Disallow referrals
-
Some Active Directory installations may require this option to be set. If you have trouble connecting to a directory (for example, the system hangs when expanding the LDAP bridge asset in the asset tree), you may need to select this option.
- Aliases
-
Select whether to Never dereferenced, Dereferenced during search, Dereferenced when locating the base object or Derefenced always.
This is an advanced feature that requires knowledge on if and how the LDAP directory uses aliases. - Host
-
Enter the host to connect to the LDAP directory.
If you are not using a secure port, you do not need to specify any host protocol. For example,your.ldap.server.example.comis valid if your LDAP directory is not secured. - Port
-
Enter the port used to connect to the LDAP directory.
If you are using a secure Port, you must addldaps://to the Host value. For example,ldaps://your.ldap.server.example.com - Base DN
-
Enter the base DN of the LDAP directory.
- Bind DN
-
Enter the DN of the user to bind as. This user account must exist underneath the specified base DN; otherwise, the LDAP bridge may not connect successfully. If you want to use a user outside of the base DN, enter their DN into the Auth Dn field below. If this field is left blank, the LDAP bridge assumes the LDAP directory should be accessed anonymously, ignoring the password field. The LDAP directory must be set up to allow anonymous binding.
- Password
-
Enter the password to use when connecting to the LDAP directory.
- Auth DN
-
If you want to bind as a user outside of the base DN, enter their DN into this field. Otherwise, enter their DN into the Bind DN field if they exist under the base DN.
- Network timeout
-
Choose the timeout in seconds for LDAP server connections. Defaults to 10 seconds.
- Auth filter
-
Enter an auth filter that will be used when Matrix attempts to authenticate an LDAP user for logging in. If Use default filter is enabled, a default filter of
({User ID}=%username%)will be used. Disable this setting to enter a custom auth filter to be used. For example, you can enter a filter specification to restrict the users allowed to authenticate to the LDAP system. A filter specification such as(ou=Sydney)could restrict authentication to users within the Sydney office. Boolean combinations can be used to refine filtering further. For example,(&(ou=sydney)(ou=developers))restricts authentication to developers in the Sydney office. You can also use the auth filter to allow users to sign in using their username or email address using something like:(|(uid=%username%)(mail=%username%)). - Recursive parent groups
-
Specify whether the LDAP bridge should recursively return all parent groups of an LDAP user when logging into the system. These parent groups are used to define the permissions of users within Matrix. By default, this field is enabled; disabling this option can speed up the LDAP sign-in process by only retrieving a user’s immediate parent groups.
Cache options
- Caching status
-
Setting this value to On enables caching for the LDAP bridge. Doing so means it will only make requests back to the LDAP server once the cache has expired. Enabling this setting can significantly improve performance for users logged in to the system using an LDAP user account.
- Cache expiry
-
The length of time an LDAP result cache entry is valid in seconds. When this value is set to
0(zero) or not supplied, the cached LDAP result will expire after the default expiry period set on the cache manager.
| You must also enable the caching status on the cache manager for caching on LDAP bridges to take effect. |
Attribute setup screen
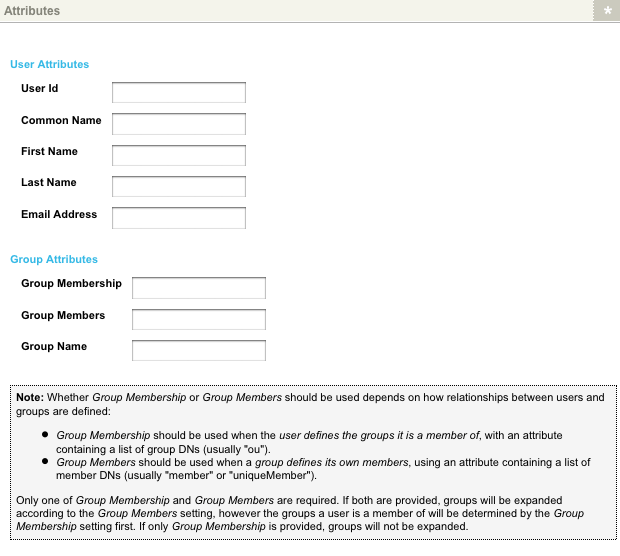
The Attribute setup screen allows you to enter which fields to use for the user accounts from the LDAP directory.
The attributes section of the Attribute setup screen is shown in the figure.
The fields available on this screen are as follows:
- User ID
-
Enter the field’s name in the LDAP directory to use as the user ID in Matrix.
- Common name
-
Enter the field’s name in the LDAP directory to use as the common name in Matrix.
- First name
-
Enter the field’s name in the LDAP directory to use as the first name in Matrix.
- Last name
-
Enter the field’s name in the LDAP directory to use as the last name in Matrix.
- Email address
-
Enter the field’s name in the LDAP directory to use as the email address in Matrix.
- Group membership
-
Enter the field’s name in the LDAP directory to use as the group membership in Matrix.
- Group members
-
Enter the field’s name in the LDAP directory to use as the group members in Matrix.
- Group name
-
Enter the field’s name in the LDAP directory to use as the group name in Matrix.
| Whether you use group membership or group members will depend on how relationships between users and groups are defined. Group membership should be used when the LDAP user defines the groups it is a member of, with an attribute containing a list of group DNS (usually OU). Group members should be used when a group defines its members, using an attribute containing a list of member DNS (usually member or uniqueMember). If omitted, a default attribute of member will be used. |
Only one of either Group membership or Group members is required. If both are provided, groups are expanded according to the group members setting in the asset tree. However, the groups a user is a member of will be determined first by the group membership setting.
How the asset tree displays groups and users
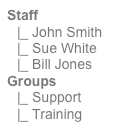
Consider the following example to understand how the asset tree displays LDAP groups and users. In the figure shown is an example LDAP directory. It contains three users and three groups. All members are part of the primary group of staff. In addition, John Smith is also part of the support group. Sue White is also part of the support and training groups, and Bill Jones is also part of the training group.

The asset tree will show all groups if you use the group membership field on the Attribute setup screen. However, the users will only appear in the primary group.
The figure shows the structure in the asset tree of the LDAP users and groups, for the example LDAP directory. All users appear in the primary group of staff, and no users appear under the support and training groups. You can still apply permissions and roles to these groups and use them within a workflow schema. When an LDAP user logs in, Matrix will query the LDAP directory to work out which groups they are a part of and hence which permissions, roles, and workflow schemas to apply. For example, say you have denied write permission on the training group’s home page but have granted them write permission to the training page. When Sue White logs in, Matrix will query the LDAP directory and find out that she is part of the training group. Sue will then be able to edit the training page but not edit the home page.
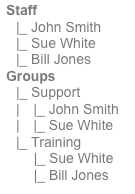
If you use the Group members field on the Attribute setup screen, the asset tree will show all groups and the users in each group. For example, the figure shows the structure of the LDAP users and groups, for the example LDAP directory.
Naming the groups and users in the asset tree
The name displayed in the asset tree for the LDAP groups and users is determined by the values that you enter into the Common name and Group name fields on the Attributes setup screen. For example, if you enter OU into the group name field, the value stored in the OU attribute field for the group in LDAP is displayed in the asset tree. This approach will only work for the groups and users using the OU and CN attributes. You cannot change what is being displayed in the asset tree for the groups using the DC, O, and C attributes.
LDAP user setup screen
The LDAP user setup screen allows you to select which LDAP fields to store as attributes for each user in Matrix. By default, no information will appear if you have not entered the connection details on the Details screen. Once the LDAP bridge is connected, the fields available from the LDAP directory will be listed.
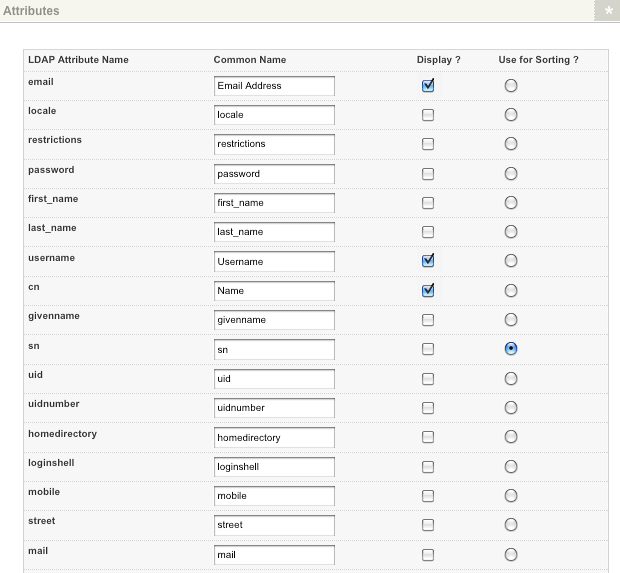
The fields available on this screen are as follows:
- LDAP attribute name
-
This field shows the field’s name in the LDAP directory.
- Common name
-
Enter the field’s name to show on the Details screen of the LDAP user. For example, in the figure shown above, Email address has been entered for the first field, displayed on the Details screen. This field will only appear if you have selected Display. By default, the name of the LDAP attribute will appear in this field.
- Display
-
Select whether to display the field on the Details screen of the LDAP user. If you display this field, the field’s name on the Details screen will be the value entered into the Common name field. Also, if you are displaying this field, you can access its value in other parts of the system through keyword replacements. For example, to display the user’s email address on a page, use the keyword replacement. Read the LDAP users section for more information.
- Use for sorting
-
Select a value to use for sorting the LDAP users in the asset tree.
LDAP users
Once the LDAP bridge has been connected, the LDAP users will be displayed in the asset tree. You can then view the user’s details, link the user into a user group, apply permissions and roles to the user, apply metadata or use the user in a step in a workflow schema.
Viewing and editing user details
To view the details of an LDAP user, go to the Details screen of the user. You will see the information that has been selected on the LDAP user setup screen of the LDAP bridge. You cannot edit this information within Matrix. You need to edit the details in the original LDAP directory to do this. Matrix is updated with this new information.
Linking an LDAP user to a user group
Once the LDAP users have been created within Matrix, you can link them into user groups. You can do this through the asset tree, but if you have several LDAP users, you should do this on the linking screen of the LDAP user. In the Create link section, select the user group in the new link parent field and click Save. The LDAP user is linked to the selected user group.
Keyword replacement for LDAP users
To display LDAP user information within content, you can use the keyword replacement %globals_user_attribute_<attribute>%.
Substitute <attribute> with an LDAP attribute field that you have selected to display on the LDAP user setup screen of the LDAP bridge.
For example, if you have selected to display the email field on the LDAP user setup screen, you can use the keyword replacement to display the user’s email address.
If you have not selected to display this field, this keyword replacement will not work.
Updating the DN for an LDAP user
If you need to update the DN of an old LDAP user to point to a new LDAP user, you can use the script ldap_change_dn.php.
This script is located in the <system_root>/packages/ldap.scripts, where <system_root> is the location of the Matrix system you are using.
An example of the usage of this script is given below:
$ php ldap_change_dn.php <system_root>
Enter the root password for "MyCompany Matrix System (stable)": <ROOT PASSWORD>
*** The following bridges are available in the system ***
[61] - MyCompany Staff
Enter the ID of the bridge to apply changes to: 61
Enter the DN to change: uid=jsmith,ou=developers,dc=mycompany,dc=net
Enter the new DN: uid=jsmith,ou=Staff,dc=mycompany,dc=net

*** Please confirm the following information is correct ***
[BRIDGE] 61
[OLD DN] uid= jsmith,ou=developers,dc= mycompany,dc=net
[NEW DN] uid= jsmith,ou=Staff,dc= mycompany,dc=net
Is this correct [y/n]: y

Changing asset permissions [ OK ]
Changing asset permissions (rollback) [ OK ]
Changing internal messages [ OK ]
Changing internal messages (rollback) [ OK ]
Changing screen access [ OK ]
Changing screen access (rollback) [ OK ]
Changing locks [ OK ]