Configure workflow steps, conditions and escalations
Learn more about workflows steps and conditions, and how you can manage content approval escalations through workflow.
Steps
A step within a workflow stream allows you to define which users will approve the asset changes. Each step comprises several conditions, with each condition being a user, user group, or role. You can have as many steps as you like on a workflow stream.
Add a step
To add a step to a workflow stream:
-
Go to the Details screen of the workflow schema.
-
Click on the
 icon, next to the workflow stream to which you want to add a step.
 -
Enter the name of the new step into the Create a new step called field.
-
Click Save.
The new step will appear in the steps defined for this workflow stream section:

Workflow conditions
A condition within a workflow stream allows you to define the user, user group, or role that must make the approval in the workflow stream. Each condition needs to be added to a step, and you can add as many conditions as needed.
Adding a condition
To add a condition to a step:
-
Go to the Details screen of the workflow schema.
-
Click on the
icon next to the workflow stream to which you want to add the condition.The selected workflow stream steps will be displayed in the Steps defined for this workflow stream section.
-
Select the user, user group, or role you want to use in the new condition field for the step.
-
Click Save.
The condition will be added to the conditions section for the step.
Edit a condition
To edit a condition:
-
Go to the Details screen of the workflow schema.
-
Click on the
icon next to the workflow stream for which you want to edit the condition.
The steps for the selected workflow stream will be displayed in the Steps defined for this workflow stream section, where you can edit the condition for each step.
Delete a condition
To delete a condition:
-
Go to the Details screen of the workflow schema.
-
Click on the
icon next to the workflow stream from which you want to delete the condition.The selected workflow stream steps will be displayed in the steps defined for this workflow stream section.
-
Check the Delete field for the condition.
-
Click Save
The condition will be removed from the step in the workflow stream.
Order of steps and conditions
If the order of conditions is important, then you should add each condition as a separate step.
Consider a situation where you want a user from the Content authors user group to approve your changes before a system administrator. In this situation, this needs to be two steps within the workflow stream. If you do not mind which user approves the changes first, you can add a step with two conditions.
Workflow escalation
Workflow escalation allows you to escalate the approval process to either the next step or an alternative set of steps when the step’s expiry time has elapsed. The alternative steps are run as a child workflow process. If no alternative steps are specified, the parent workflow will automatically proceed to the next step.
For example, consider this workflow stream set up:
-
The first step is that a user from the Content approvers user group must approve.
-
The second step is that a system administrator must approve.
-
The expiry time is set to one day.
-
Escalation is turned on, and no alternative steps have been configured.
If a user from the Content approvers user group does not approve the step within a day, the workflow is escalated to a system administrator.
If an alternative step is configured (that a content manager user must approve it, for example), the workflow would be escalated to this user instead.
However, if a user from the content approvers user group did approve the step within a day, the workflow would not be escalated.
Enable workflow escalation
To enable workflow escalation for a step:
-
Go to the Details screen of the workflow schema.
-
Click on the
icon next to the workflow stream for which you want to enable escalation.The selected workflow stream steps will be displayed in the steps defined for this workflow stream section.
-
In the Escalate field for the step select Yes.
-
Click Save.
An additional section called escalation steps will be added to the form, as shown in the figure below.
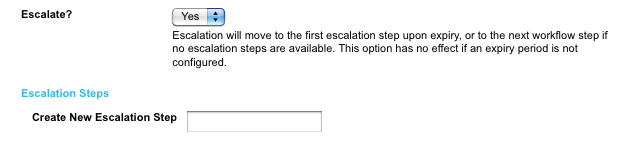
You can add alternative steps to the workflow stream if needed. If you do not add alternative steps, it will escalate to the next step in the approval process.
Add an escalation step
To add an alternative escalation step:
-
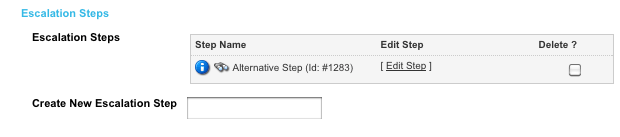
Enter a name in the Create new escalation step field.
-
Click Save.
The step will appear in the escalation steps list, as shown in the figure below.
Edit an escalation step
To edit an escalation step:
-
Click on the Edit step link.
-
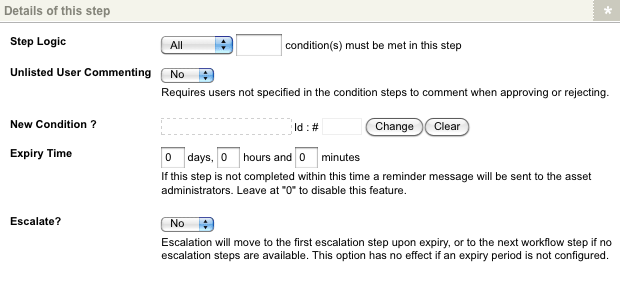
Make the necessary edits in the step details screen.
-
Click Save.
The fields on this screen are the same as those provided for each step in the steps defined for this workflow section on the Details screen of a workflow stream.
Delete an escalation step
To delete an escalation step:
-
Go to the details screen of the workflow stream.
-
Click on the
icon next to the workflow stream from which you want to delete escalation.The selected workflow stream steps will be displayed in the steps defined for this workflow stream section.
-
Select the Delete field for the escalation step.
-
Click Save.
The escalation step and all of its conditions will be deleted from the workflow schema.