SecurePay direct post payment gateway
The SecurePay direct post payment gateway asset allows you to create a Direct post payment gateway, providing users with a secure way to pay for their items.
SecurePay online payment gateway and ecommerce solutions are only available to users within Australia.
| The SecurePay online payment gateway posts payment information directly to a remote server. Your Matrix server and hosting infrastructure must be PCI compliance to use this payment gateway. |
The SecurePay direct post payment gateway accepts the following card types:
-
American Express
-
Diners Club
-
JCB
-
Mastercard
-
Visa
A successful transaction originating from a SecurePay direct post payment gateway will generate the ecommerce payment completed trigger event.
For more information, refer to the Trigger events chapter.
Once you have added a SecurePay direct post payment gateway, you can configure its settings on its associated asset screens. The majority of these screens are the same as a standard page. Read Asset screens for more information about the common screens in Matrix.
This chapter describes the Details and Display formatting screens, which are different for a SecurePay direct post payment gateway.
Additional dependant assets

When you create a SecurePay direct post payment gateway, the display format bodycopy asset is automatically created beneath it, as shown. You can use this bodycopy to define the SecurePay direct post payment gateway form’s contents and layout. This bodycopy can also be accessed through the Display formatting screen.
Details screen
The Details screen allows you to configure the settings of the SecurePay direct post payment gateway. Read the Asset details screen documentation for more information about the Status, Future status, Thumbnail, and Details sections.
SecurePay account details
This section allows you to enter your SecurePay account details and configure the payment gateway’s general settings.
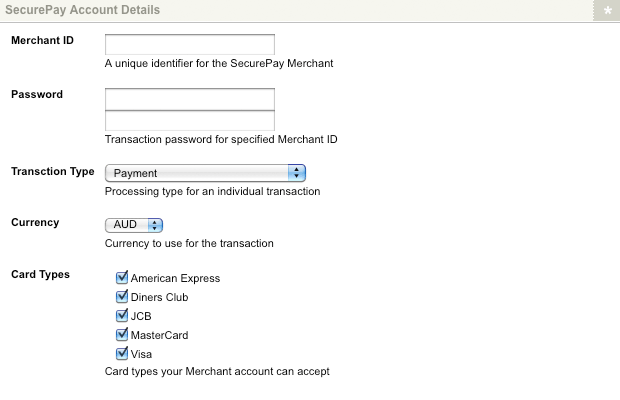
To accept payments on the direct post payment gateway, you will need to obtain a SecurePay account.
The following fields are available:
- Merchant ID
-
Enter your merchant ID, supplied to you by SecurePay customer support once your account has been activated.
- Password
-
Enter your transaction password supplied to you by SecurePay.
- Transaction type
-
Select the payment type for individual transactions on the SecurePay direct post payment gateway. This field allows you to select between the regular payment type and payment with FraudGuard service. Please note that SecurePay’s FraudGuard service must be correct configured on your SecurePay account.
- Currency
-
Select the currency used in all ecommerce transactions processed by the SecurePay direct post payment gateway. By default, this field is set to
AUD. The following currencies are available:-
Great British pound (GBP)
-
Australian dollar (AUD)
-
United States dollar (USD)
-
Euro (EUR)
-
Japanese yen (JPY)
-
Canadian dollar (CAD)
-
- Card types
-
Select the card types available on the SecurePay direct post payment gateway. If a card type is not selected, users will not select that card type during the transaction process. By default, all card types are selected.
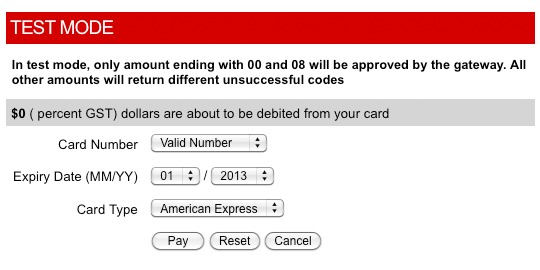
Test mode
This section allows you to modify the payment gateway to function in test mode.
To credentials to use test mode are:
-
Merchant ID:
abc0001 -
Password:
abc123
The test mode section of the Details screen:

In the Enable test mode field, select whether to use the payment gateway for testing purposes only.
If this field is set to Yes, the payment gateway will not process any payments.
The Card number field on the SecurePay direct post payment gateway form will be replaced with the test drop-down menu.
Pass-through variables
This section allows you to source address information for the SecurePay direct post payment gateway, to display on the gateway through keyword replacements available on the display format bodycopy. If your payment gateway is configured with FraudGuard you can use these fields to pass billing information to SecurePay.
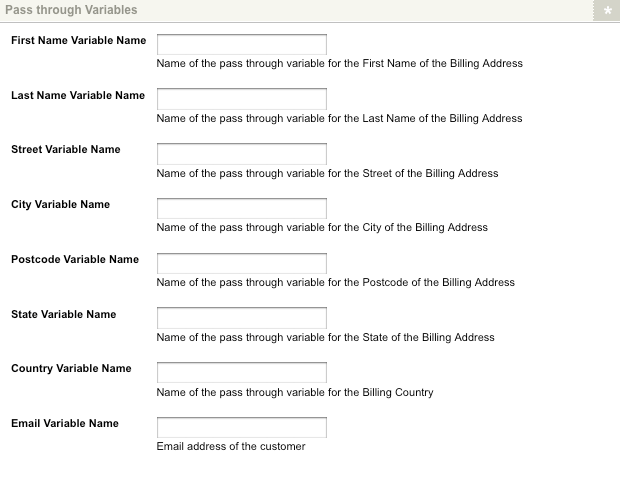
In the available fields, enter the pass-through variable keys for the corresponding form fields. These keys must be configured on the Ecommerce rules screen of the Ecommerce form page.
Read the Ecommerce form page documentation for more information about the Ecommerce rules screen section.
The fields that are available in this section are as follows:
- First name variable name
-
Enter the pass-through variable key for the first name of the billing address.
- Last name variable name
-
Enter the pass-through variable key for the last name of the billing address.
- Street variable name
-
Enter the pass-through variable key for the street of the billing address.
- City variable name
-
Enter the pass-through variable key for the city of the billing address.
- Postcode variable name
-
Enter the pass-through variable key for the postcode the billing address.
- State variable name
-
Enter the pass-through variable key for the state of the billing address.
- Country variable name
-
Enter the pass-through variable key for the country of the billing address.
- Email variable name
-
Enter the pass-through variable key for the email address of the customer.
Interface options
This section allows you to change the wording of the buttons for the payment gateway.
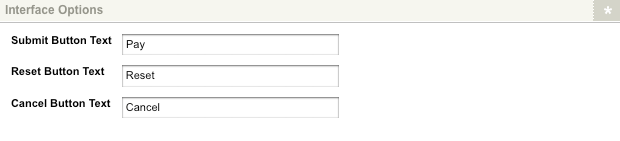
The fields that are available in this section are as follows:
- Submit button text
-
Enter the text to display as the Submit button. By default, this button will read
Submit. This button is displayed when the keyword replacement Submit button is used on the display format bodycopy. - Reset button text
-
Enter the text to display as the Reset button. By default, this button will read
Reset. This button is displayed when the keyword replacement Reset button is used on the display format bodycopy. - Cancel button text
-
Enter the text to display as the Cancel button. By default, this button will read Cancel. This button is displayed when the keyword replacement Cancel button is used on the display format bodycopy.
Display formatting screen
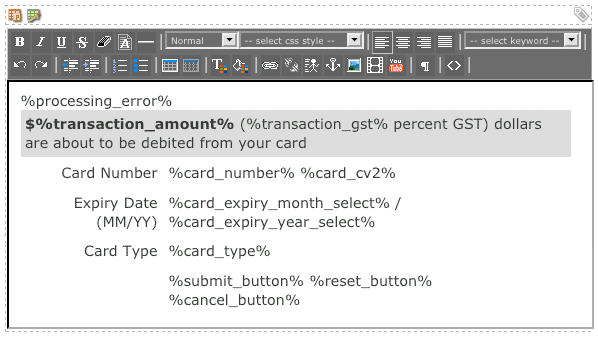
The Display formatting screen allows you to edit the display format bodycopy. Please note that this bodycopy can also be edited by right-clicking on the display format bodycopy in the asset tree and selecting edit contents.
Display format bodycopy
The display format bodycopy is used to define the layout of the SecurePay direct post payment gateway page. The default layout of the payment gateway:
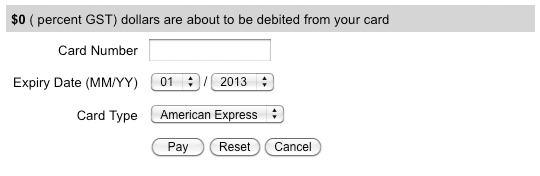
To change the information that is being shown:
-
Click on the edit
 icon – the WYSIWYG editor will appear.
 -
Use the keyword replacements and formatting to set the information’s layout to show on the payment gateway page.
By default, the information shown in the figure will appear in the WYSIWYG editor.
Keyword replacements on the display format bodycopy
A list of keyword replacements is provided in the WYSIWYG editor toolbar on the Edit contents screen of the display format bodycopy. You can use these keyword replacements in conjunction with text, images, and links to configure the payment gateway page’s layout.
The standard keyword replacements that are available include the following:
- Credit card number
-
This will show the card number field.
- Credit card expiry month (text box)
-
This will show the card expiry month text field.
- Credit card expiry month (drop-down box)
-
This will show the card expiry month drop-down field.
- Credit card expiry year (text box)
-
This will show the card expiry year text field.
- Credit card expiry year (drop-down box)
-
This will show the card expiry year drop-down field.
- Card cv2
-
This will show the card CV2 field.
- Card type
-
This will show the card type field.
- Card holder’s first name
-
This will show the card holder’s first name field.
- Card holder’s last name
-
This will show the card holder’s last name field.
- Billing address street (street number, name, and type)
-
This will show the customer’s street address specified on the billing address.
- Billing address postcode
-
This will show the customer’s postcode as specified on the billing address.
- Billing address city
-
This will show the customer’s city as specified on the billing address.
- Billing address state
-
This will show the customer’s state as specified on the billing address.
- Billing address country
-
This will show the customer’s country of residence, as specified on the billing address.
- Customer’s email address
-
This will show the customer’s email address.
- Submit button
-
This will show the Submit button on the payment gateway.
- Cancel button
-
This will show the Cancel button on the payment gateway.
- Cancel URL
-
This will show the URL to cancel the transaction.
- Reset button
-
This will show the Reset button on the payment gateway.
- Transaction amount
-
This will show the amount of money that is to be paid in the transaction.
- Transaction currency
-
This will show the currency in which the transaction is being carried out.
- Processing error (empty if no error)
-
This will show any processing errors. For example, if the user forgets to fill out a field.
| A number of these fields are compulsory when creating an active payment gateway. If the required fields are not available to the user, the transaction can not complete successfully. |