SAML account manager
Overview
The SAML account manager lets you integrate SAML 2.0 federated access through a nominated identity provider.
When a user visits the SAML account manager asset, the system will redirect the user to the SAML authentication system. After successfully authenticating, users are redirected back to Matrix and logged into the system using their linked local user account (if one has already been created).
If no account has been linked to the current user, Matrix will either:
-
identify an associated account within Matrix to link to (that is, one the user is also logged in with)
-
create a new local user account within the system to link.
After the SAML user has been successfully authenticated and linked, the service provider will retrieve their user profile data through their profile API.
This data is stored within the session and is available using the following keyword replacements:
%globals_session_saml_attributes%-
The entire attributes data as a JSON array.
%globals_session_saml_attributes_x%-
Specified value from the attributes JSON array.
For example, if the JSON data is as follows:
{ "first_name":"John", "last_name":"Doe", "email":"jd@example.com"}We can use the following keyword to extract the first_name value of John by using: %globals_session_saml_attributes_first_name%.
If a JSON key contains non-alphanumeric characters, these characters must be replaced with underscores when using the SAML keyword to print the value.
This requirement applies to all characters except for _, -, and ..
|
For example, if the JSON attribute has the following format:
{ "http://www.site.com/name":"John"}The keyword to extract that value would be: %globals_session_saml_attributes_http___www.site.com_name%
No caching settings should be used on a SAML account manager asset, including Matrix caching, HTTP cacheable headers, or any external proxy caching.
Additional dependant assets
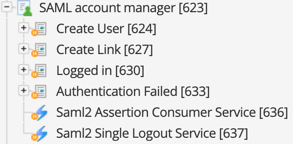
When you create a SAML account manager within your system, several assets are automatically created beneath it, as highlighted in the previous figure.
You can use these assets to define the contents and layout of the SAML account manager.
- Create user
-
This bodycopy is used to define the layout to display to a SAML user when no associated user account is found within Matrix. This layout allows the user to create and link to a new user account within the system.
- Create link
-
This bodycopy is used to define the layout to display to a SAML user when an associated user account is found within Matrix. This layout allows the user to link these user accounts, enabling federated access to the system.
- Logged in
-
This bodycopy is used to define the layout to display to a logged-in SAML user with a linked Matrix account.
- Authentication failed
-
This bodycopy is used to define the layout to display to a user when authentication fails on the SAML account manager.
Details screen
This screen lets you configure the settings of the SAML account manager. The settings available on this screen are similar to those of the Account manager asset.
This page will only cover the fields that specifically relate to the functionality of the SAML account manager.
General settings
This section displays the status of SAML on your system and lets you configure its general settings.
The general settings section is shown in the figure.
The fields available in this section are as follows:
- Authentication source
-
Select the authentication source type of the SAML identity provider. The options available here will depend upon the SAML configuration present on your server.
- IdP Metadata XML URL
-
Accepts the SAML metadata URL from third-party identity providers (IdPs). The URL must include the protocol, which typically is
https.
You can use the Refresh field to specify how often (in days) to import new metadata from the IdP.If you prefer not to refresh metadata periodically, you can initially specify an IdP metadata URL and click Save to retrieve the configuration. Once the configuration is retrieved from the IdP, you can delete the URL and click Save once more to remove the link to the source configuration and manage the IdP XML configuration manually. - IdP metadata XML
-
Accepts metadata XML provided by an IdP. You can edit metadata in this field if the IdP Metatada XML URL field is left blank. Otherwise, this field is read-only.
- SAML user ID location
-
The location to source a unique user ID on the SAML authentication response. This setting can either be set as the
NameIDelement of the SAML user or from a nominated attribute element. Selecting the attribute element setting in this field will display the Attribute element name field, where the attribute can be specified. - Allow linking to existing users
-
This option lets you link existing Matrix user accounts with their authenticated SAML identities. This option means that the SAML account manager will prompt users to link their accounts if they are logged into the system. Their account is SAML authenticated but not already linked. This process allows for federated access to the system, automatically signing the user into their account as part of the SAML authentication process. By default, this option is disabled.
- Automatic creation
-
This option allows for the automatic creation of linked local users when a user is not logged into Matrix. This option is enabled by default to create linked local users automatically. If you disable this setting, account creation through SAML becomes a manual process. Users are allowed to create a new user account during SAML authentication.
- Disallow password login
-
This option lets you randomize Matrix users' passwords when they are linked to a SAML account. By randomizing the password, users can not sign in to the system using the standard username and password. They can only sign in through the SAML bridge.
LDAP authentication
This section lets system administrators integrate the SAML account manager with an existing LDAP bridge.
- LDAP bridge
-
Choose the LDAP bridge asset you want to use to get the
userIDattribute. - Search LDAP bridge by
-
Choose either
UIDorDNas the parameter the SAML account manager searches for from the LDAP bridge.
Authentication request
This section lets you configure the request sent to the SAML identity provider from Matrix.
The fields available in this section are as follows:
- NameID policy
-
The format of the
NameIDattribute on the SAML authentication request. This option can be either persistent, transient, or left empty. - Protocol binding
-
The format of the ProtocolBinding attribute on the SAML authentication request. This option can be either HTTP POST, HTTP Redirect, HTTP Artifact, SOAP, or left empty.
- AuthnContextClassRef
-
The value of the
AuthnContextClassRefattribute on the SAML authentication request. - Use extensions
-
Enables to use of query extensions on the SAML authentication request. An Extensions field lets you configure extensions on the SAML authentication request if this field is enabled. Consult your identity provider’s integration guide for more information on the settings in this section.
SAML 2.0 service URLs
This section displays the service URLs for the SAML account manager. These URLs are required when configuring the settings in your SAML identity provider.
| Service URLs are available when the SAML account manager is created beneath a Site asset with web domains configured. |
The fields available in this section are as follows:
- Assertion consumer service URL
-
The URL of the SAML assertion consumer service on your system.
- Single sign-out service URL
-
The URL of the SAML single sign-out service on your system.
- Service provider metadata download URL
-
The download URL of the service provider metadata file for use on the SAML identity provider.
Consult your identity provider’s integration guide for more information on using the SAML 2.0 service URLs.
XML metadata converter
This section lets you convert your identity provider’s SAML 2.0 metadata XML for use with your SimpleSAMLphp metadata configuration. The parse metadata XML section is shown in the figure.
In the XML metadata field, paste the SAML 2.0 metadata XML of your identity provider and click Save.
| You can use the IdP metadata XML URL and IdP Metadata XML fields to obtain valid SAML2 metadata from your IdP service. |
This XML will be converted for SimpleSAMLphp array for use within the saml20-idp-remote.php file on your SimpleSAMLphp installation within Matrix.
Asset creation settings
This section lets you configure the user asset types created during the SAML authentication process when no linked Matrix user is found.
- Matrix user to create
-
Select the user account types to create for new Matrix users during the SAML authentication process. The account types available are:
-
User
-
Backend user
-
Content editor
-
System administrator
Read the Permissions documentation for more information on the available user types.
- Metadata schemas to apply
-
This field lets you select a metadata schema to automatically applied to the created user assets. Users can input the metadata of the nominated schema when creating their accounts.
Populate user attributes
This section lets you define the user attributes of your SAML authorized users using the profile data returned from the identity provider.
The following user attributes can be set:
-
First name
-
Last name
-
Login date
-
Login IP
-
Disallow password sign in
-
Email
-
Restrictions
-
History passwords
-
Username
-
Password
-
Locale
-
Preferences
-
Session validation
To set an attribute, select it in the Add attribute field and click Save to make the Attributes to populate on creation settings appear. In the Value field of the attribute being set, enter the source string to retrieve the specified attribute data.
To delete an attribute that has been set, select the corresponding Delete check-box and click Save.
Sync user attributes
The sync user attributes section of the Details screen lets you configure a set of user attributes of your SAML authorized users. The attributes are populated from the identity provider’s profile data, syncing each time a user logs into the system.
The following user attributes can be set:
-
First name
-
Last name
-
Login date
-
Login IP
-
Disallow password sign in
-
Email
-
Restrictions
-
History passwords
-
Username
-
Password
-
Locale
-
Preferences
-
Session validation
To set an attribute, select it in the Add attribute field and click Save to make the Attributes to sync on sign-in settings appear.
In the Value field of the attribute being set, enter the source string to retrieve the specified attribute data.
To delete an attribute that has been set, select the corresponding Delete check-box and click Save.
Return location
This section lets you set the location for users to redirect to after the SAML authentication process.
You can select one of three options when configuring this section:
-
Redirect URL
-
Asset ID
-
Query string parameter.
- Redirect URL
-
The URL of the web page to return users to, for example, http://www.example.com. This option is useful when wanting to return users to a page outside of your Content Management system.
This URL requires the web protocol to be included (for example, https://). - Asset ID
-
An asset within the system to which to return users.
- Query string parameter
-
The name of a query string parameter whose value will specify the return URL to which users return. For example, if this value is
URLand the inbound query string includes?URL=http://example.com, users are returned to http://example.com.Letting the return location URL be dynamic using a query string can result in attackers redirecting users to malicious sites.
Use custom redirect implementation on the "Signed-in bodycopy" instead to control what domains can be used for the dynamic redirect URL.
After deciding on one of the three options to control the return location, the following redirect configuration options are available:
- Redirect after sign-in
-
If enabled, the user will get redirected to the specified location as soon as they sign in.
- Redirect after user created
-
If enabled, the user will get redirected to the specified location as soon as their linked Matrix user account has been created.
This setting will not work when Redirect after sign-in is enabled. - Redirect after link created
-
If enabled, the user will get redirected as soon as their existing Matrix user account is linked with their external, signed-in account.
- Redirect delay
-
The number of seconds to delay the redirect. By default, this field is set to
0.00(zero), meaning the redirect is immediate. When a value is set in this field, JavaScript code is used to execute the delayed redirect.
Advanced settings
This section contains various settings that let you refine how the SAML account manager behaves under specific use cases.
- Ignore permissions
-
If the account manager is positioned in an area of the asset tree with elevated user permissions, this setting allows the inherited settings to be ignored when the account manager creates a user account.
This setting is enabled by default to avoid issues with account creation.
- Form submission URL
-
Customise whether the current URL or the page’s URL should be used when submitting the authentication form. This setting is useful when nesting the account manager page within another page or design.
- Set link value
-
Allows you to specify any custom link values you want to append to each authentication link.
- Paint layout to apply
-
Lets you apply an asset-based paint layout to all URLs of the asset.
- Override paint layout to apply
-
Apply an asset-based override paint layout to all newly-created assets. This paint layout does not apply to any of the asset’s children.
- Create form customization
-
Select this option to create a custom edit layout based on asset creation settings. The layout is created when you click Save.
- SAML session cookie SameSite
-
Lets you configure the SameSite attribute sent with SAML cookies.
Set this value to
Nonewhen the IdP usesHTTP-POSTbinding.Read the Mozilla developer documentation about SameSite for more details about SameSite attributes.
Logging a user out
To sign out of a SAML session, the standard method of logging out of Matrix (http://example.com/page?sq_action=logout) will often result in a redirection back to the SAML IDP if the sign-in design template is set to redirect the user to the SAML account manager.
However, as the SAML IDP session is still valid, the user will automatically sign-in again through SAML IDP.
This behavior generally results in the user being logged back into Matrix.
To ensure the user ends the SAML session properly, the user must be directed to http://example.com/path/to/SAML-account-manager?logout.
Trigger method
This method will more reliably ensure that users who sign out of admin using the Logout button will also end their SAML session with the IDP.
-
Create a trigger called SAML logout.
-
Set the event to After user logs out.
-
Set the Interface Mode condition.
-
Select the Frontend Interface check box.
-
Set an action of redirect to URL, with the URL set to: http://example.com/path/to/SAML-account-manager?logout
Keyword replacements
The following keyword replacements can be used in implementations using the [SAML account manager] and OAuth account manager.
SAML Account Manager
| Keyword replacement | Information shown |
|---|---|
|
The entire attributes data as a JSON array. |
|
Specific value from the attributes JSON array.
For example, |
Oauth account manager
| Keyword replacement | Information shown |
|---|---|
|
The entire profile data as a JSON array. |
|
Specific value from the profile JSON array.
For example, |
Examples
For example, if the JSON data returned for a SAML account manager is as follows:
{"first_name":"John", "last_name":"Doe", "email":"jd@example.com"}We can use the following keyword to extract the first_name value of John by using: %globals_session_saml_attributes_first_name%.
If a JSON key has non-alphanumeric characters in it, you (applies to all characters except for _, -, and .), they will need to get replaced with underscores when using the SAML keyword to print the value.
For example, if the JSON attribute has the following format:
{"http://www.site.com/name":"John"}The keyword to extract that value would be: %globals_session_saml_attributes_http___www.site.com_name%.
The same concept applies to the keywords for the OAuth account manager; replace saml_attributes with oauth_profile in the keyword.
Configure external authentication providers using the SAML account manager
You can add single sign-on from an external identity provider (IdP) to your Matrix site using the IdP fields in the SAML account manager.
This how-to section guides you through the basic setup information you will need to integrate with Auth0. Any assumptions are called-out in the how-to sections.
Create a SAML account manager asset with access to a web path
You need to create a SAML account manager asset beneath a Site asset. The SAML account manager needs to be accessible from a URL so that the assertion consumer URLs can be set.
| If your Matrix site already has a location where you store your OAuth configuration, you can skip steps one to three and create the SAML account manager asset beneath this location. |
-
In your website configuration, create a Site asset named "Web services".
-
Switch to the URLs screen and set a Web domain accessible for your site.
-
Right-click on the Web services site asset and create a folder named “OAuth”
-
Right-click on the OAuth folder and select in the folder.
-
Name the asset “Auth0 SSO” and select Create.
-
Click Save to view the Details screen.
-
In the SAML 2.0 Service URLs section, copy the Assertion consumer service URL (to use in the IDP callback in the next procedure).
Set up Auth0
This section of the how-to guides you through the instructions on the Auth0 documentation website as they relate to configuring an app for Matrix and the SAML account manager.
-
Go to and select Create Application.
-
Name the App “Matrix SSO”.
-
Select “Regular Web Application” from the list of application types.
-
Select Create.
-
In the Application URIs > Allowed Callback URLs field, paste the Matrix assertion consumer service URL into the field.
-
Select Save Changes.
-
Scroll to the bottom of the Settings page and select Advanced Settings.
-
Select the Endpoints tab and locate the SAML Metadata URL.
-
Copy the URL to the clipboard.
-
Go to the next section to use the copied URL to set up the IDP metadata XML URL field.
Add the Auth0 metadata URL to the SAML account manager
Now you have set up the Auth0 app and copied the URL, you can configure the SAML account manager asset to consume the configuration URL for its settings.
-
On the General settings section of the Details screen, find the Authentication source field.
-
Select This SAML account manager.
-
Paste the copied URL from the Auth0 SAML Metadata URL field into the IDP Metadata XML URL field.
-
Set the refresh interval to a value of your choosing.
-
In the Status section, select Make the Asset Live.
-
Click Save.
Set create locations
After setting up the metadata URL sources, you need to set where new users resulting from the integration are created in your site.
-
Right-click on the SAML account manager asset and select Create locations.
-
In the Fixed create locations field, select the site to which to apply the authentication to using the asset picker.
-
Click Save to set the create location for authenticated users
Test the integration
Now you have set up both sides of the authentication, you can test the sign-in process on your site.
|
These steps describe a general testing flow to verify an integration works, and may vary based on how your site is configured. Use these steps as a guide to testing the integration on your site. |
-
Copy the site URL and preview the site in a new browser window in which you are not authenticated for Auth0.
-
When you load the page, check that the Auth0 interface appears asking you to authenticate using a SSO service.
-
Authenticate using your preferred account offered by the Auth0 system.
-
After authenticating, check that a new user appears in the SAML folder you set up.
If you have set the SAML account manager to merge accounts together, you will not see a user created in this area.