RSS feed
The RSS feed asset allows you to output an RSS feed from your site. First, you configure an asset listing page to generate a list of assets you want to output and then create an RSS feed that points to that asset listing page. You then configure the RSS feed to pull information from the listed assets into XML tags.
Once your RSS feed is created, you can configure its settings on its associated asset screens. Read Asset screens for more information about the common screens in Matrix. This chapter will describe the Details and Build RSS screens, which are different for an RSS feed asset.
Details screen
The Details screen allows you to select the RSS format for the RSS feed and configure the asset listings to use in your feed. Read the Asset details screen documentation for more information on the Status, Future status, and Thumbnail sections on this screen.
Choose RSS formats and version
This section allows you to select the format of the RSS feed and whether to use HTTP authentication.

The fields available in this section are as follows.
- RSS formats
-
Select which RSS feed format you would like to use. These options include
RSS 1.0,RSS 2.0, andAtom 1.0. The default value isRSS 1.0. - Use HTTP authentication?
-
Select whether to allow restricted access to the RSS feed. If this is on and public read permission has not been granted to the feed when the user tries to access it, an HTTP 401 unauthorized header will be returned. This feature allows authentication details to be received from the user’s client, be it a browser or a feed reader. These details are then used to sign-in to Matrix and access the feed. If the user does not have read access to the asset, it will be treated as a failed sign-in, and a 404 header will be returned. If authentication is canceled on the user’s client, the Matrix sign-in screen will appear. By default, this option is set to
No; hence it is turned off.
Listing engine assets selection
This section allows you to select which asset listings you want to use in your RSS feed.

The fields available are as follows:
- Select listing engine assets
-
Select the asset listing you want to use in your RSS feed.
- Number of assets to be added in the RSS
-
Specify the number of assets to be included from each asset listing. For example, if this field is set to
15, each asset listing’s top fifteen assets would be included in the RSS feed. The default value is0, meaning that all of the assets from each asset listing will be included.
Build RSS screen
The Build RSS screen allows you to build what information will be included within the RSS output.
Add a keyword
This section allows you to select which information from the selected asset types you want to include in the RSS output. The add a keyword section of the Build RSS screen is shown:

The asset types you can select from will depend on which asset types have been included in the asset listing. For example, if you have selected to use an asset listing that lists news items, then news items will be included in the asset types list. If you have not selected an asset listing on the RSS feed’s Details screen, a message will appear in this section instead of a list. You will need to go to the Details screen and select an asset listing. Once you have done this, the choose asset type list will appear.
From the list:
-
Select the asset type you would like to edit.
-
Click Save – additional fields will appear in the add a keyword section.

The fields available are as follows:
- Choose/enter keyword
-
Select the keyword replacement you would like to add to the RSS feed from the list provided. If you would like to format a particular keyword or combine keyword replacements, you can use the text box provided on the right-hand side of the drop-down list. For example, if you want to combine the asset short name and version number for the title, you can enter
()into the text box.You can also use metadata fields as values. If, for example, you have a metadata schema with a field called Description you can enter the keyword replacement into the text box. You can only use the keyword replacements available in the drop-down list provided. For some asset types, such as standard pages, these keywords may not include those required to print the content and other details of your listed assets. In such cases, you can use metadata keyword replacements as an alternative method to print this information.
- Choose tag
-
Select the tag in the RSS feed for which you would like to use the keyword replacement.
For example, if you want to use the asset’s short name as the Title, select the keyword replacement short name of the asset in the field above and select Title in this field. The title tag in the RSS feed will be filled in with the short name of the asset. The list of available tags will change depending on which RSS format is selected on the RSS feed’s Details screen. Some fields are mandatory.The list of the available tags is as follows.
- RSS 1.0
-
Title
-
Description
-
Link
-
RDF:about.For RSS 1.0, you must fill out each of these tags for the RSS feed to work correctly. - RSS 2.0
-
Title
-
Description
-
Link
-
Pubdate
-
Category
-
Author
-
Comments
-
guid
-
Enclosure URL =
-
Enclosure length =
-
Enclosure type =
- Atom 1.0
-
ID
-
Title
-
Updated
-
Author name
-
Author email
-
Author URL
-
Content
-
Link rel =
-
Link href =
-
Summary
-
Category term =
-
Contributor name
-
Contributor email
-
Contributor URL
-
Source ID
-
Source title
-
Source updated
-
Source rights
-
Rights.
For Atom 1.0, you must fill out the Title, ID, Updated, and Author name tags for the RSS feed to work correctly.
Adding additional keywords
To add additional keywords to the RSS feed:
-
Select an asset type in the add a keyword section.
-
Click Save – additional fields will appear in the add a keyword section, as shown:

-
Select a keyword replacement and a tag from the lists provided.
-
Click Save.
An additional row will be added to the keywords as items section. Repeat these steps to add more keywords to the RSS feed.
Keywords as items
Once you have selected the keyword replacement and tags for the RSS feed, an additional section called keywords as items will appear on the screen, as shown in the figure:

This section lists the keywords and tags that have been added to the RSS feed. To delete a keyword replacement and tag:
-
Click the Delete box.
-
Click Save.
Changing a keyword
To change what keyword replacement a tag uses, perform the same process as you would when adding a keyword. Instead of adding a keyword replacement for the tag, Matrix will replace the currently used keyword. For example, if you wanted to change the keyword for the title tag to asset name, you would add a new keyword and select Asset name as the keyword replacement. When you click Save, the keyword replacement for Title will be changed to Asset name.
Deleting a keyword
To delete a keyword:
-
Select the Delete box in the keywords selected section.
-
Click Save.
The keyword will be deleted and will no longer appear in the keywords as items section.
Add channel and Image info
This section allows you to add the information required for the RSS output channel and image section. The Add channel and Image info section of the Build RSS screen:
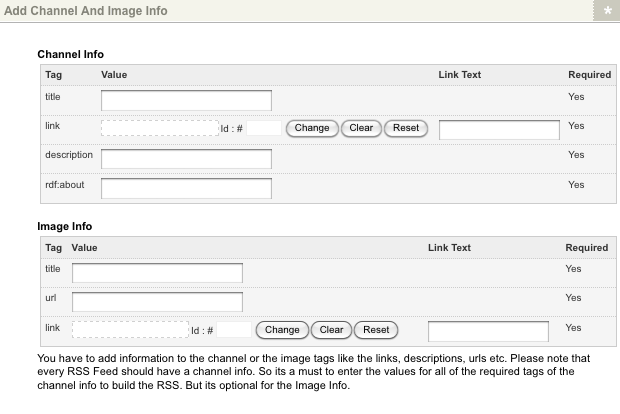
The channel information provides information about the RSS feed itself and can include the Title, link, and description. The image information allows you to specify which image will be displayed in the RSS output.
The fields available for the channel info and image info will depend on which RSS format you have selected on the RSS feed’s Details screen.
Channel info for RSS 1.0
The channel info for RSS 1.0:

The fields available in this section are as follows:
- Title
-
Enter a title for the RSS feed.
- Link
-
Enter the URL to which the title of the RSS feed will link. For example, the asset listing where the content is being sourced from or your site. You can select the asset to get the link from in the first field or enter the link text into the second field. If you are typing in the URL, remember to include the protocol – for example,
http://- otherwise, the link will not work. - Description
-
Enter a description of the RSS feed.
- RDF:about
-
Enter the URL of the RSS feed for your site.
The required field on the right-hand side indicates whether the field is required.
You must enter a value into the fields marked as Yes; otherwise, the RSS feed will not work.
|
Image info for RSS 1.0
The image info for RSS 1.0:

This section allows you to add an image to the RSS output. The fields available in this section are as follows:
- Title
-
Enter a title for the image. This field will be used as the ALT tag for the image when the RSS feed is rendered in HTML.
- URL
-
Enter the URL of the image, including the protocol – for example,
http:://. - Link
-
Enter the URL you would like the image to link to when it has been rendered in HTML, for example, your site. You can select the appropriate asset from the asset tree in the first field or enter the link text into the second field. If you are typing in the URL, remember to include the protocol – for example,
http://- otherwise, the link will not work.
The required field on the right-hand side indicated whether the field is required.
If you enter a value in one field under the Image info section, you must enter a value into the fields marked as Yes; otherwise, the RSS feed will not work.
|
Channel info for RSS 2.0
The channel info for RSS 2.0:
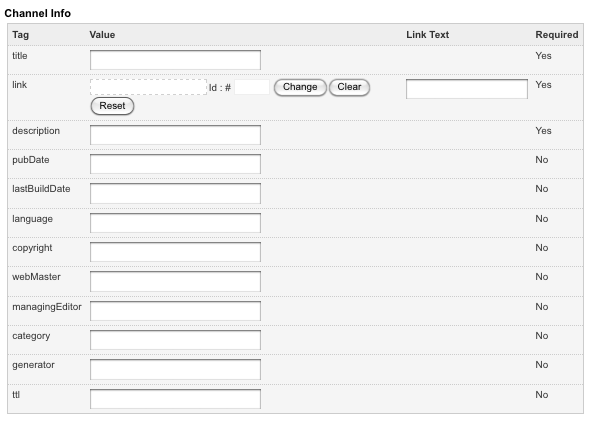
The fields available in this section are as follows.
- Title
-
Enter a title for the RSS feed. This title may be the same as the name of the asset listing.
- Link
-
Enter the URL of the page that corresponds to the content in the RSS feed. If you have included only one asset listing, you may use the URL of that page. If you have included several asset listings, you may use the URL of the site. You can either select the appropriate asset from the asset tree in the first field or enter the link text into the second field. If you are typing in the URL, remember to include the protocol – for example,
http://- otherwise, the link will not work. - Description
-
Enter a description of the RSS feed.
- Pubdate
-
Enter a published date for the content of the RSS feed.
- Lastbuilddate
-
Enter the date the content in the RSS feed was last changed.
- Language
-
Enter the RSS feed language, for example, en-au, English (Australia).
- Copyright
-
Enter the person or company who owns the copyright of the content in the RSS feed, for example, Example Corp Pty Ltd.
- Webmaster
-
Enter the name and email address of the person responsible for the RSS feed, for example, John Smith <jsmith@example.com>.
- Managing editor
-
Enter the name and email address of the person responsible for the content in the RSS feed, for example, John Smith <jsmith@example.com>.
- Category
-
Enter a category that the RSS feed belongs to, for example, Newspapers.
- Generator
-
Enter the name of the program that generates the RSS feed; in this case, it is Matrix.
- Ttl
-
Stands for Time to live. Enter the number of minutes before the RSS feed is refreshed. This time is for the RSS reader the user is using, not for your site.
The required field on the right-hand side indicates whether the field is required.
You must enter a value into the fields marked as Yes; otherwise, the RSS feed will not work.
|
Image info for RSS 2.0
The image info for RSS 2.0:
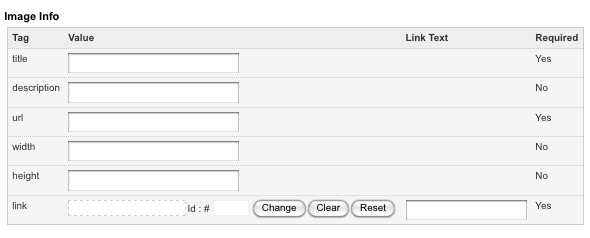
This section allows you to add an image to the RSS output. The fields available in this section are as follows.
- Title
-
Enter a title for the image. This field will be used as the alt tag for the image when the RSS feed is rendered in HTML.
- URL
-
Enter the URL of the image, including the protocol – for example,
http:://. - Link
-
Enter the URL you would like the image to link to when it has been rendered in HTML, for example, your site. You can either select the appropriate asset from the asset tree in the first field or enter the link text into the second field. If you are typing in the URL, remember to include the protocol – for example,
http://- otherwise, the link will not work. - Description
-
Enter a description of the image.
- Width
-
Enter the width of the image. The standard default width is
88, with the maximum being144. - Height
-
Enter the height of the image. The standard default height is
31, with the maximum being400.
The required field on the right-hand side indicates whether the field is required.
If you enter a value in one field under the Image info section, you must enter a value into the fields marked as Yes; otherwise, the RSS feed will not work.
|
Channel info for Atom 1.0
The channel info for Atom 1.0:
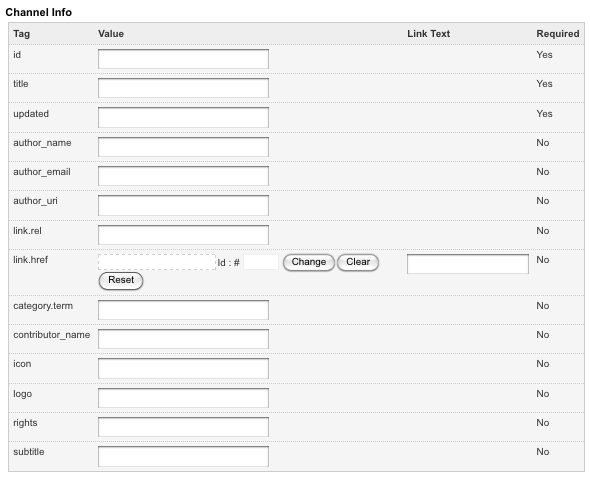
The fields available in this section are as follows.
- Title
-
Enter a title for the RSS feed. The title can be the same as the name of the asset listing.
- ID
-
Enter the ID for the RSS feed. This ID must be a unique identifier for the feed.
- Updated
-
Enter the date the content or RSS feed was last changed.
- Link.rel
-
Enter the link relation type. If this is left blank, the standard relation type is alternate.
- Link.type
-
Enter the type of link.
- Link.href
-
Enter the href of the link.
- Subtitle
-
Enter a description or subtitle for the RSS feed.
- Rights
-
Enter the person or company who owns the copyright of the content in the RSS feed, for example, Squiz Pty Ltd.
- Author_name
-
Enter the name of the person who is responsible for the RSS feed.
- Author_email
-
Enter the email address of the person responsible for the RSS feed, for example, john@example.com.
- Category.term
-
Enter the category in which the RSS feed belongs.
- Category.label
-
Enter a label for the category.
- Category.scheme
-
Enter the category scheme.
The required field on the right-hand side indicates whether the field is required.
You must enter a value into the fields marked as Yes; otherwise, the RSS feed will not work.
|
Previewing the RSS feed
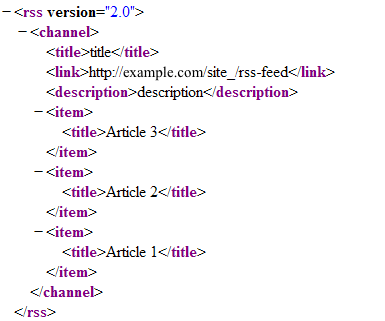
To see the XML that is getting generated by the RSS feed, go to the preview screen. The XML that will be outputted by the asset will appear.
Errors on the preview screen
When you visit the preview screen, you may receive an error instead of the XML output. These errors indicate that something has not been set up correctly with the RSS feed. Below is a list of errors that may appear on the preview screen.
| Error | Problem |
|---|---|
No listing engine assets found to get assets for |
You have not selected an asset listing from which to source content. Go to the RSS feed’s Details screen and select an asset listing in the listing engine assets selection section. |
No channel info or items found to generate |
|
Required attribute |
You need to fill out the field in the channel info section on the Build RSS screen. |
Required attribute |
You need to fill out the field in the Image info section on the Build RSS screen. |
Required tag |
Go to the Build RSS screen and ensure you have filled out each of the required tags with a keyword replacement in the keywords as items section. For RSS 1.0, all tags are required. For Atom 1.0, Title, ID, updated, and author name are required. |
Using the RSS feed
To understand how the RSS feed works consider the following example. We will create an RSS feed for the asset listing that is listing news item, which was created in the previous chapter. The asset listing then needs to display a link to the RSS feed so users can use it.
RSS feed
Create an RSS feed within your site. On the Details screen, change the following options:
- RSS format
-
Select the format type for the RSS feed.
- Select listing engine assets
-
Select the asset listing.
- Number of assets to be added in the RSS
-
Change this value to
10. A value of10means that the ten latest news items will be included in the RSS feed. The following sections describe the minimum number of fields that need to be set up for each RSS feed format type.
Setting up the RSS feed for RSS 1.0
Follow these steps to set up an RSS 1.0 feed:
-
On the Build RSS screen, change the following options in the channel info section:
- Title
-
Enter a title, for example, Latest Squiz news.
- Link
-
Select the asset listing page. The Title of the RSS feed will link to this page.
- Description
-
Enter a description, for example, The latest news items for Squiz, a web development company.
- Rdf:about
-
Enter the URL of the RSS feed, for example, \http::/example.com/site_/RSS-feed.

-
Click Save.
The keyword replacements for each tag now need to be filled in:
-
Select
news_itemfrom the list in the Add a keyword section -
Click Save.
The fields shown in the figure will appear.

-
Select the asset name as the keyword replacement.
-
Select Title as the tag.
-
Click Save – the keywords selected fields will appear on the screen.

Repeat this process and add the following keyword replacements and tags:
-
Select the keyword replacement summary of the item for the tag description.
This will include a summary of the news item in the RSS feed. -
Select the keyword replacement of the absolute URL to the asset for the tag link.
-
Select the keyword replacement the absolute URL to the asset for the tag
RDF:about.
Once you have done this, the keywords as items section should look similar to:

When you preview the RSS feed, the resulting XML should look similar to the following figure:
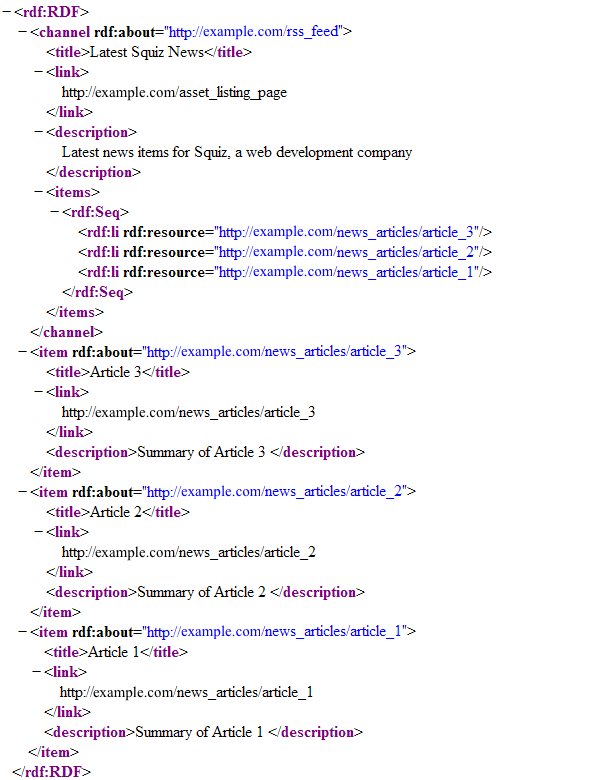
Setting up the RSS feed for RSS 2.0
Follow these steps to set up an RSS 2.0 feed:
-
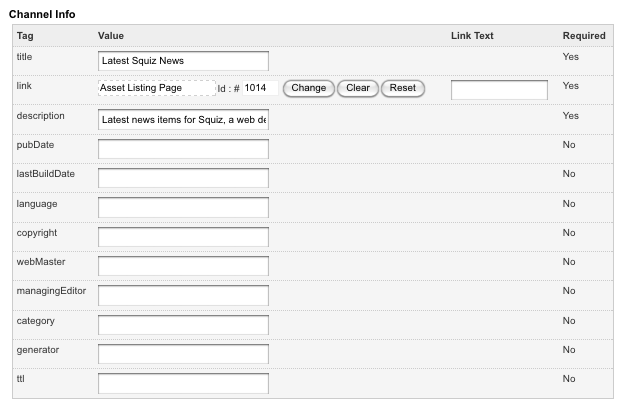
On the Build RSS screen, change the following options in the Channel info section:
- Title
-
Enter a title, for example, Latest Squiz news.
- Link
-
Select the asset listing.
- Description
-
Enter a description, for example, The latest news items for Squiz, a web development company.
-
Click Save.
The keyword replacements for each tag now need to be filled in.
-
Select
news_itemfrom the list in the Add a keyword section. -
Click Save.
The fields shown in the figure will appear.

-
Select Asset name as the keyword replacement.
-
Select Title as the tag.
-
Click Save – the keywords selected fields will appear on the screen, as shown:

Repeat this process and add the following keyword replacements and tags:
-
Select the keyword replacement summary of the item for the tag description.
This will include a summary of the news item in the RSS feed. -
Select the keyword replacement of the absolute URL to the asset for the tag link.
-
Select the keyword replacement of the absolute URL to the asset for the tag guide.
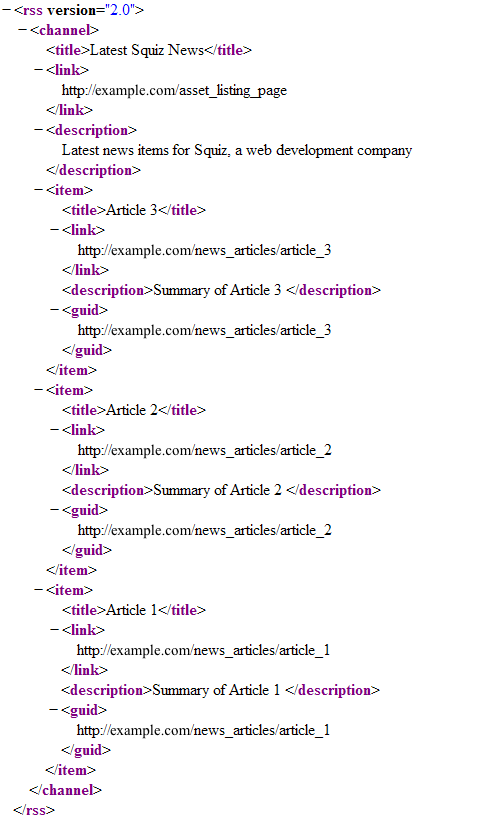
When you preview the RSS feed, the resulting XML should look similar to the following figure:
Setting up the RSS feed for Atom 1.0
Follow these steps to set up an Atom 1.0 feed:
-
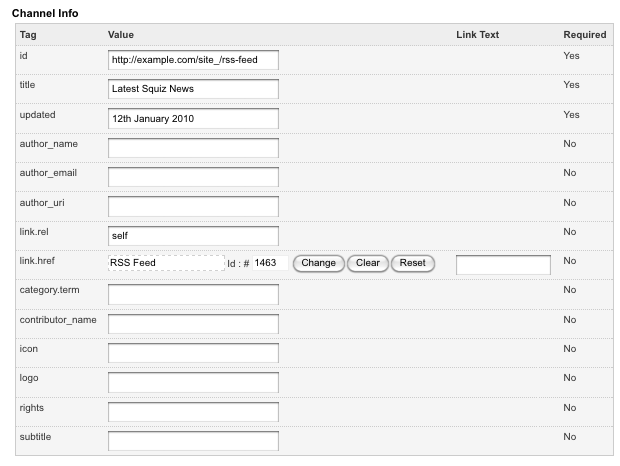
On the Build RSS screen, change the following options in the Channel info section:
- ID
-
Enter the URL of the RSS feed, for example, HTTP://example.com/site_/RSS-feed.
- Title
-
Enter a title, for example, Latest news.
- Updated
-
Enter the date the RSS feed content was last updated, for example, 12th January 2010.
- Link:rel
-
Enter the link relation type, for example,
self. - Link:href
-
Select the RSS feed.
-
Click Save.
The keyword replacements for each tag now need to be filled in.
-
Select
news_itemfrom the list in the add a keyword section. -
Click Save. The fields shown in the figure will appear.

-
Select Asset name as the keyword replacement.
-
Select Title as the tag.
-
Click Save – the keywords selected fields will appear on the screen, as shown:

Repeat this process and add the following keyword replacements and tags:
-
Select the keyword replacement summary of the item for the tag content.
This will include a summary of the news item in the RSS feed. -
Select the keyword replacement the date when the asset was last published (ISO8601 format) for the tag updated.
-
Select the keyword replacement asset attribute: contact_name for the tag author name.
-
Select the keyword replacement of the absolute URL to the asset for the tag ID.
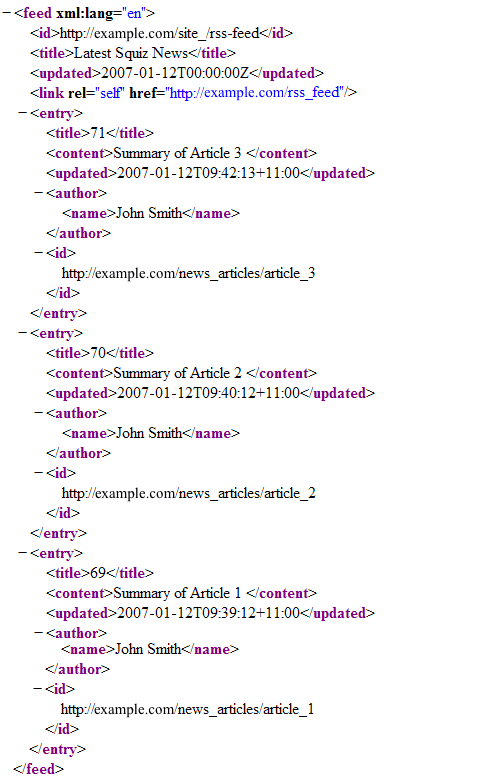
When you preview the RSS feed, the resulting XML should look similar to the following figure:
