Custom form
A custom form can collect different types of information from your users using an online form. Examples include a contact us form, feedback form, job application, customer surveys, and more.
A form consists of either form fields or form fields grouped into sections. For example, you may have a section called personal details, which has the form fields name, address, and date of birth. You may then have a form field called additional comments, which may not be part of a section.
If you create form fields within sections, you can clone or link the section to another custom form asset. You cannot clone or link a form field if it is not part of a section.
By default, when you preview the custom form, the section and form fields you have added will automatically appear. You can change the layout through the page contents bodycopy if the sections are in the wrong order or wish to add additional information (for example, instructions on using the form).
After the user has completed the form fields, Matrix can do several things with the results. The diagram below shows what can happen after a user has clicked the Submit button on the custom form.
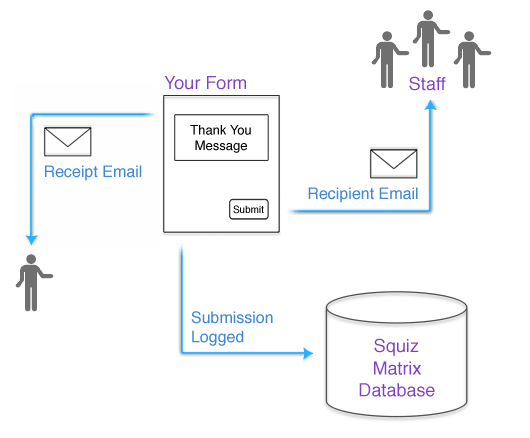
As shown in the diagram above, when the user clicks the Submit button, the following actions can happen.
-
A thank you message will be shown. By default, the information they entered on the form will appear. You can change the layout of the thank you message through the thank you bodycopy.
-
The user can receive a receipt email outlining the information they have specified on the form. You can set this up on the email options screen of the form contents asset.
-
A member (or members) of your staff can receive a recipient email outlining the user’s submitted information. You can set this up on the email options screen of the form contents asset.
-
The user-submitted information is logged to the Matrix database. You can view the logs on the submission logs screen of the form contents asset.
-
You can send emails to specific users depending on what values the user enters into the fields. For example, if the user selects
NSW, send the job application to the NSW HR manager. If the user selectsVic, send the job application to the HR manager in Victoria. You can configure this behavior on the selective emails screen of the form contents asset.
| You should not nest custom forms into other assets, such as standard pages. Nesting can lead to unexpected caching of another user’s submission details, potentially exposing them to other public users. Always present custom forms to the users on dedicated URLs and ensure that they are never cached. |
A custom form can also be used for a Send this link to a friend option within your site. This option will allow a user to enter an email address into a field, and the URL of the last page they were viewing will appear in the email. For example, if the user viewed your home page when they clicked on the link, the home page URL is sent within the email. You can set this up on the Email options screen of the form contents asset.
You can also create custom forms with multiple pages. These forms will allow a user to complete the form over any number of pages. This option is particularly useful for large forms or forms that have several sections. You can set this up in the Form contents screen of the form contents asset. All of these screens and options are described further in this manual.
Once your custom form is created, you can configure its settings on its associated asset screens. Read the Asset screens documentation for more information about the common asset screens in Matrix.
However, you perform most of the custom form set up through the form contents asset. You create this asset beneath the custom form in the asset tree. For more information on this asset, refer to the form contents chapter in this manual.
The edit contents and submission logs screen for a custom form are the same as those available on the Custom form contents screen and are explained further in this manual.