Edit assets using an asset builder
This tutorial takes you through an example of how to create an Asset Builder, with customized layouts. The asset builder can create new assets and allow users to edit any assets they have created or can edit. The tutorial adds a Metadata Schema to enable additional custom fields.
The scenario in this tutorial follows the creation of an events manager for signed-in users. The events manager lets users create new events and then edit any existing ones they have created previously.
Before you start
This tutorial assumes you have a basic understanding of the Asset Builder and Custom edit layout functionality.
| To see a working solution for this tutorial, you can Download tutorial assets used in this tutorial and import them into your Content Management system using the Import Assets from XML tool. |
Configure the asset builder
Create the main components: the Asset Builder and the Metadata Schema. Creating and editing functionality is provided by these assets.
-
Create a new Asset builder asset named "Events Manager" in a location that is accessible through a URL on the front-end.
-
Create a new Metadata schema named "Events Schema" in a location where your store your other Metadata Schemas.
You configure this asset in the next section. -
Go to the Details screen of the Events manager.
-
Find the Asset creation settings section and configure the following fields:
- Asset types to create and edit
-
Choose Single calendar event.
- Metadata schemas to apply
-
Select the "Events Schema" asset you just created. This setting makes the Metadata Schema apply to a Single Calendar Event asset when the Asset Builder creates it.
You could instead apply the Metadata Schema to the create location parent of the Asset Builder, as that would also make the schema get applied to the created events. Configuring the Metadata schema on the events manager lets you expose metadata fields on the creation layout. The asset builder is aware of the available fields that it can use when creating the events. -
Click Save.
-
Configure the following fields in the Advanced settings section:
- Enforce user login
-
Select Yes to only allow logged-in users to create and edit events.
- Create form customization
-
Select the checkbox to enable the customization of the creation form for this asset type.
- Edit form customization
-
Select the checkbox to enable the customization of the edit form for this asset type.
-
Click Save.
If you expand the asset builder’s children in the asset tree, you should now see a Custom edit layout for the Create Form and one for the Edit Form layout.
-
Go to the Create locations screen.
-
In the Fixed create locations section, select an asset to use as the parent for all events that get created.
You would normally set this under your Events or Calendar page.
However, for this tutorial, set it to the asset ID of your Asset Builder using a Type 1 link type.
|
You configure the Custom edit layouts later in this tutorial. Leave the Asset Builder as-is for now.
Configure the metadata schema
Configure the Metadata Schema asset you created previously.
-
Go to the Details screen of the Events schema and create a new Metadata section called Details. In this section, create two Text metadata fields:
- event.address
-
Used for the location address for the event.
- event.description
-
Used as a substitute for the Description field on the event’s Details screen. You want to restrict users to enter simple text only in a textarea.
It is best practice to restrict your Metadata sections, so add a restriction to the Details section for Single Calendar Events. -
Select Edit Metadata Field of the event.address field to go to the Details screen of this new metadata field.
-
Set the Friendly name to "Address".
-
Set the Field width to
60to cater for long addresses.
-
-
Go to the Details screen of the event.description field.
-
Set the Friendly name to "Description".
-
Set the Multi line option in the Options section to Yes.
-
Set the Field width to 60.
-
You can now configure the layouts of the different screens.
Configure the logged in bodycopy
You can ignore the Not logged in bodycopy and go straight to the Logged in bodycopy layout because you are only letting logged in Squiz Content Management users access your asset builder.
| Make sure the Events Manager asset has "Denied Public Read Permission" set so non-logged in users do not see this Bodycopy at all. That way, users must sign in to see the Asset Builder and will, therefore, see the Logged in bodycopy and never the Not Logged In Bodycopy. |
-
Go to the Edit contents screen of the Logged in bodycopy.
-
Set the Component to Code and add the following code:
The creation form and the editing form uses this bodycopy, so you can put in keywords that power both forms into the same layout. You can also use one component for this. If there are two created by default, you can delete the second one. <!-- Create Layout --> <div style="color: red;">%create_error%</div> (1) <div>%create_invite%</div> (2) <div>%create_form%</div> (3) <!-- Edit Layout --> <div style="color: red;">%edit_lock_error%</div> (4) <div style="color: red;">%edit_error%</div> (5) <div style="color: green;">%edit_success%</div> (6) <div>%edit_invite%</div> (7) <div>%edit_form%</div> (8)1 %create_error%prints an error message if there are any issues with creating the asset. For example, if the user tried to create a new event without entering a name.2 %create_invite%prints an introductory message with instructions on how to use the form to create the asset. The benefit of using a keyword for this instead of hard-coding a message is that it only prints if the user is creating an asset, not when they are editing it.3 The content of the Create Form Custom edit layout replaces %create_form%. You create the contents of the form later in this tutorial.4 %edit_lock_error%prints an error message if the user tries to edit an event that another user already has the locks on.5 %edit_error%prints all other edit form errors. For example, if there is an issue saving the changes in the event the user is editing.6 %edit_success%prints a message telling the user that saving an edit was successful.7 %edit_invite%prints an introductory message for the editing layout. Again, the benefit here is that it only prints in the editing form.8 The content of the Edit Form Custom edit layout replaces %edit_form%. You can customize the content of the message keywords on the Messages screen of the Asset Builder.
You can now move onto configuring the created bodycopy area.
Configure the created bodycopy
After the user successfully creates an event, this layout displays a message that the event is created and gives them some options for what to do next.
-
Go to the Edit Contents screen of the Created Bodycopy.
-
Set the Component to Code and add the following code:
<p style="color: green;">Asset created.</p>
<ul>
    <li><a href="%created_asset_url%">View</a></li> (1)
    <li><a href="%asset_url%?edit=%created_assetid%">Edit</a></li> (2)
    <li><a href="%asset_url%">Create another event</a></li> (3)
</ul>
1 %created_asset_url%prints the URL of the event asset that just got created. For this keyword to work, the asset creation location must have access to the front-end through a valid URL.2 %asset_url%?edit=%created_assetid%prints the URL to the current front-end asset (the URL of the Asset Builder) and a query string with the asset ID of the created event. Passing the?edit=query activates the%edit_X%keywords in the Logged In Bodycopy we created earlier, and thus loads the Edit Form Custom edit layout.3 %asset_url%prints a URL back to the original state of the Asset Builder: the create screen.
Configure the create form layout
Now it’s time to customize the layout for the creation form that users use to create new event assets.
-
Go to the Edit Contents screen of the Single Calendar Event Create Form Layout.
-
Set the Component to Code.
The website design uses the Bootstrap framework. The code used in the example code snippets relates to those CSS styles and classes. Feel free to customize the HTML layout to suit your own site’s design needs. -
Enter the following code for the create layout:
<div class="form-horizontal"> <div class="form-group"> <label for="%details-F_id%" class="col-sm-2 control-label">Event Name</label> <div class="col-sm-10"> %details-F_name% </div> </div> <div class="form-group"> <label for="%details-F_id%" class="col-sm-2 control-label">Date & Time</label> <div class="col-sm-10"> %details-F_start_end% </div> </div> <div class="form-group"> <label for="%details-F_id%" class="col-sm-2 control-label">Event Address</label> <div class="col-sm-10"> %metadata-F_11502% </div> </div> <div class="form-group"> <label for="%metadata-id_F_11525%" class="col-sm-2 control-label">Description</label> <div class="col-sm-10"> %metadata-F_11525% </div> </div> <div class="form-group"> <div class="col-sm-offset-2 col-sm-10"> %commit_button_clean^replace:Save:Create% (1) </div> </div> </div>1 The ^replace:Save:Createkeyword modifier on the Save button changes the label text to "Create" instead of the default "Save" label.
While not part of this tutorial, you can use keyword modifiers on the other keywords and do things like add classes and attributes to the input fields.
For example, if you want a text field to have a different class, you could use %details-F_name^replace:sq-form-field:form-control%. More examples of this are available in the next section.
| If you are unfamiliar with keywords used in this code, review the Custom edit layout keywords documentation. |
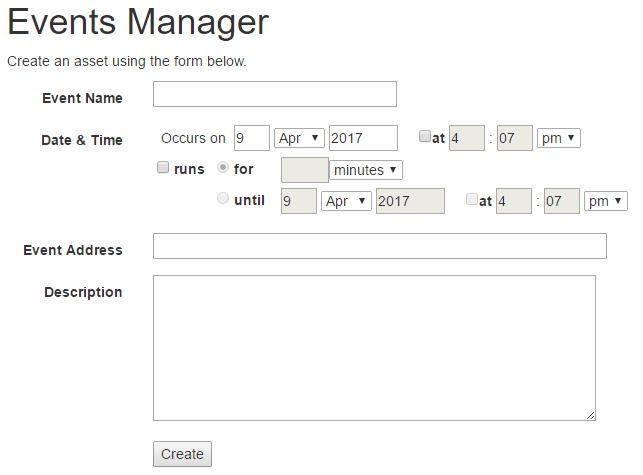
When you preview the Events Manager in a new window your window has a layout similar to the example below.
Configure the edit form layout
The editing layout is often very similar to the creation layout. In this section, you customize the editing layout to understand how certain keyword modifiers change field styles, and you add the Status selector.
-
Go to the Edit Contents screen of the Single Calendar Event Edit Form layout.
-
Set the Component to Code and copy and paste the following example code.
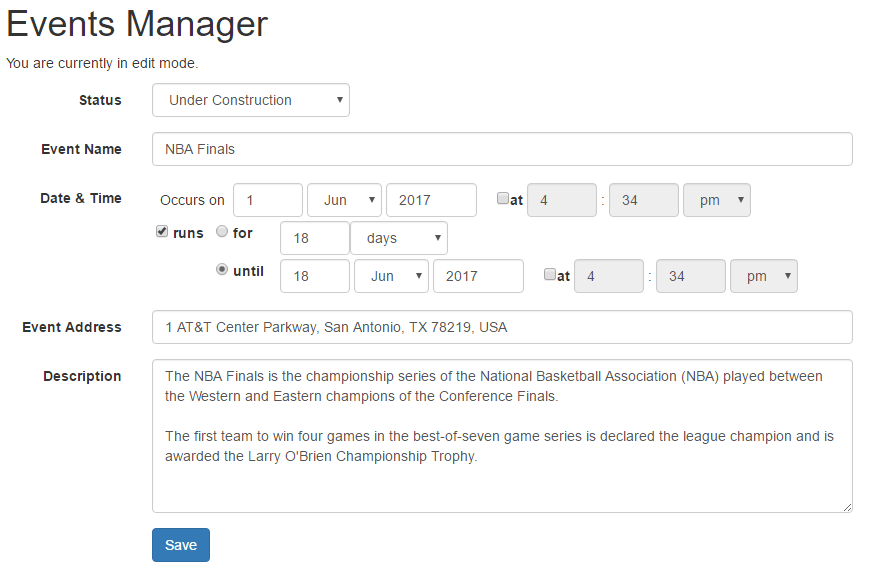
The following code uses the same structure as the creation layout, but with several keyword modifiers to change the look and feel. <div class="form-horizontal"> <div class="form-group field_status-selection"> <label for="calendar_event_single_%asset_assetid%_change_status" class="col-sm-2 control-label">Status</label> <div class="col-sm-10"> %details-F_status_change^replace:selected">:selected">{asset_status_description} ^replace:"sq-form-field":"form-control" style="display\: inline; width\: auto;" ^replace:\r\n|\n|\r:^replace:select>.*:select>% </div> </div> <div class="form-group"> <label for="%details-id_F_name%" class="col-sm-2 control-label">Event Name</label> <div class="col-sm-10"> %details-F_name^replace:sq-form-field:form-control% </div> </div> <div class="form-group"> <label class="col-sm-2 control-label">Date & Time</label> <div class="col-sm-10"> %details-F_start_end^replace:5ex:auto ^replace:"sq-form-field" style=":"form-control" style="display\: inline; ^replace:"sq-form-field" type="text":"form-control" type="text" style="display\: inline; width\: auto" ^replace:"sq-form-field" id:"form-control" style="display\: inline; width\: auto" id ^replace:select class="sq-form-field":select class="form-control" style="display\: inline; width\: auto"% </div> </div> <div class="form-group"> <label for="%metadata-id_F_11502%" class="col-sm-2 control-label">Event Address</label> <div class="col-sm-10"> %metadata-F_11502^replace:sq-form-field:form-control% </div> </div> <div class="form-group"> <label for="%metadata-id_F_11525%" class="col-sm-2 control-label">Description</label> <div class="col-sm-10"> %metadata-F_11525^replace:sq-form-field:form-control% </div> </div> <div class="form-group"> <div class="col-sm-offset-2 col-sm-10"> %commit_button_clean^replace:sq-form-field:btn btn-primary^replace:Save% </div> </div> </div>There is a lot of keyword modification in this HTML code. Outside the scope of this tutorial you might find it more convenient to customize this layout using custom CSS and JS instead. -
Create an asset using the Events Manager on the front-end.
-
Click Save as configured in your Created Bodycopy to see a similar but prettier layout.
Summary
You have created an Asset Builder that lets users create and edit their event assets.
Using this tutorial as a base, you can extend this example by using an Asset Listing to list all assets for which the logged-in user has write access. Each asset could have a link to edit the event asset in the Events Manager.