Site map
A site map is generally used to list the structure of the pages within a site. A site map is an essential feature for your site as it allows users to find pages. It can also be an excellent way to increase the popularity of pages that might not be viewed.
A site map does not only have to be used for a site – it can be used for any part of your Content Management system. For example, you can generate a map of your organizational structure if you specify a user group as the root node for a site map.
Once your site map is created, you can configure its settings on its associated asset screens. The majority of these screens are the same as a Standard page. This chapter will describe the Details screen, which is different for a site map.
| When you create a site map, it will automatically show all menu link assets for the site in which it was created. |
Details screen
The Details screen for a site map allows you to set up the site map. Read the Asset details screen documentation for more information about the Status, Future status, Thumbnail and Details sections.
Site map settings
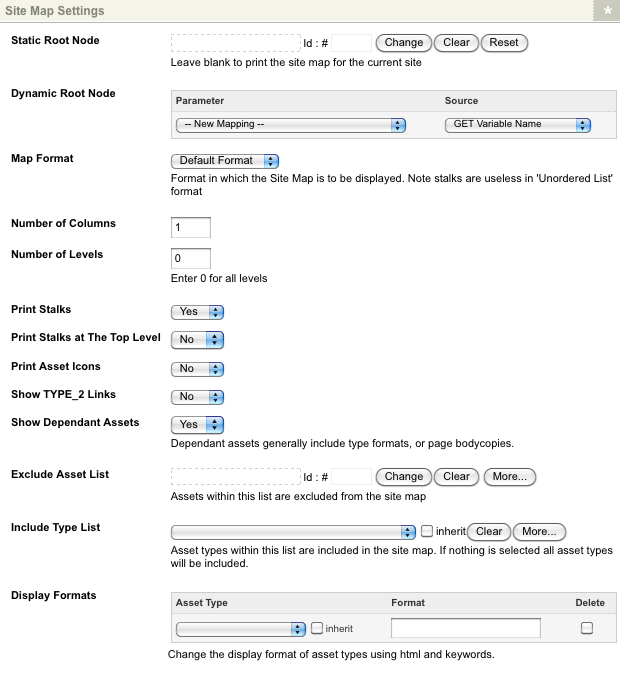
This section allows you to change the settings for the site map. The site map settings section of the Details screen is shown in the figure:
The fields available are as follows.
- Static root node
-
Select the asset to use as the root node of the site map. For example, if you want to create a site map for your site, specify the site asset as the root node. If you leave the root node blank, it will print a site map for its parent site. For example, if you create a site map under the training site, it will automatically show all menu link assets under the training site.
- Dynamic root node
-
This field allows you to specify an alternate root node for the site map based on GET, POST, or SESSION variables, current asset, current user, current site, set value, or any superglobal. For example, say you have an article folder in your site. There are several topic pages with articles for that topic stored beneath it in the hierarchy under that folder. When a user is viewing a topic page, you want to display the articles under that page in the sidebar of the design. In this case, you could nest a site map in your design and set the root node for the site map in the dynamic parameters section to be the current asset. The site map will then list the articles for the topic at which the user is currently looking. Any dynamic root node passed to the site map must be located under the asset(s) specified in the Static root node field.
- Map format
-
Select which format to use for the site map. You can select default format to display the site map using tables (that is, using
<table>,<tr>and<td>HTML tags), or unordered list to display the site map as a list (that is, using<ul>and<li>HTML tags).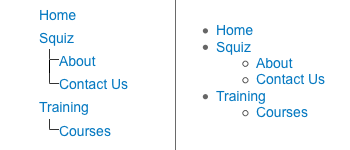
- Number of columns
-
Specify the number of columns for the site map. By default, this value is
1, meaning that the site map will be displayed in one column. - Number of levels
-
Specify the number of levels below the root node to be included in the site map. By default, this value is
0, meaning that all assets below the root node will be included. If you only wanted to show the top-level assets in the site map, you would enter1into this field.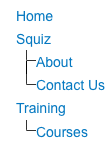
- Print stalks
-
Select whether to print stalks on the site map. By default, this value is
Yes. An example of a site map with stalks is shown in the figure: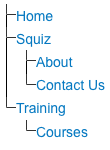
- Print stalks at the top level
-
Select whether to print stalks at the top level on the site map. By default, this value is
No. - Print asset icons
-
Select whether to print asset icons on the site map. The icons that are used are the icons you see in the asset tree for each asset type. If you were creating a site map for specific asset types, you might want to display the icons to tell which assets are. For example, if you have created a site map for your site’s files, the icons will show which assets are images, which assets are ms word documents, and which assets are PDF files. By default, this value is
No. - Show hidden link links
-
Select whether to print assets of a hidden link linked on the site map. By default, this value is
No. - Show dependant assets
-
Select whether to show dependant assets on the site map. Some examples of dependant assets are the type formats, position formats, and group formats folders under an asset listing. However, these folders will only appear if show hidden link links have been set to
Yesas well. By default, this value isYes. - Exclude asset list
-
Specify the assets to be excluded from the site map. For example, you may want to exclude the site map from the site map.
- Include type list
-
Specify which assets to include in the site map. If this field is left blank, all asset types will be included.
- To add an asset type to include
-
-
Select the asset type from the list.
-
Click Save.
-
- To select more than one asset type
-
-
Click on the More… button.
-
Select the asset from the list.
You can also check the Inherit box to specify that the site map should include all child types of the selected asset type.
-
- To remove an asset type from the list
-
-
Click the Clear button.
-
Click Save.
-
- Display formats
-
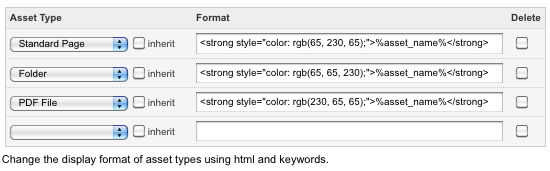
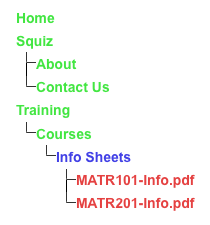
This section allows you to specify a format for a particular asset type. You can use a combination of keyword replacements and HTML to specify what information is displayed and how to display it. For example, you can display the name and published date for each asset on the site map. You can also specify to display a standard page in green text, a Microsoft Word document in blue text, and a PDF file in red text, as shown in the following figures: