Implement single sign-on with Facebook
This guide will take you through the steps needed to set up a single sign-on process for Squiz Content Management using Facebook and the OAuth Account Manager asset.
Setting up OAuth-based social sign-in in Squiz Content Management is a two-step process. In involves setting up a developer account on each social sign-in service and corresponding assets in Squiz Content Management.
|
This guide focuses on one OAuth platform (Facebook).
You can use the steps provided here as a guide for other platforms that offer OAuth-based sign-in (such as Auth0). If you are using this tutorial with another OAuth platform, you can start at [setting-up-and-configuring-matrix-oauth-assets] and substitute the Facebook steps with comparable steps for your chosen platform. |
Create a Facebook sign-in app
To integrate Facebook SSO with your site, you need to create a Facebook Login app.
Before you start
-
You have access to a developer account with Facebook and have signed into the service.
-
You have access to the following required information for creating an app:
-
Domain names of the sites that will use the social sign-in service
-
Privacy policy URL
-
Terms of service URL
-
App icon.
-
-
(Optional, but recommended) You have installed the Bootstrap starter website template from the Squiz Marketplace.
Steps
To create a Facebook app:
-
Load https://developers.facebook.com/apps/ and select Create App.
-
In the Create an App screen, select Build Connected Experiences and select Continue.
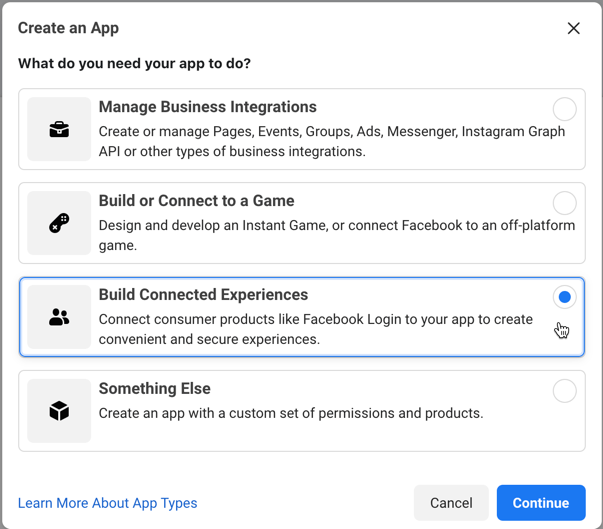
-
Specify your app’s name in the App Display Name field and select Create App.

-
In your developer dashboard, click .
-
Take note of the App ID and App Secret details for use later in this tutorial.
-
Complete all fields on the form using the following descriptions as a guide.
Read the Facebook for Developers documentation for more detailed information about these fields. - Display name
-
The name that displays on the top of the social sign-in form.
- App Domains
-
What web URLs this app will be available from. For example,
https://example.com/. - Privacy policy URL
-
Specify a link to the location of your privacy policy on your website.
- Terms of Service URL
-
Specify a link to the location of your terms of service policy on your website.
- User Data Deletion
-
Either a callback URL or instructions URL to your General Data Protection Regulation (GDPR) mechanism.
- App purpose
-
Select Yourself or your own business if you plan to integrate this social sign-on app on your website and not a client’s website.
-
Click Dashboard and scroll down to the Add products to your app section.
-
Select Set Up on the Facebook Login tile to add Facebook Login as an option under the PRODUCTS menu.
Keep your Facebook Developer dashboard open because you will need to configure further settings later in this tutorial.
Setting up and configuring OAuth assets
In the following series of steps, you will set up OAuth assets required for the Facebook integration to work.
Create site assets
This tutorial uses the Bootstrap starter website template as the base of the example site. This template has a recommended asset structure where you can logically store configuration items such as OAuth assets and OAuth account manager assets.
While it is up to you where you store these assets, a recommended approach is to store all OAuth related assets under a Site asset with a fixed URL.
For this tutorial, you can use the existing Configuration folder asset to build out this Web services asset structure.
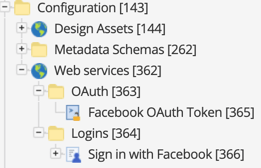
-
Create the basic asset structure described in the figure above:
-
Site asset
-
OAuth (Folder asset)
-
Facebook OAuth Token (OAuth 2.0 token asset)
-
-
Logins (Folder asset)
-
Sign in with Facebook (OAuth account manager asset).
-
-
-
-
Open the URLs screen of the Site asset.
-
In the Web domains section set a domain with a
_webservicessub-path. For example,https://example.com/_webservices. -
Click Save
With the required assets now created and your site structure accessible through a fixed URL, you can begin configuring the OAuth 2.0 token asset with details from your Facebook Login app.
Configure the OAuth 2.0 Token asset
In this step, you configure the OAuth 2.0 token asset with the authentication details contained within your Facebook Login app.
| You will need the App ID and App Secret details you saved from the Basic App Settings page in Create a Facebook sign-in app. |
-
Load the Details screen of Facebook OAuth Token asset.
-
In the OAuth 2.0 settings section, configure the following settings:
- Client ID
-
Paste the App ID value from your basic app settings.
- Client secret
-
Paste the App Secret value from your basic app settings.
- Authorization endpoint
-
Set the authorization endpoint to
https://www.facebook.com/dialog/oauth. - Token endpoint
-
Set the token endpoint to
https://graph.facebook.com/oauth/access_token. - Scope
-
Set the scope to
public_profile,email. - Redirect URI
-
Set the redirect URI to the full URI of the asset you are currently configuring. Facebook can not include the access token in its response unless you supply the URI.
-
In the Advanced settings section, make the following changes:
- Access token URI parameter name
-
Set the parameter name to
code. - Authorization Type
-
Leave this as the default
URIoption. - Access Token Type
-
Select the
Beareroption from the options list.
-
In the Access token section, set Token storage to
Session. -
Click Save to complete the OAuth 2.0 token configuration settings.
|
Some OAuth providers (like Facebook) use slightly different terminology for OAuth settings.
For example, App ID versus Client ID and App Secret versus Client Secret. Additionally, some OAuth vendors may require a value for Scope, specific to their API. For example, in the case of Auth0, you can set the Scope field to openid profile email, which means you want access to a user’s profile information and email address.
|
Configure the OAuth account manager asset
In this step, you configure the OAuth account manager with the token asset you created in the previous step, along with user creation settings and user attributes using keywords.
-
Load the Details screen of Facebook OAuth Token asset.
-
In the General settings section, configure the following settings:
- OAuth 2.0 token
-
Use the asset picker to select the Facebook OAuth Token (Asset #365 in the example).
- User Profile API
-
Set the user profile API endpoint to
https://graph.facebook.com/me?fields=id,name,email,first_name,last_name.
-
In the User creation settings section, configure the following settings:
- Matrix user to create
-
Select
Userto create a simple user for this example.
The optional Metadata schemas to apply setting lets you save any custom attributes against the user. In this case, you could configure a metadata field named customer_login_type, which tracks the source of social sign-in. -
Activate the Allow linking to existing users, Automatic creation, and Disallow password log in options.
-
In the Populate user attributes section, configure the following attributes:
-
Use the
%globals_session_oauth_profile_email%keyword. - Username
-
Use the
%globals_session_oauth_profile_email%keyword. - First Name
-
Use the
%globals_session_oauth_profile_first_name%keyword. - Last Name
-
Use the %globals_session_oauth_profile_last_name% keyword.
If you need access to additional attributes, include these attributes in the Facebook Graph API URL request. You can access the attributes through the %globals_session_oauth_profile_[attributeName]%keyword.
You have now set up the initial configuration for the account manager.
Configure the OAuth account manager logged in bodycopy
You need to configure some JavaScript on the Logged In bodycopy that manages how the Facebook popup works.
The code needs to shut down the sign-in popup and refresh the host page once a user has logged-in successfully. The code also needs to display any errors if a user fails to authenticate successfully.
-
Find the Logged In bodycopy child asset of the OAuth Account Manager asset.
-
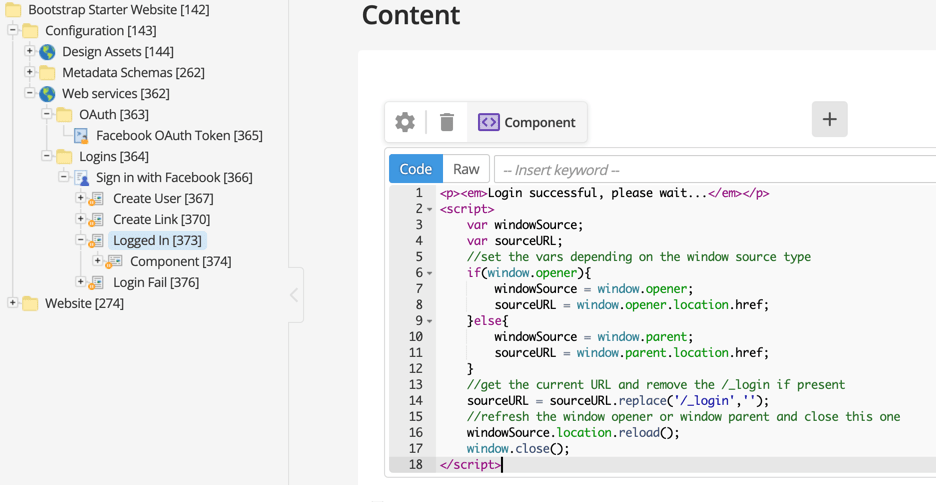
Open the Content tab and paste the following JavaScript code into the Code component.
<p><em>Login successful, please wait...</em></p> <script> var windowSource; var sourceURL; //set the vars depending on the window source type if(window.opener){ windowSource = window.opener; sourceURL = window.opener.location.href; }else{ windowSource = window.parent; sourceURL = window.parent.location.href; } //get the current URL and remove the /_login if present sourceURL = sourceURL.replace('/_login',''); //refresh the window opener or window parent and close this one windowSource.location.reload(); window.close(); </script> -
Click Save.
Your configuration should now look like this figure:
Configure the user create location
In this step, you configure a user group to store all the social sign-in accounts. You then set the OAuth account manager asset to create social sign-on accounts beneath this user group.
-
Create a Users folder asset as a child asset of the Configuration asset.
-
Create a user group named Social sign-in users beneath the Users folder asset.
-
Open the Create locations screen of the OAuth account manager asset.
-
In the Fixed create locations section, use the asset picker to select the Social sign-in users user group.
-
Click Save to set the destination for all user accounts created as part of social sign-in.
Set a valid OAuth redirect URI in your Facebook Login product
In this step, you take the URL path for your OAuth Account Manager asset and register it as a valid OAuth redirect URI for your Facebook Login product.
-
Open the URLs screen of the OAuth account manager asset.
-
Copy the Current URLs path. The path has a similar URL pattern to
https://example.com/_webservices/logins/login-with-facebook. -
Return to your Facebook app settings screen and select your Facebook Login product’s Settings screen.
-
Paste the Current URLs path into the Valid OAuth Redirects URIs field in your Facebook Login product.
-
Select Save changes to set the redirect URI for your sign-in product.
Add the Facebook sign-in button to your site
This step adds a conditional to the default paint layout bodycopy that checks if the user is signed-in. If the user is signed-in, the conditional displays the user’s first and last name. If the user is not signed-in, the conditional displays the Facebook sign-in button.
-
Click to locate the Default Formats paint layout bodycopy asset.
-
Open the Content screen and paste the following code directly below the
%asset_contents%keyword.%begin_globals_user_is_logged_in% <strong>Logged in as:</strong> %globals_user_attribute_first_name% %globals_user_attribute_last_name% <a href="?SQ_ACTION=logout">(Sign out)</a> %else_globals% <a class="btn btn-primary" href="./?a=336" onclick="openWindow('./?a=336', 'External Login'); return false;">Sign in with Facebook</a> (1) <script> function openWindow(url, title, w=500, h=600) { // Get window reference var browserWindow = window.top; // Fixes dual-screen position var dualScreenLeft = browserWindow.screenLeft != undefined ? browserWindow.screenLeft : screen.left; var dualScreenTop = browserWindow.screenTop != undefined ? browserWindow.screenTop : screen.top; var width = browserWindow.innerWidth ? browserWindow.innerWidth : document.documentElement.clientWidth ? document.documentElement.clientWidth : screen.width; var height = browserWindow.innerHeight ? browserWindow.innerHeight : document.documentElement.clientHeight ? document.documentElement.clientHeight : screen.height; var left = ((width / 2) - (w / 2)) + dualScreenLeft; var top = ((height / 2) - (h / 2)) + dualScreenTop; var newWindow = browserWindow.open(url, title, 'scrollbars=yes, width=' + w + ', height=' + h + ', top=' + top + ', left=' + left); // Puts focus on the newWindow if (browserWindow.focus) { newWindow.focus(); } } </script> %end_globals%1 Change the value of ?a=366to the asset ID of your Sign in with Facebook OAuth account manager asset. -
Click Save to add the Facebook sign-in button to your website pages.
Make the Facebook Login app live
In this step, you activate your Facebook Login product so Squiz Content Management can use it to authenticate site users through the OAuth account manager.
-
Select the Facebook Login product’s Settings screen.
-
Use the In development toggle to switch your app to Live Mode.
-
Select Switch Mode to switch your app over from In development to Live.
Test the integration
To test the Facebook SSO integration:
-
Open the Details screen of the Web services site asset. The asset’s current status should be Under construction.
-
In the Change status field, select Approve and make live.
-
Select the Cascade status change option and click Save to make your web services configuration available to the Facebook Login app you just activated.
-
Under the Users configuration folder asset, make sure the Social sign-in users user group asset is also made live.
-
Preview your website in a new window.
-
Click the Login with Facebook button to launch a minimal browser window containing the Facebook sign-in system.
-
Use the sign-in system to authenticate and close the popup window.
-
In Squiz Content Management, check to see that a new user was created as a child of the Social sign-in users user group.
| If the popup does not load, double-check that the asset IDs in your Default formats paint layout bodycopy match the Sign in with Facebook OAuth account manager asset ID. |
Optional: Use a login-redirect instead of a popup
If you prefer not to use a popup mechanism, you can set up a login-redirect mechanism to handle the sign-in process instead.
Before you start
-
You have completed all steps in the tutorial up to this point.
-
You have verified that the authentication system works by testing the authentication workflow.
Steps
-
Open the Details screen of the Sign-in with Facebook OAuth Account Manager asset.
-
In the Return location section, set the Query string parameter field to
returnurland click Save.While the procedure suggests returnurlas the parameter, you can set this value to anything that makes sense for your implementation. -
Open the Content tab of the OAuth account manager Logged in bodycopy.
-
Delete the JavaScript you added in the Configure the OAuth account manager logged in bodycopy step and click Save.
The login-redirect mechanism does not need the refresh page functionality in this bodycopy asset. -
Click to locate the Default Formats paint layout bodycopy asset.
-
Delete the popup JS code you added in Add the Facebook sign-in button to your site step and replace it with the following code.
%begin_globals_user_is_logged_in%
   <strong>Signed-in as:</strong>
   %globals_user_attribute_first_name% %globals_user_attribute_last_name%
   <a href="?SQ_ACTION=logout">(Sign out)</a>
%else_globals%
   <a class="btn btn-primary" href="./?a=366?returnurl=%frontend_asset_url%">Sign in with Facebook</a> (1)
%end_globals%
1 Change the value of ?a=366?in thehrefto the asset ID of your Sign in with Facebook OAuth account manager asset. -
Click Save
-
Test the integration and note the differences in how the authentication flow works.
In the login href value, the returnurl query parameter is set to the current asset URL, so users return to the original page after being taken to Facebook sign-in.