Menu normal design area
|
Make the switch from legacy Standard Pages to Content Pages in Page Builder. Get A/B testing, Personalization, Layouts and Templates, ongoing feature improvements, and a great authoring experience compared with Standard Pages. Read the standard page and content page feature comparison page for more information. |
This design area allows you to add a menu to the design, reflecting the hierarchy of the assets in the asset tree.
The code that is required for the menu normal design area is shown:
<MySource_AREA id_name="menu" design_area="menu_normal">
  <MySource_ASSET>
    <MySource_PRINT var="asset_name_linked" />
  </MySource_ASSET>
  <MySource_DIVIDER></MySource_DIVIDER>
</MySource_AREA>
This code will add a menu to your design. By default, it will only show the top-level assets (the site’s child assets).
Set variables
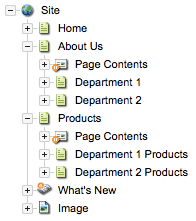
The set variables available for the menu normal design area are as follows. Please note that the examples used in this section are based on the structure shown in the figure:
- level
-
This variable allows you to define which level to print in the menu. This variable can be used in conjunction with another menu normal design area to split the menu in the design. For example, you can show the top-level assets across the top of the design and their child assets in a menu down the side of the design. For more information on how to do this, refer to the examples section. The values that can be used for this set variable are as follows:
- 0 or top
-
This value will only show the top-level assets (that is, the site’s child assets). For example, this will show home, about us and products in the menu.
<MySource_AREA id_name="menu" design_area="menu_normal"> <MySource_SET name="level" value="top" /> <MySource_ASSET> <MySource_PRINT var="asset_name_linked" /> </MySource_ASSET> <MySource_DIVIDER></MySource_DIVIDER> </MySource_AREA> - 1 or sub
-
This value will show the child assets of the top-level pages based on the current page the user is viewing. For example, if the user views the home page, no items will appear in the menu, as it does not have any child assets. If they view the Products page, Department 1 products, and Department 2 products will appear in the menu. If they click on Department 2 products, however, the menu will remain the same.
<MySource_AREA id_name="menu" design_area="menu_normal"> <MySource_SET name="level" value="sub" /> <MySource_ASSET> <MySource_PRINT var="asset_name_linked" /> </MySource_ASSET> <MySource_DIVIDER></MySource_DIVIDER> </MySource_AREA> - 2
-
This value is similar to the sub value, but it will only show the level two assets. For example, if the user views the Products page, no items will appear in the menu as Department 1 products and Department 2 products do not have any child pages. Similarly, you can use
3,4, and5as values for this set of variables.<MySource_AREA id_name="menu" design_area="menu_normal"> <MySource_SET name="level" value="2" /> <MySource_ASSET> <MySource_PRINT var="asset_name_linked" /> </MySource_ASSET> <MySource_DIVIDER></MySource_DIVIDER> </MySource_AREA> - -1 or current
-
This value will show the current page and its siblings. For example, if the user views the about us page, home, about us, and products will appear in the menu. If they view the Department 2 products page, Department 1 products and Department 2 products will appear in the menu.
<MySource_AREA id_name="menu" design_area="menu_normal"> <MySource_SET name="level" value="current" /> <MySource_ASSET> <MySource_PRINT var="asset_name_linked" /> </MySource_ASSET> <MySource_DIVIDER></MySource_DIVIDER> </MySource_AREA> - -2 or children
-
This value will show the child pages of the current page the user is viewing. For example, if the user views the Products page, Department 1 products and Department 2 products will appear in the menu. If they click on Department 2 products, no items will appear in the menu as it does not have any child pages.
<MySource_AREA id_name="menu" design_area="menu_normal">
  <MySource_SET name="level" value="children" />
  <MySource_ASSET>
    <MySource_PRINT var="asset_name_linked" />
  </MySource_ASSET>
  <MySource_DIVIDER></MySource_DIVIDER>
</MySource_AREA>
- root_node
-
This variable allows you to define from which asset to start the menu. For example, the Products page has an asset ID of
318. Setting this value to318will show Department 1 products and Department 2 products in the menu even if the user is viewing the home page.<MySource_AREA id_name="menu" design_area="menu_normal"> <MySource_SET name="root_node" value="318" /> <MySource_ASSET> <MySource_PRINT var="asset_name_linked" /> </MySource_ASSET> <MySource_DIVIDER>Divider</MySource_DIVIDER> </MySource_AREA> - show_subs
-
This variable allows you to define how to display sub-pages in the menu. It can only be used in conjunction with the MySource_SUB tag (for more information on creating submenus, refer to the Creating sub-menus section). The values that can be used for this set variable are as follows:
- always
-
This value will display the sub-pages for all of the assets in the menu. For example, it will show home, about us, Department 1, Department 2, products, Department 1 products, and Department 2 products in the menu.
<MySource_AREA id_name="menu" design_area="menu_normal"> <MySource_SET name="show_subs" value="always" /> <MySource_ASSET> <MySource_PRINT var="asset_name_linked" /> <MySource_SUB design_area="menu_normal"> <MySource_ASSET> <div class="subnav"> <MySource_PRINT var="asset_name_linked" /> </div> </MySource_ASSET> </MySource_SUB> </MySource_ASSET> <MySource_DIVIDER> </MySource_DIVIDER> </MySource_AREA> - on_current
-
This value will only print the sub-pages for the page the user is currently viewing. For example, if the user views the home page, it will show home, about us, and products in the menu. If the user were viewing the Products page instead, it would show home, about us, products, Department 1 products, and Department 2 products in the menu.
<MySource_AREA id_name="menu" design_area="menu_normal">
  <MySource_SET name="show_subs" value="on_current" />
  <MySource_ASSET>
    <MySource_PRINT var="asset_name_linked" />
    <MySource_SUB design_area="menu_normal">
      <MySource_ASSET>
        <div class="subnav">
          <MySource_PRINT var="asset_name_linked" />
        </div>
      </MySource_ASSET>
    </MySource_SUB>
  </MySource_ASSET>
  <MySource_DIVIDER> </MySource_DIVIDER>
</MySource_AREA>

- settings.*.*
-
This variable allows you to change the format of the menu items based on which page the user is currently viewing. For example, using the example structure shown in the figure, say the user was viewing the Department 2 products page. Using this variable, you can change the format of the Department 2 products page in the menu by using a different CSS class. You can also change the format of its parent pages (that is, the Department 2 pages) using a different CSS class. There are three different levels that you can format by using this variable.
The levels are as follows:
- normal
-
This is the default format for the menu items that are not part of the hierarchy or are not the current page that the user is viewing.
- hierarchy
-
This format is used for the menu items that are in the lineage for the current page the user is viewing.
- current
-
This format is used for the current page the user is viewing. You need to include all three levels within the design area for it to work.
A fourth option allows you to add a CSS class to the menu items that have child assets.
- has_children
-
When this option is added, its value will be included in the CSS class along with the level. Using the example structure shown in the previous figure, if the user were viewing the Department 2 products page, the current format would be used for the Department 2 products page. The hierarchy format will be used for Department 2 and about us pages. The normal format will be used for the home, Department 1, and products pages. The code to produce this menu format is shown:
<MySource_AREA id_name="menu" design_area="menu_normal">
<MySource_SET name="settings.class.normal" value="" />
<MySource_SET name="settings.class.current" value="selected" />
<MySource_SET name="settings.class.hierarchy" value="hier" />
<MySource_SET name="settings.class.has_children" value="has-children" />
  <MySource_ASSET>
    <a href="<MySource_PRINT var="asset_link" />" class="<MySource_PRINT var="settings.class" />">
       <MySource_PRINT var="asset_short_name" />
     </a>
    <MySource_SUB design_area="menu_normal">
<MySource_SET name="settings.class.normal" value="" />
<MySource_SET name="settings.class.current" value="selected" />
<MySource_SET name="settings.class.hierarchy" value="hier" />
<MySource_SET name="settings.class.has_children" value="has-children" />
      <MySource_ASSET>
        <div class="subnav">
           <a href="<MySource_PRINT var="asset_link" />" class="<MySource_PRINT var="settings.class" />">
             <MySource_PRINT var="asset_short_name" />
           </a>
         </div>
        <MySource_SUB design_area="menu_normal">
  <MySource_SET name="settings.class.normal" value="" />
<MySource_SET name="settings.class.current" value="selected" />
<MySource_SET name="settings.class.hierarchy" value="hier" />
<MySource_SET name="settings.class.has_children" value="has-children" />
          <MySource_ASSET>
            <div class="subnav2">
               <a href="<MySource_PRINT var="asset_link" />" class="<MySource_PRINT var="settings.class" />">
                 <MySource_PRINT var="asset_short_name" />
               </a>
             </div>
          </MySource_ASSET>
        </MySource_SUB>
      </MySource_ASSET>
    </MySource_SUB>
  </MySource_ASSET>
   <MySource_DIVIDER></MySource_DIVIDER>
</MySource_AREA>
You can leave the normal format blank to use the default format that has been set up for the design.
If you are using the mysource_sub tag to show different levels within the menu, you need to set the settings.*.* variable for each level, as shown in the previous code (for more information on how to create sub-menus, refer to the creating sub-menus section).
The format of the settings.*.* variable is
<mysource_set name="settings.<variable_name>.<level>" value="<class_name>" />
Where <variable_name> can be any name that you want to use, <level> is normal, hierarchy or current, and <class_name> is the name of the CSS class you want to use.
- prefix_with_divider
-
This variable allows you to define whether to show the divider at the start of the menu item. By default, this is set to
false. The following example sets this value totrue, meaning that it will be shown.<MySource_AREA id_name="menu" design_area="menu_normal"> <MySource_SET name="prefix_with_divider" value="true" /> <MySource_ASSET> <MySource_PRINT var="asset_name_linked" /> </MySource_ASSET> <MySource_DIVIDER>Divider</MySource_DIVIDER> </MySource_AREA> - suffix_with_divider
-
This variable allows you to define whether to show the divider at the end of the asset lineage. By default, this is set to
false. The next example sets this value totrue, meaning that it will be shown.<MySource_AREA id_name="menu" design_area="menu_normal"> <MySource_SET name="suffix_with_divider" value="true" /> <MySource_ASSET> <MySource_PRINT var="asset_name_linked" /> </MySource_ASSET> <MySource_DIVIDER>Divider</MySource_DIVIDER> </MySource_AREA> - wanted_asset_types
-
This variable allows you to specify a list of asset types to include on the menu. For example, you can choose to display only standard pages on the menu. If you want to include multiple asset types, use a comma-separated list of values. The following example includes the standard page asset type on the menu.
<MySource_AREA id_name="menu" design_area="menu_normal"> <MySource_SET name="wanted_asset_types" value="page_standard" /> <MySource_ASSET> <MySource_PRINT var="asset_name_linked" /> </MySource_ASSET> <MySource_DIVIDER></MySource_DIVIDER> </MySource_AREA> - unwanted_asset_types
-
This variable allows you to define a list of asset types to exclude from the menu. For example, you can hide folders from the menu. If you want to hide multiple asset types, use a comma-separated list of values. This example hides the folder asset type from the menu.
<MySource_AREA id_name="menu" design_area="menu_normal"> <MySource_SET name="unwanted_asset_types" value="folder" /> <MySource_ASSET> <MySource_PRINT var="asset_name_linked" /> </MySource_ASSET> <MySource_DIVIDER></MySource_DIVIDER> </MySource_AREA> - self_link
-
This variable allows you to select whether the current page the user is viewing is a hyperlink in the menu. For example, if the user views the home page, it will not be hyperlinked in the menu. All other menu items will be hyperlinked. This variable will only work if the level variable is set to current and you are using
asset_name_linkedorasset_short_name_linkedin themysource_printstatement. By default, it is set totrue, meaning that it will be shown as a hyperlink.<MySource_AREA id_name="menu" design_area="menu_normal"> <MySource_SET name="level" value="current" /> <MySource_SET name="self_link" value="false" /> <MySource_ASSET> <MySource_PRINT var="asset_name_linked" /> </MySource_ASSET> <MySource_DIVIDER></MySource_DIVIDER> </MySource_AREA>
Print variables
The print variables available for the menu normal design area are as follows:
- asset_name_linked
-
This will print a hyperlink to the asset in the menu. The text for the hyperlink will be the full name of the asset.
<MySource_AREA id_name="menu" design_area="menu_normal"> <MySource_ASSET> <MySource_PRINT var="asset_name_linked" /> </MySource_ASSET> <MySource_DIVIDER></MySource_DIVIDER> </MySource_AREA> - asset_short_linked
-
This will print a hyperlink to the asset in the menu. The text for the hyperlink will be the short name of the asset.
<MySource_AREA id_name="menu" design_area="menu_normal">
  <MySource_ASSET>
<MySource_PRINT var="asset_short_linked" />
  </MySource_ASSET>
  <MySource_DIVIDER></MySource_DIVIDER>
</MySource_AREA>
Along with these print variables, you can use the standard keyword.
For example, if you want to print the asset’s short name along with its URL in the lineage, use the keyword replacements %asset_short_name% and %asset_link%.
An example of this is shown in the following code:
<MySource_AREA id_name="menu" design_area=" menu_normal ">
<MySource_ASSET>
<a href="<MySource_PRINT var="asset_link" />">
<MySource_PRINT var="asset_short_name" />
</a>
</MySource_ASSET>
<MySource_DIVIDER> > </MySource_DIVIDER>
</MySource_AREA>You can also use the metadata keyword replacement to print information from a metadata field on an asset.
Read the Keyword replacements documentation for more information on these keyword replacements.
Optimized variables
While you can effectively use any asset keyword as the variable to print information about an asset, the following variables are optimized for speed. They will render the menu area much faster than any other keywords:
-
assetid -
asset_link -
asset_short_name -
asset_name -
asset_name_linked -
asset_short_name_linked -
asset_thumbnail -
asset_thumbnail_url
For example, do not use:
<mysource_print var='asset_url'/>
Instead, use:
<mysource_print var='asset_link'/>
Creating sub-menus
To show more than one level in the menu, you need to use the mysource_sub tag within the menu normal design area. For each mysource_sub tag that is added into the design area, a new level will be shown.
For example, if you want to show three levels in the menu, you would use the menu normal design area to show the first level and then include two mysource_sub tags.
This arrangement is shown here:
<MySource_AREA id_name="menu" design_area="menu_normal">
  <MySource_SET name="show_subs" value="always" />
  <MySource_ASSET>
    <MySource_PRINT var="asset_name_linked" />
      <MySource_SUB design_area="menu_normal">
        <MySource_SET name="show_subs" value="on_current" />
        <MySource_ASSET>
          <div class="subnav">
            <MySource_PRINT var="asset_name_linked" />
            <MySource_SUB design_area="menu_normal">
              <MySource_ASSET>
                <div class="subnav">
                  <MySource_PRINT var="asset_name_linked" />
                </div>
              </MySource_ASSET>
            </MySource_SUB>
          </div>
        </MySource_ASSET>
      </MySource_SUB>
  </MySource_ASSET>
  <MySource_DIVIDER> </MySource_DIVIDER>
</MySource_AREA>
The set and print variables available for the menu normal design area are also available for the sub-menus. For example, in the previous code, the show_subs set variable is used twice.
The first instance sets it to always.
This setting will be used for the first MySource_SUB tag.
The second instance sets it to on_current.
This setting will be used for the second MySource_SUB tag.
Customizing the menu normal design area
When you create a design customization, you will be able to customize the menu normal design area. This customization is done on the Details screen of the normal menu design area.
Read the Asset details screen chapter of the Asset screens for more information on the Status, Future status, and Thumbnail sections.
Read the Design customizations documentation for more information on the General section.
Settings
This section allows you to modify the settings of the menu.
- Root node
-
Select which asset from which to start the menu. This variable will only apply if menu level is set to
top. - Menu level
-
Select the level to print in the menu from the list provided or enter the level into the box. For more information on each of the available levels, refer to the level set variable already outlined.
- Self link
-
Select whether the current page that the user is viewing is a hyperlink in the menu. For example, if the user views the home page, it will not be hyperlinked in the menu. All other menu items will be hyperlinked. This field will only apply if menu level is set to current and you are printing
asset_name_linkedorasset_short_name_linkedin the design area. - Ignore permissions
-
Select whether to ignore permissions when displaying assets in the menu. If this option is enabled, all assets will be displayed in the field, regardless of user permissions. If a user selects a page they do not have permission to view, the Matrix sign in box will appear. By default, this option is disabled.
- Excluded asset types
-
Select which asset types to exclude from the menu. For example, you can hide folders from the menu. To choose more than one asset type, then select More…. An additional list will appear on the screen.
- Included asset types
-
Specify which asset types to include in the menu. Only the asset types selected in this field will appear in the menu. For example, you can choose to only display standard pages on the menu. To choose more than one asset type, select More…. An additional list will appear on the screen. If no assets are selected in this field, all asset types will be displayed in the menu.
- Dynamic parameters
-
Here, you can use dynamic parameters for either the root node or menu level values. For example, you can base the root level of where to start the menu dynamically from an asset’s metadata value or a GET URL query parameter.
Example
The following are three different examples of the types of menus that can be created using this design area.
Menu with two sub-levels
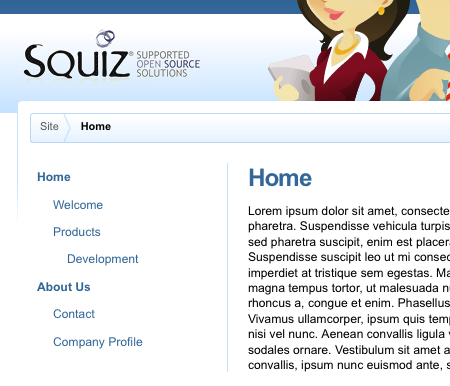
This example is the HTML code added to the static HTML file to show where the menu should go in the design.
<!-- Main Menu -->
<div id="section-nav">
  <!-- main navigation items -->
  <a href="#" class="">Main Menu Item</a>
  <!-- Sub navigation items -->
  <div class="subnav"><a href="#" class="">Sub Item</a></div>
</div>
<!-- End Main Menu -->
The required code is added to the parse file for the Menu Normal design area, as shown:
<div id="section-nav">
<MySource_AREA id_name="menu" design_area="menu_normal">
   <MySource_SET name="level" value="top"/>
   <MySource_SET name="show_subs" value="always"/>
   <ul>
   <MySource_ASSET>
     <li><MySource_PRINT var="asset_name_linked" />
       <MySource_SUB design_area="menu_normal">
         <MySource_SET name="show_subs" value="always"/>
         <ul>
         <MySource_ASSET>
           <li><MySource_PRINT var="asset_name_linked"/>
             <MySource_SUB design_area="menu_normal">
             <ul>
               <MySource_ASSET>
                 <li><MySource_PRINT var="asset_name_linked"/></li>
               </MySource_ASSET>
             </ul>
              </MySource_SUB>
            </li>
         </MySource_ASSET>
         </ul>
        </MySource_SUB>
        </li>
      </MySource_ASSET>
    </ul>
  </MySource_AREA>
</div>
This code will display a menu with two sub-levels in the design of the site, as shown in the figure:
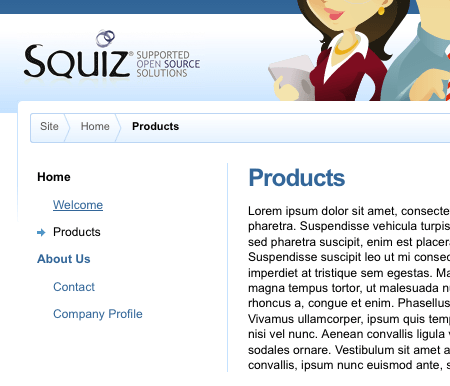
Menu with settings
The required code is added to the parse file for the menu normal design area, as shown:
This code includes the use of the settings.*.* set variable.
<div id="section-nav">
<MySource_AREA id_name="menu" design_area="menu_normal">
    <MySource_SET name="level" value="top"/>
    <MySource_SET name="show_subs" value="always"/>
    <MySource_SET name="settings.class.normal" value="" />
    <MySource_SET name="settings.class.current" value="current" />
    <MySource_SET name="settings.class.hierarchy" value="hierarchy" />
    <ul>
    <MySource_ASSET>
      <li class="<MySource_PRINT var="settings.class"/>"><MySource_PRINT var="asset_name_linked" />
      <MySource_SUB design_area="menu_normal">
        <MySource_SET name="settings.class.normal" value="" />
        <MySource_SET name="settings.class.current" value="current" />
        <MySource_SET name="settings.class.hierarchy" value="hierarchy" />
         <ul>
         <MySource_ASSET>
           <li class="<MySource_PRINT var="settings.class"/>"><MySource_PRINT var="asset_name_linked"/></li>
</MySource_ASSET>
         </ul>
      </MySource_SUB>
      </li>
    </MySource_ASSET>
    </ul>
  </MySource_AREA>
</div>
This code will display a menu with one sub-level in the design of the site. An arrow image is shown next to the page that is currently being viewed. Any pages in the hierarchy will be underlined.
Menu that is split
The required code is added to the parse file for the menu normal design area, as shown:
<div id="main-nav">
<MySource_AREA id_name="Main_navigation" design_area="menu_normal">
  <MySource_SET name="level" value="top"/>
  <MySource_SET name="show_subs" value="always"/>
    <ul>
    <MySource_ASSET>
      <li><MySource_PRINT var="asset_name_linked"/></li>
    </MySource_ASSET>
    </ul>
</MySource_AREA>
</div>
<div id="section-nav">
<MySource_AREA id_name="Section_menu" design_area="menu_normal">
<MySource_SET name="level" value="sub"/>
<MySource_SET name="show_subs" value="always"/>
<ul>
<MySource_ASSET>
<li><MySource_PRINT var="asset_name_linked" />
<MySource_SUB design_area="menu_normal">
<ul>
<MySource_ASSET>
<li><MySource_PRINT var="asset_name_linked"/></li>
</MySource_ASSET>
</ul>
</MySource_SUB>
</li>
</MySource_ASSET>
</ul>
</MySource_AREA>
</div>The first design area only shows the top-level assets (that is, the child assets of the site) and appears across the top of the design. The second design area only shows the sub-assets (the child assets of the selected top-level asset). It appears on the left side of the design. This design area is shown in the figure:
