Creating and applying custom edit layouts
|
Make the switch from legacy Standard Pages to Content Pages in Page Builder. Get A/B testing, Personalization, Layouts and Templates, ongoing feature improvements, and a great authoring experience compared with Standard Pages. Read the standard page and content page feature comparison page for more information. |
Learn how to create and use custom edit layouts using the Custom Edit Layout Manager in the System Management folder.
Applying edit layouts on the Custom Edit Layout Manager
The Custom Edit Layout Manager allows you to apply edit layouts to assets on a system-wide basis and is located under the System Management folder in the asset tree, as shown in the figure:

When you apply an edit layout in the Custom Edit Layout Manager, it will be used across all sites within the system.
Management of edit layouts is done on the Details screen of the Custom Edit Layout Manager. Read Version history screen and Asset logs screen for more information on the History and Logs screens
| Read Applying edit layouts on the Custom Edit Layouts screen to learn how to apply edit layouts to different root nodes within the system on an asset’s Custom Edit Layouts screen. |
Details screen
Read Asset details screen for more information on the Status, Future status, and Thumbnail sections.
CSS settings
This section allows you to enable the formatting applied to the inline edit mode.
By default, Output edit CSS file is set to Off, meaning that Custom Edit Layout formatting will not be used.
Enabling this option is required for Custom Edit Layout formatting to be applied.
Add a layout
The Add a layout section lets you select which asset types you want to apply a global custom edit layout to.
To add a layout for an asset type:
-
Select the asset types from the list.
For example, if you have created a layout for the standard page, select Standard Page from the list.
-
An asset type list appears and opens immediately for you to make another selection.
Click away from the list to close the menu if you do not need to add subsequent asset types.
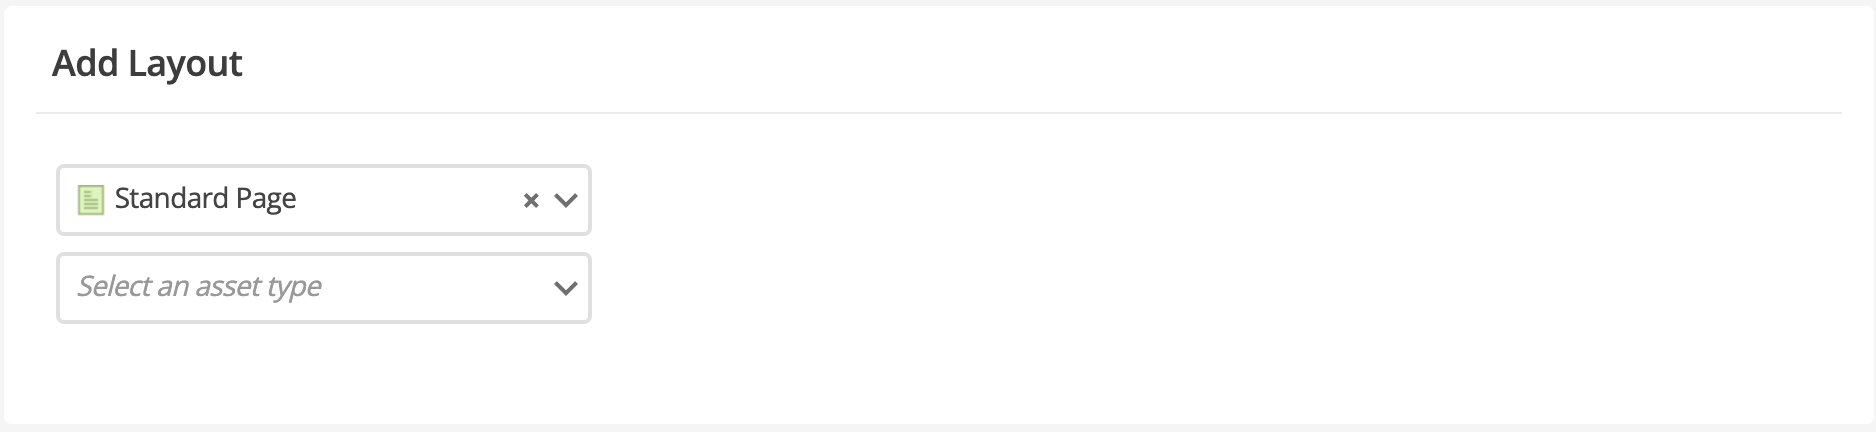 Figure 1. The Add a layout section
 -
Click Save once you have selected the required asset types.
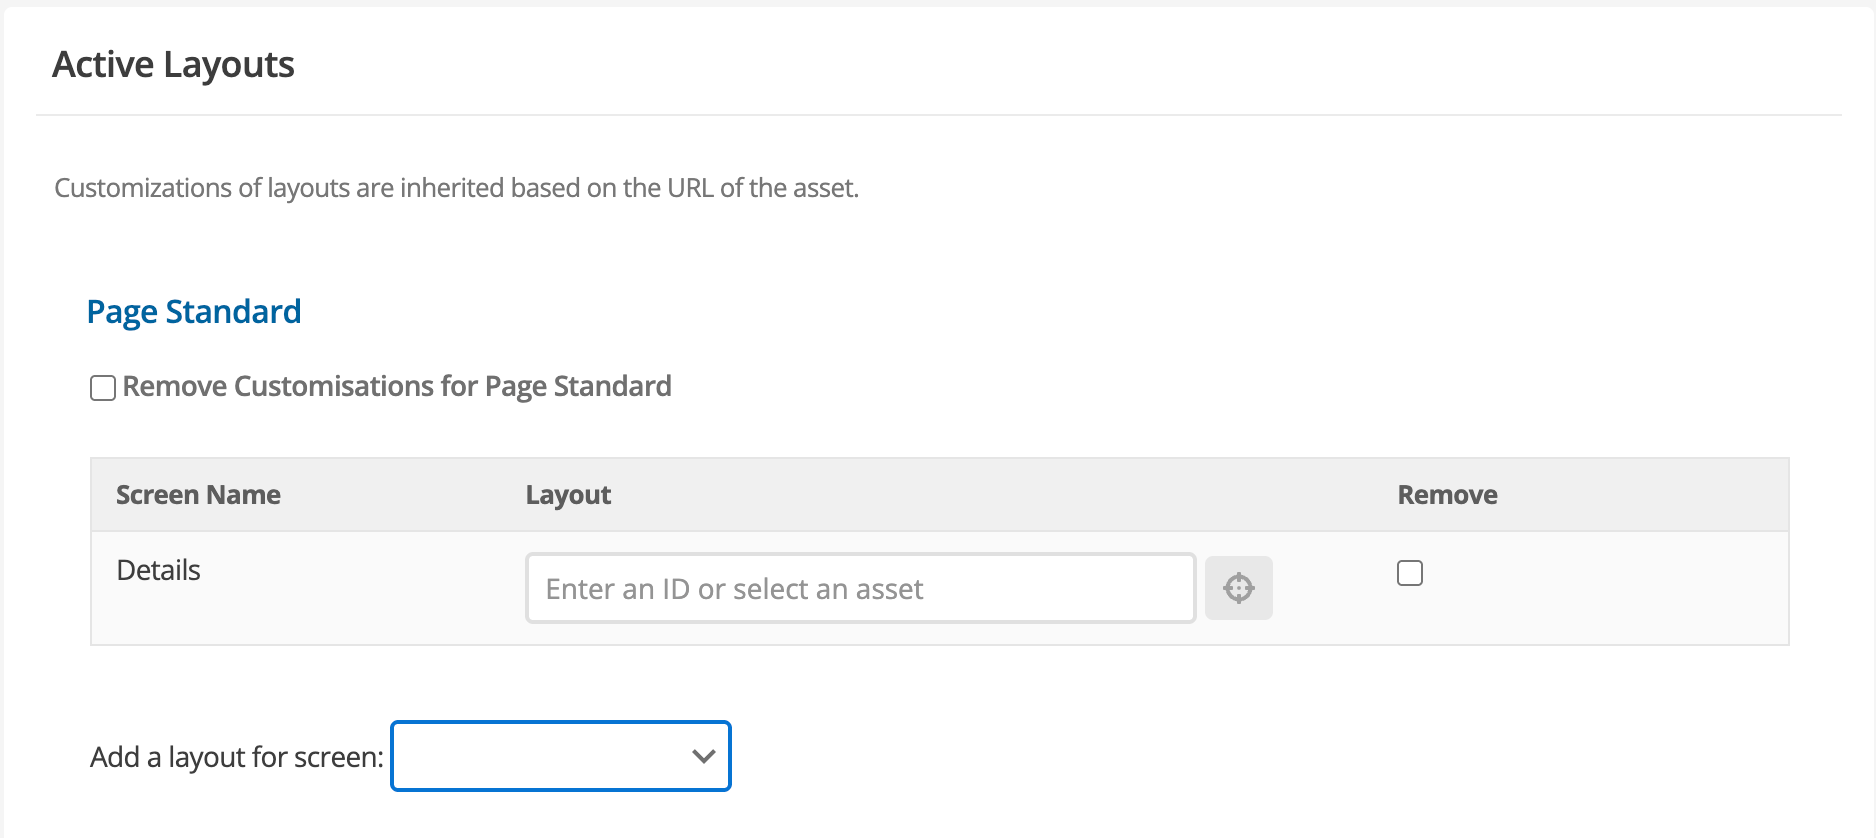
Edit layouts
The Edit layouts section lets you select which edit layouts to use for a particular asset type.
By default, no information will appear until you follow the steps in Add a layout. Once you have saved your asset selections in the Add layout section, the Add a layout for screen option appears for each asset.
Each asset type appears with a blue heading. For example, in the Add a layout steps, the standard page asset type was selected; therefore, Page standard appears in a blue heading.
Add an asset screen
To add a layout for an asset screen:
-
Click Add a layout for screen: and select the screen from the list.
-
Click Save to load the Customizations for that screen.
For example, if you have created a custom edit layout for the Details screen, select Details from the list, and click Save.
-
In the Layout field, select the asset containing the custom edit layout you want to apply to the selected screen.
-
Click Save to make the Details screen use the custom edit layout you applied.
A custom edit layout will only be visible if the asset has a design applied. Read Designs for more information about how to apply a design.
Applying edit layouts on the Custom Edit Layouts screen
The Custom Edit Layouts screen of an asset allows you to apply edit layouts to root nodes, overriding any edit layouts that have been applied on the Custom Edit Layout Manager. This function allows you to create individual layouts for the different sites in your system.
Read Custom edit layouts screen for more information on applying edit layouts on the Custom Edit Layouts screen.
Creating and applying edit layouts
To understand how to create and apply edit layouts, consider the following examples.
Using one edit layout
We want to create a layout for the inline edit mode that allows the user to edit a standard page and fill out the metadata fields. As workflow is applied to the assets, they need to change the status to safe edit and apply for approval. This should all be shown on one page.
Creating the edit layout
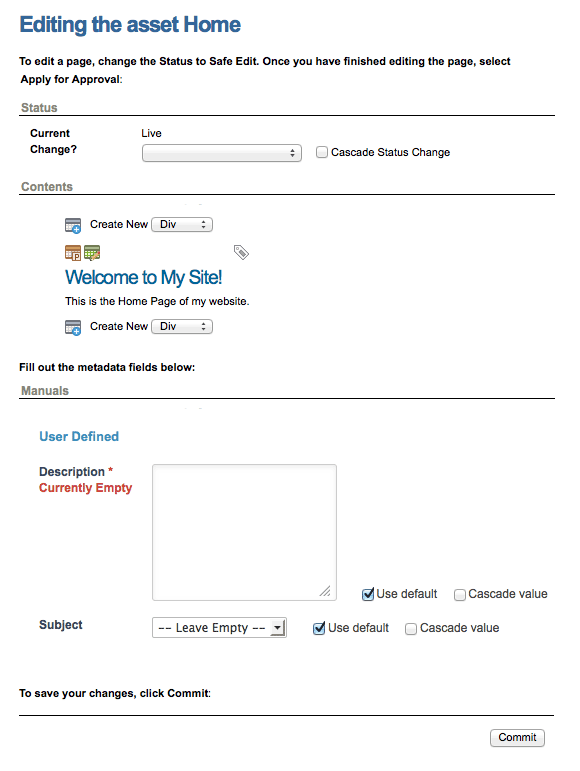
An edit layout is created, and the layout is entered onto the edit contents, as shown in the figure:

The Details screen’s status section is shown in the first, followed by the edit contents screen and then the metadata fields. The Save button is added at the bottom of the page to save their changes. Instructions on how to use each part of the screen and a heading are also added.
| If there are fields on the screen that only certain users should see, create a new division and add them to that division. You can then modify the permissions for that division so that only certain users see those fields in the inline edit mode. |
Applying the edit layout
The edit layout now needs to be applied to the standard page for the system. To do this, follow the steps outlined here:
-
On the Details screen of the Custom Edit Layout Manager, select
Standard pagein the add a layout field. -
Click Save.
Additional fields will appear in the edit layouts section.
-
Select
Detailsin the Add a layout for screen list. -
Click Save.
-
In the grey box, select the
Editlayout in the layout field. -
Click Save.
The layout is now applied to all standard page assets in the system.
Using multiple edit layouts
We want to create a layout similar to the layout in the previous example. This time, however, we want to split the screens up and add the Preview screen.
Creating the edit layouts
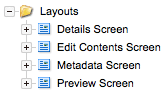
Four edit layouts are created in the asset tree, as shown in the figure: On each of these layouts, the required fields and instructions are added.
An example of one of these layouts is shown in the figure:
Applying the edit layouts
The edit layouts now need to be applied to the standard page for the system. To do this, follow the steps outlined here:
-
On the Details screen of the Custom Edit Layout Manager, select
Standard pagein the add a layout field. -
Click Save.
Additional fields will appear in the edit layouts section.
-
Select
Detailsin the Add a layout for screen list. -
Click Save.
-
In the grey box, select the Details screen layout for the Details screen in the layout field.
-
Click Save.
-
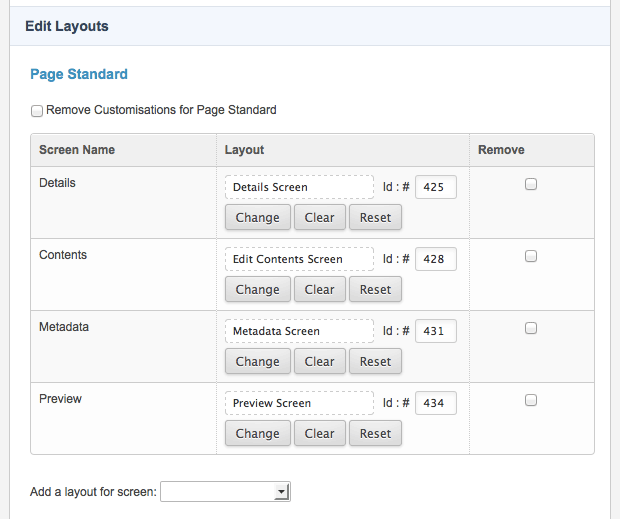
Repeat steps 2 and 3 and apply the Edit contents screen layout to the Contents screen, the Metadata screen layout to the Metadata screen, and the Preview screen layout to the Preview screen. The edit layouts section should look similar to the figure:
Viewing the edit layouts
The figure shows what the inline edit mode will look like for the Edit contents screen.
To access the inline edit mode, add /_edit onto the end of the URL.

The user can navigate to other screens by using the screen menu at the top.