Paint layouts
|
Make the switch from legacy Standard Pages to Content Pages in Page Builder. Get A/B testing, Personalization, Layouts and Templates, ongoing feature improvements, and a great authoring experience compared with Standard Pages. Read the standard page and content page feature comparison page for more information. |
Defines the layout of the asset’s content and allows you to add metadata fields and other information, including the date and time of when the asset was published. For example, say you had several media releases in your site. Each media release needs to show the title, the date it was published, and who published it. Instead of adding this information every time you create a page, you can create a paint layout that will include the extra information.
| Paint layouts can only be applied to assets that are accessible via a URL, that is, those that have a URL screen. |
An example is shown:
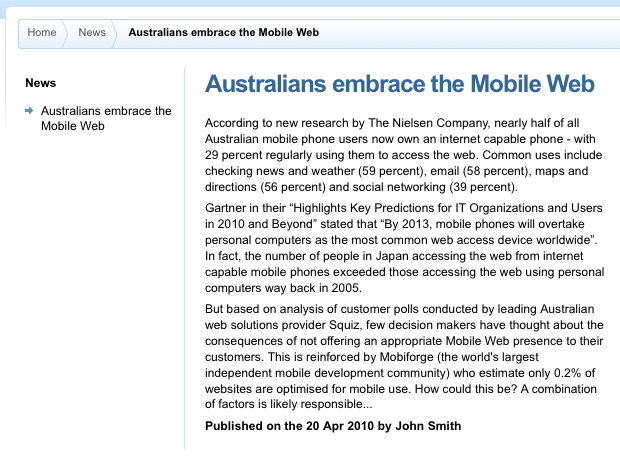
The page’s content is defined on a standard page, and the title and published information at the bottom of the page are defined in a paint layout. This paint layout can then be applied to any new media releases that are added to the site.
Once you have created a paint layout, you can configure its settings on its associated asset screens. The majority of these screens are the same as a standard page and are described in the Asset screens manual. This manual will describe the Details and Usage screens, which are different for a paint layout.
Applying a paint layout
Once you have created a paint layout, you can apply it to an asset on the Paint layouts screen. For more information on this screen, refer to the Asset screens manual.
A paint layout will only be visible if a design has been applied to the asset. If the paint layout does not appear, a design may not have been applied. Read the Asset settings documentation for more information about configuring paint layouts.
Status and permissions
To allow a public user to see the paint layout for an asset, grant public read permission to the paint layout. Otherwise, you will need to grant at least read permission to the specific users you want to view the layout. The paint layout also needs to be live.
Details screen
The Details screen allows you to configure various settings, including using a specific type format.
For more information on the Status, Future status, Thumbnail, and Details section of the screen, refer to the Asset details screen chapter in the Asset screens manual.
Layout settings
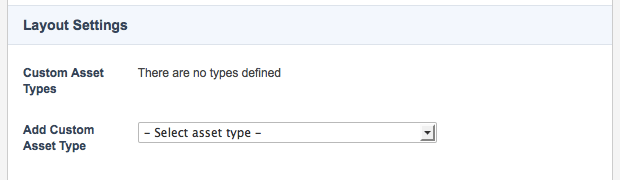
This section allows you to create a bodycopy asset for an asset type. The layout settings section of the Details screen is shown in the figure:
You can create a standard page format to define the layout for a standard page. When you apply the paint layout to a standard page, it will use the standard page format instead of the default format. The default format will only be used for assets that are not standard pages.
To add a specific type format:
-
Select the asset type in the Add custom asset type field.
-
Click Save.
The bodycopy asset will appear under the type formats folder in the asset tree, and the asset type will be listed in the Custom asset types field, as shown:
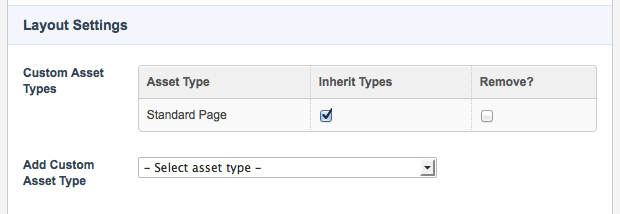
By default, the Inherit types flag will be ticked. This flag means that the child types of the selected asset type will also use the layout defined in this bodycopy. For example, if you have selected a user asset type and checked the inherit box, the users, backend users, system administrators, and the root user will also use the layout defined in the bodycopy.
If you do not want to use the bodycopy for the child types:
-
Clear this box.
-
Click Save.
To add additional bodycopy assets:
-
Select the asset type from the add custom asset type list.
-
Click Save.
For more information on creating and editing type formats, refer to the Type formats chapter that follows.
Usage screen
The Usage screen shows assets that are currently using the paint layout. The Paint layout usage section of the Usage screen is shown in the figure:

By default, if the paint layout has not been applied to any assets, no information will appear on the screen, as shown in the previous figure. Once the paint layout has been applied to an asset, the information shown in the following figure will appear.
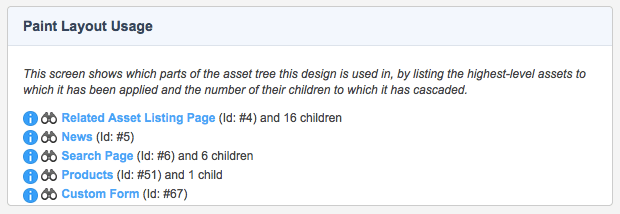
The top-level assets where the paint layout has been applied and the number of child assets under it also using the paint layout are shown. You can click on the asset’s name to go to the Paint layouts screen of that asset.
Type formats
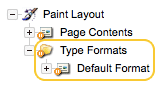
By default, when you create a paint layout, a type formats folder containing a default format bodycopy is created underneath it, as highlighted in the figure:
This bodycopy is used to define what information to display for the asset. For example, in the page shown in the next figure, the title and published information are being shown. This layout has been defined in the default format bodycopy.
However, this default format is used for all asset types to which the paint layout is applied. For example, if you apply this paint layout to a standard page and a folder, the layout defined in the default format bodycopy will be used for both asset types. You can, however, create a bodycopy asset for each asset type. For example, you can create a bodycopy for the standard page and a bodycopy for the folder. The advantages of creating a type format bodycopy for a specific asset type are as follows:
-
You can change the layout for each asset type without having to create different paint layouts. For example, you can show the last updated information for standard pages but show the published information for folders.
-
Matrix can provide you with more specific keyword replacements to use within the bodycopy. For example, it can also show the keyword replacements file size and friendly name for the file for a PDF file and the standard keyword replacements. These additional keyword replacements will appear in the select keyword list in the WYSIWYG editor toolbar.
Creating a type format bodycopy
To create a type format bodycopy:
-
Right-click on the paint layout.
-
Select Details.
-
Select the asset type in the Add custom asset type field in the Custom layout settings section.
-
Click Save.
The asset type will be listed in the Custom asset types field, as shown:
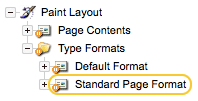
The bodycopy will also appear under the type formats folder in the asset tree, as highlighted in the figure to the right.
By default, the Inherit types flag will be ticked. This flag means that the child types of the selected asset type will also use the layout defined in this bodycopy.
For example, if you have selected a user asset type and checked the Inherit types box, the users, backend users, system administrators, and the root user will also use the layout defined in the bodycopy.
If you do not want to use the bodycopy for the child types:
-
Clear this box.
-
Click Save.
To add additional bodycopy assets:
-
Select the asset type from the add custom asset type list.
-
Click Save.
Editing a type format bodycopy
To edit a type format bodycopy:
-
Right-click on the bodycopy in the asset tree.
-
Select Edit contents.
-
Format the layout of the paint layout in the WYSIWYG editor through the keyword replacements listed in the toolbar.
For more information on the standard keyword replacements, refer to the Formatting a paint layout chapter in this manual.
| If you do not include the keyword replacement asset contents on the bodycopy, the content of the asset that you apply the paint layout to will not be shown on the page. |
Deleting a type format bodycopy
To delete a type format bodycopy:
-
Right-click on the paint layout in the asset tree.
-
Select Details.
-
Click the
Removebox for the type format you want to delete in the Layout settings section. -
Click Save.
The type format bodycopy will be removed from the type formats folder in the asset tree.
Conditional keywords screen
On each of the type formats bodycopy, the Conditional keywords screen can be found. This screen allows you to specify conditions that must be satisfied for a section of your content to be displayed. If the condition is not satisfied, the appropriate section of content is not displayed to the user.
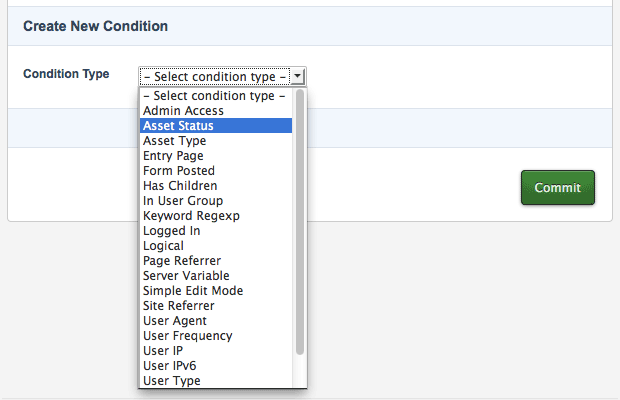
The Conditional keywords section of the Conditional keywords screen is shown in the figure:
To add a condition:
-
Select the type of condition you want to use from the condition type list.
-
Click Save.
Additional fields will then appear on the screen, allowing you to configure that condition.
You can add as many conditions as you want.
The conditions available are:
- Admin access
-
The user has or does not have admin access to the front-end asset.
- Asset status
-
The current asset is or is not a specified status.
- Asset type
-
The current asset is or is not one of a specified set of asset types.
- Entry page
-
The entry page of the user matches or does not match a specified set of URL patterns or asset IDs.
- Form posted
-
The form has or has not been posted.
- Has children
-
The current asset has or does not have children that match a specified set of asset and link types.
- In user group
-
The user is or is not in a specified set of user groups.
- Keyword regexp
-
A specified keyword matches or does not match a specified pattern. This condition supports the use of custom keywords.
- Logged in
-
The user is or is not signed in.
- Logical
-
A specified combination of keywords with a logical grouping rule evaluates to true or false. This condition supports the use of custom keywords.
- Page referrer
-
The page referrer URL matches or does not match one of a specified set of URL patterns.
- Server variable
-
A specified server variable matches or does not match a specified pattern. For example, you can specify that the content will be shown if the user uses Internet Explorer. To do this, select the following server variable matches the specified pattern from the list provided, enter
http_user_agentinto the Server variable field, and enterMSIEinto the Pattern field. - Inline edit mode
-
The user is or is not using the inline edit mode.
- Site referrer
-
The site referrer URL matches or does not match one of a specified set of URL patterns.
- User agent
-
The user agent string matches or does not match a specified pattern. For example, you can specify that the content will be shown if the user uses Internet Explorer. To do this, select
The user agent string matches the patternfrom the list provided and enterMSIEinto the User agent pattern field. - User frequency
-
A specified amount of time or activity (hit/session/days/hours/minutes) has or has not passed.
- User IP
-
The user’s IP address matches or does not match a specified pattern.
- User IPv6
-
The user’s IPv6 address matches or does not match a specified pattern.
- User type
-
The user is or is not one of a specified set of user types.
- Visited pages
-
Any previously visited pages match or do not match one of a set of specified URL patterns and asset IDs.
- Write access
-
The user has or does not have write access to the front-end asset.
Using a conditional keyword
Once you have set up a condition on the Conditional keywords screen, several keyword replacements will be available on the Edit contents screen of the bodycopy. These keyword replacements allow you to configure the content so that only certain areas will be visible if certain conditions are met and are as follows:
- Begin <condition name>
-
If the condition is
true, the content between this keyword replacement and either theElse <condition name>orEnd <condition name>will be shown. - Full structure for <condition name>
-
This keyword replacement will add the keyword replacements
Begin <condition name>,Else <condition name>andEnd <condition name>in the WYSIWYG editor. You can then add the required content in between these keyword replacements. - <condition name>
-
This will show
1if the condition istrueor0if it isfalse. - Else <condition name>
-
If the condition is
false, the content between this keyword replacement and the keyword replacementEnd <condition name>will be shown. This keyword replacement is optional. - End <condition name>
-
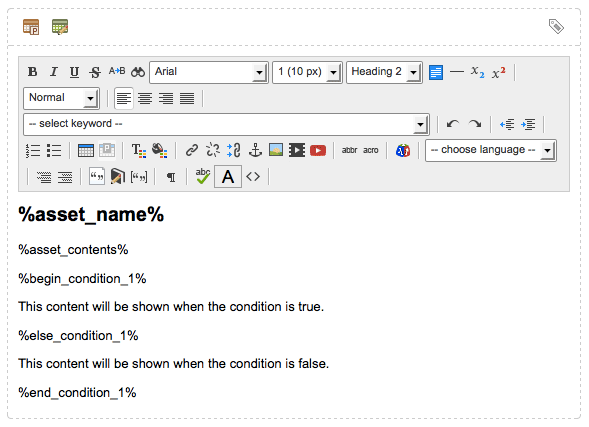
Use this keyword replacement to indicate where the conditional content ends. Please note
<condition name>is the name of the condition on the Conditional keywords screen. An example of the conditional keyword replacement structure is shown in this figure: