Create a dynamic asset listing using keywords
This tutorial creates an asset listing that can have dynamic parameters passed to it when nested into other assets to function differently based on those different parameters.
When creating asset listings, you often need to re-purpose them for multiple scenarios. In other words, you may need to tweak various small settings within the asset listing while keeping most of the other configurations the same.
Instead of creating multiple asset listings with slightly different settings and presentation layouts, it’s sometimes better to just create one and make it dynamic in those areas.
You can set dynamic parameters when nesting in the asset listing into a template such as a paint layout or Design. However, they can also be automatic based on various factors.
This tutorial teaches you how to configure the following dynamic parts of an asset listing:
- Root node
-
The root node from which to list assets.
- Assets per page
-
The maximum number of assets to list per page.
- Listing heading
-
The heading above the list.
- Listing format
-
The presentation layout of each asset listed.
To make things dynamic, we’ll use several keywords and modifiers and break each of these down to help you learn and understand a bit more about the power of keywords.
Before you start
This tutorial assumes you are already familiar with the Admin Interface and understand the basic concepts of Keyword Replacements, Components, and asset listings.
| To see a working solution for this tutorial, you can Download tutorial assets used in this tutorial and import them into your own Squiz Content Management system using the Import Assets from XML tool. |
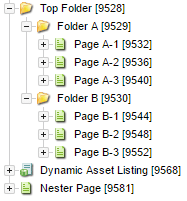
Create the assets
For our example, we’ll create a basic asset listing that lists some standard pages from different folders. The first step is to create assets used within the dynamic listing.
-
Create one top-level folder called "Top Folder".
-
Inside the Top Folder folder, create two sub-folders called "Folder A" and "Folder B".
-
Inside each of the sub-folders, create three Standard page assets each and give them names in the following format:
-
"Page A-1"
-
"Page A-2"
-
"Page A-3"
It doesn’t matter what their names are, as long as you can easily identify each page uniquely on the front end. -
-
Next to the "Top Folder" folder, create an asset listing named "Dynamic Listing" that lists these assets.
-
Create another standard page asset named "Nester Page" on the same level that nests in the asset listing and pass the dynamic parameters to it.
You should now have an asset structure similar to the image below:
Configure asset listing settings
Configure the asset listing and make the root node and assets per page settings dynamic.
-
Go to the Details screen of the asset listing and select Acquire Locks.
-
Configure the following areas:
- Asset Types to List
-
Set this to Pages and select the Inherit option.
- Root Nodes
-
Set this to our Top Folder asset ID, which in our example is "9528".
- Assets Per Page
-
This is where the first piece of dynamic configuration displays. In this field, enter
%nested_get_max^empty:10%. This keyword replacement keyword gets the value from a GET parameter calledmax. To control what happens if the field value is empty, specify the default to10. - Dynamic Parameter
-
This controls our dynamic root node functionality. In the Parameter drop-down, select "Replacement root node" for the listing and leave the Source as GET Variable Name.
- If dynamic root not found
-
Set this to "Return empty result". If a dynamic root node value can not be found, this setting limits unnecessary page loads by preventing all assets from being listed from the fixed root node.
-
Save the screen and then scroll down to the Dynamic Parameters section again and in the GET Variable Name field that now is available, enter "root".
Now we have our dynamic asset listing configured with a couple of dynamic settings we can work on the presentation layout and make that more dynamic as well.
Configure the asset listing page contents layout
Make the listing heading dynamic, which appears just before the list.
-
Load the Edit Contents screen of the asset listing’s page contents bodycopy.
If it isn’t already, set the component’s component to "Code". -
Add the dynamic heading in the form of a keyword and a modifier and also the standard keyword for the asset listing content itself:
<h2>%nested_get_heading^empty:{nested_get_root^as_asset:asset_name}^empty:Page List%</h2>
<ul>
    %asset_listing%
</ul>
Let’s break down that keyword to see what it’s doing:
| If you are familiar with keyword modifiers go to the next section to continue the tutorial. |
nested_get_heading-
This gets the value from a GET parameter called "heading" which can be passed to the asset listing when nested into another asset. We’ll show where and how this is done later in the tutorial.
^empty:-
Print something if the preceding value is empty (in our case, if
nested_get_headingis empty). {nested_get_root^as_asset:asset_name}-
This is what gets printed if the preceding value is empty. In our case, it’s a whole other keyword, which we can break down further:
nested_get_root-
Get the value from a GET parameter called "root". We expect this to be an asset ID value.
^as_asset:-
Allows us to print any attribute or metadata value from the asset ID value sourced from the preceding
nested_get_rootpart. asset_name-
Print the Asset Name of the asset ID sourced from
nested_get_root. ^empty:Page List-
We finish off with another fallback and default value if both
nested_get_headingandnested_get_rootare empty.
Try and print the value from the GET parameter heading. If that value is empty, try to print the Asset Name from an asset ID sourced from a GET parameter called "root". If that also is empty, then just print "Page List".
Configure the asset listing default format layout
Make the listing format dynamic, which is the layout format for each asset produced by the asset listing.
-
Go to the Edit Contents screen of the asset listing’s Default Format Bodycopy.
-
Make sure you set Component to Code.
-
Add the following keyword functionality to the Code component:
-
a basic keyword for printing the Asset Name wrapped in a link to itself,
-
some conditional keywords to print the published date, created date, or nothing.
<li>
    %asset_name_linked%
    %begin_nested_get_date^eq:published% (1)
        (Published: %asset_published_readabledate%)
    %else_begin_nested_get_date^eq:created% (2)
        (Created: %asset_created_readabledate%)
    %end_nested% (3)
</li>
1 If the value generated from nested_get_dateis equal to (^eq:) "published", then print(Published: %asset_published_readabledate%)on the front-end.2 If the begin_condition returnsfalse, and if the value generated fromnested_get_dateis equal to (^eq:) "created" then print(Created: %asset_created_readabledate%)on the front-end.3 This closes our condition code off, meaning we are not printing any other code if the first two conditions are false. So basically, ifnested_get_dateis not equal to "published" or "created", then print nothing. -
We now have a dynamic layout generated for each asset that gets listed.
Using the asset listing
Our dynamic asset listing is complete, and we can now start embedding it into other assets. Here are two common ways of doing this:
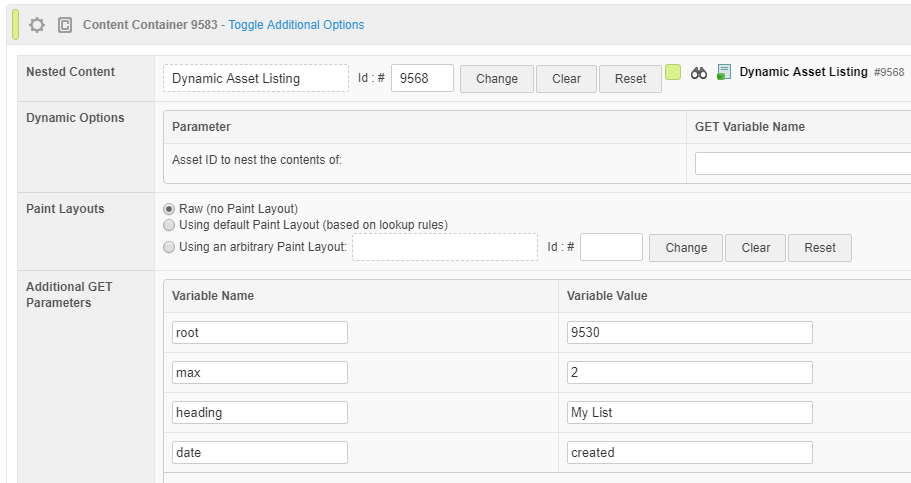
Use the nested content component method
-
In our Nester Page that we created earlier, go to the Edit Contents screen and click Save.
-
Change the Component to "Nested content".
-
Chose the Dynamic asset listing as the asset to nest within.
-
Click on the "Toggle Additional Options" link to display the Additional GET Parameters area. This area allows us to specify our settings to pass to the asset listing.
-
Click on Add a new variable four times to add four variable Name and Value fields.
-
Enter values for all four of our dynamic settings, for example:
Name Value Description root
9530
Use the asset ID of "Folder B" as the root node. (replace with your asset ID).
max
2
List max 2 assets per page.
heading
My List
Use this as the list heading.
date
created
Print each asset with its created date attribute.
-
Check that your Nested content component looks something like this example:
-
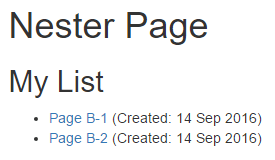
Save the screen and preview the Nester Page on the frontend. Your page should look similar to this example:
Use the global keyword method
This method uses a Global Keyword together with the ^with_get: keyword modifier.
-
In the same Nester Page, create another Component but with a type of Code.
-
In the code block, enter the following keyword:
%globals_asset_contents_raw:9568^with_get:root=9528&max=4&date=published%globals_asset_contents_raw:9568-
Grab the Asset Contents, without any Paint Layout applied, of asset 9568 (our Dynamic asset listing).
^with_get:-
This modifier lets us pass GET parameters to asset 9568 when we request its Asset Contents with the
globals_asset_contents_rawkeyword. root=9528&max=4&date=published-
These are the GET parameters that we are passing (make sure you replace 9528 with the asset ID of your Top Folder). As you can see, it’s in the same format as if you were requesting a page with a URL query string.
We haven’t specified a heading parameter in order to test that our fallback works correctly. -
Save the screen and preview the Nester Page again. Another list displays with some different content (including the name of the root node asset as the heading fallback):