Search page
The search page is used to allow users to search within a specified set of assets. For example, if the user enters the word "Squiz", the page will search for the word "Squiz" within the assets. You can create a simple search page that will only search one field on the asset. Alternatively, you can create a complicated search page that will search across several different asset fields, asset attributes, and metadata fields.
Once you have created a search page, you can configure its settings on its associated asset screens. The majority of these screens are the same as a Standard page or an Asset listing. This manual describes the Details, Search fields, Search categories, and Messages screens.
Additional dependant assets
When you create a search page, several assets are automatically created beneath it.
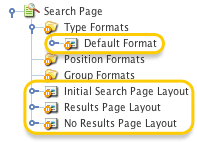
You can use these assets to define the layout of the search page.
- Default format
-
This bodycopy defines the information to be shown for each asset that appears in the list of results.
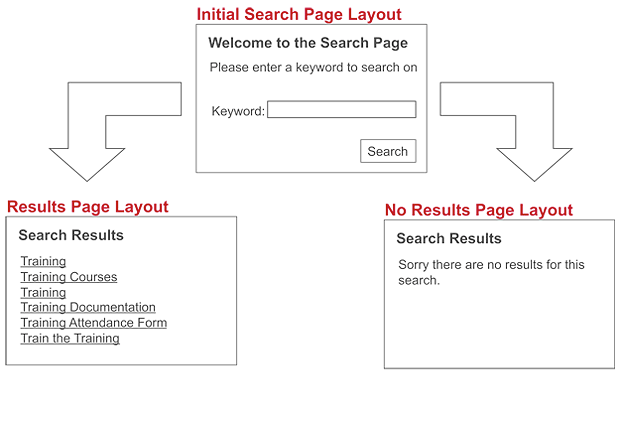
- Initial search page layout
-
This bodycopy defines the search page’s initial layout when the user first visits the page.
- Results page layout
-
This bodycopy defines the layout if results are found from the search that is being performed.
- No results page layout
-
This bodycopy defines the layout if no results are found from the search that is being performed. The default format bodycopy is similar to the one that is created under the asset listing page. Read Asset listing for more information on this asset.
This figure shows how the search page works through the use of these dependant assets.
Details screen
The Details screen allows you to configure the search page settings, including the search and display options parameters. Read Asset details screen for more information about the status, future status, thumbnail, and details sections.
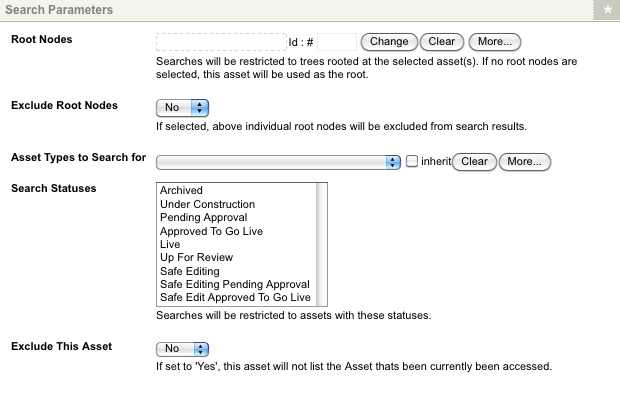
Search parameters
This section allows you to define which assets to search.
The fields available are as follows:
- Root nodes
-
Select which section of the system to search in for the search page. For example, if you want to search all assets on your site, select the site asset. You can select multiple root nodes by clicking on the More… button.
- Exclude root node
-
Select whether to exclude the individual root node assets (as specified in the Root nodes field) from the search page’s search results. If this field is enabled, only the child assets of these root nodes will be listed on search results. By default, this field is set to
No. - Asset types to search for
-
Select the types of assets to search in. For example, if you only want to search within your site’s pages, select Standard page. To select more than one asset type, click on the More… button. An additional list will appear on the screen.
- Search statuses
-
Select the status the asset must be to be included in the search page. For example, if you want to search all assets that are under construction and live, select both of these statuses. To select multiple statuses, hold down the Ctrl key on the keyboard and click on the list’s status.
- Exclude this asset
-
Select whether to list the asset that is currently being viewed. For example, if the search page is nested in the site design, it will not list an asset if the user is currently viewing it.
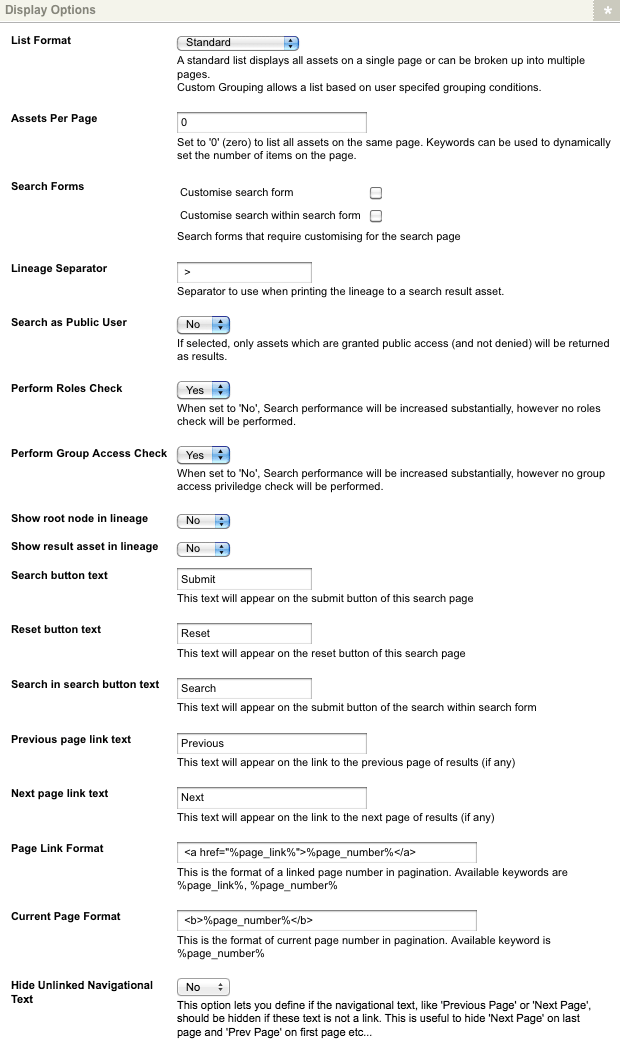
Display options
This section allows you to change the format of the search page.
The fields available in this section are as follows:
- List format
-
This option allows you to change the format of the list of results. The options available in this list are as follows:
- Standard list
-
This format allows you to display the list of results on a single page or broken up across multiple pages, for example, ten assets per page.
- Custom grouping
-
This format displays assets grouped by the grouping conditions setup on the asset grouping screen. Read Asset grouping screen for more information on this screen.
- Assets per page
-
Enter the number of assets to show on the results page. You can use this field to restrict the number of assets seen on the page or break up the assets into several pages. To do this, add the keyword replacements previous page link and next page link to the results page layout bodycopy to navigate to the next page of the list.
- Search forms
-
This field allows you to add the search again and search in search bodycopy to the search page. For more information on these bodycopies, refer to the default search bodycopy and search in search bodycopy sections.
- Lineage separator
-
Enter the separator to use when showing the asset’s lineage in the results list. This separator is used when you use the keyword replacement asset lineage or asset lineage linked on the default format bodycopy. By default, this is set to
>. - Search as public user
-
Select whether the search page will only search the assets that have been granted public read permission. In other words, the search will be performed as a public user, even if someone is signed into the system. By default, this is set to
No, meaning that it will search all assets. - Perform roles check
-
When a search is performed, and an asset is found, Matrix will check whether the user has permission to view it. This feature includes checking any roles that have been given permissions on the asset. The Perform roles check field allows you to turn off this check for the roles. By doing this, you can increase the performance of the search page. By default, this is set to
No, meaning that the checks for the roles will not be performed. - Perform group access check
-
When a search is performed, and an asset is found, Matrix will check whether the user has permission to view it. This feature includes checking any user groups that have been given permission on the asset.
The Perform group access check field allows you to turn off this check for the user groups.
By doing this, you can increase the performance of the search page.
By default, this is set to Yes, meaning that the checks for the user groups will be performed.
- Show root node in lineage
-
Select whether to show the root node in the lineage of an asset in the results list. This setting is used when you use the keyword replacement asset lineage or asset lineage linked on the default format bodycopy. By default, this is set to
No. - Show result asset in lineage
-
Select whether to show the asset’s name in the lineage in the results list. This setting is used when you use the keyword replacement asset lineage or asset lineage linked on the default format bodycopy. By default, this is set to
No. - Search button text
-
Enter the text to show on the search button. By default, this text is
Submit. This button is shown when the keyword replacement Submit button is used on the search page. - Reset button text
-
Enter the text to show on the reset button. By default, this text is
Reset. This button is shown when the keyword replacement Reset button is used on the search page. - Search in search button text
-
Enter the text to show on the Search in search button. By default, this text is "search".
- Previous page link text
-
Enter the text used for the hyperlink to the previous result page. This text will be shown when you add the keyword replacement previous result page link to the results page layout bodycopy. By default, this is set to
Previous. - Next page link text
-
Enter the text used for the hyperlink to the next result page. This text will be shown when you add the keyword replacement next results page link to the results page layout bodycopy. By default, this is set to
Next. - Page link format
-
This format defines the unique layout of items on the result page’s linked page list when you list results over multiple pages.
- Current page format
-
This format defines the layout of the current page number on the result page’s linked page list when you are listing results over multiple pages.
- Hide unlinked navigation text
-
This option allows you to hide any unlinked navigation text on the search results when you list results over multiple pages. The previous page link will not appear on the first page of the results, and the next page link will not appear on the last page of the results.
Advanced settings
The advanced settings section of the Details screen is shown in the figure:
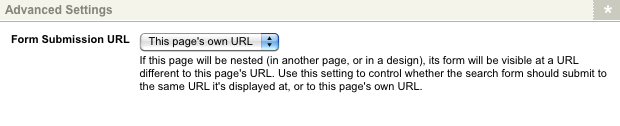
The Form submission URL field allows you to control where the search form is submitted. This feature is useful if you nest the search page in another page. By default, this is set to the page’s URL, meaning that the search page will submit to its own URL. The list of results will not be nested in another page, and the user will be redirected to the search page itself. The URL, the lineage, and the menu will change to be the search page. If you set this option to the current URL, the form is submitted to the current page you are viewing (that is, the page in which the search page is nested). This feature means that the list of results will be shown on the original page.
Synonym search options
This section allows you to set up synonym searching for the search page. The synonym search options section of the Details screen is shown in the figure:
The fields available are as follows:
- Thesaurus asset
-
Select the thesaurus asset to use for the synonym search. By selecting a thesaurus, the search page can suggest other terms for which the user can search. For example, say you created a thesaurus that contained the term squiz, and its related terms were matrix and cms. On the search page, when the user searches for the term squiz, the results page can say
Did you mean Matrix, CMS?. When the user clicks on one of these terms, a search will be performed using that term. To show the related terms, on the results page layout bodycopy, include the keyword replacement%<field_name>_query_synonyms_message%, where<field_name>is the name of a field on the Search fields screen. You can change the message being shown on the Messages screen. For more information on these screens, refer to the following sections. - Auto synonym search
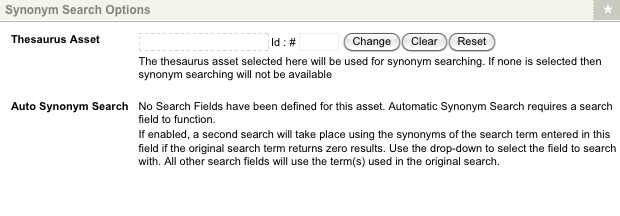
-
By default, no fields will appear for this field, as shown in the previous figure. Once you have selected a thesaurus in the Thesaurus asset field and have created fields on the Search fields screen, the fields shown in the figure will appear.
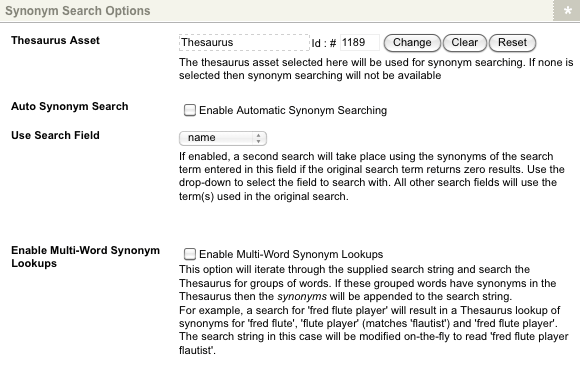
This option allows you to turn on automatic synonym searching. If you search for a term that returns no results, the search page performs the search again using the related terms that have been set up in the selected thesaurus. For example, say you created a thesaurus that contained the term squiz, and its related terms were matrix and CMS. The user enters squiz into a search field on the search page, but it produces no results. The search page will then perform the search again using the terms matrix and cms, as they are related to the term squiz. If the search page does not find the term in the thesaurus or does not find any related terms, it will show no results. If this option is enabled, select which search field to use in the User search field.
- Use search field
-
This field will not appear on the Details screen until you have selected a thesaurus in the Thesaurus asset field and have created fields on the Search fields screen. This field allows you to select which search field on the search page to perform the automatic synonym search. You can only select one field from the list. If a user does not enter a term into this field, the automatic synonym search will not be performed.
- Enable multi-word synonym lookups
-
This option allows you to turn on multi-word synonym searching. This feature enables the use of synonym searching for more than just a single word. For example, say you created a thesaurus that contained the terms flute player and flutist as synonyms of each other. On the search page, the user enters professional flute player into a search field. Any found synonyms, in this case, flutist, are automatically attached to the search query. The existing search query of professional and flute player will become professional and (flute player or flutist). Auto synonym search must be enabled for this option to be available.
Stored search
This section allows you to set up parameters for the search page.
These parameters can then be used to set up a default search and show the results rather than the initial search page layout.
For example, say you create a search page with a field called Keyword and set up the parameters.
You can then create a hyperlink to the search page from another page in the site and pass in different terms to use in the Keyword field, for example, matrix.
When the user clicks on the hyperlink, if the show the results page field is set to No, the initial search page layout will be shown, and the Keyword field will contain the term matrix.
If, however, the show the results page field is set to Yes, a search will be performed using the term matrix, and the results page layout will be shown.
The stored search section of the Details screen is shown in the figure:

Stored search options
This section allows you to select whether to show the initial search page layout or the result page layout when using the fields in the Stored search section. The stored search options section of the Details screen is shown in the figure:

If you have selected No, the initial search page layout will be shown when passing through parameters.
If you have selected Yes, the results page layout will be shown instead.
Security enhancement
This section allows you to enhance the search page’s security by disabling the replacement of any keywords that may be present in a user’s search field inputs. When keywords are replaced, as usual, users may retrieve information that they otherwise would not have permission to view and may potentially be a security risk.
The security enhancement section of the Details screen is shown in the figure:

To prevent keywords from being replaced in user search field inputs, select Yes in the Disable keyword replacements field.
If this field is enabled, keywords will not be replaced in the user’s search field inputs.
For example, %globals_asset_attribute_xxx:100% will be output as globals_asset_attribute_xxx:100 rather than the attribute value.
By default, this field is set to Yes.
Search fields screen
The Search fields screen allows you to add the fields used on the search page to perform the search.
Logical grouping
This section allows you to select the grouping to use for the search fields. The logical grouping section of the search fields screen is shown in the figure:

If you select Match on all fields, the asset must match the information that is entered into all fields by the user. For example, say you have two fields called Name and Created date. If the user enters a value into both fields, the asset must match both to be included. If you select Match on at least one field, the asset only has to match one field on the search page. For example, it can match either the value entered into the Name field or the Created date field to be listed in the results.
Field configuration
This section allows you to set up the fields for the Search page. The Field configuration section of the Search fields screen is shown in the figure:
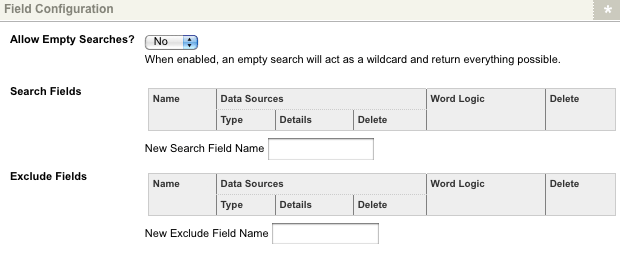
Once you have added a field, you need to add the keyword replacements for that field on the initial search page layout bodycopy. The fields available in the field configuration section are as follows:
- Allow empty searches?
-
Select whether the user can perform an empty or wildcard search. In other words, if they click search without entering any values into the fields that are provided, all possible assets will be returned. By default, this is set to
No. - Search fields
-
This section allows you to add the fields for the search page. By default, no fields will be listed.
To add a new field:
-
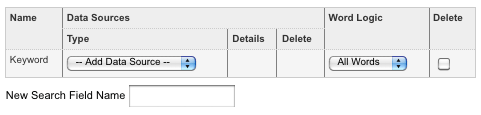
Enter the field’s name into the New search field name.
-
Click Save. The field will be added to the grey box, as shown in the figure:
In the add data source list, select in which field on the asset to search. The options available are as follows:
- Include all
-
This option will search all standard fields, attribute fields, and metadata fields for the asset.
- Standard asset field
-
This option allows you to select a standard field to search in, for example, the name of the page or the asset ID.
-
Select this option.
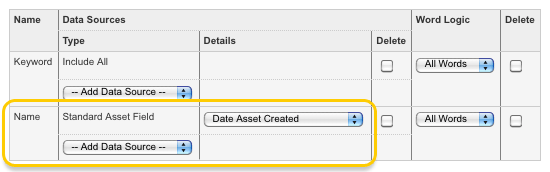
-
Click Save — an additional list will appear in the Details section, as shown in the figure:
-
Select the field in which you want to search from the list.
-
Click Save.
The available fields include: Date asset created, Date asset last updated, Date asset published, Date asset status last changed, Asset ID, Asset name, Asset short name, Asset contents.
-
- Asset attribute
-
This option allows you to select an attribute field to search in, for example, the file title for a Microsoft Word document.
-
Select this option.
-
Click Save — an additional list will appear in the details section, as shown in the figure:
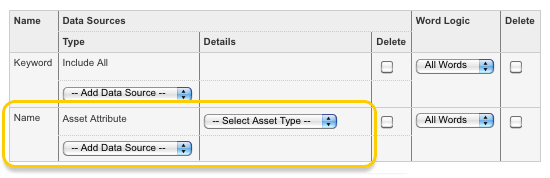
-
Select the asset type from the list.
-
Click Save. An additional list will appear in the details section, as shown in the next figure. The list of available asset types will depend on what asset types you have select in the asset types to search field on the details screen.
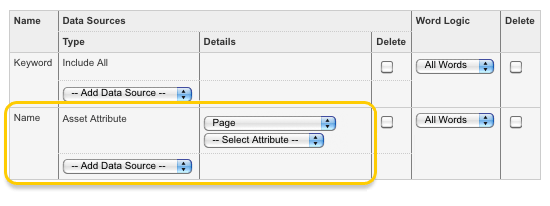
Select the attribute field that you want to search in from the list provided.
-
- Asset metadata field
-
This option allows you to select a metadata field to search in.
To select a metadata field in which to search:
-
Select this option.
-
Click Save — an asset finder field will appear in the details section, as shown in the figure:
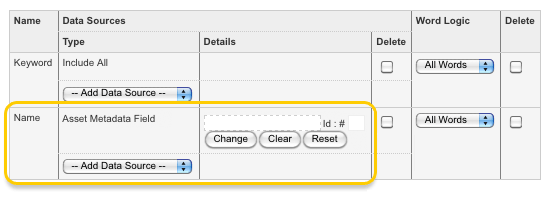
Select the metadata field from the asset tree in the field provided.
-
For each field that you add, you can select multiple data sources to search in. For example, you can create a field called Name that will search in the standard fields asset Name and asset Short name and the attribute field Title.
To add multiple data sources:
-
Select a new value in the Add data source list for the field.
-
Click Save.
-
If you select
Multiple data sourcesfor a field, you can select to search all words or any words in the word logic field. -
If you select
All words, the value that the user enters into this field must exist in all fields for the asset. -
If you select
Any words, the value has to exist in at least one field on the asset.
-
-
Click the Delete box to delete a field from the search page.
-
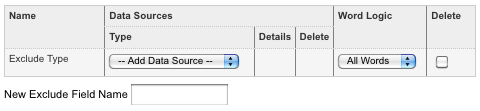
- Exclude fields
-
This field allows you to add a field to the search page where the user can enter terms to exclude assets from the list of results. For example, if the user entered squiz in the exclude field, any asset that uses that term will not appear in the result list. By default, no fields will be listed.
To add a new field:
-
Enter the field’s name into the New search field name.
-
Click Save. The field will be added to the grey box, as shown in the figure:
-
Select in which field on the asset to search in the Add data source list. The options available are the same as those available in the search fields field.
-
Field styles
This section allows you to change the styles of the search fields. The Field styles section of the Search fields screen is shown in the figure:

The fields available are as follows:
- Use date picker
-
Select whether to display the JavaScript calendar styles date picker for any date field on the search page. By default, this is set to
No. - Field styles
-
This section allows you to customize the width and height of the boxes used for the search fields that are searching attribute fields. For example, the next figure shows the Name field. This attribute field was selected for a field in the Search fields section.

Enter the width and height in the fields provided.
Search categories screen
This screen allows you to create a list of different search criteria to use on the search page. For example, the user can select to search within three different product categories – fridges, freezers, and dishwashers. Each search category can search either a different area of your site or search assets with a different status, for example, Under construction as opposed to Live. The user can then select which category to use on the search page.
The Categories section of the Search categories screen is shown in the figure:
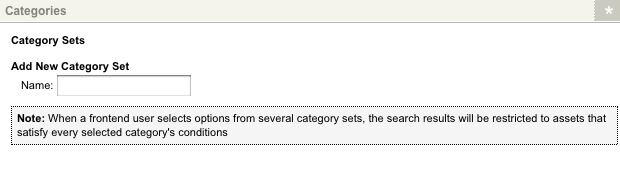
By default, no categories will appear on the screen.
To add a new category:
-
Enter a name for the category in the Name field.
-
Click Save.
Additional fields will appear on the screen, as shown in the figure. You can add as many categories as you want to the page.
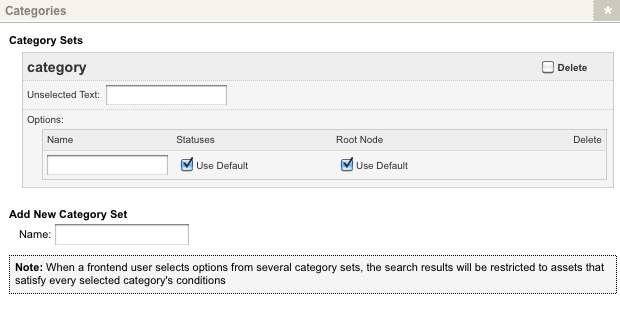
The fields available for each category are as follows:
- Delete
-
To delete the category:
-
Click the Delete box.
-
Click Save.
-
- Unselect text
-
Enter the value to show for the empty option in the list. If you, the user, select this option, it will use the settings that have been selected on the Details screen of the search page. This option can be left blank.
- Options
-
This section allows you to add the options to the list. The user will be able to select an option to use when performing a search on the page. The fields available are as follows:
- Name
-
Enter the value to show in the list for this option. For example, if this option is going to search in the folder called Freezers, enter
Freezers. - Statuses
-
To select a status to use for this category option, clear the Use default box. If you do not select a status, the category will use the settings that have been selected on the Details screen of the search page.
- Root node
-
To select a root node to use for this category option, clear the Use default box. For example, if you are setting up a category to allow the user to search the folder called Freezers, select the folder. If you do not select a root node, the category will use the settings that have been selected on the Details screen of the search page.
- Delete
-
To delete an option:
-
Click the Delete box.
-
Click Save.
-
Once you have filled out the information for an option, click Save.
A new set of fields will appear in the options section, where you can add a new option to the list.
You can add as many options as you want.
Once you have created a category, to show it on the search page, you need to add the keyword replacement %<category_name>_category_chooser% to the initial search page layout bodycopy, where <category_name> is the name that was entered when you created the category.
Messages screen
This screen allows you to change the messages that are shown on the search page. The search results keywords section of the Messages screen is shown in the figure:
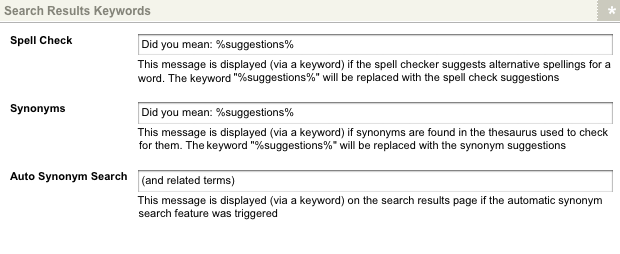
The fields available on this screen are as follows:
- Spell check
-
This message is shown when the keyword replacement
%<field_name>_query_suggestions_message%is added to the results page layout. Using the spell checker, it will suggest alternative spellings for a term the user entered in a field on the search page. For example, if the user misspelled a term in a field, the spell checker can suggest the correct spelling. The keyword replacement%suggestions%needs to be included in the message to show the terms the spell checker has suggested. - Synonyms
-
This message is shown when the keyword replacement
%<field_name>_query_synonyms_message%is added to the results page layout. If synonym searching has been set up, it will suggest other terms the user can search for based on what they have entered into a field on the search page. The keyword replacement%suggestions%needs to be included in the message to show the terms. - Auto synonym search
-
If the automatic synonym search has been set up, this message is shown when the keyword replacement
%<field_name>_query_synonym_search_message%is added to the results page layout.
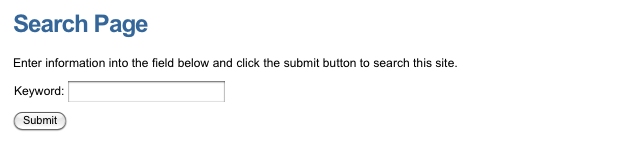
Initial search page layout bodycopy
The initial search page layout bodycopy defines the search page’s initial layout when the user firsts the page. This layout includes the fields to display as well as a heading and the search button. An example of a layout created in the initial search page layout bodycopy is shown in the figure:
To change what information is being shown:
-
Right-click on the Initial search page layout bodycopy in the asset tree.
-
Select Edit contents.
-
Click on the
 icon – the WYSIWYG editor will appear.
 -
Use keyword replacements and formatting to layout the information to show on the search page.
By default, the submit button keyword replacement will appear in the WYSIWYG editor.
Keyword replacements on the initial search page layout bodycopy
A list of keyword replacements is provided in the WYSIWYG editor toolbar on the Edit contents screen of the initial search page layout bodycopy. You can use these keyword replacements in conjunction with text, images, and links to layout what to show for the search page’s first page. The standard keyword replacements that are available include the following:
- Input field for <field_name>
-
Where
<field_name>is the name of the field entered when it was created on the Search fields screen. For example, if you entered the name keyword, this will be the keyword’s input field. This setting will show the box where the user can enter the search criteria for the field. The format of this keyword replacement is%<field_name>_query%, for example,%keyword_query%. - Word logic chooser for <field_name>
-
Where
<field_name>is the name of the field entered when it was created on the Search fields screen. For example, if you entered the nameKeyword, this will be a word logic chooser for a keyword. This setting displays a list allowing the user to specify the logic to be applied to the terms entered into the search field. The user can specify that either all or any of the words entered into the field can be matched. This setting should only be used for text fields. - Dropdown box for category set <category_name>
-
Where
<category_name>is the name of the category entered when it was created on the Search categories screen. For example, if you entered the nameFreezers, this will beDropdown box for category set Freezer. This keyword replacement shows the list of options for the category. The user can select an option from the list to modify the search criteria being used. - Submit button
-
This will show the Submit button. This keyword replacement is required so that the user can submit the information to perform a search.
- Results per page
-
This will show a box where the user can enter how many results per page they would like to see. For example, if the user enters
10, they will see ten assets in the results list. Suppose you have included the Previous and Next hyperlinks on the results page layout bodycopy. In that case, they will be able to navigate to the next set of results. - Structured root node
-
This will show the list of root nodes that have been selected in the structured root node fields on the details screen of the search page.
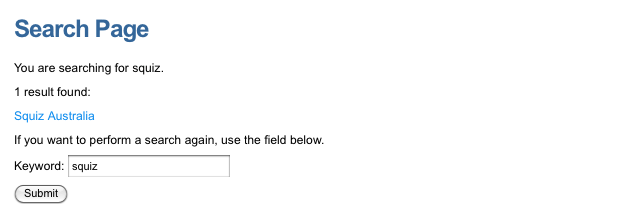
Results page layout bodycopy
The results page layout bodycopy defines the layout if results are found from the search that is being performed. For example, for the search page shown in the figure, a heading, the number of results found, the list of results, and other related terms are shown. This layout has been defined in the results page layout bodycopy.
To change what information is being shown:
-
Right-click on the Results page layout bodycopy in the asset tree.
-
Select Edit contents.
-
Click on the
icon – the WYSIWYG editor will appear. -
Use keyword replacements and formatting to layout the information to show on the search page.
By default, the information shown in the next figure will appear in the WYSIWYG editor.
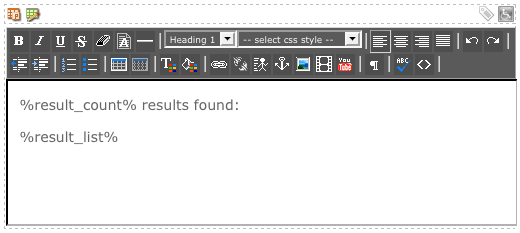
| If you do not include the keyword replacement result list on the results page layout bodycopy, the list of results will not appear. |
Keyword replacements on the results page layout bodycopy
A list of keyword replacements is provided in the WYSIWYG editor toolbar on the Edit contents screen of the results page layout bodycopy. You can use these keyword replacements in conjunction with text, images, and links to layout what to show for the list of results. The standard keyword replacements that are available include the following:
- Result list
-
This will show the list of results. If you do not include this keyword replacement, the results will not appear on the page.
- Results count
-
This will show the number of assets that are returned in the list of results.
- Current result page
-
If you have split the list of results over several pages, this will show the number of the page the user is currently viewing.
- Total result pages
-
If you have split the list of results over several pages, this will show the total number of pages.
- Result page index
-
If you have split the results over several pages, this will show a hyperlink to each page in the list.
- Sliding page list showing X page numbers at a time
-
If you have split the list of results over several pages, this setting shows a sliding list of hyperlinked page numbers. The number of pages it shows at once is defined in
X. For example, if you enter3for theXvalue of the keyword replacements, it will show1 2 3. When you click on3, it will slide along the list of pages and show2 3 4. - Previous result page link
-
If you have split the list of results over several pages, this will link to the previous page of results. You can change this link’s wording in the Previous page link text field on the search page’s Details screen.
- Next result page link
-
If you have split the results over several pages, this will display a link to the next page of results. You can change this link’s wording in the Next page link text field on the search page’s Details screen.
- Previous result page href
-
If you have split the results over several pages, this will show a href to the previous page of results.
- Next result page href
-
If you have split the list of assets over several pages, this will show a href to the next page of assets.
- Initial layout
-
This will show the layout that has been defined in the initial search page layout bodycopy. By adding this keyword replacement, the user can perform the search again without going back to the initial search page.
- Category list links
-
This will show each option in the category as a hyperlink. When a user clicks on the hyperlink, the search is performed again for the selected category.
- Initial result count
-
If you are using the proxy asset type search, this will show the initial count of matching assets before the proxy assets are returned.
| If you include the keyword replacement initial layout, the search fields will show on the results page. The user can then perform a search again without having to return to the initial search page. |
Along with the keyword replacements that appear in the list, you can also use the following keyword replacements on the results page layout bodycopy:
%<field_name>_query_synonyms_message%-
Where
<field_name>is the name of the field entered when it was created on the search fields screen. For example, if you entered the name keyword, this will be%keyword_query_synonyms_message%. If synonym searching has been set up, this will show the message entered on the Messages screen in the Synonyms field. It will show other terms the user can search for based on what they have entered into the field. Each term will be hyperlinked. When a user clicks on the hyperlink, the search is performed again using that term. %<field_name>_query_synonyms%-
Where
<field_name>is the name of the field entered when it was created on the search fields screen. For example, if you entered the name keyword, this will be%keyword_query_synonyms%. If synonym searching has been set up, other terms the user can search for based on what they have entered into the field. Each term will be hyperlinked. When a user clicks on the hyperlink, the search is performed again using that term. %<field_name>_query_suggestions_message%-
Where
<field_name>is the name of the field entered when it was created on the search fields screen. For example, if you entered the name keyword, this will be%keyword_query_suggestions_message%. This replacement will show the message entered on the Messages screen in the Spell check field. The spell checker will suggest alternative spellings for a term the user entered into the field on the search page. %<field_name>_query_suggestions%-
Where
<field_name>the name of the field was entered when it was created on the search fields screen. For example, if you entered the name keyword, this will be%keyword_query_suggestions%. This replacement will suggest alternative spellings for a term the user entered into the field on the search page. It will use the spell checker to do this. %<field_name>_query_synonym_search_message%-
Where
<field_name>is the name of the field entered when it was created on the search fields screen. For example, if you entered the name keyword, this will be%keyword_query_synonym_search_message%. Suppose automatic synonym searching has been set up. In that case, this will show the message that has been entered in the messages screen in the auto Synonym search field. %<field_name>_query_terms%-
Where
<field_name>is the name of the field entered when it was created on the Search fields screen. For example, if you entered the name keyword, this will be%keyword_query_terms%. This replacement will show the terms the user entered into the search field. %<field_name>_query%-
Where
<field_name>is the name of the field entered when it was created on the Search fields screen. For example, if you entered the name keyword, this will be%keyword_query%. This replacement will show the box where the user can change the search criteria for the field and perform the search again. %<field_name>_query_logic%-
Where
<field_name>is the name of the field entered when it was created on the Search fields screen. For example, if you entered the name keyword, this will be%keyword_query_logic%. This replacement will show a list allowing the user to specify the logic to be applied to the terms entered into the search field. The user can specify that either all or any of the words entered into the field can be matched. Only use this replacement for text fields. %current_result_page_start%-
If you have split the list of results over several pages, this will show the first asset’s position number on the page. For example, if the user is viewing the first ten assets in the list, it will be
1. When they view the next page of results, it will be11. %current_result_page_end%-
If you have split the list of results over several pages, this will show the position number of the last asset on the page. For example, if the user is viewing the first ten assets in the list, it will be
10. When they view the next page of results, it will be20. %page_list_x%-
If you have split the list of results over several pages, this will show a sliding list of page numbers that are hyperlinked. The number of pages it shows at once is defined in
X. For example, if you enter3for theXvalue of the keyword replacements, it will show1 2 3. When you click on3, it will slide along the list of pages and show2 3 4.
No results page layout
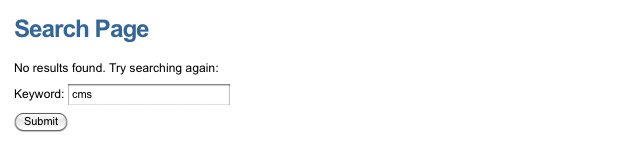
The no results page layout bodycopy defines the layout if there are no results found from the search that is being performed. For example, in the search page shown in the figure, a heading, a message, and the layout defined in the initial search page layout bodycopy are shown.
This layout has been defined in the no results page layout bodycopy.
To change what information is being shown:
-
Right-click on the No results page layout in the asset tree.
-
Select Edit contents.
-
Click on the
icon – the WYSIWYG editor will appear. -
Use keyword replacements and formatting to layout the information to show on the search page.
By default, the information shown in the figure will appear in the WYSIWYG editor.
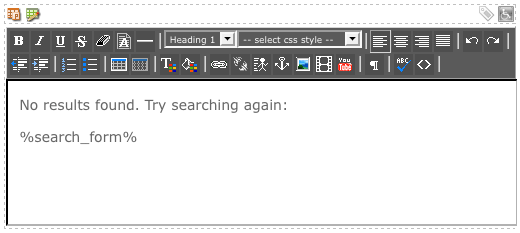
Keyword replacements on the no results page layout bodycopy
A list of keyword replacements is provided in the WYSIWYG editor toolbar on the Edit contents screen of the no results page layout bodycopy. You can use these keyword replacements in conjunction with text, images, and links to layout what to show for the list of results. The standard keyword replacements that are available include the following:
- Initial layout
-
This will show the layout that has been defined in the initial search page layout bodycopy. By adding this keyword replacement, the user can perform the search again without going back to the initial search page.
Default search bodycopy
By default, when a search is performed on the search page, the results page layout does not allow the user to search again. Suppose the keyword replacement initial layout is added on the results page layout bodycopy. In that case, it will show the search fields. It will also include any headings and additional text that may be included on the initial search page layout, as shown in the figure:
Instead of using the initial layout, a new bodycopy called default search can be added to the search page. This bodycopy can be used to layout the search fields only and included on the initial search page layout bodycopy, results page layout bodycopy, and no results page layout bodycopy. This bodycopy means that any headings and additional text will not be shown unless added to the default search bodycopy.
Adding the default search bodycopy

To add the default search bodycopy:
-
Right-click on the Search page in the asset tree.
-
Select Details.
-
In the Search forms field, select
Customize search form. -
Click Save.
A new folder called Search forms and the default search bodycopy will be added under the search page in the asset tree, as highlighted in the figure.
Editing the default search bodycopy
To change what information is being shown:
-
Right-click on the Default search bodycopy in the asset tree.
-
Select Edit contents.
-
Click on the
icon – the WYSIWYG editor will appear. -
Use keyword replacements and formatting to layout the information to show on the search page.
Keyword replacements on the default search bodycopy
A list of keyword replacements is provided in the WYSIWYG editor toolbar on the Edit contents screen of the default search bodycopy. You can use these keyword replacements in conjunction with text, images, and links to layout what to show for the list of results. The standard keyword replacements that are available include the following:
- Input field for <field_name>
-
Where is the name of the field that was entered when it was created on the Search fields screen. For example, if you entered the name keyword, this will be the input field for a keyword. This replacement will show the box where the user can enter the search criteria for the field. This keyword replacement format is
%<field_name>_query%, for example,%keyword_query%. - Dropdown box for category set <category_name>
-
Where is the name of the category entered when it was created on the Search categories screen. For example, if you entered the name
Freezers, this will beDropdown box for category set Freezer. This keyword replacement shows the list of options for the category. The user can select an option from the list to modify the search criteria being used. - Submit button
-
This will show the Submit button. This keyword replacement is required so that the user can submit the information to perform a search.
Showing the default search bodycopy on the bodycopy assets
Once you have added the default search bodycopy, add the keyword replacement search form to each bodycopy. Doing this will show it on the initial search page layout bodycopy, results page layout bodycopy, and no results page layout bodycopy.
Search in search bodycopy
The search in search bodycopy allows you to add a search again function to the results page layout bodycopy.
The user can use this function to refine their search criteria.
These refined results are added to the current results.
For example, say a user searches for modules and receives 50 results.
They can then refine their search by overwriting the term modules with the term matrix.
The search page will now look for assets with both modules and matrix in the field.
The results page now shows 70 results.
Adding the search in search bodycopy
To add the search in search bodycopy:
-
Right-click on the Search page in the asset tree.
-
Select Details.
-
In the Search forms field, select
Customize search within search form. -
Click Save.
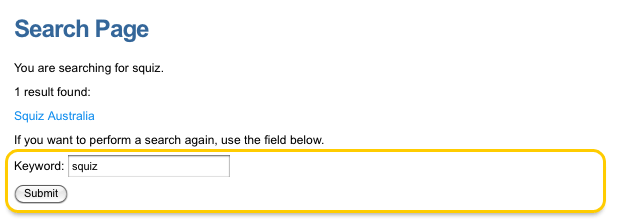
A new folder called Search forms, and the Search in search bodycopy will be added under the asset tree’s search page, as highlighted in the figure.
Editing the search in search bodycopy
To change what information is being shown:
-
Right-click on the Search in search bodycopy in the asset tree.
-
Select Edit contents.
-
Click on the
icon – the WYSIWYG editor will appear. -
Use keyword replacements and formatting to layout the information to show on the search page.
Keyword replacements on the search in search bodycopy
A list of keyword replacements is provided in the WYSIWYG editor toolbar on the Edit contents screen of the search in search bodycopy. You can use these keyword replacements in conjunction with text, images, and links to layout what to show for the list of results. The standard keyword replacements that are available include the following:
- Input field for <field_name>
-
Where
<field_name>is the name of the field entered when it was created on the search fields screen. For example, if you entered the name keyword, this will be the input field for a keyword. This replacement will show the box where the user can refine the search criteria for the field. This keyword replacement format is%<field_name>_query%, for example,%keyword_query%. - Dropdown box for category set <category_name>
-
Where
<category_name>is the name of the category entered when it was created on the Search categories screen. For example, if you entered the name Freezers, this will beDropdown box for category set Freezer. This keyword replacement shows the list of options for the category. The user can select an option from the list to modify the search criteria being used. - Search in search button
-
This will show the Search in search button. This keyword replacement is required so that the user can submit the information to refine their search.