Custom form submission logs screen
The Submission logs screen shows submissions made through the custom form.
Enable/disable logging
This section allows you to turn the logging of submissions either on or off.
If this is off, the details will not be stored within the database when a user fills out and submits the form. You will not be able to view the form at a later time.
By default, Log submissions is set to Yes to log all submissions.
Change this field to no if you do not want to log the submissions to the database.
| While you are setting up and testing the custom form, you may want to disable logging, so test information is not stored. Once you are ready to make the custom form live, you can activate logging once more. |
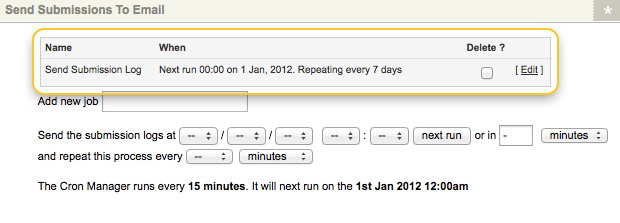
Send form submissions through email
This section allows you to create and configure a cron job that automatically sends form submissions through email.
To create a new job:
-
Enter a name in the add new job field.
-
Specify when to run the available fields.
-
Click Save to display the configured submission log job.
To delete a send submission log job:
-
Select the Delete field for the job.
-
Click Save.
To edit the settings of a send submission log job:
-
Click the Edit button to display the Details screen for the job.
The sections of the Details screen for a submission log cron job are outlined below.
Details
This section defines the name of the job, and it’s scheduled run time.
The fields available in this section are similar to those used when creating the send submission log job. You can change the job’s name, time, and frequency in the Task name and When fields.
Submissions log
This section specifies the logs that will be sent by the send submission log job.
The fields available in this section are as follows:
- Send logs since
-
Specify from which date to send the submission logs. This setting can be either the last run time of the send submission logs job or from a specified start date.
If you set this option toLast run, the send submission logs job sends a log of all submissions since the job was last run or the job sent the last email.
If you set the option to a given start date, the job sends a log of all submissions since that date.
You must configure the date in the Start date field if you select the given start date option in this field. - Start date
-
If you have chosen to send logs since a given start date, specify the start date in this field. You can specify this date as either a fixed date and time (for example, 01 Jan 2012, 12::00) or as a period relative to the current date and time (
2weeks in the future). - Log format
-
Specify the format of the logs sent on the send submission log job email. You can select either
Comma-separated values (CSV),Comma-separated values (CSV) - No header rowandXML format. - CSV delimiter
-
When you select a CSV format option in the Log format field, this field determines the delimiter used to separate the values. The default delimiter type is a comma (
,).
Email format
This section defines the email format sent when the send submission log job runs, including its recipients and body.
The fields that are available in this section are as follows:
- To
-
This field nominates the person(s) to send the email to. You can specify people manually by entering email addresses in the available text fields or selecting a user account in the asset finder field.
- From
-
This field is the email address that will appear in the From field in the email.
- Reply-to
-
This field nominates the email address to which recipients reply. If no reply-to address is configured, this header will not be sent on the email.
- Subject
-
The subject of the email.
- Body
-
Enter the body of the email. You can enter either the text or HTML version of the email in this field.
To edit the HTML version:
-
Click on the
 icon.
icon.
A WYSIWYG editor will appear. You can use the following keyword replacements in the body of the email:- %submission_log_from_date%
-
The date from which the custom form submissions were logged.
- %submission_log_to_date%
-
The date to which the custom form submissions were logged.
-
Export
This section allows you to export the submission logs to either a CSV file or XML format.
The fields that are available in this section are as follows.
- Date range
-
Select a date range for the submissions you want to export. For example, if you only want to export the submissions that have been made today, enter today’s date in both sets of fields.
- Format
-
Select the format for the exported file. You can choose from the following options:
- Comma-separated values (CSV)
-
This option exports the submissions as comma-separated-values, including a header row showing each field’s title. You can change the delimiter that is used by changing the value in the delimiter field.
- Comma-separated values (CSV) – No header row
-
This option exports the submissions as comma-separated-values, with no header row. You can change the delimiter that is used by changing the value in the delimiter field.
- XML format
-
This option exports the submissions in xml format.
- Download
-
Click this button to begin the export of the selected submissions and download the created file. You will be prompted to choose whether to open the file or save it.
Submissions
This section allows you to view the submissions that have been made on the custom form.
The fields that are available in this section are as follows.
- Date range
-
Select a date range for the submissions you want to view. For example, if you only want to view the submissions that have been made today, enter today’s date in both sets of fields.
- Items per page
-
Enter the number of submissions that you want to view per page. By default, this value is
50. If more entries have been submitted, they are displayed on separate pages. - Submissions
-
The submissions that occurred between the dates selected are displayed in this section. You can also see the current range of submissions being shown on this page, out of the total number of submissions. For each submission, the asset ID, the date and time it was submitted, and the user’s name are displayed.
To view responses submitted by a user:
-
Click the Expand box.
-
Click Save.
To delete a submission:
-
Click the Delete box.
-
Click Save.
To edit a submission:
-
Click the Edit link.
-
On the Details screen for that submission, change the details of the submissions as required.
-
Click Save.
-