Managing workspaces
This document provides information on workspace management, namely the following actions: creating workspaces, managing a workspace, as well as adding new and managing existing users.
Creating workspaces
A Workspace is an environment within your platform contract where users can build and test flows. Access to a workspace is restricted by default.
As a rule each Workspace should have a specific function. For most organisations we recommend a Production workspace where your live integrations are running, and a Staging or Testing workspace where you can test new or updated flows against staging or sandbox accounts.
However any user can create a workspace to test new ideas in a space where other users cannot see or access them.
Limited workspaces
All new Workspaces created within a contract are Limited workspaces by default.
Limited workspaces are denoted as Limited when the pointer hovers over the icon next to the workspace name (ie, when the icon takes a mouseover event).
Limited workspaces are designed to function like sandboxes. They have limited logging and data storage.
Limited workspaces are also work-time restricted. All active flows in limited workspaces stop after eight (8) hours.
If an integration flow contains messages in the processing queues, these messages are lost when the flow is stopped.
To continue testing, flows in limited workspaces must be manually restarted.
Limited workspaces should not be used for production flows
Full workspaces
Full workspaces are, by contrast, designed for production use.
Full workspaces are denoted as Full when the pointer hovers over the icon next to the workspace name (ie, when the icon takes a mouseover event).
Full workspaces have no work-time restrictions: integration flows can run continuously and without interruption.
As a consequence, messages in processing queues are not lost to work-time constraints.
If you have a Limited workspace that you want to use for production flows, contact support.
Creating a workspace
Learn how to create a new workspace that contains its own flows, credentials and members.
Working in the UI, the option to create a new workspace is available on a number of screens, however the Create Workspace button in the left hand menu is always available.
-
Click "Create Workspace"
-
Enter a Workspace name and click "Create".
Working in the API, use the following request:
POST https://api.connect.squiz.cloud/v2/workspaces
Below are request parameters:
| Payload Parameter | Required | Description |
|---|---|---|
|
yes |
Allowed value: |
|
yes |
Name of the new workspace |
|
yes |
ID of the contract |
|
yes |
Allowed value: |
EXAMPLE:
To create a new workspace called Integrator 2: Judgement Day, we will use the following request:
$ curl https://api.connect.squiz.cloud/v2/workspaces \
  -X POST \
  -u {EMAIL}:{APIKEY} \
  -H 'Accept: application/json' \
  -H 'Content-Type: application/json' -d '
  {
    "data":{
      "type":"workspace",
      "attributes":{
        "name":"Integrator 2: Judgement Day"
      },
      "relationships":{
        "contract":{
          "data":{
            "id":"{CONTRACT_ID}",
            "type":"contract"
          }
        }
      }
    }
  }'
The Workspace name may contain only letters, digits, whitespaces, - and _ symbols, and be from 3 up to 40 symbols long.
|
Managing a workspace
A workspace owner or admin can manage the Workspace.
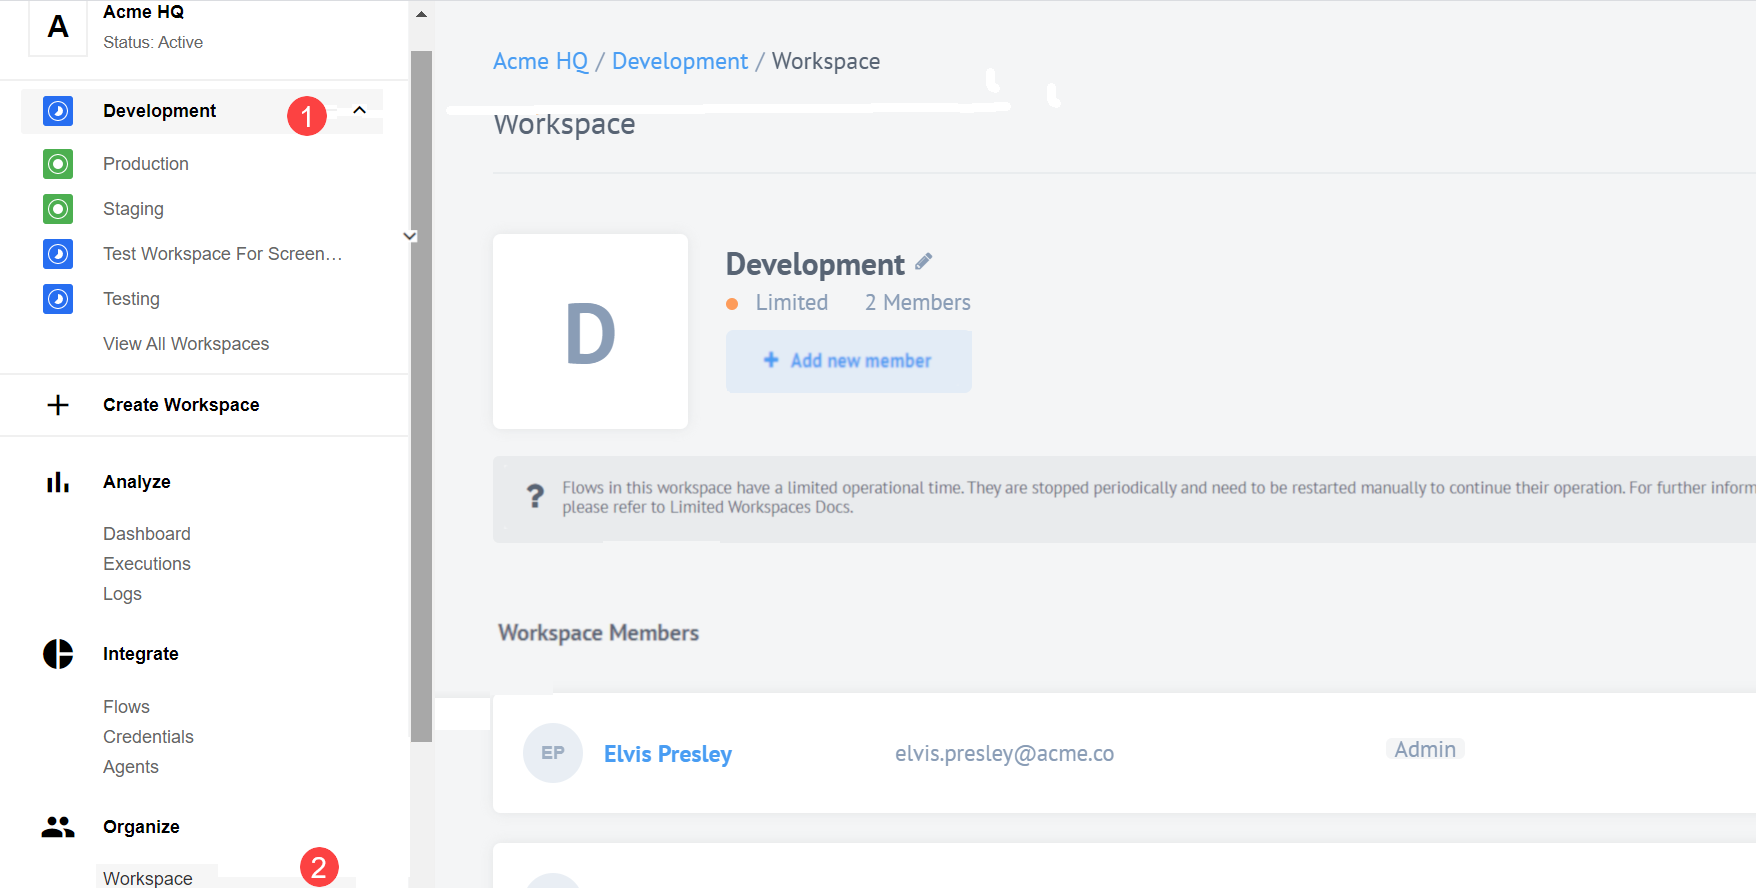
1 At the top of the left-hand menu, select the workspace you want to administer.
2 In the Organise section of the menu, click Workspace to view the admin screen.
You will see the workspace details, including a list of workspace members.
Add users
Learn how to add members of your contract to a workspace and change a member role in Integrations.
Any platform user can be added to your contract as a member. New members can be invited to the contract from DXP Console.
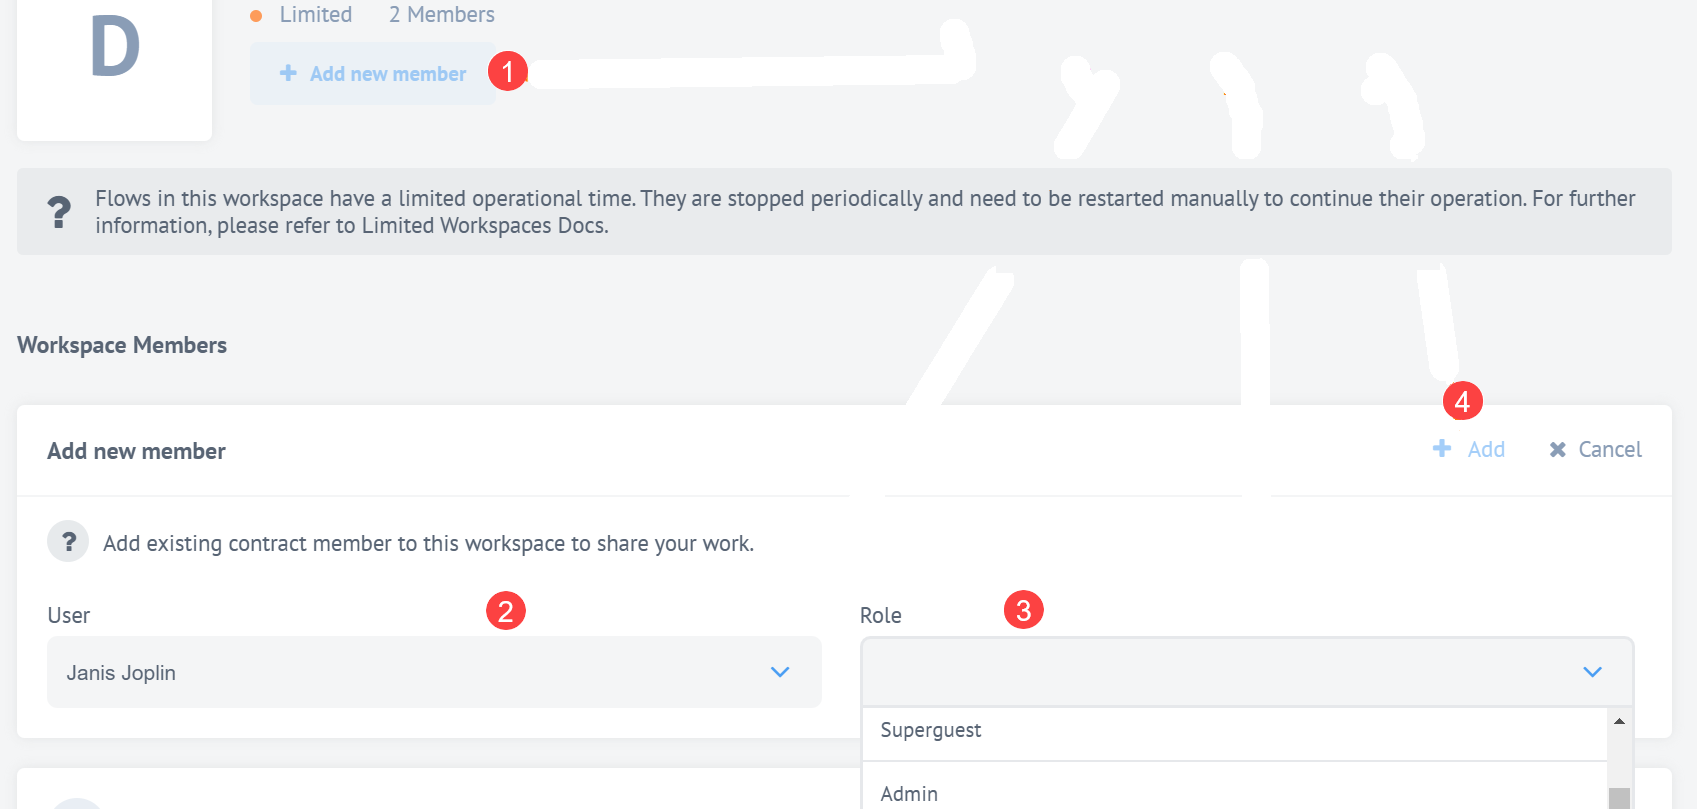
1 Click Add new member button.
2 Select the member.
3 Define workspace role.
4 Click Add.
Manage existing users
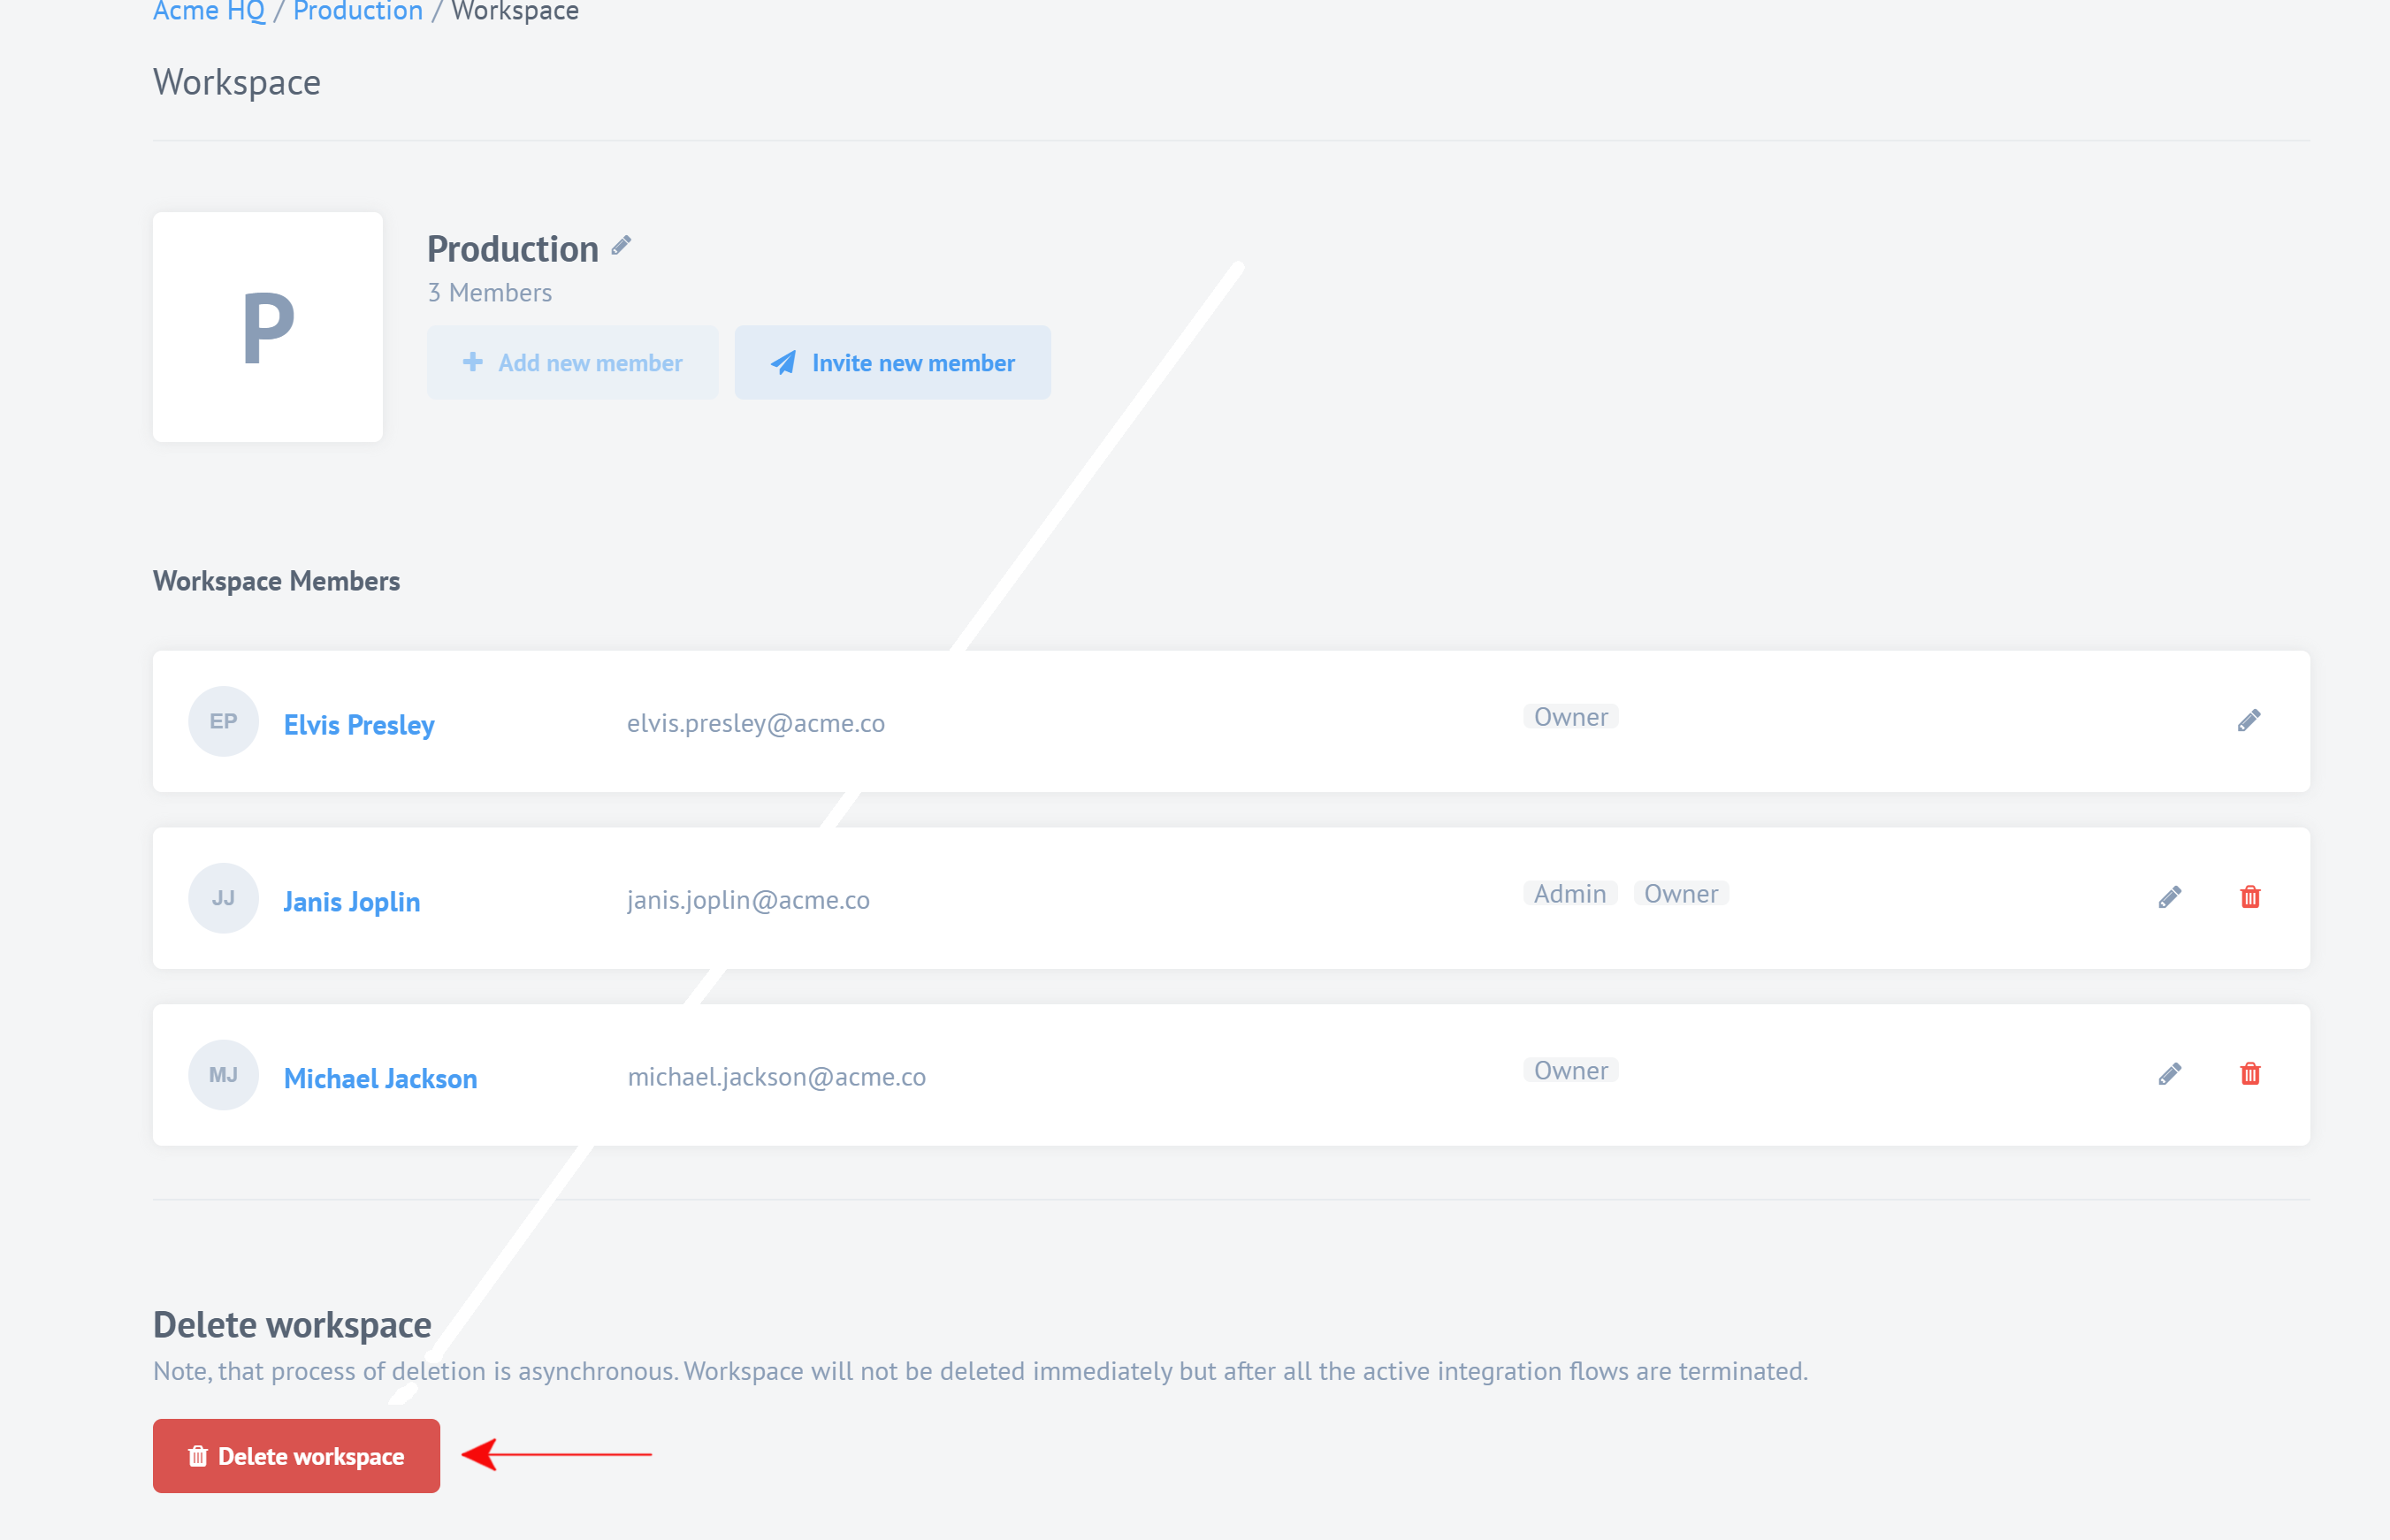
To remove members from a workspace, click the Remove icon on the user list, or click Edit to change a member’s role.
Workspace details
To rename a workspace, click Workspace in the menu, and then click Workspace name.
To delete a workspace, click Delete workspace on the same page:
If you are working in an Limited Workspace a message will display on screen. Limited workspaces are for test use only and have limitations that make them unsuitable for use in productions. Contact support if you need to make a limited workspace unlimited.
Workspace management via the API
All actions that can be carried out in the UI can be carried out via the API.
To add a new member via the API, use the following request:
POST https://api.connect.squiz.cloud/v2/workspaces/{WORKSPACE_ID}/members
Below are request parameters:
| Payload Parameter | Required | Description |
|---|---|---|
|
yes |
ID of an already registered user, who will be added as a member of the workspace |
|
yes |
Allowed value: |
|
yes |
New member roles. |
EXAMPLE:
To add a user with the ID Elvis with King and Immortal roles we will use the following request:
$ curl https://api.connect.squiz.cloud/v2/workspaces/{WORKSPACE_ID}/members/ \
    -X POST \
    -u {EMAIL}:{APIKEY} \
    -H 'Accept: application/json' \
    -H 'Content-Type: application/json' -d '
    {
       "data": {
           "type": "member",
           "id": "{Elvis}",
           "attributes": {
               "roles": [
                 "{King}",
                 "{Immortal}"
               ]
           }
       }
    }'
To update user roles via the API, use the following request:
PATCH https://api.connect.squiz.cloud/v2/workspaces/{WORKSPACE_ID}/members/{USER_ID}/
Below are request parameters:
| URL Parameter | Required | Description |
|---|---|---|
|
yes |
Workspace ID |
|
yes |
Target user ID |
| Payload Parameter | Required | Description |
|---|---|---|
|
yes |
ID of an already registered user, match URL parameter |
|
yes |
Allowed value: |
|
yes |
Roles. |
EXAMPLE:
To change user roles we will use the following request:
$ curl https://api.connect.squiz.cloud/v2/workspaces/{WORKSPACE_ID}/members/{USER_ID}/ \
    -X PATCH  \
    -u {EMAIL}:{APIKEY} \
    -H 'Accept: application/json' \
    -H 'Content-Type: application/json' -d '
    {
       "data": {
           "type": "member",
           "id": "{USER_ID}",
           "attributes": {
               "roles": [
                 "{NEW_ROLE}"
               ]
           }
       }
    }'
To remove a member from the workspace via the API we will use the following request:
DELETE https://api.connect.squiz.cloud/v2/workspaces/{WORKSPACE_ID}/members/{USER_ID}/
Below are request parameters:
| URL Parameter | Description |
|---|---|
|
The ID of the Workspace. |
|
The ID of the user, which requires deletion. |
EXAMPLE:
$ curl https://api.connect.squiz.cloud/v2/workspaces/{WORKSPACE_ID}/members/{USER_ID}/ \
    -X DELETE    \
    -u {EMAIL}:{APIKEY}
To rename a workspace via the API we will use the following request:
POST https://api.connect.squiz.cloud/v2/workspaces/{WORKSPACE_ID}
Below are request parameters:
| Payload Parameter | Description |
|---|---|
|
The value must be |
|
Name of the workspace. |
EXAMPLE:
$ curl https://api.connect.squiz.cloud/v2/workspaces/{WORKSPACE_ID} \
  -X PATCH \
  -u {EMAIL}:{APIKEY} \
  -H 'Accept: application/json' \
  -H 'Content-Type: application/json' -d '
   {
  "data":{
    "type":"workspace",
    "attributes":{
      "name":"New Workspace Name"
      }
    }
  }'
To delete workspace via the API we will use the following request:
DELETE https://api.connect.squiz.cloud/v2/workspaces/{WORKSPACE_ID} \
Below are request parameters:
| URL Parameter | Description |
|---|---|
|
The ID of the Workspace. |
EXAMPLE:
$ curl -i https://api.connect.squiz.cloud/v2/workspaces/{WORKSPACE_ID} \
  -X DELETE \
  -u {EMAIL}:{APIKEY}