Maester component
The Maester component provides object storage for data persistence and retrieval. It supports TTL-based object lifecycle management and integration with other platform components.
Triggers
This component has no trigger functions. This means you cannot select it as the first component when you design an integration flow.
Actions
You can use the Maester component’s actions to integrate your data.
For example, with the Upsert object action, you can provide the body of your webhook in the Data field.
The Upsert Criteria dynamically generates the Maester Object ID, which you can retrieve as an output.
In another flow, you can use the Lookup object (at most one) action to retrieve the data.
To do this, select Maester Object ID as the Lookup Criteria and provide the ID from the previous flow.
To connect Maester Object IDs across your workflows, you can use the ID Linking component.
Delete object
Deletes an object from Maester.
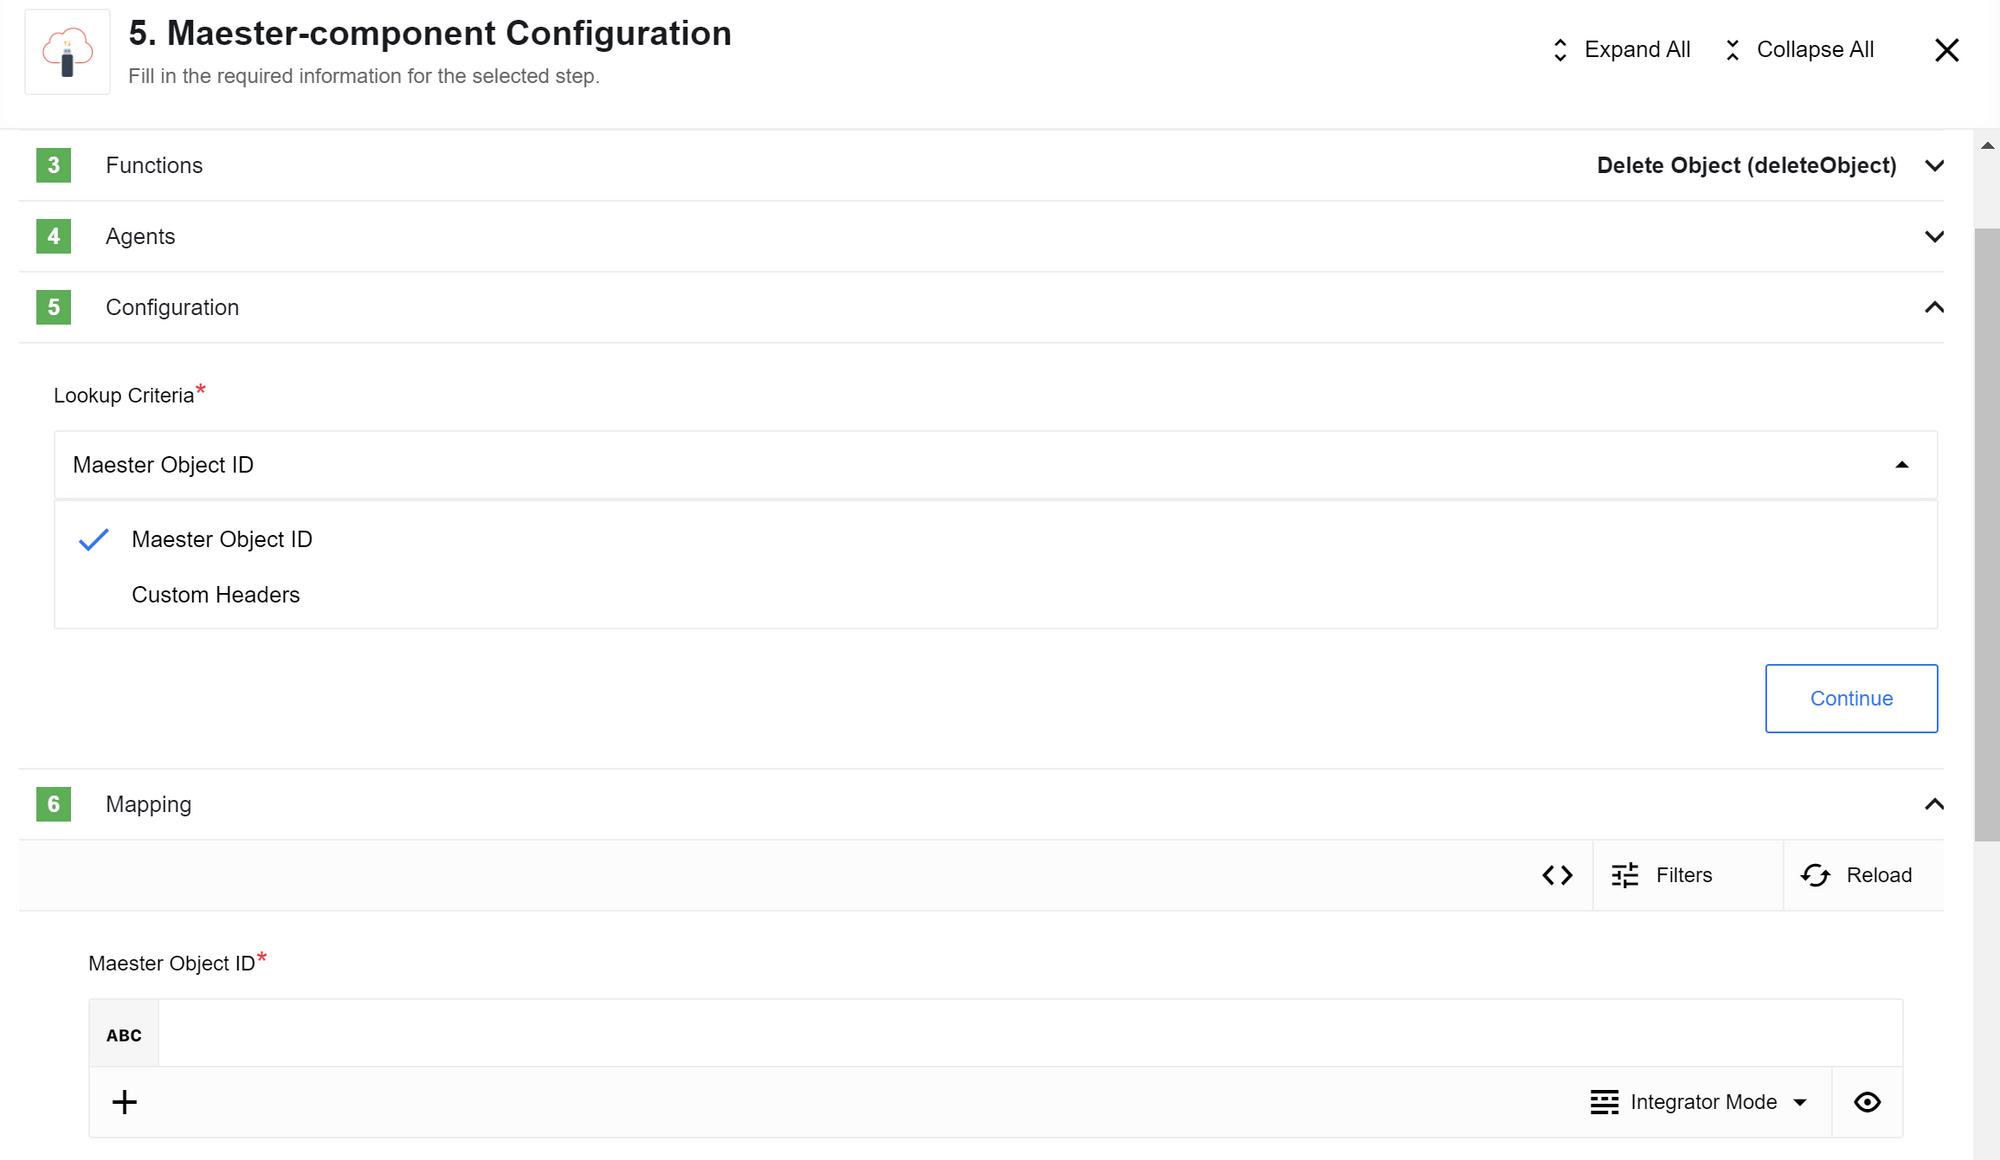
Delete object configuration fields
- Lookup Criteria
-
Select how to find the object to delete.
Options are
Maester Object IDorCustom Headers.This is a required dropdown field.
Input Metadata
The available input fields depend on the Lookup Criteria you select.
- Maester Object ID
-
The object’s ID to find in Maester.
This field accepts a UUID and is used when
Lookup CriteriaisMaester Object ID.This is a required string.
- Search Headers
-
An array of key-value pairs to find an object in Maester.
This field is used when
Lookup CriteriaisCustom Headers. You can use up to five headers.This is a required array.
`[{ "key": "header-key-1", "value": "header-value-1" }]`Lookup object (at most one)
Looks up a single object in Maester.
|
The component throws an error if the |
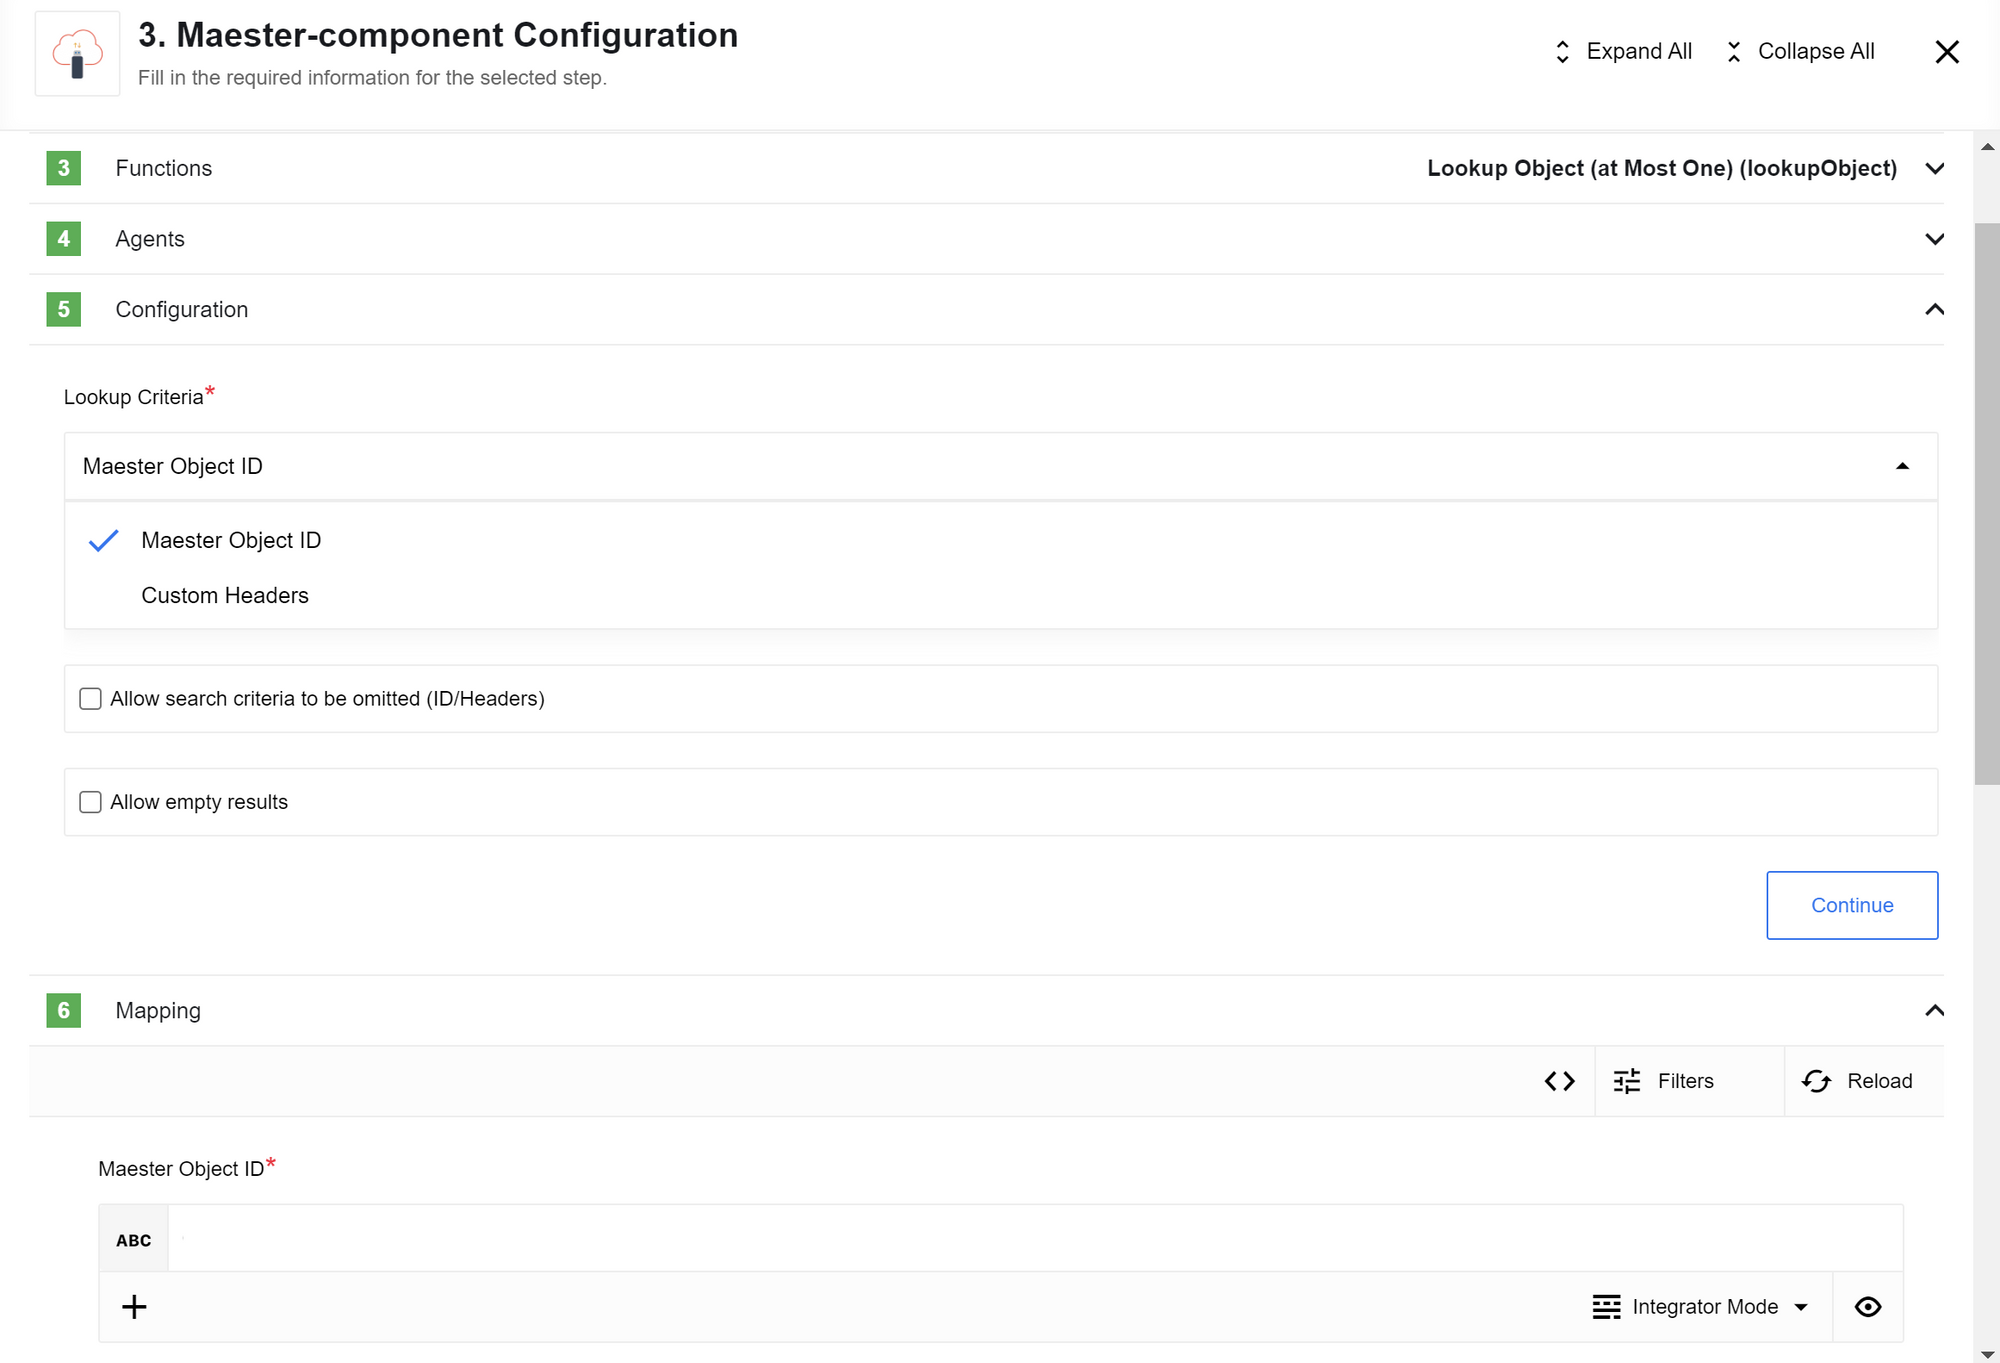
Lookup object (at most one) configuration fields
- Lookup Criteria
-
Select
Maester Object IDorCustom Headersto specify how to look up the object.This is a required dropdown field.
- Allow search criteria to be omitted (ID/Headers)
-
When selected, if you do not provide search criteria, the component emits an empty object (
{}) instead of throwing an error.This is an optional checkbox.
- Allow empty results
-
When selected, if no results are found, the component emits an empty object (
{}) instead of throwing an error.This is an optional checkbox.
Input Metadata
The available input fields depend on the Lookup Criteria you select.
- Maester Object ID
-
The ID of the object to find.
This field accepts a UUID and is used when
Lookup CriteriaisMaester Object ID.This is a required string.
- Search Headers
-
An array of key-value pairs to find an object.
This field is used when
Lookup CriteriaisCustom Headers. You can use up to five headers.This is a required array.
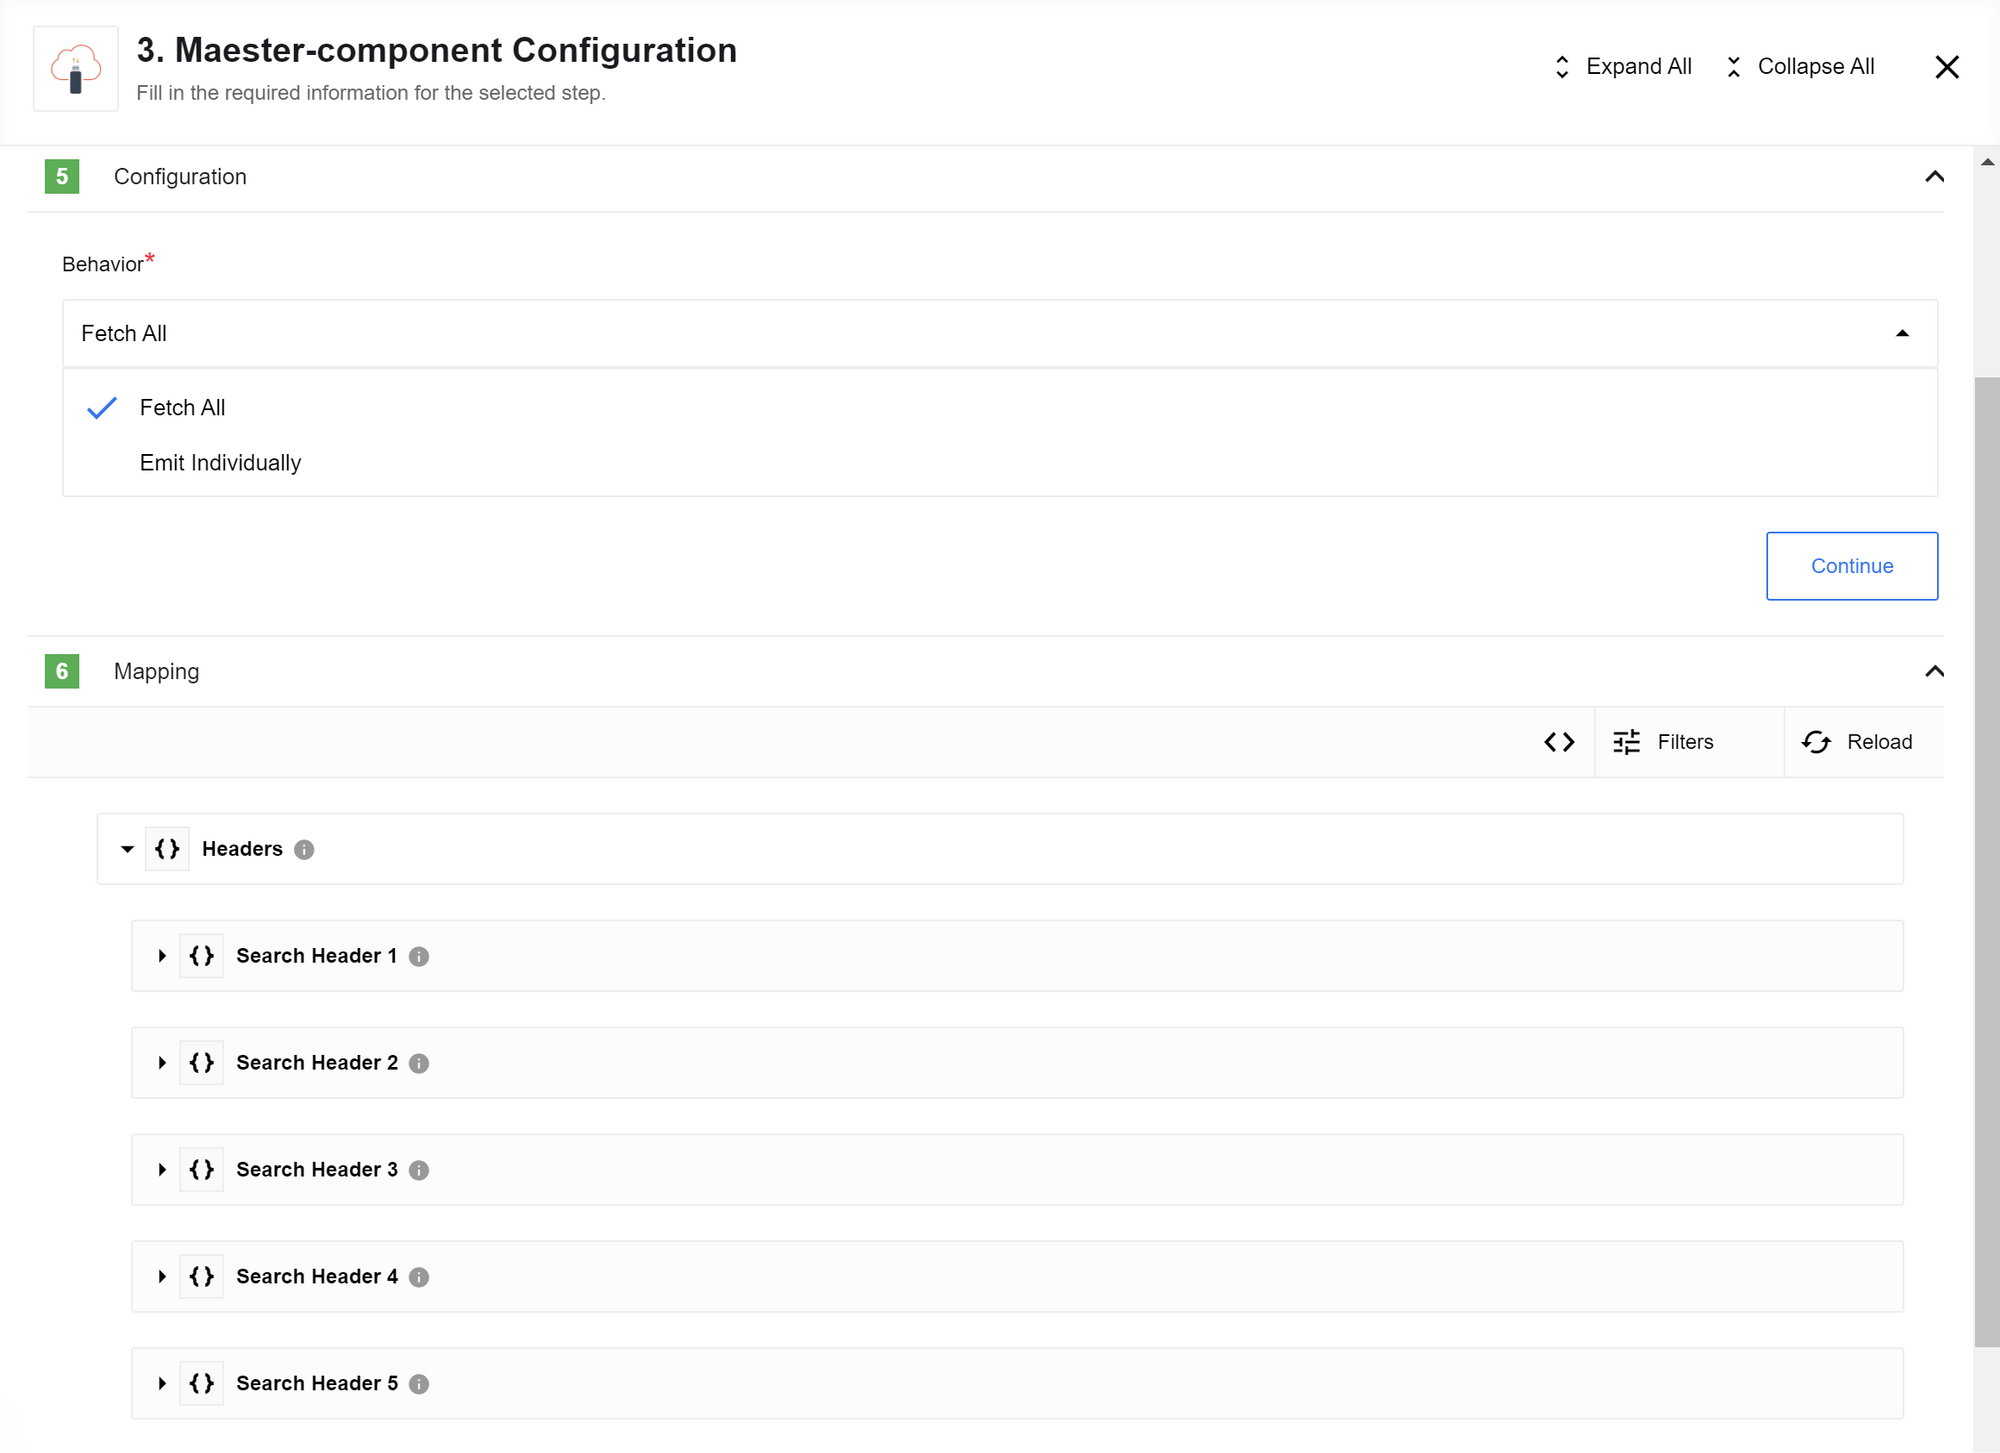
Lookup objects
Looks up multiple objects in Maester based on search headers.
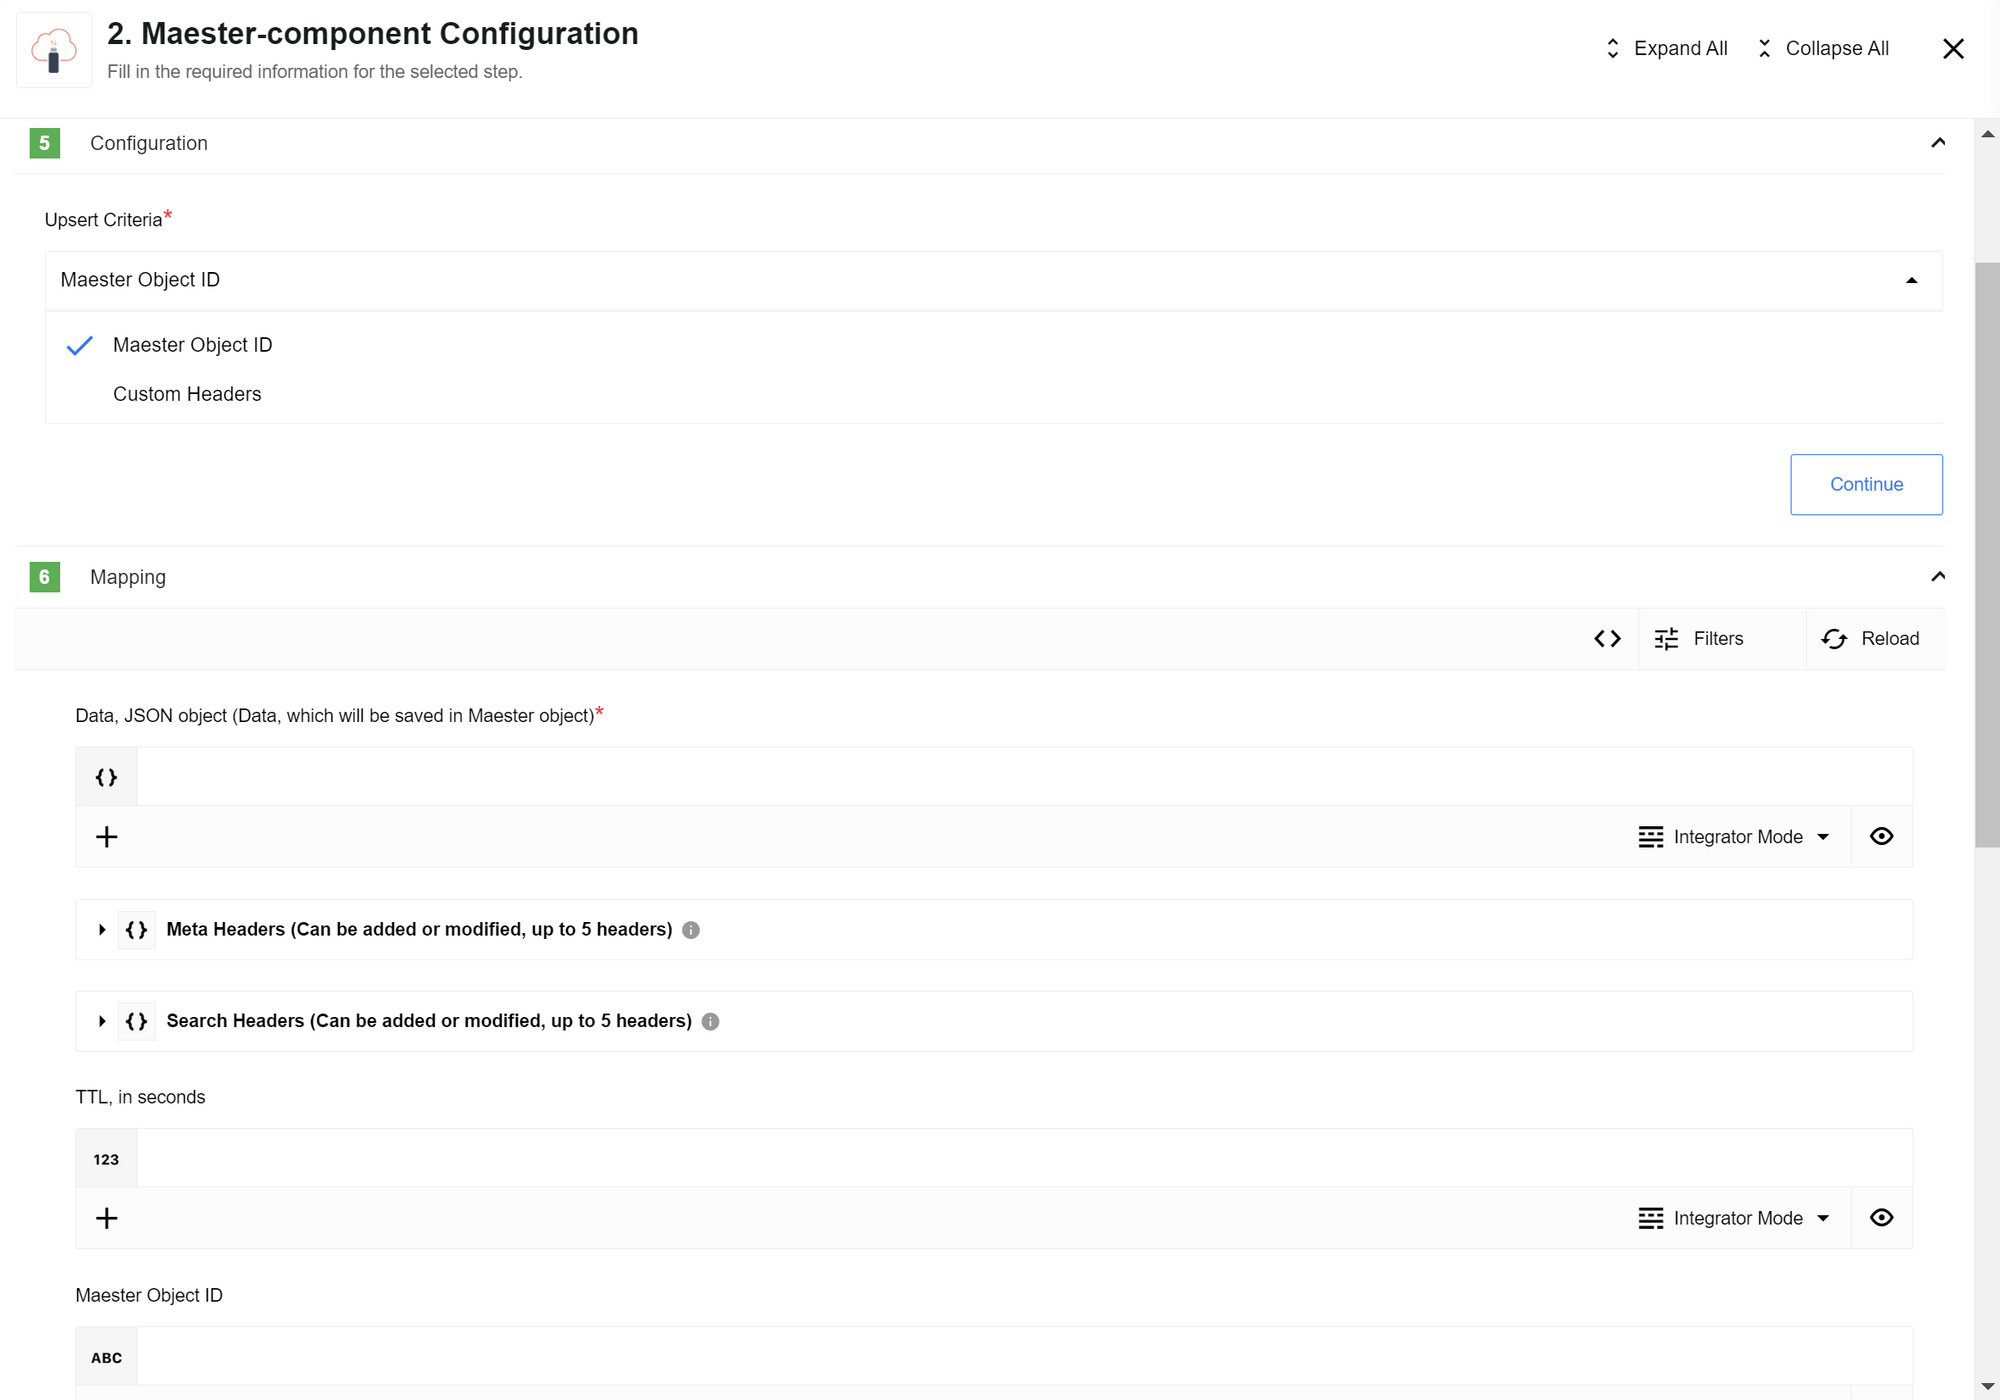
Upsert object
This action finds an object based on the Upsert Criteria and either updates it or creates a new one.
- Maester Object ID
-
Looks for an object with the provided ID.
If an object is not found, it creates a new object.
If found, it updates the existing object.
- Custom Headers
-
Looks for an object using the provided search headers (up to five).
If more than one object is found, the component throws an error.
Otherwise, the behavior is the same as for
Maester Object ID.
|
If no object exists with the given ID when using the The new object’s ID will not match the ID you provided. |
Upsert object configuration fields
- Upsert Criteria
-
Select
Maester Object IDorCustom Headers.This is a required dropdown field.
Input Metadata
The available input fields depend on the Upsert Criteria you select.
- Maester Object ID
-
The ID of the object to find.
This string field accepts a UUID.
This is an optional string unless
Upsdert CriteriaisMaester Object ID.When
Upsert CriteriaisMaester Object IDthis is a required string. - Search Headers
-
An array of key-value pairs (up to five) to find an object.
This array field is used when
Upsert CriteriaisCustom Headers.This is a required array field.
- Data
-
It contains the data to store in the object.
This field accepts a JSON object.
This is a required field.
- Headers
-
An array field for adding key-value pairs to new objects.
You can add or modify headers on an existing object.
You cannot not delete them.
This is an optional array field.
- TTL
-
Specifies the time, in seconds, that the object will exist in the database.
After this time, the object is deleted. The deletion process runs hourly.
If not set, the default expiration time from the Maester installation is used.
The TTL cannot be modified or deleted after an object is created.
This is an optional number field.
Use case
This use case shows how to create a real-time flow using webhooks.
The first flow starts when an external source calls a webhook endpoint with data you need to store.
Shortly after, another person starts a different real-time flow by calling a separate endpoint with a specific ID. Using this ID, you can retrieve the previously stored data.
To process the results, you can use a Batch or Pub-Sub component as the trigger.
In this scenario, the webhook captures incoming data and starts subsequent actions. Maester has no trigger functions, but you can use it with a webhook.
First flow
In the first flow, data related to an order is received through a webhook. This provides the information needed to calculate product costs.
Using the Maester component, this data can be stored and then accessed in other flows or processes.
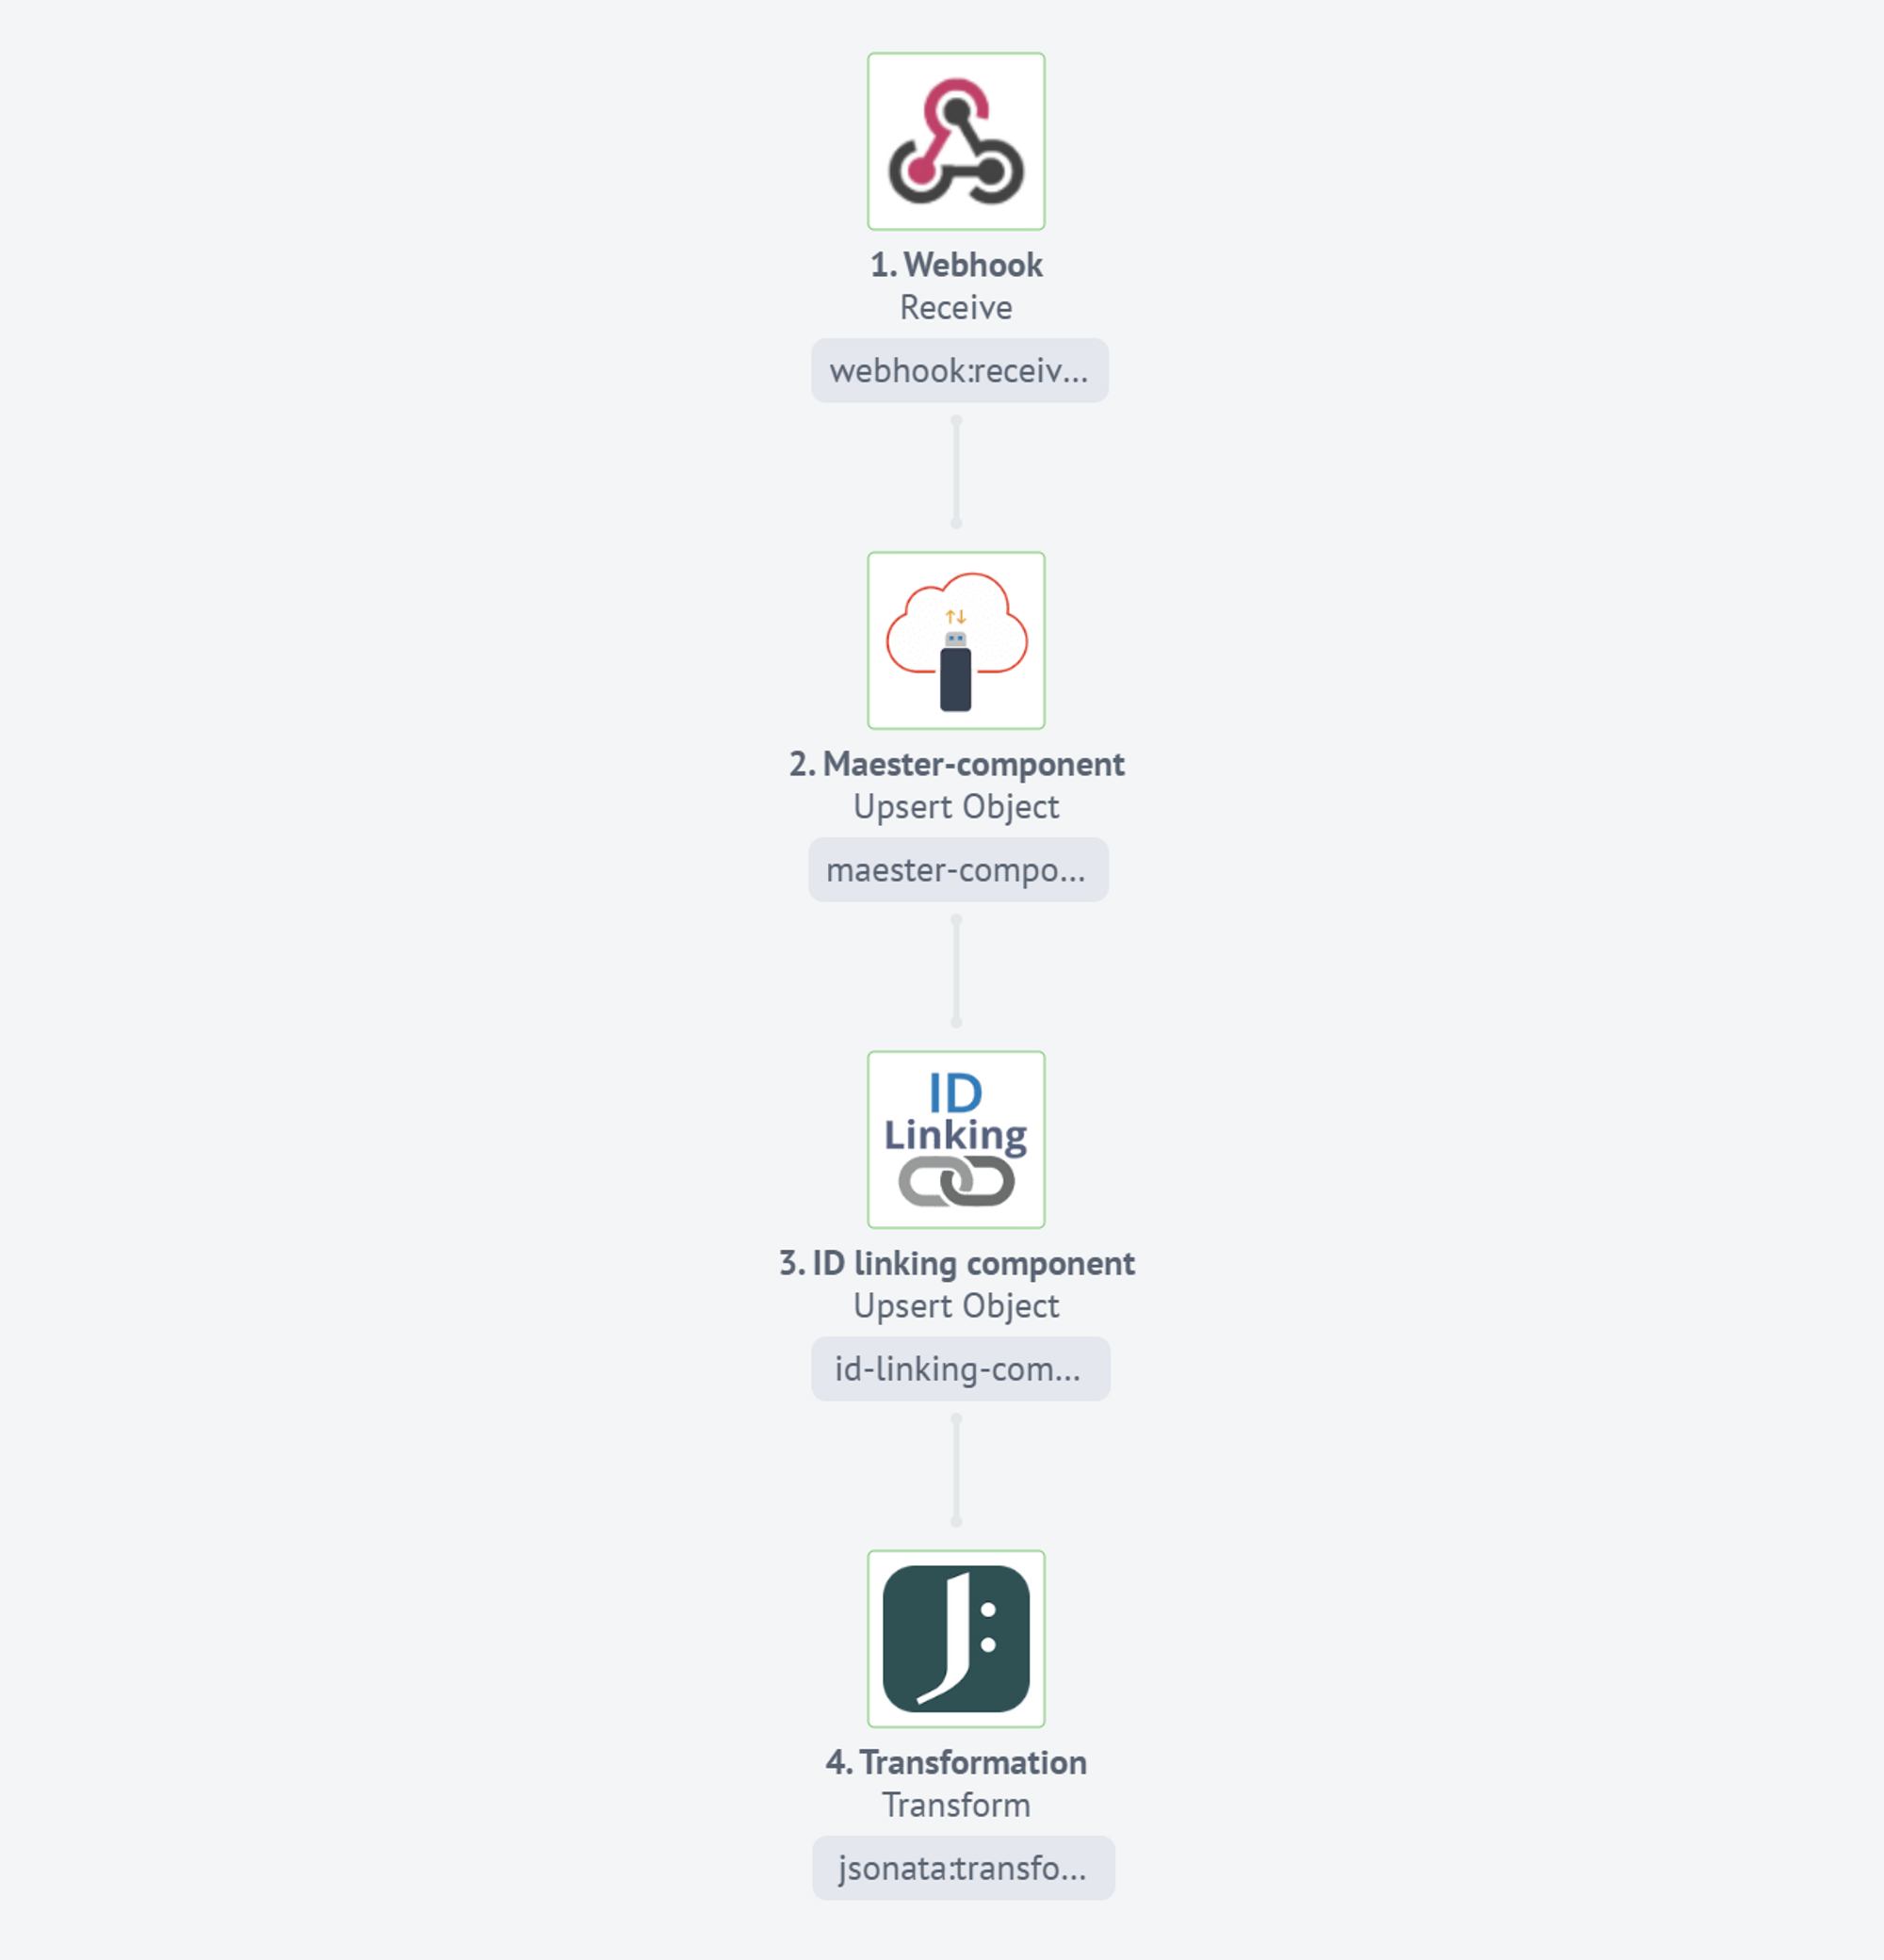
-
The first step uses a webhook component to receive specific data.
{ "Order": "0406654608", "ProductID": 858383, "City": "Berlin", "Address": "Friedrichsruher Str. 37", "Price": 34.45, "Quantity": 30 } -
In the second step, the Maester component stores the data from the webhook.
To avoid constructing custom headers, use
Maester Object IDas theUpsert Criteria.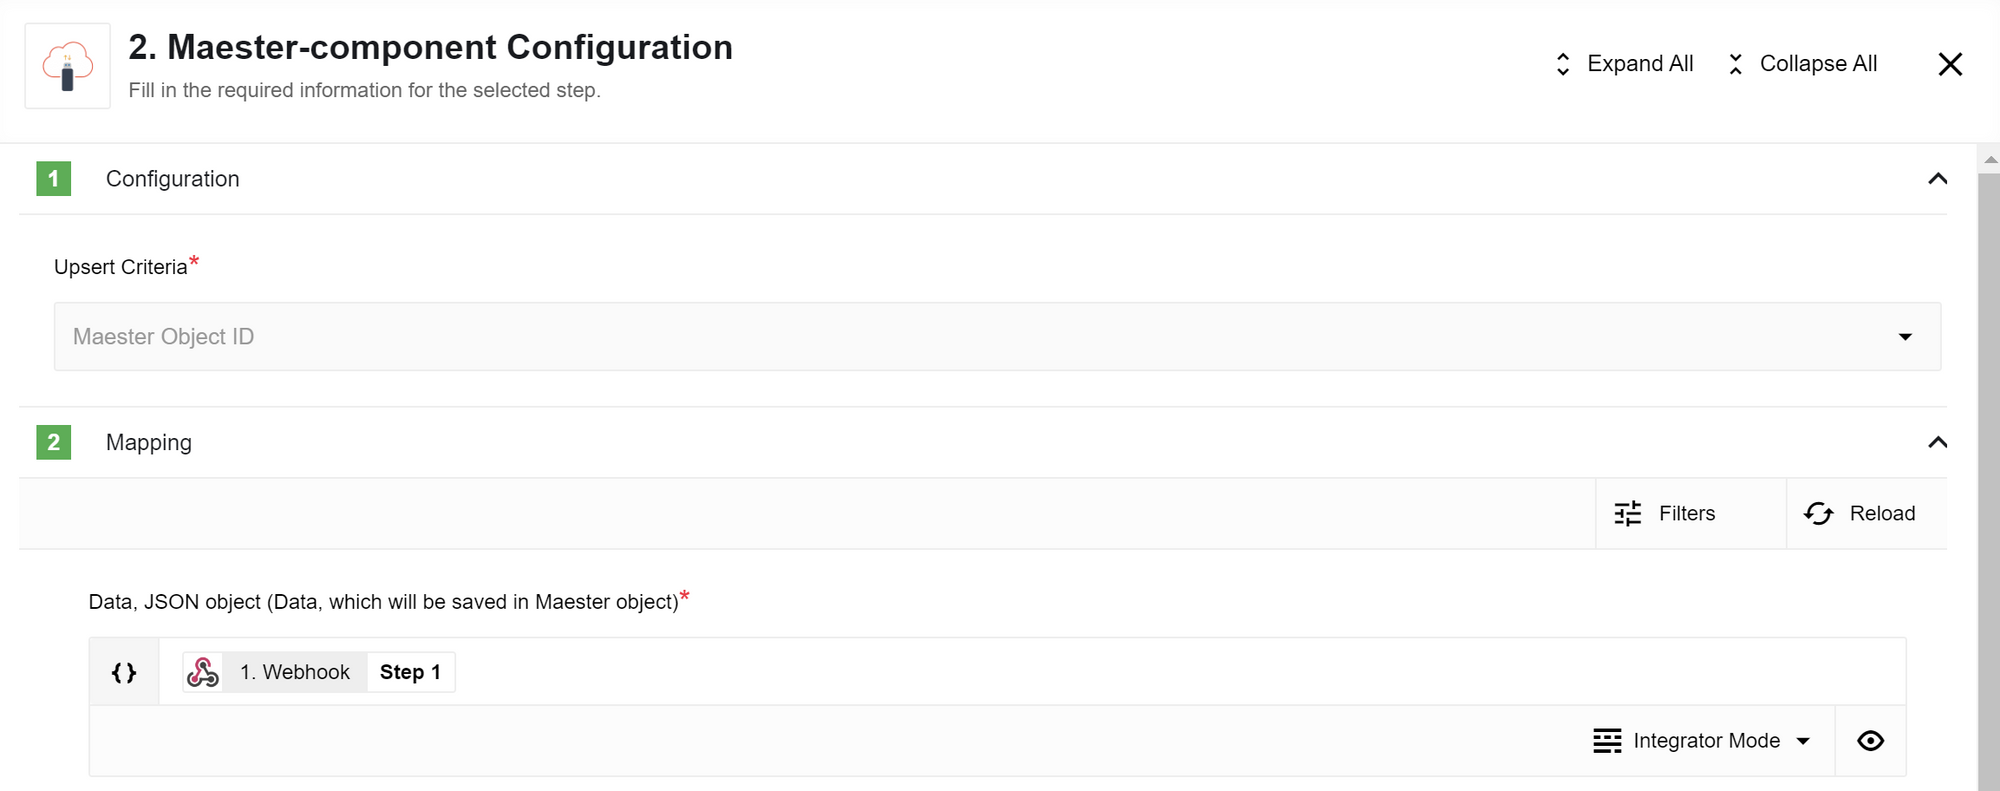 Figure 6. The Maester component configuration for the first flow, with Upsert Criteria set to Maester Object ID.
 -
In the third step, the
ID Linkingcomponent stores the Maester Object ID. This relies on the order value specified in the webhook data.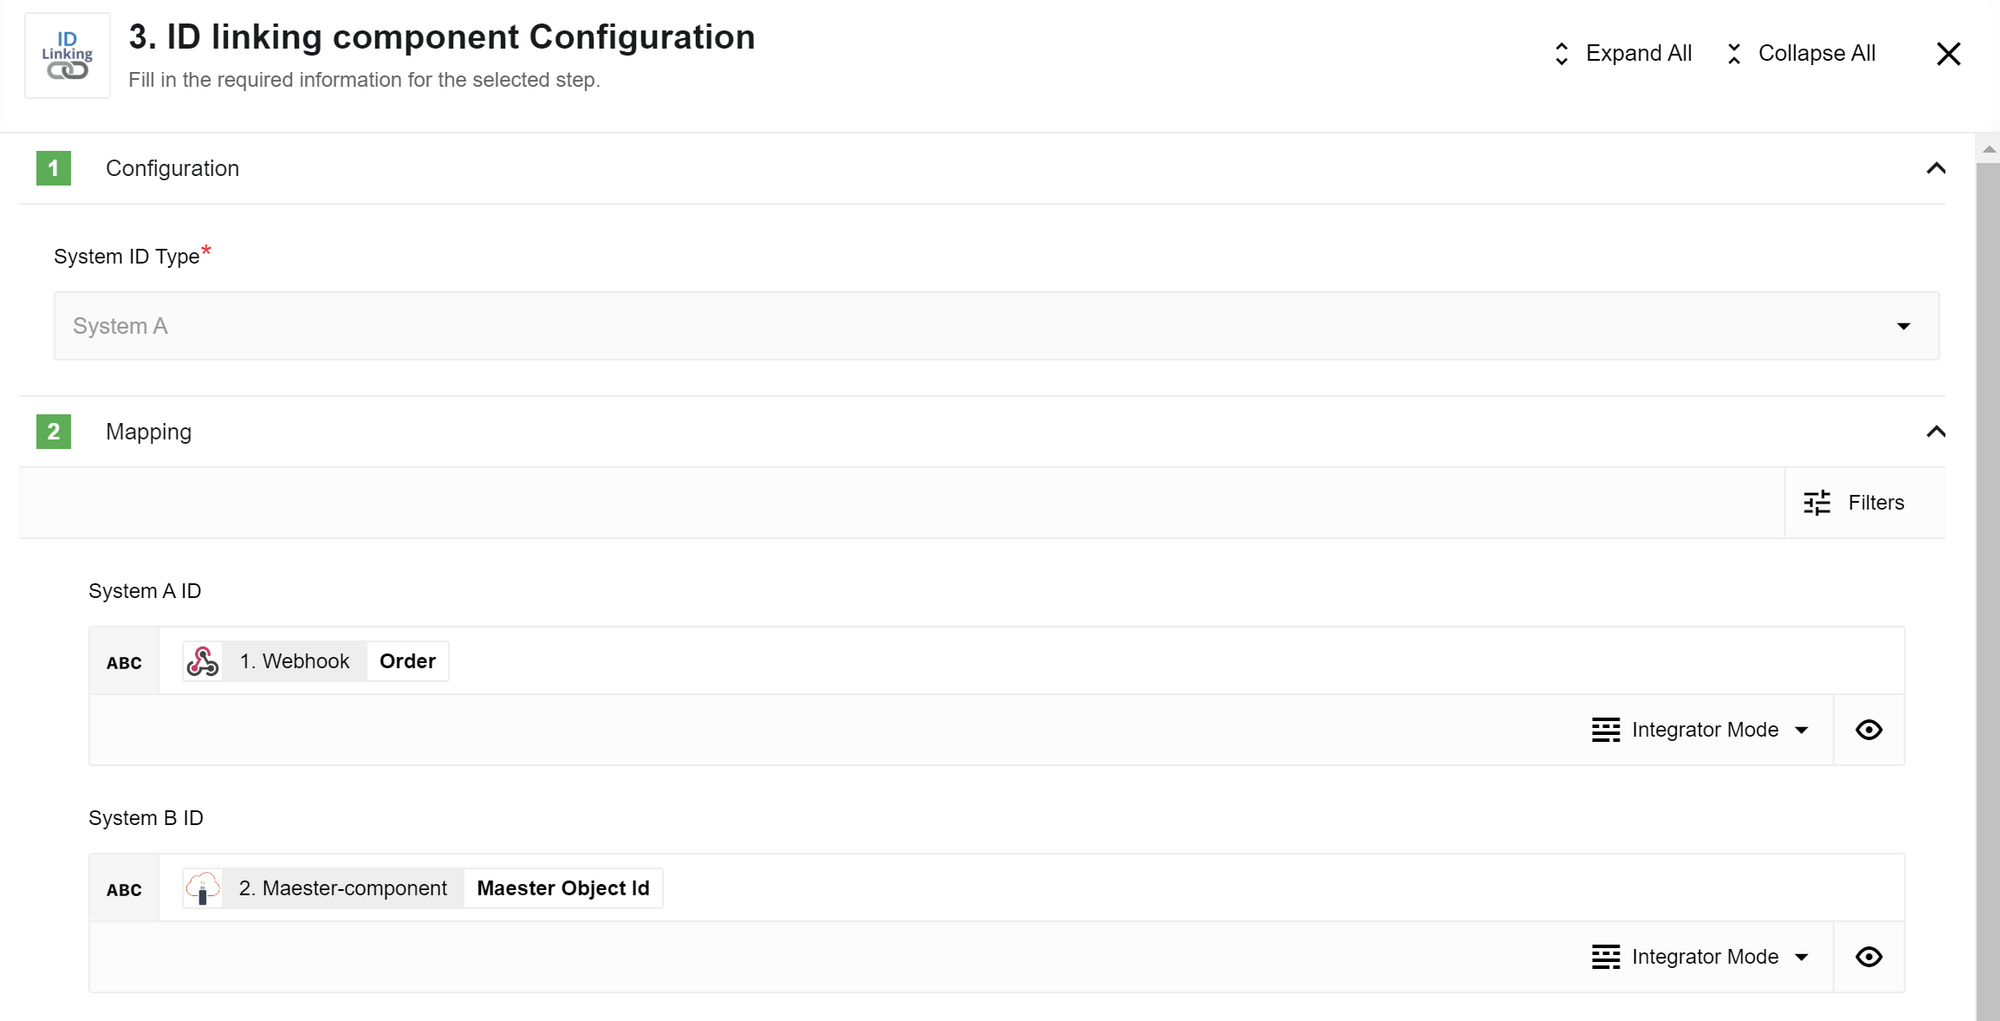 Figure 7. The ID Linking component configuration for the first flow, storing the Maester Object ID.
 -
In the fourth step, the Transformation component calculates the total sum of the order. You can then send this calculated data to other systems, for example, a CRM or a database.
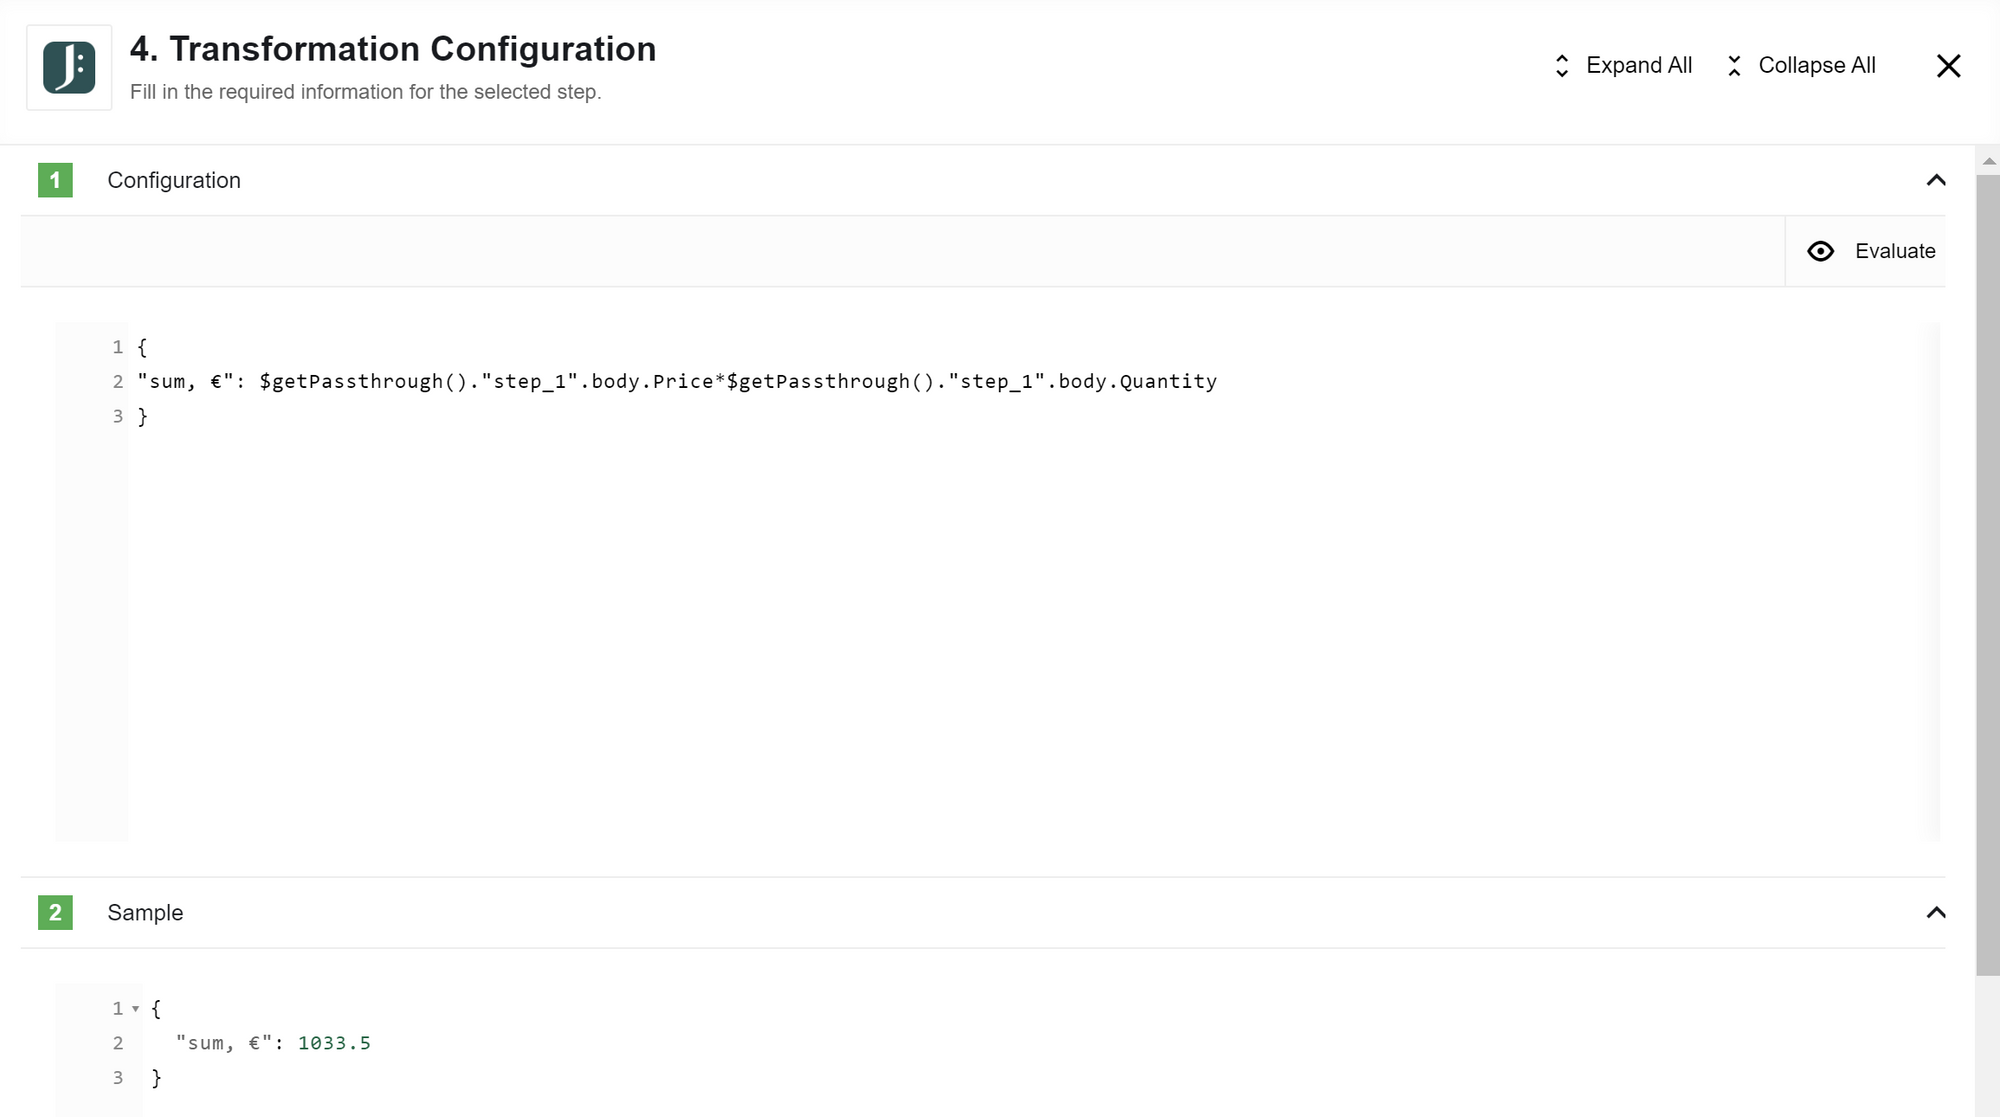 Figure 8. The Transformation component configuration for the first flow, calculating the total order sum.
{
  "sum, €": $getPassthrough()."step_1".body.Price * $getPassthrough()."step_1".body.Quantity
}
Second flow
In the second flow, data about the order description is received through a webhook. This enables the calculation of product dimensions based on information from the first flow.
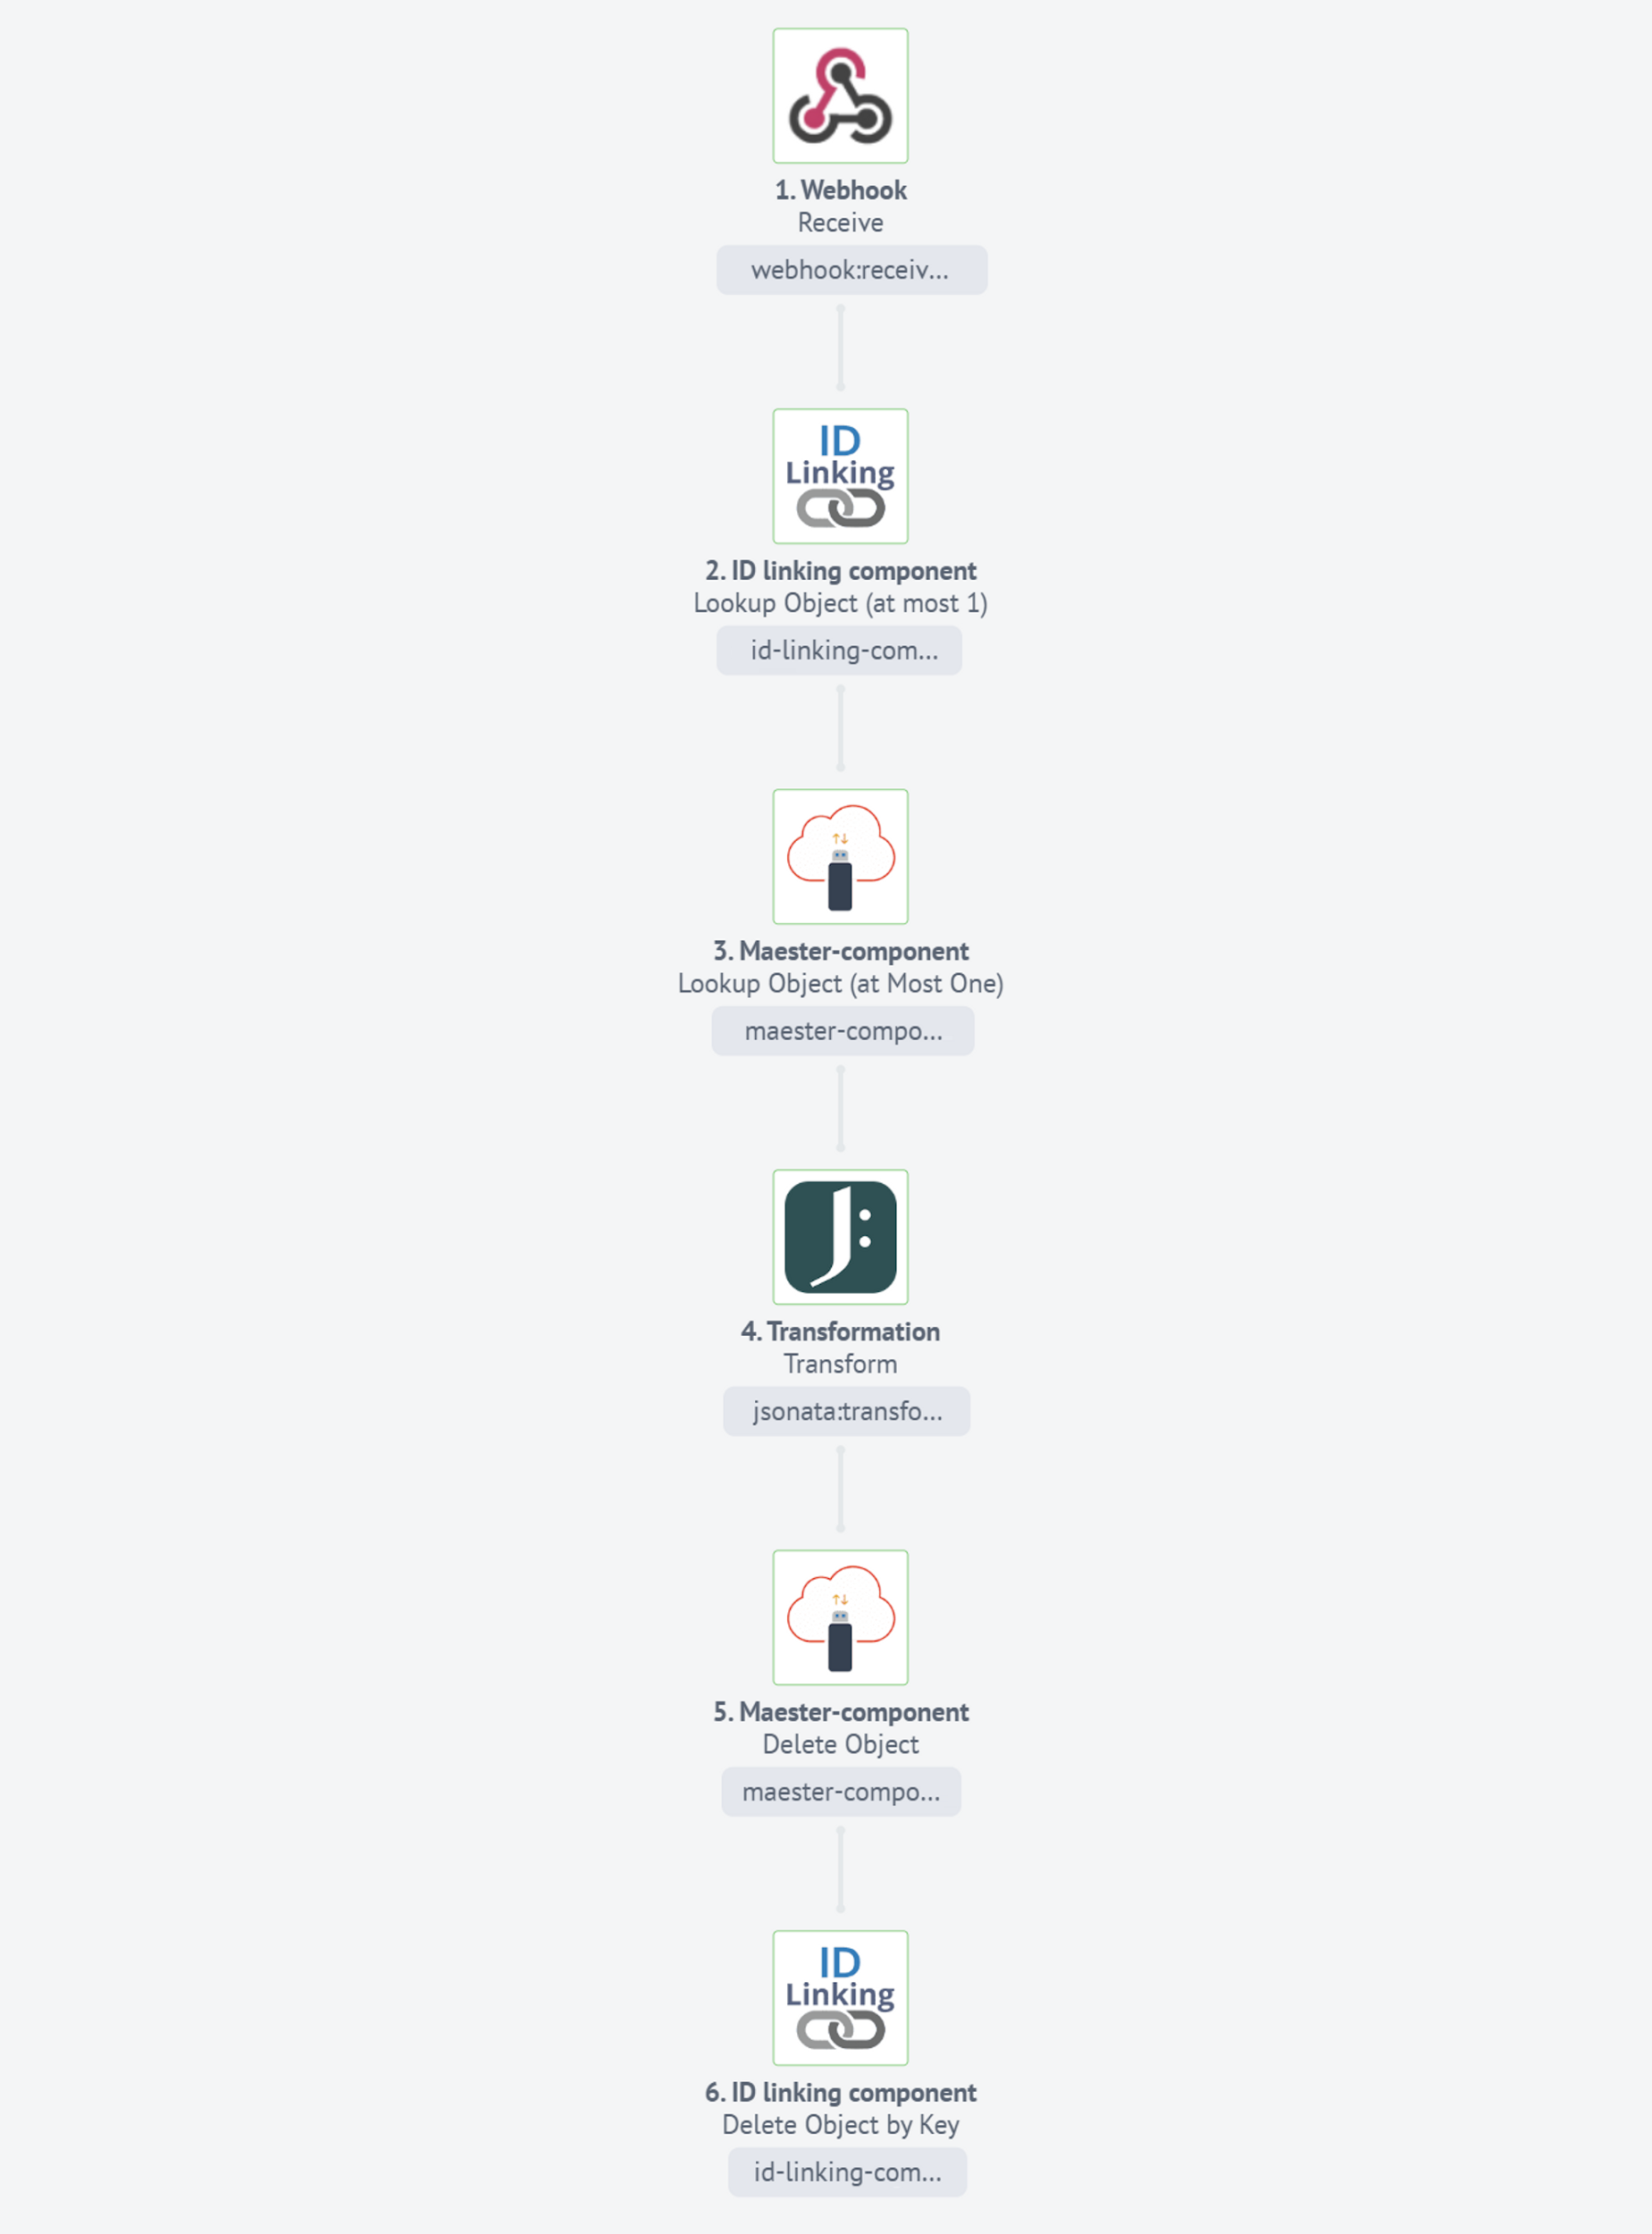
-
The first step of our process uses a webhook component to receive incoming data.
{
  "Order": "0406654608",
  "Description": {
    "Width": 300,
    "Height": 200,
    "Depth": 210,
    "Weight": 0.75
  }
}-
In the second step, the
ID Linkingcomponent retrieves the Maester Object ID using the order value from the webhook data.To ensure the webhook triggers promptly, use the
Wait for object to existbehavior.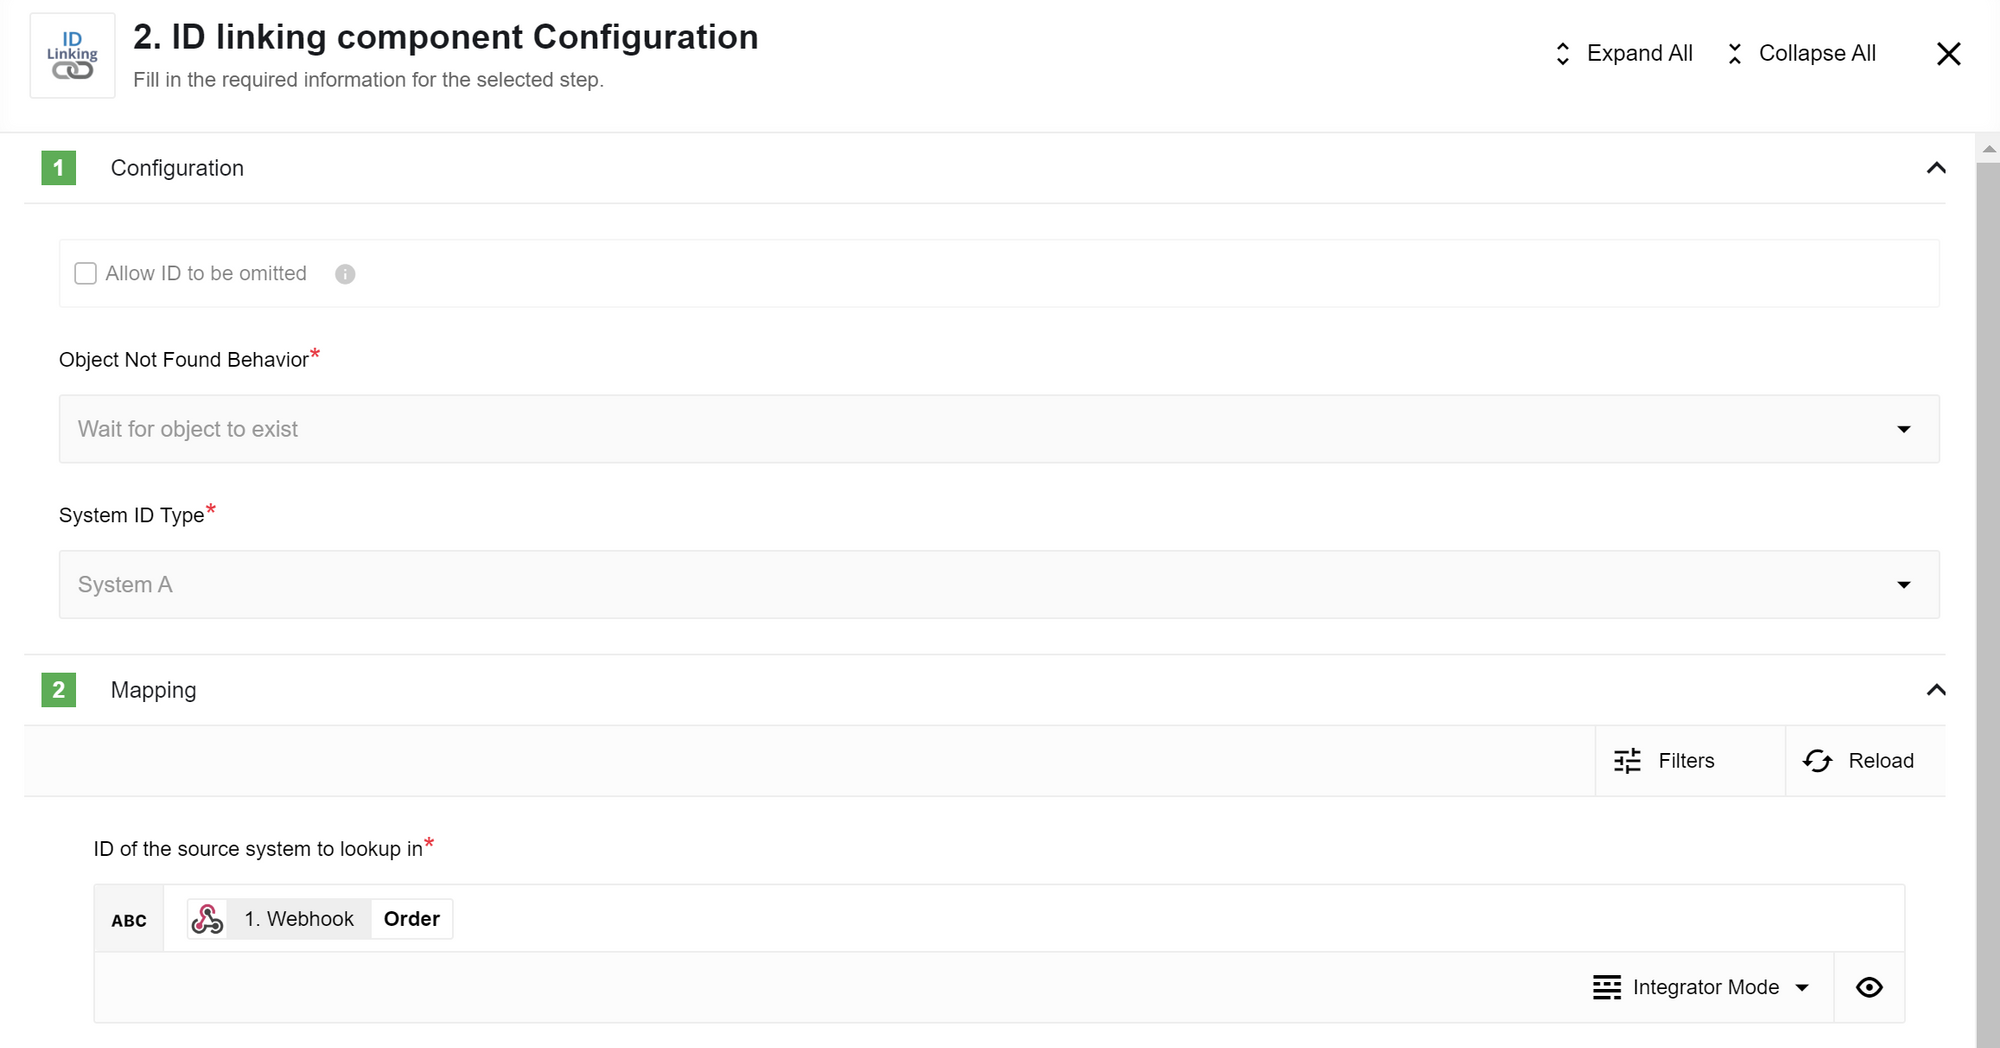 Figure 10. The ID Linking component configuration, retrieving the Maester Object ID.
 -
In the third step, the Maester component retrieves the stored data using its Maester Object ID.
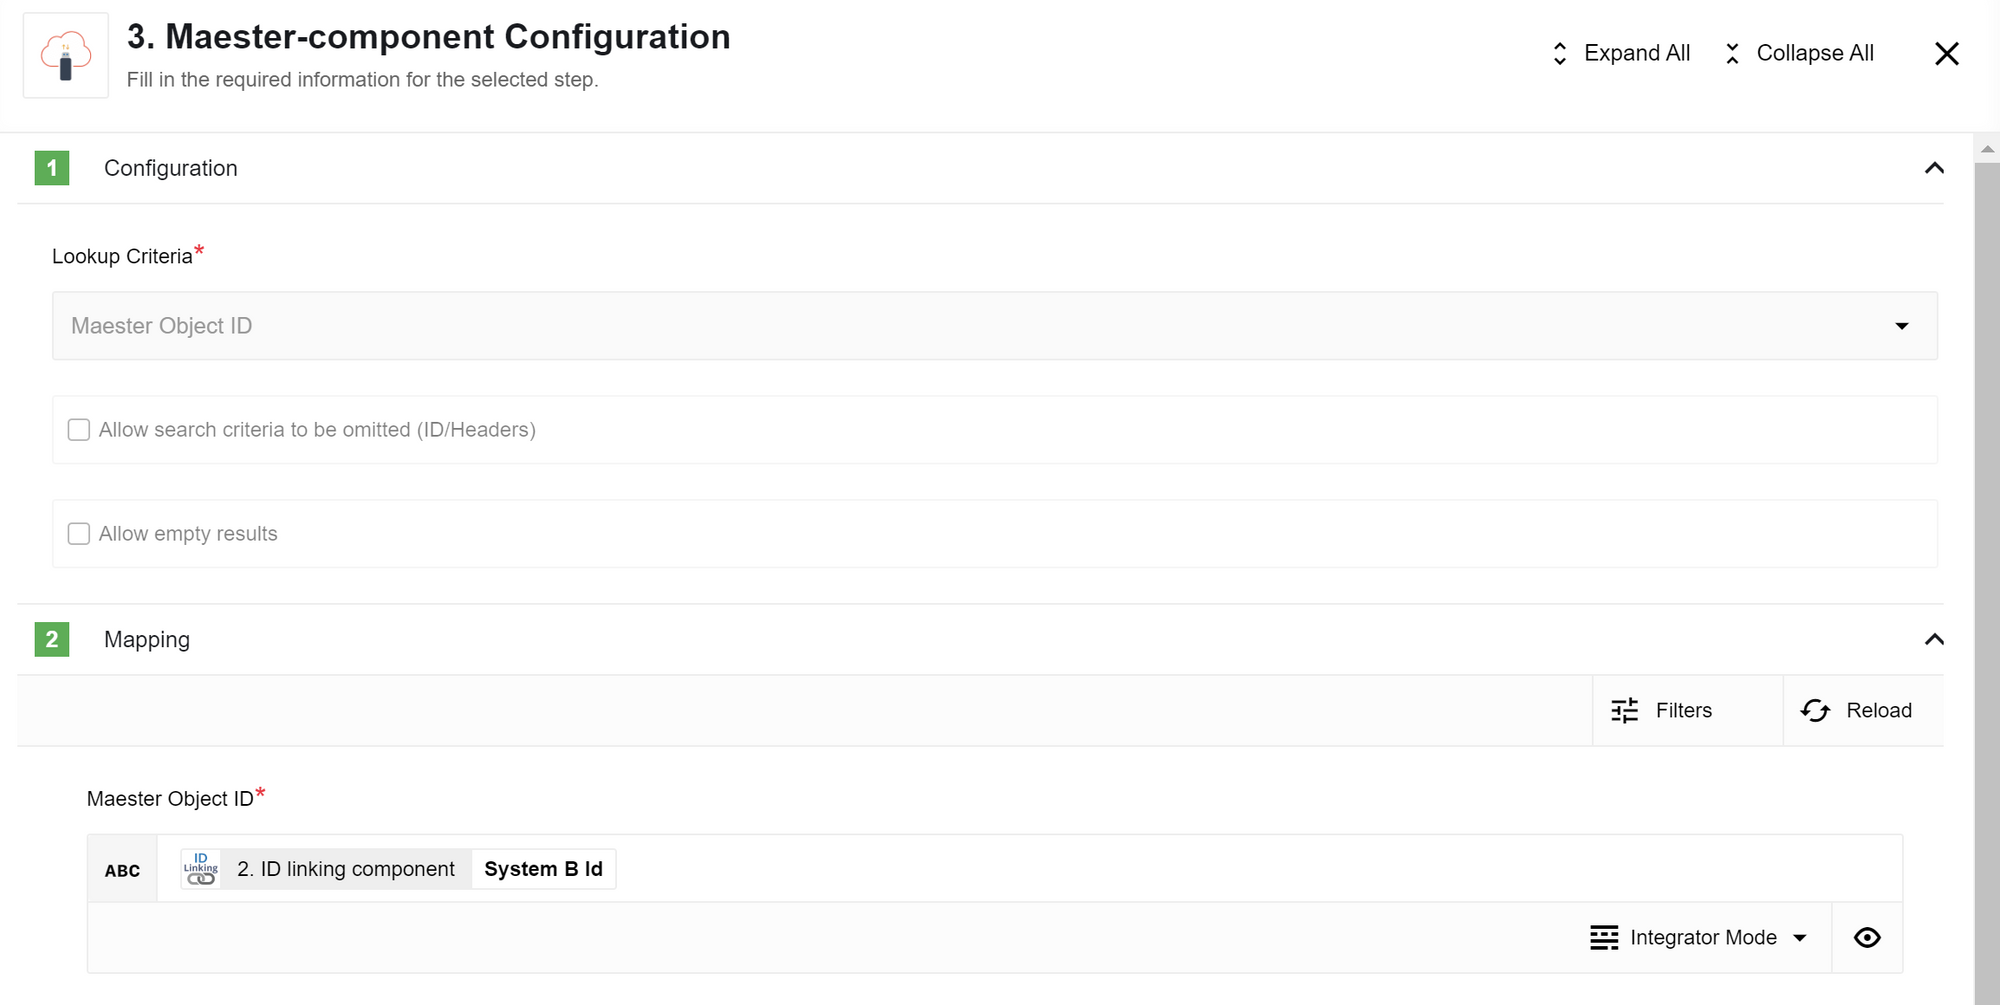 Figure 11. The Maester component configuration, retrieving the stored data.
 -
In the fourth step, the Transformation component calculates the dimensions of the order. You can then send this data to your shipping partner and other recipients.
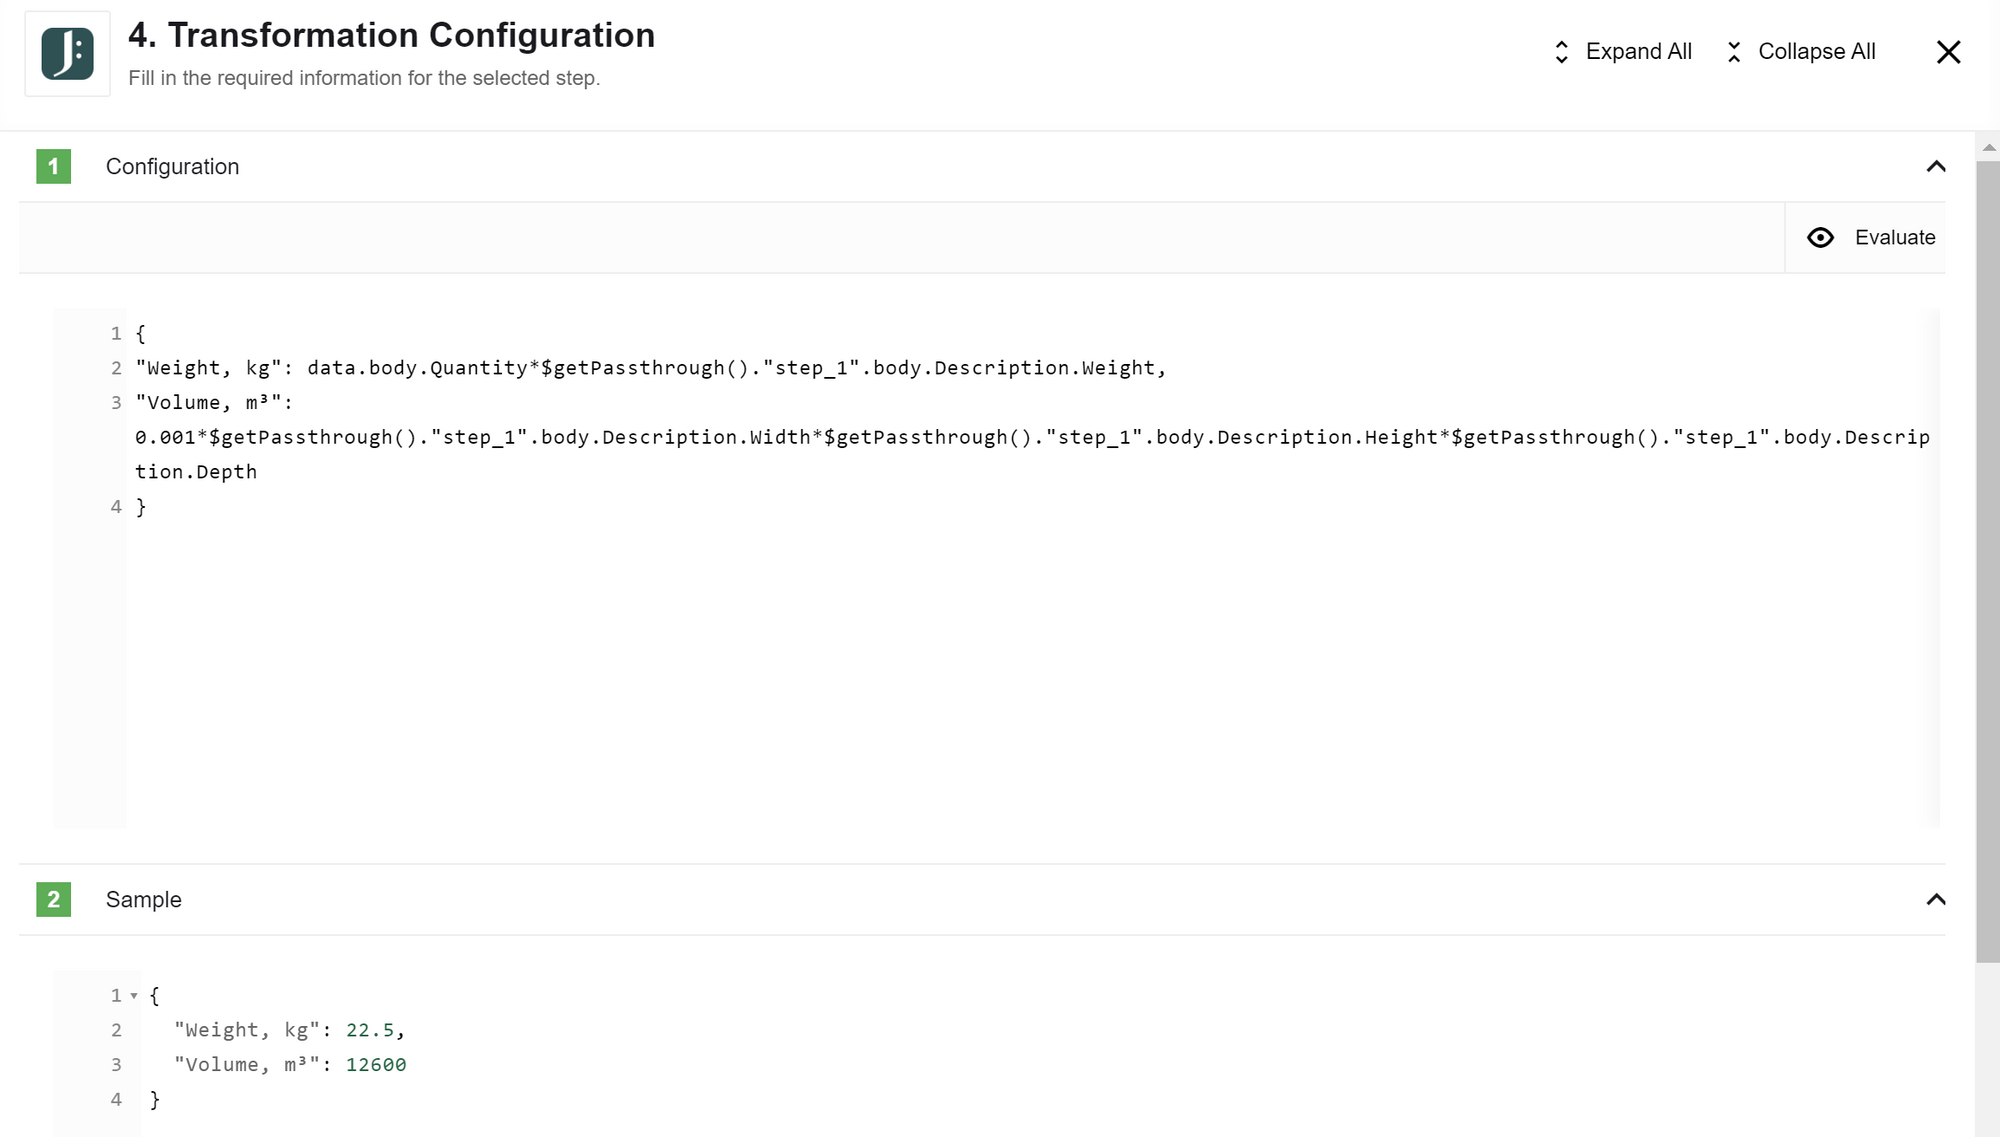 Figure 12. The Transformation component configuration, calculating order dimensions.
{ "Weight, kg": data.body.Quantity * $getPassthrough()."step_1".body.Description.Weight, "Volume, m³": 0.001 * $getPassthrough()."step_1".body.Description.Width * $getPassthrough()."step_1".body.Description.Height * $getPassthrough()."step_1".body.Description.Depth } -
In the fifth step, the Maester component deletes the stored object after use. This action optimizes Maester storage, which is useful if the flow triggers multiple times per hour.
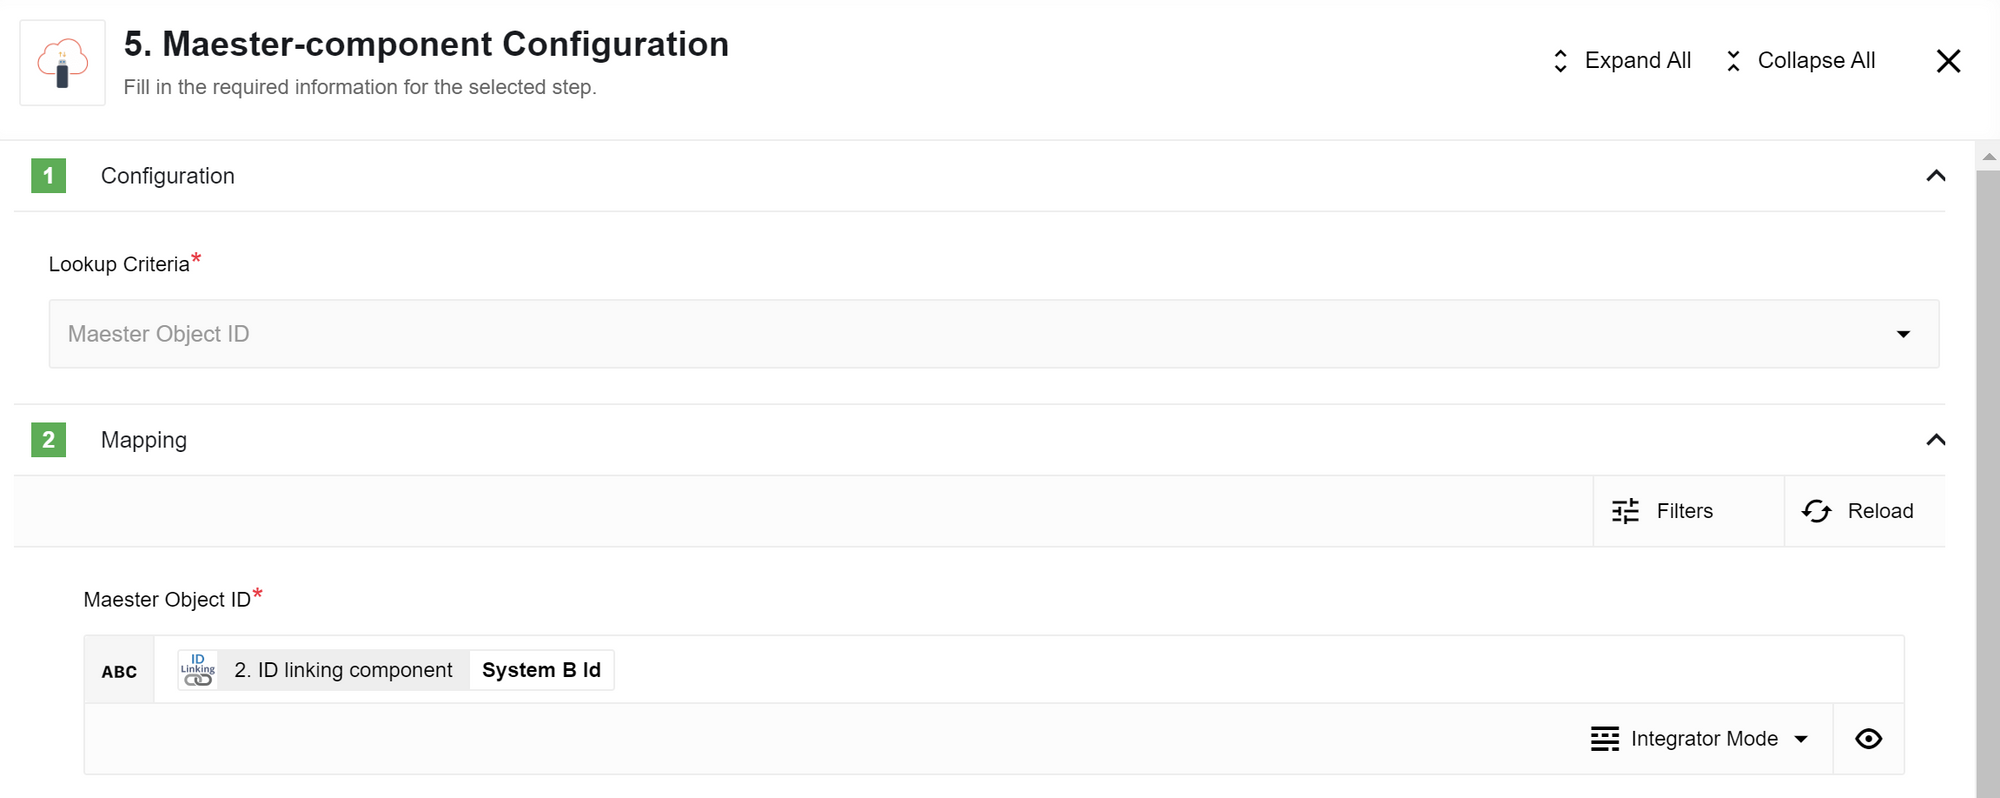 Figure 13. The Maester component configuration, deleting the stored object.
 -
In the sixth and final step, the
ID Linkingcomponent deletes the linked object corresponding to the Maester Object ID. This deletion uses the order value from the webhook data. Figure 14. The ID Linking component configuration, deleting the linked object.