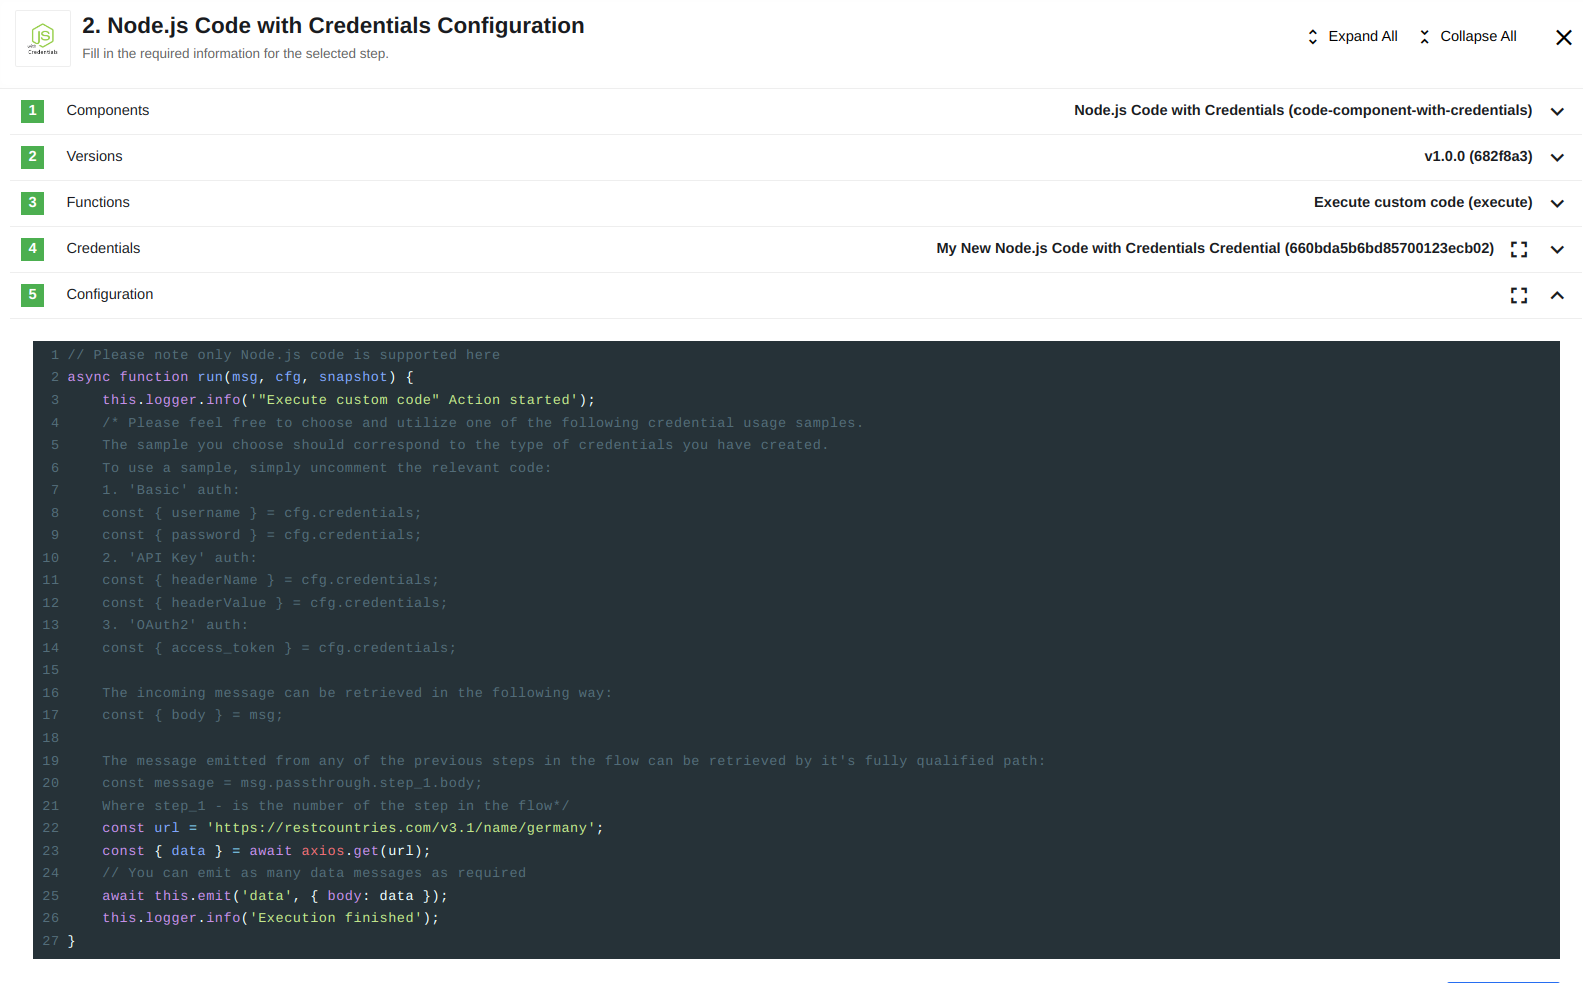
Node.js code with credentials
The code component is derived from the Node.js code component. The difference is that an authorization mechanism has been added. Read the Credentials section for more information.
The Code component is a powerful feature that lets you run a piece of JavaScript code within your integration flow. It functions similarly to other components in our system.
It has a full-fledged interface with useful features, like many desktop development tools:
-
Syntax highlighting, a standard feature for any online real-time coding interface.
-
Code auto-completion, another standard feature that you are familiar with from desktop tools.
-
Support for a variety of variables and libraries within the execution context.
-
Compatibility with the latest ECMAScript standard.
-
Ability to run and troubleshoot within the designer interface.
Available variables and libraries
The code component provides access to the following variables and libraries within the execution context.
The most up-to-date list can always be found in the code.js file of the component.
The following documentation is a sample for reference. Built-in Node.js global objects are also supported.
Integrations specific functionality
- msg
-
Incoming message containing the payload from the previous step.
- cfg
-
Step configuration, which includes the following properties:
- code
-
The code being executed.
- secretId
-
The ID of the secret being used by the credentials.
- credentials
-
The Credentials section. Depending on the selected credentials type, it contains a set of credential fields.
- snapshot
-
Step snapshot.
- messages
-
Utility for convenient message creation.
- emitter
-
Used to emit messages and errors.
Available libraries and functions
- wait(numberOfMilliscondsToSleep)
-
Utility function for sleeping.
- axios
-
A well-known HTTP client.
- request
-
HTTP Client (wrapped in co-request so that it is pre-promisified). Support for requests is maintained for backward compatibility only.
- _
Credentials
| The code component can solve various tasks, from basic data transformations to complex external API calls. You will usually not need credentials while working with the component. However, if you do not need any credentials, you can create and save the No Auth credentials. |
You can use credentials of the same type as those used in the REST API component since plain REST API calls are the most common use case across our platform. However, this does not mean that you can only use these credentials for REST API calls.
The code component supports four authorization types:
- No Auth
-
Use this method if you do not need credentials or want to work with any open REST API.
- Basic Auth
-
This method provides sign-in credentials such as username/password.
- API Key Auth
-
This method provides an API Key to access a resource.
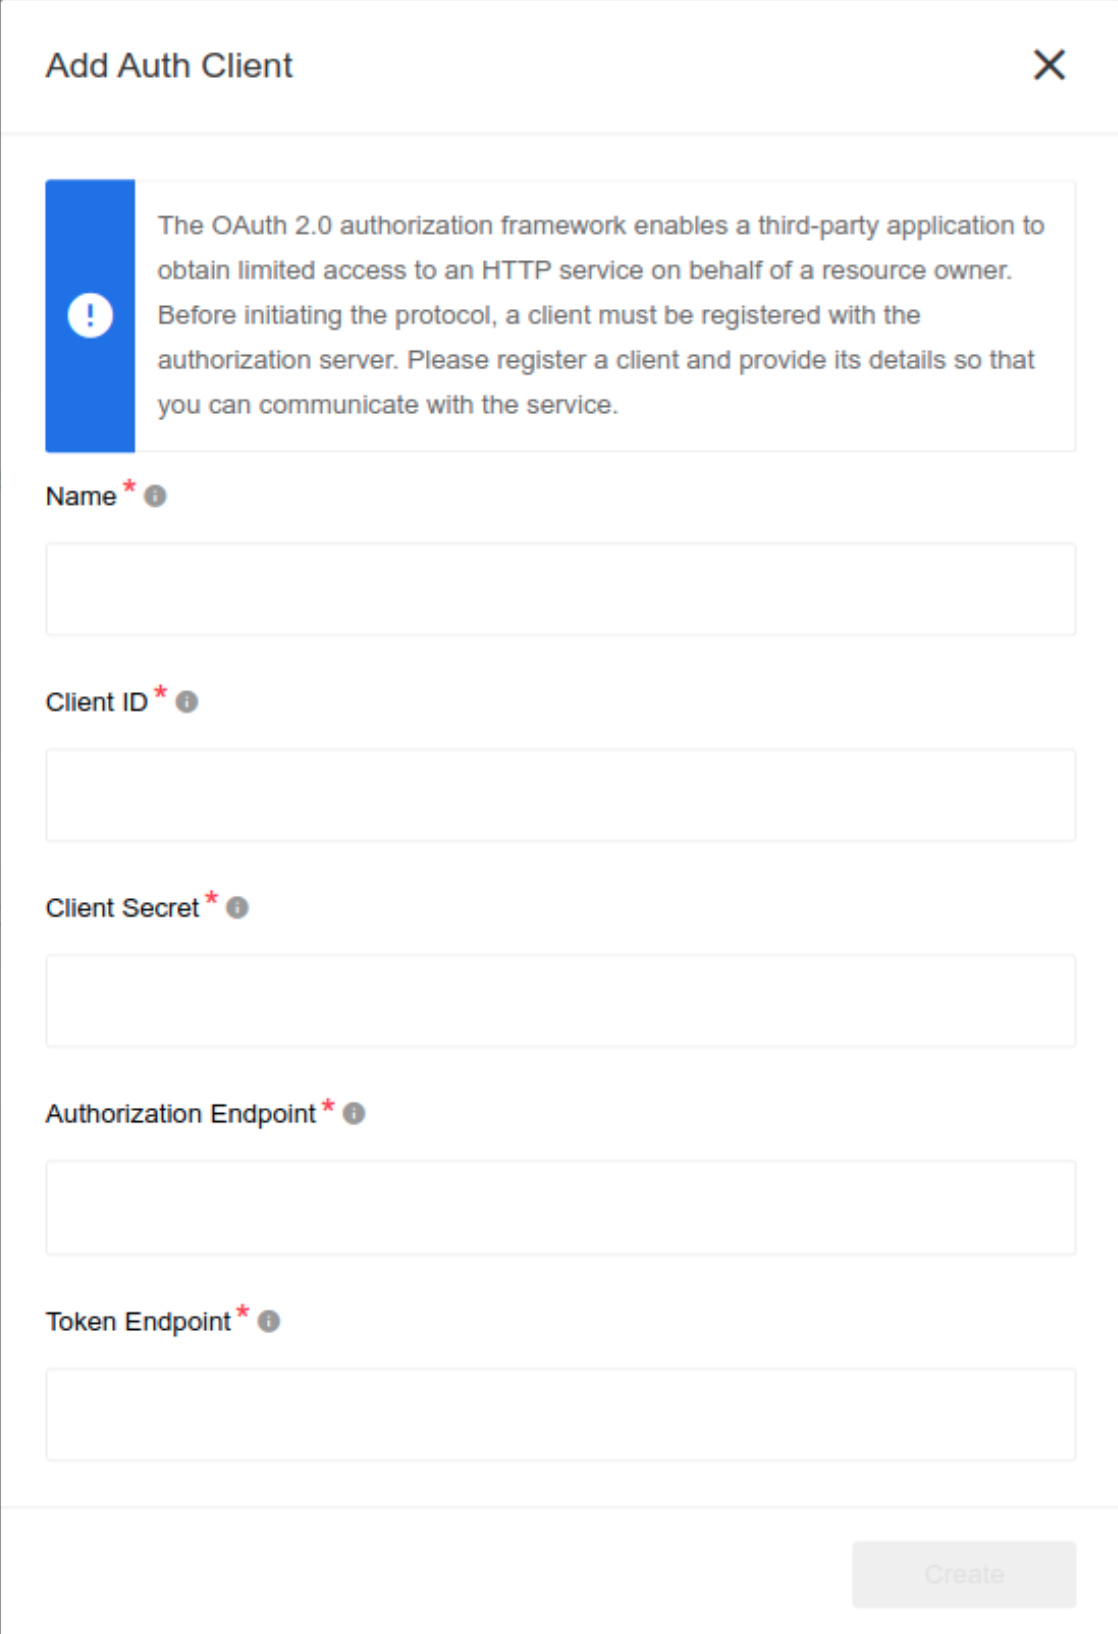
- OAuth2
-
This method provides OAuth 2.0 credentials to access a resource. The only implemented OAuth 2.0 flow is the Authorization code flow.
Credentials are always verified successfully. However, the component is not system-agnostic, so meaningful verification is not possible.
To create an OAuth2 credential, you have to choose Auth-client or create a new one. It must contain the Name, Client ID, Client Secret, Authorization Endpoint, and Token Endpoint attributes.
The following example shows adding a new Auth-client to access the API, to better illustrate how to use the different auth types:
- No Auth
-
No particular usage is required.
- Basic auth
-
You can find the username/password fields within the
cfg.credentialsobject:const { username } = cfg.credentials; const { password } = cfg.credentials; - API Key Auth
-
You can find the header name/headerValue fields within the
cfg.credentialsobject:const { headerName } = cfg.credentials; const { headerValue } = cfg.credentials; - OAuth 2.0
-
All the available fields are within the
cfg.credentialsobject. For Salesforce OAuth credentials, it would look like this:{ ... "credentials": { "access_token": "00DE0000000dwKc...25beUAzsBb6L4yTQUWwRf", "refresh_token": "5Aep861rEpScxnNE66jGO...LPWsLPojH6C3hT.8L_", "expires_in": 3600, "undefined_params": { "signature": "ehhgLZp7T...UrmmEE=", "instance_url": "https://de0007100dwkcmai-dev-ed.my.salesforce.com", "id": "https://login.salesforce.com/id/00DE0000917dwKcMAI/032481200092zqdAAA", "issued_at": "1706879649168" } } }
|
Using the OAuth2 mechanism can be complex due to its nature. If you need to use OAuth2 for REST API calls, consider using our REST API with Arbitrary Token Authentication component instead. It handles all routines such as refreshing tokens and retries. |
Code component usage examples
To use the code, you can follow these examples:
async function run(msg) {
  console.log('Incoming message is %s', JSON.stringify(msg));
  const body = { result : 'Hello world!' };
  // You can emit as many data messages as required
  await this.emit('data', { body });
  console.log('Execution finished');
}| If you have a simple one-in-one-out function you can return a JSON object as a result of your function, it will be automatically emitted as data. |
Complex data transformation
While JSONata is a useful tool, sometimes it is easier to perform tasks in JavaScript. If you want to transform an incoming message with code, you can use the following example:
async function run(msg) => {
  addition : "You can use code",
  keys : Object.keys(msg)
}