Configuration in CDP and Advanced Forms

This section covers the initial setup required within the CDP and Advanced Forms interfaces to establish a connection.

Prerequisites

Before configuring the CDP integration, ensure the following requirements are met:

  • Form integration must be enabled to allow the connection between Advanced Forms and CDP.

  • A System Administrator must create a dedicated form user account.

  • The form user account must be assigned the data consumer user role.

  • The following authentication details are required for the integration:

    • Client ID (string).

    • Client Secret (password type).

    • Username (string).

    • Password (password type).

      Contact Squiz Customer Support to configure these credentials for your DXP instance.

Generate API credentials in Advanced Forms

Generate API credentials to allow the CDP to communicate with Advanced Forms.

  1. Log in to your DXP instance.

  2. Click the Advanced Forms tile.

    The Advanced forms page loads.

  3. Click the Forms instance for your system.

    The Forms page for that system loads in a new browser tab.

  4. Locate the form to be integrated and select Actions  Edit.

    The Edit Form page for the selected form loads.

  5. Click the Form Settings button.

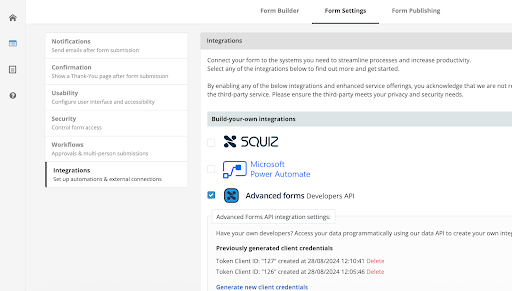
  6. Click the Integrations button.

    The Integrations UI presents.

Integrations page showing Advanced forms Developers API section with credentials
Figure 1. Integrations page showing Advanced forms Developers API
  1. Select the Advanced forms Developers API checkbox.

  2. Click the Generate new client credentials button.

    A unique Client ID and Client Secret are generated and displayed.

  3. Save the Client ID and Client Secret to an external data store (for example, a local file).

    The Client ID and Client Secret are displayed once only, on creation.

    They are required for the CDP to authenticate and retrieve form details.

    If they are not saved for re-use by the CDP, the integration will not work.

Create a new destination in CDP

A Destination in the CDP defines an endpoint where customer data can be sent or synchronized.

Create a destination for your form.

  1. Click the Customer data platform button in the Squiz DXP dashboard.

  2. Click the Destinations button in the CDP left-hand navigation.

  3. Click the ➕ Create destination button.

    The ➕ Create destination dialog presents.

  4. Enter a unique and descriptive name in the Name field.

    For example, Website Contact Form Prefill.

  5. Select Type  Advanced Forms from the menu.

  6. Click Create.

    When the destination is created, a success alert presents and the page for the new destination loads.

Import form attributes into CDP

Once the destination is created, import the structure of your Advanced form so the CDP knows which fields are available for mapping.

  1. On the destination page, click Import from Advanced Forms.

  2. A two-step import process will begin. You will need to copy information from the Form Publishing section in Advanced Forms.

  3. In Advanced Forms: Navigate to Form Publishing  Smart JavaScript.

  4. In the Smart JavaScript section, copy the entire contents of the first text field.

  5. In the CDP: Paste this code into the first field of the import wizard and click Next.

  6. Go back in Advanced Forms, copy the embed code from the second text field.

  7. In the CDP, paste the embed code into the second field of the import wizard and click Import.

The CDP will now process the codes and fetch the available questions/fields from your form.

Map CDP attributes to form fields

This is the core step where you link user profile data to your form questions.

  1. Once the import is complete, you will see a mapping interface.

  2. On the left, you will find a list of available Single Customer View (SCV) profile attributes (for example, firstName, lastName, email, addresses, street).

  3. On the right, you will see the questions imported from your form.

    A form might include fields that require prefill mapping:
    • Firstname.

    • Lastname.

    • Line1Address.

    • Line2Address.

    • Suburb.

    • State.

    • Postcode.

    • Phone number.

    • Email address.

  4. Select the corresponding SCV attribute from the dropdown list for each form question you want to prefill.

  5. If a form question should not be prefilled, leave it unmapped or select the Ignore option.

  6. After mapping all required attributes, click Save.

Grant data access in the SCV schema

For the prefill to function, the system needs explicit permission to read data from a user’s profile and display it on the frontend.

Ensuring read access in SCV schema

  1. Navigate to the SCV Schema configuration area in your CDP.

  2. For every SCV attribute you mapped in the previous step, ensure that the customer role has been granted read access.

  3. If read access is not granted, the CDP cannot retrieve the value for that attribute, and the corresponding form field will not be pre-populated.

    The SCV schema is a security and governance layer for customer data.

    Denying read access for sensitive attributes prevents them from being inadvertently exposed.

    Permissions are set using x-scv-permissions in the schema configuration.

    If permissions are not correctly set using x-scv-permissions, the JSON schema deployment may be invalid and prefill will not function.

    Read the SCV Schema Documentation for more details on schema structure and permissions.

Once configuration is complete, Embed the form for prefilling in CMS.