Design elements
Images
Image fields can add a banner, logo, or other images within your form.
To add an image to your form:
-
Locate the Add An Image field in the Design elements section of the available fields panel on the left-hand side of the screen.
-
Drag it to the appropriate place on your form.
You can optionally set the alignment and width of the image before saving.
Headings
Add a main heading and other headings at the top of your form to break up form sections.
To add a Heading field to your form:
-
Locate the Add A Heading field in the Design elements section of the available fields panel on the left-hand side of the screen.
-
Drag it to the appropriate place on your form.
While editing your field, click Show Advanced Options to apply specific styling options to this heading.
Field group
A field group is a way to group multiple fields into one section.
To add a field group to your form:
-
Locate the Field Group module in the Design elements section of the available fields panel on the left-hand side of the screen.
-
Drag it to the appropriate place on your form.
-
Supply a name for the field group.
-
Drag the required fields into the group. Fields can be dragged either from the available fields panel or from the body of the form itself.
Formatted text
Add some formatted text for use as an introduction or extra text content throughout your form.
To add a Formatted Text module to your form:
-
Locate the Add Formatted Text module in the Design elements section of the available fields panel on the left-hand side of the screen.
-
Drag it to the appropriate place on your form.
While composing your text, you have all the typical features available with rich-text editing. This includes:
-
Bold
-
Italic
-
Underline
-
Text color
-
Text size
-
Text alignment
-
Lists
-
Images
Images can be aligned with the text on the page but must be set to a matching alignment.
That is, the text alignment setting in the Formatted Text tool bar and the image settings alignment in the image settings bar must match.
For example, both alignment settings must be set to centered to center the image.
Matching alignment example
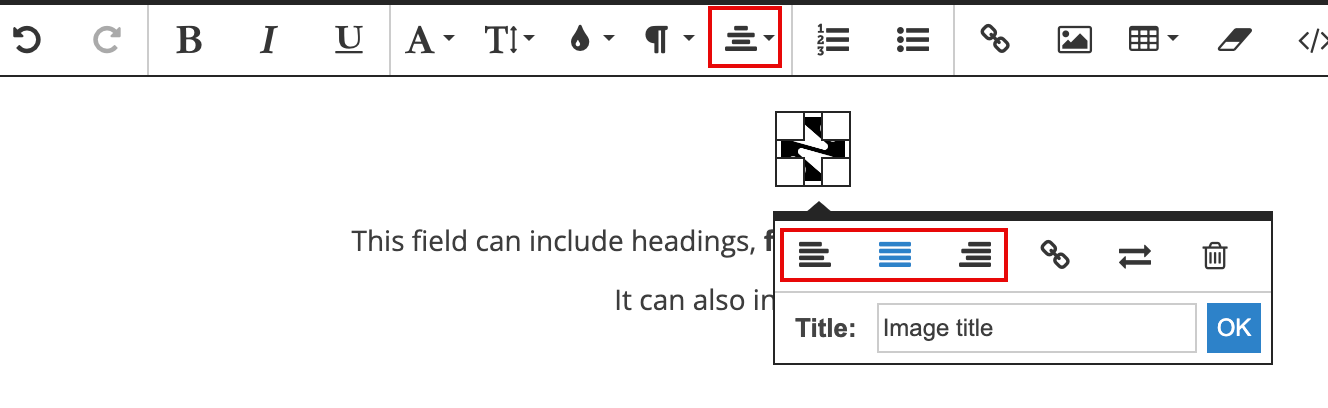 Figure 1. Matching text alignment and image alignment.
 -
Links
-
HTML
-
Tables
Tables in the Formatted Text module are static tables.
You can use a Field Table if you want to add a dynamic table.
Dynamic values in Formatted Text fields
You can dynamically display answers from a form submission within a text field on your form.
This can be used to, for example,
-
create user choice summaries;
-
update contract text; or
-
display a payment table.
Dynamic values are added to Formatted Text fields using Short-codes.
Adding dynamic values to Formatted Text fields
To add dynamic values to Formatted Text fields
-
Find the short-codes for the form.
See Short-codes for how to do this.
-
Copy the needed shortcode from the list and paste it into the formatted text editor.
It will be enclosed in double curly braces. For example,
{{your field name}}. -
Click the Save & Close button.
-
Test the result by clicking View Form and filling in the relevant fields.
The dynamic text in the Formatted Text field will populate automatically when data is entered into these fields.
Divider
Add horizontal line dividers to help visually break up sections of your form. You can set the color, width, and spacing around the horizontal divider line.
To add a divider to your form:
-
Locate the Horizontal Divider field in the Design elements section of the available fields panel on the left-hand side of the screen.
-
Drag it to the appropriate place on your form.
Colors and font styles
Brand your form using the colors and fonts of your choosing.
The global form styling settings can be found on the left-hand side of the Form Builder tab.
These are optional settings where you can:
-
Change the colors throughout your form.
-
Change the font and text size used throughout your form. We recommend a text size of
14or16pxfor the main text. -
Add a form border.
-
Save all styling settings as a theme that can be applied to other forms you manage.