Configure an event to listen for Advanced Form submissions
Setting up an event to listen for submissions from an Advanced Form entails several distinct and related tasks.
Create a form
From the desired agency or organisation DXP Dashboard:
-
Click the Advanced forms card.
-
Click the Forms instance for the desired DXP instance.
-
Click ➕ New Form.
A Create form dialog slides down.
-
Click a preferred starting method.
Blank Form is selected for this example.
-
Enter a Form name.
For this example, the name given is advanced form integration demo.
-
Click Next.
The Form Builder screen presents, showing a basic form and the available Form Fields and Styling & Themes to add to the basic form.
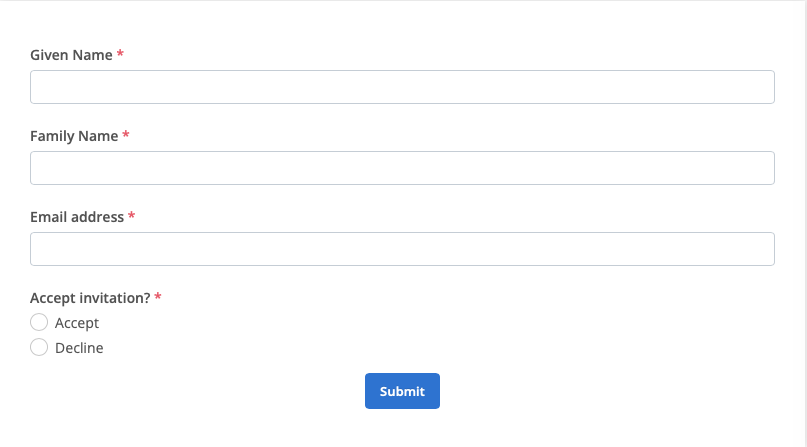
This example uses four fields as follows:
| Field name | Form field type | Compulsory? |
|---|---|---|
Given Name |
Text |
✔️ |
Family Name |
Text |
✔️ |
Email address |
Email Address |
✔️ |
Accept invitation |
Choose One |
✔️ |
The form will look something like this:

Clicking Submit sends an event to the event service along with the form’s ID.
In this example the form URL is https://example.com/form/advanced-form-integration-demo.
And the form ID is advanced-form-integration-demo.
Create a Flow
|
The following procedure is specific to this example. For a general introduction to automated workflows, see Integration flows. |
From the DXP Dashboard:
-
Click the Integrations card.
-
Click the Flows link in the Integrate section of the sidebar.
-
Click Add New Flow.
-
Click Give me a name to make the line editable and name the new flow.
For this example, the name given is advanced form integration demo flow.
-
Click Please enter your flow description here to make the line editable and enter a flow description.
Flow descriptions are optional. For this example, the description added is A flow for the advanced form integration demo.
Add a trigger to the flow
The example flow used in this demonstration has one trigger:
-
A Webhook trigger.
To add the Webhook trigger to the flow
-
Click ➕ Add the initial trigger.
-
Enter webhook in the Find component text-entry field.
-
Select the Webhook.
-
Click Choose Webhook.
-
If there no extant credentials click Create new credential.
-
If there are extant credentials, and none of them are suitable (which, for this example, they are not), Click ➕.
-
Click My New Webhook Credential to make the line editable and name the new Webhook.
For this example, the name given is advanced form integration demo webhook.
-
Click Type and choose the Authorization used by this Webhook.
For this example, the Authorization used is No Auth.
-
Click Save.
-
Click the Webhook Configuration ✖️.
Add an E-Mail Component
From the DXP Dashboard:
-
Click the Integrations card.
-
Click the Flows link in the Integrate section of the sidebar.
-
Click advanced form integration demo flow in the List of flows in the current workspace.
The flow, showing one action — a Webhook set to receive — presents.
-
Click the Add a new action button immediately below the extant Webhook.
-
Setup this step Configuration slides out from the right-hand edge of the browser window.
-
In the Find component text-entry field, enter the string mail.
-
Select the E-Mail component.
-
Click the E-Mail button.
Configure the E-Mail component
-
Click Mapping.
-
In the To text-entry field, enter the e-mail address the component will send e-mails to.
A working e-mail address, able to receive mail, is, required for an e-mail component to work. -
In the Subject text-entry field, enter a Subject string.
For this example, the string entered is Advanced forms integrations demo e-mail.
-
Click the ➕ immediately below the Body text-entry field.
-
Click the Webhook option that appears.
This adds the Webhook contents to the body of the sent e-mail.
-
Click Continue.
Check the E-Mail component
-
Click the Retrieve sample from E-Mail button.
-
A JSON file presents.
the same JSON file is sent to the working e-mail address entered above. -
Click Continue.
-
Click Finish step.
Publish the draft flow
The component configuration interface slides closed and the advanced form integration demo flow presents, now with two components: Webhook and E-Mail
-
Click the Publish draft button.
-
An alert, The draft has been successfully published presents.
Click the alert’s Close button.
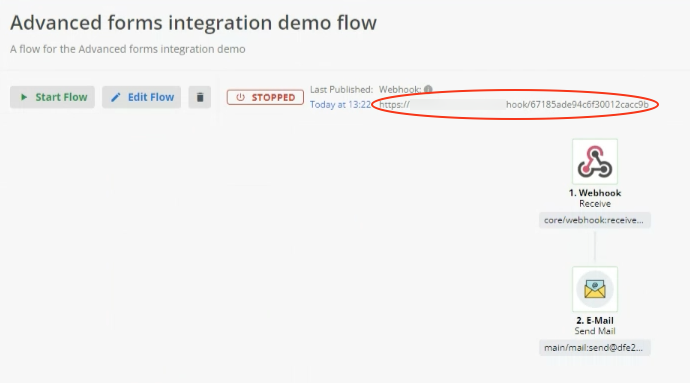
The advanced form integration demo flow refreshes and now shows a URL.

|
This URL is required in the Target details section of the Create an event subscription step following. Keep the browser tab presenting this screen open until this step is reached and done. (Tab is the word used in this procedure but multiple browser windows work identically for this if separate Browser windows are your working preference.) |
Create an event subscription
To listen for the event sent by the form submission, an event subscription must be created.
To create an event subscription:
-
in a new browser tab, load the DXP Dashboard.
(The new browser tab leaves the previous browser tab — and the Webhook URL needed in the Target details step below — available.)
-
Click the Configuration card.
-
Click the Event Service card.
The Event subscriptions page presents.
-
Click the Create event subscription button.
-
Enter the required Subscription details
-
Name
An unambiguous and descriptive name is strongly recommended.
Multiple generic names, such as Event Subscription x are unhelpful once you have more than a few event subscriptions to manage.
For this example procedure, the entered name is Advanced form integration demo.
-
Source
Select Advanced Forms from the Source drop-down menu.
-
Event type
Select form.response.create from the Event type drop-down menu.
The Event type corresponds with the event sent by the form.
-
Add an Attribute filter
If the above Subscription configuration were saved, the event subscription would listen to all events coming from form submissions.
To restrict the subscription to listen only to the events sent by a specific form, add an Attribute filter.
-
Click ➕ Add attribute.
The Attribute filter configuration pops out from the clicked button.
-
Select formid from the Attribute drop-down menu.
-
Select Equals from the Rule drop-down menu.
-
Enter the Form ID in the Value field.
For the example above, the Form ID is the value set when the Form was created above:
advanced-form-integration-demo.
Target details
-
A Subscription can send the event to an
-
API;
-
Integrations flow; or
-
Job
For this example, select Integrations flow from the Type menu.
-
-
The Integrations flow details configuration presents below the Type menu, showing two configuration values:
-
Webhook Flow URL; and
-
API key
-
Add a Webhook URL from the previously prepared Flow.
As per Create a Flow above, the previously prepared Webhook
-
listens for Triggers on this URL;
-
where this URL is the URL presented under the sub-head Webhook; and
-
-
sends an email notification to a pre-made list of addresses.
To add this Webhook’s URL to the Target details
-
Switch to the browser tab presenting the published draft flow showing the Webhook and its URL.
-
Hover the pointer over the Webhook URL until a Copy to clipboard tooltip presents.
-
Click the Webhook URL to copy it to the clipboard.
A Copied tooltip presents to show the URL has been copied.
-
Switch back to the Target details browser tab.
-
Paste the copied URL into the Webhook Flow URL field.
|
For this example flow, No Auth was selected when adding a trigger to the flow. Consequently the API key field is left blank. Also, no data manipulation or change is being done in this example flow. So, no Event transformer configuration is added in the example. |
-
Click Create.
The Event subscriptions page loads with the new Event subscription — in this example, Advanced form integration demonstration — listed.
Test the Demo
To test the Event subscription is working
Start the Integration flow
To start the Integration flow
-
Switch to the browser tab showing the published draft flow.
-
Click the ▶︎ Start Flow button.
-
The Integration flow screen shows the flow is now running.

Send form data
Next, send test data through the form.
-
load the form in a browser tab.
As per the initial form creation, the form will have a URL structure as follows: https://example.com/form/advanced-forms-integration-demo.
-
enter testable values into the form
In this case a
-
given name;
-
family name;
-
an e-mail address; and
-
an invitation response (in this example, the invitation is declined).
-
-
Click the Submit button.
This demonstration form presents no end-user feedback.
It does not return a Confirmation page after the form is submitted.
A Confirmation page can be added when creating a form and is strongly recommended for any real-world forms.
However, while an end-user will reasonably infer that a Confirmation page is confirmation the form data has been submitted, a Confirmation page is not confirmation the form data has, in fact, been submitted.
Check the form data was received
To check the form data was received
-
in a new browser tab, load the DXP Dashboard.
-
Click the Advanced forms card.
-
Click Forms in the sidebar.
A Recent Forms list presents.
-
In the Actions column of the Advanced forms integration demo row, click View Responses.
A list of form responses presents. For example, in the screenshot below, the Advanced forms integration demo form has received one response at 13:32.
Identifying information has been redacted from this screenshot, but, as per the Send form data procedure above, this single response includes a declining of the invitation.
The data entered into the form and Submitted above was received.
Check Flow execution
To check Flow execution
-
Switch to the browser tab showing the published draft flow.
-
Click Executions in the Analyze section of the sidebar.
If the Flow execution happened as expected, a record of the execution will be listed here.
In the example screenshot below the record shows a single execution of the Advanced forms integration demo flow at 13:32 with no errors.

Other confirmation sources
Other indications and records show that the Flow is working.
Badges on components
While still on the Executions page
-
Click on the Flow name corresponding to the execution.
In the screenshot above, for example, click on Advanced forms integration demo flow.
-
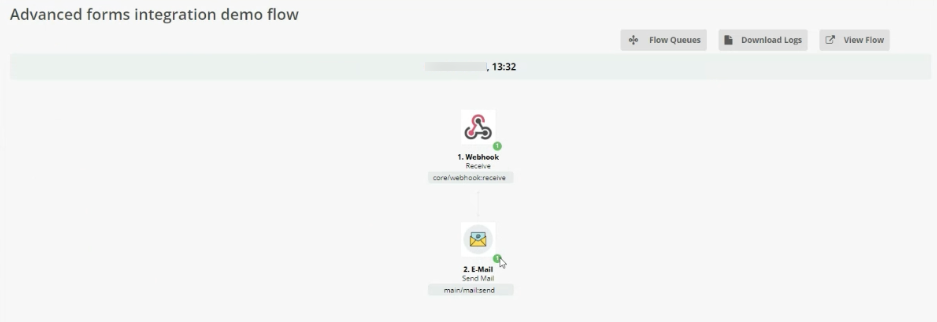
The Advanced forms integration demo flow Integration presents, showing the number of data events recorded at each step.
For example, the numeric one in a green circle badge attached to each step in the screenshot below.

Component Logs
While still on the Integration page
-
Click on Webhook.
The Webhook’s log file loads.
For example, the Webhook log presented below shows the Advanced forms integration demo flow Webhook successfully received a message and passed data on to the next component at 13:32.
[YYYY-MM-DD 13:32:07.868]: Checking if incoming messages is lightweight... [YYYY-MM-DD 13:32:07.870]: Emitting data of message [YYYY-MM-DD 13:32:07.870]: Received new message [YYYY-MM-DD 13:32:07.878]: Data emitted -
Click out of the log file to return to the Advanced forms integration demo flow integration.
-
Click on E-Mail.
The E-Mail component’s log file loads.
For example, the E-Mail component log presented below shows the Advanced forms integration demo flow E-Mail component successfully sent an e-mail and 13:32.
[YYYY-MM-DD 13:32:07.935]: Checking if incoming nessages is lightweight...
[YYYY-MM-DD 13:32:07.935]: Checking If incoming nessages is lightwelght...
[YYYY-MM-DD 13:32:07.935]: Checking if incoming nessages is lightweight...
[YYYY-MM-DD 13:32:07.939]: About to send an enall to 1 recipient(s)
[YYYY-MM-DD 13:32:07.939]: "Send Email" action started
[YYYY-MM-DD 13:32:08.528]: Email sending status: sent
[YYYY-MM-DD 13:32:88.521]: "send Email action is done, emitting...
The sent e-mail
When the E-mail Component was added an e-mail address was set in the component’s To field.
Check that e-mail address for a received e-mail with
-
Subject
-
Advanced forms integration demo email
-
-
Body
-
A JSON file from the Event service.
-
Without authentication, the event sent to the event service does not include the form data.
Consequently, the JSON file sent from the event service in this example does not include the form data
The JSON file does, however, include (among other data)
-
A form ID
-
needed for the Event subscription to only listen for events from this specific form.
-
-
A response ID
-
tied to the Form data.
-