Usability
Usability settings add options to improve a form’s accessibility and usability.
These settings are presented in sections:
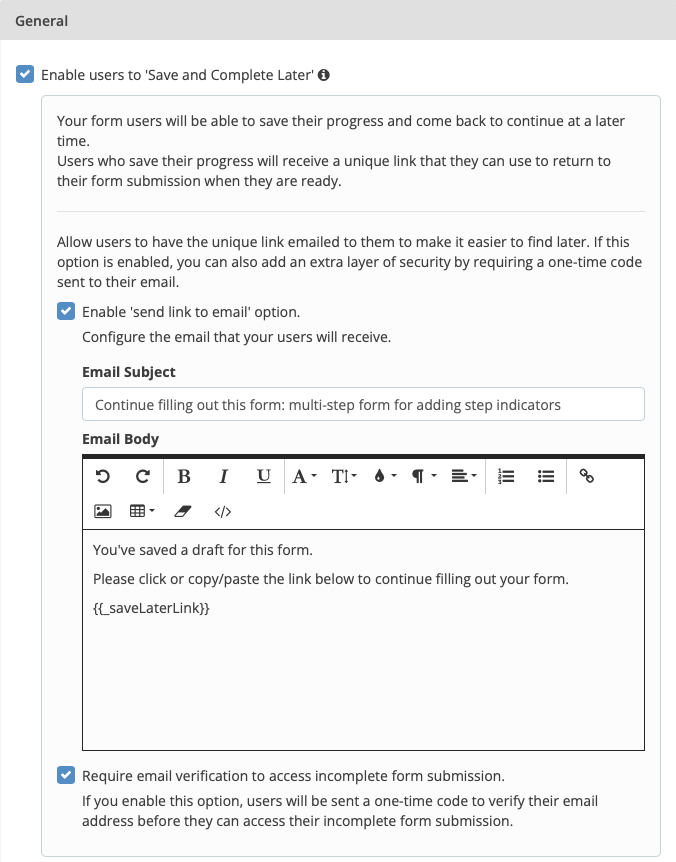
General
The General usability section provides settings for
Save and complete later
As per the name, the Save and complete later setting enables end-users to save progress made in filling in a form and come back to the form later to finish.
This feature can be used on any form but is particularly designed for lengthy forms that require significant time for users to complete.
Enabling this setting for such a form and, consequently,allowing end-users to continue filling in the form later will likely increase submission rates and response quality.
Prerequisites
-
The form must be embedded using one of the JavaScript embed methods.
-
The allowed domains must be specified in the Allowed Domains section of the Form Publishing settings page.
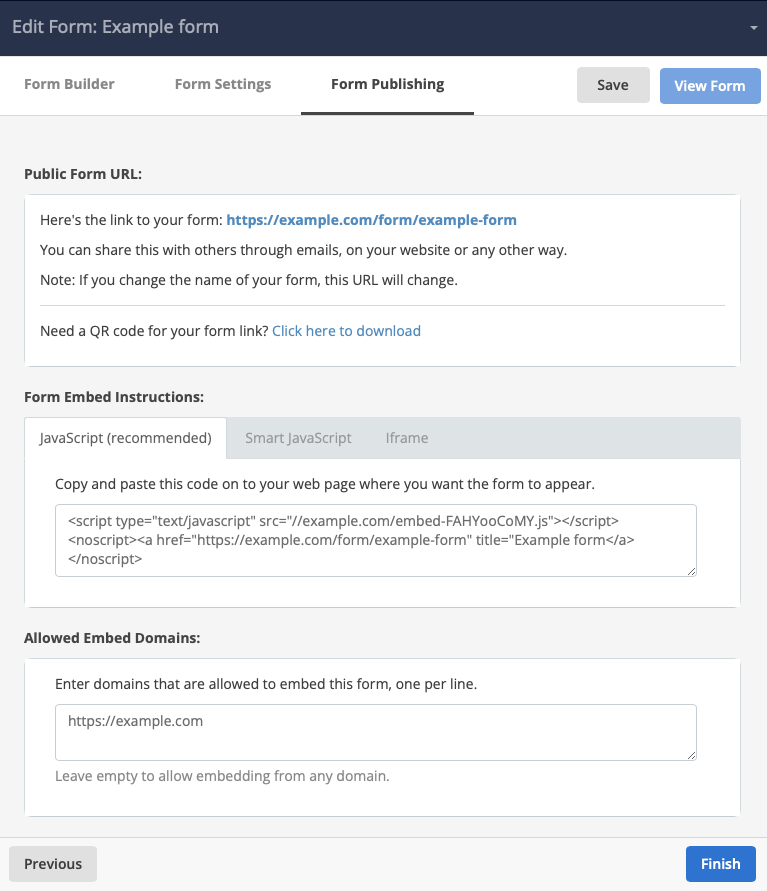 Figure 1. Example Form Publishing page.
End-user experience
When the Enable users to ‘Save and Complete Later’ checkbox is checked for a given form, a Save and complete later link is added to the form.
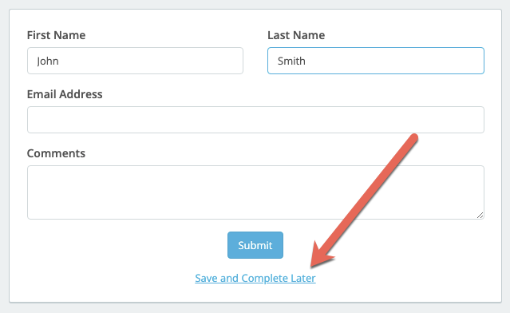
When a user clicks this link, the user’s progress through the form is saved, allowing them to come back and finish filling in the form at a later time.
As well, a dialog presents showing the URL to use to come back and finish later, along with a clickable Copy URL link.
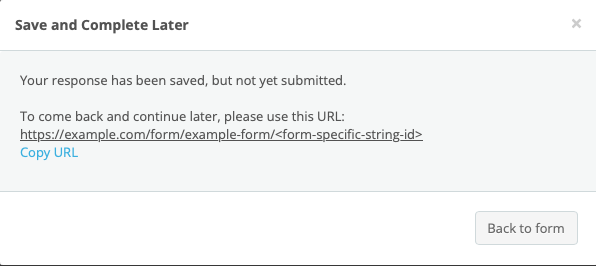
|
The look and feel of this dialog depends on the applied styles. This example uses the look-and-feel of a completely uncustomised Squiz DXP instance. |
If further settings are applied, the end-user dialog changes.
See Using the Save and complete later setting, immediately following, for examples of these changed dialogs.
Using the Save and complete later setting
When the Enable users to ‘Save and Complete Later’ checkbox is checked, the user interface for establishing the settings and values for the form presents.
This interface consists of the following settings and values.
- Enable ‘send link to email’ option.
-
When this checkbox is selected, the form adds a Save and complete later link to the form.
When a user clicks this link while filling in the form, a dialog containing the URL presents. The user can copy this URL for later use.
Visiting this URL allows them to reload the form in the partly-completed state they left it and continue filling it in.
- Enable ‘send link to email’ option.
-
When this checkbox, is selected, a dialog presents, offering to email a URL to their nominated email address.
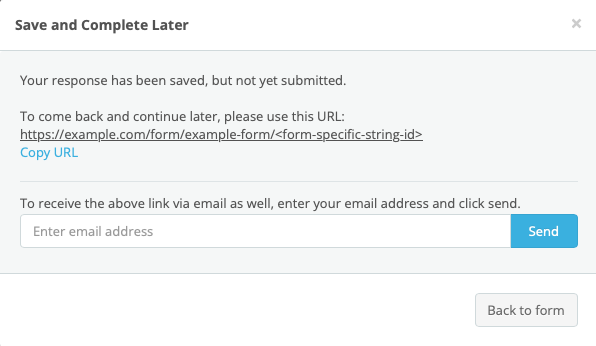 Figure 5. End-user dialog presented when the ‘send link to email’ setting is checked.
The look and feel of this dialog depends on the applied styles.
This example uses the look-and-feel of a completely uncustomised Squiz DXP instance.
Visiting this emailed URL allows them to reload the form in the partly-completed state they left it and continue filling it in.
As well, three further Form Settings options present.
- Email Subject
-
This text box presents when the Enable ‘send link to email’ option is selected.
Enter the subject for the customised email in this text box.
This subject is used as the subject of the customised email sent to the user.
- Email Body
-
Enter the body copy for the customised email in this text box.
This body copy is used as the body text of the customised email sent to the user.
This field includes pre-populated boilerplate text.
This text can be edited, altered and formatted as preferred.
However the Short-code,
{{_saveLaterLink}}, must be included in the edited email body.This short-code generates the unique link the returns users to their partially–filled-out form.
- Require email verification to access incomplete form submission
-
When this checkbox is selected, end-users are presented with a dialog asking for their email address.
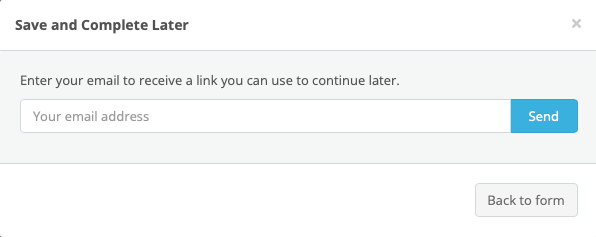 Figure 6. End-user dialog presented when the ‘Require email verification to access incomplete form submission’ setting is checked.
The look and feel of this dialog depends on the applied styles.
This example uses the look-and-feel of a completely uncustomised Squiz DXP instance.
A one-time code is then sent to the nominated email address to verify the address before the customised email, containing the unique link that returns them to their partially–filled-out form, is sent.
Enable a progress bar for multi-page forms
When the Enable progress bar for multi-page forms checkbox is checked for a given form, the user interface for setting the look and feel of the progress bar for multi-page form presents.
-
In the Progress bar style section, select a Style
-
Style 1 — a set of numbered and named steps — is selected by default.
-
-
Set the Progress bar direction
-
This is set to Horizontal by default.
-
-
Select a Progress bar color.
-
Optionally, check the Page titles checkbox.
When this checkbox is checked, text-entry fields appear immediately below the checkbox. The number of presented text-entry fields is the number of page breaks (that is, the number of steps) in the form being edited.
The screenshot shows optional page titles added to a three-step form.
-
Click the Save button.
Form visibility
These options let you pause and show a message on a live form rather than receiving a response.
This is useful for existing forms already known to your users, where you want to stop new submissions without completely turning off the form.
Disable form after a certain number of responses have been received
-
Enter the maximum number of responses to allow.
-
Enter your holding page content or message.
Disable form between certain dates
-
Enter your holding page content or message, which will be displayed to anyone accessing your form during the holding time.
-
Enter the start and end dates for the holding page.
Your form will go back to normal at the end of this period.
Your users cannot submit your form during the dates specified in the holding page settings.