Calculation
The Calculation field lets you automate form calculations and is helpful anywhere you might need to compute a value based on what users select on your form.
Quickly process online bookings, product orders, medical assessments, scores, event registrations, monetary donations, expense reimbursements, employee surveys, and more.
To use the calculation field:
-
Create your form containing all the relevant fields to make up the calculation.
-
No action is required for fields that expect and accept a numeric answer. All other fields used in the calculation will need a numeric value assigned.
Numeric answers must be assigned to values for all of the following field types:
-
Choose one fields.
-
Choose multiple fields.
-
Drop down list fields.
-
Choice Matrix fields.
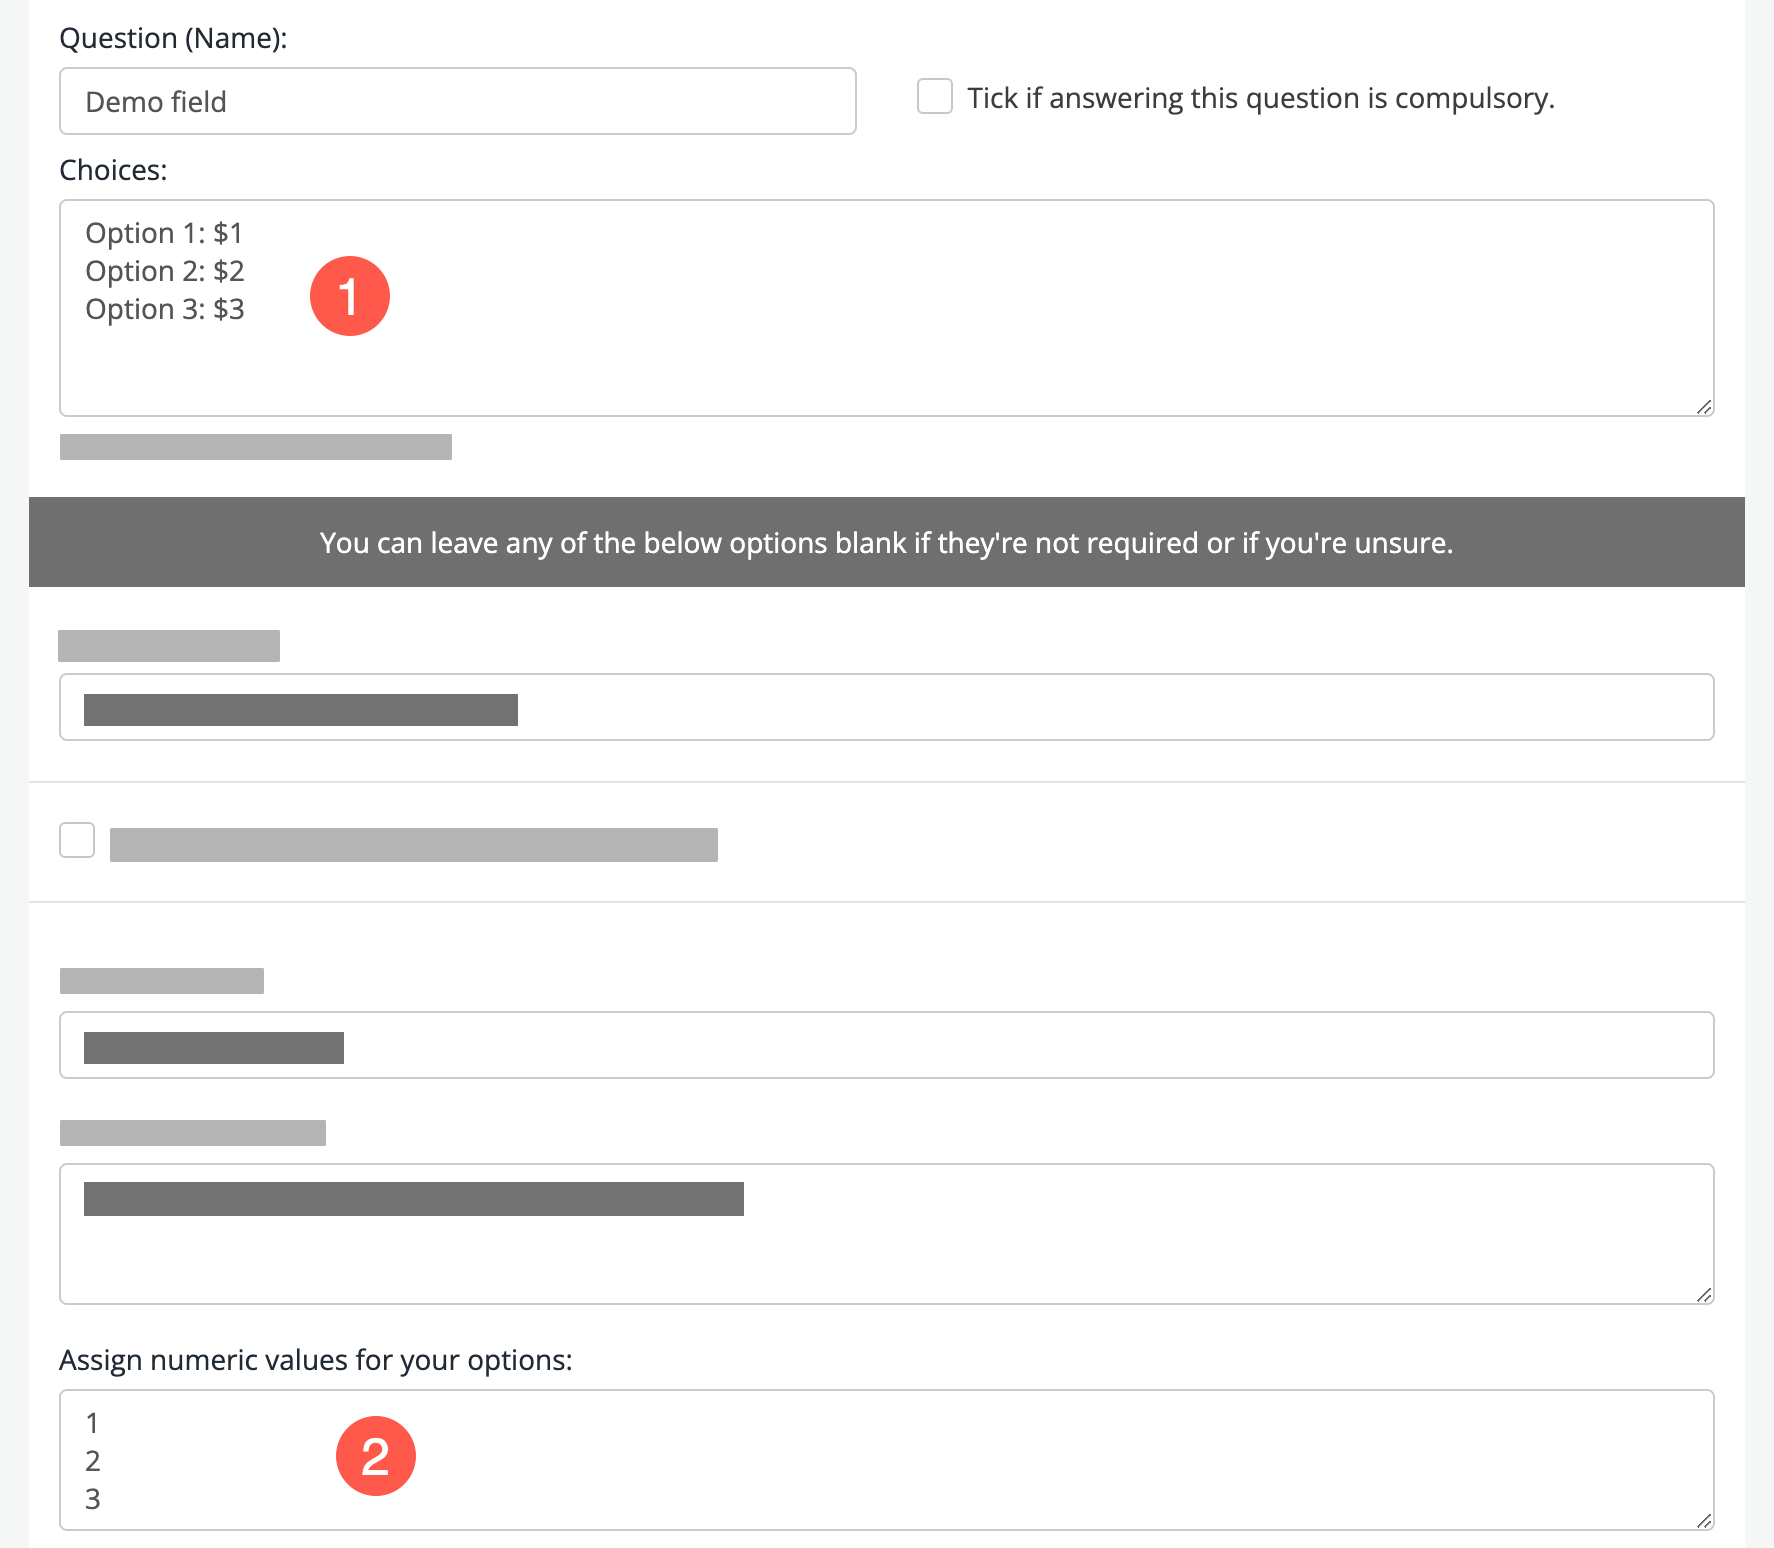
To assign numeric values for these fields;
-
Hover over that field and click the Edit Field Details button.
-
Click Show Advanced Options.
-
Assign a numeric value for each of the choices for that field.
-
Put the numeric values in the same order as the choices.
-
Click Save & Close.
-
-
-
Drag a Calculation field type into your form.
-
Give your calculation field a name. For example, 'Total price'.
-
Build your formula by selecting the fields in the Insert into formula drop-down box. As you select each field, it will be added to the formula on the left.
You will see that all of your form fields are listed twice in the field choice drop-down when inserting into a formula. The second entry for each field is to mark it as an optional value. If a specific question is not mandatory or critical to your formula and the calculation can be done without an answer being provided, select the (as optional value)version from the list. -
Insert the appropriate mathematical symbols where needed in the formula box:
-
+for addition. -
-for subtraction. -
*for multiplication. -
/for division. -
( )brackets for building multiple nested formulas in one.Read the Using operators to build your formula and Formula examples sections for examples and operators.
-
-
Complete an optional settings as needed:
- Decimal places
-
Determines the number of decimal places the result will have.
- Placeholder
-
An optional description that will appear inside the calculation field before the calculation is done.
- Value prefix
-
An optional prefix appearing below the final calculated value. For example, a $ or other currency symbol.
- Value suffix
-
An optional suffix appearing after the final calculated value. For example, 'per month' or 'dollars'.
- Read only
-
Select if the calculation value should be 'read-only' on the form, which means the user filling in the form cannot change it.
- Hidden
-
Select if the calculation field should be hidden on the form and only visible when you receive the submission.
Using operators to build your formula
You may use operators for all everyday arithmetic operations and conditional expressions. The following operators are available with examples of their use.
Expand
| Operator | Name | Example Formulas |
|---|---|---|
+ |
Add |
{{product price}} + {{fee}} |
- |
Subtract |
{{hours worked}} - {{breaks}} |
* |
Multiply |
{{quantity}} * {{product price}} |
/ |
Divide |
{{people}} / {{tables}} |
^ |
Power |
{{interest}} ^ {{percentage}} |
? : |
Conditional expression |
{{age}} == 18 ? "you are 18" : "You are not 18" |
== |
Equal |
{{age}} == 18 ? "you are 18" : "You are not 18" |
!= |
Unequal |
{{age}} != 18 ? "you are not 18" : "You are 18" |
< |
Smaller |
{{score}} < 10 ? "Low" : "High" |
> |
Larger |
{{score}} > 10 ? "High" : "Low" |
<= |
Smaller or equal to |
{{hours}} <= seven ? "you have seven hours or less" : "You have more than seven hours." |
>= |
Larger or equal to |
{{hours}} >= seven ? "you have at least seven hours" : "You have less than seven hours." |
to, in |
Unit conversion |
{{minutes}} minutes to seconds {{hours}} hours to minutes {{seconds}} seconds to years {{length}} cm to meters |
and |
Logical and |
{{age}} > 18 and {{age}} < 65 ? "Adult" : "Other" |
or |
Logical or |
{{priority}} == one OR {{priority}} == two ? "High" : "Low" |
( ) |
Grouping |
{{hours}} * ({{minutes}} / 60) |
Formula examples
Here are some more advanced formula-building scenarios to help you get started.
Expand
-
Require or do not require all questions to be answered before the formula will calculate.
While inserting field values into your formula, you can choose the 'As optional value' version of each question. If you choose the 'As optional value' version, the formula will calculate with or without the user selecting an answer for that field.
-
Using IF statements within calculations
You can use IF statements within your formula to determine outcomes based on multiple scenarios. The format for an IF statement is as follows:
CONDITION ? RESULT IF TRUE : RESULT IF FALSEThis example shows an IF statement in action where the result is text. As the result is text, we have surrounded it with quotation marks
".The below formula depicts the following scenario: *IF* the product has a value of
1, THEN the result is "sales@acme.com", ELSE the result is "support@acme.co" -
Using multiple IF/ELSE IF scenarios
Sometimes, you may need to calculate a result based on multiple IF/ELSE/IF scenarios. The format for chaining multiple IF/ELSE/IF statements is as follows:
CONDITION ? RESULT IF TRUE : NEXT CONDITION ? RESULT IF TRUE : NEXT CONDITION ? RESULT IF TRUE : RESULT IF FALSEThis example shows an IF / ELSE IF statement with multiple scenarios resulting in different text results.
The below formula for the following scenario: *IF* age is less than 12, THEN the result is "you are a child", ELSE IF age is less than 18, THEN the result is "you are a teenager", ELSE IF age is less than 65, THEN the result is "you are an adult", ELSE the result is "you are an older adult".
-
Nested formulas
You can use brackets to nest formulas within formulas. The below formula depicts: *IF* the product chosen has a value of
1, THEN the result should be the Quantity times5; otherwise, the result should be the Quantity times10. -
Calculating the time between two dates
As usual, you can calculate the time between two date fields by inserting the date fields into your formula. The result will be in seconds, so you need to divide it if you want minutes, days, years, or something else.
This example gets the minutes between two dates.
-
Calculating between a specified date and the current date
You can insert the Current date & time field from the field drop-down to calculate the time between a specified date and the current date.
The result will be in seconds, so you need to divide it if you want minutes, days, years, or something else. This example will show the days between the selected and current dates.