Deploy a component to the Squiz DXP
After local testing, the next step is deploying a component to the component service in the DXP.
Deployment is done using the DXP CLI but requires the tenant ID for the DXP instance being deployed to.
Also, to deploy a component requires a DXP user account with developer or administrator permissions.
Retrieve your Squiz DXP tenant ID
To retreive your Squiz DXP tenant ID:
-
Load the Squiz DXP URL — https://dxp.squiz.cloud — in a web browser.
-
Login using the credentials for your DXP instance.
-
Click the Component Service button in the DXP dashboard.
-
Note the URL in the browser.
It will have the following form:
https://dxp.squiz.cloud/organization/your-tenant-id/component-service/component-sets
The your-tenant-id string is an alphanumeric identifier specific to your DXP instance.
-
For example: in the URL
-
https://dxp.squiz.cloud/organization/sample-company-12345/component-service/component-sets
-
-
the tenant ID is
-
sample-company-12345
-
-
-
Copy your tenant ID.
Save the tenant ID string to a local text file.
Login to your DXP instance using the DXP CLI
Next, login to your DXP instance using the DXP CLI.
-
Launch or switch to your development system’s command shell.
-
Enter the following command, replacing your-tenant-id with the actual tenant ID copied and saved in the previous procedure.
dxp-next auth login --tenant=your-tenant-idIf your account is associated with only a single tenant, you can omit the
--tenantswitch in the command string.If you do not specify the
--tenantswitch, and your account is associated with multiple tenants, thedxp-nextcommand will prompt you to select the required tenant from a list. -
Enter your username and password at the command shell as prompted.
The following message is returned to STD OUT when you are logged in:
Login successful
Tenant saved to session
If the
dxp-next authcommand fails, verify your tenant ID, and your username and password.If your DXP instance has configured Single Sign On (SSO), the auth sub-command will pass the authentication challenge to a web browser window.
Sign in as is normal for your SSO process.
Deploy the component
Now, deploy the component to your DXP instance.
-
Launch or switch to your development system’s command shell.
-
Make the previously created components directory the present working directory.
That is, the output of following command —
ls— should be
hello-world-ab -
Run the following command:
dxp-next cmp deploy hello-world-abAs the component is deployed, messages equivalent to the following are returned to STD OUT:
YYYY-MM-DDTHH:MM:SS.DDDZ info: Initial scanning
YYYY-MM-DDTHH:MM:SS.DDDZ info: deployment id: 43ec5f53-f4ef-4ca4-bb65-628b11bb6923 status: transferring
YYYY-MM-DDTHH:MM:SS.DDDZ info: deployment id: 43ec5f53-f4ef-4ca4-bb65-628b11bb6923 status: deploying component folder
YYYY-MM-DDTHH:MM:SS.DDDZ info: deployment id: 43ec5f53-f4ef-4ca4-bb65-628b11bb6923 status: success
YYYY-MM-DDTHH:MM:SS.DDDZ info: uploaded location: https://dxp.squiz.cloud/organization/sample-company-12345/component-service/all-components/ab-components/hello-world-ab
Verify the component has deployed
To verify the component has deployed, access the All components option in the Squiz DXP Component Service.
-
Load the Squiz DXP URL — https://dxp.squiz.cloud — in a web browser.
-
Login using the credentials for your DXP instance.
-
Click the Component Service button in the DXP dashboard.
-
Click the All components option in the navigation panel.
-
Locate the deployed component in the component cards list.
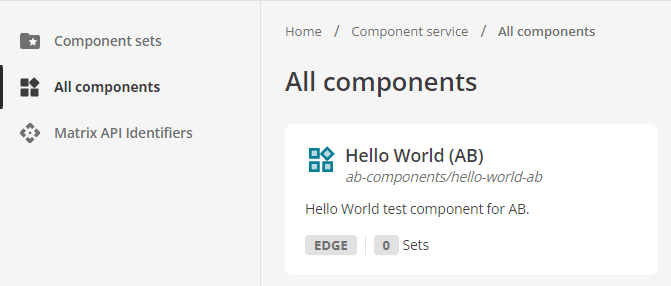 Figure 1. The Hello World AB component on the All components page.
Components are listed on the All components page from oldest to newest.
The newly-deployed component will be towards the bottom of the list.
If your Component Service has many components, you may have to scroll to find your component.
There is also a Load more button to load additional pages of components.
Next Step: Preview a component in the Component Service.