Example job package
The structure of the uploadable job package is shown on this page.
job-name
    ├──node_modules
    ├── main.js
    ├── manifest.json
    ├── package.json
    └── package-lock.json
Three files that were created as part of a demonstration package are included here.
To use this demonstration package for testing:
-
Create a directory in which to store your package.
-
Use the code samples shown to create the following files in your directory:
-
main.jsDetails
/*!
 * @license
 * Copyright Squiz Australia Pty Ltd. All Rights Reserved.
 */

const axios = require('axios');

const asyncForEach = async (array, callback) => {
  // eslint-disable-next-line no-plusplus
  for (let index = 0; index < array.length; index++) {
    // eslint-disable-next-line no-await-in-loop
    await callback(array[index], index, array);
  }
};

const makeRequest = async (input, context) => {
  let url = `${context.environment.apiUrl}/${input.collectionName}/`;
  if (input.recordNumber) {
    url += input.recordNumber;
  }
  const response = await axios.get(url, {});

  if (Array.isArray(response.data?.results)) {
    await asyncForEach(response.data.results, async element => {
      console.log(element);
    });
  } else {
    console.log(response.data);
  }
};

async function run(input, context) {
  try {
    console.log('Begin retrieving Star Wars data...');
    await makeRequest(input, context); (1)
    console.log('Finished requesting Star Wars data');
  } catch (error) {
    console.log(error);
  }
}

module.exports = async function (input, context) {
  await run(input, context); (2)
};
1 Job context can be accessed through info.2 The contextobject properties:{ "environment": { "apiUrl": "https://swapi.dev/api" }, "contextName": "Star Wars API Job Context", "description": "The job context for the Star Wars API Job" }Read Setting contexts and inputs for more information about how to declare
-
manifest.jsonDetails
{
  "$schema": "https://[ORG_ID].components.prod.dx.squiz.cloud/schemas/JobV1.json#", (1)
  "name": "swapi-job",
  "displayName": "Star Wars API Job",
  "version": "1.0.3",
  "timeout": 600,
  "concurrency": 30,
  "mainFunction": "main",
  "description": "Job will log result of requests to SWAPI",
  "functions": [
    {
      "name": "main",
      "entry": "main.js",
      "input": { (2)
        "type": "object",
        "properties": {
          "collectionName": { (3)
            "type": "string"
          },
          "recordNumber": { (4)
            "type": "number"
          }
        },
        "required": [ (5)
          "collectionName"
        ]
      }
    }
  ]
}
1 Substitute [ORG_ID]with your DXP Organization ID.2 Any objects within the inputsection will be rendered in the UI.3 The first field name. 4 The second field name. 5 Marks the nominated object(s) as required. 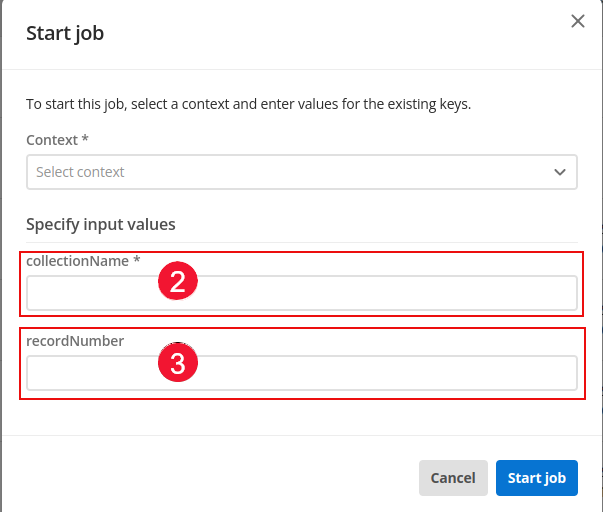
-
package.jsonDetails
{
  "name": "swapi-job",
  "version": "1.0.1",
  "description": "",
  "main": "main.js",
  "private": "true",
  "scripts": {
    "test": "echo \"Error: no test specified\" && exit 1"
  },
  "author": "",
  "license": "ISC",
  "dependencies": {
    "axios": "^0.25.0"
  }
}
-
-
Run
npm installto install packages and dependencies. -
Upload the entire contents of the directory using the uploadJob CLI command.
Information about setting contexts and inputs can be found in the Using Job runner section.