Administering communities
Overview
A community in Workplace provides a focus for group discussions and collaboration about specific topics or tasks.
Learn more about communities in Working with communities in the Using Workplace guide.
This page provides Workplace system administrators with details on how to administer communities within their Workplace instance.
As a Workplace system administrator, you have full access to all private communities configured in Workplace and have the ability to configure permissions within a private community by implementing differential administrator- and user-level access in the private community. This allows specific Workplace users (who are not Workplace system administrators) to retain full control within the private community.
Configuring permissions within a private community
Configuring permissions within a private community allows specific Workplace users (who are not Workplace system administrators) to administer their community. These people (called private community administrators) are able to:
-
Edit the private community’s name, overview and image,
-
Archive the private community,
-
Add new members to the community.
Once permissions have been configured, members of the community (who are not community administrators) are no longer able to perform these functions (listed above) within the community.
There are two methods by which a private community’s access can be restricted to specific community administrators:
-
Create a community administrator user group for each individual community.
-
Create a community administrator user group for all private communities across Workplace.
Using a group for each individual community
This procedure describes how to create a user group for members who will be administering an individual private community.
-
Ensure you are logged in to Workplace as a Workplace system administrator and have accessed admin mode.
-
In the asset map side nav on the left, locate the asset and expand its tree.
-
Locate the user group whose name matches that of the private community you are configuring permissions on.
This user group:
-
is automatically created with the original name of the private community, and
-
contains all current members of the private community.
If the community’s name was changed prior to you performing this procedure, then the names of this user group asset and its community asset may not match. Therefore, you may wish to update the name of this user group asset (from the asset’s Details screen) to match that of the current name of its community asset.
-
-
Within this user group asset (for example, My private community), create a new user group, whose Group Name follows the recommended convention
private-community_name administrators(for example My private community administrators). This convention makes it easier to search for and identify this asset in Workplace and clearly describes the asset’s purpose. -
Expand the parent user group asset (for example, My private community) and move the user account assets of each Workplace user who will be an administrator of this community to the child user group you created (for example, My private community administrator).
If only one user account is present, it will belong to the creator of this private community. Otherwise, at least one of these user accounts will belong to the community’s creator. -
Back in the asset map side nav on the left, locate the asset and expand its tree.
-
Locate the private community’s asset (for example, My private community) and choose Details.
-
Click Acquire locks.
-
Scroll down the page to the Members section and set the Select Admin Group asset value to the child user group for administering the community (for example, My private community administrators).
-
Click the Commit button to save your changes.
Using a group for all private communities across Workplace
This procedure describes how to create a user group for members who will be administering all private communities across Workplace.
-
Ensure you are logged in to Workplace as a Workplace system administrator and have accessed admin mode.
-
In the asset map side nav on the left, locate the Squiz Workplace Mk III > Squiz Workplace - Site > Site Configuration > Squiz Workplace Users asset and expand its tree.
-
Within this Squiz Workplace Users user group asset, create a new user group, with the recommended name Private communities administrators. This name makes it easier to search for and identify this asset in Workplace and clearly describes the asset’s purpose.
This user group may already be present if you or another Workplace system administrator previously ran through this procedure. -
Expand the Squiz Workplace Users asset’s tree and locate the user group whose name matches that of the private community you are configuring permissions on.
This user group:
-
is automatically created with the original name of the private community, and
-
contains all current members of the private community.
If the community’s name was changed prior to you performing this procedure, then the names of this user group asset and its community asset may not match. Therefore, you may wish to update the name of this user group asset (from the asset’s Details screen) to match that of the current name of its community asset.
-
-
Expand the parent user group asset (for example, My private community) and move the user account assets of each Workplace user who will be an administrator of this private community (as well as others across Workplace) to the Private communities administrators user group you created above.
If only one user account is present, it will belong to the creator of this private community. Otherwise, at least one of these user accounts will belong to the community’s creator. -
Back in the asset map side nav on the left, locate the Squiz Workplace Mk III > Squiz Workplace - Site > Squiz Workplace > Communities asset and expand its tree.
-
Locate the private community’s asset (for example, My private community) and choose Details.
-
Click Acquire locks.
-
Scroll down the page to the Members section and set the Select Admin Group asset value to the child user group for administering the community (for example, Private communities administrators).
-
Click the Commit button to save your changes.
Adding members to a private community
While private community members with administrator-level access can add new members to the community, Workplace system administrators can also do this through the admin mode area of their Workplace instance.
This procedure assumes that your Workplace user accounts were configured through a SAML identity provider.
-
Ensure you are logged in to Workplace as a Workplace system administrator and have accessed admin mode.
-
In the asset map side nav on the left, locate the Squiz Workplace Mk III > Squiz Workplace - Site > Site Configuration > Squiz Workplace Users asset and expand its tree.
-
Locate the user group whose name matches that of the private community you are adding members to, and expand its tree.
This user group:
-
is automatically created with the original name of the private community, and
-
contains all current members of the private community.
If the community’s name was changed prior to you performing this procedure, then the names of this user group asset and its community asset may not match. Therefore, you may wish to update the name of this user group asset (from the asset’s Details screen) to match that of the current name of its community asset.
-
-
Still within the Squiz Workplace Users asset, expand the SAML Users user group asset.
-
For each Workplace user who is being added to this private community as a member, link the Workplace user’s user account asset from within the SAML Users user group to the community’s user group asset.
'Unarchiving' a community
When a community is archived, its Workplace Community asset is set to Archived, and the community is hidden from the Communities page and cannot be accessed. Therefore, to 'unarchive' an archived community, its Workplace Community asset needs to be set to Live.
To unarchive a community along with all of its discussions:
-
Ensure you are logged in to Workplace as a Workplace system administrator and have accessed admin mode.
-
In the asset map side nav on the left, locate the Squiz Workplace Mk III > Squiz Workplace - Site > Squiz Workplace > Communities asset and expand its tree.
-
Locate the Workplace Community asset of the community to unarchive and choose Details.
The name of this asset should match the name of the community. -
Click Acquire locks.
-
In the Status section, set the Change Status asset value to Place Under Construction and select the Cascade Status Change check box.
-
Click the Commit button to save your changes.
-
In the Status section again, set the Change Status asset value to Approve and Make Live and select the Cascade Status Change check box.
-
Click the Commit button to save your changes.
The community and all of its discussions should now appear on the Communities page again.
|
While unarchiving a community with this procedure, you can also prevent any previously archived discussions within that community from being unarchived. To do this, when setting the Change Status asset value in each of the two steps above, do not select the associated Cascade Status Change check box. Keeping these checkboxes cleared ensures that any previously archived discussions (such as Workplace topic assets) remain unarchived. |
'Unarchiving' a community’s discussion
When a community’s discussion is archived, its Workplace Topic asset is set to Archived, and the discussion itself is hidden from the community’s overview page and cannot be accessed. Therefore, to 'unarchive' an archived discussion, its Workplace Topic asset needs to be set to Live.
To unarchive a community’s discussion:
-
Ensure you are logged in to Workplace as a Workplace system administrator and have accessed admin mode.
-
In the asset map side nav on the left, locate the Squiz Workplace Mk III > Squiz Workplace - Site > Squiz Workplace > Communities asset and expand its tree.
-
Locate the Workplace Community asset of the community containing the discussion to unarchive and expand its tree.
The name of this asset should match the name of the community. -
Locate the Workplace Topic asset of the discussion to unarchive and choose Details.
Similarly, the name of this asset should match the Topic name of the community’s discussion. -
Click Acquire locks.
-
In the Status section, set the Change Status asset value to Place Under Construction.
-
Click the Commit button to save your changes.
-
In the Status section again, set the Change Status asset value to Approve and Make Live.
-
Click the Commit button to save your changes.
The community’s discussion should now appear on the community’s overview page again.
| When setting the Change Status value for either of the two steps above, there is no need to select the associated Cascade Status Change check box. Doing so has no effect. |
Reordering and disabling community tabs
Each community in Workplace has five tab categories that Workplace system administrators can reorder and disable if required. The tabs displayed, and their order can be controlled at at global level, or customised for each community.
Reorder and disable community tabs globally
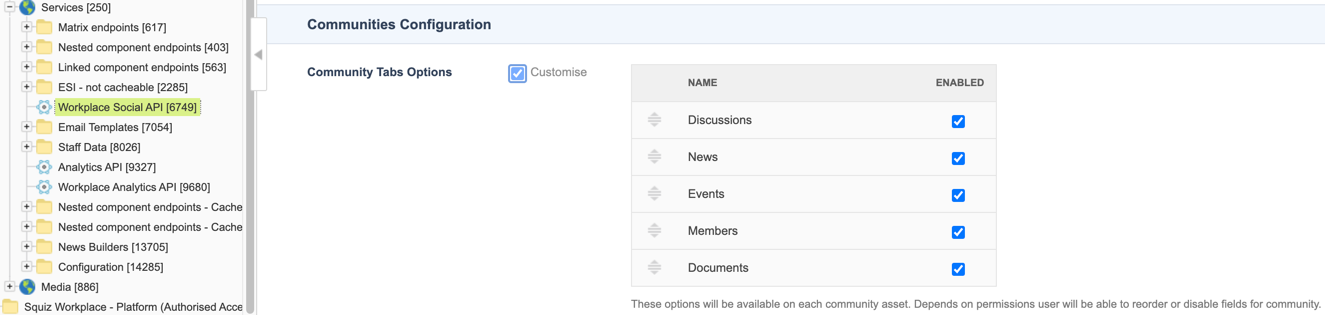
Workplace system administrators can change settings in the Workplace Social API asset to control how the default community tabs display across all communities in your Workplace site.
-
Ensure you are logged in to Workplace as a Workplace system administrator and have accessed admin mode.
-
In the asset map side nav on the left, locate the .
-
Open the Details screen of the Workplace Social API asset.
-
Navigate to the Communities Configuration section.
-
Click Acquire locks and then select the Customise checkbox to unlock the Community Tabs Options area.
-
Use the following options to customise the community tabs for all Workplace communities:
-
Select or clear the Enabled checkboxes to deactivate community tabs.
"Members" in the tabs options list displays as Contributors for public communities and Members for private communities. -
Use the drag handles to reorder the community tabs.
-
-
Click Commit to save your changes.
Reorder and configure community tabs for a single community
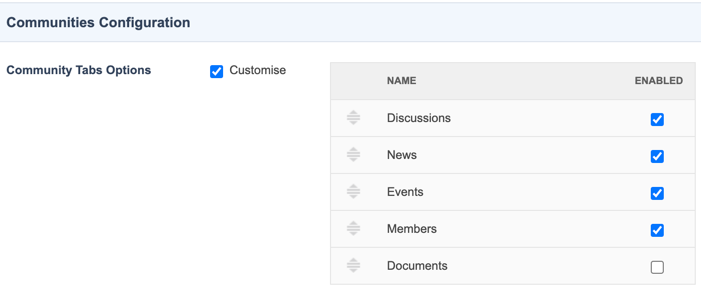
Workplace system administrators can can adjust the communities configuration in individual Workplace Community assets to control what features are available.
-
Ensure you are logged in to Workplace as a Workplace system administrator and have accessed admin mode.
-
In the asset map side nav on the left, locate and expand the asset group.
-
Open the Details screen of the Workplace Community asset you want to customise.
-
Navigate to the Communities Configuration section.
-
Click Acquire locks and then select the Customise checkbox to unlock the Community Tabs Options area.
-
Use the following options to customise the community tabs in this community only:
-
Select or clear the Enabled checkboxes to deactivate community tabs.
"Members" in the tabs options list displays as Contributors for public communities and Members for private communities. -
Use the drag handles to reorder the community tabs.
-
-
Click Commit to save your changes.