Configure an A/B test
The test builder is used to create your A/B test.
| All fields except for the description are required for the A/B test to be in a runnable state. |
Basic information
The basic setup panel records a name and description for the A/B test.
- Test name
-
This is required. Enter a suitable name for your A/B test. This name will be presented on the test management screen, and also in the select list that displays available tests when you connect an A/B test to your page builder block.
- Description
-
This is optional. Enter a short description that outlines your test.
Test page
| A/B testing can only be configured on URLs that are Content page assets stored within the DXP CMS. Other pages (such as Standard Pages) cannot currently be connected to an A/B test. |
- Website domain
-
Enter the domain of your website where the A/B testing will run. (for example,
www.example.com)This domain must match the domain of the site where the test is running, but you do not need to include the protocol or any path component. - Content page asset
-
Displays the connection status of this A/B test. In order to use this A/B test you need to connect it from the content page asset in your DXP CMS website. It will display Not connected if this test is not currently connected to a content page.
The A/B test cannot be started until it is fully configured and connected.
Variants
- Content variants
-
You can define names for your A and B variants, which will be displayed in your A/B testing report. The content of the A and B variants would be completed using the page builder within your connected content page.
Traffic distribution
This option controls how requests to the page will be distributed between the two different variants of the A/B test. The default is to perform an even distribution (50% to each variant) but you can vary this to match your needs.
Vary the amount by moving the slider, or by entering the percentage values directly into the fields at either end.
The percentages assigned to each variant set the probability for a user being assigned to group A or to group B.
The group is assigned when a user first accesses the page containing the variants.
Probability calculation
To determine which group a new user is assigned:
-
A random number between 1 and 100 is generated and assigned to the user.
-
If the generated number is below the configured distribution threshold (
50for 50% distribution,10for 10% distribution) the user will be placed in Group A. -
Inversely, if the generated number is above the threshold, they will be assigned to Group B.
-
Once assigned to a group the user will always see the same variant for the duration of their session.
-
This same process is applied to every new user that makes a request.
When multiple content blocks on a page are configured to be part of the A/B test, the variants are treated as sets with all Variant A blocks forming one set and all Variant B blocks forming another set.
-
If a visitor is distributed to Variant A, the page they see will render with Variant A active for each content block to which the test has been connected.
-
If a visitor is distributed to Variant B, the page they see will render with Variant B active for each content block to which the test has been connected.
Success metric
This setting allows you to choose between a page view and a click event to associate with a successful A/B test result.
|
Page view
Success is achieved if the user navigates to the URL specified in the linked Page URL field after seeing one of the test variants.
-
The Page URL must exactly match the destination URL visited by the user (including the protocol and any default page extension) for the test to be marked as successful.
The best way to determine this URL is to do the following:
-
Visit your public site.
-
Locate the page you wish to track.
-
Copy the URL from your browser address bar.
-
Paste the URL into Page URL field.
-
-
The Page URL must be served by the Squiz DXP via the CloudFlare layer. URLs can only be tracked if they are served by the Squiz DXP.
-
Javascript tracking code is not required for the page views metric.
Click event
Success is achieved if the user clicks on a particular element.
The particular element is identified using a JavaScript element selector.
This requires JavaScript code be added to the page.
The JavaScript tracks the click event for the targeted element.
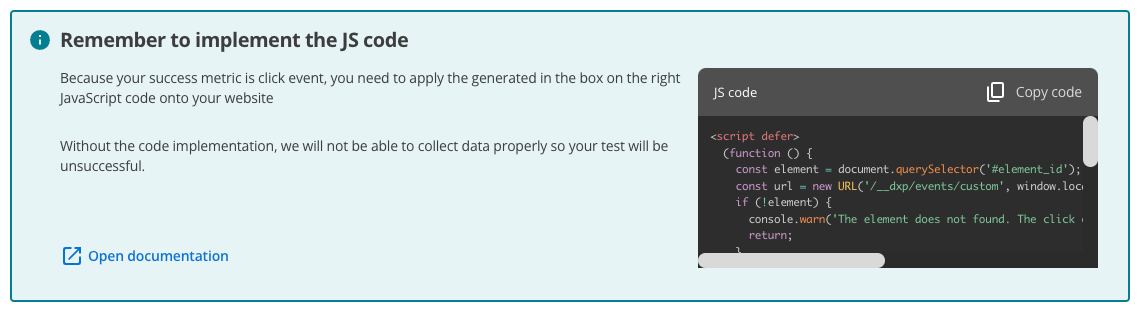
When you choose to use a click event, a banner will be displayed at the top of the A/B test configuration screen, reminding you that you need to install the Javascript for the test to function.
If you click the copy code button on the banner it will copy the Javascript code to your clipboard.
|
Javascript handler for the custom event
A Javascript handler must be added to your page to handle and register the click event.
How this is added will vary depending on the page on which you are tracking click events.
The purpose of this script is to listen for the click event, and submit this as a custom event when a click is detected.
| Remember to remove your Javascript code once the A/B test has concluded. It will not have any lingering effects, but may produce errors logged to your console. |
<script defer>
  (function () {
    const element = document.querySelector('#element_id'); (1)
    const url = new URL('/__dxp/events/custom', window.location.origin);
    if (!element) {
      console.warn('The element was not found. The click event cannot be handled');
      return;
    }
    element.addEventListener('click', async () => {
      await fetch(url, {
        method: 'POST',
        headers: {
          'Content-Type': 'application/json',
        },
        credentials: 'include',
        body: '{"action":"abtest.click","event":{"abTestId":"example-ab-test-id"},"source":"custom"}', (2)
        redirect: 'follow',
      });
    });
  })();
</script>| 1 | Update the #element_id to match the selector of element that you are testing. |
| 2 | Update the example-ab-test-id to the abTestId for the A/B test you are linking.
If you copy the code using the copy code button on the page banner, this value will be filled in automatically for you. Your AB testing ID can be obtained by managing/editing your A/B test and copying the AB testing ID from the URL. The ID is a GUID; a string of letters and numbers joined with dashes. The URL format is https://dxp.squiz.cloud/organization/<YOUR-ORGANIZATION>/optimization/experiments/<AB-TEST-ID>. |
Schedule
The schedule for an A/B test determines when and how the test will be started and stopped.
The schedule is configured from the Schedule section on the A/B testing configuration screen.
Test start
This section defines how and when your A/B test will start. You can schedule a specific date for the A/B test to automatically start, or choose to start the test manually.
- Start date
-
Set the date and time that the A/B test will start from the calendar picker.
The start date is selected from the month view and the month and year can be selected using the appropriate drop-down menus.
The start time can be set using the drop-down menus that appear below the calendar.
The timezone is determined by your web browser and will normally be your local time. - Start manually
-
When this option is selected the A/B test will only start when you choose the Start test option from the A/B testing management screen.
Test duration
This defines when your A/B test will finish.
You have a choice to set a specific end date, base the test on a fixed number of visitors, or just let the test run indefinitely until you manually end the test.
- End date
-
Set the date and time that the A/B test will finish from the calendar picker.
The finish date is selected from the month view and the month and year can be selected using the appropriate drop-down menus.
The finish time can be set using the drop-down menus that appear below the calendar.
The timezone is determined by your web browser and will normally be your local time. - Visitors amount
-
The A/B test ends when a set number of visitors have been served the test.
- Finish manually
-
The A/B test runs until you manually finish the test.
You can manually finishs an A/B test by managing a running test and clicking the … button and selecting the Finish option.
Calculate duration
Expanding the calculate duration panel opens a tool to help advise you on an appropriate end date or total visitor count to use in your A/B test.
The calculation is based on some basic site metrics, and you will need to provide your current conversion rate, desired conversion rate and daily visitor numbers.